Outlook Webmail
  Usage Guide

   2007-2008
←
→
Page content transcription
If your browser does not render page correctly, please read the page content below
Outlook Webmail Usage Guide 2007-2008
Technology Training
                              Outlook Webmail Usage Guide

                 Webmail Guide Contents
      1. Accessing Webmail………………………………………………………………………..
           i. Opening Webmail for the First Time
          ii. Opening Webmail Successive Times

      2. Viewing Emails……………………………………………………………………………
            i. Viewing Your Inbox
           ii. Reading Your Emails
          iii. Navigating Through Your Emails
          iv. Sorting Mail
           v. Organizing Emails into Folders
          vi. Adjusting Panel Widths

      3. Creating, Sending, and Deleting Emails…………………………………………………
             i. Email Toolbar
            ii. Creating a New Message
          iii. Finding an Email Address
           iv. Responding to Messages
            v. Forwarding Messages
           vi. Viewing Sent Mail
          vii. Deleting Messages

      4. Working with Attachments……………………………………………………………….
           i. Viewing Attachments
          ii. Sending Attachments

      5. Setting User Options………………………………………………………………………
            i. Using the Options Screen
           ii. Using the Out of Office Assistant
          iii. Creating a Signature

      6. Calendar Features…………………………………………………………………………
            i. Opening the Calendar
           ii. Setting Appointments
          iii. Setting Recurring Appointments
          iv. Inviting Others to Meetings

      7. Closing Webmail…………………………………………………………………………..
           i. Logging Off

Emma Lozman                           Page 2 of 28                   2007-2008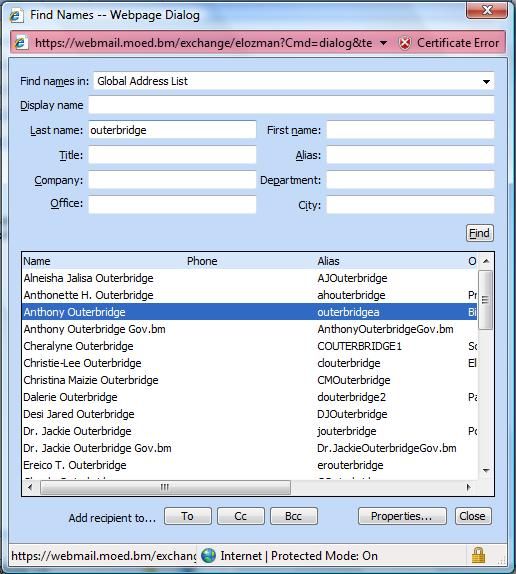
Technology Training
                                                   Outlook Webmail Usage Guide

          1. Accessing Webmail
          1.1 Opening Webmail for the First Time

             To access Webmail, you will need to be connected to the internet. At school, your laptop should
             be automatically connected. If you have a computer connected to the internet at home, then you
             can also access Webmail from there following these same steps.

             Open Internet Explorer. In the address bar near the top of the screen, delete the address that is
             currently there, and type the following:

             https://webmail.moed.bm

Webmail
Address

             Then press the enter key on your keyboard. You will see the following screen:

                                                                                 Yes
                                                                                 Button

             Click the Yes button. Do not worry about the warning.

   Emma Lozman                                             Page 3 of 28                                          2007-2008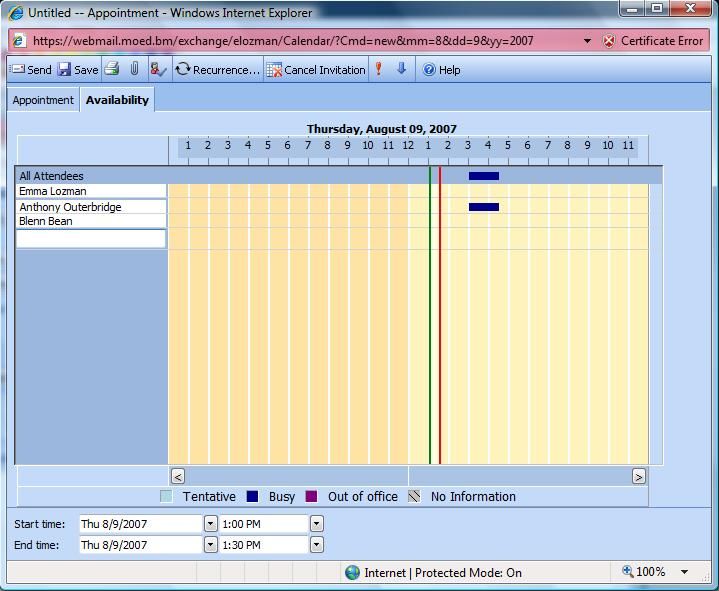
Technology Training
                                               Outlook Webmail Usage Guide

          A window will appear asking you to enter your username and
          password. You will have been supplied with these by the
          Ministry IT department.

          In the username field, type “Ministry\”.
          In the password field, type your password.

          Click on the checkbox for “Remember my password”.

          Click the OK button.
                                                                                                                  Fields
                                                                                                                  to Fill in

      1.2 Opening Webmail Successive Times

          Selecting “Remember my password” (as above) will allow you to skip the step of entering your            Okay
          password each time you open Webmail (although you will still need to click the OK button when           Button
          the password screen appears).

          If you are familiar with using Favorites, then you may wish to add the Webmail site to your list of
          favorites for easy access.

Emma Lozman                                            Page 4 of 28                                             2007-2008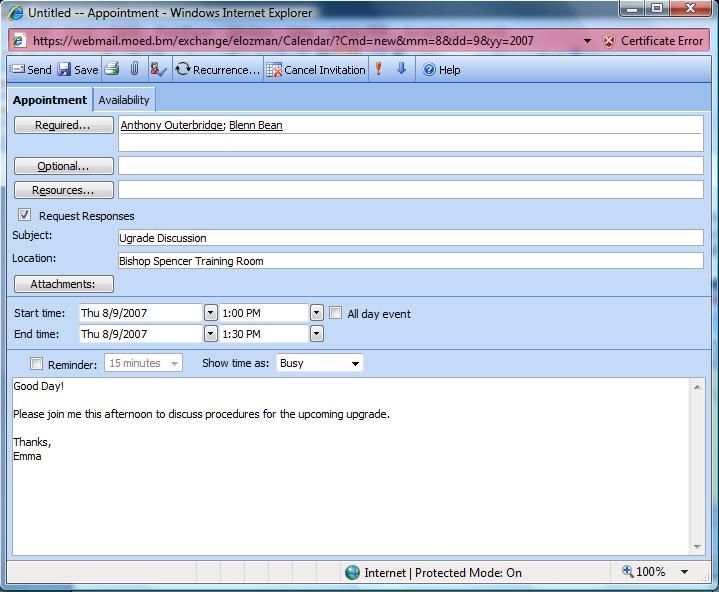
Technology Training
Outlook Webmail Usage Guide
2. Viewing Emails
2.1 Viewing Your Inbox
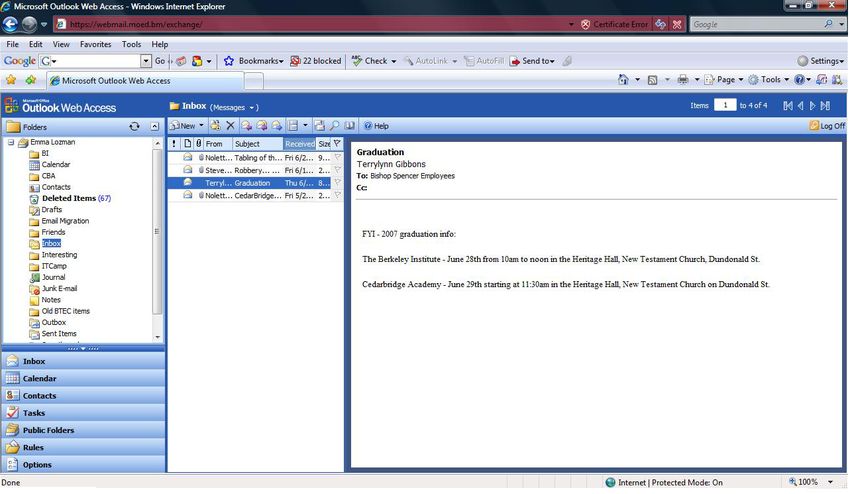
When you first open Webmail, your screen will look something like this:
Folders and Tasks Current Folder Current Message
The screen is broken into three panels:
FOLDERS AND TASKS (on the left): When you first open Webmail, Inbox will probably be
highlighted in this panel, indicating that the current messages you are viewing are in what is
known as the Inbox folder. All incoming mail goes into this folder and remains there until you
delete it or move it to another folder of your choice. If Inbox is not highlighted, just click on it
once with your mouse to select it.
CURRENT FOLDER (in the middle): This panel displays some brief information about all the
messages in the current folder (Inbox, in this case). In the example above, there are 4 emails in
the Inbox folder. At a glance, you can see the sender’s email address, subject line, and date
received for each email in your Inbox.
CURRENT MESSAGE (on the right): This panel displays a single email from the CURRENT
FOLDER in its entirety. In the example above, the email with the subject “Graduation” is
highlighted in the CURRENT FOLDER panel, and displayed in full in the CURRENT
MESSAGE panel.
Emma Lozman Page 5 of 28 2007-2008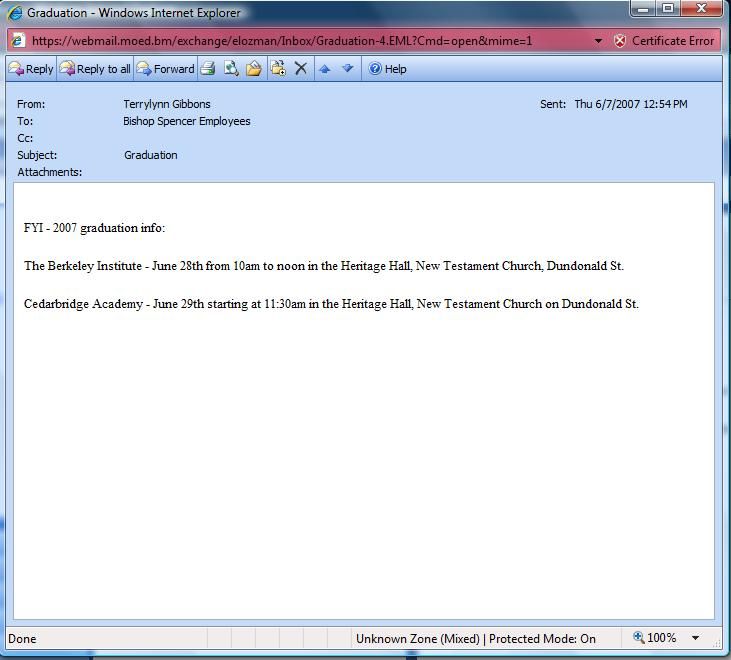
Technology Training
                                                Outlook Webmail Usage Guide

      2.2 Reading Your Emails

          To read your emails, you’ll need to display each message individually. Use the mouse to click
          once on the message subject or sender name in the CURRENT FOLDER panel. Once selected,
          it will be highlighted in that panel and the entire message will be displayed in the CURRENT
          MESSAGE panel. You can also use the arrow keys on your keyboard to move up and down
          through the emails in the list.

          If you prefer, you can double-click on the message subject instead of single-clicking on it.

          Double-clicking will bring the
          message up in a separate Email
          Window.

                           Viewing A
                           Message in the
                           Email Window

      2.3 Navigating Through Your Emails

          If you have not checked or organized your email in a while, you may have many messages in
          your inbox – sometimes even a few hundred! Because the screen is a fixed size, you will only be
          able to see 25 messages at once in the CURRENT FOLDER panel.

          To view the rest of your messages, you will need to use the arrow keys at the top right of the
          screen to move forward and backward through the list in bulk.

Emma Lozman                                             Page 6 of 28                                        2007-2008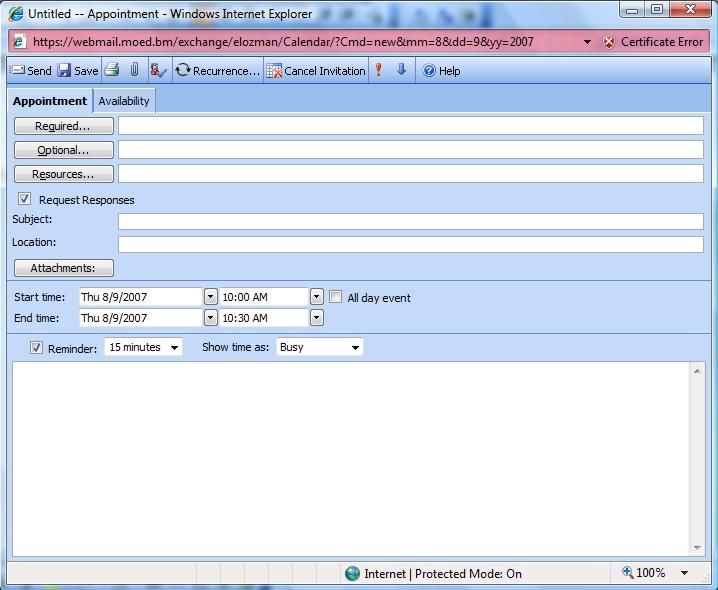
Technology Training
                                                   Outlook Webmail Usage Guide

                                                                                                                   Page
                                                                                                                   Scrolling
                                                                                                                   Arrows

          In this example, emails 1-25 of the messages in the Inbox folder are being displayed in the
          CURRENT FOLDER panel (there are 29 emails in this folder in all). Clicking the right
          arrow will scroll to the next group of up to 25 emails (in this case, emails 26-29); clicking the left

          arrow    will return to the first group. If you have hundreds of emails, clicking         skips

          quickly to the first page and clicking         skips quickly to the last page.

      2.4 Sorting Mail

          By default, the list of messages in the CURRENT FOLDER panel are sorted according to the
          dates the messages were received (usually with most recent at top). Sometimes, however, it will
          be useful to sort the list by some other characteristic (for example, by sender). There are two
          quick ways to sort your messages.

          Method 1: Click on the heading that you would like to use as the sorting characteristic, such as
          “From” (sender name), “Subject” (message subject), or “Size” (email size). Messages will
          immediately be rearranged accordingly.

                                                                                           Sorting Characteristics

Emma Lozman                                                Page 7 of 28                                             2007-2008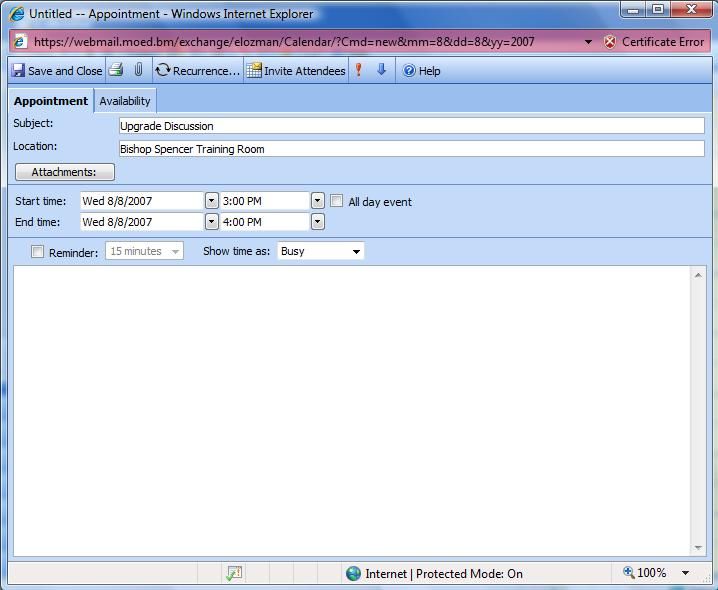
Technology Training
                                                   Outlook Webmail Usage Guide

            Method 2: Click on “Messages” to the
            right of the Inbox heading and choose one
            of the options that appears.

            With this method, you will also change the
            way the messages are displayed in the list.

            To revert back to the default display
            setting, simply re-select “Messages” at the
            top of the options.

                                                                                          Message Display
                                                                                          Options

        2.5 Organizing Emails into Folders

            If you start using your email account regularly, you will probably find yourself saving many
            emails for posterity and/or reference.

            If you keep all the emails you wish to save in the Inbox folder, it will be difficult for you to find
            specific messages again. Instead, you can organize your emails into your own folders.

            To create a new folder, right-click the mouse on your name, which appears at the top of the
            FOLDERS AND TASKS panel. Choose New Folder from the list of options that appears.

Your
Name

 New
 Folder
 Option

  Emma Lozman                                              Page 8 of 28                                             2007-2008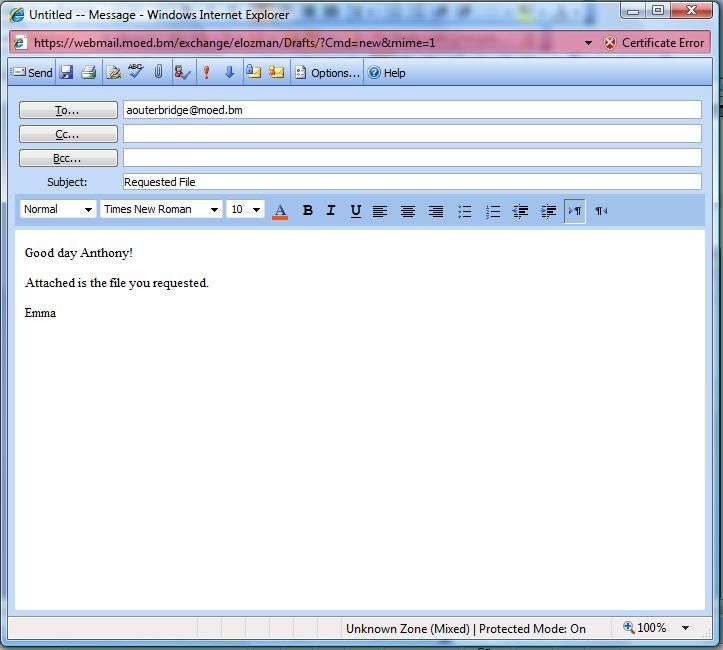
Technology Training
                                                   Outlook Webmail Usage Guide

               The Create New Folder Window will appear. You will need to give your folder a name and then
               click the OK button.

 Name
 Your
 Folder

   OK
   Button

               Create New Folder Window

               Your new folder will appear in the FOLDERS AND TASKS panel (in alphabetical order).

New
Folder

               When you wish to move an email from your Inbox folder to the new folder, click and hold the
               mouse on the message subject in the CURRENT FOLDER panel, and drag it until the folder
               name (in this case, “P6 Parents”) is highlighted in the FOLDERS AND TASKS panel. When

     Emma Lozman                                           Page 9 of 28                                      2007-2008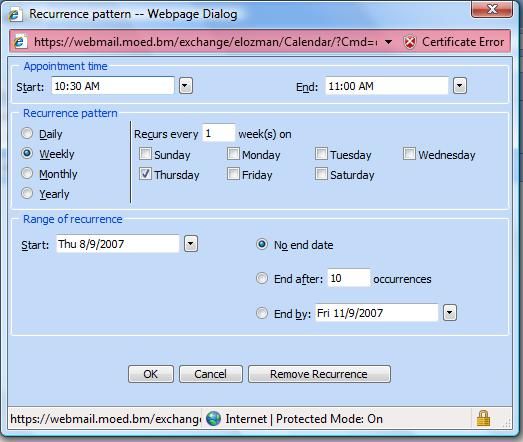
Technology Training
                                               Outlook Webmail Usage Guide

          you release the mouse, the message will have been moved to that folder. To retrieve it, select the
          new folder (e.g., “P6 Parents”) by clicking on its name in the FOLDERS AND TASKS panel.

      2.6 Adjusting Panel Widths

          You can adjust the display size of each panel on the screen to your liking. Rest your mouse over
          the border between two panels until it becomes a two-headed arrow. Click and hold the mouse
          and while dragging it to the right or left to resize the window.

Emma Lozman                                           Page 10 of 28                                            2007-2008
Technology Training
Outlook Webmail Usage Guide
3. Creating, Sending, and Deleting Emails
3.1 Email Toolbar
Most of the actions you will perform with your emails will be done through the Email Toolbar
near the top of the screen.
Email
Toolbar
Email Toolbar
If you rest your mouse over the buttons on the toolbar, a small box of text will appear telling you
the button’s function.
Button
Caption
Emma Lozman Page 11 of 28 2007-2008Technology Training
Outlook Webmail Usage Guide
3.2 Creating a New Message
When you are ready to write an email of your own, click the New button on the Email
Toolbar. A blank email message will appear in a New Message Window.
Message
Toolbar
Addressee
Section
Message
Body
There are three sections in this window:
MESSAGE BODY (at the bottom): This section is where you will type and format your
message as you wish. The formatting options are similar to those in Microsoft Word (bold,
italicize, underline, etc.).
ADDRESSEE SECTION (in the middle): In this section, you will type the email addresses of
the intended recipients for your message. Put the addresses for all the primary recipients in the
To field, addresses for all the secondary recipients in the CC field (similar to carbon-copy with a
paper letter), and addresses for any recipients you would not like anyone else to know about in
the BCC field (only use BCC if you fully understand how it works!). Multiple email addresses
must be separated by a semi-colon (;) *not* a comma (,).
Also type in a subject for your message in the subject field: this should be a brief summary (a
few words at most) of what your email is regarding.
MESSAGE TOOLBAR (at the top): Click the Spellcheck button to check the spelling for
your message; click Print if you’d like to print your message. When you are ready to send
Emma Lozman Page 12 of 28 2007-2008Technology Training
Outlook Webmail Usage Guide
your message, click the Send button . Clcik the Save button to save a message
without sending it so you can return to edit and send it later (the message will be saved in the
Drafts folder).
3.3 Finding an Email Address
If you do not know the email address of the person you wish to write to, you can look them up in
the Ministry of Education directory if they are a Ministry employee.
Instead of typing an address in the To field of the ADDRESSEE SECTION of your outgoing
message, click the To… button .
The Find Names window will appear. To search for
someone’s email address, type in their last name (and
first name) in the space provided and click the Find
button.
Find
Button
SEARCH
TERMS
Find Names Window
A list of possible results will appear. When you find
the correct person, select their name and click the To
button.
Repeat these steps for all the people you are looking for,
and click the Close button when you are finished. The
addresses will appear in the ADDRESSEE SECTION
of the outgoing message.
Selected
Name
To Close
Button Button
Emma Lozman Page 13 of 28 2007-2008Technology Training
Outlook Webmail Usage Guide
3.4 Responding to Messages
Often, instead of starting a new blank email from scratch, you will want to respond to an email
you have received.
When replying to an email, you can choose either simply to reply to the sender of the original
email you received, or to reply not only to the sender of that email, but also to ALL the recipients
of that email (known as replying-to-all).
It is a good idea to make careful note of who the email you are replying to was originally sent to.
Look at the information displayed at the top of the email displayed in the CURRENT
MESSAGE folder to determine this.
Sender
Information
The subject line appears at the top (in this example, “Graduation”), followed by the sender’s
name (“Terrylynn Gibbons”). Underneath that are two
key fields of information: the To field and the CC field.
These fields tell you who the sender sent her email to. In
this case, Terrylynn’s email was sent to all Bishop
Spencer Employees. In this example, there are no cc’d
(carbon-copied, or secondary) recipients.
To reply to the sender only (in this case, Terrylynn), click the Reply button on the Email
Toolbar. To reply-to-all (in this case, all Bishop Spencer Employees as well as Terrylynn), click
the Reply to all button on the Email Toolbar.
Emma Lozman Page 14 of 28 2007-2008Technology Training
Outlook Webmail Usage Guide
Be wary of using Reply to all! Do not use it unless you have a specific reason for it, or you may
unwittingly broadcast private information!
Note that if you had opened the original email in a new window, then in that window the Reply
and Reply to all buttons will have labels next to them in the MESSAGE TOOLBAR; you may
find it easier to respond using those buttons.
Labeled Buttons in the
Email Message Window
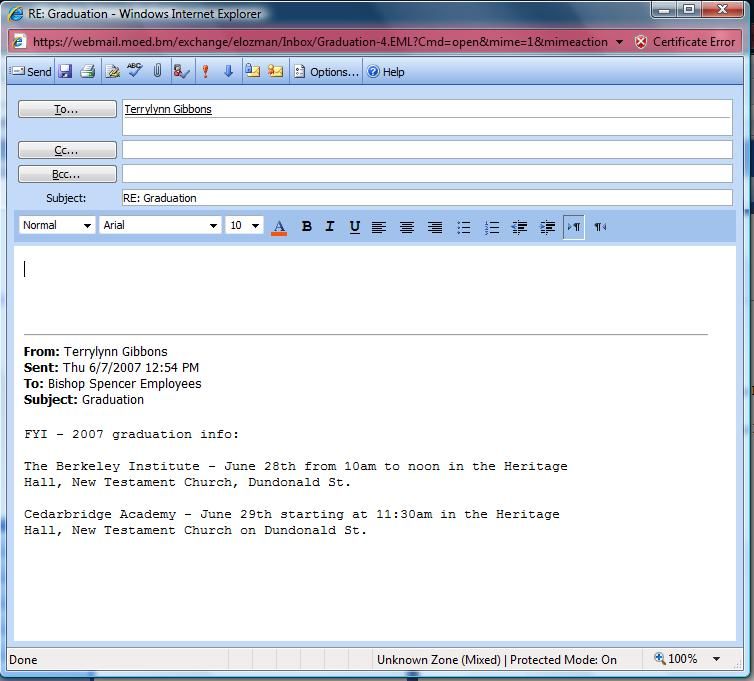
Whenever you click either Reply or Reply to all, new Reply Message Window will open that
will be very similar to the New Message
Window, except the MESSAGE BODY will
already contain the original email you
received, with space for you to add your
response.
In addition, the ADDRESSEE SECTION
will contain the email address(es) of the
intended recipient(s).
You can then compose your email and send it
as you would any other.
Reply Message Window
Emma Lozman Page 15 of 28 2007-2008Technology Training
Outlook Webmail Usage Guide
3.5 Forwarding Messages
You can also choose to forward a message that you have received to another person. When the
message is displayed in the CURRENT MESSAGE panel, click the Forward button of the
Email Toolbar.
A new window will open that will be very similar to the Reply Message Window, except that
you will have to fill in the ADDRESSEE SECTION with your intended recipient email
addresses.
Be aware that any email you send may be forwarded by the recipient to anyone else, without your
knowing about it! You should always be cautious with using email for private conversations.
3.6 Viewing Sent Mail
A copy of each email you send is placed automatically in the Sent Items folder. You can view the
messages in this folder by selecting it (clicking on it once with the mouse) in the FOLDERS
AND TASKS panel.
Displaying
Sent Items
3.7 Deleting Emails
Once you have read an email, you may find that you do not need or want to keep it any longer. In
that case, when the message is displayed in the CURRENT MESSAGE panel, use the mouse to
click on the Delete button on the Email Toolbar.
Emma Lozman Page 16 of 28 2007-2008Technology Training
Outlook Webmail Usage Guide
The message will be moved into the Deleted Items folder. You can view the messages in this
folder by selecting it in the FOLDERS AND TASKS panel.
New
Toolbar
Buttons
Displaying
Deleted
Items
Deleted emails will remain in your Deleted Items folder until you decide to permanently remove
them from storage. Click the Empty Deleted Items button and confirm that you want to
permanently delete all the items in the folder (keep in mind that once you do so they will be gone
forever!).
Emma Lozman Page 17 of 28 2007-2008Technology Training
Outlook Webmail Usage Guide
4. Working with Attachments
4.1 Viewing Attachments
Many emails you will receive will contain attachments. These may be Microsoft Word
documents, pictures, PowerPoint presentations, or any number of other types of files.
You can identify that a message has an attachment by the paperclip that appears with it in the
CURRENT FOLDER list, and because the attachment’s full name will appear in the heading of
the CURRENT MESSAGE panel.
Paperclip
Attachment
Name
You should *only* view an attachment if you know the person who sent it to you (otherwise it
may contain a virus, and you should delete the email immediately without viewing the
attachment).
You will need to download an attachment (save it to
your computer) before you can view it.
Right-click the mouse on the attachment name, and
select Save Target As… from the options that appear.
You will then be asked to select a location for the file
to be saved.
Once it is saved, locate it on your computer and open
it to view it.
Emma Lozman Page 18 of 28 2007-2008Technology Training
Outlook Webmail Usage Guide
4.2 Sending Attachments
You may also wish to attach a file to an email you are sending.
When you have prepared an outgoing
message that you wish to attach a file to,
click the Add Attachment button (which
Add looks like a paperclip).
Attachment
Button You will be prompted to search for the file
on your computer.
Repeat these steps to attach as many files as
you need. [Note that most email programs
have a restriction on the size of attachments
they can send and receive; don’t send too
many files at once.]
If you accidentally attach the wrong file, you can
delete it by selecting it (by clicking on it with the
mouse) and then pressing the delete key on your
keyboard.
Attachment
to be Deleted
Note: When you forward an email, any attachments it came with will be forwarded as well. You
can remove the attachments as above if you would prefer that they not get forwarded on.
Emma Lozman Page 19 of 28 2007-2008Technology Training
Outlook Webmail Usage Guide
5. Setting User Options
5.1 Using the Options Screen
Like all applications, Webmail has many default settings which you can customize. These
settings are found in the Options screen, which you open by clicking Options in the lower left
corner of the FOLDERS AND TASKS panel.
Options
Task The Options screen will open.
Options
Screen
You can experiment with these options as you wish. Two particularly useful settings are
described below.
Emma Lozman Page 20 of 28 2007-2008Technology Training
Outlook Webmail Usage Guide
5.2 Using the Out of Office Assistant
If you will be unable to check your email for a lengthy period of time, you can set your account to
automatically reply to all incoming mail, alerting the senders that you are not available (you have
probably received emails like this in the past).
This feature is known as the Out of Office Assistant, and it is the first option in the Options
screen.
Choose “I’m currently out of the office” to
turn this setting on. You can customize the
auto-reply message with the text you would
like to use. Save and
Close
Button
To save your changes, click the Save and
Close button near the top of the screen.
When you return to your email account,
remember to revisit this page, select “I’m
currently in the office,” and save the new
setting.
5.3 Creating a Signature
The second option in the Options screen allows you to create a signature, or a personal tag that
will automatically be placed in each of your outgoing messages.
To turn this setting on, choose
“Automatically include my signature on
outgoing messages”.
Then create your signature by clicking the
Edit Signature button under the Messaging
Options category.
Turn on
Signature
Edit Signature
Button
Emma Lozman Page 21 of 28 2007-2008Technology Training
Outlook Webmail Usage Guide
The Edit Signature Window will appear. Type the tag you wish to include in your messages;
you can format it as you would format text in Microsoft Word. When you are done, click the
Save and Close button in the Edit Signature Window, and then again in the Options screen to
save your settings.
Save and Close
Button
Signature
Edit Signature
Window
The next time you create a message, this signature will automatically appear in the body of the
email. If for some reason you do not want it included in a particular email, you can delete it as
you would any other text.
Emma Lozman Page 22 of 28 2007-2008Technology Training
Outlook Webmail Usage Guide
6. Calendar Features
6.1 Opening the Calendar
In addition to being an Email Management System, Outlook Webmail also has built-in Calendar
functionality which allows you to use it as a datebook. To access the Calendar, click Calendar in
the FOLDERS AND TASKS panel.
Calendar
Task
The Calendar will open, displaying the current date.
Calendar
Toolbar
Calendar Screen
You can set up appointments and meetings using the Calendar Toolbar near the top of the
screen.
Calendar Toolbar
Emma Lozman Page 23 of 28 2007-2008Technology Training
Outlook Webmail Usage Guide
6.2 Setting Appointments
To enter a new appointment in your calendar, click the New button on the Calendar
Toolbar.
The Appointment
Window will appear.
Save and You can specify the
Close appointment subject and
Button
location, and set the start
and end time.
[Note: Uncheck the box
that says “Reminder”; this
Fields to feature is not very useful
Fill In in Webmail.]
When you are finished,
click the Save and Close
button.
Reminder
Checkbox
Appointment Window
After you have created an appointment, it will appear in your calendar. You can change the
display of your new datebook using the view buttons on the Calendar Toolbar:
daily view , weekly view , or monthly view .
Daily View Weekly View
Emma Lozman Page 24 of 28 2007-2008Technology Training
Outlook Webmail Usage Guide
Monthly View
To edit the appointment, double click on the appointment entry (in any of the three views) and
make changes to it in the Appointment Window that appears.
To delete the appointment, click once on the appointment entry and press the delete key on your
keyboard.
6.3 Setting Recurring Appointments
You can easily enter recurring meetings into your calendar. Create a new appointment as above,
but before clicking Save and Close, click on the Recurrence… button on the
Appointment Window toolbar.
The Recurrance Pattern
Window will open, allowing
you to specify the pattern for the
recurrence (for example, every
Tuesday), as well as the duration
of the recurrence (for example,
Sept 1-Dec 1).
When you are finished setting
the options, click OK.
Then Save and Close your new
appointment
OK
button
Recurrence Pattern Window
Emma Lozman Page 25 of 28 2007-2008Technology Training
Outlook Webmail Usage Guide
6.4 Inviting Others to Meetings
In addition to recording your own appointments, you can also use the Outlook Webmail calendar
to invite others to meetings. By using this Meeting Invitation feature, you can evaluate the
availability of other meeting attendees based on their own calendar entries. Outlook will also
automatically track responses to the meeting request for you.
Create a new appointment as above, but before clicking Save and Close, click on the Invite
Attendees button on the Appointment Window toolbar. The Appointment
Window will change to include fields for email addresses of the people you would like to invite
(you can think of the Required field as the To field and the Optional field as the CC field):
Availability
Tab
Attendee Invitation
fields
Attendee Invitation Window
Once you have entered some attendee email addresses, you can check their availability for the
meeting you are scheduling before sending the invitation. Click on the Availability tab near the
top of the screen.
Emma Lozman Page 26 of 28 2007-2008Technology Training
Outlook Webmail Usage Guide
The availability of the meeting invitees will be displayed according to the entries in their OWN
Outlook calendars (no information about the specifics of their engagements is available). You
can then evaluate whether the meeting time you have chosen is appropriate, and change the time
if not.
Send
Button
Attendee Invitation Window Attendee Availability Window
Indicates that
Anthony is busy
from 3pm-4pm
Indicates that everyone
is available for your
meeting time
Once you are confident you have chosen an appropriate meeting time and have included all
intended invitees, you can compose some text for your invitation. When you are finished, click
the Send button on the Appointment Window toolbar. Your meeting invitation will be sent to
all the invitees.
When they receive the invitation, they will have options to Accept, Tentatively Accept, or
Decline. Their responses will be tracked in your calendar accordingly.
Response Option
Buttons
Meeting Invitation
Emma Lozman Page 27 of 28 2007-2008Technology Training
Outlook Webmail Usage Guide
7. Closing Webmail
7.1 Logging Off
When you are finished using Webmail, instead of simply closing Internet Explorer, it is always
best to Log Off first and then close Internet Explorer. Performing both these steps will help
ensure that no one else gains access to your email account accidentally.
Click the Log Off button on the right side of the screen when you are ready to close.
Log Off
Button
Emma Lozman Page 28 of 28 2007-2008You can also read