GROUPWISE 6.5 WEBACCESS - INFORMATION SERVICES
←
→
Page content transcription
If your browser does not render page correctly, please read the page content below
Information Services

GroupWise 6.5
WebAccess

Contents                                                                                                                    page
Introduction ...................................................................................................................1
Starting GroupWise WebAccess .............................................................................1
          Exiting GroupWise WebAccess ................................................................3
          Toolbar icons ................................................................................................3
          Using a signature ........................................................................................3
Using WebAccess for Electronic Mail ....................................................................4
        Opening messages .....................................................................................4
        Sending new messages .............................................................................4
        Attachments .................................................................................................4
        Address book ...............................................................................................5
        Replying to messages ................................................................................5
        Forwarding mail ...........................................................................................5
        Check spelling ..............................................................................................5
        Saving messages ........................................................................................6
        Moving messages .......................................................................................6
        Creating new folders ...................................................................................6
        Deleting messages......................................................................................6
        Rules .............................................................................................................6
To Send a Phone Message........................................................................................7
Using WebAccess for Calendaring .........................................................................8
        Opening the default Calendar ...................................................................8
        Opening the Java Calendar .......................................................................9
        Accepting Calendar Items ........................................................................10
Completing a Task .....................................................................................................13
         Marking an item as Unread (Read Later) ..............................................13
         Creating Calendar items ..........................................................................14
         Deleting Calendar Items...........................................................................15
         Retracting a Sent Item ..............................................................................15
The Trash......................................................................................................................15
Time Zones ..................................................................................................................16
Icons in Items List......................................................................................................17
Online Help ..................................................................................................................17
Cross-Platform GroupWise functionality differences in WebAccess..........17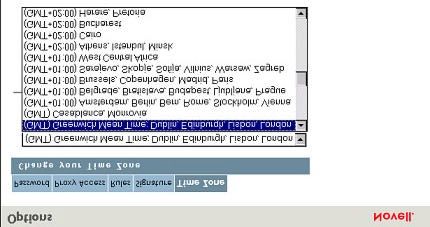
Introduction

Starting GroupWise WebAccess
To start WebAcess, from any web browser open the site:

                       http://webmail.childandfamilycentre.on.ca/gw/webacc

                                     page 1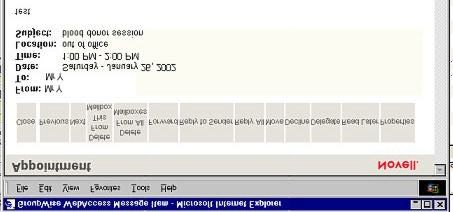
You will then be presented with the following screen:-

                                                 Click the Go button next to
                                                 GroupWise WebAccess. The next
                                                 window displays a login and
                                                 password screen.

Enter your username and password
details and then click Login. This will
open the main window and will display
the mailbox by default.

                                                   You will see that the view mailbox
                                                   icon:

                                                   is already selected

                                       page 2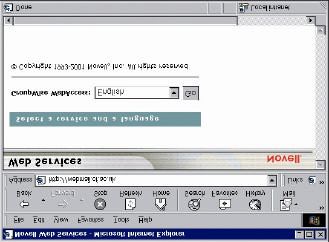
Exiting GroupWise WebAccess

It is important that you exit GroupWise WebAccess correctly this prevents
unauthorised access to your GroupWise account. The Exit        button is
located at the top of the general screen.

When you have finished using GroupWise WebAccess click on the Exit button and
you will be returned to the secure log-on screen.

Toolbar icons

The following toolbar icons, and their meanings, are visible in GroupWise
WebAccess:-

       View mailbox                                  View calendar

                                                     Search for documents
       Compose message,
                                                     (Currently unsupported at
       appointment, task or note
                                                     Cardiff)

       Search mailbox for items                      Proxy to user’s account

       Search address books

Using a signature

You can create a signature for automatically sending with your electronic mail
messages. GroupWise WebAccess stores it in your GroupWise mailbox at your post
office. Whether you log in to your mailbox through GroupWise WebAccess or
another version of the GroupWise client, you always have the same signature. Add,
or change an existing signature, as follows:-

From the GroupWise WebAccess main window click on the options icon,            click
Signature.

                                   Click Activate Signature box, and type your
                                   signature text in the box.

                                   Click Automatically add signature to have
                                   GroupWise WebAccess add the signature when
                                   you send the item, or click Prompt before adding
                                   signature to have GroupWise WebAccess prompt
                                   you before adding the signature when you send
                                   the item.

                                   Click Save.

                                       page 3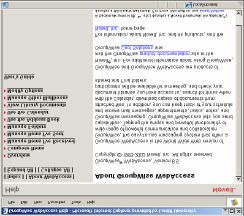
Note that GroupWise only allows one signature at the present time. If you wish to
use more than one signature, use the work around of adding all the required
signatures in the signature file. When sending mail, remove the signatures you do
not require by highlighting the unwanted text with your mouse and then use the
Delete key on your keyboard. Use the prompt before adding signature method of
adding a signature to make use of this work around.

Using WebAccess for Electronic Mail

Archiving of a GroupWise item is not possible via WebAccess, but is a feature
of other GroupWise clients.
Note that if a message has been archived it is not possible to view the item via
WebAccess.

Opening messages

To open messages in GroupWise WebAccess click the subject part of the message.

Sending new messages

To create a new mail message click on the compose message icon        .   This will
open a new Compose Message window.

                                    Fill in the To, Subject and Message fields. Use
                                    the Novell GroupWise address book or if
                                    addresses are not in the address book type in
                                    the email address, separating each address
                                    with a comma.

Attachments

If you need to attach a document then you should specify this last, before you send
the message. If you add an attachment and then perform an action which requires
WebAccess to communicate with the server (e.g. using the spellchecker) your
attachment will be lost and you will have to add it again. You may add up to three
files to any WebAccess message. If you would like to add your signature then
ensure that you have ticked the Activate signature box. When you have added all
the information required, click Send.

                                      page 4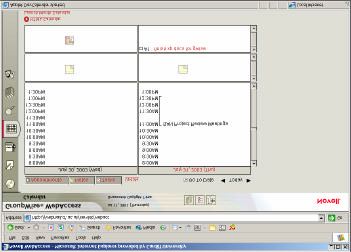
Please note that it is a design feature of GroupWise that attachments cannot
be deleted from the message with which it was sent.

Address book

To access your address book from GroupWise WebAccess, click on the search
address book icon    .

You can choose which address book you want to search by clicking the down arrow
next to the GroupWise Address Book.

If you want to search the address book you can
specify which field you want to search by: Name,
First name, Last Name or Department. You can
specify how many names are displayed at once by
clicking the down arrow next to the Number of
names to display.

To display all names in the address book leave the
name boxes empty and click search address book.

You can add names to the address book by pressing the Add button and filling in the
new details. Fields with an asterix must be filled in. Once you have chosen all the
required addresses from the Address Book, press the Mail button
to return to your mail message.

Replying to messages

Open the message you want to reply to and either choose Reply to sender or Reply
to all.

Forwarding mail

Open the message you want to forward and click the Forward button. The message
will be forwarded as an attachment to the new message.

Check spelling

If you have the Java-Enhanced version of
WebAccess you can click spell check to
open up the Speller window.        This will
highlight misspelled words and give you the
option to replace them with suggestions, or
skip them. When you have finished click
Close to return to the message. The
WebAccess dictionary and word lists cannot
be modified.

                                     page 5
Saving messages

Open the message you want to save, under the subject heading you will see the
option to Save As for the message and for any attachments that are present.
Browse to the location where you would like to save the file. If you want the file to
open up in a particular application then remember to save it with the correct suffix,
e.g. *.doc for a Word document.

Moving messages

Locate the item you want to move and click in the tick box
to the left of the message. Click on move. This will show
you a list of your folders. If you want to move the message
to a subfolder of the Cabinet,                     expand the
Cabinet by clicking on the ‘+’ sign next to the icon.

This will expand the Cabinet. Click on the required
destination of the message. Note that you cannot drag
items from folder to folder nor move more than one item at
a time.

                    Creating new folders

                    In the folder list click add folder. Click a position for the new
                    folder. If you want the new folder to be directly under another
                    folder click in the Down column. If you want the new folder to be
                    a sub folder of another folder click the Right column next to the
                    folder.

Deleting messages

Locate the item you want to delete and click in the tick box on the left of the
message. Then select delete. This wi ll place the item in the Trash folder. You
cannot delete your user folder, the Mailbox, the Cabinet or the Trash.

Rules

Please note that any rules created using the GroupWise Windows client
cannot be edited in WebAccess.

Rules are automated actions determined by a set of conditions which you define.
When those conditions are fulfilled the action is performed. Rules in GroupWise are
similar to mail filters in Pegasus Mail. An example of a simple rule is shown.

                                       page 6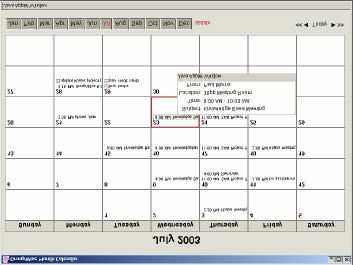
To create a rule in GroupWise WebAccess, go to Options           then       click   on
Rules         .

Choose from the drop down list which type
of Rule you would like to create.

Then click Create.

The following example is for a Vacation Rule which sends an automated response
to items sent to you while you are away from your office.

                                    When you have finished, click Save. This will
                                    return you to the Options page.

Here you will see your new Rule. This is
where you enable/disable your rules by
checking the appropriate boxes.

When creating an Out of Office reply please follow these guidelines:

Never say that you are away on holiday, out of the country, or that you are away
from the office between certain dates.

Never put alternative personal contact details on an 'away from office' message.

Never put home address details, home phone numbers or personal mobile phone
numbers on messages.

Never put a colleague's personal contact details on a message.

Never set 'away' messages on home or personal email accounts.

To Send a Phone Message

From the GroupWise WebAccess main window, click          ,   then   click           to
change the mail message to a phone message.

Click           to add recipients, or type a recipient's address in the To box. The
address can be a GroupWise user ID, GroupWise full name, or external email

                                       page 7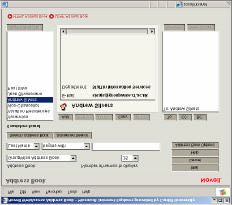
address. Separate each address with a comma. Type the caller, company, and
phone information.

Type a message (you can include Web site locations or URL addresses in the
Message box.)

Click            to spell check the message. For this feature to work, your
browser must be enabled for Java.

Click           to attach files to the message. For this feature to work, your
browser must support attachments.

Click           .

Using WebAccess for Calendaring

The Calendar lets you view appointments, tasks, or notes you've received from
others or created for yourself. You can view one day, one week, or one month at a
time.

The Calendar displays any appointments, tasks, and notes you've received whether
you've accepted them or not. You can perform the same actions on an item in the
Calendar that you can on an item in the Mailbox, such as accepting, declining,
delegating, or moving the item. While you have the Calendar open, you can also
schedule appointments, assign tasks, and write notes to other users.

Your Calendar can be viewed in HTML format, or if you use a Java enabled web
browser, a functionally improved Java Calendar is available for you to use.

Opening the default Calendar

                                     page 8
GroupWise 6.5 WebAccess (November 2003)
You can open your Calendar by clicking on in the folders list, or
click on the View Calendar icon on the GroupWise WebAccess Tool Bar.
By default, the first time you run WebAccess you will see the HTML Calendar
showing appointments, notes and tasks for the current date.
Click on at the top of the folders list on the left of the main window,
to change your Calendar view period.
You can also view any particular date by selecting a month, day and
year in the boxes, then click the Change To button to view that
date.
You can also click on the left and right white
coloured arrow buttons to change current month in the monthly
calendar box (shown left), or click on any date to view items for
that date.
To get back to the current date, click on
Opening the Java Calendar
If your browser supports Java, you can select to view a Java Calendar by clicking on
the located on the bottom of the folders list. You may have to scroll
down to see the button. If your browser is not Java enabled you will see the error
message ‘This browser does not support Java or Java support has been disabled’, to
continue you should select .
The Java Calendar:-
You can control what you view by
clicking on
Use the scroll down buttons to
show all the times of the
Calendar.
To access other dates, use the
black coloured left and right
arrows to scroll through different
dates, or click on the Go To Date
icon .
Click on Today to get back to the current date.
page 9GroupWise 6.5 WebAccess (November 2003)
Note that with a Java enabled browser you also have the option to view a monthly
calendar by clicking on while viewing the Java Calendar. This is
located below the HTML Calendar option at the bottom of the screen.
The Java Month Calendar:-
Moving your mouse pointer
across an item will show you
some extra details (such as the
location of an appointment).
To close this calendar view, click
on the X in the top right hand
corner of the window.
To move to other dates click on
the black filled arrows in the
bottom right of the window:
You can also move to other dates by selecting the month buttons located on the
bottom of the window .
To get back to the current date, click on the Today button. Click on the double
chevrons to move forward or backwards in years.
Accepting Calendar Items
Click on the Mailbox icon in the Folder List, or click on the Calendar icon
and go the date of the appointment, note or task. Click the Calendar item to open it,
it will appear in a separate window (below).
Click on .
page 10GroupWise 6.5 WebAccess (November 2003)
This opens the Compose Message window, in which you can type a message in the
Comments to Sender box. Then click o n Accept.
The Calendar item (appointment, task or note) is then removed from the item list in
your Mailbox and appears only in the Calendar. A sender will know if you have
accepted the item by checking its status information. To do this click on
in the folder list.
Click on the item in the item list to open it.
Click on .
page 11Declining Calendar items
Click on the Mailbox icon in the folder list, or if you have already accepted the
item, click on the Calendar icon to open the Cale ndar and go to the date of the item.
Click on the item to open it and click on to decline it. Type a message in the
Comments to sender box, then click Decline.
The item will then be removed from your Calendar and Mailbox, and the status
information updated in the sender's mailbox to show you have declined the item.
Delegating Calendar items
To delegate a Calendar item for action
by another person, click on the Mailbox
icon in the Folder List.
Alternatively, if you have already
accepted the appointment, task, or note,
click on to open the Calendar, then go
to the date of the appointment, task, or
note.
Click the appointment, task, or note to open it and click on to open a
Delegate form. Click to add recipients in the To box or type a
recipient's address in the To box. The address can be a GroupWise user ID,
GroupWise full name, or external e-mail address. Separate each address with a
comma.
Type a message; you can include Web site locations or addresses (URLs) in the
Message box.
Click to spell check the message. For this feature to work, your browser
must be enabled for Java.
Click to attach files to the appointment, task, or note. For this feature to
work, your browser must support attachments.
Click .
The original sender can see that you've delegated the appointment, task, or note by
checking the status information for the item. You can also check whether the
delegated item was accepted or declined by opening your Sent Items folder and
checking the status information (see section above in this document) for the
delegated item.
page 12Completing a Task
You can mark a Task as completed by clicking on the Calendar icon in
the Folder List to open the Calendar and then go to the date of the Task. If you have
not already accepted the task then click on the Mailbox icon .
Click on the task to open it.
Click on to open a
Complete form window.
Click on .
This will place a tick
against the item, and
show it as completed in
the status information
for this item.
Marking an item as Unread (Read Later)
You are able to mark an already opened and read item as unread. When you do
this, you then change the item's icon as it appears in the item list back to that of an
unopened item. For example, you may do this if the item requires further action.
Click on the Mailbox icon in the Folders List.
Select the item in the Item List, then click on from the top of the Item
list.
Using Read Later does not change the status of the item in Properties. For example,
if you have opened an item, then marked the item unread, the sender of the item still
sees the item status as opened in Properties.
page 13Creating Calendar items
You can create a new appointment from GroupWise WebAccess main window in a
number of ways:
By clicking on the icon to display a mail message , then click Appointment to
change the mail message to an appointment;
From the HTML Calendar, click Create Appointment. (You
may have to scroll down top see this area on your screen);
From within the Java Calendar, double -click anywhere in the Appointment list.
Then click on to add recipients in the To, CC, and BC boxes. If you
want to create a personal appointment that displays only in your Calendar, do not
add additional names;
Please note that if you use the address book you will then have to click the
mail button in order to get back to the item creation window,
which resets the item as a mail. You should therefore make use of the address
book before specifying which type of item you want to send or else you will
have to redo this after using the address book.
Type a recipient's address in the To, CC, or BC box. The address can be a
GroupWise user ID, GroupWise full name, or external email address. Separate each
address with a comma. To schedule a resource, such as a meeting room, that is
available in the address book, add the resource to the To box. Type a location for
the meeting. If you added a resource to the To box, the location may be filled in
automatically. Specify the month, day, year, and beginning time for the appointment;
Click to find and insert an appointment time when all the recipients are
available.
To set the duration, type a number, select Hours, Minutes,
or Days. You can use whole numbers or decimal numbers,
such as 90 minutes or 1.5 hours.
Type a subject and message.
You can include Web site locations or addresses (URLs) in both the Subject and
Message boxes.
Click to spell check the message. For this feature to work, your
browser must be enabled for Java.
Click to attach files to the appointment. For this feature to work, your
browser must support attachments.
Click .
page 14Note that a Calendar item created in this way in WebAccess has a status of
“Busy” only, it cannot be marked Private, so that anyone with Proxy read
access to your Calendar items will be able to read the contents of the item.
You can create both Calendar Notes and Tasks in the same fashion as shown
above, by selecting Notes and Tasks as appropriate.
Deleting Calendar Items
To delete a Calendar item that you have previously accepted or created yourself,
click on the Calendar icon in the Folder List. In the HTML Calendar
view, locate the item you want to delete and click in the tick box on the left of the
message. Then select delete. You can recover this item as long as it remains in
your Trash.
If you use the Java Calendar view, you should locate the item and double click on it
to open it. Click on . In the next pop up window, select again.
This will remove your item and place it in your Trash until you delete it form there.
After deleting a Calendar item, you may need to refresh your screen to see the
change. To do this click on the View Mailbox icon . Then click on Update
located on the top menu bar area.
Retracting a Sent Item
Note that a mail message or phone message is retracted only if the recipient
has not yet opened it. An appointment, note, or task is retracted even if the
recipient has already opened and accepted it.
Click in the Folder List and locate the item in the item list. Click the
item to open it.
To delete the item from your Mailbox only, click
To retract the item from your Mailbox and from all recipients' Mailboxes, click
.
The Trash
All deleted items end up in the Trash. To open the Trash, click on on the
Folders List. An item emptied from the Trash cannot be undeleted.
To undelete an item in your Trash, select the item from the list then click Undelete at
the top of the Item list. You can also click on the item to open it, then select
.
page 15Undeleted items are moved to the folder from which it was originally deleted.
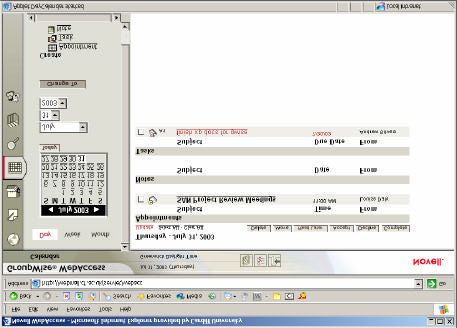
Time Zones
To ensure that dates and times are correct in messages, appointments, and other
time-relevant info rmation, GroupWise WebAccess must know the time zone in which
you are located.
By default, Cardiff GroupWise users have a default time zone set to:-
(GMT) Greenwich Mean Time; Dublin, Edinburgh, London, Lisbon.
You should change this in your time zone setting if using GroupWise WebAccess in
another time zone.
The GroupWise WebAccess time zone setting applies only to GroupWise
WebAccess. If you have access to the Windows version of the GroupWise client,
that client will use the time zone configured through the Windows operating system,
not the time zone you set in GroupWise WebAccess. To change your WebAccess
time zone, click on the options icon t to run up an Options window:-
Click on to change your
time zone setting from the drop
down list:-
page 16Click .
Icons in Items List
GroupWise uses icons to indicate the type of message, its status and also its priority.
Priority, for example, is shown as colour coded icons, where red is the highest
priority, grey a medium priority and white a low priority item. To see the full list of
icons, look in the online help by clicking on . Select Index, then click on I in the
alphabetical listing. This will take you to a section where you can select Icons, in
item list.
Online Help
To access online help, press the Help icon
on the top tool bar of the WebAccess screen.
This will open a window, in which you can select
Help topics.
Cross-Platform GroupWise functionality differences in WebAccess
This section attempts to highlight some differences that a user may experience when
switching from the Windows NT GroupWise client to the Windows or Mac-based
WebAccess version of GroupWise.
(a) No Auto-completion of addresses.
(b) When using Address Book, if you want to search for Last Name first, Mac
users will have to set this each time (Windows users do not).
(c) No Posted Appointments calendar type (you will need to send yourself an
appointment type).
page 17(d) No Work in Progress folder to save Draft messages.
(e) Dates in Mail folders are shown in American format as
(f) There is no Delete option to remove items in the Java Calendar view – you
have to select Decline, which will result in another message for yourself.
(g) In creating a Calendar item, the default date will always be Today, regardless
of the date you may be viewing on the Calendar.
(h) Mac users lose authentication to WebAccess if the current browser session is
used to visit another website (for example, to find a URL that you wish to
include in a new message).
(i) There is no archiving function; cannot view archived information if done so via
GroupWise Windows client.
(j) Rules created in the GroupWise Windows client cannot be edited in
WebAccess.
(k) Cannot view IMAP folders created using the GroupWise Windows client.
page 18You can also read