Custom localization Version 7.18 - Creatio Academy
←
→
Page content transcription
If your browser does not render page correctly, please read the page content below
Custom localization Version 7.18
This documentation is provided under restrictions on use and are protected by intellectual property laws. Except as
expressly permitted in your license agreement or allowed by law, you may not use, copy, reproduce, translate,
broadcast, modify, license, transmit, distribute, exhibit, perform, publish or display any part, in any form, or by any
means. Reverse engineering, disassembly, or decompilation of this documentation, unless required by law for
interoperability, is prohibited.

The information contained herein is subject to change without notice and is not warranted to be error-free. If you
find any errors, please report them to us in writing.

© 2021 Creatio. All rights reserved.
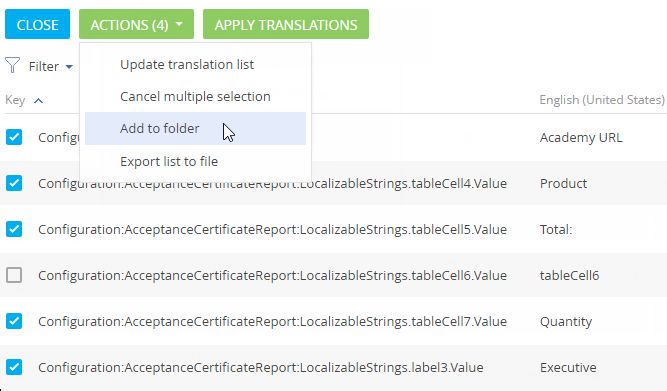
Table of Contents | 3

Table of Contents

Manage UI languages                                                          4
  Enable UI language                                                         5
  Change UI language                                                         6
  Set default UI language                                                    7
  Add new UI language                                                        8
Localize UI via the [Translation] section                                    8
  Enter translations                                                         9
  Search translation strings using filters                                  10
  Identify errors with applying translations                                13
Import UI translations from Excel                                           14
Determine translation string context by the “Key” column                    15
  Structure of the configuration resource keys                              15
  Structure of the data resource keys                                       18

© 2021 Creatio. All rights reserved.
Manage UI languages | 4

Manage UI languages
PRODUCTS:         ALL CREATIO PRODUCTS

Creatio supports localization into multiple languages. You can manage the list of languages in the system designer
of the [ Languages ] section.

    Note. Access to the list of languages and translation is configured using the “Access to “Languages”
    section” and “Access to “Translation” section” system operations. Setting up permissions for various
    operations is described in a separate article.

Creatio interface is translated into following languages:

© 2021 Creatio. All rights reserved.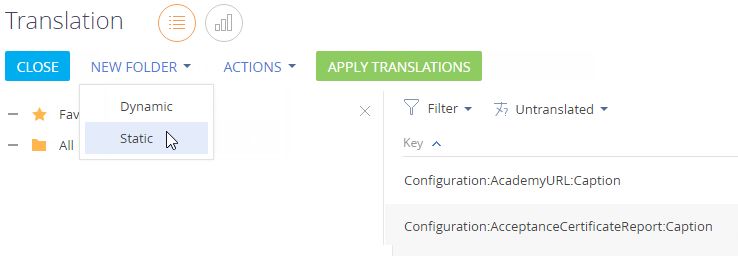
Manage UI languages | 5

                English (United States)                                    Portuguese (Brazil)

                Arabic (Saudi Arabia)                                      Romanian (Romania)

                Dutch (The Netherlands)                                    Russian (Russia)

                Hebrew (Israel)                                            Thai (Thailand)

                Spanish (Spain)                                            Ukrainian (Ukraine)

                Italian (Italy)                                            French (France)

                German (Germany)                                           Czech (Czech Republic)

                Persian (Iran)                                             Swedish (Sweden)

                Polish (Poland)

All localization tools are built-in, there is no need to install or set up additional software in Creatio. Translation of
the interface and other elements is performed in the [ Translation ] section.

    Note. If the needed language is present in the list above but is not available in the [ Languages ] section,
    contact Creatio technical support. Indicate Creatio version and product you use in your request.

Enable UI language
Only English language is available in the user profile by default. You need to enable the needed languages in the
[ Languages ] section to add them to the list of languages in the user profile.

© 2021 Creatio. All rights reserved.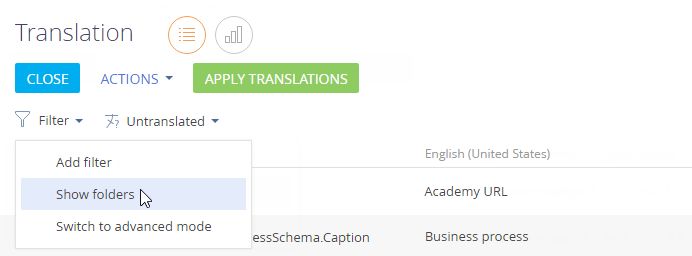
Manage UI languages | 6

1. Go to the [ Languages ] section in the system designer.
2. In the list of languages, locate the language you need and click [ Open ].

3. On the language page, select the [ Active ] checkbox (Fig. 1).

    Fig. 1 Enabling additional language

4. Save the changes.
    As a result, Creatio compilation will start and you will see the enabled language appear in your Creatio user
    profile after the compilation is finished.

        Attention. Compilation is a required step when enabling additional languages. If a language is enabled,
        but the application is not compiled, the user who selected this language will not be able to log in.

        Note. If you cannot access Creatio after switching languages, you can quickly access the
        [ Configuration ] section by adding “/dev” after Creatio application URL and initiate compilation from
        there.

Change UI language
You can change the system interface language in the user profile. These settings apply individually to the users
who changed their language.

1. Click the profile picture at the top right corner and select [ Your profile ].
2. On the profile page, select the needed language from the available list and save the changes (Fig. 1).

    Fig. 1 Changing the interface language

© 2021 Creatio. All rights reserved.
Manage UI languages | 7

    After changing language, you will need to log in again.

    Note. If you do not see the needed language in the list, it may be disabled. You can find more information
    about enabling additional languages in a separate article.

    Note. System administrators can change interface language for different users in the [ System users ]
    section.

Creatio interface, including sections, columns, pages and lookups will be displayed in the language specified in the
user profile (if the corresponding translation is available). The actual section data, such as account or contact
names, notes and knowledge base articles are not localized and will always be displayed in the language they were
entered.

    Note. If a value has s a translation for the currently selected language, it will be displayed in that language.
    If no translations are found, the value will be displayed in the language it was originally added.

Set default UI language
After adding a new user account, system administrator specifies user’s interface language (culture) on the user
page of the [ System users ] section. You can set default interface language for all users. This will help when
adding large numbers of users at once (i.e., by importing users, when using SSO, etc.).

To set the default language:

1. Go to the [ Languages ] section in the system designer.

2. Select a language and click [ Open ].
3. Select the [ Use by default ] checkbox on the opened page (Fig. 1).

    Fig. 1 Setting the default language

        Note. The [ Use by default ] checkbox can be enabled only for one language.

© 2021 Creatio. All rights reserved.
Localize UI via the [Translation] section | 8
4. Save the changes.
When you create a new user, the default language will be automatically selected in the user’s profile.
Note. If the culture is not specified for the user, the interface language and localized data will be
displayed in the language, specified in the [ Primary culture ] system setting. More information about
system settings is available in a separate article.
Users can change language in their profile after logging in to the system. After changing the language, the
interface will be displayed in that language next time the user logs in.
Add new UI language
If you are localizing your Creatio application to one of the languages that are not yet available, you will need to
add that language in the [ Languages ] section first.
1. Go to the [ Languages ] section in the system designer.
2. Click the [ New language ] button. A new language page opens.
3. In the [ Name ] field, select the language you want to add.
Note. The list of languages is located in the system lookup, and is non-editable.
4. Select an image to be used as an icon for that language.
5. Save the changes.
Localize UI via the [Translation] section
PRODUCTS: ALL CREATIO PRODUCTS
You can localize custom Creatio elements, e.g., sections, lookups into languages available in the [ Languages ]
section. The translation is performed in the [ Translations ] section of the System Designer (you can also open
the [ Languages ] section by clicking the [ Go to translation ] button).
The records in the [ Translation ] section represent a list of strings requiring translation. You can enter
translations directly in the list, without opening new pages.
Note. Strings from the non-customizable interface (most of it is located on the “Advanced settings” page)
are called “Core” resources. Core strings are not available in the [ Translation ] section. Core resources are
stored in the form of MS Visual Resources (.resources files) along with Creatio executable files on the
application server. The .resources files are localized using specialized localization tools (for example,
Passolo, Catalyst, etc.).
© 2021 Creatio. All rights reserved.Localize UI via the [Translation] section | 9
Enter translations
The translation is performed using the following columns:
[ Key ] – a system string name that shows the context of the string. This is a non-editable column. Read
more >>>
[ English (United States) - Default ] – the default language in Creatio is English.
You can add a separate set of columns for each additional language. Use the [ View ] > [ Select fields to
display ] command to set up the displayed languages in the translation section (usually, adding the target
translation columns is enough).
[ Verified ] – use this column for translation review. The checkbox will be automatically cleared for new
translation strings and strings where source has changed since the translation verification.
[ Modified on ] – standard Creatio column showing the date and time when the current record was last
modified.
If the untranslated text is short and fully displayed in the [ Translations ] section string, translate it right in the
editable list. More complex texts are easier to translate in the translation string edit window (Fig. 1).
Fig. 1 Translation string edit window
Translate the interface and system elements in Creatio
1. Use the standard filters to select records for translation.
2. Click the string to modify, then click the button to switch to edit mode.
3. Translate the text and save the changes.
4. Click the [ Next > ] button to display next sting in the edit window and the [ < Back ] button to display the
previous string in the list.
5. When the translation is complete, close the translation edit window and click the [ Apply translations ] button.
The newly translated strings will be displayed in the system next time a user with the corresponding language
selected in their profile logs in.
Note. The [ Translation ] section is designed for localization of custom functions. To translate the whole
system to a new language, we recommend exporting translation strings and using professional
localization tools.
© 2021 Creatio. All rights reserved.Localize UI via the [Translation] section | 10
Display untranslated strings
To display untranslated strings, use the “Untranslated” filter and specify the target translation language. For
example, in the “Untranslated” filter you have specified Spanish. The list will display strings that have a name or
description of an item in Russian in the “Russian (Russia) - default" column, and the “English (United States)”
column will not be filled in or will have the same value as “Russian (Russia) - default" column .
Update the list of translations
After creating a new section or column or adding new values to the lookup, new strings will appear in the system.
To work with an up-to-date list of untranslated strings, update the translation list. To do this, click the [ Actions ]
button, select [ Update translation list ]. This action starts searching for new untranslated strings. We
recommend you to update your list every time you start translating.
Note. The translation list update occurs every time you enter the [ Translations ] section.
Search translation strings using filters
The [ Translation ] section has a set of standard filters that you can use to search for specific translation strings.
Since the [ Key ] column contains information about the string context, you can filter strings by this column to
select only strings that are used in a specific part of the system: page, detail, mini page, etc. page, detail, mini
page, etc.
Note. The translation string key structure and meaning are covered in a separate article.
To filter the strings, first you need to determine the schemas that implement the functions that you need to
localize. To do this, use the [ Configuration ] tab of the [ Advanced settings ] window. Alternatively, you can
access the required function (for example, open the page that you need to localize) and check its schema name
in the browser address bar. For example, when the [ Contacts ] section is open, the following URL in the address
bar looks like this: “http://creatioapp.com/0/Nui/ViewModule.aspx#SectionModuleV2/ContactSectionV2/”. The
name of the [ Contacts ] section schema is “ContactSectionV2”.
Note. When searching schema names in the [ Configuration ] section, be sure to check if the search
results contain schema names with “V2” suffix. If search results contain schema names both with and
without suffix (for example, “ContactSection” and “ContactSectionV2”), make sure that you translate
strings for the schema with the “V2” suffix.
Note. Strings whose keys contain “Configuration”, followed by the schema name and the word “Caption”
(for example, “Configuration:SchemaName:Caption”) contain schema titles (displayed in the [ Configuration
] section) and do not require translation.
How to filter configuration resources
© 2021 Creatio. All rights reserved.Localize UI via the [Translation] section | 11
Configuration resources include list column and page field names, tab captions, field group names, etc. For
example:
To translate the column names in the [ Contacts ] section and the corresponding field names on the contact
page, apply the following filter by the [ Key ] column: “Configuration%Contact%Column%”.
To translate the section page of the [ Contacts ] section, apply the following filter by the [ Key ] column:
“Configuration%ContactSectionV2%”.
To translate the contact mini page, apply the following filter by the [ Key ] column:
“Configuration%Contact%MiniPage%”.
To translate contact section record page, apply the following filter by the [ Key ] column:
“Configuration%Contact%ContactPageV2”%. A section record page can have significant number of translation
strings if separate pages are used for different types of records.
To translate detail list and record page, apply the following filter condition:
“Configuration:Contact%Detail%”. In the list of filtered records, locate the name of the required detail schema.
Then, apply a new filtering condition with the name of the needed detail schema, such as
“Configuration%ContactCareer%” (for strings of the [ Job experience ] detail).
If a section contains built-in reports, apply the following filter condition to select their translation strings:
“Configuration%Contact%Report%”.
Additionally, to select strings used in the contact synchronization functions, use the following filter:
“Configuration:Contact%SyncSettings%”. Use the “Configuration:%NotificationProvider%” filter to localize
notifications.
Attention. Translation string text may contain variables represented by numbers in braces, such as {0}.
Make sure that translation includes all variables from its source text.
How to filter data resources (localized lookup records)
To localize lookup values for a specific section, first determine which lookups are used in the section. To do so,
filter translation strings by the [ Key ] column, using the following filter: “Data:Lookup.Name%”. The resulting
string list will contain names of all registered lookup schemas. You can also use the folders in the [ Lookups ]
section of the system designer to check which lookups are associated with which section or function. Use lookup
schema names to filter records from the needed lookups. For example, the “Data:Job%” filter condition will return
all records from the [ Job titles ] lookup.
The [ Contacts ] section, for instance, uses the following lookups:
[ Contact types ] – ContactType.
[ Contact roles ] – ContactDecisionRole.
[ Salutations ] – ContactSalutationType.
[ Contact genders ] – Gender.
[ Job titles ] – Job.
[ Departments ] – Department.
Lookups are not necessarily used on the record pages. For example, the [ Reasons for job change ]
(JobChangeReason) lookup is used on the [ Job experience ] detail in the [ Contacts ] section.
© 2021 Creatio. All rights reserved.Localize UI via the [Translation] section | 12 How to maximize translation efficiency using static folders Use static folders to avoid creating complex filters. You can manually add specific strings for translation (for example, all lookups used in specific section) and then work only with the trans strings in the folder. To create a static folder, in the [ Filter ] menu, select [ Show folders ] (Fig. 1). Fig. 1 Enabling folder tree Click [ New folder ] and select [ Static ] (Fig. 2). Fig. 2 Adding a static folder Enter the name of the new folder and click [ OK ]. Apply a filter to select required strings, then add filtered strings to the folder. Apply next filter and add filtered strings to the folder (Fig. 3). Fig. 3 Adding records to the static folder © 2021 Creatio. All rights reserved.
Localize UI via the [Translation] section | 13
This way you can create and save a list of strings used in a specific section or other system function and later
use a single folder to access them all.
Identify errors with applying translations
After completing the translation and clicking the [ Apply translations ] button, some UI elements may remain
untranslated because of errors in the process of applying translations (e.g., the schema of the translated
resource has been deleted, etc.).
Note. If a translation resource has been deleted, the corresponding translation strings will be deleted as
well when the translations are applied. This does not result in a translation application error.
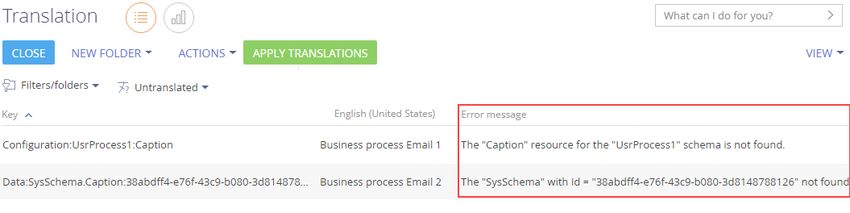
If an error occurs when applying translations from a string, Creatio records the error text in the [ Error message
] column in the [ Translation ] section list (Fig. 1). To display the [ Error message ] column in the list of translation
strings, add the [ Error message ] column to the list view via the [ Select fields to display ] command of the [ View
] menu.
Fig. 1 [ Error message ] column in the section list
© 2021 Creatio. All rights reserved.Import UI translations from Excel | 14
Use the [ Translation apply errors ] folder (Fig. 2) to quickly view all strings with error messages. To open the
[ Translation apply errors ] folder, click the [ Show folders ] option in the [ Filter ] menu of the [ Translation ]
section.
Fig. 2 Folder with translation apply errors
You can create additional folders using a filter by the [ Error message ] column to view specific translation errors.
If the [ Error message ] column is empty for a translation string, then it has been properly applied and should be
displayed in the UI.
Import UI translations from Excel
PRODUCTS: ALL CREATIO PRODUCTS
You can use Excel import to quickly export and import translations. To do this:
1. Open the [ Translations ] section and select the needed strings. Searching and filtering translation strings are
covered in a separate article.
2. Use the [ Export list to file ] action in the [ Translation ] section to obtain a template for the import table. An
.xlsx file with the currently displayed records and columns will be downloaded.
Note. Columns required for translation are the [ Key ] column, as well as source and target language
columns.
3. Open the system designer and click the [ Data import ] link. Drag the XLSX file with translations and click
[ Other ]. Select the “Translation” object (Fig. 1).
Fig. 1 Importing the translation file
© 2021 Creatio. All rights reserved.Determine translation string context by the “Key” column | 15
4. Set up duplicate check by the [ Key ] column and click [ Start data import ].
5. After importing, perform the [ Apply transfers ] action in the [ Translation ] section.
Determine translation string context by the
“Key” column
PRODUCTS: ALL CREATIO PRODUCTS
The context of the translation string is represented with the [ Key ] column. Use the [ Key ] column in the
[ Translation ] section to determine the context of each translation string. There are two general types of
translation strings: configuration resources and data resources, each having a specific key structure.
Note. Before starting the localization, we recommend getting a basic understanding of the system
architecture, and the general functions of the [ Configuration ] section.
Structure of the configuration resource keys
Configuration resources contain translations for buttons, columns, notifications and other interface elements.
The structure of their keys is: ::.
– is always “Configuration”. It indicates that the string is a configuration resource.
© 2021 Creatio. All rights reserved.Determine translation string context by the “Key” column | 16
– internal name of the schema in which the translation string is located. “Schemas” are the “building blocks” of a
Creatio configuration. There are three types of schemas: objects (they represent database tables), pages and
processes. For example, “Activity” is the “Activity” object schema, “ActivityPageV2” is activity edit page schema,
and “ActivitySectionV2” is the section page of the [ Activities ] section.
Note. The list of all schemas is available in the [ Advanced settings ] section, on the [ Configuration ] >
[ Schemas ] tab.
Note. You can view internal names of schemas created for custom sections in the Section Wizard.
Schema names for custom sections are generated automatically, based on the value in the [ Code ] field,
entered on the first step of the Section Wizard.
– location of the string within the schema.
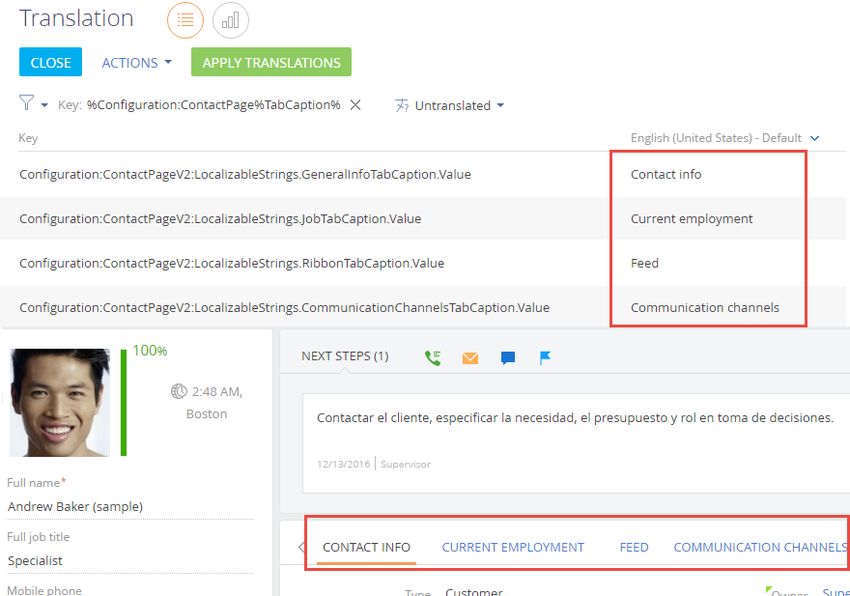
The following types of keys are used in the configuration resources:
“Caption” – schema name. For example, the string “Configuration:ActivityPageV2:Caption” contains caption
of the “ActivityPageV2” schema.
“Columns” – key for strings that contain column names of an object schema. The “Columns” keys have the
following structure: “Columns..Caption“. For example, the
“Configuration:Activity:Columns.Author.Caption” string contains the caption of the “Author” column in the
“Activity” object. Object column titles are used as the names of the corresponding fields on the section
lists, record pages and details. Thus, by localizing a column in an object, you will localize the corresponding
captions in the section and detail lists and pages.
“LocalizableStrings” – key for localizable strings that were added directly by developers. These strings can
be found in any schema (object, page, business process). Usually, these are not standard translation
strings (i.e. Not object fields) in the page schemas, such as menus, messages, etc. The key has the
following structure: “LocalizableStrings..Value“. The internal name of the
string is specified by the developer or generated automatically by the Section Wizard. For example, the
string “Configuration:ActivityPageV2:LocalizableStrings.CallTabCaption.Value” contains caption of the [ Calls
] tab of the activity page.
Keys for configuration resource strings that are unique to business processes are as follows:
“Parameters” – the string contains process parameter names and values. The process parameter name
key syntax is as follows: “Parameters..Caption“. The key syntax process
parameter names is as follows: “Parameters..DisplayValue“. For example, the
string “Configuration:CreateInvoiceFromOrder:Parameters.CurrentOrder.Caption” contains the name of
the “CurrentOrder” parameter in the “New invoice based on this order” process.
“EventsProcessSchema” – key of an embedded process string. Embedded processes handle business
logic of objects and usually contain localizable error and message texts. The syntaxis of the embedded
process string keys is similar to that of the regular process strings (with the addition of
“EventsProcessSchema” at the beginning of the key).
“BaseElements” – the string contains information about process elements. The key syntax depends on the
information type. For example, the key “BaseElements..Caption” identifies an
© 2021 Creatio. All rights reserved.Determine translation string context by the “Key” column | 17
element caption on the business process diagram, “BaseElements..Parameters.
.Caption” – key for a process element parameter name string,
“BaseElements..Parameters..Value” — key
for a process element parameter value string.
Note. Business process schema names are available in the [ Name ] column of the [ Process library ]
section (you will need to add this column to the list via the [ Select fields to display ] command, or open a
process properties page). Read more >>>
Note. The translation strings whose key ends with “DisplayValue” contain process diagram captions (seen
on the diagram only) and do not require translation.
Below are examples of configuration resource keys and their meaning.
Configuration:ActivityPageV2:LocalizableStrings.ActivityParticipantTabCaption.Caption – the name of the
[ Participants ] tab on the activity page.
“Configuration” – configuration resource key.
“ActivityPageV2” – activity page schema.
”LocalizableStrings” – localizable string.
“ActivityParticipantTabCaption” – localizable string internal name, identifying it as the [ Participants ] tab.
“Caption” – the string is the caption.
Configuration:Account:Columns.Type.Caption – the title of the [ Type ] column in the “Account” object.
“Configuration” – configuration resource key.
“Account” – ”Account” object schema.
“Columns” – object column.
“Type” – column name.
“Caption” – column title.
Configuration:ImportSettingsPage:EventsProcessSchema.LocalizableStrings.ErrorMessage.Value – error
message in the embedded process of the “ImportSettingsPage” schema.
“Configuration” – configuration resource key.
“ImportSettingsPage” – import settings page schema.
“EventsProcessSchema” – identifies that this is a string from an embedded process.
”LocalizableStrings” – localizable string.
“ErrorMessage” – error message.
“Value” – message text.
Configuration:AutoGeneratedPageUserTask:Parameters.InformationOnStep.Caption – name of the
[ Information on step ] parameter of the [ Auto-generated page ] business process element.
© 2021 Creatio. All rights reserved.Determine translation string context by the “Key” column | 18
“Configuration” – configuration resource key.
“AutoGeneratedPageUserTask” – identifies that this is a schema of the [ Auto-generated page ] process
element.
“Parameters” – the string contains parameter information.
“InformationOnStep” – internal name of the [ Information on step ] process element parameter.
“Caption” – parameter title.
Fig. 1 Examples of translation strings and their location in the interface of the contact page
Structure of the data resource keys
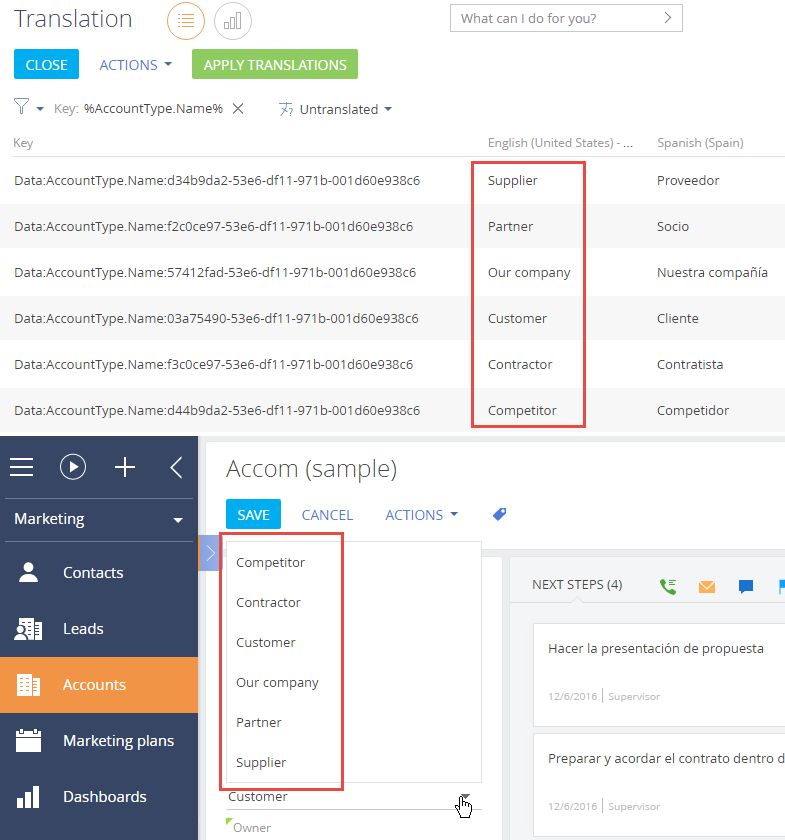
Data resource keys identify data, such as lookup records, that must be localized. The key format is :.:
.
– is always “Data”. It indicates that the string is a data resource string.
© 2021 Creatio. All rights reserved.Determine translation string context by the “Key” column | 19
– name of the table (object) that contains the localized string. For example, “AddressType“ refers to the lookup
table that contains address types.
– table column name in the database. For example, [ Description ] or [ Name ].
– unique Id of the localized record. Record ID is a unique code that can be viewed in the database or in the
browser address bar by opening a specific record.
Below are examples of data resource keys and their meaning.
Data:ActivityCategory.Name:42c74c49-58e6-df11-971b-001d60e938c6 – a activity category name.
“Data” – this is a data resource.
“ActivityCategory” – the table (object) is “Activity category”.
“Name:” – the localized value is in the “Name” column.
“42c74c49-58e6-df11-971b-001d60e938c6” – record Id.
Data:ContactType.Name:60733efc-f36b-1410-a883-16d83cab0980 – a contact type name.
“Data” – this is a data resource.
“ContactType” – the table (object) is “Contact type”.
“Name” – the localized value is in the “Name” column.
“60733efc-f36b-1410-a883-16d83cab0980” – record Id.
Data:SysDashboard.Caption:e2895654-6ce4-4ef8-a126-5f75f49d9073 — a “Dashboard” tab name.
“Data” – this is a data resource.
“SysDashboard” – table (object) is “SysDashboard” (this object contains dashboard settings).
“Caption” – the localized value is in the “Caption” column.
“E2895654-6ce4-4ef8-a126-5f75f49d9073” – the record Id.
Fig. 1 Examples of data resource translation strings in the [ Translation ] section and in on the account page
© 2021 Creatio. All rights reserved.Determine translation string context by the “Key” column | 20 © 2021 Creatio. All rights reserved.
You can also read