INTRODUCTION PODCASTING - HOME RECORDING
←
→
Page content transcription
If your browser does not render page correctly, please read the page content below
INTRODUCTION
HOME RECORDING and
PODCASTING
By Chris Lyons

A Shure Educational Publication
INTRODUCTION
HOME RECORDING and
PODCASTING
By Chris Lyons
Introduction to
Ta ble of Contents                                       HOME RECORDING AND PODCASTING

Introduction . . . . . . . . . . . . . . . . . . . . . . . . . . . . . . . . . . . . . . . . . . . . . . . . . . . . . . . 4

Section One: Getting Started . . . . . . . . . . . . . . . . . . . . . . . . . . . . . . . . . . . . . . . . . . 5
     The Difference Between Home Recording and Podcasting . . . . . . . . . . . . . . . 5
     So, What is Good Sound? . . . . . . . . . . . . . . . . . . . . . . . . . . . . . . . . . . . . . . . . . 6
     Basic Equipment Needs . . . . . . . . . . . . . . . . . . . . . . . . . . . . . . . . . . . . . . . . . . 7

Section Two: Capturing . . . . . . . . . . . . . . . . . . . . . . . . . . . . . . . . . . . . . . . . . . . . . . 8
     The Recording Environment . . . . . . . . . . . . . . . . . . . . . . . . . . . . . . . . . . . . . . . 8
     Microphones . . . . . . . . . . . . . . . . . . . . . . . . . . . . . . . . . . . . . . . . . . . . . . . . . . 9
     Microphone Accessories . . . . . . . . . . . . . . . . . . . . . . . . . . . . . . . . . . . . . . . . 14
     Basic Microphone Techniques . . . . . . . . . . . . . . . . . . . . . . . . . . . . . . . . . . . . 15
          General Recording Techniques . . . . . . . . . . . . . . . . . . . . . . . . . . . . . . . 15
          Vocal Microphone Placement Techniques . . . . . . . . . . . . . . . . . . . . . . 17
          Instrument Microphone Placement Techniques . . . . . . . . . . . . . . . . . . 18

Section Three: Enhancing . . . . . . . . . . . . . . . . . . . . . . . . . . . . . . . . . . . . . . . . . . . 20
     Recording Devices . . . . . . . . . . . . . . . . . . . . . . . . . . . . . . . . . . . . . . . . . . . . . 20
     Mixers & Interfaces . . . . . . . . . . . . . . . . . . . . . . . . . . . . . . . . . . . . . . . . . . . . . 20
     Recording Software & Effects Processing . . . . . . . . . . . . . . . . . . . . . . . . . . . . 23
     Monitors . . . . . . . . . . . . . . . . . . . . . . . . . . . . . . . . . . . . . . . . . . . . . . . . . . . . . 24

Section Four: Saving & Sharing . . . . . . . . . . . . . . . . . . . . . . . . . . . . . . . . . . . . . . 26

Section Five: Summary & Additional Resources . . . . . . . . . . . . . . . . . . . . . . . . . 27

Section Six: Appendices . . . . . . . . . . . . . . . . . . . . . . . . . . . . . . . . . . . . . . . . . . . . 28
     Latency . . . . . . . . . . . . . . . . . . . . . . . . . . . . . . . . . . . . . . . . . . . . . . . . . . . . . 28
     Microphone Output . . . . . . . . . . . . . . . . . . . . . . . . . . . . . . . . . . . . . . . . . . . . . 29
     Product Selection Charts . . . . . . . . . . . . . . . . . . . . . . . . . . . . . . . . . . . . . . . . . 31

Glossary        . . . . . . . . . . . . . . . . . . . . . . . . . . . . . . . . . . . . . . . . . . . . . . . . . . . . . . . . 33

About the Author . . . . . . . . . . . . . . . . . . . . . . . . . . . . . . . . . . . . . . . . . . . . . . . . . . 35

Home Recording
                                                                                                                               3
Introduction to
HOME RECORDING AND PODCASTING
Introduction
Home recording and podcasting are increasing in popularity every day. The equipment
used for these applications has become more sophisticated, practical, accessible,
and affordable — and more and more people are getting involved with these types of
audio projects.
Shure has been a leader in audio production for more than 80 years, and we have
learned that “audio quality” will make or break any project.
The purpose of this guide is to help you, the home recordist or podcaster, capture
better sound for your recording projects, whether they are …
• monologues,
• round table discussions,
• interviews,
• music performances, or
• creating audio tracks for videos.
If you are new to home recording and podcasting, this is a great place to start!
If you have been wondering why other people are able to create better sounding
recordings, this guide should help you identify the reason and the solution.
The guide takes a step-by-step approach to discussing principles, products and
placements, as well as helping you get past some of the most common problems.
We’ve also provided reference sources where you can find more technical information.
So put down your iPod (just for a few minutes) and learn why some podcasts and home
recordings are clean and crisp and why others sound like they were recorded from the
bottom of a can or in front of an air conditioning unit.
Introduction
4Introduction to
HOME RECORDING AND PODCASTING
SECTION ONE
GETTING STARTED
The most important concept of all: Start with Good Sound.
Good sound starts with one basic principle: The better the original source recording, the
better the final audio output will be.
Therefore, your #1 goal is to make sure that your initial recording of voices and
instruments provide good starting points for mixing and combining into a final program.
To give yourself the most flexibility, you need to be able to control and edit each voice
or instrument individually.
In professional recording studios, every individual voice, instrument, and sound effect is
recorded separately, so that they can be blended together in just the right mix. In a home studio,
you might not have the time or equipment to record every single thing separately, but it’s a
good idea to at least separate voice tracks from instrument tracks, or separate different types
of instruments from each other (one track for drums and one for guitar, for example.) This will
allow you to adjust the level or tonal quality of each voice and instrument separately, so that the
changes you make to one track are not also applied to another track that does not need it.
If you are setting up a home recording studio or are just about to begin your first podcast,
you need to keep this guiding principle in mind during all three of the following major steps:
• choosing your recording location
• selecting your equipment, accessories, and even cables and adapters
• recording the audio
While you can clean up the sound, somewhat, during the editing and mixing process,
the equipment quickly becomes expensive and the techniques start to get very advanced.
Even if money and expertise are at your fingertips, there is only so much that even the
world’s best sound engineer can do to soften the negative affects of background noise and
hiss without noticeably altering the sound of voices or instruments.
Simply put: the best way to eliminate unwanted and ambient noise is to make sure
you do not capture it in the first place.
The difference between home recording and podcasting.
Home recording is the term used for any recording created outside of a traditional
professional recording studio. This term can be misleading, however, because recording
equipment has become so compact, easy to use, and affordable that there might be no
difference between the equipment used in a traditional recording studio and what is used in
a home ‘project’ studio. Today, a recording studio might be located in an office, basement,
or garage and be capable of producing professional-quality content. A traditional recording
studio still offers one critical component that is missing from most home recording studios:
a quiet room that is suitable for recording sound.
5Introduction to
HOME RECORDING AND PODCASTING
The word podcasting comes from combining ‘broadcasting’ with Apple’s popular audio
player, the iPod. It is now the generic term for creating audio or video files that can be
subscribed to, so that the subscriber is automatically notified that a new episode is available.
It is also a generic term for downloadable (non-subscriber) recordings – especially those that
are part of an ongoing series.
Podcasts can contain audio only, audio with graphics, or video, and can be played on an
MP3 player or a computer. Some podcasts are created by traditional media organizations (news
networks, magazines, newspapers, etc.) while others are created by companies, religious
groups, educational institutions, or individuals. The one thing they have in common is the
desire to deliver information to people who are interested in a particular subject.
The bottom line is that home recording is a method of capturing and producing
content, while podcasting is a means of distributing that content. In other words, many
people reading this booklet are both home recordists and podcasters.
So, What is Good Sound?
Subjective as the term ‘good sound’ might seem, it’s the optimization of three
components:
1. Audibility – is it loud enough?
More to the point, does the sound achieve sufficient level that does not require the
listener to strain to hear it or reach for the volume control?
2. Intelligibility – is it clear enough?
Intelligibility describes how well the listener can understand the information being
delivered. Intelligibility is critical in spoken word recordings, because it determines
whether the listener accurately hears the difference between words like “cat” and “bat”.
Poor intelligibility can be the result of poor diction or pronunciation by the talker, poor
recording, or simply too much undesired ambient sound or noise.
3. Fidelity – does it sound like ‘being there’?
Each component of the sound path can affect the tonal character of the sound
arriving at the listener’s ear. This changes the realism and accuracy of the recording.
While the listener can hear your words and music clearly and at a comfortable level,
if it does not sound like the original performance, then it lacks fidelity.
You may hear many colorful, yet vague, terms for describing sound – such as ‘warmth,’
‘punch,’ and ‘bottom’ – but they’re not measurable. For example: Speech that is warm but
unintelligible does the listener little good.
6Introduction to
HOME RECORDING AND PODCASTING
But, at the end of the day, “good sound” is 100% subjective. If you and your listeners
believe your recordings and podcasts have good sound (that is, they sound like what you have
in mind and people can understand them) then you have achieved good sound. Now comes
the hard part: getting your recordings to sound as you intended.
Basic equipment needs
Below are basic and more complex recording signal paths for home recording and
podcasting needs.
Basic: Mic Cable Recording Device (often the computer)
More complex:
Mic Cable Preamplifier
Mixer/Signal Processor + Loudspeaker or headphones Recording Device
Before you create a budget and run out to buy all the hardware you can afford, it’s critical to
match your equipment to your recording environment.
7Introduction to
HOME RECORDING AND PODCASTING
SECTION TWO
CAPTURING SOUND
The Recording Environment
The ‘deader’ the better.
As recording equipment becomes more compact, you can look to smaller and smaller
spaces for your home recording and podcasting needs. This is good because it provides
more opportunity to find the most acoustically neutral (quietest and least reflective or ‘dead’)
area. Smaller areas also make it easier and less expensive to improve the acoustics.
So what are you looking for? It’s more what you are looking to avoid:
• Avoid reflective or hard surfaces, such as windows or concrete walls. If your
space includes these surfaces, you will want to ‘deaden’ them with acoustic
foam, carpet, blankets, or heavy drapes.
• Avoid fans, air conditioning units, furnaces or other appliances that generate
mechanical or electrical noise.
• Avoid other people. Use a sign to alert family and friends to stay away while you
are recording.
Make a few sample recordings.
Your brain is quite good at ignoring background hiss or mechanical noise, so make a
recording of the chosen areas for a minute or so. Then listen to them on your MP3 player or
computer. You’ll be surprised at how much noise the microphone picks up that you didn’t
notice while standing in the room. Obviously, the area with the least amount of noise should
be the winner.
Tip: Can’t find a “dead” enough space? Sing or talk into the closet.
One of the best tricks we’ve found is to open the closet door, throw blankets
or sleeping bags over the wide open doors, and position the mic so that the
least sensitive side of the mic is facing into the back of the closet. The more
clothes in the closet, the better! This absorbs many of the reflections and can
give you a more intelligible sound.
8Introduction to
HOME RECORDING AND PODCASTING
Microphone styles
The choice of microphone style is determined by what the sound source is (a person
vs. an instrument), what the sound source is doing (sitting, standing, moving, not moving,
etc.), and how the microphone can be conveniently mounted. The microphone style
should help put the microphone in exactly the right place and keep it there.
Handheld – True to its name, the handheld
microphone is shaped to be easily held in the
hand. Handhelds can, of course, be attached to a
mic stand to free up the hands. Mic stands are a
good idea for home recording. One of the main
variables to improving sound levels and overall
sound quality is to keep a consistent distance
between the sound source and the microphone.
Placing the microphone on a stand also reduces
handling noise, which are low frequency ‘thumps’ Handheld Stand mounted
microphone microphone
created by the talker’s hand tapping or interacting
with the body of the microphone.
Stand mounted – These mics are designed
to be attached to a stand and, for this reason,
additional accessories, such as shock mounts,
work best with these microphone types.
Lavalier – Very small microphones that clip
to a shirt or tie, lavalier microphones are good
for people who need to move while talking
(examples: presenter, theatre performer) or who
may be intimidated by seeing a microphone in
front of them (such as an interview subject for a
podcast). Lavalier microphones also free up the
hands for other uses, such as demonstrating how
to operate a tool or perform an activity.
Headworn – These mics take the lavalier Lavalier
to the next level. While the lavalier is fixed in microphone
position on the body, a headworn mic is fixed in
relationship to the mouth, keeping the distance between the
sound source (the person’s voice) and the microphone constant.
Because the microphone is closer, there is less pickup of
background noise in a noisy recording environment. Headworn microphone
9Introduction to
HOME RECORDING AND PODCASTING
Instrument-mounted – Some microphones are
specifically designed to attach to certain instruments,
such as the bell of a trumpet or the edge of a snare
drum. This helps isolate the sound of that particular
instrument from others around it, while keeping the
distance from the microphone to the sound source
constant. (See example to the right.)
Direct input – Some instruments, such as an
electric bass guitar, can be connected directly into
a device called a direct box, which converts the
instrument signal to a standard microphone
signal. The direct box is not a microphone,
but it replaces the microphone in the signal
path. The advantage of using a direct box is Instrument
that you eliminate the microphone, so there mounted
microphone
is no ambient noise in the recording. The
disadvantage is that some instruments may
not sound as expected when recorded
directly, because you are missing the tonal
character that is added by the body of the
instrument (or, in the case of an electric gui- Example of a direct input
tar or bass, by the guitar amplifier). (or “direct box”).
Tip: If you use a direct input, you should also consider using a monitor speaker so
that you can hear exactly what you are recording. (See “Monitors” on page 24.)
Transducer Types
The transducer is the part of the microphone that converts acoustic energy (sound)
into an electrical signal that can be recorded. There are several types of transducers, but the
two most common types used for recording are Dynamic and Condenser.
Dynamic mics are very rugged and can handle high sound pressure levels, like those
delivered from snare drums and guitar amps. They are also very tolerant of hostile conditions
like high temperature and humidity... and careless interview subjects.
Condenser mics are more sensitive and more responsive to higher frequencies, which
allows them to capture more detail from instruments like acoustic guitars or cymbals.
Condenser microphones can also reveal added texture and realism in voices.
10Introduction to
HOME RECORDING AND PODCASTING
There are two main types of condenser microphones:
Small diaphragm – generally used for live performance and recording. They are called
small diaphragm because the transducer’s diaphragm is less than one inch in diameter.
(See diagram below.)
Large diaphragm – traditionally favored by recording studio engineers and broadcast
announcers, condenser microphones with a large diaphragm (one inch in diameter or larger)
usually have higher output, less self-noise (the ‘hiss’ the microphone might make), and
better low-frequency response, which can result in a ‘higher fidelity’ sound for both vocals
and instruments.
< 1” > 1”
in diameter in diameter
Small diaphragm Large diaphragm
Does Diaphragm Size Really Matter?
When looking for a large diaphragm microphone, you will come across terms such as
‘large style’ and ‘large diaphragm type.’ Generally these do not refer to true large diaphragm
microphones, but to smaller diaphragm microphones that are designed to appear as if
they were large diaphragm versions. A true large diaphragm microphone typically has
a physical diaphragm of 1” or larger diameter. (As shown in the illustration above.)
But the question remains… “Does it matter?”
As costs for some true large diaphragm microphones are now competitive with small
diaphragm microphones and even dynamic microphones, it becomes a question of
performance and personal taste.
The answer is… it depends. If you want the highest sensitivity, the lowest self-noise,
and a truer sound, go for a large diaphragm mic. In all cases… try them before you
buy them. But recall that ‘good sound’ is subjective. If you like the way your voice
sounds in your recordings, regardless of diaphragm size, then you have found the
right microphone.
11Introduction to
HOME RECORDING AND PODCASTING
USB microphones
More and more professional microphone
companies are manufacturing USB microphones.
A USB microphone is essentially a microphone
that has a USB audio interface built in, so that
it can be plugged into your computer without
requiring an external audio interface.
In addition, some USB microphones provide
a headphone output to help you monitor your XLR connector USB connector
recordings. (See “Monitors” on page 24.)
To USB or not To USB
If you only need to use one microphone and plan to record directly into your
computer, a USB microphone is the most convenient solution. It’s quick and easy to set
up, and it eliminates the need for a pre-amp, mixer, or USB audio interface.
If you need to use multiple microphones at once (to record multiple voices or
instruments, for example) or you want to be able to connect the microphone to a mixer
or other recording equipment as well as your computer, consider an XLR-to-USB adapter.
This lets you connect existing XLR-style microphones into the USB port on your computer.
Pickup patterns
Microphones are available with various
pickup (or polar) patterns. The pickup pattern
is the representation of the microphone’s
directionality. In other words, the pickup
pattern describes the microphone’s sensitiv-
ity to sounds arriving from different directions.
Omnidirectional – picks up sounds
equally from all directions. Good for natural
Omnidirectional
room sound and group vocals. Also good for
when the singer or talker may move around
different sides of the microphone (but their
distance to the mic stays the same). However,
if the goal is to eliminate ambient sound, a
unidirectional pickup pattern is a better choice.
Unidirectional – most sensitive to sounds
coming from in front of the mic, and less
sensitive to sounds coming from the sides or
rear. Unidirectional mics fall into two main Cardioid (Unidirectional)
categories:
12Introduction to
HOME RECORDING AND PODCASTING
Cardioid – the most common type of microphone.
Called ‘cardioid’ due to its heart-shaped pick up pattern
(see diagram on page 12), this microphone helps
reduce pickup of background noise or bleed from
nearby sound sources. However, if the goal is to enable
the listener to hear what is occurring in the background,
you should consider an omnidirectional pick-up pattern.
Supercardioid – is even more directional than Supercardioid
the cardioid. Supercardioids have the tightest pickup pattern, further isolating the sound
source. Good for noisy, crowded spaces and when multiple microphones are being used,
such as for round-table discussions where you want to keep the voices distinct.
An example: Annie’s knitting podcast.
Annie hosts a knitting show. If she wants the listener to hear the ‘click and clack’ or her
darning needles during the podcast, she should use a mic with an omnidirectional pickup
pattern. If not, she should use a mic with a cardioid pick-up pattern.
Better yet, she can use two mics. A cardioid aimed at her mouth, to pick up her
explanations, and another cardioid aimed at her hands, to pick up the click and clack of
her needles. Then she can mix them together – adjusting the levels of the two sounds to
achieve the maximum combination of intelligibility and fidelity – during the editing process.
Microphone electrical outputs
The electrical characteristics of the microphone’s output signal are important, because
they must be compatible with the audio input to which the microphone is connected.
Microphone signals have historically been analog, but with the increasing popularity of digital
audio recording and editing, microphones with digital audio output have become available.
Some ‘purists’ prefer analog, while others prefer having the microphone provide the
digital signal. The truth is that you need to end up with digital, so it really depends on how
and when you want to enhance your sound. (See Appendix for a more complete discussion
on analog and digital output.)
Phantom Power and Condenser Microphones.
Condenser microphones require power. A common way of providing them with power
is through something called phantom power. Phantom power is real power, but is the
term used for when a voltage is fed through the microphone cable. Most microphone
mixers provide phantom power, so if you are using a condenser microphone and a mixer,
make sure the mixer has a microphone input that provides phantom power.
Note: Dynamic microphones do not require phantom power, nor will they be harmed if
they are plugged into a microphone input that has phantom power turned on.
13Introduction to
HOME RECORDING AND PODCASTING
Microphone Accessories
Mounting accessories can help improve the resulting
sound of your home recordings and podcasts. Creative
use of these accessories can allow microphones to be
placed almost anywhere, either freeing up your hands for
other needs or helping make sure the microphone is in
precisely the right place.
Stands, Booms and Goosenecks – should be sturdy
enough to support the microphone in the intended
location and to accommodate the desired range of motion.
These accessories come in many shapes and sizes,
but the purpose remains the same: to position the A boom arm stand, while more
microphone in the right place to pick up only the sound expensive than a normal stand,
you want. So finding the right version for your needs and balances the microphone in mid-air
your microphone is what matters most. and can be repositioned with gentle
Shock Mounts – are used to isolate the microphone pressure that, if careful, will not be
from vibrations transmitted through the stand or the heard in the recording.
mounting surface, such as a desktop or floor. A shock
mount can reduce or eliminate the ‘handling’ noise you
hear when microphones are moved during a recording
session or if the surface upon which the microphone rests
is being jarred or vibrated (often called ‘stand thumps’).
Windscreens and Pop Filters – First of all, you need
to understand what popping is. When you say the word
‘pop’ for example, you will hear an explosive breath after
the ‘p’, that is, ‘po-puh’. Pops occur most often with “p”,
“t”, “d”, and “b” sounds, and can be very distracting on
the final recording. Windscreens and pop filters provide an
acoustically transparent shield around your microphone,
which breaks up the wall of air before it hits the mic and Example of a shock mount
helps reduce popping sounds. (See Technique 2 and and a pop filter.
diagram on page 17.)
Two Microphone Accessory Tips:
• Too much handling noise? – Or does it sound like the microphone is being tapped
during the recording (stand thumps)? Use an accessory shock mount.
• ‘P’,‘t’, ‘d’, and ‘b’ sounds too explosive for your tastes? Try a ‘pop’ filter. Note: You
can also place the microphone out of the path of pop travel, such as a few inches
to the side, above, or below the mouth. (See diagram on page 17.)
14Introduction to
HOME RECORDING AND PODCASTING
General Recording Techniques
Within this guide, we will hit the highlights applicable for general home recording and
podcasting needs.
1. Microphone technique is largely a matter of personal taste. Whatever method
sounds right to you is right. Keep trying different placements until you get the sound
you want.
2. Maintaining a consistent sound level is critical. Make sure your sound sources do not
move in and out of the pickup areas of the microphone. Movement (i.e. varying dis-
tance from the microphone) will change recording levels, which are hard to fix later.
3. Keep the microphone away from reflective surfaces. Reflections (i.e. bouncing
sound waves) caused by hard surfaces, including even tabletops and music stands,
can affect the sound quality captured by the microphone. This is also called
reverberation and if you want this effect, it is best to add it later. (See “Reverberation”
on page 24.)
4. Place the microphones far from unwanted sound sources. Be sure to also point the
microphones away from any unwanted noise. Make a few sample recordings of the
chosen recording area, with the microphone facing different directions, to find the
quietest possible placement.
✓
Picking up unwanted background noise (such as from street noise through windows or from mechanical
appliances including furnaces, heating and A/C registers) is a common issue with home recordings.
The more you can isolate your recordings from background noise, the better they will sound.
15Introduction to
HOME RECORDING AND PODCASTING
5. Make sure to use a microphone with the right pick-up pattern and transducer
type for the application. (See “Microphones” on page 9).
6. Use as few microphones as necessary. Fewer microphones mean fewer technical
issues and, for the purposes of capturing clean sound, less pickup of background
noise.
7. Record each voice and instrument (or sound source) separately. (See “Start with
Good Sound” on page 5.)
8. Keep the 3-to-1 rule in mind. When multiple microphones are used, the distance
between microphones should be at least three times the distance from each
microphone to its intended sound source. For example, if two microphones are each
placed one foot from their sound sources, the distance between the microphones
should be at least three feet. If each microphone is just two inches from an
instrument, they only need to be six inches apart.
1 FT
3 FT
The 3 to 1 Rule: The distance between microphones should be at least
three times the distance from each microphone to its intended sound source.
16Introduction to
HOME RECORDING AND PODCASTING
Vocal Microphone Placement Techniques
In addition to the general techniques, here are a few specific to vocal recording:
1. Keep the microphone 6” – 12” from your mouth. This distance is close enough to
minimize pickup of unwanted room reflections and reverberation, but far enough away
to minimize picking up mouth and breathing noises. Do not get too close, though.
‘Eating the microphone’ can decrease intelligibility.
2. Aim the microphone toward your mouth from below or above. This placement
minimizes the popping caused by plosive consonants (e.g. “p” and “b”; “d” and “t”).
Every person is different, so some trial and error is usually necessary. Some people
have problems with “p” but not “t”, for example.
3. Use an external pop filter. Though most microphones have some sort of built-in
windscreen, an additional filter will provide extra insurance against “p” pops. The pop
filter also helps serve as a reference to help you maintain a consistent distance from
the microphone.
4. Speak directly into the microphone. When you turn your head away from the
microphone, the sound captured by the microphone will get noticeably duller. If a talker
continues to move away from the mic, try a headworn microphone. (See page 9.)
Plosive Directions Risky Microphone Placements
b&p
d&t
1 ✗
2 ✗
“b” & “p” tend to go straight out. 1 “b” & “p” aims at mic causing popping.
“d” & “t” tend to drop. 2 “d” & “t” aims at mic causing popping.
Suggested Microphone Placements Use a Shield
3 ✓
b&p ✓
d&t 4 ✓
3 Place mic above plosives to avoid popping. A pop filter can shield the microphone
4 Place mic between plosives to avoid popping. from plosives. (See page 14.)
Plosives (popping) and tips for avoiding them with microphone placement
17Introduction to
HOME RECORDING AND PODCASTING
Instrument Microphone Placement Techniques
When recording instruments, it’s always best to find placement techniques specific to the
instrument you are using. Plus, the same as for vocal recording, it’s largely a matter of personal
taste. Whatever sounds right to you is right.
However, for the purposes of this guide, we will provide a few pointers:
1. Try a few different recordings and see which placement sounds best to your ears.
2. Record any instruments separately from vocals. Use two microphones: one posi-
tioned near the singer’s mouth and one positioned near the instrument’s sound source.
3. Place the microphone only as close as necessary. Too close a placement can color
the sound source’s tone quality (timbre), by picking up only one part of the
instrument. But too far away means you will pick up more ambient sound.
Tip: To determine a good starting microphone position, try closing one ear with
your finger. Listen to the sound source with the other ear and move around until
what you hear sounds good. Put the microphone there.
Different instruments require different microphone placements and techniques.
We can highlight some of these differences by looking at a couple of specific instruments:
Acoustic guitar – Assuming you do not have multiple microphones, you can achieve a
well-balanced, natural sound by placing the microphone six inches (6”) above the side, over
the bridge, and in line with the front soundboard (see graphic). Some people prefer clipping a
miniature microphone outside of the sound hole, which allows freedom of movement.
6”
Example placement for acoustic guitar
18Introduction to
HOME RECORDING AND PODCASTING
Open
Mics
Open
or
Upright Piano – Assuming you only have one instrument microphone, try placing it
just over the open top, above the treble strings. If you can remove the front panel,
try aiming it at the front hammers.
Piano – Open the lid and aim a condenser microphone just over the top, above the
treble strings.
Tip: Minimize pickup of floor vibrations by using a rubber shock-mount for the mic.
(See “Accessories” on page 14.)
Again, there is no right solution, there are only techniques that provide a good starting point
for your own experimentation. (See “Additional Resources” on page 27 for places where you
can get specific advice for your instrument recording needs.)
19Introduction to
HOME RECORDING AND PODCASTING
SECTION THREE
ENHANCING
Recording Devices
The end point of the signal path (before sharing)
is the recording device. In many home recording
studios, the recording device will be the computer.
(See “Basic Equipment Needs” on page 7.) However,
some audio projects require more complex equipment
needs or require sounds recorded outside of the
studio. In any case, let’s look at four common
recording devices.
Digital recorder – can be a standalone unit or
part of a ‘studio-in-a-box’ solution. Some features of
digital recording devices include simple editing and Example of a portable digital recorder.
instant CD burning. Some allow you to create both Image of PMD620 courtesy of
MP3 and WAV files and even convert files between the Marantz Professional.
two for easier file distribution.
There are also inexpensive and easy-to-use portable voice recorders for use in
the field (outside of the studio) for capturing interviews or other non-music recordings.
For some podcasters, this one device could be all the recorder you need.
Analog recorder – often associated with old-fashioned reel-to-reel systems but can
still be found in the studios of musicians looking for a certain sound.
Sound card – is the hardware circuit board inside your computer. If your computer
has sound, there is a sound card in there. Usually it’s plenty for your video games and
office work, but is it powerful enough for your recording needs? If not, consider a…
Audio interface – is an external device that sits between your audio inputs/outputs
and your computer. Think of it as an external sound card. An audio interface can have
either a USB or Firewire port to connect to the computer, although USB ports are more
common on most computers.
Mixers/Interfaces
At the nerve center of the prototypical profes-
sional recording studio is a giant mixing board. Odds
are, you have a picture in mind from a movie you
have seen about an old-time rock band.
Today, especially for home recording needs, you
can find far more compact mixers and, in many
cases, you might be able to go ‘mixerless’. Example of an audio interface box.
20Introduction to
HOME RECORDING AND PODCASTING
Going ‘mixerless’ all depends on …
1. How many audio inputs you are combining together
2. Whether your interface (software or audio sequencer) provides the control you need
3. Whether or not you have lots of external hardware (such as synthesizers, reverbs,
delays, pedals, etc.)
4. If you plan to produce CDs or DVDs, versus only podcasts or digital recordings
5. Your budget
Do you need a mixer or an interface? Or: Just how fast is your computer?
The mixer, itself, does not define your home recording studio. While a mixer does
provide that professional studio look, it might be entirely unnecessary for your needs.
In fact, more and more professional sound studios are going ‘mixerless.’
This does not mean they are giving up the ability to control multiple audio tracks.
It means that are relying on audio interfaces and their computer to do the mixing.
The good news, here, is that going ‘mixerless’ often costs less and provides a more
portable/moveable studio.
However, the less powerful your computer’s sound card, the more likely you will need
an external interface or, even, a mixer if you plan to do any serious audio manipulation.
Also, while some software (such as Apple’s GarageBand) does not require an
interface, other software (such as Digidesign’s Pro Tools) does require a compatible
audio interface to be connected for the software to work.
In addition, plugging your microphone directly into your computer’s sound card might
not provide the sound quality you want. Many internal sound cards are not shielded
from electrical noise that is often caused by fans, hard drives, and the computer’s own
circuitry. Because of this, noise and hum can be introduced into your audio. Also, most
internal sound cards are not equipped with professional microphone connectors, do
not provide phantom power for condenser microphones, and do not provide enough
amplification or gain when working with low-level tracks or sounds.
So... What’s our advice? Try using your computer. If you are happy with the resulting
sound, then you do not need a mixer.
21Introduction to
HOME RECORDING AND PODCASTING
Mixers
Some recording devices do not allow you to connect a microphone directly, though this
is becoming less and less common. More likely, there will be cases when you are capturing
a number of audio sources and will want to manipulate and combine these tracks into a
single recording, which is called a mix.
In both these cases, you will want to consider a mixer (or ‘mixing console’ or ‘mixing
board’). Mixers come in many varieties – and can get expensive and technical very quickly –
so make sure you only get as much mixer as you need.
Be sure that the mixer you choose has enough inputs to handle the number of
microphones you are using. You also need to consider what you might need a few years
from now. You can’t easily add more inputs, so if you do invest in a mixer, leave a little room
for growth. Also, if you wish to capture the sound of each microphone on a separate track
(which we wholeheartedly advise), then your mixer will need to have direct outputs for each
channel to connect to your recording device. Otherwise, you will only be able to capture the
blend of all of the inputs.
Interfaces
An audio interface is what gets the sound into and out of your computer. Technically,
it converts an analog signal from microphones and other audio equipment to digital data
(so you can manipulate and share it).
There are two basic types: a sound card (usually built right into your computer) and a
standalone audio interface box. (See example on page 20.)
Microphone Pre-Amp
A good microphone pre-amplifier (called a ‘preamp’ or ‘mic-pre’) boosts the sound level
from your microphone without adding noticeable hiss, and often does a better job of
rejecting electrical noise and hum than a mixer or audio interface. A mic preamp usually
accommodates just one or two microphones and offers separate controls for each.
The microphone preamplifiers built into most USB or Firewire audio interfaces are
adequate for the vast majority of home recording applications. But if you are recording a
quiet voice or instrument, placing the mic far from the source, or just using a microphone
that is not very sensitive, you might find that your mixer or
audio interface just can’t amplify the signal enough without
adding excessive hiss. If this is the case, you should consider
using an external preamp to increase the sound strength to
a more audible level. Additionally, some recording interfaces
may have as many as eight inputs, but often only two will
accept microphone level signals. An external pre-amp lets
you take advantage of these additional inputs. Example of a microphone pre-amp.
22Introduction to
HOME RECORDING AND PODCASTING
Cables and Adapters
While it’s best to try to find new equipment that is compatible with your current
equipment, using adapters is not as bad as you might think. Six adapters in a row to connect
your mixer to your recording device? Perhaps that’s too many and you might hear some
noise or hum. But don’t replace the equipment if all you need is an adapter. Odds are, any
hiss or issues are not coming from the adapter.
Better advice, however, is not to skimp on the cables. Finding a quality cable, of the right
type for your equipment, is important for reducing noise and hum.
Recording Software
Now that you have your sound captured, you need to edit, mix and apply effects. Some
software also includes extensive sample libraries (samples of real instruments that can be
played back or ‘triggered’ by a keyboard, for example) and synthesizers which mimic
various instruments.
Recording software is all about mixing (which was covered earlier), effects processing
(which you can read about below), and which export features you want (See “Saving and
Sharing” on pages 26-27.) Make a list of what you are planning on doing and make sure the
software you choose has all that functionality. Also, some software requires an interface (See
“Mixers/Interfaces” on page 21). This is good to know before you open the box.
Effects Processing
Effects processing is a means of manipulating or changing certain aspects of the recorded
sound with the goal of enhancing the overall sound quality. Sometimes an effect is applied to
an individual track (vocal, guitar, etc.), while other times it is applied to the finished recording.
There are plenty of effects you can use for home recording, though most podcasts
(especially if you capture clean sound) do not require much in the way of effects processing.
While you can find a separate piece of hardware to provide each unique effect, most are com-
monly included as unique controls within a single software package or digital mixing console.
Compression – A compressor automatically turns down the talker’s or singer’s peaks
(loud parts) by a preset amount so they don’t cause distortion. Compression also reduces the
difference between the loudest and softest note, so the apparent loudness is greater.
Example usage: A singer might vary in loudness from very soft to very loud, but the
compressor reduces the magnitude of these extreme changes.
Limiting – Limiters are like compressors, but instead of reducing any levels that go
beyond the preset threshold, they stop them from getting any louder at all, that is, providing a
top limit that cannot be exceeded. How is this different? Imagine a sound that goes to 11.
The compressor might reduce it to 10 or 10.5 depending on the dynamics of the signal, but
the limiter would cap the sound firmly at 10 no matter how abrupt that might sound. Note that
compressors and limiters affect all voices or instruments on the same track equally. If one
vocalist yells into their mic causing the compressor to reduce the level, other voices on the
same track will be similarly affected.
23Introduction to
HOME RECORDING AND PODCASTING
Equalization (also called EQ) – EQ emphasizes or de-emphasizes certain frequency
bands, which can either make different tracks stand out from each other or helps different-
sounding tracks sound more similar. Equalization is critical when combining multiple
instruments into a single mix.
Advanced Tip: Avoid the dreaded ‘smiley-face’ EQ curve.
As a general rule, you should try to shape the sound by reducing certain
frequencies, rather than boosting others. In particular, excessive boosting of low
frequencies is a common cause of less intelligible recordings. These ‘muddy-
sounding’ speech recordings often result from the dreaded ‘smiley-face’ EQ curve,
when lows and highs are boosted to the point where the all-important mid-range
(critical to intelligibility) is effectively masked.
Reverberation (or ‘reverb’) – Reverb is the ‘bouncing around’ of sound waves in a
particular acoustic space, such as a room. (See “General Recording Techniques”, tip 3, on page
15.) Reverb is often added to audio tracks to create a feeling that the recording took place in
a particular environment instead of in a recording studio. Example: In a movie, you might want
the talker to sound like she is in a subway station. Adding the right amount of reverb will allow
you to achieve this effect.
Delay – Delay is adding intentional latency to an audio signal, which is usually combined
with the original undelayed signal for creative effect. Like reverb, delay can be used to mimic
the sound of a particular environment. (See Appendix for a more complete description of latency.)
Normalization – Normalization adjusts the levels of different audio files or parts of a file to
be the same. Audio tracks that come from different sources or that have been recorded at
different times can have different levels. Since these level differences might be noticeable to
listeners, you can normalize them to make it sound more like they were recorded together and
so it is less of an audio rollercoaster for anyone enjoying your podcast.
Monitors
Why Monitor Your Recordings?
Before you can record or mix good sound, you need to be able to hear what you
are getting. In audio terms, monitors allow you to listen to the audio while it is being recorded
or edited.
• If you are mixing or editing different sounds that were previously recorded, you can
monitor through loudspeakers, headphones, or earphones.
24Introduction to
HOME RECORDING AND PODCASTING
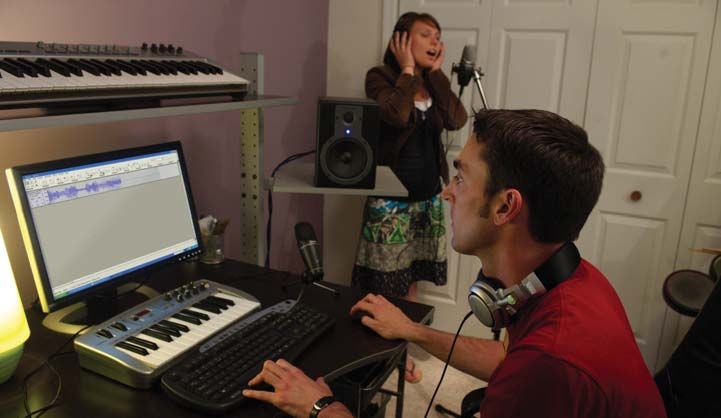
• If you’re trying to sing or play along with a recorded music track, you need to monitor
through headphones or earphones. If you try to do this with speakers, the sound of
the speakers will be picked up by the microphone, which could in turn ‘bleed’ onto
the new track, or be reamplified through the speakers. This can cause the whistling
or howling you know as feedback.
• If you are trying to sing or play along in sync with previously-recorded tracks, you must
be able to monitor in real time, with almost no latency. (See “Latency” in the
Appendix.) A few milliseconds of latency isn’t critical, although it can slightly alter your
perception of pitch or tone. More than 10 milliseconds of latency can have a
noticeable effect on your rhythm and timing.
To monitor in real time, you need to tap into the audio signal before it gets converted from
analog to digital and fed into the computer.
Tip: Some USB microphones and audio interfaces provide a headphone output,
which allows you to monitor without latency.
The Basic Types of Monitors
Speakers – Many home recordists start with their handy stereo system, which already
has speakers attached. As you move into more sophisticated recording, you should consider
a pair of dedicated ‘studio monitors.’ The most common choice for home recording are called
‘near field’ or ‘close field.’ These are designed to provide accurate sound when you are very
close to them, as opposed to normal stereo speakers, which are designed to sound better
from a distance and are not necessarily accurate.
Headphones or earphones – The simplest and easiest to understand monitor is a set
of headphones. Earphones (also called in-ear earphones) are basically headphones that are
inserted directly into the ear. Either of these will let you hear sounds without outside
distractions and without bothering other people around you.
Types of monitors (left to right) speaker, headphones, and earphones.
25Introduction to
HOME RECORDING AND PODCASTING
SECTION FOUR
SAVING & SHARING
Now that you have your recording, two questions arise:
1. How are you going to save it?
2. How are you going to get it to your audience?
The easiest way to save your files is on your computer, but anyone who has experienced
a computer crash knows that this is not optimal. Also, these files can get really big really fast.
Most home recordists and podcasters have a number of backup solutions for storing their
recordings:
• Backup to an external hard drive – dedicated to storing your recording files. In this
case, the biggest (in GB) and the fastest (in RPM) you can afford the better.
• Burn onto CDs/DVDs –These are being used mainly as a backup to your external
hard drive… but do make sure to make new versions periodically. The good news is
that blank CDs and DVDs are fairly inexpensive.
Tip: When saving your files onto CD, use WAV files. This insures that you will have
the highest quality available if you want to re-use or re-edit the file later for a
different project.
• Post it on a host website – Websites like MySpace.com, Garageband.com, and others
allow you to store the content you’ve created, and allow other people to hear it as well.
MP3 or WAV?
MP3s are the most popular digital-recording format available. Why? Because they are
small files, making them perfect for e-mailing, uploading to websites and general
sharing. There are also some proprietary versions of MP3 files; songs downloaded from
iTunes are in the M4A format, which only plays on an iPod. Microsoft has its own format
called WMA (Windows Media Audio) which plays on Windows-compatible devices.
But MP3 files will play on just about any brand of music player, including iPods, and
computers. However, when MP3 files are burned onto a CD, the result is a data disk (not
an audio CD) which may not play on all CD players.
MP3 files are small because they are compressed; this means that some of the data
is discarded and cannot be recovered. WAV files are not compressed, which provides the
best possible audio quality, but they require much more storage space on the computer
and take much longer to upload/download.
26Introduction to
HOME RECORDING AND PODCASTING
Many software programs (including iTunes) convert WAV files to MP3s. This reduction
in size will affect audio quality, though many people accept this tradeoff in exchange for
the ability to fit more songs onto their music player. While there are programs that convert
MP3s to WAV files, they do not make the resulting sound quality any better, because the
data that was discarded when the MP3 file was created cannot be ‘added back in’.
To summarize: Always save your initial recordings as WAV files. Use the WAV files for
burning CDs, and down-convert to MP3 for distribution via the Internet.
SECTION FIVE
SUMMARY & ADDITIONAL RESOURCES
Home recording and podcasting are both constantly evolving applications. Technologies
are changing quickly; people are finding new solutions to common problems; and listeners
are expecting higher and higher quality recordings, even when downloaded for free.
This is why Shure continually updates the FAQ and Support sections on Shure.com.
We also create and maintain our ‘Shurecasts,’ which are podcast versions of the most
popular audio topics, from technical and troubleshooting issues to interviews with artists
and engineers.
A key benefit of our Shurecasts, is that you can hear the difference that good techniques
and specific effects will make to your recordings.
To access our extensive educational library and our Shurecasts, visit http://shure.libsyn.com/.
Microphone Techniques
Shure has written a comprehensive educational publication
entitled Microphone Techniques for Recording in which Shure
Applications Engineers describe microphone techniques and
placements for a wide range of vocal and instrumental needs.
A valuable resource for musicians, it is available for free online
and in a printed version. See the back cover for details.
27Introduction to Appendix 1
HOME RECORDING AND PODCASTING Latency
SECTION SIX
APPENDICES
Latency
Latency is a delay in the signal path caused by the time required to convert sound
from analog to digital (or vice versa) or otherwise process the signal. Usually measured in
milliseconds, latency can occur at multiple points in the signal path… and it can really add
up. What this means is that the sound you are hearing when you listen to yourself singing
might not be happening in real time. It might be five, ten, twenty, or even one hundred
milliseconds latent.
While you cannot fully avoid latency, regardless of how much you spend for
processing power, you can use hardware that allows you to listen to the sound at the
beginning of the signal path.
• If you are using one microphone… look for a microphone with ‘zero latency
monitoring’ (which means it has an integrated headphone amp) so you can monitor
directly from the microphone.
• If you are using multiple microphones… use an interface box with headphone jacks,
which will let you mix and monitor the combined output.
• If you are recording directly from the sound source (such as from an electric bass
guitar connected to a direct box)… see if your USB adapter has a monitoring option.
Conversion of sound from analog to digital causes a delay (top path) called latency.
The sound you hear directly (lower path) arrives milliseconds before the converted sound.
28Appendix 2 Introduction to
Microphone Output HOME RECORDING AND PODCASTING
Microphone electrical outputs
The electrical characteristics of the microphone’s output signal are important,
because they must be compatible with the audio input to which the microphone is
connected. Microphone signals have historically been analog, but with the increasing
popularity of digital audio recording and editing, microphones with digital audio output have
become available.
The wiring configuration of the microphone can be balanced (with two wires carrying
the audio signal, with a metal shield around them connected to ground) or unbalanced (with
just one signal wire and a shield). The balanced wiring configuration reduces the pickup of
electrical hum or noise through the microphone cable, but the microphone, the cable, and
the recorder’s input must all be wired this way for this to work.
The physical connector used by an analog microphone may vary, although the
three-pin XLR connector is by far the most common. (See example on page 12.) These
connectors are rugged and secure, and are available with multiple pins to accommodate
balanced or unbalanced wiring configurations.
Analog Output
The output from an analog microphone has three important electrical characteristics:
output level, impedance, and wiring configuration. The output level or sensitivity is the level
of the electrical signal (usually specified in millivolts or decibels) for a given input sound level.
Condenser microphones typically have higher output level than dynamic mics, making them
more suitable for use with recording equipment that may have inputs that are noisy or not
very sensitive. Microphones with lower sensitivity require either more gain added at the mixer
or interface input, or that the microphone be placed closer to the sound source. For example,
dynamic microphones do not make good choir microphones because to pick up the entire
ensemble evenly, they are placed at a distance that results in extremely low output. In this
case, a higher output condenser microphone would be a better choice.
Most professional microphones have a low output impedance (less than 600 ohms),
which allows the use of long cables (up to 1,000 feet or more) with no loss of sound quality.
High-impedance microphones exhibit noticeable high frequency loss with cable lengths greater
than about 20 feet. Contrary to common belief, the impedance of the microphone should not
match the impedance of the input to which it is connected, but actually should be much less.
Digital Output
Microphones with direct digital output have an internal analog-to-digital (or ‘A to D’)
converter, which changes the analog signal into a digital format. The important
characteristics of this digital signal are the sampling rate (See diagram on page 30), bit
depth, and digital format. In general, the conversion from analog to digital involves taking
periodic measurements or samples of the audio signal level and translating those
measurements into a string of 0’s and 1’s. You want to make sure that the software you are
29Introduction to Appendix 2
HOME RECORDING AND PODCASTING Microphone Output
using can support the sampling rate and bit depth of your digital microphone. Digital
microphones offer the advantage of direct connection to a computer without the need for
a mixer, sound card or external interface.
The sampling rate describes how many times per second the analog signal is measured.
The higher the sampling rate, the higher the maximum frequency response can be. A sam-
pling rate of 44.1 kHz (meaning that the analog signal is sampled 44,100 times per second)
can accommodate audio frequencies as high as 22,050 Hertz, delivering “CD quality.” Lower
sampling rates provide reduced sound quality (sometimes described as ‘speech quality’) but
result in smaller file sizes and faster download speeds. Higher sampling rates are sometimes
found on professional recording equipment, although there is debate as to whether sampling
rates much higher than 44.1 kHz translate into audible improvements in sound quality.
The bit depth describes the number of digital bits used to store the measurement of the
audio signal level each time it is sampled. Using more bits allows a more accurate
measurement and a better quality recording, by increasing the dynamic range and
reducing hiss. For example, an 8-bit sample allows the audio signal level to be measured in
256 discrete steps; if the actual signal level is somewhere between two steps, then the
estimate won’t be accurate. A 16-bit sample (used on audio CD’s) allows 65,536 discrete
steps, which is enough to create a very accurate estimate of the signal. Using more bits
also results in larger file sizes and longer download times, however, and requires more
processing power and memory when editing.
# bits/sample = # samples/sec =
bit depth Sample sampling rate
# bits
Bit depth basic rule:
• 8 bits is good
• 16 bits is optimum
1 second
The format of a digital microphone’s output describes how the digital data is arranged
as it moves from the microphone to the recorder or computer. The most common format for
digital microphones is the USB (‘Universal Serial Bus’) standard. The USB format is
recognized by most computers today, and USB connectors are sufficiently compact and
reliable for use in microphones. The USB connection can also supply power to the
microphone, making batteries or an external power supply unnecessary. USB connections
are limited to a maximum length of 5 meters (about 15 feet).
30You can also read