Karin Slaughter's Cupcake Contest
←
→
Page content transcription
If your browser does not render page correctly, please read the page content below
Karin Slaughter’s Cupcake Contest
A few weeks ago my mom and I had the pleasure of meeting Karin Slaughter, crime writer and author of the
recently released book Undone, at the Random House Book Fair. We got to spend some time with her, hear
her amusing stories, and laugh often. After trading books with us she came up with the idea of having a
cupcake contest for her fans. I loved the idea, so, hoping to inspire others, I came up with 5 new cupcake
designs. And here they are with step‐by step directions.
For more information on Karin’s contest visit: http://www.karinslaughter.com/cupcakes.shtml
Enjoy!
Liv and Kaye Hansen from The Whimsical Bakehouse ( www.whimsicalbakehouse.com )

What you will need:
The amount and type of decorations, icings, and colors you need may differ depending on which cupcake
design you choose to make. Refer to individual directions for specific decoration and color needs.
To download the templates visit: http://www.whimsicalbakehouse.com/img/karintemplate.pdf

Cake: 12‐24 cupcakes of your choice
Icing: 1 recipe Kids’ Buttercream (see bake) and/or Matt’s Fudge (see bake) according to what’s appropriate
for your design
Miscellaneous: one 12‐mold muffin pan, pastry cones, Karin Slaughter templates (download), 1 half sheet pan
or flat work surface, parchment paper or cellophane
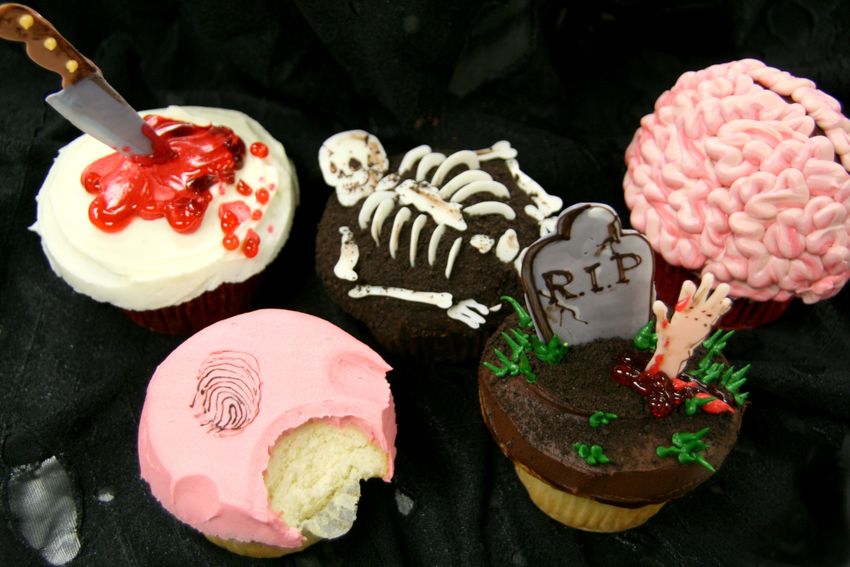
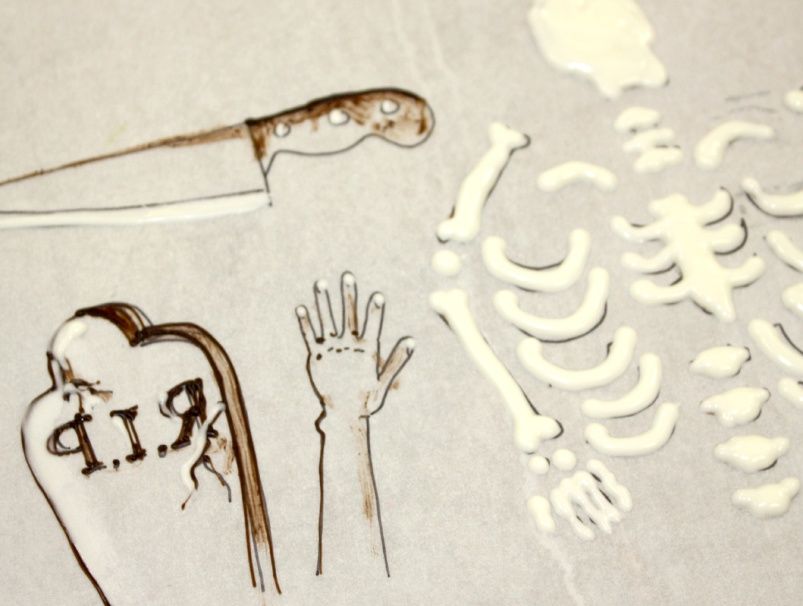
DAGGER CUPCAKE

                 What else you will need:
                 Decoration: Approximately 1/2 cup dark wafer
                 chocolate and 1 ½ cups white wafer chocolate on
                 hand to make daggers and 1 tube red piping gel
                 Colors: Red liquid gel color and black and yellow
                 candy color

                     1. Melt the dark wafer and white wafer
                 chocolates separately. Using the template provided
                 make 12 ‐24 daggers as illustrated in the “Chocolate
                 Method” (for more information refer to our book the
                 Whimsical Bakehouse‐ Fun to Make Cakes that Taste
                 as Good as They Look or the Chocolate Portrait in
                 Step‐by‐Step). To make 24 daggers you will need
                 approximately 2 tablespoons dark chocolate, 2
                 tablespoons light brown chocolate, 2 tablespoons
                 yellow, 2 tablespoons white, and 4 tablespoons grey
                 chocolate. Set aside the completed designs to harden.

                        2. Bake the cupcakes and let them cool
                    completely. For best results, freeze for at least 1
                    hour. Meanwhile, prepare the Kids’ Buttercream.
                    Ice the cupcakes. Each cupcake will need
                    approximately 2 tablespoons of buttercream.

                        3. Prepare between 2 tablespoons to ¼ cup
                    red buttercream. If you have untinted gel, tint 2
                    tablespoons to ¼ cup red (if not purchase a small
                    tube of red gel). Place the red buttercream and gel
                    into separate pastry cones. Cut a medium hole at
                    the tip of each. Pipe a red amoebic shape with
                    buttercream on top of the cupcake. Pipe red gel
                    around the red buttercream as an accent.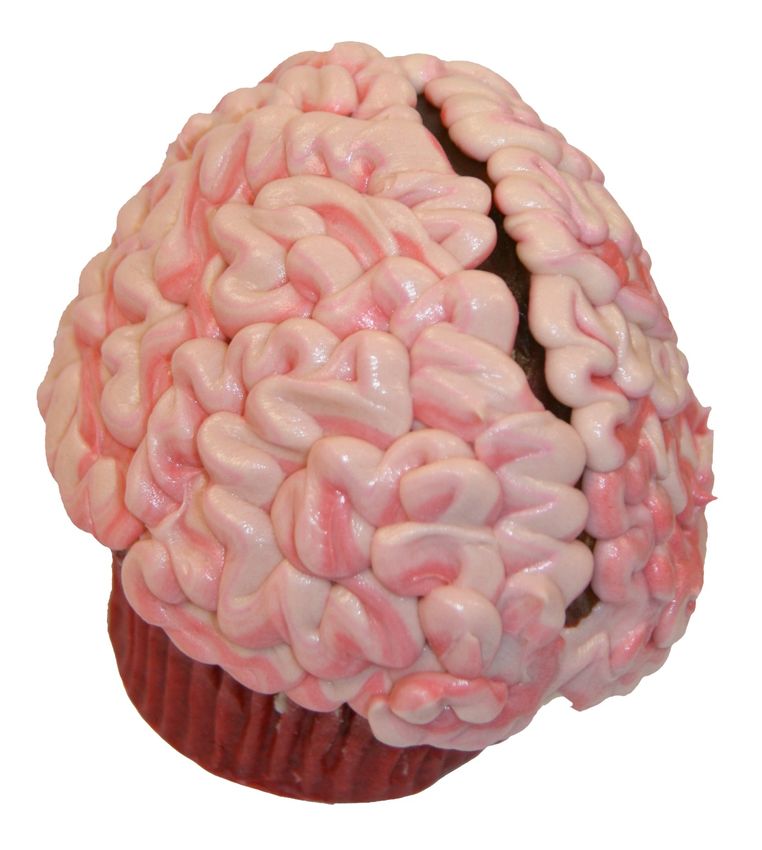
4. If needed (to remove any bumps or irregularties in the piped chocolate) gently trim the “sharp” edge of
   the dagger with a paring knife. Peal the dagger off the cellophane and insert into the cupcake about
   1/4‐icnh to ½ inch. To facilitate this, and to prevent the chocolate from breaking, you can first press a
   real knife into the cupcake. Pipe additional gel up part of the dagger.
BURIED ALIVE CUPCAKE
What else you will need:
Decoration: Approximately 1/2 cup dark wafer chocolate and 1 ½ cups white wafer chocolate on hand to
make grave stones and hands, 1 tube red piping gel, and ½ cup chocolate cookie crumbs
Colors: Red and green liquid gel color and black and orange candy color

   1. Melt the dark wafer and white wafer chocolates separately.
      Using the template provided make 12 ‐24 daggers as illustrated
      in the “Chocolate Method” (for more information refer to our
      book the Whimsical Bakehouse‐ Fun to Make Cakes that Taste as
      Good as They Look or the Chocolate Portrait in Step‐by‐Step and
      see pictures from Dagger Cupcake). To make 24 hands and
      gravestones you will need approximately 2 tablespoons dark
      chocolate, 2 tablespoons white, 2 tablespoons “flesh” color (can
      be mixed with orange or orange and melted dark chocolate) and
      6 tablespoons grey chocolate. Set aside the completed designs
      to harden.

   2. Bake the cupcakes and let them cool completely. For best
      results, freeze for at least 1 hour. Meanwhile, prepare Matt’s
      Fudge Icing. Ice the cupcakes. Each cupcake will need
      approximately 2 tablespoons of buttercream. Sprinkle cookie
      crumbs on top of each cupcake.

                                                            3. Prepare between 2 tablespoons to ¼ cup
                                                        green buttercream. If you have untinted gel, tint 2
                                                        tablespoons to ¼ cup red (if not purchase a small
                                                        tube of red gel). Place the green buttercream and gel
                                                        into separate pastry cones. Cut a medium hole at the
                                                        tip of each.

                                                            4. Peal the grave stone and hand off of the
                                                        cellophane and insert each into the cupcake about
                                                        1/4‐icnh to ½ inch. To facilitate this, and to prevent
                                                        the chocolate from breaking, you can first press a real
                                                        knife into the cupcake.

                                                           5. Pipe red gel blood dripping from the hand.
                                                        Pipe grass around the cupcake – to do this place the
                                                        pastry cone so it just skims the surface of the
                                                        cupcake, squeeze and hold in place until a small ball
                                                        forms then pull up as you begin to release pressure so
                                                        that a pint forms when you tail off.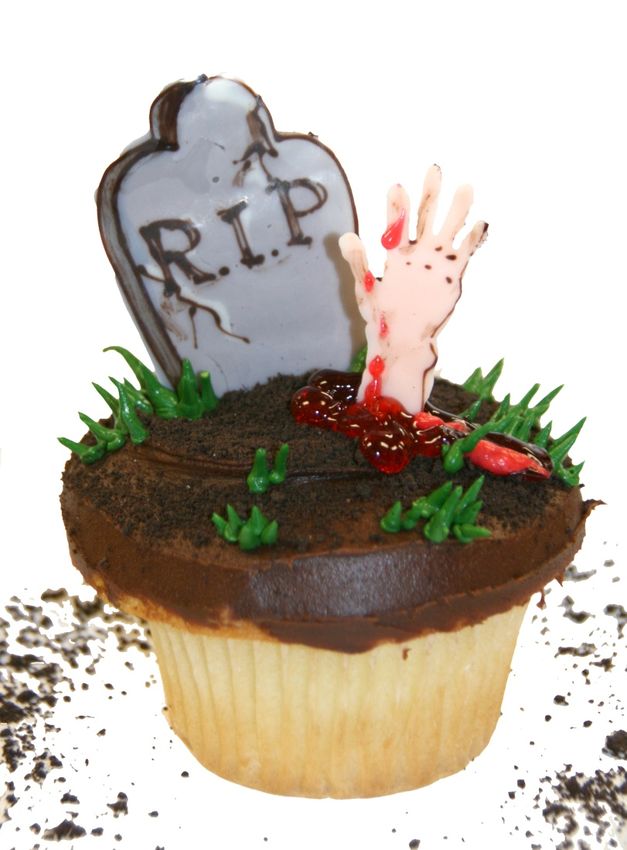
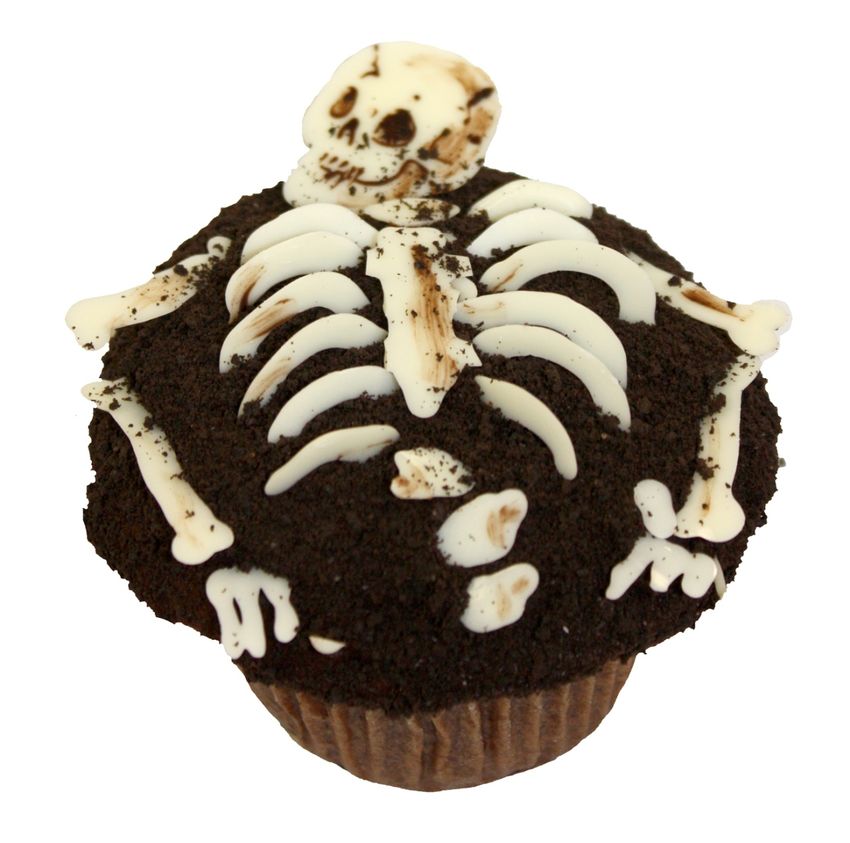
SKELETAL REMAINS
What else you will need:
Decoration: Approximately 1/2 cup dark wafer chocolate and 1 ½ cups white wafer chocolate on hand to
make skull and bones, and ½ cup chocolate cookie crumbs

   1. Melt the dark wafer and white wafer chocolates separately
      and pour into separate pastry cones. Using the template
      provided make 12 ‐24 skulls and sets of bones as illustrated in
      the “Chocolate Method” (for more information refer to our
      book the Whimsical Bakehouse‐ Fun to Make Cakes that Taste
      as Good as They Look or the Chocolate Portrait in Step‐by‐
      Step). Set aside the completed designs to harden.

   2. Bake the cupcakes and let them cool completely. For best
      results, freeze for at least 1 hour. Meanwhile, prepare Matt’s
      Fudge Icing. Ice the cupcakes. Each cupcake will need
      approximately 2 tablespoons of buttercream. Invert each
      cupcake and dip it into a bowl of cookie crumbs so that the
      entire top of the cupcake is encrusted with crumbs.

                                                                                    3. Peal the bones off
                                                                                of the cellophane and
                                                                                insert each one into the
                                                                                icing (use the photograph
                                                                                as reference for
                                                                                placement). If needed
                                                                                pipe a dot of fudge on the
                                                                                underside of the bone to
                                                                                make it stick.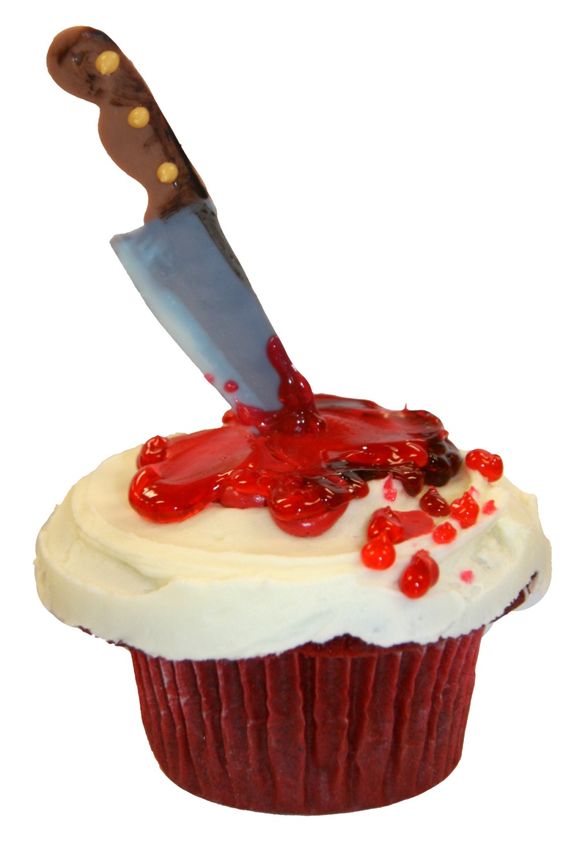
BRAINS, YUM!
Note: If you bake 24 cupcakes, your final yield will be between 12 and 18 cupcakes (see step 1).
What else you will need:
Decoration: Approximately 1/2 cup dark wafer chocolate on hand to pipe line between brain halves
Colors: Red or pink and purple liquid gel color

   1. Bake the cupcakes and let them cool completely. For best
      results, freeze for at least 1 hour. Meanwhile, prepare Kids’
      Buttercream. Using a small serrated knife cut the tops off of
      6 cupcakes. Cut these tops in half to form two semicircles.
      Spread a spoonful of icing on one semicircle and place the
      other half on top. Adhere this to the top of an uncut cupcake
      with a dot of icing. If desired, peal the paper off of the
      bottom half of the cut cupcake and using a serrated knife
      carve the cylindrical form into a hemisphere. Adhere to the
      top to an uncut cupcake with a dot of icing. If you choose to
      only use the cupcake tops you will yield 12 decorated
      cupcakes, if you use both the top and bottom you will yield
      18.

   2. Ice the cupcakes, but it is ok if cake shows through. Each
      cupcake will need approximately 2 tablespoons of buttercream.

   3. Prepare the tinted buttercream: 1 cup light pink/mauve (pink
      combined with a little purple), ¼ cup medium pink/mauve, and
      ¼ cup dark pink/mauve. Using a small metal spatula (or butter
      knife) spread a thin strip of the dark pink up one side of a pastry
      bag or cone. Spread a strip of medium pink up the inside of the
      bag/cone, adjacent to the first. Fill the rest of the bag/cone with
      the pale pink. Cut a medium hole at the tip.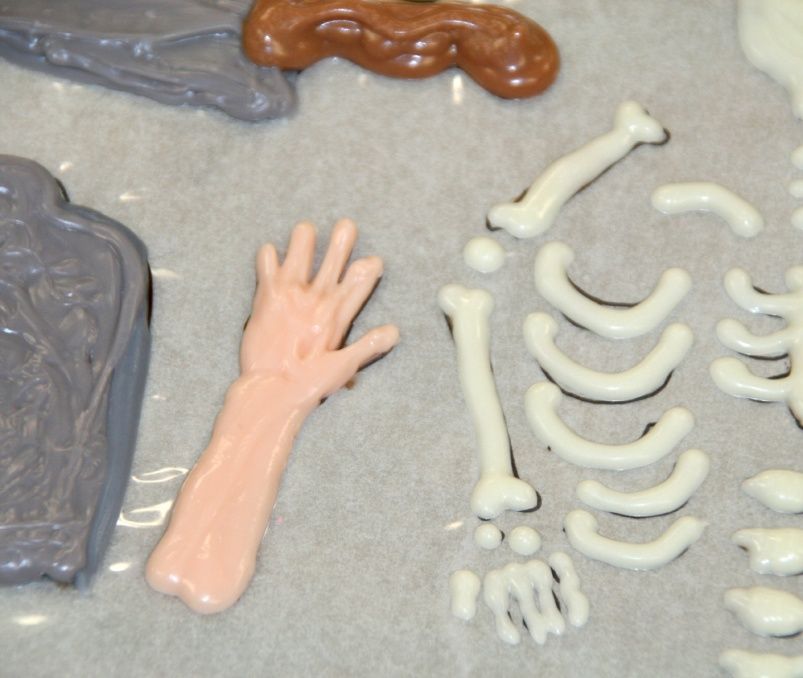
4. Melt the dark wafer chocolate and pour it into
a pastry cone. Cut a medium hole at the tip and pipe a
line running from the base of one side to the other,
bisecting the “brain”.

    5. Pipe squiggly lines all over one side of the
chocolate line. To do this place the pastry cone so it
just skims the surface of the cupcake, squeeze and
hold in place until a small ball forms then move the
bag randomly around the surface of the cupcake so
that the line never completely overlaps itself, but
always touches itself (so that no cake shows through).
This piping application is a variation on Cornelli lace.

    6. Repeat on the opposite side of the chocolate
line.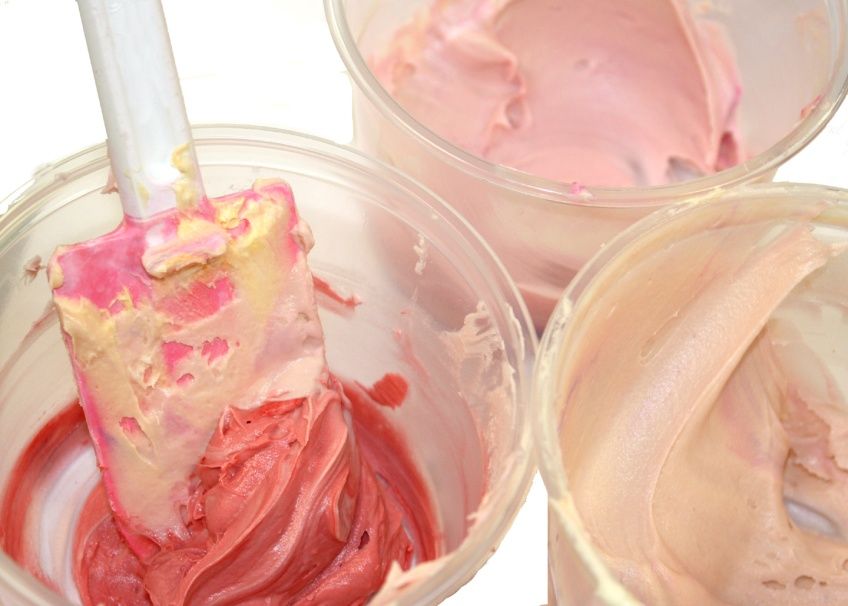
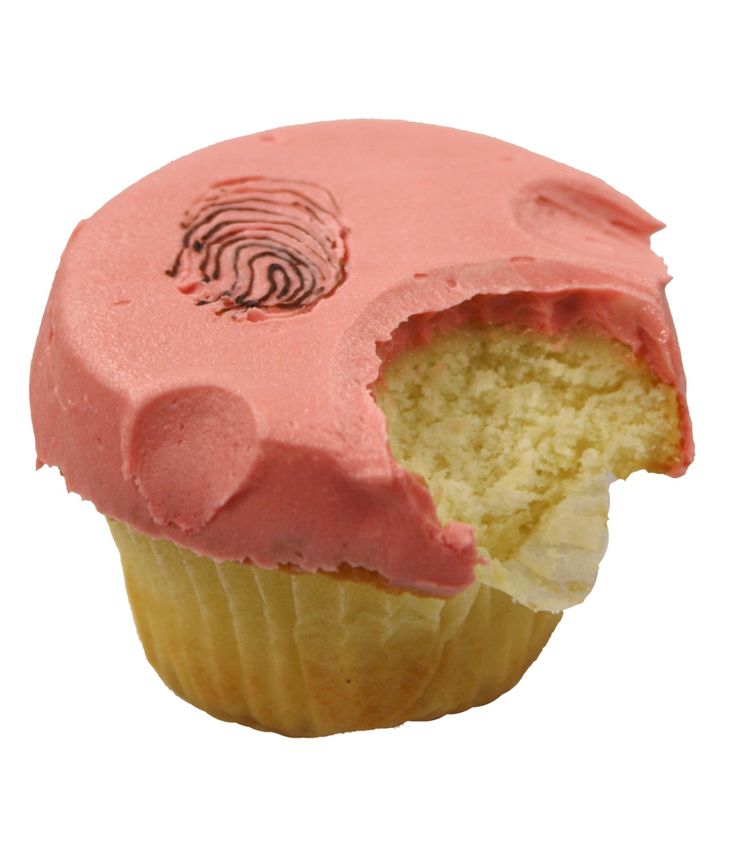
WHODUNIT?
What else you will need:
Decoration: Approximately 1/2 cup dark wafer chocolate
Colors: Red or pink liquid gel color (or color of your choice)

   1. Bake the cupcakes and let them cool completely. For best results, freeze for at least 1 hour.
      Meanwhile, prepare Kids’ Buttercream. Tint the buttercream light pink, or your choice of color. Ice the
      cupcakes. Each cupcake will need approximately 2 tablespoons of buttercream.

   2. Melt the dark wafer chocolate and pour it into a pastry cone. Cut a small hole at the tip and, on top of
      the cupcake, pipe a series of fine lines to resemble a fingerprint.

   3. Stick your fingers in the icing and lick. Take a bit out of the cupcake…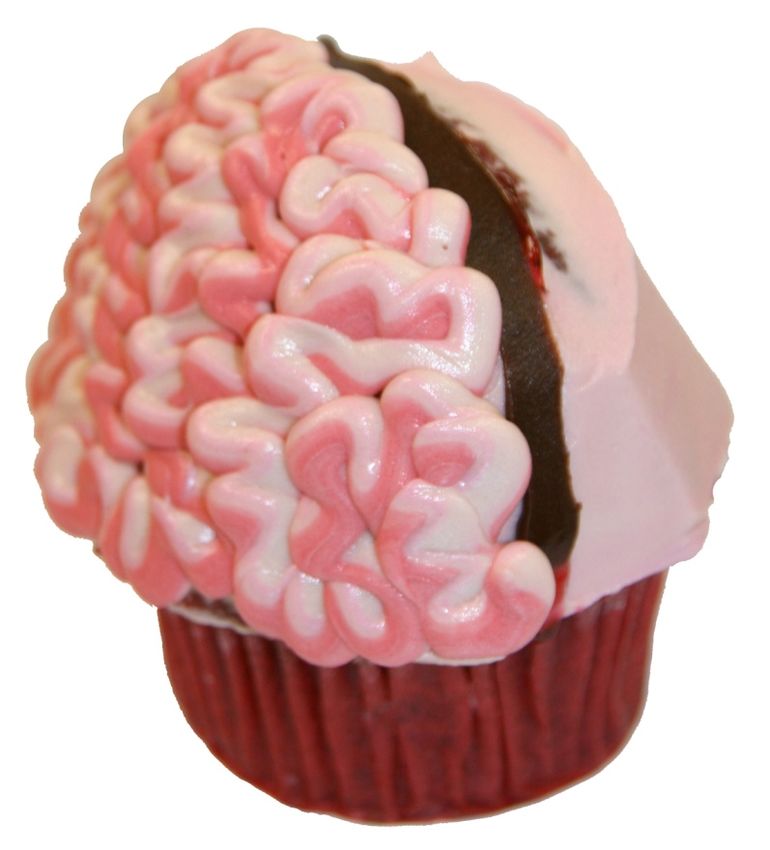
You can also read