LESSON PLANS FOR CMNH CLINICAL UPDATE FOR HEALTH WORKERS - JULY 2013 AFAR REGION
←
→
Page content transcription
If your browser does not render page correctly, please read the page content below

LESSON PLANS
FOR CMNH CLINICAL UPDATE FOR HEALTH WORKERS
                   JULY 2013
                  AFAR REGION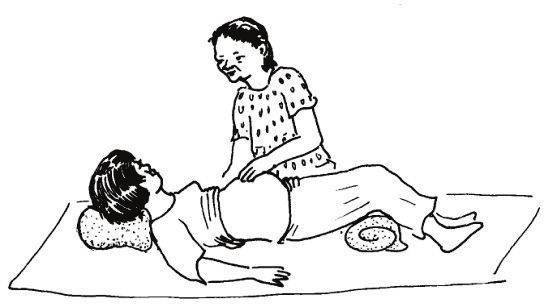
BLANK PAGE
MATERNAL AND NEWBORN HEALTH IN ETHIOPIA                                                       recognizes the participants as “adult learners” and is based on adult learning
PARTNERSHIP                                                                                   principles.. Use of this method focuses on asking (rather than telling) and
                                                                                              listening (everyone’s experiences are important).
The Mother and Newborn Health Partnership (MaNHEP) was developed in
2009-2013, to demonstrate a community-oriented model for improving                            The main curriculum parts are described below.
maternal and newborn health care in rural Ethiopia, and to prepare for
acceptance by the Ministry of Health for it’s use nationwide. This initiative                        •    The Lesson Plans are used by the facilitators. The lesson plans
was funded by Bill and Melinda Gates Foundation. Under the leadership of                                  include objectives and homework assignments. They also include
the Ministry of Health, the initiative was led by Emory University, in                                    time, teaching methods, content, and materials needed.
collaboration with John Snow Research and Training Inc., University
Research Co. LLC and Addis Ababa University. It was implemented in three                             •    The Learning Guide is a checklist that the participant uses to
districts in Amhara and three districts in Oromia regions. During 2012 - 2016,                            practice skills during training. It lists the important steps involved in a
MaNHEP is being expanded to the Afar region through a collaboration of the                                specific skill in the correct order. It helps participants learn to do new
Afar Regional Health Bureau, Micronutrient Initiative and Emory University.                               skills correctly and to guide each other’s performance during
This expansion is made possible through a grant from Canadian                                             practice.
International Development Agency to Micronutrient Initiative.
                                                                                                     •    The Reference Text, Safe and Clean Birth and Newborn Care: A
                                                                                                          Reference for Health Extension Workers (SCBNC),2 was adapted
COURSE DESCRIPTION
                                                                                                          from A Book for Midwives: Care for Pregnancy, Birth and Women’s
This Community Maternal and Newborn Health (CMNH) Clinical Update for                                     Health.3 The SCBNC was field tested in 2008, revised with stronger
Health Workers curriculum1 is developed for the continuing education of                                   focus on Essential Newborn Care. The Ethiopian Ministry of Health
health workers (nurses, midwives, and health extension workers). These                                    endorsed the SCBNC July 2009. The text is compatible with the
health workers stationed at community health facilities will guide the CMNH                               World Health Organization regulations that govern health care.
and Mothers Nutrition training meetings which are conducted during the
antenatal care visits. The topics and skills focus on responding to maternal                         •    The Take Action Card Booklet has many take action cards and is a
and newborn care and problems that are identified as important in the                                     reference for use at home and in the community. On the front side
community.                                                                                                there is a large drawing of a problem / danger sign and on the back
                                                                                                          side there are six drawings of actions which respond to the problem
The approach is competency based, which means that each participant is                                    on the front side of the card. The drawings are to remind us of what
given the opportunity to practice skills as many times as needed to become                                was learned. This booklet is an important tool to help families learn to
competent in doing them. The training methodology includes presentations,                                 help each other and know when to refer to the health facility.
discussions, group work, video’s, demonstrations, role-plays, practice with
models and learning guides, and supervised clinical practice. The training
                                                                                              2
1
 Topics selected and adapted from Safe and Clean Birth and Newborn Care (SCBNC) – Guide for       SCBNC. Federal Democratic Republic of Ethiopia Ministry of Health (2009).
                                                                                              3
Trainers and Participants, FMOH, Ethiopia                                                         Adapted with generous permission of the Hesperian Foundation, Berkeley,California, USA (2004)
• The CMNH and Mothers Nutrition Manual is describes how to COURSE OBJECTIVES
conduct community meetings. The meetings cover the most By the end of the one-week, the participants will be able to demonstrate
dangerous time for the woman and her baby. The meetings are the following:
presented in the same way each time to help the participants
become familiar with the process and know what to expect. This • Focused culturally sensitivity care during pregnancy care
approach is particularly important for learners who do not read or do • Counseling and key messages during pregnancy for nutrition,
not read well. The woman and her family team are the focus at the anemia, malaria, tetanus, hookworm
health post or in the home. The Family Health Card and the Take • Care of a woman during Stage 1 of labor and use of the picture
Action Card are used with discussions and role plays on topics listed partograph
in the table of contents. Selected topics are used during ANC • Care of a woman in Stage 2 of labor and immediate newborn care
counseling. including putting baby to breast within one hour of birth
• Care of a woman in Stage 3 of labor using misoprostol
• CMNH Key Messages. A reference for community members on
• Care of a woman and her baby in Stage 4 of labor: first few hours
woman and baby problems and actions to save the lives of women
after birth.
and babies.
• Prevent and take emergency action for too much bleeding after birth
• Family Health Card 4 Health workers give the Family Health Card • Newborn resuscitation
to all the families so that they can practice each of the actions which • Care of a woman and her baby during the postpartum period
will ensure a healthy life style. It enables parents to recognize • Throughout all phases of care:
useful health actions, enables pregnant mothers to take care of Recognize danger signs for woman (pregnancy, labor,
themselves and their children’s health and to keep track of postpartum) and newborn
children’s growth. Take all immediate emergency measures possible
Provide timely referrals.
Use Standard Precautions for infection prevention.
Keep appropriate and complete records.
4
Family Health Card. Federal Democratic Republic of Ethiopia Ministry of Health – Key Actions to
Improving Family Health (2012).ADAPTED COURSE SCHEDULE pregnant women at home to encourage ANC attendance (even if they have
The CMNH Clinical Update Schedule for facilitators and participants not attended ANC before), and to encourage pregnant women and their
(nurses, midwives, others) differ to give the facilitators time to practice families to come to the facility for birth or if not possible to get to the facility,
teaching. The adapted course schedule illustrates how selected lesson call Health Extension Worker for the birth. This plan will be part of the
plans found in this document could possibly be completed. However, class CMNH and Mothers Nutrition activities.
sessions should be interrupted whenever clinical opportunities present
(e.g., if a woman comes to the health facility in labor or antenatal clinic). If SITE PREPARATION
skills are required that have not yet been covered in class, the facilitator To prepare for the clinical update, the facilitators brief all relevant staff in the
should do the skill while the participants observe and follow along with their maternity, OPD/clinic and ANC/PMTCT/PNC clinics about the upcoming
learning guides. If the skill has been covered in class, one participant training. The facilitators and all other staff in the areas in the health facility
should do the skill with coaching from the facilitator or team partner (based where the training is undertaken should be role models for the participants
on the learning guide), while the other participants observe and follow and make sure that what they say is also what they practice! The facilitators
along with their learning guides. need to ensure that the site is supported with essential supplies:
• Tape measures
TOT FOR FACILITATORS • Urine testing kits
The TOT for Facilitators is 2 weeks. WEEK 1: Facilitators are participants • Delivery kits
from two training site updating both their clinical and training skills. They • Fetoscopes
represent ANC, L&D, PNC, and newborn care from each site. WEEK 2: • Heavy duty aprons
Facilitators are trainers preparing their training sites as they teach
• Newborn ambu bags and masks size 1 and 0
participants with the support of MaNHEP team. The clinical training for the
• Goggles
participants is held in two facilities with 8 participants at each facility. The
• Foot covers
clinical update continues at both sites until the target number of health
workers are trained. • Blood Pressure cuffs and stethoscopes
• Gloves
Note that on the last day of the course, the participants work on a facility • Baby blankets
action plan for their area that includes working with community health • Pre-printed partographs
workers to inform the community on key maternal and newborn care • IP supplies like bleach
messages, track and keep records of pregnant women in their area, visiting • Clinical demonstrations models (cloth pelvis, baby and placenta models,
newborn resuscitation models)
• Training and reference materialsCMNH CLINICAL UPDATE SCHEDULE FOR FACILITATORS (sample)
TIME Day 1 – Monday Day 2 – Tuesday Day 3 – Wednesday Day 4 – Thursday Day 5 – Friday Day 6 – Saturday Day 7 - Sunday
8 :00 – Welcome
8 :30 AM
Review previous day and case review
Course Overview
• Introductions • Facilitators
• Course Objectives ANC: (Care during CMNH and Mothers Care of Mother and Responsibilities
8:30 AM Schedule pregnancy) Nutrition : Baby After Birth (PNC
• • Training Schedule
– 10:30 • Review course materials Demonstration • During Pregnancy counselling) • Planning
AM • Orient to Clinical Practice5i (Demonstration) (Demonstration) • Site Preparation
• Equipment
10:30 AM – 11:00 AM TEA BREAK
• Written PreTest
• Tour of labor, delivery, 1st Stage Labor: Continue above • Welcome participants
11:00
antenatal clinic • Supporting Woman in • Before Baby is Born Infection Prevention • Preparation of Site
AM – Skills checkout
• Videos: Birth in Squatting Labor Demonstration (Demonstration) (Demonstration) • Organize equipment
1:00 PM Position & Delivery Self • Using Picture Partograph End-Course Evaluation • Facilitator responsibilities
Attachment, Discussion
1:00 PM – 2:00 PM LUNCH BREAK
G 1. Prepare to teach ANC
G 2. Prepare teach consulting Continue above
G 4. Prepare to teach Emergency Skills :
2:00PM During Pregnancy, Before 2nd, 3rd,
4th Stage of infection prevention Helping Baby Breathe
–
Baby is Born
Labor G 3. Prepare to teach PNC External Bimanual FEEDBACK Continue above
G3. Prepare to teach 1st stage CERTIFICATES
5:00 PM (Demonstration) counseling Compression(EBC)
of Labor CLOSING WEEK 1
G2. Prepare to teach HBB DEMONSTRATIONS
G 4. Prepare to teach 2nd,3rd,
G1 Prepare to teach EBC
4th stages
5:00 to 5:30 PM: Groups gather to review the day/experiences, How do you think the day went?
5:30 PM Facilitators Meeting
CLINICAL Group 3, 4 Group 1,2 Group 3,4
6 PM –
10 PM PRACTICE 5 :30 - ? Groups 1, 2 Group 3, 4 Group 1, 2
HOMEWORK Read Lesson Plans &
Read Lesson Plans:
Read Lesson Plans: ANC, TAC during pregnancy
infection prevention, TAC:
1st, 2nd, 3rd, 4th Stages and before baby is born, Review as needed
Care of Mother & Baby
Labor too much bleeding,
(PNC),
Helping baby breathe,
5
Clinical practice: Participants divided into teams of 4. Clinical times for labor: 12:30 – 5:00, 6.00 - 10.00 LABOR CLINICAL: 2 participants/patient: one participant managing the labor, second participant providing support.
• Activities during quiet times: Practice skills on models as needed, present cases: history, picture partograph, plan of care, outcome.
• Participants always have Clinical Update Skill Checklists (adapted Learning Guide 2nd, 3rd, 4th Stage) in Labor Ward and (ANC and Mothers Nutrition) in Antenatal Clinic (2 participants/patient).CMNH CLINICAL UPDATE SCHEDULE FOR HEALTH WORKERS (SAMPLE)
TIME Day 1 – Monday Day 2 – Tuesday Day 3 – Wednesday Day 4 – Thursday Day 5 – Friday Day 6 – Saturday Day 7 - Sunday
8 :00 – 8 :30 AM Review previous day and case review
9 AM Welcome 2nd , 3rd, 4th
CMNH and Mothers Care of Mother and Baby
Discuss Facility Action Plan
Course Overview ANC: (Care during Stage of Labor Too
8:30 AM Nutrition : After Birth (PNC Post-Update Skills Checkout 6
• Introductions pregnancy) Much Bleeding After
– 10:30 During Pregnancy & Counseling) Written Post-Test and
• Course Objectives Discussion the Baby Is Born
AM Before Baby is Born (Demonstration) End-Course Evaluation7
• Schedule (Demonstration)
(Demonstration)
10:30 AM – 11:00 AM TEA BREAK
Antenatal clinic practical 10:30 – 2:00 PM as appropriate
Written PreTest 1st Stage Labor: Continue above Welcome participants
11:00 Group 3,4 Group 1,2 As needed •
• Review course materials • Supporting Woman in Wrap-Up
AM – • Preparation of Site
• Orient to Clinical Practice8 Labor Helping Baby Breathe
12:30 • Organize equipment
Tour of labor, delivery, • Using Picture Continue from (Newborn Resuscitation) Infection Prevention CERTIFICATES
PM • Facilitator responsibilities
antenatal clinic Partograph above (Demonstration) (Demonstration) CLOSING
12:30 PM – 1:30 PM LUNCH BREAK
Group 1,2 Group 3,4 Group 1,2 Group 3,4
1:30 PM CLINICAL……….. (selected facilitators and
MaNHEP team prepare for next
– Video: Birth in Squatting Group 3,4 Practice ANC, Group 1,2 Practice 2nd, Group 3,4 Practice ANC All Groups Practice Other group) Continue above
5:00 PM Position & Delivery Self 1st Stage of Labor 3rd, 4th, Stages Of Counseling,PPH, HBB Actions (PNC), Infection
Attachment, Discussion Labor Prevention, HBB
5:00 to 5:30 PM: Groups gather to review the day/experiences, How do you think the day went?
5:30 PM Facilitators Meeting
CLINICAL Group 3, 4 Group 1,2 Group 3,4 Group 1,2
6 PM –
10 PM PRACTICE 5 :30 - ? Group 1, 2 : ANC, 1st Group 3,4 :2nd,3rd, 4th Group 1,2 ANC counsel Group 3,4 PPH, IP
HOMEWORK Write Facility Action Plan to:
Read SCBNC Chapter Read SCBNC Chap 3 Read SCBNC Chapter
Share key messages
Read SCBNC Chapter 3:
6D, 6E & Learning & TAC HBB, During 6E, 2 Prevent Infection
Identify pregnant women
ANC, Chapter 6B &C : 1st
Guide: 2nd, 3rd, 4th Pregnancy, Before & TAC Too Much
Stage Labor Labor notification
Stages Of Labor Baby Is Born Bleeding, Other Actions
6
Post-Update Skills Evaluation: Immediate newborn and woman care, ANC counseling
7
Done while waiting for skills checkout
8
Clinical practice: Participants divided into teams of 4. Clinical times for labor: 12:30 – 5:00, 6.00 - 10.00 LABOR CLINICAL: 2 participants/patient: one participant managing the labor, second participant providing support.
• Activities during quiet times: Practice skills on models as needed, present cases: history, picture partograph, plan of care, outcome.
• Participants always have Clinical Update Skill Checklists (adapted Learning Guide 2nd, 3rd, 4th Stage) in Labor Ward and (ANC and Mothers Nutrition) in Antenatal Clinic.
• Trainer has Clinical Experiences record book to write all participant clinical experiences.WHAT A LEARNING GUIDE IS AND HOW TO USE IT
A learning guide is a tool that participants will use while participating in the clinical update training in maternal and newborn care.
1. It clearly states all of the important steps involved in a specific skill in the proper order—to help trainees learn to perform new skills correctly and to
guide each other’s performance during practice.
2. It is also a tool for evaluation and can be used by the facilitator to assess whether participants are competent in performing their newly acquired skills.
3. Later, when participants return to their work sites, they can use the learning guides as job aides to remind them of how to perform their new skills
correctly.
Tips for using learning guides effectively:
Always have the learning guide with you in the clinical area; also Write any additional comments at the end of the learning guide.
bring it to meetings or demonstrations with your trainer. Such comments can be very important if you do not have all the
Read the learning guide before “doing” a skill (with an actual equipment needed to do an exam, for example, or if there is
patient or for demonstration). something you want to remember that is not covered in the guide.
You may even write about how you feel about the skill or your
If practicing a skill by yourself, after doing a skill, use the learning
performance of it. The main purpose of these comments is to help
guide for self-evaluation.
you learn, so write whatever is most help to you.
Write the date you are practicing the skill at the top of the first
If helping a team partner with a skill, follow the learning guide while
empty column. After you have performed the skill, read each step
your partner is doing the skill, rate your partner’s performance after
of the skill again. Put an “” if you performed the step satisfactorily
each step of the skill, and give feedback as soon as possible after
(according to the guide), and put an “NI” if you need improvement
your partner performs the skill.
or more practice
When doing demonstrations of skills in the classroom, use a pencil
to mark the learning guide so you can erase your markings and
reuse the guide in the clinical area.WORKING IN TEAMS
On the first day of the clinical update training in maternal opportunity to learn from both types of experiences,
and newborn care, participants are put in teams of two those in which they are performing the skills and those in
and asked to work together as partners during the entire which they are evaluating the skills of their partners.
training. The team partners take turns—alternating
between doing skills themselves while their partners Partners who are evaluating on a given turn can help by
evaluate their performance, and evaluating their coaching their partners to remember things or providing
partners’ performance while following along with the guidance on how to do the steps of a skill correctly. The
learning guide. In this way, all team members have an responsibilities involved in each team partner role are
summarized below.
Responsibilities When You “DO” a Skill:
1. Read the learning guide before doing the skill.
2. Do the skill.
3. After the skill is done:
If practicing alone, evaluate your performance and fill in the learning
guide.
If practicing with your team partner, discuss with her your performance
of the steps covered in the learning guide.
Responsibilities When You “Help” with a Skill:
1. Read the learning guide before helping your team partner.
2. While you partner is doing the skill, watch her and follow along with the
learning guide:
Evaluate her performance based on the steps covered in the learning
guide.
Help her if any step is forgotten.
3. After the skill is done, provide your evaluation feedback to your team
partner about how the skill was done.CLIENT’S RIGHTS DURING CLINICAL TRAINING
The following client’s rights should be shared with participants in preparation for their supervised clinical practice with clients:
• The rights of the client to privacy and confidentiality • A facilitator or trainer should be present during any
should be considered at all times during a clinical client contact in a training situation.
training course. Always explain to the client about the • Facilitators and trainers must be discreet in how
role of each person inside the room (eg., participants coaching and feedback are given during training when
and facilitators who are providing or observing care). clients are present. Corrective feedback in a client
• The client’s permission must be obtained before situation should be limited to errors that could harm or
having a participant observe, assist, or perform any cause discomfort to the client.
care. If a client does not permit a participant to • In order to maintain client confidentiality, case studies
provide care or observe, the facilitator or staff member and clinical discussions should take place in a private
should perform the procedure. area, out of hearing of other staff and clients and be
conducted without reference to the client by name.
DO’S AND DON’TS OF TRAINING
The following do’s and don’ts should ALWAYS be kept in mind by the facilitator or trainer. During any learning session:
• DO maintain good eye contact
• DO prepare in advance
• DO involve participants
• DO encourage participation
• DO use visual aids • DON’T talk to the flip chart
• DO speak clearly and loud enough • DON’T block the visual aids
• DO encourage questions • DON’T stand, be at the same level as participants
• DO keep it simple • DON’T ignore comments and feedback
• DO give feedback • DON’T shout at participants
• DO be patientFACILITATOR PREPARATION
RESPONSIBILITY FACILIATOR(S)
1. Prepare staff in Hospital (ANC, L & D, PP Ward as appropriate)
2. Give information on class dates, class size, when on ward, focus of clinical time
3. Ask for assistance/cooperation from staff
4. Ensure sufficient supplies for participants when on the units
5. Work with staff to ensure high quality care provided (staff models skills taught in training)
6. Do inventory of teaching equipment, supplies and documents and replace as needed
7. Assist as needed with logistics such as meals, snacks, accommodation
8. Prepare classroom (clean, enough, whiteboard/pens, chalk board / chalk, project as needed)
9.
10.
11.
12.
13.
14.
15.
16.
17.
18.
19.
20.CMNH CLINICAL UPDATE FOR HEALTH WORKERS
LESSON PLANS
TABLE OF CONTENTS
Topic Page
Antenatal Care (Pregnancy Care and Nutrition)……………………………………………………………….………3
First Stage of Labor: supporting a woman in labor, nutrition, picture partograph……………………10
Second Stage of Labor: pushing, positions………………………………………………………………..…………….17
Third Stage of Labor: active management, misoprostol……………………………………………..…………...24
Fourth Stage of Labor: immediate care of mother and baby birth to 6 hours, breastfeeding……27
Too Much Bleeding After the Baby is Born (PPH)……………………………………………………………………..30
Infection Prevention…………………………………………………………………………………………………….………….36
Helping Baby Breathe……………………………………………………………………………………………….……………..43
Care and Nutrition of Mother and Baby After Birth…………………………………………………..….………….51
CMNH Clinical Update for Health Workers Lesson Plan July 2013 Page 1BLANK PAGE CMNH Clinical Update for Health Workers Lesson Plan July 2013 Page 2
Topic: ANTENATAL CARE                                                                                                          Time: 2 Hours

General Objective:          At the end of the session, participants will be able to demonstrate culturally sensitive focused antenatal care (FANC): registration
                            and record keeping, take a general history, observe and examine [general, breasts, abdominal, genitals], order laboratory tests as
                            appropriate, identify and take action for danger signs and complications, key messages [danger signs, registration, CMNH meetings,
                            birth preparation, labor notification, referral], prevention and counseling for [nutrition, breastfeeding, anemia, malaria, tetanus,
                            hookworm].

Participant Tools:          Handout: Focused ANC: overview, systems review illustration ii, CMNH key messages, Family Health Card; Learning guides: Focused
                            ANC, CMNH TAC Prevent Problems During Pregnancy and Before Baby is Born.

Homework:                   Read Learning Guide. Safe and Clean Birth and Newborn Care 2009 - Chapter 3, including: 3A: Helping Women Stay Healthy; 3B:
                            Common Changes In Pregnancy; 3C: Learning a Pregnant Woman’s Health History; and 3D: Focused Antenatal Care Checkups.

            TIME                                                           CONTENT                                                        MATERIALS
                                                                                                                                           NEEDED
        5 min            Ask: a participant to volunteer to read the general objective from the flip chart.                            Flip chart with
                                                                                                                                       objective
        10 min           Ask: participants:
                          • Have you ever seen a pregnant woman do something to keep her blood strong (prevent anemia)?
                              What did she do?
                          • Have you ever seen or heard a pregnant woman do something to prevent tetanus or HIV? What did
                              she do?
                          • Have you ever seen a pregnant woman eat something special during her pregnancy? What did she
                              eat? What happened? Why does she eat this?
                          • Is there anything a pregnant woman does not eat during pregnancy? What? Why?
                          Say: Women who have good care during pregnancy are more likely to have safer births and healthier
                          babies. Today we are going to talk about and practice a special way to help a woman during pregnancy
                          and before the baby is born. It is called focused antenatal care.

                           Say: There are 4 goals of caring for a pregnant woman (FANC).                                               Learning guide:
                                                                                                                                       Pregnancy Care

CMNH Clinical Update for Health Workers Lesson Plan July 2013                                                                                             Page 3
TIME CONTENT MATERIALS
NEEDED
(Say each goal and ask participants to tell what happens during that goal)
1. Early detection and treatment of problems and complications
CMNH key
[Tell the pregnant woman: visit health facility by the time you feel the baby kick or before (16 weeks) messages
and three more times during your pregnancy. Any problems or danger signs will be treated]
2. Prevention of complications and disease Family Health
Card
[Tell the pregnant woman: take tetanus injection to prevent tetanus (lockjaw) in you and your baby,
take iron / folic acid to protect against anemia, sleep under mosquito net to prevent malaria, you
and husband get tested for HIV, learn about danger signs, cook food with iodized salt, eat extra
meals]
3. Birth preparedness and ready for referral
[Tell the pregnant woman and family: prepare for the baby and for any complication. Be ready to go
to health facility: call for help, transport, money; cover with blanket; lie down if possible; drink fluids;
go directly to health facility (see key messages: referral)]
4. Health promotion
[Tell the pregnant woman and family: attend CMNH meetings: danger signs, referral, care during
pregnancy and nutrition, care before baby is born and nutrition, care after the baby is born and
breastfeeding, helping a baby who has trouble breathing, helping a mother who bleeds too much]
15 mins History Taking: Ask participants what are the two most important actions to do (after greeting and Systems review
making her comfortable) when you first see a pregnant woman? Look at the Systems Review illustration. illustration
Answers: 1) Look at the woman head-to-toe, and ask yourself how does she look? Are there any danger
signs? The systems review picture can help make a quick assessment. 2) Ask the woman how she is Learning guide:
feeling and take action for any danger sign/problem. FANC
Ask participants to look at the Learning Guide FANC and read the points 3 – 15, under History: ASK AND
LISTEN.
Say: there are many ways to find out the expected date of delivery. Ask the participants what method
CMNH Clinical Update for Health Workers Lesson Plan July 2013 Page 4TIME CONTENT MATERIALS
NEEDED
they use? Ask participants to read signs on flipchart and explain how one finds out about the sign. (What Flipchart of signs
do you ask or do to get the information?) to decide due
date and
1. Signs to Decide Due Date and Gestation (make flipchart of factors)
gestation
Remember: Due dates are not exact. Women often give birth up to 2 or 3 weeks before or after
their due date. This is safe. We know that for a normal pregnant woman the following signs
Calendar
usually occur:
Breast changes (enlargement, tenderness) 4 - 8 weeks
Pregnancy
calculator
Nausea 6-12 weeks
Awareness of baby's movement 16 - 18 weeks (Multigravida)
18 - 20 weeks (Primigravida)
Baby's heartbeat heard 20 weeks (Fetal Stethoscope)
11 - 12 weeks (Doptone)
22 –24 weeks (Pinnard Fetoscope)
CASE STUDY
Use the signs and symptoms of pregnancy to find out the gestational age and date of delivery.
Justina is a primigravida and comes to your clinic on 30 April for the first time in this pregnancy.
She does not know her LMP.
She felt breast changes and nausea 25 December.
Her baby first moved on about 25 March.
Today you hear the fetal heart rate with a pinnard fetascope.
What is her gestational age?
What is her Expected Date of Delivery ?
2. Use your fingers when the LMP is known
Count 10 fingers saying the months. If the LMP was August 15th , count August 15, September 15, October
15, November 15, December 15, January 15, February 15, March 15, April 15, May 15 + 5 days = EDD May
20.
CMNH Clinical Update for Health Workers Lesson Plan July 2013 Page 5TIME CONTENT MATERIALS
NEEDED
3. Use a Gestation Wheel when the LMP is known
If she knows her LMP, turn the inner circle until the arrow points to her LMP. Hold the inner circle in
this position, and look at the date opposite the arrow at 40 weeks. This is her EDD (expected date of
delivery). To find how many weeks pregnant (gestation) she is, look for today’s date on the outer
circle. Read off the number of weeks opposite today’s date.
EDD CALCULATING EXERCISES
Exercise 1:
Hanna comes to see the midwife for her first visit on 20 April. The first day of her last menstrual period
was 10 November.
1. What is her date of delivery?
2. How pregnant is she (gestational age)?
Exercise 2:
Dupe, a G3 P2 comes to the doctor for her first visit on 30 October. She does not remember the date of
her last menstrual period, but she noticed the baby started moving 1 week ago. Use a calendar to answer
the questions below.
1. What is her date of delivery?
2. What is the probable date of her last menstrual period?
Exercise 3:
Today is 14 June. Ydnas comes to you for the first time. This is her first pregnancy. She says she has
regular menses but she does not remember when she had the first day of her last menses. She does
remember she felt some breast changes and nausea starting the beginning of March and the baby began
moving yesterday. On examination you measure her uterus at the umbilicus. You cannot yet hear the fetal
heart.
1. Approximately how many weeks is she today?
2. When will be her date of delivery?
CMNH Clinical Update for Health Workers Lesson Plan July 2013 Page 6TIME CONTENT MATERIALS
NEEDED
Physical Examination: Trainer demonstrates essential parts of physical examination. Flip chart and
markers
1. Prepare the necessary equipment.
Ask participants to look at their learning guide FANC FIRST visit, the Physical Examination section. Ask
participants what equipment and supplies are available where they give FANC?
2. Demonstrate Physical Examination: LOOK and FEEL. Ask participants to read 1 – 11 steps for FIRST Tape measure
(initial) antenatal examination. ASK any questions?
Facilitator demonstrate these steps 1-11 and demonstrate the following:
MEASURE arm circumference. Less than 23.5 cm indicates chronic undernutrition. iii
FEEL for kidney tenderness at the first FANC or when there are signs of urinary tract
infection:
a. Tell the woman and support person you are going to gently tap her back on both
sides.
b. Close your hand into a fist. With your fist, gently tap on the right and left sides of
the woman’s back, just above her waist where the spine meets the rib case. This is
where the kidneys are located the costovertebral angle (CVA).
c. If there is pain, it is a sign of kidney infection. Usually it is on one side.
d. Explain the finding.
TEST urine for protein when diastolic above 90.
a. With TEST STRIPS. Dip in urine and compare to chart on bottle. Keep bottle tightly closed, if they
get wet they won’t work. They are expensive, cut each strip in half down its length to make your
supply last longer.
b. With ACETIC ACID METHOD. Fill test tube 2/3 full of urine and heat from the top of the tube until
the urine boils. Add 4 drops acetic acid 5% (vinegar) to the tube. Heat urine to boiling again. If
cloudiness disappears, there is no protein. If the urine remains cloudy, protein is present. iv
c. With BOILING. Fill test tube 2/3 full of urine and heat from the top of the tube until the urine
boils. Let it cool. Cloudiness (sediment) in the bottom of the test tube, protein is present. v
CMNH Clinical Update for Health Workers Lesson Plan July 2013 Page 7TIME CONTENT MATERIALS
NEEDED
DEMONSTRATE ABDOMINAL EXAMINATION. PREPARATION
(place the baby
Say: As the baby grows inside the womb, you can feel the model with the
womb grow bigger in the mother’s belly. The top of the head down under a
womb moves about two finger-widths higher each month. cloth wrapped
At 12 weeks, the top of the womb is usually just above the around a volunteer.
mother’s pubic bone. At about 20 weeks, the top of the Help the volunteer
womb is usually right at the mother’s bellybutton. At about get in the position
32 weeks, the top of the womb is almost up to the mother’s shown here).
ribs. Babies may drop lower just before birth.
Tape measure
3. Ask participants to follow in the learning guide.
a. To feel the womb, have the mother lie on her back with some support under her head and knees.
Your touch should be firm but gentle.
b. Look at the skin for scars.
c. Look at the shape.
d. Feel for size. You may measure by using your fingers or a centimeter tape. Use the method you are
used to that works for you. The uterus grows about 2-finger breadths or 4 centimeters in a month.
• If 20 weeks (uterus to belly button) or more, check FHR
• If 24 weeks (22-26 cm) or more, measure fundal height and compare to expected gestation
• If 32 weeks (uterus almost to ribs or 32 cm) or more check: lie, presentation, descent
4. DISCUSS GENITAL INSPECTION
Many women are embarrassed or feel shy about the pelvic parts of their bodies. They may not want
to talk about them, look at them, or have other people look at them. If the woman is too shy, explain
why you need to ask some questions. Possibly you may wait until delivery to look. Ask the
participants to read the genital inspection in the learning guide.
5. LABORATORY TESTS, according to protocol.
Ask participants to read number 15.
6. IDENTIFY PROBLEMS / NEEDS AND MAKE CARE PLAN
CMNH Clinical Update for Health Workers Lesson Plan July 2013 Page 8TIME CONTENT MATERIALS
NEEDED
7. TAKE APPROPRIATE ACTION and EVALUATION AND REPEAT PROCESS
Ask participants to read Take Appropriate Action on the Learning Guide Focused First ANC.
Discuss as needed.
8. Discuss HINT below:.
A full history and examination takes 20 minutes, so what should you do if you don’t have this long?
• Always greet and make the woman / family comfortable: privacy, listen, answer, respect
• Look at the woman head-to-toe: danger signs? Problems?
• Ask, look and listen: how she is feeling?
• History - 90% of the problems (risks) can be found from the history. Ask:
o How far away do you live?
o Can you easily get to the health facility if necessary?
o Do you have someone to help you?
o Have you had trouble with your previous pregnancies?
o Do you have a cough?
o Have you had a Caesarean section, tear or cut when giving birth, too much bleeding, too big
baby, too small baby or a baby die?
o Do you want to wait a while before having another pregnancy?
• Examination – look and feel
o Take blood pressure, weigh, and measure arm circumference.
o Look head to toe for any problem: anemia, swelling.
o Look at the abdomen: skin and for scars (make sure bladder is empty)
Look at shape and feel for size
• If 20 weeks or more, listen for fetal heart rate
• If 24 weeks or more, measure fundal height and compare to expected gestation plus
fetal heart rate
• If 32 weeks or more check: fetal lie, presentation, descent, plus fetal heart rate, fundal
height, compare to gestation
• Identify problems / needs and make care plan
• Take appropriate action, counsel, and give next visit date.
CMNH Clinical Update for Health Workers Lesson Plan July 2013 Page 9Topic: FIRST STAGE OF LABOR Time: 2 Hours
General Objective: At the end of the session, participants will be able to care for a woman in Stage 1 of labor: Admission, support, record on labor
chart, use picture partograph to manage labor.
Participant Tools: Handout: Picture partograph; Learning guide: Admission in labor
Homework: Read Reference Text, Chapter 6A: Getting Ready for Labor and Birth; 6B: Giving Good Care during Labor and Birth; 6C: Opening—
First Stage of Labor;
TIME CONTENT MATERIALS
NEEDED
5 min Ask a participant to volunteer to read the general objective from the flip chart. Flip chart with
objective
10 min Ask participants:
• How many of you have had a baby at home? Did you have someone with you to support you during
labor and birth? Did having a support person with you help you? Why did you decide to deliver at
home?
• How many of you have had a baby in the hospital? Did you have someone with you to support you
during labor and birth? Did having a support person with you help you? Why did you decide to deliver
at hospital?
• Do you think having a support person may help a woman in labor? Say more women have normal labor
and delivery when relatives are with them during labor.
Ask: There are 4 stages of labor? (Say each stage, ask participants to tell what happens during that stage) Flipchart with
four stages of
Part 1 (Stage 1) Womb is Opening: Contractions/pains that open the womb inside the body. This part of
labor
labor is the longest part usually less than 8 hours for a woman who has had a baby before, or up to 12 hours
for a woman giving birth for the first time. It usually starts with mild contractions that do not last long.
Toward the end of this first part the contractions become very frequent, very strong and last about a
minute each.
Part 2 (Stage 2) Pushing the Baby Out: When the womb is completely open, the contractions move the
baby out of the womb and down the vagina. The woman pushes to help move the baby out. This part can
last from a few minutes to over 2 hours. [Obstructed labor may be prevented when the woman waits to
push until womb is completely open.]
CMNH Clinical Update for Health Workers Lesson Plan July 2013 Page 10TIME CONTENT MATERIALS
NEEDED
Part 3 (Stage 3) Birth of Placenta: After the baby is born, the placenta (afterbirth) separates from the
womb and contractions push out the placenta. This is the shortest part of labor and usually lasts 5 – 10
minutes. [PPH is more common if the placenta is not out by 18 minutes. Severe PPH is common if placenta is
not out by 30 minutes.]
Part 4 (Stage 4) First Few Hours After Baby is Born: After the placenta comes out for three hours (up to six
hours), the mother starts to recover from the birth and the baby begins to adjust to the world. The womb
gets hard to stop bleeding, the baby starts to breastfeed. [PPH is the largest cause of maternal death after
delivery, even in normal births. Hypothermia(when the baby is too cold) is dangerous for the baby.]
15 min History taking: Ask participants what are the four most important questions to ask a woman when you first picture
see her in labor? Look at the picture partograph. Answers: 1) when did labor pains start? 2) did the bag of partograph
waters break? If yes what color is the water (liquor)? 3) do you have any problems: headache, bleeding,
heartburn, any other? 4) did you take any medicine or herbs to change the contractions (labor pains)?
Physical Examination for Admission in Labor: Trainer demonstrates essential parts of physical examination. Learning guide:
Ask participants to look at their learning guide, the Physical Examination section. Ask “why” questions when Admission in
appropriate. Labor
Getting ready:
• Ask the woman to empty her bladder and save the urine (if you are going to test the urine)
• Help the woman onto the bed, mat or examination table and place a pillow under her head and upper
shoulders
• Wash hands with soap and water and dry them
• Explain each step of the physical examination to the woman before you perform it
Look at general well-being:
• Height (shorter than other women in her area)
• Swelling (face and hands), blood pressure
• Tired, worried
• Malnourished (arm circumference below 23.5 cm)
• Anemia (conjunctiva for paleness)
• Hydration
• Signs of infection (temperature, pulse)
CMNH Clinical Update for Health Workers Lesson Plan July 2013 Page 11TIME CONTENT MATERIALS
NEEDED
Abdominal examination Equipment and
Use a baby under a cloth on a participant or co-trainer (lying on back with pillow under head/shoulders, supplies:
bend knees a little, do some slow deep breathing) covered by a sheet to do a complete abdominal Whiteboard/flip
examination, as in learning guide: chart
• Look at abdomen and womb for shape, scars, unusual shapes or swelling Markers
• Feel and decide fundal height Model baby and
• Feel womb for contractions: frequency, duration, strength, relaxation of the womb ‘mother’
• Feel womb: Sheet to cover
1. what part of the baby is in the top of the womb, mother, Pillow
2. where are the back, arms, legs (lie) Blood pressure
3. what is in the lower uterus, can it be moved? (engagement) cuff,
4. Is the head coming first? (presentation and descent) stethoscope,
• Count fetal heart rate as contraction is ending. Fetoscope,
• Feel for the bladder. ‘Examination
table’
Vaginal examination
Discuss vaginal examination as described in the learning guide: Sterile gloves
Cervical dilatation Soap and towel
• Provide privacy and explain what you are going to do Contaminated
• Feel baby’s descent by abdominal examination waste container
• Help woman position: on her back, bend her knees, spread legs apart
• Wash hands, put on gloves
• Look for discharge: blood, waters (liquor), meconium
• Clean genital area, lubricate gloved examining fingers
• With other gloved hand separate woman’s labia Cervical
• Gently insert 2 fingers of examining hand into vagina and do not remove fingers until the examination is dilatation model
done
CMNH Clinical Update for Health Workers Lesson Plan July 2013 Page 12TIME CONTENT MATERIALS
NEEDED
o Feel vagina for moist or hot/dry, scarring
o Feel cervix for thinning (effacement), opening (dilatation)
o Feel if umbilical cord is in cervix or vagina
o Feel bag of waters
o Feel baby’s head / presenting part.
o If vertex feel fontanel’s, position, molding, caput
• When examination finished, remove hand from vagina, look for any discharge on gloves. Remove and
care for gloves using infection prevention guidelines. Wash, dry hands. Help woman get in comfortable
position.
• Explain findings to the woman and her family. Record information.
Focus carefully on how to correctly feel for cervical dilatation: Use the wooden cervical dilatation
model. Ask several participants to practice measuring dilatation by closing their eyes and moving their
fingers around the model, and tell the dilatation. This can be done during clinical practice.
Ask: participants if they have any questions.
Participants do return demonstrations as needed.
10 min
Ask: participants to define first stage of labor. Answer: The first stage of labor begins when contractions start Cervical
to open the cervix. It ends when the cervix is completely open. First stage is usually the longest part of labor. It dilatation model
should not last more than a day and a night (24 hours).
Ask: participants how to decide from the history and examination of the woman if she is in active phase of
first stage of labor. Answer: Contractions mild and about 30 seconds long every 15-20 minutes in low belly or
back (early labor may be called latent phase). Contractions strong and up to 1 minute long every 3-5 minutes
in her belly and her womb gets hard. Later the mother feels contractions never stop (active phase of labor)
Partograph
Background about the Pictorial Partograph. vi The pictorial partograph has the same purpose as the WHO
partograph and that is to identify problems during labor (decide whether the woman can deliver or refer).
• Ask: What is a partograph? Why is it used? Answer: The partograph is a tool used to write
information when a woman is in labor. This tool helps identify problems during labor for the woman
and baby and the progress of the labor. It is not a replacement for labor care.
• Ask: Has anyone ever used a partograph? If yes, could you explain to us how you used it? Were
there any problems identified for the woman or baby?
CMNH Clinical Update for Health Workers Lesson Plan July 2013 Page 13TIME CONTENT MATERIALS
NEEDED
Ask: What is the advantage of using a partograph? Answer: All the information can be seen on one chart. It is
very useful when a referral is needed because it shows the doctor and referral staff what has happened.
Give participants
Explain the picture partograph parts: a picture
FRONT OF THE PICTURE PARTOGRAPH – ‘THE PARTOGRAPH CLOCK’ partograph with
• Ask: a volunteer to point out the times on the clock. clock on one side
• Ask: another volunteer to read the instructions and one person to find the time on the clock. [Find and delivery
the time on this clock now] mother on the
• Ask: one person to find the time on the clock when labor pains started. [before midnight] other side.
• Ask: one person to follow the ‘road’ from the time labor pains started to the time now. How many
black marks were crossed? Count the time now black line. [9 black lines] Post in
• Ask: volunteer to read results of black lines…… labor/delivery
• Ask: what result this is? 9, then moderate risk. ward
Any questions?
BACK OF PARTOGRAPH – DELIVERING MOTHER PICTORIAL PARTOGRAPH
• Ask: a participant to point out the 3 columns of ‘risk’ for mother [low risk mother, risk mother, high
risk mother]
• Trainer to ‘read’ each box in the column for low risk mother [ mother looks well, labor pains less than
8 hours, no or clear water, time of leaking less than 8 hours, not pushing, care for mother: fluids and
rest, no pushing on belly, no injections/IVS, where for care follow birth plan at home or health
facility]
• Ask: a participant to ‘read’ each box in the column for risk mother [ mother tired, labor pains more
than 8 hours, waters yellow or green, time of leaking more than 8 hours, pushing for 1 hour, care for
mother all the above and support and encourage, where for care prepare for referral and go in 1-2
hours if no change]
• Ask: a participant to ‘read’ each box in the column for high risk mother [very tired, weak, labor pains
more than 12 hours, waters thick, time of leaking more than 12 hours, pushing for 2 hours, care for
mother all the above and family team go with woman for referral, refer NOW]
• Ask: participants, what result did we have? [low risk, pains less than 8 hours]. What care would we
help the family team give to the woman? After discussing ask participants if they have any questions.
If more review is needed, ask a volunteer to explain/show the columns.
CMNH Clinical Update for Health Workers Lesson Plan July 2013 Page 14TIME CONTENT MATERIALS
NEEDED
20 min Equipment and
Ask: participants to list actions they can take to help a woman and her support person feel comfortable in supplies:
Stage 1 of labor (ask another trainer to put responses on a flip chart or chalk board): Glass (to show
1. Educate the woman and her support person about what happens during labor and delivery. DO NOT try drinking)
to educate the woman during a contraction. When she feels the pain of a contraction, she cannot Fan
concentrate on what you are saying. Remember to use words the woman will understand. Labor has 4 Chair
parts: Cloth (to cool
Part 1 Your Womb is Opening: Having contractions/pains that open the womb inside the body. This woman)
part of labor is the longest part usually less than 8 hours for a woman who has had a baby before, or Picture
up to 12 hours for a woman giving birth for the first time. partograph and
Part 2 You are Pushing the Baby Out: When the womb is open, the womb is pushing the baby out of Labor chart
the body. This part can last from a few minutes to over 2 hours.
Part 3 Birth of Placenta: When the baby is born, the womb is pushing out the placenta/afterbirth.
This is the shortest part of labor and usually lasts 5 – 10 minutes.
Part 4 (Stage 4) First Few Hours After Baby is Born: After the placenta comes, the mother starts to
recover from the birth and the baby begins to adjust to the world.
2. Teach the woman and her support person about ways to breathe during labor and delivery
The way a woman breathes can have a strong effect on how her labor will feel. It is important to
continue breathing when you have a contraction. It is a natural response for someone to hold their
breath and tighten their muscles when they feel pain. But that only uses MORE energy and makes the
contractions feel MORE painful. Try to use these breathing methods:
Just before and after EVERY contraction
o Slow, gentle breathing. Take a VERY deep breath in through the nose and out through your mouth
making a kiss with her lips. As you let your breath out, think about letting all your body relax. It
helps you relax your body as completely as possible before and after a contraction.
3. Teach the woman and her support person how to help the woman relax. Use massage to relieve pain of
contractions (demonstrate how to massage a woman’s back, arms, legs. Have participants practice on
each other).
o THIS MASSAGE USUALLY FEELS BETTER DURING A CONTRACTION. This can be done when the
woman is on her hands and knees, lying on her side, or sitting in a chair while she is facing the bed.
Ask the woman where the massage feels better. Ask the woman if massaging in a circle with your
CMNH Clinical Update for Health Workers Lesson Plan July 2013 Page 15TIME CONTENT MATERIALS
NEEDED
palm of the hand, or your fingers feels better, or if steady pressure in those places feels better.
O THIS MASSAGE USUALLY FEELS BETTER BETWEEN CONTRACTIONS. If a woman’s muscles are very
tired, massaging the muscles of the neck, back, arms or legs may feel very good and help her to
relax more.
4. Help the woman stay cool during labor and delivery
o Ask those who have had a baby, how did you stay cool during labor and delivery? Answers may
include: Use a cool cloth on the woman’s neck, face and/or chest. Use a hand fan or a firm piece of
paper to fan the woman’s face and body. Encourage the woman to take a shower or bath. Research
shows that when a woman washes during labor, she has fewer infections.
5. Guide the woman and her support person on positions to use during labor.
o Ask those who have had a baby, what positions were most comfortable for you during labor? When
you help a woman in labor, what positions do they like to use? Reference in SCBNC page 148, 149
for laboring out of bed.
Answers may include for labouring: walking, sitting, sitting on a chair with no arms facing the bed
and the woman sits with her legs open wide, side-lying, hands and knees
6. Use other care to help a laboring woman feel care for and prevent her from getting too tired
• Create privacy for the woman and a comfortable place to labor.
• Encourage the support person to help the woman to:
o Drink at least 1 glass of fluid every hour and eat small amounts of light food if desired.
o Urinate at least every 2 hours.
• Explain to the mother and her family: during labor and birth, the health care provider will be helping:
o Checking you (blood pressure, pulse, temperature), your baby (fetal heart rate), and the progress
of your labor (abdominal and vaginal examination) regularly.
o Cleaning your perineum just before the baby is born.
o Giving you medicine just after the baby is born to reduce the amount of blood you will lose.
o Laying the baby on your abdomen, skin to skin, after drying the baby. This will keep the baby
warm, help the baby breathe, encourage the baby to breastfeed in the first hour after birth and
help the baby to feel safe.
CMNH Clinical Update for Health Workers Lesson Plan July 2013 Page 16Topic: Second Stage of Labor Time: 2 Hours
General Objective: At the end of the session, participants will be able to care for a woman in Stage 2 of labor: help with birth of baby (position of
woman, pushing), immediate newborn care (dry, warm, breathe) and baby to breast
Participant Tools: Learning guides: Management of Stage 2 and TAC Booklet: Prevent Problems First Actions.
Homework: Read Reference Text, Chapter 6, including: 6D: Pushing—Second Stage of Labor NOTE: read HIV text
Time Content Materials
20 mins Caring for a woman in Stage 2 of labor: Learning guide
REVIEW: checklist: Care
Ask: what are the 4 important parts of labor. Answers below: During Stage 2 of
Part 1 (Stage 1) Womb is Opening Labor
Part 2 (Stage 2) Pushing the Baby Out: When the womb is completely open, the contractions move the
baby out of the womb and down the vagina. The woman pushes to help move the baby out. This part can
last from a few minutes to over 2 hours. [Obstructed labor may be prevented when pushing waits until
womb is completely open.]
Part 3 (Stage 3) Birth of Placenta
Part 4 (Stage 4) First Few Hours After Baby is Born
Say: We are going to talk about caring for a woman as she pushes the baby out.
Ask: participants what the signs are that a woman is probably in Stage 2 of labor. Answers:
• The mother feels an uncontrollable urge to push (she may say she needs to pass stool).
• Contractions come less often, but they stay strong or get stronger.
• She may hold her breath or grunt during contractions.
• The mother’s mood changes. She may become sleepy or more focused.
• The mother’s outer genitals or anus begin to bulge out during contractions.
• The mother say she feels the baby’s head begin to move into the vagina.
Ask: participants: How can you support a woman in Stage 2 labor. Answers below:
CMNH Clinical Update for Health Workers Lesson Plan July 2013 Page 17Time Content Materials
• Fluids. Usually by this time the woman is very tired and has used a lot of water from her body, so
she needs to take sips of water
• Pass urine. Since this is the time the baby is coming down more, it is important for the bladder to be
as empty as possible so the baby has more room.
• Position. help the woman get in a position that is comfortable for her for pushing and delivery.
o Ask participants: What positions may be comfortable for pushing and delivery? Answers may
include for birthing (side-lying, semi-sitting, hands and knees, squatting, standing).
o Ask participants: Why might an upright position help pushing? Answer: When the cervix is fully
dilated and the baby’s head begins to move down into the birth canal, the woman will usually
feel like pushing. Help the mother push effectively (correctly). Encourage her to keep her
mouth and legs relaxed and open.
o Encourage her to try different positions if descent is slow. These positions have special benefits:
1) Sitting or half sitting. Often the most comfortable position, and makes it easier for the
midwife to guide the birth of the baby's head and observe the perineum. It is important for
the woman to open her legs wide and to pull her knees as close to her body as possible.
2) Hands-and-knees Good when the woman feels labor in her back and the baby is posterior.
Can also help when the baby is occiput posterior and having trouble turning to occiput
anterior.
3) Squatting or standing Helps bring the baby down when the birth is slow or the mother does
not feel like pushing. In this position the pelvis tilts upward and opens by 1 – 2 cm more.
4) Lying on the left side This position is relaxing and may help the woman not to push when
she feels like pushing before she is fully dilated. Research shows that women have fewer
lacerations or smaller lacerations when they use this position for delivery.
o Positions not to use:
1) Flat on back. It is usually not good for the mother to lie flat on her back during a normal
birth. It can squeeze the blood vessels that bring blood to the baby and the mother so they get
less blood and oxygen. It is much harder for the mother to push when she is lying flat on her
back.
CMNH Clinical Update for Health Workers Lesson Plan July 2013 Page 18You can also read