LF-Factura 2.4 User guide Guide de l'utilisateur English . .. 3 Français . . . 37 - ITygrys
←
→
Page content transcription
If your browser does not render page correctly, please read the page content below
Copyright © 2014-2020 ITygrys Sp. z o.o.                                                      1

                                           LF-Factura 2.4
                                           User guide
                                           Guide de l’utilisateur

                                           English …………….………..………… 3
                                           Français …………….……….………. 37

                                           Latest revision of this document: 20 April 2020.
                                           This document may not be modified by the public.

                                           Dernière révision de ce document: 20 avril 2020.
                                           Ce document ne peut être modifié par le public.

                                           www.itygrys.com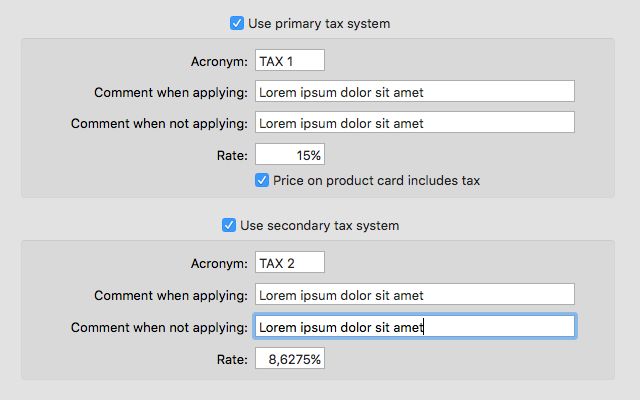
Copyright © 2014-2020 ITygrys Sp. z o.o. 2
Copyright © 2014-2020 ITygrys Sp. z o.o.                                                      3

Table of contents
How to start ?
• Structure of the application                                                               4
• Backing up your data                                                                       6
• Getting started: what you must do firstly... and then...                                   7

Configuring the application preferences
•   Building a header with your name and details                                              8
•   Taxation rates and rules                                                                  8
•   Document numbering format - Default offset for dates                                     10
•   Customizing printed document labels in your language                                     11
•   Applying a surcharge to orders, invoices and credit notes                                11
•   Applying a discount to orders, invoices and credit notes                                 11
•   Using footers on orders, invoices and credit notes                                       12
•   Printing options                                                                         12

Defining categories, territories and payment informations
• Product and client categories - Sales territories                                          13
• Payment methods - Bank accounts                                                            14

Creating books of products and clients
•   Building a list of products and services                                                 15
•   Informations to specify on a product card before creating orders                         15
•   Building an address book and a list of clients                                           16
•   Assigning a status of Client, Lead, Supplier, Resource, Competitor, Company, Recipient   17
•   Informations to specify on a client card before creating orders                          18

Performing usual operations
•   Creating orders                                                `                         18
•   Creating invoices                                                                        20
•   Creating credit notes                                                                    21
•   Searching and filtering data tables                                                      22
•   Printing data and exporting documents in PDF format                                      23
•   Quick display of a product or service results                                            23
•   Quick display of a client results or details                                             23
•   Modifying client informations on orders, invoices and credit notes                       24
•   Querying contents of orders, invoices and credit notes                                   25
•   Creating sales reports                                                                   26

Passing data from LF-Factura to other applications
•   Writing an e-mail to a contact or group of contacts                                      27
•   Browsing the Internet page linked to an address book card or log entry                   27
•   Viewing a company or contact card in the Contacts application                            27
•   Starting the Maps application from an address book card                                  28
•   Sharing informations by e-mail, on social networks, in your notes and reminders          28
•   Exporting data in CSV or XML format                                                      29
Copyright © 2014-2020 ITygrys Sp. z o.o.                                                                        4

Structure of the application
LF-Factura is a single-computer, single-user, application. When installed, the application automatically
adopts the currency, number and date formats of the region for which your Mac is configured. The
application stores its data in a single database file in SQLite format which is created automatically by the
application when it starts for the first time. It saves modifications as they are made, without your intervention.
The database resides locally on your Mac and does not involve any connection or storage plan outside of it,
and is not accessible via network.

LF-Factura is a single-window application in which all functions to manage your business are spread across
several views. By clicking on the icons of the window's toolbar, you switch from one view to another within
the same window. Additionally, the application menu gives access to the Preferences panel to configure
multiple settings, and to Tools for exporting data and sending e-mails to groups of recipients. The main
window's toolbar presents the following icons:

        Categories
        Where you define product categories, client categories, sales territories, payment methods and
        bank accounts to display on printed documents.

        Products
        Where you manage the list of products and services that you are selling and all related informations
        including unit price and tax rate.

        Address book
        Where you manage the address book containing your clients and other categories of people or
        companies. For each of them, you can display an instant report showing its numbers since the
        beginning of the activity.

        Orders
        Where you manage orders and invoices.

        Credit notes
        Where you manage credit notes.

        Query
        Where you perform searches on your orders, sales, invoices and credit notes.

        Reports
        Where you compile sales reports.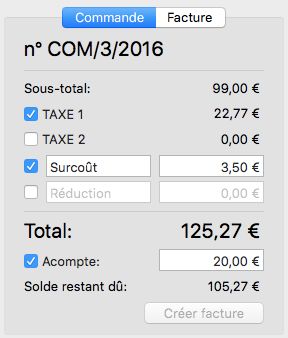
Copyright © 2014-2020 ITygrys Sp. z o.o.                                                                   5

On the views, the application uses buttons to manipulate your data. Buttons found on most views are linked
to the following commands and keyboard shortcuts:

        Add an element to a view's main table.                                                      ⌘+

        Delete the selected element from a view's main table.                                       ⌘−

        Go to the previous element of a table.                                                         ⍐

        Go to the next element of a table.                                                             ⍗

        Print the selected element.                                                                 ⌘P

        Show informations about the selected element.

        Show contacts from macOS to import them into the address book.                            ⌥⌘+

        Action button to pass data from LF-Factura to another application.

        Share informations of the selected element.

        Execute or reload an operation (search or calculation).

Writing and limitations of numeric values

When you type a numeric value, you must only type the numbers, and decimal sign if needed, then press the
↵ key (Enter key). The application automatically completes the formatting by adding required signs such as
the % sign and the currency sign ($, £, €…).

On an order or invoice, reduction amount (rebate) must be typed as a positive value because the application
will subtract it. Every value entered in the application must be positive.

Limitations to the decimal part of a numeric value are as follows :

• money value : two decimals (hundredths)
• quantity : three decimals (thousandths)
• percentage : four decimals (ten-thousandths)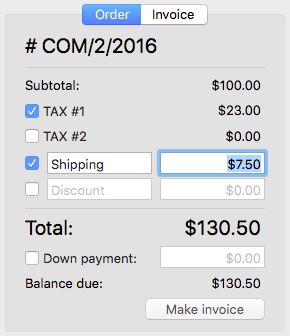
Copyright © 2014-2020 ITygrys Sp. z o.o.                                                                    6

Backing up your data
You are advised to back up all data of your computer and consider it as a normal operation in the daily use of
any computer. The editors of LF-Factura are not responsible for the loss of application data in any way. It is
your responsibility to make a copy of your data in case of a computer crash, or LF-Factura crash, or
unproper modifications done to your data in a way that prevents recovery within the normal use of your
computer or LF-Factura.

Data of LF-Factura are stored in the following folder on your Mac:
/Users/*your_username*/Library/Containers/com.itygrys.LF-Factura/

By following the hierarchy of the folder, you will come across the two files that matter:

• The database file:
  /Data/Library/Application Support/com.itygrys.LF_Factura/lf_factura.sqlite

• The preferences file:
  /Data/Library/Preferences/com.itygrys.LF-Factura.plist.

Do not attempt to manually modify any data from the application as Apple core technologies used in LF-
Factura have their own way to encode data. You are not supposed to manipulate these files directly.

Your /Library/ folder is invisible to prevent accidental loss of data. To access it, start the macOS Finder
application then click on its Go menu while holding the ⇧ key (Shift key) simultaneously. In the Go menu,
the Library position will appear. Click on it to open the folder. Alternately, use the ⇧⌘L keyboard shortcut
(Shift with Command and L keys simultaneously) to open your /Library/ folder.

On more recent versions of macOS such as macOS 10.15 (Catalina), the key combination differs. Start the
macOS Finder application then click on its Go menu while holding the ⌥ key (Alt key) simultaneously. In the
Go menu, the Library position will appear. Click on it to open the folder.

If you prefer, it is possible to make it visible permanently using appropriate commands. To do so, start the
macOS Terminal application and, in the window that opens, type the following command then press ↵
(Enter) to validate:

        chflags nohidden ~/Library/

or, if you are not logged on with an administrator account of the Mac, type the following command, after
which you will be asked for the administrator password:

        sudo chflags nohidden ~/Library/

You may then use macOS Finder to explore your personal /Library/ folder.
In case of issues with these manipulations, please refer to the documentation or help of macOS.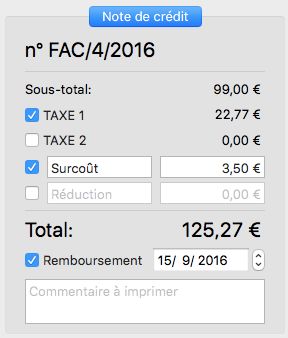
Copyright © 2014-2020 ITygrys Sp. z o.o.                                                                    7

Getting started: what you must do firstly... and then...
Configuring some options of LF-Factura is mandatory prior to using the application. They must be configured
from the beginning to produce documents (orders, invoices and credit notes) bearing all the required
informations such as correct numbering, tax definition and calculation. Other options have to do with printing
your orders, invoices and credit notes. They consist of creating a header with your name and details,
customizing words used for various mentions and titles, activating the surcharge and discount options to gain
time when creating orders, creating footers and setting parameters for the layout of printed documents and
which informations you want to see printed. Though of secondary importance, we advise to configure these
options along with the mandatory ones from the beginning, because they are all grouped on the preferences
view, easily accessible and altogether constituting the application settings.

The first thing to do is therefore to configure the application Preferences.
You may refer to the following sections in the table of contents :

•   Building a header with your name and details
•   Taxation rates and rules
•   Document numbering format - Default offset for dates
•   Customizing printed document labels in your language
•   Applying a surcharge to orders, invoices and credit notes
•   Applying a discount to orders, invoices and credit notes
•   Using footers on orders, invoices and credit notes
•   Printing options

In order to get comprehensive sales reports, you should also define sales territories and categories to assign
to your products and clients.

Invoices can contain informations such as a bank account on which the client can pay, and the payment
method used to pay. You may want to create a list of payment methods and one or several bank accounts to
choose from when you will be editing invoices.

The second thing to do is therefore to define data on the Categories view.
You may refer to the following sections in the table of content :

• Product and client categories - Sales territories
• Payment methods - Bank accounts

Afterwards, you may start creating books of products and clients, filling up their cards with required and
optional informations, then you can start creating orders and invoices, and perform usual daily operations.
You may refer to the following sections in the table of content :

•   Building a list of products and services
•   Informations to specify on a product card before creating orders
•   Building an address book and a list of clients
•   Assigning a status of Client, Lead, Supplier, Resource, Competitor, Company, Recipient
•   Informations to specify on a client card before creating orders
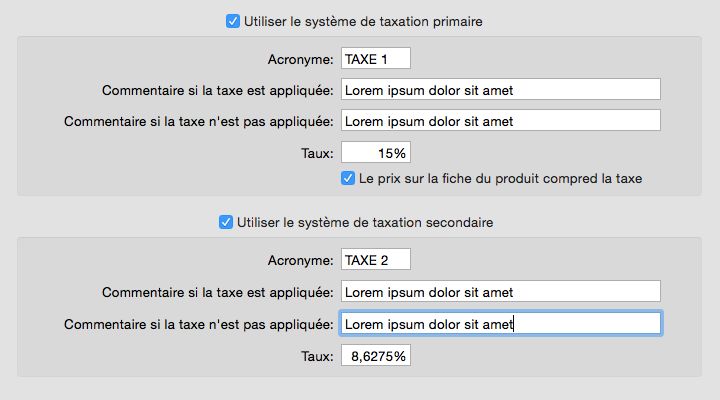
Copyright © 2014-2020 ITygrys Sp. z o.o.                                                                       8

Configuring the application Preferences
To access the Preferences view of the application, click on the LF-Factura menu then on the Preferences
menu item, or use the ⌘, keyboard shortcut (Command and Comma keys simultaneously). The Preferences
view will pop up. It presents various settings dispatched on several tabs. Click on a tab title to open it.

To configure an option, select or deselect the available checkboxes as needed and type text in text fields.
After typing text, validate it by pressing the ↵ key (the Enter key) on your keyboard. To close the
Preferences view, press the esc key (the Escape key) on your keyboard or click on the small red icon in the
upper left corner of the Preferences view.

Building a header with your name and details
On the documents you print for your clients, you can create a header bearing your name and other details
such as your address, phone number, tax number, office hours or any information you wish to present on
orders, invoices and credit notes.

On the Preferences view, select the General tab. Type in your business name in the appropriate text field
and up to eight additional lines of information. Lines may remain empty to serve your desired layout. These
lines together will constitute the header block. Modifications to the header will be visible on all existing and
future documents.

Taxation rates and rules
To configure the taxation options, go to the application preferences and select the Taxation tab. The first
thing to do is to wonder if the products and services that you are selling are sometimes (or always) subject to
taxation. If the answer is no, then leave the taxation options unselected and no mention of any form of
taxation will be made on your documents. If the answer is yes, then you may choose from two ways to apply
taxes, or even use them both at the same time if you conduct business in a region where two taxes apply.

• The primary tax system applies to each product or service individually.
• The secondary tax system applies globally to the total of the order, invoice or credit note.

If you choose to use the primary tax system, every new product added to your book of products will be
automatically assigned the primary tax rate. If, exceptionally, some products are subject to a distinct tax rate,
you will modify the rate for these products on their product card individually and not in the taxation options of
the Preferences (see Building a list of products and services for instructions regarding products).

If you choose to use the secondary tax system, the whole content of your order, invoice or credit note will be
equally subject to the taxation rate you defined here.

Once you have customized your taxation method and started to create orders, do not modify the combination
afterwards. Tax rates however, can be modified at any time and changes will affect new products, new orders
and invoices.
Copyright © 2014-2020 ITygrys Sp. z o.o.                                                                       9

To customize your taxation method, select the primary and/or secondary tax systems according to your
needs. For each of them, you can define the same kind of informations: an acronym which will appear on
your documents, a rate expressed as a percentage and, optionally, a short comment when tax applies and a
short comment when tax does not apply even though the tax system is involved in your business. You can
leave the comments empty if you do not wish to use them at all. Comments are printed next to the related
acronym on orders, invoices and credit notes. Example:

Acronym = V.A.T.
- Comment when applying = “Value Added Tax"
- Comment when NOT applying = “Zero rated intra-E.C. supply“

Before starting creating orders and invoices, be sure to define the right acronyms and tax rates. Once an
order was created, it is no longer possible to modify the secondary tax rate for this order. Modifications
made to tax rates apply only to orders and invoices created after a modification. However, modifications
made to acronyms and comments apply to all documents.

To satisfy the needs for rates of various regions in the world, LF-Factura handles tax rates containing up to
four decimal numbers without rounding them inappropriately. To type a rate, enter the numeric value in the
text field then press the ↵ key (Enter key) to validate. Do not type the percent sign as the application will
add it automatically.

Price on the product card includes tax

This selectable option in the primary taxation system allows you to build product prices which already include
the tax amount. For example, in many European countries it is common to display prices for consumers,
including the amount of V.A.T. (value-added tax), as opposed to traditions in the United States where
displayed prices do not include the amount of tax.

If you select this option, the primary tax will be subtracted from the product price when items are added to an
order, instead of being added. Whichever way you go, it is advised not to modify this option once you started
creating orders. If you modify it, do not forget to review your products list and ensure that each product's unit
price is still appropriate, before creating new orders. Example:

Product price = 200 and primary tax rate = 5%
- If option is NOT selected then the total price will be: 200 + 10 = 210
- If option IS selected then the total price will be: 190.48 + 9.52 = 200
Copyright © 2014-2020 ITygrys Sp. z o.o.                                                                      10

Document numbering format
Prior to creating documents, you must define their numbering format. You can also define default time offsets
for dates applying to your documents. To do this, go to the application preferences and select the
Numbering and Time tab.

Every time you create an order, invoice or credit note, it receives an automatic number which follows the
previously given one in ascending order. To customize numbering, there are two things to consider:

• how to build the number block if you are used to specifying other informations in the number ?
• which number to start with if you are in the middle of a tax year and you switched from another application
  to LF-Factura to manage your business ?

You can build a number format limited to the automatic number itself, or you can add a prefix and/or a suffix
around it to express an additional information in the number block.

When LF-Factura starts for the first time, no prefix or suffix is specified, and the number of the first document
of each kind which you will create is equal to 1. To specify other values to start with, enter the numeric value
in the Next # text field then press the ↵ key (Enter key) to validate. Under the formatting fields, an
information called Preview shows how the next document number will look like.

Invoices and credit notes share the same numbering format because a credit note can be considered as a
negative invoice. From an accounting point of view, it fits the same category and shares its numbering
properties.

Default offset for dates
When creating orders and invoices, LF-Factura creates several default dates: a creation date, a sale date
and a due date for payment. You can define a default offset between these dates to suit your preferences in
order to save time when creating new documents. On the new documents, the final date can always be
modified on a case-by-case basis except for tcreation date.

• Default offset between Invoice creation date and payment due date = a certain number of days.
• Sale date is identical to Order creation date: if not selected, the default Sale date will be identical to the
  Invoice creation date.
Copyright © 2014-2020 ITygrys Sp. z o.o.                                                                   11

Customizing printed document labels in your language
LF-Factura is not available in all languages but enables you to print documents for your clients in any
Western language. You can specify words to use on the documents for various labels, mentions and column
titles. Go to the application Preferences then select the Labels tab and modify words in text fields according
to your needs. Modifications will apply to all existing documents as well as future ones.

Applying a surcharge to orders, invoices and credit notes
To add a surcharge to your orders, for example a cost of shipping and handling, or a labor cost, or whatever
fits your business, you can use the surcharge option available on each new order. To speed up the process
and have a surcharge activated with a default title on each new order, you may configure the default
surcharge title using the application Preferences. Go to the Labels tab then select the Surcharge option and
type adequate words to describe it on your documents.

When Surcharge is activated, all orders, invoices and credit notes will have the Surcharge option activated
by default. You then just have to specify a surcharge amount that will be added to the subtotal of the
document. On a case by case basis, you may select or deselect the surcharge on an order, invoice or credit
note, specify another title and modify the amount. Note that taxation does not apply to the surcharge. If the
surcharge represents something subject to taxation, the amount of tax must be included in the specified
amount.

Applying a discount to orders, invoices and credit notes
You can apply a discount to the items sold by specifying a discount percentage for each item. However, the
application features a second way to apply a discount by specifying an amount impacting the subtotal of the
order. To specify an amount for discount on your orders, for example a voucher or whatever fits your
business, you can use the discount option available on each new order. To speed up the process and have a
discount activated with a default title on each order, you may configure the default discount title using the
application Preferences. Go to the Labels tab then select the Discount option and type adequate words to
describe it on your documents.

When Discount is activated, all orders, invoices and credit notes will have the Discount option activated by
default. You then just have to specify a discount amount that will be subtracted from the subtotal of the
document. You will have to enter the amount as a positive value (do not write the minus sign). On a case by
case basis, you may select or deselect the discount on an order, invoice or credit note, specify another title
and modify the amount. Note that taxation does not apply to the discount. If the discount represents
something subject to taxation, the amount of tax must be included in the specified amount.
Copyright © 2014-2020 ITygrys Sp. z o.o.                                                                       12

Using footers on orders, invoices and credit notes
On the documents you print for your clients, you can create a footer which consists of a block of continuous
text with a length of no more than five hundred characters approximately. For example, a footer may indicate
sales conditions. You can create a distinct footer for orders, for invoices and for credit notes.

You can build footers using the application Preferences. Go to the Footers tab and type the text for the
footers you want to use. If you do not want any footer, leave the text box empty. Modifications to a footer will
be visible on all existing documents of the related kind, as well as all future ones.

Printing options
You can customize the layout and select which informations are printed on documents using the application
Preferences. Go to the Print tab and modify options at your convenience. Modifications will alter the layout
and choice of elements appearing on all printed documents (both existing and future) but will not interfere
with calculations and content. Default printing options are as follows:

• Header (select if you want to print a header on your documents, using informations from the General tab)
• Text inside header is centered (select if you want to center the text inside the header block)
• Addressee is on the left side of document (if not selected, the address will be printed in the right half of the
  paper, as it is generally done in Europe and other regions outside the United states)
• Attn: (select if you want to add the name of the person specified on the company card in the Address book)
• City precedes Post code (if not selected, the name of the city will be printed after the post code)
• Use Subdivision for State in U.S. address format (if not selected, subdivision will be printed below the city
  and post code and above the country)
• Client tax number (select if you want to add the client tax number)
• Client company number (select if you want to add the client company number)
• Client code (select if you want to add the client code)
• Product code column (select if you want to add the product code)
• Product discount column (select if you want to add the applied discount as percentage for each product)
• Bank informations on invoices (select if you want to print bank informations on invoices)
• Payment method on paid invoices (select if you want to print payment method on paid invoices)
• Print PAID IN FULL on paid invoices (select if you want to specify that a paid invoice was paid)
• Double height for item row on documents (to avoid cropping a particularly long item name or option on an
  order, invoice or credit note - this will in return reduce the number of available lines in the items table)
Copyright © 2014-2020 ITygrys Sp. z o.o.                                                                       13

Product and client categories - Sales territories
If you want to produce detailed sales reports involving categorization, you should define a list of categories
for your products and clients, and a list of sales territories. Those informations will be saved inside the orders
and will be used afterwards by the query and reporting tools to compile sales reports.

You define these on the Categories view. To display the Categories view, click on the Categories icon on the
main window's toolbar. To add a record to the corresponding table, click on the + (Plus) button below it. A
new empty record labelled unspecified will appear in the table. Double-click on the table cell and type text
inside, then press the ↵ key (Enter key) to validate.

Although you can always modify categories and territories at any time on the Categories view, modifications
only apply to new orders created after a modification. Unless you want, at some time, radically change the
categories and territories of your business, it is therefore advised to take a moment to carefully think of the
way you want to define these from the beginning, in order to preserve continuity in your sales reports. This
includes minding the correct spelling.

To delete a category or a territory, select it in the table then click on the - (Minus) button below the table. If
you accidentally delete a category or territory which was already assigned to a product or client, the
association will disappear on the product or client card. You may need to recreate and reassign a category or
territory to the corresponding products and clients before creating new orders.
Copyright © 2014-2020 ITygrys Sp. z o.o.                                                                    14

Payment methods - Bank accounts
Payment methods and bank accounts are additional informations which you may specify on invoices.

A payment method will help you remember how the invoice was paid. After defining a list of payment
methods, a menu of available methods will appear on each of your invoices, from which you can select the
method used. The method name will also be printed on the invoice if you configure the application
Preferences to do so. Examples of payment methods are: cash, credit card, money order.

A bank account will provide the client with the required informations to make a payment for the invoice using
a transfer. After defining a list of bank accounts, a menu of available accounts will appear on each of your
invoices, from which you can select the desired account. The account informations will be printed on the
invoice if you configure the application Preferences to do so.

You define these on the Categories view. To display the Categories view, click on the Categories icon on the
main window's toolbar. To add a record to the corresponding table, click on the + (Plus) button below it. A
new empty record labelled unspecified will appear in the table. Double-click on the table cell to type text
inside, then press the ↵ key (Enter key) to validate.

A bank account has several parameters:

• Short name: this is the name which will later constitute the accounts menu on the invoice on the Orders
  view. It is just a short name for you to work with and is not printed on the invoice.
• Bank name: the full real name of the bank. It will be printed on the invoice.
• BIC (Swift): the Bank International Code. It will be printed on the invoice.
• IBAN: the account number in IBAN format (International Bank Account Number). It will be printed on the
  invoice.

Payment method and bank account informations are not saved inside the invoices but only linked to them.
Modifications to these made on the Categories view will apply to all invoices, previous and future. If, at some
point, you wish to modify the details of an account number, you should create a new record for the account
and apply it to future invoices in order to preserve the integrity of existing documents.

To delete a record, select it in the table then click on the - (Minus) button below the table. If you delete a
payment method or a bank account accidentally, it will disappear from the invoices to which it had been
assigned and you will have to recreate it on the Categories view and reassign it on the invoice to preserve
the integrity of our archives.
Copyright © 2014-2020 ITygrys Sp. z o.o.                                                                      15

Building a list of products and services
To build the list of products and services that you are selling, click on the Products icon of the main window's
toolbar to display the Products view. Products are listed in the table on the left side of the view.

Adding a card

To add a product, click on the + (Plus) button under the table or use the ⌘+ keyboard shortcut (Command
and Plus keys simultaneously). Give a name to the product and fill up additional informations if relevant:
category, strength, weakness, supplier, note, unit price, primary tax rate and product code.

When you create a new product, it automatically receives the primary tax rate as defined in the application
preferences if you elected to use the primary taxation system. If you do not use the primary taxation system,
no tax information appears on the product card.

Depending on tax configuration in the application Preferences, the unit price includes or excludes the
amount of primary taxation system.

You may specify a category and a supplier for the product by selecting the appropriate information from the
related drop-down menus on the product card. Prior to seeing the desired category and desired supplier in
the menus, you must have defined a list of product categories on the Categories view and assigned the
supplier status to the company supplying this product on its address book card.

Product log

A product card also contains a table where you can add informations regarding the life of your product. To
add a record in the log, click on the + (Plus) button below the log table. A new record will be created with the
day's date. Double-click on the cell next to the date and type the information you wish to add to the log. To
delete a record from the log, select it in the log table and click on the - (Minus) button below the table. The
cell to the right allows to store an Internet address for reference. To use this address, refer to the following
section in the table of contents:

• Browsing the Internet page linked to an address book card or log entry.

Deleting a card

To delete a product, select it in the products table and click on the - (Minus) button under the table or use the
⌘- keyboard shortcut (Command and Minus keys simultaneously). Deleting a product will also delete its log.

Informations to specify on a product card before creating orders
When adding products to an order, some product informations are saved in the order and cannot be modified
afterwards. You may delete a product from the order and, after having corrected or completed its card on the
Products view, add it again to the order. However, the best way is to get everything right from the beginning
to avoid wasting time when filling up orders. Mandatory informations are therefore: correct name, unit price,
tax rate (if applying), category and product code (if relevant).
Copyright © 2014-2020 ITygrys Sp. z o.o.                                                                      16

Building an address book and a list of clients
The Address book is the place where you manage the list of clients, leads, suppliers, resources and
competitors of your business. Companies in the address book are managed on the Address book view. To
display the Address book view, click on the Address book icon on the main window's toolbar.

The first time you access the address book view of LF-Factura, your Mac tells you that "LF-Factura.app"
would like to access your contacts (if you kept the default security settings of macOS). Click the OK button,
so that LF-Factura will be able to import records from the list of the macOS Contacts application.

Adding a card

There are two ways to add a company to your address book: by creating an empty record from scratch and
by importing an existing record from the list of your Mac's Contacts application.

To create a new, empty record, click on the + (Plus) button below the Companies table or use the ⌘+
keyboard shortcut (Command and Plus keys simultaneously). Then start filling up the form with informations
for the new company.

To create a new record by importing it from the Contacts application's list, click on the Contacts button
below the address book table or use the ⌥⌘+ keyboard shortcut (Option with Command and Plus keys
simultaneously). A window pops up and presents a table of all companies in Contacts. Select one or several
contacts from this list then click on Import to create records for them in LF-Factura.

For each of these contacts, LF-Factura will parse the data found in the macOS Contacts card and find
suitable informations: address, phone number, fax number, e-mail address, internet (web site) address, the
note and specific instant messaging and social network accounts (Skype, LinkedIn, Facebook, Twitter). Note
that if a company name was not defined on the original card, LF-Factura will create one by concatenating the
contact’s first and last name.

Filling up a card

The person’s name on the company card in LF-Factura corresponds to the Attn label (like Attention on the
addressee details, or c/o for in care of). It is the name of the person which will be printed on orders, invoices
and credit notes if you elect to specify an addressee name on those documents in addition to the company
name.

The company card contains two lines for the street address, labelled Address 1 and Address 2, allowing to
write particularly detailed locations that do not fit on a single line. The Subdivision information may be used
to specify a territory subdivision between city and country, for example: state, province, department,
prefecture…

The Note text box allows you to make comments on the related company.

The Category and Territory drop-down menus allow to specify a client category and a sales territory for this
company. These informations will be saved in the orders, invoices and credit notes and will be used to
provide detailed statistics on sales reports, although they do not appear on printed orders and invoices.

The Date allows to specify a date at your convenience. The date can be used as a filter in the bulk mailing
tool. The default date is the date of card creation.

A client may also receive a Tax number and a Company number. If your clients are a mixture of companies
and non-companies (for example: private people), you may select the Company option whenever
appropriate. The Company flag will be used to filter addresses when exporting data, and on orders, invoices
and credit notes, to compare sales figures for companies and non-companies.
Copyright © 2014-2020 ITygrys Sp. z o.o.                                                                     17

Creating a group of contacts on a card

An additional table appears for each company or person in the address book. You can create a list of
contacts for this company, for example by specifying people names and their position in this company or the
role they are playing in your business transactions with this client.

To create a new contact from scratch, click on the + (Plus) button below the Contacts table then type the
name of the person. Double-click on the Position/role column to type basic informations on this person. Do
the same as needed with the Phone and e-mail columns.

To create a new contact by importing its name from the Contacts application's list, click on the Contacts
button below the Contacts table. A window pops up and presents a table of all companies in Contacts. Select
one or several contacts from this list then click on Import to create records for them.

To delete a contact, select it and click on the - (Minus) button below the Contacts table.

Deleting a card

To delete a card from the address book, select it in the table and click on the - (Minus) button below the table
or use the ⌘- keyboard shortcut (Command and Minus keys simultaneously). Deleting a card will also delete
its contacts. Deleting a competitor card will also delete the list of its products.

Assigning a status of Client, Lead, Supplier, Resource,
Competitor, Company, Recipient
For each entry of your address book, you can define a status by selecting roles played
in your business relationship on the contact's card. Status acts as a filter in the
addresses export and bulk mailing tools.

The Company status can be used for whichever purpose serves you best, for example
to make a distinction between businesses and private persons. The Recipient status
is used to opt whether a client will be included in the recipients group when you send
an e-mail using the application mailing list tool. When you create a new card in the
address book, it automatically receives the Client and Recipient statuses.
Copyright © 2014-2020 ITygrys Sp. z o.o.                                                                         18

Informations to specify on a client card before creating orders
When you fill up the card for a new entry in the address book, make sure to specify all informations which
must figure on orders, invoices and credit notes, and those which will not be printed on documents but saved
inside them for future use by the query and reporting tools, as you should not have to modify the client
informations on a document once it has been created. This helps ensuring that all required informations are
saved in the document and accessible, even if you accidentally delete informations from the address book or
categories and territories lists.

You should therefore ensure that all following informations, if relevant, were specified on the client card
before starting to create orders: client category, sales territory, client code, client tax number, client name and
address. Ensuring that required informations are present also means minding their correct spelling.

Creating orders
Creation and management of orders are done on the Orders view. To display the Orders view, click on the
Orders icon on the main window's toolbar. The view contains two tables and one box of informations:

• The main table listing orders and invoices in the upper left part of the view.
• The information box (subtotal, taxes, surcharge and discount, dates, invoice) in the right part of the view.
• The contents table in the lower part of the view, showing items added to each order.

Adding an order

To add a new order, click on the + (Plus) button under the orders table or use the ⌘+ keyboard shortcut
(Command and Plus keys simultaneously). A window pops up, showing the list of clients. Select a client in
the list then click on the Make order button to add an order for this client. Click on Cancel or press esc
(Escape key) to close the window without adding an order.

Clients will only appear in the list of available clients if they have been assigned the Client status on their
card in the address book.

Adding products and services to an order

To add a product to an order, click on the + (Plus) button under the content table. A window pops up,
showing the list of products. Select one or several products in the list then click on the Add button to add
them to the order. Click on Cancel or press esc (Escape key) to close the window without adding products.

In the content table, you can select a product and double-click on the Product option cell to type an option if
needed. Double-click on the Qty cell to modify the quantity of the ordered product. Quantity accepts values
with up to three decimal numbers, allowing to specify thousandths of a unit. Double-click on the Discount
cell to specify a discount if applying, expressed as a percentage with a precision of up to four decimals.

To remove a product from the order, select it in the content table then click on the - (Minus) button under the
content table.
Copyright © 2014-2020 ITygrys Sp. z o.o.                                                                        19

Applying taxation to an order

Applying taxation is done in the order information box. Available
taxation systems will appear in the box accordingly to the
configuration you set in the application Preferences. For each
active taxation system, the tax acronym will appear on the order
and the amount for that tax is calculated automatically. If,
exceptionally, the tax must not apply to this order, deselect it.

Applying a surcharge to an order

If you wish to apply a surcharge to the order globally, it is better to
first activate the Surcharge option in the application Preferences in
order to gain time at the moment of order creation. On the order,
specify the surcharge amount in the Surcharge text field (under the
secondary tax information), then press the ↵ key (Enter key) to
validate. If you do not want to apply a surcharge to a specific order,
deselect it to prevent any mention of surcharge on the printed
document.

Applying a discount to an order

If you wish to apply a discount as an amount, it is better to first activate the Discount option in the application
Preferences in order to gain time at the moment of order creation. On the order, specify the discount amount
as a positive value (do not use the minus sign) in the Discount text field (under the surcharge information),
then press the ↵ key (Enter key) to validate. The application will subtract the discount from the total. If you
do not want to apply a surcharge to a specific order, deselect it to prevent any mention of surcharge on the
printed document.

Down payment and balance due

If a client makes a down payment at order time, select Down payment in the order information box and
specify the value in the related text field, then press the ↵ key (Enter key) to validate. The Balance due
amount is the difference between the total and the down payment amounts.

Deleting an order

To prevent the accidental loss of critical data, it is not possible to delete an order. You can however cancel it
by clicking on the - (Minus) button under the orders table, or using the ⌘- keyboard shortcut (Command and
Minus keys simultaneously). The cancelled order will appear in red in the orders table. It is not possible to
make an invoice for a cancelled order. Cancelled orders are ignored by the Export, Query and Reports tools.
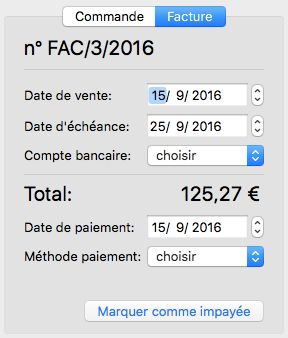
Copyright © 2014-2020 ITygrys Sp. z o.o.                                                                  20

Creating invoices
Creation and management of invoices are done on the Orders view. To display the Orders view, click on the
Orders icon on the main window's toolbar. Basically, you create an invoice by turning an existing order into
an invoice.

Adding an invoice

In the orders table, select the order for which you wish to create an invoice and click on the Make invoice
button in the order information box. This will add the following informations to the order: invoice number,
invoice creation date, sale date and payment due date.

Managing the invoice informations

By default, the sale and payment due dates will be created
consequently to the time offset you defined in the application
Preferences. If those default dates do not suit you, modify them in
the invoice information box.

If you configured the default printing options in the application
Preferences to enable the specification of bank account informations
for invoice payment, the invoice box contains a drop-down menu
from which you can pick the desired bank account. Its parameters
will be printed on the document for your client (bank name, BIC and
IBAN).

To indicate that an invoice was paid, click on the Mark as paid
button below the invoice information box. If you configured the
default printing options in the application Preferences to enable the
specification of a payment method for invoices, the invoice box will
display a drop-down menu from which you can pick the desired
payment method, once the invoice has been paid. An additional
information for date paid will also be displayed, which you may
modify.

After marking an invoice as paid, the Mark as paid button will now read Mark as unpaid. If you mistakenly
marked an invoice as paid, or wish to cancel the payment information, click again on the button. This will
restore the unpaid status of the invoice and cancel the date paid and payment method informations.

Deleting an invoice

To avoid the accidental loss of critical data, it is not possible to delete an invoice. An invoice is a final
document of legal value which can normally not be modified or destroyed. If you select an invoice and try to
delete it, LF-Factura will suggest to create a credit note instead, based on this invoice.
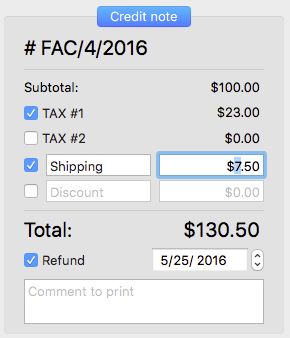
Copyright © 2014-2020 ITygrys Sp. z o.o.                                                                      21

Creating credit notes
A credit note can be described as a negative invoice. It is usually
used in order to compensate for an undue invoice, or to credit the
account of a client. In LF-Factura, credit notes are created using
the Orders view and, once they have been created, their
management is performed on the Credit notes view.

To display the Orders view, click on the Orders icon on the main
window's toolbar. Basically, you create a credit note from an
existing invoice. Select the invoice in the orders table then click on
the - (Minus) button below the table or use the ⌘- keyboard
shortcut (Command and Minus keys simultaneously).

Once the credit note has been created, click on the Credit notes
icon on the main window's toolbar to display the Credit notes view.
The Credit note has the exact same content as the invoice it
derives from. It has a creation date, a credit note number, and
additional informations such as the date and number of the invoice
it derives from (for reference in the credit notes table only, it will not
appear on the printed document).

Taxation, surcharge, discount and content of a credit note

You can apply taxation, surcharge and discount on a case by case basis, the same way as with an order and
invoice.

If the credit note implies refunding money to the client instead of just crediting his account, select the Refund
option in the credit note information box. An additional date will appear in the box: the refund date, which you
can set as you wish.

The information box ends with a larger text field where you can type a comment to print on the document.

Credit notes have the same structure as orders and invoices. You may therefore use their content table to
modify its content. Adding products, removing products, modifying the option, quantity and discount for a
product are done the same way as with orders.
Copyright © 2014-2020 ITygrys Sp. z o.o.                                                                22

Searching and filtering data tables
On several views of the application, it is possible to search for records in the view’s
main information table using the search field located above or below the table. In
order to match existing records, keywords used in the search field must be of the
following types on the distinct views:

•   Products = product name or code
•   Address book = company name, person name (Attn) or client code
•   Orders = order number, invoice number or client name
•   Credit notes = credit note number, referenced invoice number or client name

It is also possible to filter the main table to display only records matching a criteria, using a segmented
button located below the table. On the distinct views, the segmented buttons are as follows:

Orders

•   All = shows all orders and invoices
•   Billed = shows all orders for which an invoice was made
•   Paid = shows all invoices that have been paid
•   Unpaid = shows all invoices that have not been paid yet
•   Overdue = shows all unpaid invoices where today's date is beyond the payment due date
•   Cancelled = shows cancelled orders

Credit notes

• All = shows all credit notes
• Refunded = shows only notes which were refunded
• Not refunded = shows only notes which were not refunded

Note that the effects of the search field and the segmented button are not cumulated. For a more extensive
search of orders, invoices and credit notes using additional options, please go to the Query view of the
application and refer to the Querying contents of orders, sales, invoices and credit notes section of this
guide.
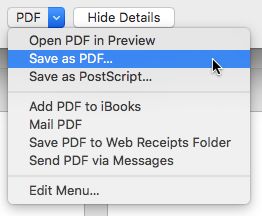
Copyright © 2014-2020 ITygrys Sp. z o.o.                                                                  23

Printing data and exporting documents in PDF format
Most informations in LF-Factura are printable: product cards, address book cards, orders, invoices, credit
notes and reports. On a view, select the element you want to print then click on the Print button or use
the ⌘P keyboard shortcut (Command and P keys simultaneously).

There is a slight difference on the Orders view, where the button lets you choose to print either an order or
an invoice. To print the order, click on the Print button and select Order or use the ⌥⌘P keyboard shortcut
(Option with Command and P keys simultaneously). To print the invoice, click on the Print button and select
Invoice or use the ⌘P keyboard shortcut (Command and P keys simultaneously).

Whenever you print a document from LF-Factura, you can benefit from
the options available from the macOS printing dialog to save the
document as a PDF file. After clicking on the Print button, the printing
dialog appears. On this dialog, click on the PDF drop-down button and
select the desired function.

Available functions depend on the version of macOS installed on the
Mac. Please refer to the help and the documentation of macOS to learn
more about available options.

Quick display of a product or service results
At any time, you can have a quick view of how a product performs in your business. Click on the Products
icon of the main window's toolbar to display the Products view. Select a product and click on the Details
button     on its card. A small window will pop over to display summarized informations about the product:
amount for total sales excluding taxes and surcharge, best sales territory, best client category and best
client's name related to this product. Only orders for which an invoice was created are taken into account in
the calculation. Click outside the status window to close it.

Quick display of a client results or details
On many views, you can have a quick access to a company informations using the Details button
(button showing a magnifying glass).

On a company card of the Address book view, when you click on the button, a window will pop over to show
the business status for this company under the form of various amounts: total ordered, total billed, paid,
unpaid, total credited and refunded. Click outside the status window to close it.

On the Orders and Credit notes views, when you click on the button, a window will pop over to show the
details for this client: address, client code, tax number, company number, phone, fax, web site and e-mail
address. Click outside the details window to close it.
Copyright © 2014-2020 ITygrys Sp. z o.o.                                                                     24

Modifying client informations on orders, invoices and credit
notes
When you create an order (or consequently an invoice or credit note), the client informations are copied from
the address book card and duplicated inside the order to preserve the integrity of your archives in case of an
accidental modification or deletion of the original address book card. Once the order was created, the client
informations are not to be modified. However, there are situations where one may want to modify them, for
example if the name or address was misspelled in the address book, or if an information such as client tax
number, territory or category was missing.

On the order or credit note view, click on the Client button to display the client informations saved inside the
document and modify them as you need. To update these informations using those contained in the address
book card (if the card still exists), click on the Update from address book button. Such possibility to modify
a client informations should not be used as a normal way to specify client informations on a document. It was
intended only as a last chance to get all informations right on a document. Particularly, it should not be used
to try replacing a client by another one on a document, as documents still contain a link to the original client
card in the address book. The convenient way to proceed is to always ensure that informations are correct
on the client's address book card in the first place.

Difference between the Client button and the Details button

The Client button will display the client informations saved inside the order, whereas the Details button
(button showing a small magnifying glass) follows the link from the document to the address book and will
display the client informations from his/her card if the card still exists.
Copyright © 2014-2020 ITygrys Sp. z o.o.                                                                      25

Querying contents of orders, sales, invoices and credit notes
To perform queries on the contents of orders, sales, invoices or credit notes, click on the Query icon of the
main window's toolbar to display the Query view. The view spontaneously shows the result of a default query
for sales starting on the first day of the current month. Sales figures are those relating to orders for which an
invoice was made. Use the buttons of the Query view to perform a query with customized options:

From the first drop-down menu, select the object of the query: orders, sales, invoices or credit notes, then
choose from and to dates to define the period covered by the query and click on the Reload button         to
process or update the query. Optionally, you can refine your query using comparison options located
between the to date and the Reload button.

Select the first option to the right of the to date to enable the following elements:
• an object to compare: subtotal, tax #1, tax #2, surcharge, discount, total or down payment
• a mathematical symbol: = (equal to), ≠ (different from), < (smaller than), > (greater than), ≤ (equal to or
  smaller than), ≥ (equal to or greater than)
• an amount to compare to

Select the second option if you want to define a range. It will enable the following elements:
• a logical operator: AND (both conditions must be true), OR (at least one of the conditions must be true, and
  it is admitted that both can be true at the same time), XOR (exclusive OR, meaning that one of the
  conditions must be true but both cannot be true at the same time, they mutually exclude each other)
• a mathematical symbol: = (equal to), ≠ (different from), < (smaller than), > (greater than), ≤ (equal to or
  smaller than), ≥ (equal to or greater than)
• an amount to compare to

You can refine the query further by optionally selecting a specific territory, client category, product category,
client or product from the appropriate drop-down menus on the lower line of the query options.

Query result is displayed in a big table showing contents of the selected documents. Each row of the table
indicates the following informations: document date, document number, client name, product name, product
option, product unit price, quantity, discount (as percentage) and product total. Below the table, in the right
corner of the view, the query tool will display the total amount of products value (excluding taxes and
surcharge).

To refine the search even more, you can use the search field located below the table, in the left corner of the
view. This search field will perform a search on the Product option and works in a complementary way with
the option buttons above the table.
Copyright © 2014-2020 ITygrys Sp. z o.o.                                                                                  26

Creating sales reports
The creation of reports is performed on the Reports view. To display the Reports view, click on the Reports
icon on the main window's toolbar. The view spontaneously shows a report for sales since the first day of the
current month. Sales figures are those relating to orders for which an invoice was made.

From the drop-down menu, select which report you want to create: sales or invoices, then choose from and
to dates to define the period covered by the report and click on the Reload button     to create or update
the report. Click on the Print button to print the report.

Sales by Categories

Sales reports present the following data in tables showing figures (excluding taxes, surcharge and discount):

• tables indicating results (excluding taxes, surcharge or reduction) for sales territories, product categories,
  client categories, products, clients
• a table indicating results (including taxes, surcharge or reduction) for payment methods.

Below the tables is a selectable menu allowing to choose which dates constitute the time range you defined
for the report: order creation date, sale date specified on invoices, invoice creation date. For the table items,
rows indicate the total amount (excluding taxes and surcharge) and the share (percentage) it represents.
The products table also indicates the quantity of units sold. After choosing the source for dates, click on the
Reload button        to update tables.

As for the table of payment methods, it displays amounts paid during the specified time range. Note that
those figures are made of two things: down payments paid by clients for orders which have not been fully
paid yet, (with no details regarding the method) and amounts for invoices which have been fully paid (with
detail for each method used).

Invoices and Credit notes

The invoices report presents the following data:
• for invoices: amounts for subtotal, taxes, surcharge, discount, total (box on the upper left)
• for credit notes: amounts for subtotal, taxes, surcharge, discount, total (box on the upper center)
• for the difference: amounts for subtotal, taxes, surcharge, discount, total (box on the upper right)
• a table showing detailed figures for invoices and credit notes: amount for each category of products sold,
  for each tax rate, for each type of surcharge, depending on which dates are the object of your specified
  time range

The table indeed contains several columns showing distinct amounts:
• The Sale date column indicates amounts when the time range is based on sales dates as stated on invoices
• The Invoice date column indicates amounts when the time range is based on invoices creation dates
• The Payment date column indicates amounts paid (fully paid invoices) by clients during the time range
• The Credit note date column indicates amounts when the time range is based on credit notes creation dates
• The Refund date column indicates amounts refunded to clients when the time range is based on credit notes refund
  dates
• The Difference column indicates amounts resulting from the difference (subtraction) between the selected invoices
  and credit notes amounts

In order to specify the reference dates to be taken into account for choosing amounts playing in the
subtraction between invoices and credit notes, use the selectable menus located below the table:
• The first button in the bottom left corner of the view allows to choose whether calculation must be performed for all
  clients, or only for clients which were flagged as Company in the Address book, or those not flagged as Company.
  The second button allows to choose between the sale date, the invoice date or the payment date (for invoices)
• The third menu allows to choose between the creation date or the refund date (for credit notes)

After making your choices, click on the Reload button             to update informations in the boxes and the table.
You can also read