User's Guide - Diversatek ...
←
→
Page content transcription
If your browser does not render page correctly, please read the page content below
Reflux Monitoring
                                System
User’s Guide

                                   Diversatek Healthcare
                                   Technical Research & Training Center
                                   9150 Commerce Center Circle, Suite 500
                                   Highlands Ranch, CO 80129 USA

                                   P 800.558.6408 or 303.470.7020

                                   technicalsupport@diversatekhc.com
                                   clinicalsupport@diversatekhc.com
2460                               clinicaleducation@diversatekhc.com

Part Number: Z07-0145 Rev.5        DiversatekHealthcare.com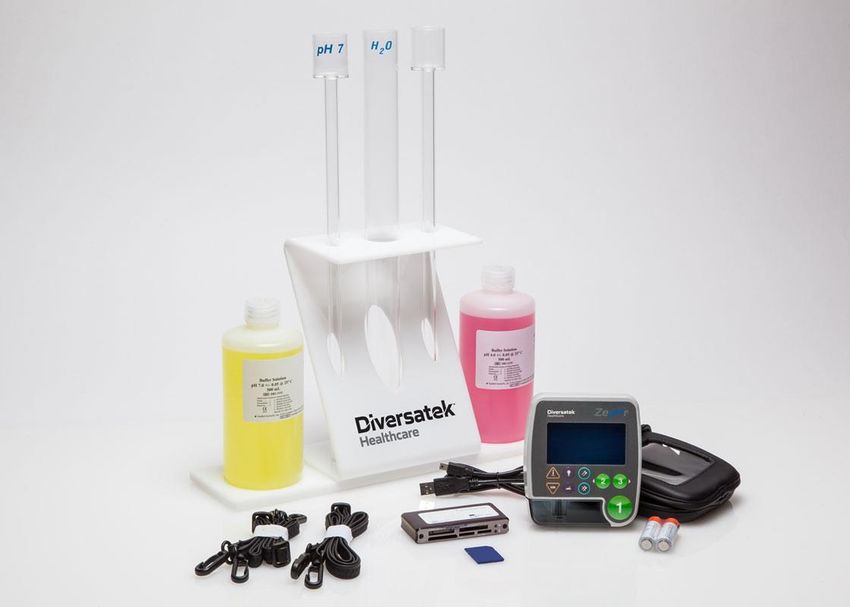
ZepHr® Reflux Monitoring System
                                                                                                             User’s Guide

Notes, Notices, and Cautions in User’s Guide
                                        A NOTE indicates important information that helps you make better use of your
          NOTE:
                                        system.

                                        A NOTICE indicates either potential damage to hardware or loss of data and
          NOTICE:
                                        tells you how to avoid the problem.

                                        A CAUTION indicates a potential for property damage, personal injury, or
          CAUTION:
                                        death.

Symbols Marked On Devices
                                          The operator must read, understand, and follow all instructions in the
           Refer to Instruction
                                          accompanying documents including all warnings, cautions, and precautions
           Manual:
                                          before using the medical device.

           General Warning Sign:          General warning sign to alert the user to potential hazards.

           Caution                        Caution, consult accompanying documents

           Use-By Date (YYYY-
                                          Expiration date for single use and reusable probes.
           MM-DD):

           Do Not Reuse:                  Marked on single use probes.

           Non-Sterile:                   The product associated with this symbol is not sterilized after manufacturing.

           Not made with natural
                                          The product associated with this symbol is not made with natural rubber latex.
           rubber latex:

                                          The key on the Recorder that acts as an Enter key for accepting the current
           Event 1 or Enter Key:          selection on the display. The key also records Event 1 during data acquisition.
                                          See section 4 Record the Patient Study for details on setting the Event 1 value.

                                          The key on the Recorder that acts as a left arrow key for moving the focus on
                                          the display to the left. If the focus is already fully to the left, the Left Key will
           Event 2 or Left Key:           act as an Enter key for accepting the current selection on the display. The key
                                          also records Event 2 during data acquisition. See section 4 Record the Patient
                                          Study for details on setting the Event 2 value.

                                          The key on the Recorder that acts as a right arrow key for moving the focus on
                                          the display to the right. If the focus is already fully to the right, the Right Key
           Event 3 or Right Key:          will act as an Enter key for accepting the current selection on the display. The
                                          key also records Event 3 during data acquisition. See section 4 Record the
                                          Patient Study for details on setting the Event 3 value.

                                          The key on the Recorder that records the beginning of an eating period during
           Begin Meal Key:
                                          data acquisition.

Z07-0145 Rev 5, Edited 12/09/2020, ECO 220-034                                                                               ii
ZepHr® Reflux Monitoring System
                                                                                                           User’s Guide

                                          The key on the Recorder that records the end of the eating period during data
           End Meal Key:
                                          acquisition.

                                          To conserve battery power, the Recorder turns off the display light after a
           Light Key:
                                          certain period of no user input. Pressing the Light Key will turn on the light.

                                          Pressing the Diary Key will create a Diary event during data acquisition. The
                                          Diary event can be used in conjunction with a patient’s handwritten diary to
           Diary Key:
                                          record events or observations not handled with Event 1, Event 2, and Event 3.
                                          See section 4.7.1 Record Symptoms for details on using the Diary feature.

                                          The key on the Recorder that acts as an up arrow key for moving the focus on
           Upright or Up Key:             the display upward. Pressing the Upright Key also records the time that the
                                          patient’s torso moves to an upright position during data acquisition.

                                          The key on the Recorder that acts as a down arrow key for moving the focus
           Recumbent or Down              on the display downward. Pressing the Recumbent Key also records the time
           Key:                           that the patient’s torso moves to a 45° or greater reclining position during data
                                          acquisition.

           International Protection
   IP00                                   The device provides no protection from the ingress of liquids or solids.
           Rating:

           EC Representative:             Authorized Representative in EU.

           Manufacturer:                  Name and address of device manufacturer.

           Serial Number:                 The manufacturer’s serial number uniquely identifying the device.

           Part /Reference
                                          The manufacturer’s part number of the device for re-order.
           Number:

           Medical Device:                Indication the device is a medical device.

                                          The device contains electronics and must be disposed of in accordance with
           Do Not Discard:
                                          local regulations.

Recorder Classifications
                Type BF Applied Part:            This symbol indicates that the patient applied part (probe) is Type BF
                                                 (floating from electrical ground) which offers a specific level of safety.

                Ingress Protection:              Not protected against ingress of moisture. Equipment is not suitable for
                                                 use with flammable anesthetics.

 Rx Only        Prescription Only                Device restricted for use by or on the order of a physician.

Z07-0145 Rev 5, Edited 12/09/2020, ECO 220-034                                                                           iii
ZepHr® Reflux Monitoring System
User’s Guide
Abbreviations and Acronyms
A/D: Analog-to-Digital converter; an electronic circuit or device that converts an analog input signal
into a digital signal. A channel on a probe produces analog output. The Recorder converts that
output to digital data and saves it to the patient’s data file. The A/D channel refers to the probe
channel.
EGJ: Esophagogastric Junction.
LES: Lower Esophageal Sphincter. A ring of smooth muscle fibers at the junction of the esophagus
and stomach. Also called cardiac sphincter or gastroesophageal sphincter.
MII: Multichannel Intraluminal Impedance.
UES: Upper Esophageal Sphincter. Often used to reference the cricopharyngeal and inferior
pharyngeal constrictor muscles at the proximal esophagus.
USB: Universal Serial Bus. USB is a standard port that enables the user to connect external devices
(such as printers, CD writers, memory card readers, etc.) to a Windows system.
Z: Impedance.
Catheter (Probe): Patient applied sensor device.
Z07-0145 Rev 5, Edited 12/09/2020, ECO 220-034 ivZepHr® Reflux Monitoring System
User’s Guide
© Copyright 2020 by Diversatek Healthcare
All rights reserved. Reproduction in any manner whatsoever without the written permission of Diversatek
Healthcare is strictly forbidden.
DISCLAIMER: The information in this manual is subject to change without notice. Diversatek Healthcare makes
no representations or warranties with respect to the contents hereof, and specifically disclaims any implied
warranties of merchantability or fitness for a particular purpose. Diversatek Healthcare reserves the right to revise
this publication and to make changes from time to time in the content hereof without obligation of Diversatek
Healthcare to notify any person of such revisions or changes.
Trademarks used in this text: AirFlo, ZVU, ComforTEC, and ZepHr are trademarks of Diversatek Healthcare; Dell is
a trademark of Dell Inc.; Intel, Pentium, and Celeron are registered trademarks of Intel Corporation; Microsoft and
Windows are registered trademarks of Microsoft Corporation.
Other trademarks and trade names may be used in this document to refer to either the entities claiming the marks
and names or their products. Diversatek Healthcare disclaims any proprietary interest in trademarks and trade
names other than its own.
Z07-0145 Rev 5, Edited 12/09/2020, ECO 220-034 vZepHr® Reflux Monitoring System
User’s Guide
Contents
1 Introduction .........................................................................................................................................................1
1.1 HOW TO USE THIS GUIDE ............................................................................................................................... 1
1.2 CAUTION: SAFETY INSTRUCTIONS ..............................................................................................................2
1.3 PRODUCT DESCRIPTION ..................................................................................................................................4
1.3.1 Indications of Use ..................................................................................................................................4
1.3.2 Contraindications ..................................................................................................................................4
1.3.3 Biocompatibility .....................................................................................................................................4
1.3.4 Overview ................................................................................................................................................5
1.3.5 ZepHr System Components ....................................................................................................................6
1.3.6 Recorder Main Features ........................................................................................................................7
1.3.7 Probe and Memory Card Connection Points .........................................................................................8
1.3.8 Battery Compartment ............................................................................................................................. 9
1.3.9 pH Calibration Kit ............................................................................................................................... 10
1.4 SOFTWARE INSTALLATION ........................................................................................................................... 11
1.4.1 System Requirements ........................................................................................................................... 11
1.4.2 Connecting the System to a Data Network ........................................................................................... 11
1.4.3 Software Installation Instructions ........................................................................................................ 12
1.4.4 Software Activation .............................................................................................................................. 12
1.4.5 Software Upgrades .............................................................................................................................. 12
1.5 SECURITY AND AUTHENTICATION ................................................................................................................ 13
2 Getting Started ................................................................................................................................................... 14
2.1 FIRST-TIME SETUP OF A RECORDER .............................................................................................................. 14
2.2 OVERVIEW: RUN A ZEPHR STUDY ................................................................................................................ 14
2.3 TRAINING THE PATIENT ................................................................................................................................ 14
2.4 PATIENTS WITH SPECIAL NEEDS ................................................................................................................... 14
3 Setup and Maintenance ..................................................................................................................................... 16
3.1 SETUP OPTIONS ............................................................................................................................................ 16
3.1.1 Access the Setup Screen ....................................................................................................................... 16
3.1.2 Set Recorder Time and Date ................................................................................................................ 16
3.1.3 Changing the Language ....................................................................................................................... 17
3.1.4 Changing the Date Format .................................................................................................................. 17
3.1.5 Enabling the Study Time Limit ............................................................................................................. 17
3.1.6 About the Recorder .............................................................................................................................. 17
3.2 CLEANING PROCEDURES .............................................................................................................................. 17
3.2.1 Recorder and AirFlo Sphincter Locator .............................................................................................. 18
3.2.2 Calibration Tubes ................................................................................................................................ 18
3.3 PREVENTATIVE MAINTENANCE .................................................................................................................... 18
3.4 SERVICE ....................................................................................................................................................... 18
3.5 DECOMMISSIONING AND DISPOSAL .............................................................................................................. 18
4 Record the Patient Study .................................................................................................................................. 19
4.1 SETUP THE PATIENT IN ZVU.......................................................................................................................... 19
4.2 SETUP THE RECORDER FOR THE PATIENT ..................................................................................................... 20
4.3 CALIBRATE PROBE ....................................................................................................................................... 22
4.4 POSITION THE PROBE .................................................................................................................................... 24
4.4.1 Manometric Location of Probe ............................................................................................................ 24
4.4.2 Pressure Sphincter Location of Probe ................................................................................................. 25
4.5 RECORD THE STUDY ..................................................................................................................................... 27
4.5.1 Start Recording after Calibration and Probe Positioning ................................................................... 27
4.5.2 Start Recording from Standby Mode .................................................................................................... 27
4.5.3 Start Recording after Battery Power Loss ........................................................................................... 27
Z07-0145 Rev 5, Edited 12/09/2020, ECO 220-034 viZepHr® Reflux Monitoring System
User’s Guide
4.6 RECORD ESOPHAGEAL FUNCTION EVALUATION .......................................................................................... 28
4.7 RECORD EVENTS AND BODY POSITIONS ....................................................................................................... 29
4.7.1 Record Symptoms................................................................................................................................. 29
4.7.2 Record Meal Periods ........................................................................................................................... 30
4.7.3 Record Body Position Changes ........................................................................................................... 30
4.8 STOP THE PATIENT STUDY ............................................................................................................................ 30
5 Transfer an Acquired Study for Analysis ........................................................................................................ 32
6 Troubleshooting ................................................................................................................................................. 33
6.1 RECORDER SETUP FAILS BECAUSE THE PROBE DOES NOT MATCH PROTOCOL ............................................ 33
6.2 BATTERY LOW OR EXHAUSTED .................................................................................................................... 33
6.3 PROBE FAILS TO CALIBRATE ........................................................................................................................ 34
6.3.1 Impedance Channel(s) Fail to Verify ................................................................................................... 34
6.3.2 pH Channel(s) Fail to Calibrate .......................................................................................................... 34
6.4 BEEP/SHOW PROBE DISCONNECT WARNINGS .............................................................................................. 35
6.5 PATIENT FILE FAILS TO TRANSFER ............................................................................................................... 35
6.6 THE SPECIFIED MEMORY CARD DRIVE IS UNAVAILABLE ............................................................................. 35
6.7 ERROR WHEN ERASING A PATIENT FROM THE MEMORY CARD .................................................................... 36
6.8 ERROR MESSAGES DISPLAYED BY THE ZEPHR RECORDER........................................................................... 37
7 Appendix ............................................................................................................................................................ 39
7.1 TECHNICAL SUPPORT ................................................................................................................................... 39
7.2 DECLARATION OF CONFORMITY ................................................................................................................... 40
7.3 EMC INFORMATION ..................................................................................................................................... 40
7.3.1 Electromagnetic Emissions .................................................................................................................. 40
7.3.2 Electromagnetic Immunity ................................................................................................................... 41
7.3.3 Recommended Separation Distances ................................................................................................... 43
7.4 SPECIFICATIONS ........................................................................................................................................... 44
Z07-0145 Rev 5, Edited 12/09/2020, ECO 220-034 viiZepHr® Reflux Monitoring System
User’s Guide
1 Introduction
1.1 How to Use This Guide
“Recorder” in this manual refers to the ZepHr Recorder.
This guide is designed to help you learn how to use the Recorder quickly and easily. It is intended for health-care
professionals trained in performing clinical procedures. Regularly scheduled clinical training courses are offered for
your convenience. See contact information on the cover page or in section 7.1 Technical Support.
This User’s Guide assumes the user has the following basic computer skills common to Microsoft software
applications:
• Mouse click and double-click.
• Open desktop folders and double-click desktop icons to run applications.
• Use Windows Explorer to browse and manage files and folders.
• Maximize, minimize, resize, and move application windows.
• Use dialog boxes and message boxes.
• Use menu bars to execute menu commands.
This guide uses visual clues and typographical conventions to attract attention and clarify instructions.
Keyboard keystrokes are written in bold face.
Labels in the software such as a menu, toolbar, button, shortcut names, etc. are written in italics.
This guide is divided into different sections featuring specialized tasks for quick, easy reference.
Z07-0145 Rev 5, Edited 12/09/2020, ECO 220-034 1ZepHr® Reflux Monitoring System
User’s Guide
1.2 CAUTION: Safety Instructions
The Recorder is a sensitive electronic instrument. Please use the following safety guidelines to help ensure your
own personal safety and to help protect your ZepHr System and working environment from potential damage.
CAUTION: The user must be qualified in gastrointestinal diagnostic procedures, trained in the use of the
system, and must be familiar with all labeling and instruction for use associated with the
equipment. The user of the device is advised to thoroughly understand the use of the
equipment, and familiarize themselves with the location and function of all controls and alarms
prior to using the equipment.
CAUTION: The ZepHr System is intended for use by gastroenterologists, surgeons, other trained
physicians, and medically trained personnel as an aid in documenting and diagnosing digestive
disorders. This system includes analysis software, but requires skilled interpretation by a
physician to make a diagnosis.
CAUTION: Single use catheters are designated as such for the protection of the patient. If single use
catheters are reused the risk of cross contamination with other patients is possible. Do not
reuse single use catheters.
CAUTION: Do not get the Recorder wet as the device is not waterproof.
CAUTION: Do not expose the Recorder to x-rays, metal detectors, MRI, or other strong radiation.
CAUTION: Do not drop the Recorder.
CAUTION: Do not attempt to open or service the Recorder.
CAUTION: Remove and discard the used batteries after each completed study.
CAUTION: Electromagnetic interference is possible between Z probes and implanted devices such as
pacemakers and internal defibrillators. Monitoring of all implanted devices is advised.
Consult with the manufacturer of the implanted device for any possible interference issues.
CAUTION: Follow instructions provided with all types of probes used with the ZepHr System.
CAUTION: Discard all used disposable probes in accordance with local biohazard requirements. Refer to
section 3.5 Decommissioning and Disposal for additional information.
CAUTION: The Recorder incorporates a lithium device. Dispose of the Recorder in accordance with local
regulations or return to manufacturer. Refer to section 3.5 Decommissioning and Disposal for
additional information.
You can contact Technical Support either by email or telephone.
• Email address is technicalsupport@diversatekhc.com.
• The telephone number is 303-470-7020.
CAUTION: Instruct the patient to not wear the strap around their neck while in bed.
CAUTION: Warning: No modification of this equipment is allowed.
Z07-0145 Rev 5, Edited 12/09/2020, ECO 220-034 2ZepHr® Reflux Monitoring System
User’s Guide
CAUTION: In order to minimize the risk of nosebleed, use adequate lubrication with a water soluble
lubricant for catheter intubation.
CAUTION: Do not apply liquid directly to the recorder. Please refer to the cleaning instructions in
section 3.2 Cleaning Procedure.
CAUTION: Only use Diversatek Healthcare approved accessories with the ZepHr Recorder. Damage
to the system, the accessory, and/or patient injury may occur.
CAUTION: Do not use Diversatek Healthcare accessories with other non-Diversatek Healthcare
equipment. Damage to the system, the accessory, and/or patient injury may occur.
CAUTION: Do not use the ZepHr Recorder in association with an MRI machine. The ZepHr
Recorder contains sensitive electronics not designed to operate in the extensive magnetic
fields of an MRI machine.
CAUTION: Do not use the ZepHr Recorder in emergency situations or for patient treatment or
monitoring. The system is designed for diagnostic use only in non-emergency situations.
CAUTION: Do not use the ZepHr Recorder in an oxygen rich environment.
CAUTION: Any serious incidents that occur in relation to the ZepHr Recorder and/or probes should
be reported to Diversatek and the Competent Authority.
NOTICE: Use of non-Diversatek Healthcare approved USB devices can cause unpredictable intermittent
device operation.
NOTICE: Use of non-Diversatek Healthcare approved memory cards can cause unpredictable intermittent
device operation.
NOTICE: Insertion of AA alkaline batteries powers “ON” the Recorder. The batteries must be removed to
switch “OFF” the Recorder. Removing batteries is not synonymous with ending the study.
NOTICE: Always use new alkaline batteries for each study.
NOTICE: Do not store or use the ZepHr System in extreme temperatures. The ZepHr System is best stored
between 32° and 104°F (0° to 40°C). See section 6.8.
NOTICE: Use only with Diversatek Healthcare Z/pH and pH-only probes.
NOTICE: The ZepHr Recorder contains no user serviceable parts. The device must be sent to Diversatek
Healthcare for servicing.
Z07-0145 Rev 5, Edited 12/09/2020, ECO 220-034 3ZepHr® Reflux Monitoring System
User’s Guide
1.3 Product Description
1.3.1 Indications of Use
The ZepHr Recorder (registered as Accessory Model MII), when used in conjunction with a pH probe, can be used
as an aid in differentiating acid vs. non-acid reflux events. In addition, the ZepHr Recorder is intended to measure
motor function of the proximal gastrointestinal tract including swallow effectiveness and directional bolus transport
by means of intraluminal impedance recording when used in conjunction with a Z/pH probe. The ZepHr Recorder is
not intended for use in biliary studies.
1.3.2 Contraindications
Reflux studies are contraindicated in the following situations:
• Suspicious or known pharyngeal or upper esophageal obstruction (e.g. tumors)
• Patients with severe clotting disorders
• Patients with known esophageal problems such as deep ulcers, varices, Zenker's diverticula, and strictures
1.3.3 Biocompatibility
The ZepHr Recorder system utilizes common materials with no known biocompatibility issues. However, the
following cautions should be observed:
CAUTION: Some catheters have applied parts made with 316L stainless steel. This
type of stainless steel, although medical grade, contains 10-14% nickel
which may pose risks for people with certain allergies to nickel.
Z07-0145 Rev 5, Edited 12/09/2020, ECO 220-034 4ZepHr® Reflux Monitoring System
User’s Guide
1.3.4 Overview
The ZepHr Recorder is an ambulatory diagnostic instrument used to quantify gastroesophageal reflux and correlate
reflux episodes to symptom events occurring during the study period. ZepHr Monitoring employs concurrent
collection of Multichannel Intraluminal Impedance (MII/Z) data and pH data. Reflux episodes are identified by
impedance based on the ability of impedance to detect all reflux episodes; both acid and nonacid. pH sensors are
also employed to support the differentiation between acid and nonacid reflux episodes. If a reflux episode is detected
by impedance and the pH is below 4 for at least 5 seconds during the reflux (MII) episode, the episode is
characterized as acid reflux. Conversely, if a reflux episode is detected with impedance and the pH remains above
4.0, the episode is characterized as nonacid reflux.
The Recorder can be used with a combined modality impedance/pH (Z/pH) probe to assess both acid and nonacid
reflux. Alternatively, the Recorder can be used to acquire pH-only studies in conjunction with 1, 2 or 3 channel pH
probes.
Diversatek Healthcare manufactures a complete series of Z/pH and pH-only probe models sold under the product
name ZepHr®, ComforTEC® and ComforTEC® Plus.
ZVU Software is used to configure a new study on the memory card. The configuration process supports entry of
patient data, selection of a study workflow which is based upon the specific probe selected and designation of the
symptom event keys to match a specific patient’s symptoms. After the study is acquired, ZVU Software is used to
manage the transferring of acquired data on the memory card to the analysis computer for subsequent analysis.
The ZepHr System’s memory card is included with the Recorder upon purchase. If additional or replacement
memory cards are needed, they should be purchased from Diversatek Healthcare to ensure compatibility and
reliability.
The memory card reader is installed on the analysis computer via the USB port. Once installed, the memory card
reader supports the configuration of memory cards for new studies and transferring of acquired studies.
Diversatek Healthcare’s ZVU Software supports the analysis and report generation of Z/pH (acid, non-acid) and pH
(acid) reflux studies.
Z07-0145 Rev 5, Edited 12/09/2020, ECO 220-034 5ZepHr® Reflux Monitoring System
User’s Guide
1.3.5 ZepHr System Components
The ZepHr System consists of the following components:
1. Host Computer (U.S.A.): Provides computer processing capabilities to setup, store, and analyze
recorded patient data.
2. Memory Card Reader: Removable drive that can read and write to a memory card.
3. Memory Card: Provides Recorder with patient specific instructions for recording a
study. The Recorder writes study data per the instructions onto the
memory card for later transfer by the Host Computer and ZVU Software.
4. Recorder: Records patient’s position, symptoms, events, meal periods, and Z/pH
data during an ambulatory study.
5. Carrying Case: Provides a convenient way for the patient to carry the Recorder during a
study.
6. ComforTEC® Z/pH and Disposable probes used to collect biomedical data and convert it into a
ComforTEC® Plus pH (Acid) format that can be displayed and analyzed by a computer.
Probes:
7. pH Calibration Kit: pH buffer and tubes for calibrating pH channels and verifying
impedance channels before each study.
8. AirFlo™ Sphincter Locator Air pressure infusor for locating the upper or lower esophageal
sphincter by providing uncalibrated pressure readings as the probe is
pulled slowly through the sphincter.
9. ZVU Software: Provides an easy way for the user to setup the memory card for
recording a study, transfer recorded data, display data for analysis and
report the data.
Z07-0145 Rev 5, Edited 12/09/2020, ECO 220-034 6ZepHr® Reflux Monitoring System
User’s Guide
1.3.6 Recorder Main Features
Display Light Begin Meal
ZepHr Recorder Programmable Event 2 or
Display ◄ Key
Programmable Event 3 or
Upright or ► Key
▲ Key
Recumbent or
▼ Key
Programmable
Event 1
End Meal
Diary Event
Figure 1: ZepHr Recorder - Front View
ZepHr Recorder Features:
• Small and light-weight.
• Verifies that the probe and selected protocol correspond.
• Supports calibration of Z/pH and pH-only probes.
• Supports pressure location techniques for probe positioning properly with respect to the lower or upper
esophageal sphincter.
• Records and stores reflux data during ambulatory Z/pH or pH-only studies.
• Stores body position data as entered by Recumbent and Upright keys.
• Stores meal period data as entered by Begin Meal and End Meal keys.
• Stores symptom events as entered by programmable symptom Event 1, Event 2, and Event 3 keys.
• Stores diary event markers that may be referenced to a written diary.
See the Symbols Marked on Devices section at the beginning of this User’s Guide for descriptions of Recorder keys.
Z07-0145 Rev 5, Edited 12/09/2020, ECO 220-034 7ZepHr® Reflux Monitoring System
User’s Guide
1.3.7 Probe and Memory Card Connection Points
Z/pH Probe Connector
pH-only Probe
AirFlo Sphincter Locator
Connector
Memory Card – oriented
Memory Card properly for insertion.
Connector
Figure 2: ZepHr Recorder - Top View with Cover Removed
ZepHr Connection Point Functions:
• Memory card connector supports insertion of a memory card for data storage. To insert, push the card in
fully. To remove, push the card in and release, then pull the card out completely.
• For pH-only probes, the RJ-45 connector supports both input of signal from AirFlo Sphincter Locator and
connection of pH-only probes.
• Z/pH probe connector supports both input of signal from the AirFlo Sphincter Locator and connection of
Z/pH probes.
• A cover (not shown) secures both memory card and probe connection during study to prevent
disconnection during a procedure.
Z07-0145 Rev 5, Edited 12/09/2020, ECO 220-034 8ZepHr® Reflux Monitoring System
User’s Guide
1.3.8 Battery Compartment
AA Battery Compartment
Figure 3: ZepHr Recorder – Back View with Battery Compartment Cover Opened
Battery Compartment Functions:
• Supports connection of AA alkaline batteries to power the Recorder.
• Recorder powers on when last battery is inserted.
• Removal of one battery powers down the Recorder.
NOTE: Incorrect installation of a battery causes no harm.
NOTE: Use only alkaline (LR6) batteries. Energizer and Duracell brand batteries are recommended.
Other batteries may not fit properly and could cause interrupted studies and shortened battery life.
Z07-0145 Rev 5, Edited 12/09/2020, ECO 220-034 9ZepHr® Reflux Monitoring System
User’s Guide
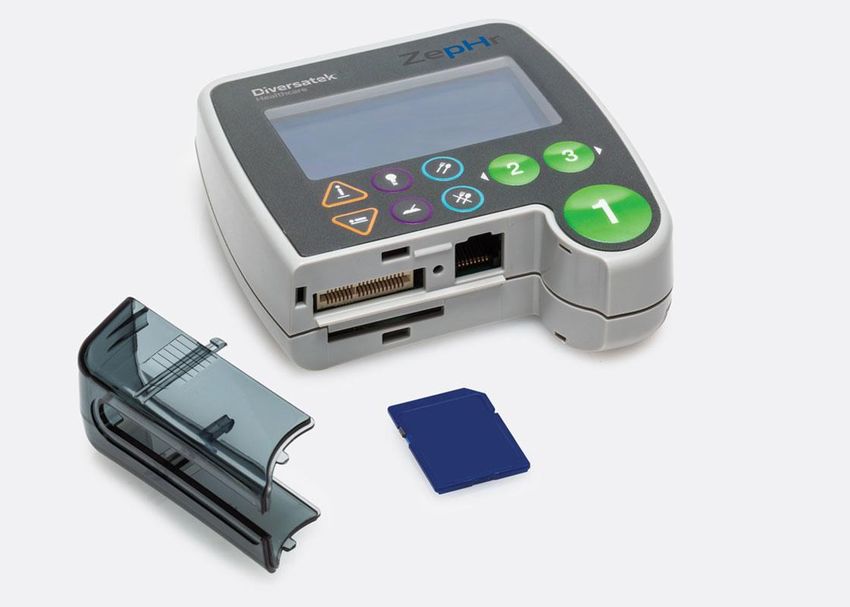
1.3.9 pH Calibration Kit
Calibration Tubes (2)
Rinse Water
Buffer
Solutions (2)
Figure 4: pH Calibration Kit
Calibration Kit Components:
• pH 4 and pH 7 calibration buffer solutions.
• Calibration tubes for calibration buffer solutions.
• Tube for rinse water.
• Calibration tube stand.
CAUTION: Do not combine buffer bottles to consolidate multiple containers as this may change the
concentration of the solution.
CAUTION: Do not fill the same calibration tube from more than one supply bottle as this may change the
concentration of the solution.
NOTE: Replace buffer solutions in the calibration tubes with fresh buffer and rinse water on a daily
basis.
Z07-0145 Rev 5, Edited 12/09/2020, ECO 220-034 10ZepHr® Reflux Monitoring System
User’s Guide
1.4 Software Installation
Your ZepHr System is delivered with all required software installed. However, in special situations, it may be
necessary to install the latest update or other special software. If such a situation arises, first consult this section for
guidance, and then if in doubt, please contact Technical Support.
1.4.1 System Requirements
For ZepHr Systems with ZVU Software, a host computer with the following requirements is recommended:
Recommended Minimum
PC Processor Intel 64-bit processor, 2 GHz or faster with 4 Intel 32-bit processor, 2 GHz or faster with 2
cores cores
Operating System: Windows® 10 Professional Windows® 7 Professional
Graphics: DirectX-11 device with Feature (DDI) level DirectX-11 device with Feature (DDI) level
11 or higher (includes Intel HD2500) 11 or higher (includes Intel HD2500)
Memory: 4 GB 4 GB
Hard Drive: 200 GB 200 GB
Monitor: Full HD 1080p (1920x1080 resolution) Full HD 1080p (1920x1080 resolution)
USB Ports: 1 available USB 2.0 port 1 available USB 2.0 port
1.4.2 Connecting the System to a Data Network
The PC utilized by the ZepHr System does not need to be connected to a data network for it to function properly and
achieve its intended use. Attachment to a network provides for convenient sharing of data files, back-up of data, and
printing to network printers. There are no known hazardous situations resulting from a failure of the network
coupling.
The IT data network port utilized by the PC conforms to the conventional Ethernet standard IEEE 802.3. There are
no required characteristics or configuration of the IT network.
If the PC is connected to a data network, please be aware of the following:
CAUTION: Connection of the PC to a network/data coupling that includes other
equipment could result in previously unidentified risks to patients,
operators or third parties. All risks should be identified, analyzed,
evaluated and controlled. Subsequent changes to the network/data
coupling could introduce new risk and require additional analysis
such as unauthorized access. Changes to the network/data coupling
include:
• Changes in network/data coupling configuration
• Connection of additional items to the network/data coupling
• Disconnecting items from the network/data coupling
• Update of equipment connected to the network/data coupling
• Upgrade of equipment connected to the network/data coupling
Please refer to the current revision of IEC 60601-1 for the requirements applicable to Medical Electrical (ME)
Systems.
Z07-0145 Rev 5, Edited 12/09/2020, ECO 220-034 11ZepHr® Reflux Monitoring System
User’s Guide
1.4.3 Software Installation Instructions
NOTE: Before you get started: You must have “Local” administrator privileges to load the software.
If you do not have local administrator privileges, the install will not run. Please contact your local IT
administrator if you need assistance with obtaining local administrator privileges.
To install ZVU Software, do the following:
• Power on the host computer.
• Log on as a user with Local Administrator privileges.
• Insert the ZVU installation media (CD or USB memory stick) and wait about 15 seconds. The setup program
will run automatically. If the auto-start installation wizard does not start:
• Open Windows Explorer.
• Navigate to the installation media.
• Double-click on the exe file.
• The ZVU installation begins.
• Follow the installation prompts to complete the installation.
• After the installation is complete, exit from the installation screen.
• Remove the installation media from the PC.
1.4.4 Software Activation
Diversatek Healthcare is required by regulatory agencies to track the installation of ZVU Software at each customer
site. To comply with regulations, ZVU requires that each installation on each computer be activated. Basic site and
computer information for each installation of ZVU Software will need to be provided. No patient information is
collected.
For customers outside of the United States, contact your Distributor for help with activating the software.
For customers within the United States, contact Technical Support and provide the following information:
• Machine identification code: generated by ZVU and displayed on the Activation Screen at initial start up
• Facility name
• Facility address
• Contact person at facility
• Contact person’s telephone number
• Contact person’s email address
Technical Support will then generate an activation code to enter on the ZVU Activation Screen.
1.4.5 Software Upgrades
NOTE: DO NOT install the software immediately before starting a study. If anything goes wrong
with the installation, for example the installation CD is scratched and cannot finish the installation;
you will need time to fix the problem. Once the old software is uninstalled, it is no longer readily
available.
• To install the software update, follow the instructions accompanying the upgrade. If those instructions are not
available, then follow the steps in Section 1.4 Software Installation.
Z07-0145 Rev 5, Edited 12/09/2020, ECO 220-034 12ZepHr® Reflux Monitoring System
User’s Guide
1.5 Security and Authentication
The ZVU Software utilizes patient identifying information. In some countries access to this kind of information
must be restricted. The use of Windows Security and Authentication to limit access to the software and patient data
is recommended. Software users should be required to login with a unique user ID and password that can be
authenticated.
Z07-0145 Rev 5, Edited 12/09/2020, ECO 220-034 13ZepHr® Reflux Monitoring System
User’s Guide
2 Getting Started
This section provides important information to help you get started with the ZepHr recorder.
2.1 First-time Setup of a Recorder
With new systems, all required software has been installed on the Host Computer.
• Set the clock on the Recorder if it is the first time the Recorder is to be used. See section 3 Setup and
Maintenance.
• Follow the directions in section 2.2 Overview: Run a ZepHr Study.
2.2 Overview: Run a ZepHr Study
• Put the memory card into the memory card reader attached to the computer.
• Set up the memory card for the upcoming patient study using ZVU. See section 4 Record the Patient Study .
• Remove the memory card from the computer’s memory card reader and insert into the Recorder.
• Setup the Recorder for the patient. See section 4.2 Setup the Recorder for the Patient.
• Calibrate the probe. See section 4.3 Calibrate Probe.
• Position the probe in the patient. See section 4.4 Position the Probe.
• Instruct the patient in recording events. See section 4.7 Record Events and Body Positions.
• Start recording patient data. See section 4.5 Record the Study.
• (Optional) Perform 10 saline swallows prior to reflux study. See section 4.6 Record Esophageal Function
Evaluation.
• After recording data for a sufficient amount of time, usually 24 hours, stop the recording. See section 4.8 Stop
the Patient Study.
• Remove the memory card from the Recorder and replace in the computer’s memory card reader.
• Transfer the patient data from the memory card using ZVU.
• (Optional) Once the data is successfully transferred off the memory card, the card can be erased to make way
for the next patient study.
2.3 Training the Patient
The accuracy and success of the study is directly related to how well the patient understands how to properly operate
the ZepHr Recorder. In addition, since the need to wear the recorder and probe is sometimes viewed as an
inconvenience to the patient, a thorough understanding of the recorder may help to make the experience as stress-
free as possible. Extra care should be taken to instruct the patient concerning at least the following items. It is
helpful to provide a simple instruction/reminder sheet for these items and others you may determine through
experience. Refer to the later sections of this manual for detailed explanations and instructions.
• Meaning and function of each button.
• How to properly press a button once for an event, and not repeatedly press the button for the same event.
• Point out the audible feedback (beep).
• How to recognize when the batteries are depleted and need to be replaced.
• How to replace the batteries and restart the recording.
• Remind the patient not to remove the probe or SD card from the recorder at any time.
• Remind the patient not to remove the recorder from the carrying case.
• Review with the patient precautions on wearing the recorder under clothing.
• Remind the patient to keep the recorder dry (i.e. do not take it into the shower or bath).
• Provide the patient with your facility’s contact number to call if they have issues.
2.4 Patients with Special Needs
The ZepHr recorder has been designed to be simple to configure and operate. For patients such as young children or
those with special needs such as visual or cognitive disabilities, it is recommended the patient be assisted by an adult
Z07-0145 Rev 5, Edited 12/09/2020, ECO 220-034 14ZepHr® Reflux Monitoring System
User’s Guide
or guardian to help with operating the recorder. In some cases, the recorder unit may be placed in a backpack or
worn under the patient’s clothing to minimize unintended operation of the recorder.
Z07-0145 Rev 5, Edited 12/09/2020, ECO 220-034 15ZepHr® Reflux Monitoring System
User’s Guide
3 Setup and Maintenance
3.1 Setup Options
The recorder’s Setup screen permits setting the language, setting the date, setting the time and setting the date
format. It also can display information about the recorder such as the recorder type, the serial number, etc.
3.1.1 Access the Setup Screen
• Remove the memory card from the Recorder if it is plugged in. See Figure 2, page 8.
• Place AA alkaline batteries into the Recorder’s battery compartment. Assure the batteries are correctly oriented
as per the symbols in the battery compartment. See Figure 3, page 9.
• When the startup screen appears, press the Diary key. See Figure 1, page 7.
• Note: If desired, the Setup screen can also be accessed by following menu prompts:
• Remove the memory card from the Recorder if it is plugged in. See Figure 2, page 8.
• Place AA batteries into the Recorder’s battery compartment. Assure the batteries are correctly oriented as
per the symbols in the battery compartment. See Figure 3, page 9.
• When the startup screen appears, press the Event 1 or Enter key (Enter).
• When the No Flash Card screen appears, press the ◄ key to highlight NEXT on the screen and press
Enter.
• When the task selection screen appears, use the ▼ key to scroll to the Setup option and press Enter.
3.1.2 Set Recorder Time and Date
Before beginning the initial study, the Recorder must be set with the current time and date for your location. Once
these Recorder settings are accomplished, you will not need to perform this action again unless you wish to change
the time to accommodate a change such as daylight savings time. The Recorder will maintain these settings during
time periods when batteries are removed.
To setup the Recorder time and date:
• Go to the setup screen as described in section 3.1.1 Access the Setup Screen.
• When the Setup screen appears, use the ▼ key to scroll to the Set Date option by pressing Event 1 or Enter key
(Enter).
• Use the ▼ key and/or ▲ key to set the month.
• Use the ► key to scroll right or Enter to select the day field.
• Use the ▼ key and/or ▲ key to set the day.
• Use the ► key to scroll right or Enter to select the year field.
• Use the ▼ key and/or ▲ key to set the year.
• Press Enter to set the date and return to the main Settings screen.
• Use the ▼ key to select the Set Time option and press Enter.
• Use the ▼ key and/or ▲ key to set the hour.
• Use the ► key to scroll right or Enter to select the minute field.
• Use the ▼ key and/or ▲ key to set the minute.
NOTE: Set the minute field and the upcoming second field to the time when you will press Enter to start
the clock.
• Use the ► key to scroll right or Enter to select the second.
• Press Enter when the time arrives matching your above settings.
The time and date settings are now complete.
• Highlight Done and press Enter to return to the Setup screen.
• Highlight Done and press Enter to exit the Setup screen and put the Recorder into the Standby mode.
Z07-0145 Rev 5, Edited 12/09/2020, ECO 220-034 16ZepHr® Reflux Monitoring System
User’s Guide
3.1.3 Changing the Language
• Go to the setup screen as described at the start of the setup section.
• When the Setup screen appears, use the ▼ key and/or ▲ key, if necessary, to scroll to the Language option.
Press Event 1 or Enter key (Enter).
Note: The current language will be identified with an “*”. Pressing Enter at this time keeps the current
language.
• Use the ▼ key and/or ▲ key, if necessary, to scroll to the desired language. Press Enter.
• Remove and re-insert the batteries to power cycle the Recorder.
3.1.4 Changing the Date Format
The date format can be set to mm/dd/yyyy (month/day/year) format or to dd/mm/yyyy (day/month/year) format.
• Go to the setup screen as described at the start of the setup section.
• When the Setup screen appears, use the ▼ key and/or ▲ key, if necessary, to scroll to the Date format option.
Press Event 1 or Enter key (Enter).
Note: The current date format will be identified with an “*”. Pressing Enter at this time keeps the current date
format.
• Use the ▼ key and/or ▲ key, if necessary, to scroll to the desired format. Press Enter.
• Remove and re-insert the batteries to power cycle the Recorder.
3.1.5 Enabling the Study Time Limit
The Study Time Limit is a configurable option that when enabled will stop the recording of a study 24 hours after it
was started. Note this is 24 hours of clock time and not actual recording time. For example, if a study is stopped to
change the batteries, the resulting recorded study time will be less than 24 hours.
• Go to the setup screen as described at the start of the setup section.
• When the Setup screen appears, use the ▼ key and/or ▲ key, if necessary, to scroll to the Study Time Limit
option. Press Event 1 or Enter key (Enter).
• Use the ► key or ◄ key to toggle the feature on or off. Press Enter.
3.1.6 About the Recorder
The following information about the ZepHr Recorder can be viewed by accessing the About screen:
• Type
• Serial number
• Configuration
• Revision number
• Firmware revision number
• Text revision number
• Go to the setup screen as described at the start of the setup section.
• When the Setup screen appears, use the ▼ key and/or ▲ key, if necessary, to scroll to the About option. Press
Event 1 or Enter key.
3.2 Cleaning Procedures
Z07-0145 Rev 5, Edited 12/09/2020, ECO 220-034 17ZepHr® Reflux Monitoring System
User’s Guide
3.2.1 Recorder and AirFlo Sphincter Locator
Clean the outside of the Recorder and the AirFlo Sphincter Locator accessory as needed with disinfectant solutions
or an approved hospital grade wipe defined by the appropriate rules of the using institution.
NOTE: Always apply cleaning solution to a soft cloth and then wipe the equipment. Never apply liquid
directly to the equipment.
3.2.2 Calibration Tubes
Change the buffer solutions and rinse water in the calibration tubes with fresh solution on a daily basis. When using
external reference probes, since these require the patient to place a finger in the buffer solution as part of the
calibration process, replace the buffer solutions and rinse water after each use.
Clean the calibration tubes monthly or more frequently as required by the current hospital/clinic practices by
following these steps:
1) Discard buffer solutions and rinse water that is in the calibration tubes.
2) Clean the tubes with mild soap and water, then rinse well with tap water and drain. For locations with hard
water, do a final rinse with distilled water to help keep water deposits from forming.
3) Allow to air dry.
3.3 Preventative Maintenance
The ZepHr recorder should be periodically examined to ensure the device is in working order. This will help
eliminate the chance for troubles when a study is being performed.
In addition to periodic cleaning mentioned above, the following should be done on a regular basis. Contact
Technical Support for replacement parts.
• Inspect the recorder enclosure for cracks and other damage.
• Check the retaining clips of the probe cover have not been broken off. If the retaining clips have broken off the
probe cover should be replaced.
• Check the retaining clips of the battery cover have not been broken. If the retaining clips have broken off the
battery cover should be replaced.
• Clean the positive battery contact using a cotton swab and alcohol to remove accumulated particles.
3.4 Service
There are no serviceable components in the Recorder. If necessary, the device should be returned to the
manufacturer or manufacturer’s representative for repair.
3.5 Decommissioning and Disposal
The ZepHr System does not require decommissioning to remove it from service.
The device contains electronics and must be disposed of in accordance with facility policies and local
regulations. For customers who do not have approved device disposal procedures, please go to the following
website page for guidance:
Website URL: www.diversatekhealthcare.com/downloads
Document: Safe Disposal of Electrical/Electronic Medical Devices
Z07-0145 Rev 5, Edited 12/09/2020, ECO 220-034 18ZepHr® Reflux Monitoring System
User’s Guide
4 Record the Patient Study
4.1 Setup the Patient in ZVU
The ZepHr recorder utilizes a memory card containing the information needed for the recorder to conduct the patient
study. Set up the card using ZVU Software. For assistance on using ZVU for reflux studies, refer to the additional
help guides and information accessible from within the software.
• For a new patient, create the patient record using the ZVU Patient Management screen. For a patient that
has already been the subject of a prior reflux or manometry study, locate the original patient record on the
Patient Management screen.
• Add a new study to the patient record and select the workflow that is appropriate for the type of probe to be
used for the study. (The workflow must match the probe type being used, otherwise the recorder may
record incorrect data.) Add any additional study demographic information and save the patient record.
• Progress to the screen for setting up the memory card, set the following configurations and save the study
files to the memory card.
o Annotation (Symptom Event) Buttons 1, 2 and 3:
These buttons provide a convenient way for the patient to indicate when a symptom has occurred.
They can be customized depending on the patient’s most common complaints. All three event
keys must be assigned a symptom or be intentionally disabled using the event.
It is suggested that the primary symptom or most frequent symptom be selected for Event Button
1.
If desired, all event buttons can be set to the same symptom to simplify patient usage.
o View pH While Recording:
When this option is selected the pH value will be displayed on the screen of the Recorder.
o Probe Disconnect Warnings
Depending on which of these options are selected, the Recorder will either display a message on
the screen informing the patient the probe has been disconnect, emit an audible warning beep, or
both.
NOTE: The probe disconnect warnings only apply to Z/pH probes. pH-only
probes do not contain the probe disconnect circuitry and this setting is ignored
by the Recorder.
o Use Pressure LES Location
Check this option if you are intending to use the AirFlo Sphincter Locator to position the probe in
the patient.
Z07-0145 Rev 5, Edited 12/09/2020, ECO 220-034 19ZepHr® Reflux Monitoring System
User’s Guide
4.2 Setup the Recorder for the Patient
NOTICE: Before starting the initial study, the Recorder must be set with the current time and date for your
location. See section 3.1 Setup Options.
NOTE: Before starting each study, setup the new patient study on the memory card. See the section above
for details.
• Insert the memory card into the Recorder. See Figure 2, page 8.
NOTICE: The icons on the memory card will help to insert the memory card into its slot on the Recorder
with the proper orientation. Forcing the card in upside down will damage the Recorder.
• Insert new AA alkaline batteries into the battery compartment of the Recorder. The batteries must be inserted
as per the graphic inside the battery door. See Figure 3, page 9.
The Recorder will beep once when the last battery is inserted and battery power is available.
A “low power” alert will occur if the batteries are not new or have been partially exhausted.
• At the Startup screen, press the Event 1 or Enter key (Enter) to advance to the next screen.
NOTE: If there is an acquired study already on the memory card, you cannot proceed with calibration. If
this warning occurs:
• Put the Recorder into Standby mode.
• Remove the memory card.
• Follow the directions in section 5 Transfer an Acquired Study for Analysis.
The Recorder will take a few seconds to read the memory card and then the patient’s name or alternate patient
identifier, protocol and probe information will be displayed.
Sample Patient
Protocol (44) Protocol Type
Protocol Name 44
Probe (44) Probe Type
Probe Number ZAI-BG-44
NEXT STANDBY
Z07-0145 Rev 5, Edited 12/09/2020, ECO 220-034 20You can also read