LOW SUGAR RICE COOKER - ELBA
←
→
Page content transcription
If your browser does not render page correctly, please read the page content below
LOW SUGAR
                                         RICE COOKER
                                         MODEL: ERC-K2050D(BK)

                                         Owner’s Manual
                                         Please read this manual carefully before
                                         operating your set.

                                         Retain it for future reference.

                                         Record model number and serial number of
                                         the set.

                                         See the label attached on the set and quote
                                         this information to your dealer when you
                                         require service.

For The Warranty Terms & Conditions, Please Refer To Warranty Certificate.
IMPORTANT SAFEGUARDS

When using this appliance, basic precautions should always be followed, including the following:

1. Read all instructions before using.
2. Do not operate the appliance with damaged power cord or plug, after the appliance
    malfunction, or if it is dropped or damaged in any manner. Return the appliance to the nearest
    authorized dealer or after-sales service centre for examination, repair, electrical or mechanical
    adjustment.
3. Do not use the appliance if the plug, the mains cord or other parts are damaged.
4. When removing the plug from wall outlet, grasp the plug to pull and not the cable.
5. Do not let the power cord hang over edge of table or counter or hot surface.
6. Do not place the appliance on or near hot gas or electric burner, or in a heated oven.
7. Do not expose the appliance to direct sunlight.
8. Place the appliance on a stable, horizontal and level surface.
9. Do not leave the appliance unattended while operating.
10. Always put the inner pot in the appliance before you insert the plug in the wall outlet and
    switch it on.
11. Do not place the inner pot directly over an open fire to cook rice.
12. Do not use the inner pot if it is deformed.
13. The accessible surface may become hot when the appliance is operating. Only contact the
    control panel and lid.
14. Beware of the hot steam coming out from the steam vent during cooking or when you open
    the lid. Keep hands and face away from the rice cooker to avoid the hot steam.
15. Do not lift and move the appliance while it is operating.
16. Do not exceed the maximum water level indicated in the inner pot to prevent overflow.
17. Do not place the cooking utensils inside the inner pot while cooking, keep warm, reheating
    rice, or when operating the appliance.
18. Do not place any metallic objects or any others foreign object into the steam vent.
19. Make sure the heating element, the out of the inner pot are clean and dry before you insert
    the power outlet.
20. Do not plug in appliance or touch the screen with wet hands.
21. Always let the appliance to cool off before starting the cleaning process.
22. Always clean the appliance after use. Do not clean the appliance in the dishwasher.
23. Never use any accessories or parts from other manufacturers or that ELBA does not
    specifically recommended.
24. Should the product body become moist or wet, remove the plug from wall outlet immediately.
25. Never immerse any part of the product body in water or any other liquids nor rinse it under the
    tap. Use only a moist cloth to clean the exterior product body.
26. This appliance is only be used with the power cord provided.
27. Close supervision is necessary when your appliance is being used near children or infirm
    persons.
28. Do not operate the appliance for other than its intended use.
29. Do not use this appliance outdoors.
30. This appliance is for domestic use only.
31. This appliance is not intended for used by persons (including children) with reduced physical,
    sensory or mental capabilities, or lack of experience and knowledge, unless they have been
    given supervision or instruction concerning use of the appliances by a person responsible for
    their safety.
32. Children should be supervised to ensure that they do not play with the appliance.
33. Save these instructions for future reference.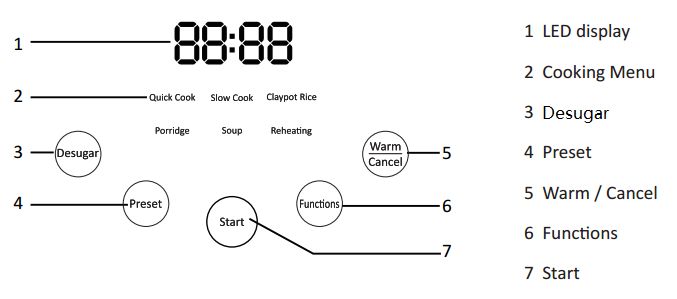
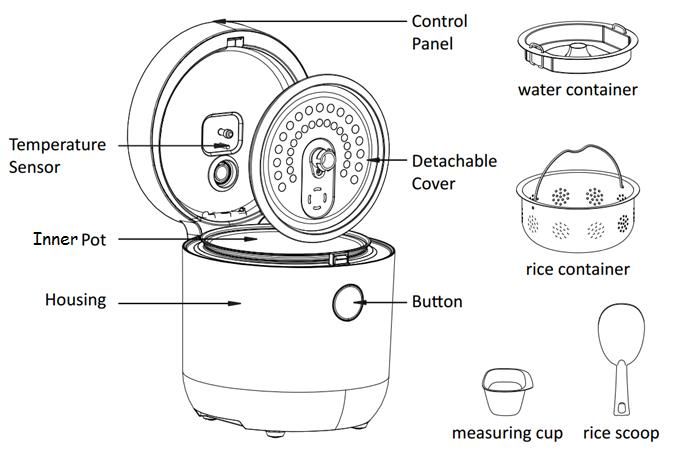
PRODUCT DESCRIPTION

CONTROL PANEL
BEFORE FIRST USE

Removing all packing materials. Check to make sure the appliance is not damaged. In case of
any damage return the appliance to the nearest authorized dealer or service center for
examination and repair.

Before first use, clean the non-stick inner pot and lid thoroughly by cleaning with damp sponge
and mild cleaning detergent.

Note: Make sure the bottom of the inner pot is completely dry before inserting into the heating
element.

OPERATING THE APPLIANCE

   1. Quick Cook

   ➢ The maximum boiled rice content of this product is 4 cups of rice. It is recommended that
     the ratio of rice to water be 1 cup of rice and 1.1 cup of water. The ratio of rice to water
     should not exceed the maximum boiled rice content (the above ratio of rice to water can
     be adjusted according to individual preferences).
   ➢ To Press "Functions" button to select “Quick Cook” function.
   ➢ Complete the required settings by press the start button, 5 seconds later 2 beeps into the
     corresponding functional work process, the display screen shows the hours-running lamp
     and cooking function key display lamp is always on.
   ➢ After the setting function is completed, the cooker automatically enters the warming
     process, the buzzer sounds 4 times, and the warm lights up at the same time.
   ➢ Maximum cooking time will be 30mins to 45mins; this is subjective to type of rice and
     water level and cooking time will be different.

   2. Slow Cook

   ➢ The maximum boiled rice content of this product is 4 cups of rice. It is recommended that
     the ratio of rice to water be 1 cup of rice and 1.1 cup of water. The ratio of rice to water
     should not exceed the maximum boiled rice content (the above ratio of rice to water can
     be adjusted according to individual preferences).
   ➢ Press "Functions" button to select “Slow Cook” function.
   ➢ Complete the required settings by press the start button, 5 seconds later 2 beeps into the
     corresponding functional work process, the display screen shows the hours-running lamp
     and cooking function key display lamp is always on.
   ➢ After the setting function is completed, the cooker automatically enters the heat
     preservation state, the buzzer sounds 4 times, and the heat preservation lamp lights up at
     the same time.
   ➢ Maximum cooking time will be 30mins to 50mins; this is subjective to type of rice and
     water level and cooking time will be different.
3. Claypot Rice ➢ Press "Functions" button to select “Claypot Rice” function. ➢ Setting time is show 70 mins (this is subjective to type of rice and water level and cooking time will be different.) Do not required for other setting, just press "Start". 5 seconds later, it will enter into the working process after 2 beeps. The time on LED display is countdown mode, and the light of the “Claypot Rice” will be on. ➢ After the setting function is complete, the cooker will enter to "warming" process with 4beeps, and the light of the warm will be on at the same time. 4. Porridge ➢ Press the "Functions" button and select the "Porridge" function. ➢ Cooking time will be 50 mins to 60 mins (this is subjective to type of rice and water level and cooking time will be different.) complete the required settings, press the start button, enter the corresponding functional work process, 5 seconds later, 2 beeps into the corresponding functional work process, the display screen shows a countdown, the function of cooking porridge key display light is always on. ➢ After the setting function is completed, the cooker will automatically enter the warming process, the buzzer will ring four times, and the warm light will light up. Tips: Maximum amount of porridge rice is 2 cups of rice. Proposed ratio of rice to water is 1:8 or 1:10. 5. Soup ➢ Press the "Functions" button and select the "Soup" function. ➢ Default working time is 2 hours, complete the required settings, press the start button, enter the corresponding functional work process, 5 seconds later, two beeps enter the corresponding functional work process, the display screen shows the countdown, the soup cooker function key display lamp is always on. ➢ After the setting function is completed, the cooker will automatically enter the warming process, the buzzer will ring four times, and the warm light will light up. 6. Reheating ➢ Press "Functions" button and select "Reheating" function. ➢ Default working time is 20 minutes, complete the required settings, press the start button, enter the corresponding functional work process, 5 seconds later, two beeps enter the corresponding functional work process, the display screen shows the hours-running lamp, reheating function key display lamp is always on. ➢ After the setting function is completed, the cooker will automatically enter the warming process, the buzzer will ring four times, and the warm light will light up.
7. De-sugar

➢ Press the "De-sugar" function button.
➢ Cooking time will be 50 mins to 60 mins (this is subjective to type of rice and water level
  and cooking time will be different.) complete the required settings, press the start button,
  enter the corresponding functional work process, 5 seconds later, 2 beeps into the
  corresponding functional work process, the display screen shows a countdown, the
  function of cooking de-sugar key display light is always on.
➢ After the setting function is completed, the cooker will automatically enter the warming
  process, the buzzer will ring four times, and the warm light will light up.
    Tips: The recommended height of water is over rice about 3mm or rice to water ration is 1:2 or 2:4.

    De-sugar Function Operating Step:

    Accessories:

Step 1: Put the cleaned and dried inner pot into rice cooker to fit into product heater base.
Step 2: Put the rice container into inner pot and washed rice and add in water over the rice
        3mm.

Step 3: Put the water collector flat in the rice container and close the lid cover.

Step 4: Select the de-sugar function, and then press the start button.
Tips: For this function, maximum rice is for 2 cups. Do not over add to avoid spillage or affect rice taste.
8. Preset (Timer)
➢ This function is to preset the timer if you want to cook later with your desired cooking
function.
➢ The preset timer for this product is 24 hrs and the preset time of this appliance is the start
time of cooking.
➢ Recommend the preset time do not exceed 12 hours, this is to avoid deterioration of food
caused of abnormal smell. Preset time can be adjusted according to temperature and the
deterioration of food.
➢ After switch on the appliance, select the desired cooking function (quick cook, slow cook,
claypot rice, porridge, soup and de-sugar), continue to press the “Preset” function before
the indicator light is on, adjust the timer by pressing “Preset” key.
➢ The timer can be adjusted at the interval of 0.5 hours each time the “Preset” key is
pressed. When the time up to 10 hours, the time will increase at 1 hour interval for each
press. The maximum preset time setting up to 24 hours. After setting the timer and
function, press the “Start” button to enter working process of the corresponding function.
Now, preset and selected cooking function is kept light at the same time.
➢ After working time is over, the rice cooker will automatically enter the keep warm function
the buzzer will ring 4 times, and the keep warm light will be on.
➢ Please refer to the preset schedule.
Function Cooking Soup Porridge
Time 1.5 Hours-12 Hours 1.5 Hours-24 Hours 1 Hour-12 Hours
LED DISPLAY STATUS REFERENCE
➢ In standby state LED display will show "-- --" and start indicator light is always on.
➢ Under the warming state, the LED displays the countdown time, the warming indicator and
the function indicator are always on.
➢ The digital tube displays "00:00" under the warming process. The warming button light is
always on, and the time is progressive in unit of 1 minute.CLEANING AND MAINTAINANCE
1. Before cleaning, always turn off the appliance and unplug the power plug from the power
supply.
2. Clean the inner pot, water container and rice container.
➢ Use warm water, dishwashing liquid and sponge to clean. Do not use any abrasive
scouring agents, steel wool, metal objects, hot cleaning agents or disinfectants,
since they can damage the appliance.
➢ If food sticks to the bottom of the inner pot, soak it for a while before cleaning, and
then wipe it clean.
3. Maintenance for inner pot.
➢ Clean the non-stick inner pot with a little dishwashing detergent added. Please be
careful not to damage the inner coating. Rinse thoroughly and dry completely.
➢ Only use wooden or plastic spoon. Do not use metal spoon to avoid scratching the
surface of the inner pan.
➢ To protect of the non-stick coating as much as possible, do not cutting food in the
inner pot.
➢ To avoid corrosion, do not pour vinegar into the inner pot.
4. For product exterior, control panel surface and heating element base, please clean with
damp cloth and let it complete dry before next use. Recommended to clean steam vent
after each usage for hygienic purpose, then reinstall it.
TROUBLESHOOTING CODE- FAULTY CODE
Screen Display Fault Detected Solution
Power off the appliance and unplug from
E1 Bottom Sensor Short Circuit the wall outlet. Connect the plug to the
wall outlet again and power on.
Power off the appliance and unplug from
E2 Bottom Sensor Open Circuit the wall outlet. Connect the plug to the
wall outlet again and power on.
Power off the appliance and unplug from
E3 Top Sensor Short Circuit the wall outlet. Connect the plug to the
wall outlet again and power on.
Power off the appliance and unplug from
E4 Top Sensor Open Circuit the wall outlet. Connect the plug to the
wall outlet again and power on.
Cool down the appliance and power on
E5 Overheated again after the appliance is completely
cool down.TROUBLESHOOTING GUIDE
Possibility of
Reason Guide
fault
Indicator light 1. The power board is not connected Check if the product is connected to
did not on 2. Power failure power source
Heating Element 1. Board failure Send to service center for
is not heated 2. Fuse blown examination and repair.
3. Heating element failure
Indicator light is
on but heating 1. Heating element failure Send to service center for
element is not 2. Board failure examination and repair.
heated
1. Adjust the total capacity of rice and
water
1.Too little or too much cooking 2. Adjust the ratio of rice to water
2.The ration of water n rice is in- 3. Rotate inner pot to left and right to
appropriate fit into position
3.Inner pot is not placed 4. Clean the foreign object
Uncooked rice
4.The is something in between the 5. Contact after sales service center
inner pot and heating element base. for repurchase inner pot.
5.Inner pot deformed 6. Send to service center for
6.Board failure examination and repair.
7.Sensor failure 7. Send to service center for
examination and repair.
Overflow 1.Too much water 1. To reduce the water ratioYou can also read