Sewing Club - Kids 'R' Kids Mini Camp - Kids 'R' Kids
←
→
Page content transcription
If your browser does not render page correctly, please read the page content below
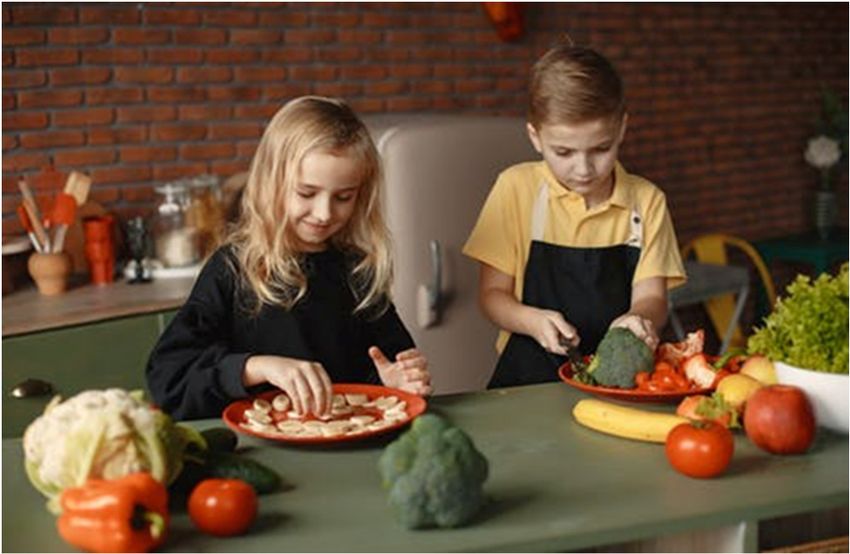
Kids ‘R’ Kids Mini Camp

Sewing Club
Sewing Without Needles - Safety First
                                                                          1
       Kids ‘R’ Kids International © Copyright 2020 All Rights Reserved
Sewing Club

Week 1: Welcome                                      sewing machine. You will need to guide and
                                                     assist all campers in working the sewing
Welcome Campers to the Sewing Club! Share
                                                     machine. Over time, you will be teaching them
with campers that you are excited for them to
                                                     the proper way to use it and the skills that it
join this club. They will learn how to create
                                                     requires.
many different items by using a technique called
liquid stitch that requires no sewing machine or
                                                     Supplies: How much to buy will be determined
needle and thread. Campers will also get the
                                                     by the number of children in the club. Also, talk
opportunity to work on an individual sewing
                                                     about items they will sew and buy accessories
project. This project will allow them time with a
                                                     you will need. You can ask campers families if
sewing machine with supervision. The greatest
                                                     they have any items at home they could bring in
keepsake will be seeing how you have grown in
                                                     like thread, trim, lace, buttons, and old T-shirt
your techniques each week.
                                                     (for tote bag project) etc.

Begin week one with a group discussion. Use
                                                     Items that you will need:
these questions to help guide the conversation:
    • Why did you decide to join this club?                 •   At least one sewing machine
    • Do you have any relatives that sew?                   •   Thread for sewing machine
       Have you learned anything from them?                 •   Fabric – consider each project to see
    • Have you ever heard of liquid stitch                      how many yards of material you will
       before?                                                  need.
    • What are some things that you think you               •   Scissors
       can make with liquid stitch?                         •   Liquid stitch glue (or fabric glue will
Then, show your list of projects that you are                   do) - you can purchase at Michael’s,
planning for the class to make.                                 Wal-Mart, Hobby Lobby, JoAnn’s,
                                                                etc.)
Liquid Stitch Project List:                                 •   Hair Ties - (2 per child) - Face Mask
    • Face Mask                                                 activity
                                                            •   Ribbon (1 in) – Apron activity
    • Pillow
                                                            •   Kitchen dish towel cotton or polyester
    • Stuffed animal – (rabbit)
                                                                (do not get the microfiber) - Apron
    • Apron
                                                                project
    • Tote Bag                                              •   Bags of cotton (poly fil) – Pillow
                                                                activity
Individual sewing project:                                  •   Clothespins or chip clips – Pillow
Explain to campers that in addition to these                    Activity
projects, each camper will get to work on an                •   White rice - Bunny project
individual sewing project. You will allow campers
                                                            •   White socks- Bunny activity
time each week for campers to research and
work on a sewing project of their choice. As their
projects progress, you can create a schedule for
each camper to have supervised time with the

                                                                                                       2
               Kids ‘R’ Kids International © Copyright 2020 All Rights Reserved
Week 2 - Face Mask
Materials:                                            wrapping it around. Glue it down. Repeat this on
internet access,                                      both side of the mask.
markers, scissors,                                    9. You mask is now finished!
fabric, liquid stitch
                                                      Now that the project is complete ask campers
(or hot glue like in
                                                      the following questions:
video), two hair
                                                      What did they like about it? What parts were
ties for each
                                                      easy? What parts were challenging?
camper, printed
                                                      If you have extra material and time, as a group
face mask
                                                      you can make additional masks to share with
templates (1 for
                                                      family or peers at school.
each camper)

Preparation:                                          Individual Sewing Project:
Print face mask templates for each camper:            (reoccurring activity)
https://docs.google.com/document/d/1fkuRpc2y
-fOHaTPbT51439eKEsp-i3dORRpg5q4cOUI/edit              Materials:
Pre-load the video:                                   internet access, tablets or
https://www.youtube.com/watch?v=clplniCS-             computers, sewing
gw&t=56s                                              machine, thread, fabric,
                                                      sewing patterns, markers,
Time: approximately 1 hour                            scissors

Instructions:                                         Time: approximately 30 to
Show the video to campers and discuss the             45 minutes
process as a group. Follow the steps below:
                                                      Instructions:
1. Begin by having campers cut out their face
                                                      Over the course of the next few weeks, campers
mask templates along the outside lines.
                                                      are going to have the opportunity to work on a
2. Fold your fabric in half. This will give you two
                                                      sewing project of their own. They will have the
pieces of each template with one cut. Trace your
                                                      opportunity to use a sewing machine with
template on the fabric. Cut out the template.
                                                      supervision. Each week allow time for campers
You should now have two pieces of each
                                                      to work on the project. Begin by letting campers
template.
                                                      research a potential sewing project they would
3. Flip the fabric so that the inside of the fabric
                                                      like to try and make. Guide campers to look for
is face up.
                                                      projects that they can realistically complete over
4. Using liquid stitch, glue the two pieces
                                                      the next few weeks. They can search for online
together on the long side of the fabric. Repeat
                                                      patterns or even select a pattern to be
on both templates.
                                                      purchased. If you would like, you can pre-
5. Reverse the smaller template fabric after you
                                                      purchase a variety of easy to make patterns
have glued it.
                                                      from a store like Jo Ann Fabrics and allow
6. Place the smaller template inside the larger
                                                      campers to choose from the ones you have
template and glue them together along the
                                                      preselected.
edges.
                                                      During this time discuss the process of
7. Allow time for the fabric and glue to
                                                      completing a sewing project from start to finish.
completely dry. Once it is dry, flip it inside out.
                                                      They will select their pattern, their fabric, take
8. Place the hair ties one each end of the face
                                                      measurements if necessary, learn how to follow
mask. Fold the fabric through the hair tie,
                                                      a pattern, cut fabric, use a sewing machine etc.

                                                                                                        3
                 Kids ‘R’ Kids International © Copyright 2020 All Rights Reserved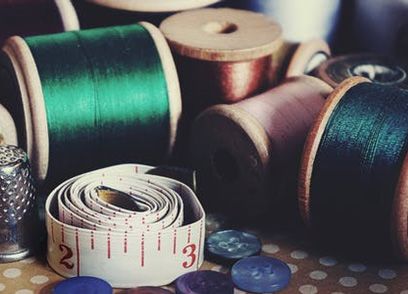
Week 3 - Apron
                                                     Individual Sewing Project:
                                                     (reoccurring activity)
                                                     Materials:
                                                     internet access,
                                                     tablets or computers,
                                                     sewing machine,
                                                     thread, fabric, sewing
                                                     patterns, markers,
                                                     scissors

                                                     Time: approximately
Materials:                                           30 to 45 minutes
internet access, markers, scissors, fabric, liquid
stitch, one dish towel for each camper, ribbon,      Instructions:
fabric paint and other decorative accessories.       Over the course of
                                                     the next few weeks,
Time: approximately 30-45 minutes                    campers are going to have the opportunity to
                                                     work on a sewing project of their own. They will
Instructions:                                        have the opportunity to use a sewing machine
1. Measure ribbon pieces for all campers. They       with supervision. Each week allow time for
will need one piece that will fit over their head    campers to work on the project. Last week
and two identical in length pieces that will tie     campers should have begun or completed their
around their waist.                                  search for a pattern they would like to work on.
2. Trim the top two corners of the towel off. You    If all campers have chosen their patterns, you
can fold them in a few inches and cut. Leave a       will now allow them time to continue to work on
half inch of fabric to glue down using liquid        this project. Work individually with campers to
stich. This will create a clean-cut edge. You can    assess what their next steps are. Do they need
use your clips or heavy books to hold the fabric     to take measurements? Can they begin to lay
in place while it dries.                             their pattern out on fabric? Guide them through
4. Using liquid stitch, glue ribbon that will go     the process and teach them the skills and
around their neck. Glue each side of the ribbon      knowledge they need along the way.
to the top of the apron. Be sure that campers        Continue to discuss the process of
glue it leaving the hole large enough to fit their
                                                     completing a sewing project from start to
head. Place clips and allow to dry. Now, campers
                                                     finish. They will select their pattern, their
will use the other two pieces of ribbon to create
their wait tie. Glue one ribbon to each side of      fabric, take measurements if necessary,
the towel. Place clips and allow to dry.             learn how to follow a pattern, cut fabric, use
5. Give campers time to decorate their apron.        a sewing machine etc.
They can write their name, add decorative detail
etc.
6. Once dry, allow campers to try on their new
apron!

                                                                                                    4
                Kids ‘R’ Kids International © Copyright 2020 All Rights Reserved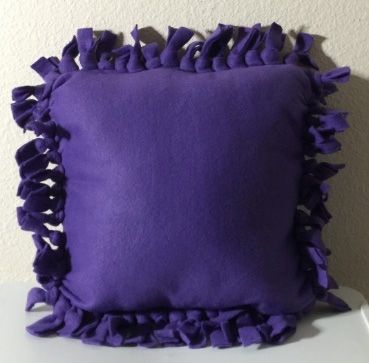
Week 4 – Sock Bunny
                                                        7. Use the markers to draw eyes and the
                                                           face on the bunny.
                                                        8. You can allow campers to add other
                                                           decorative components to their bunny
                                                           using resoruces you made available to
                                                           them.
                                                        9. All done! Allow campers to share their
                                                           bunnies with each other, seeing how
Materials:                                                 unique each one came out!
internet access, markers, scissors, a sock for
each camper, twine, ribbon, rice, rolls of duct      Individual Sewing Project:
tape(optional)
                                                     (reoccurring activity)
Preparation: Preload video:
https://www.youtube.com/watch?v=giqTWcq6nFk
                                                     Materials:
                                                     internet access, tablets or
Time: approximately 30 minutes                       computers, sewing
                                                     machine, thread, fabric,
Instructions:                                        sewing patterns, markers,
   1. Campers will thread their sock through         scissors
      the roll of duct tape and fold the open
      end of the sock of the tape roll. This will    Time: approximately 30 to
      hold the sock open as you fill it with rice.   45 minutes
      Fill the sock with rice until it is about      Instructions:
      2/3rds of the way full.                        Over the course of the next few weeks, campers
   2. Remove the tape roll from the sock.            are going to have the opportunity to work on a
   3. Pinch the top of the sock shut and tie it      sewing project of their own. They will have the
      tight with twine. Apply multiple knots to      opportunity to use a sewing machine with
      ensure no rice will spill out. You can also    supervision. Each week allow time for campers
      add a drop of liquid stitch inside the sock    to work on the project. Continue to work
      where you are tying it shut. This will add     individually with campers to assess what their
      additional support to ensure the sock          next steps are. Do they need to take
      remains shut.                                  measurements? Can they begin to lay their
   4. Using your hands to separate the rice          pattern out on fabric? Guide them through the
      inside the sock, pinch it making one small     process and teach them the skills and knowledge
      round head and a large round body. Add         they need along the way. As campers become
      a piece of twine where you have pinched        ready to use the sewing machine, create
      the sock and knot it a few times. This is      scheduled time for each camper. You will need
      creating the head and the body of the          to guide and assist them closely with they use
      bunny.                                         the machine.
   5. Trim the left-over sock at the top. Cut        Continue to discuss the process of completing a
      one slit down the middle. Then shape the       sewing project from start to finish. They will
      two pieces to resemble bunny ears.             select their pattern, their fabric, take
   6. Tie the ribbon around the bunnies next         measurements if necessary, learn how to follow
      into a bow.                                    a pattern, cut fabric, use a sewing machine etc.

                                                                                                    5
                Kids ‘R’ Kids International © Copyright 2020 All Rights Reserved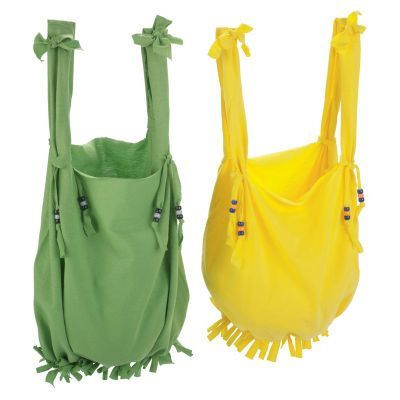
Week 5 – Pillows
                                                         Individual Sewing Project:
                                                         (reoccurring activity)
                                                         Materials:
                                                         internet access, tablets
                                                         or computers, sewing
                                                         machine, thread, fabric,
                                                         sewing patterns,
        https://www.bonanza.com/listings/no-sew-         markers, scissors
                 fleece-pillow/262842476
                                                         Time: approximately 30
Materials:
                                                         to 45 minutes
internet access, scissors, fabric, poly fill stuffing,
tape measure
                                                         Instructions:
Preparation: Preload video:
https://www.youtube.com/watch?v=A6HjUAQeMqk
                                                         Over the course of the next few weeks, campers
                                                         are going to have the opportunity to work on a
Time: approximately 30 minutes                           sewing project of their own. They will have the
                                                         opportunity to use a sewing machine with
Instructions:                                            supervision. Each week allow time for campers
   1. Allow campers to choose their favorite             to work on the project. Continue to work
      fabric from what you have available.               individually with campers to assess what their
      Once all campers have picked fabric you            next steps are. Do they need to take
      can measure and cut.                               measurements? Can they begin to lay their
   2. Campers will measure out 22 inches by              pattern out on fabric? Guide them through the
      16 inches or any size that you would like          process and teach them the skills and knowledge
      them to make. They will cut two identical          they need along the way. As campers become
      sized pieces.                                      ready to use the sewing machine, create
   3. Once they have their pieces cut, they will         scheduled time for each camper. You will need
      cut a square shape out of each corner.             to guide and assist them closely with they use
   4. Next, they will cut their fringe along all         the machine.
      sides of the fabric. They should make              Continue to discuss the process of completing a
      cuts ¼ inch wide and 3-inches long.                sewing project from start to finish. They will
      They will repeat this until all side of their      select their pattern, their fabric, take
      fabric have been cut.                              measurements if necessary, learn how to follow
   5. It’s time to start tying knots! Tie single or      a pattern, cut fabric, use a sewing machine etc.
      doubled knots around the entire pillow,
      leaving a 3-inch opening on one end.
   6. Being stuffing the poly fill into your
      opening. Continue filling until you have
      reached your desired fullness.
   7. Tie the remaining fringe pieces with
      double knots.
   8. Your pillow is now complete!

                                                                                                       6
                  Kids ‘R’ Kids International © Copyright 2020 All Rights Reserved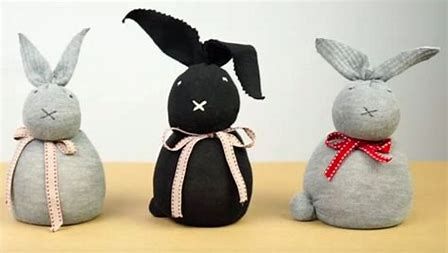
Week 5 – T-Shirt Tote Bag
                                                           7. Allow time for campers to decorate their
                                                              tote bags with fabric paint or any other
                                                              items you made available to them.
                                                              Campers can also tie knots at the top of
                                                              each strap to give it added support and a
                                                              cute design.
                                                           8. Their tote bag is now complete!

Materials:
old t-shirt (the thicker the fabric the better),
scissors, washable marker, any decorative
supplies you want to provide

Preparation: Remind all camper to bring in an           Individual Sewing Project:
old t-shirt.                                            Display Event
Time: approximately 30 minutes                          Materials:
                                                        internet access, tablets or computers, sewing
Instructions:
                                                        machine, thread, fabric, sewing patterns,
Every camper will work on the T-shirt that they
                                                        markers, scissors
brought in from home or you can supply t-shirts.
It is a good idea to have a couple shirts on hand       Time: approximately 30 to 45 minutes
just in case any campers forget or lose their
shirt.                                                  Instructions:
     1. First, you will cut the sleeves off the t-      Over the course of the last few weeks, campers
         shirt. You can fold your t-shirt in half if    have had the opportunity to work on a sewing
         you would like to cut the sleeves off at       project of their own. The have learned how to
         the same time to make identical cuts.          use a sewing machine with supervision. It’s time
     2. Next, you will cut the neck area. Cut           they show their peers and even family members
         around the collar of the t-shirt to create a   their finished product!
         little bit larger oval shaped opening.         Allow time for campers to add any finishing
     3. You will want to determine how deep you         touches to their sewing projects during the
         will want your tote bag to be. Turn your       week.
         shirt inside out. Draw a line using the        Near the end of this week, host a display event
         washable marker where you want the             to showcase all that campers have learned
         bottom of your bag to be.                      during sewing camp! They can display their
     4. Cut fringe starting from the bottom of          individual sewing project, along with all the
         the shirt and stopping at the line you         other projects they worked on over the last few
         drew across the shirt. You will want to        weeks. Include campers in the planning of this
         make the fringe about ¾ to 1-inch wide.        event! They can decide how to display their
     5. Tie your fringe together using double           projects, who to invite, refreshments to serve
         knots.                                         etc. Have fun and show off all the fun things you
     6. Turn your bag back to right side out.           did as a group!

                                                                                                        7
                Kids ‘R’ Kids International © Copyright 2020 All Rights Reserved
You can also read