HyperCube User's Manual - Hyperspace Lighting Company
←
→
Page content transcription
If your browser does not render page correctly, please read the page content below
HyperCube
User’s Manual

                Don’t Panic!

This is your personal guide to your new hyper-
          dimensional portal device
Table of Contents
Table of Contents ..................................................... 2
Getting Started......................................................... 3
What’s in the box?! .............................................. 3
Powering up ......................................................... 3
Hyper-Care ........................................................... 4
Operation ................................................................. 4
The Button ........................................................... 5
The Hyperspace App ................................................ 6
Setup .................................................................... 6
Usage.................................................................. 11
Troubleshooting ..................................................... 16
Warranty ................................................................ 18
Contact ................................................................... 18
Tech Specs .............................................................. 19
2Getting Started
What’s in the box?!
❖ HyperCube
❖ Control Box
❖ Power Supply
Powering up
1. Plug the power supply into an outlet (accepts
outlet voltage from 100-240 V).
2. Connect the HyperCube cable to the control box
cable. Twist the screw-ring to secure
33. Connect the power supply barrel jack to the front
of the control box. The blue button on the control
box will light up.
4. Let there be light!
Hyper-Care
The HyperCube is an art piece; while it is sturdy, it is not meant
to be handled excessively. Be extremely careful with the
mirrors. When cleaning the mirror panels, use only a microfiber
cloth and, if needed, lightly soapy water. Clean very gently,
without applying much pressure, in order to prevent damage to
the mirrored panels.
Operation
The HyperCube features 3 modes:
❖ Kaleidoscopic: dynamic, fast, and colorful patterns.
This is the default mode (40 patterns)
4❖ Meditative: calm, classy and slowed down patterns
to help you relax (24 patterns)
❖ Sound Reactive: dance and entrance, with specially
designed patterns that respond to the beat. A
microphone is located inside the control box (31
patterns)
Each mode is essentially a playlist of unique patterns. By
default, a pattern plays for 60 seconds before switching.
New colors are randomly generated every 10 seconds, for
near-infinite variety! This behavior can be fully customized
in the app, and can be controlled with the button on the
control box.
The Button
× 1: Next pattern Hold (2s): Turn off
× 2: change mode: Hold (10s): Reset
WiFi credentials
Kaleidoscopic
Meditative
Sound Reactive
5The Hyperspace App
Hyperspace Lighting
Download the “Hyperspace Lighting” app to fully control
and customize your HyperCube!
Setup
The setup process will connect your HyperCube to your
home WiFi network for convenient smartphone control.
(NOTE: the HyperCube only connects to 2.4 GHz networks)
1. Make sure the cube
is not in sound
reactive mode.
2. Open the app and
press the “+” icon in
the top right corner
of the main menu
62. Press “Add New 3. Enter your home WiFi
HyperCube” credentials and press
“Connect!”
Note: if the connection fails,
press “Can’t Connect?” at
the bottom of the screen
and follow the instructions.
74. You’re done - press
“My HyperCube” to
pilot the controls!
Trouble connecting?
5. If the process
finished but the
cube isn’t showing
on the device list,
press “Discover
Cube” in the “+”
menu. Leave for
10-20s, then press
the check mark
6. If this does not work, reset the WiFi by
holding the button on the control box for 10s
(until the LEDs flash green)
7. Repeat steps 1-5. OR, in step 3 press “Can’t
Connect?” at the bottom of the screen.
8Not at home?
If you’re out and about without a WiFi connection, you can
still connect to the HyperCube’s internal WiFi hotspot.
Press the “+” icon on the main menu and select “Connect
Directly” to access the controls! This will leave you
connected to the HyperCube WiFi channel.
Connecting via browser, without the app
If you don’t have an Android/iOS smart phone, you can still
connect to and control your HyperCube! All you need is an
internet browser on your PC or phone.
1. On your phone, connect to the “HyperCube” WiFi
network. Password: hyperspace
2. A new window will appear (or a prompt will appear
asking you to log in. Press this). Enter your home WiFi
network information. This procedure will connect the
HyperCube to your home network.
3. Access your router settings. Typically, this can be
done by entering the router IP address in a browser.
Most use an address of 192.168.1.1, but you may
need to confirm with your router’s manual.
4. Find the list of connected devices and copy the
HyperCube’s IP address (also in-app, after setup).
5. Enter the HyperCube IP address in any browser and
you will be taken to the controls!
9Connecting via E1.31
The HyperCube also supports pixel mapping via sACN/E1.31
protocol. Various third-party software can be used to control
the LEDs, such as xLights and MadMapper. This feature is
experimental, not guaranteed to work smoothly, and is
recommended only for users with pixel mapping experience.
The setup process differs for all software. In general, you will
need your HyperCube’s IP address, shown on the main device
list page:
You will also need the following pixel information:
HyperCube10: 288 total pixels (WS8211/WS2812)
HyperCube15: 480 total pixels (WS8211/WS2812)
The total pixels are split across 2 separate LED tracks,
each with half the total pixels (i.e. 2 universes with
432/840 channels each for HC10/HC15).
10Usage
Patterns Menu (default)
Nightlight: dims Sync with Sync brightness to
brightness over other cubes music (makes any
60 minutes pattern sound reactive)
Toggle Settings
power
Pattern menu
Mode
selection
Next &
previous
pattern
Stay on
current
pattern in the
mode playlist Choose individual
pattern (from any
mode)
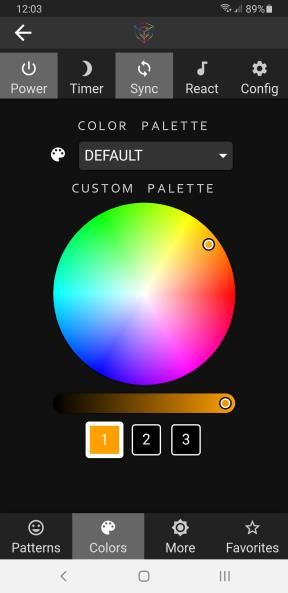
11Colors Menu
Choose pre-defined
color palette
Customize your
own colors
Adjust
brightness of
selected color
Choose up to 3
unique colors
12More Controls Menu
Adjust overall
brightness
Adjust pattern intensity
(unique effects on each
pattern)
Adjust Symmetry menu
pattern
speed
Pause or
freeze
animation
Change the symmetry
of motion each pattern
displays
13Favorites Menu
Save your favorite patterns for easy playback! All color, speed,
intensity, and symmetry customizations are also saved.
To save: To load:
1. Press “saving Press a
mode” highlighted slot
number with a
2. Press a slot previously saved
number to save pattern
to that slot
14Settings Menu
Toggle advanced Play time before
settings pattern transition
within each mode
Random color
change time
Patterns play
in fixed or
random order
Startup
settings
Blend time
between auto-
transitions
Blend time
between
button-press
transitions
15Troubleshooting
Trouble connecting the app?
Try the alternative connection process here.
1. Scan the QR code below with your smartphone. A
new window will open (or a prompt will appear
asking you to log in. Press this).
2. Enter your home WiFi information
3. Open the app, press the “+” button in the top right of
the main menu, and press “Discover Cube”.
4. Return to the main menu with the check in the top
right. Your HyperCube should now be connected!
16Cube not found or lost in the app?
If your HyperCube disappears from the main menu in the app,
try the following steps:
❖ Re-discover device: press the “+” in the top right of the
main menu, then “Discover Cube”. Return to the main
menu with the check in the top right.
❖ Refresh the device list by pressing anywhere on the main
menu screen and pulling down.
❖ Force close the app and re-discover cube.
❖ If all else fails, the WiFi connection can be reset by
holding the button on the control box for 10 seconds.
After, re-do the initial setup procedure (“+” → “Add New
HyperCube → Connect!).
Want to connect an additional device to the cube?
You can control one HyperCube from multiple devices. If you
have already gone through the initial setup process once, on
your new device simply press the “+” button in the top right of
the main menu, then “Discover Cube”. All cubes connected to
the WiFi network will be added.
Sound reactivity issues?
The HyperCube automatically adjusts to a wide range of volume
levels, but still requires a moderate volume and/or distance-to-
source to respond best. The microphone is located in the control
17box; for optimal performance, keep the sound source 3 – 10 ft
away.
❖ If the HyperCube appears too sensitive to ambient noise
(patterns trigger with no sound) or won’t respond, the
microphone sensitivity can be adjusted. Go to settings >
sound reactivity and adjust the sensitivity value. Higher
values will allow the mic to pick up softer sounds, but may
trigger the lights on ambient/electrical noise.
Note that if music volume is extremely loud (and close to the
control box), the sound response may be poor.
Warranty
The Hyperspace Lighting Company, LLC offers a 1-year limited warranty
on each HyperCube. We guarantee that each product purchased will
arrive in working condition, without damage, and will be free from
defects in electrical operation for a period of one (1) year from the date
of delivery. Please contact us if you have any issues, we’re here to help!
The full detailed warranty description can be found online at
https://www.hyperspacelight.com/1-year-limited-product-warranty
Contact
Questions, comments, concerns? Lost in hyperspace and can’t
find your way out? Email us at: hello@hyperspacelight.com
18Tech Specs
HyperCube10 HyperCube15
Dimensions (per side) 10.04” (255 mm) 15.16” (385 mm)
Total LEDs 288 480
LEDs Per Edge 12 20
Max Power Draw 11.25W (2.25A) 20W (4A)
Avg Power Draw 6W (1.2A) 10W (2A)
Weight 5.7 lb (2.6 kg) 12.3 lb (5.6 kg)
Colors ~16 million
LED Rating 50,000+ hours
Windows Scratch-resistant mirrored acrylic
Frame PVC
Wifi Connectivity 2.4 GHz
System Voltage 5V
Standby Power DrawYou can also read