WORDPRESS TUTORIAL - SALTECH SYSTEMS
←
→
Page content transcription
If your browser does not render page correctly, please read the page content below

Web • IT • Cloud • Marketing • Design

 WordPress Tutorial
 This document is meant to give a general overview of using WordPress to edit content on
 your website. The intention of this tutorial is to cover the basics of WordPress and is
 meant to supplement any additional training you receive from our team. Always feel free
 to reach out to our design team for any additional support and assistance you may need
 with your website.

  abigail@saltechsystems.com

  (515) 520-8200

Saltech Systems WordPress Tutorial
Table of Contents

                                                 We are constantly improving your
                                                 website with the latest technology
                                                 and security updates. Due to these
                                                 updates, some items in this tutorial
                                                 may look slightly different when
                                                 editing your website.

                                                 Check out our online tutorial for the
                                                 most up-to-date instructions, FAQs,
                                                 and troubleshooting!

                                                  saltechsystems.com/wp-tutorial

 01: Getting Started                           04: Page Editor Basics
     1 - What is WordPress?                       6   -   Basic Text Editing & Links
     1 - Logging into WordPress                   7   -   Editing Buttons
     2 - WordPress Dashboard Overview             7   -   Duplicating Content
                                                  7   -   Page Layout
 02: Blog Posts
     3 - Create, Edit, and Delete Blog Posts   05: Common Plugin Editing
     4 - Post Editor Basics                       8 - Slider Revolution
                                                  9 - Essential Grid
 03: Media Library                                9 - Event Calendar
     5 - Media Library Overview
     5 - Attachment Details                    06: Troubleshooting
     5 - Optimizing Images                       10 - Common Questions

Saltech Systems WordPress Tutorial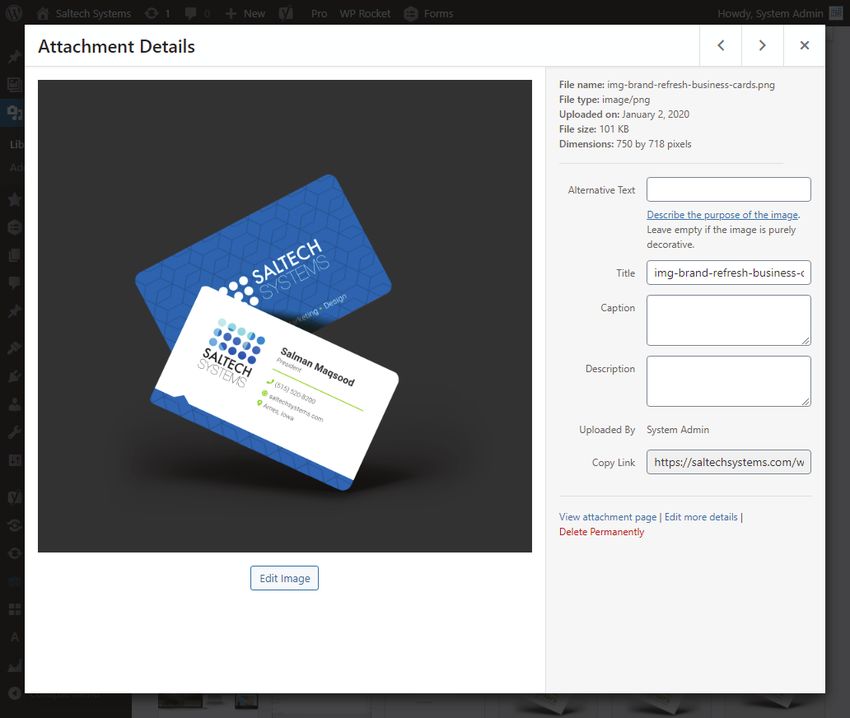
01: Getting Started

 What is WordPress?

 WordPress is a publishing software that is used to create websites. Since it was estab-
 lished in 2003, WordPress has become one of the most popular website platforms, pow-
 ering 35% of the internet! WordPress powers websites for a wide range of businesses
 from small hobby blogs to large companies like Miscrosft, Best Buy and Walt Disney.

 One of the primary benefits of using WordPress for your company’s website is that it is
 easy to learn and use - no coding knowledge is required to make basic content updates
 to your website. WordPress is also extremely customizable and has virtually endless
 functionalities that we can implement on your website.

 Logging into your WordPress Website

 1. To login to your website add /wp-admin to the end of your websites domain.
    Ex: https://yourwebsite.com/wp-admin

 2. You will reach a screen that looks similar to the image below, enter the login
    credentials that our team has provided you.

Saltech Systems WordPress Tutorial                                                         1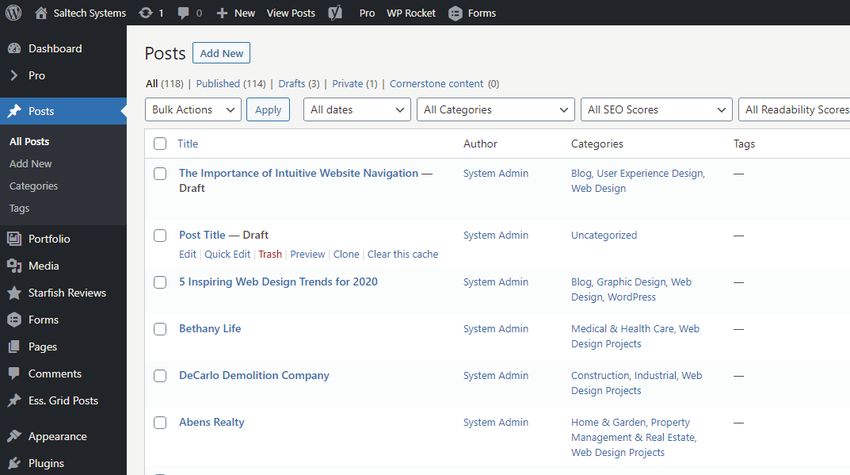
01: Getting Started

 WordPress Dashboard Overview

 The WordPress Dashboard is the starting point for administrative tasks such as editing
 pages, posts, media, etc. It is the first page you will see after logging into your website.

 1. To navigate to the front end of your website: Hover over the site title in the upper left
    corner of the screen > click “visit site”. To navigate back to the dashboard, follow the
    same steps, except select “Dashboard”.

 2. Google Analytics Quick View: From the dashboard you can see some quick data
    about traffic to your website. Interested in learning how to increase traffic? Contact
    our team to learn about our SEO & digital marketing services.

 3. Other links: Make note of all of the links along the left side of the dashboard, the tabs
     you will probably use most often will be Posts, Media, and Pages. You may utilize
    some other tabs depending on various functionalities of your website.

 4. To log out of your account: Hover over your name in the top right corner of the
    dashboard, click log out.

Saltech Systems WordPress Tutorial                                                              2
02: Blog Posts

 Creating, Editing, and Deleting Blog Posts

 Your website might inlcude blog posts to display news, announcements and more on
 your website. Blog posts are great ways to continuosly produce new content on your
 website, which can be useful for current & prospective customers, as well as help
 improve your ranking in Google and other search engines.

 1. To view your blog posts: Head to the WordPress dashboard (/wp-admin). Click the
    “Posts” tab                    on the left side of the screen. You will see a table
    with all posts that are published on your website.

 2. To create a new post: Click the            button near the top of the screen. View the
    next page in this tutorial to learn how to edit your new blog post.

 3. To edit or delete an existing post: Find the title in the list of posts > hover over the
    title > click “Edit” or “Trash”.

Saltech Systems WordPress Tutorial                                                             3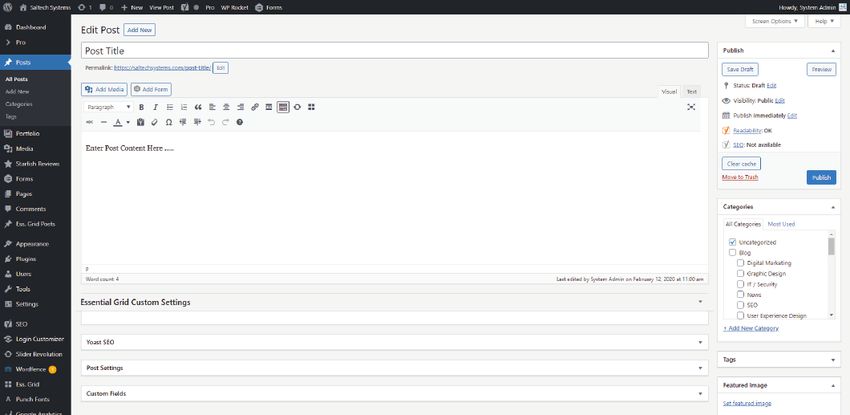
02: Blog Posts

 Post Editor Basics

 1. Enter Title: It’s best to keep your post title short, yet descriptive.

 2. Enter Post Content: Use the “Visual Editor” to edit content. For further information on
    how to use the visul editor, visit this resources from WordPress.org.

 3. Post Categories & Tags: If your website utilizes categories or tags, select the
    category(s) and/or tag(s) that you’d like to assign to the post. These make it easy for
    users to filter posts based on what they are looking for, and may also affect where the
    post is displayed on your website.

 4. Featured Image: Select                           to open the media library and select an
    image to use. The featured image is the large image that appears across the top of
    your blog post, and it may also be used as a thumbnail in other parts of your website
    that will link to the full post. It is best to use a large, quality image for this.

 5. Publishing your post: Click           to publish your post. Use this button
    to save your post as a draft if you don’t want to publish it yet, or you can schedule
    your post to be published automatically by clicking “edit” here -

Saltech Systems WordPress Tutorial                                                             4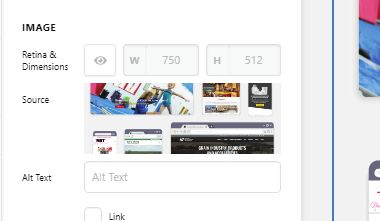
03: Media Library

 Media Library Overview

 The media library is where all images, pdfs, and other media is stored.

 1. To access the media library, head to the WordPress dashboard click -

 2. To upload new items, click         then either drag and drop your files in the upload
    area or click        to upload files from your computer.

 Attachment Details
 1. Click on an image in the media library to open the Attachment Details Pop-Up.

 2. Alt Tags: These are important for SEO and accessibilty. For screen readers and web
    crawlers who can’t view images, these alt tags will be used as a description.

 3. Copy Link: You will mainly need to access these if you are linking PDFs on your
    website - ex: newsletter archive. Copy/Paste this link on the front end of your website
    so users can view and download PDF files.

 Image Optimization                                                           Front and Bac k of Sa ltec h Sy..

 Often times, images may come with very large file
 sizes. It’s important that you optimize your images to
 give your users the best experience possible. Optimiz-
 ing images can help your website load faster = happy
 users & happy search engines!

 Here is a great resources to make optimzing your
 images easy -Optimizilla Online Image Compressor

Saltech Systems WordPress Tutorial                                                                                5
04: Page Editor Basics
Pro Page Builder
The Pro Page Editor allows you to visually adjust the content of your website.
1. Open the page editor: Navigate to the page you’d like to edit on the front end of your
website. In the top black bar, click Pro > Edit Page. This opens up the page builder.
The left side of the screen contains all editing functionalities, while the right side of
the screen is a preview of what the page will look like on the front end.
2. Text Editing: For most text edits, simply double click directly on the text that you
would like to edit, and type your changes directly within the page.
3. Text Links (PDF’s, External Links): When editing text, hilight the text you’d like to add
a link to, click the link icon and paste your desired URL. Click “Okay” to attach link.
h ttp s: // s al te c h sy ste m s . c om / w e b -d e s i gn
I ow a w e b d e s i gn
Change the “Target” if you want to
open the link in a new window
Saltech Systems WordPress Tutorial 604: Page Editor Basics
4. Editing Buttons: Click the button you want to edit. In the left side bar you can change
the URL, as well as the button text (you will need to scroll towards the middle of the
side bar to view the text setup section).
5. Replacing Images: Select the image on the page
you want to change. In the left side bar a small
preview of the image appears. Hover over this pre-
view, click the X, then click the + to open the media
library and upload/select your new image.
6. Duplicating Content: The best way to add new
content to your page is to duplicate content that
already exists. You can duplicate anything on the
page from a single section of text, to an entire
section of the page. Hover over content until you
see a green or blue outline around the element you’d
like to duplicate > click to select. In the left column
click the duplicate button. To delete content- do the
same, except click the Delete button.
7. To rearrange sections: At the very top of the left
side bar, click “Layout”. This shows you how your
page is arranged. you can drag and drop sections
and elements to change the order on the page.
8. Save your changes! Click the button in the
lower right corner of the editor.
Saltech Systems WordPress Tutorial 705: Common Plugin Editing
WordPress is extremely versatile in when it comes to having the ability to add various
functionalities to your website. These additional functionalities are added using 3rd-par-
ty “plugins”. Every website is unique, so we can’t cover all of the plugins in this tutorial.
See below for some basic editing tips for plugins that we use on a lot of our websites.
And of course, always feel free to reach out to our team for help and additional training
on the various plugins that we use on your website.
Slider Revolution
If you have an image slider on your home page, we have probably used slider
revolution to create this. For the most part the slider should be all set up for you,
we are always willing to assist you in editing this, but if you’d prefer to make
simple image and text updates yourself here are some basic instructions:
1. From the home page of your website, in the top black bar hover over “Slider
Revolution” and then click the title of your slider. (You can also access this
from the tabs in the left of the WordPress dashboard)
2. You can click on any text and edit it within the right side bar.
3. To switch between slides, click then select the desired slide.
4. Replacing the background image: Click on in
the upper right. Click Background. Click “Media
Library” to open the media library to select a new
background image. Note that most slider images
should have dimensions of about 1920px x 750px to
display properly.
5. Save your changes! Click the save button in the
bottom right to save your changes.
NOTE: Your website may be using an older version of
Slider Revolution so the layout of your plugin may look
different.
Saltech Systems WordPress Tutorial 805: Common Plugin Editing
Essential Grid
If you have an image grid on your website, it probably uses Essential Grid.
1. To open the plugin editor, head to the WordPress dashboard - find the “Ess.
Grid” tab in the left side bar (it is typically towards the bottom of the side bar)
2. Find the title of the grid you want to edit > click the green “Settings” button
3. To upload a new photo, click the “Images” tab near the top center of the editor.
4. Select “Bulk” > this will pull up the Media Library where you can select your
desired images.
5. Some image grids contain captions or titles. To edit this find the image within
the grid preview in the bottom half of the page > click the Green settings icon
to open the editor. It’s easiest to base the changes you make in the editor on
other elements that have the correct fields filled in, as there is many fields in
this editor that you won’t need to use.
6. If your essential grid requires more advanced editing features, our team is here
to help train you, or complete the edits/updates for you!
7. To save your changes to the grid, click the green “Save” icon on the right side
of the screen.
Events Calendar
If your website contains an event calendar, we have probably used an events
plugin on your website. We may use different calendar plugins based on the
needs of your website, so instructions for adding events may be different.
Most events can be added just like blog posts, except in your WordPress dash-
board there is a tab for “Events” instead of “Posts”. There will also be additional
fields within the post editor like date, time, and location. We will go over adding &
editing events in ypur WordPress training, and we can always assist with your
questions via phone or email!.
Saltech Systems WordPress Tutorial 906: Troubleshooting I saved my changes, why aren’t they showing up on my website? We use caching software which helps to speed up the load time of your website. This helps retain users and improve your SEO rankings. Due to caching, some changes may not appear immediately on the front-end of your website. In the top black bar of your site, you can clear the cache by hovering over “WP Rocket” > then Click “Clear Cache”. You may also need to clear your browsers cache by pressing [Ctrl], [Shift] and [del] on your Keyboard. Why isn’t my website showing up at the top of search results? We optimize your website to perform well in search results by following some SEO best practices when building your website. These technical things include; adding Title & Alt Tags, speeding up the load time, submitting your website to Google Search Console, creating a site-map and more. The technical side of SEO is just one small part of SEO. Contact our team to learn about how we can help improve your rankings even more! How can I add new features to my website? If you want to add a new page, blog, custom form, online store, memberships, or any other functionality to your website, contact our team! We have the ability to implement many different functionalities on your website. But wait... there’s more! You’ll find FAQ’s, plugin tutorials and more on our website - saltechsystems.com/wp-tutorial Always feel free to reach out to our team, we’re happy to help! abigail@saltechsystems.com (515) 520-8200 Saltech Systems WordPress Tutorial 10
You can also read