Manual Fuse Sift - Formlabs
←
→
Page content transcription
If your browser does not render page correctly, please read the page content below
Manual Fuse Sift
Installation and Usage Instructions

Fuse Sift
Powder recovery station for the Fuse 1 (SLS)
3D printer

Original English instructions
Read this manual carefully and keep it for future reference.
April 2021
REV 02
© Formlabs
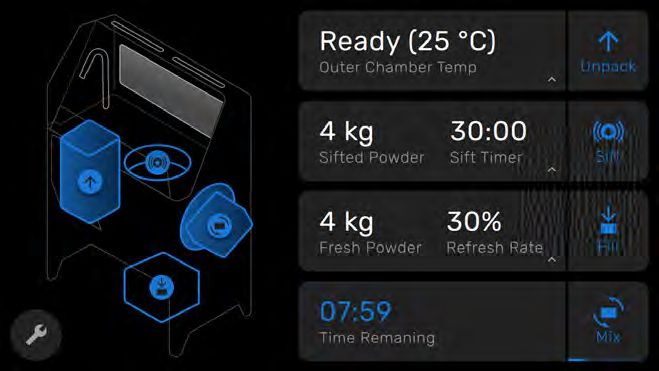
Table of Contents

1     Preface .  .  .  .  .  .  .  .  .  .  .  .  .  .  .  .  .  .  .  .  .  .  .  .  .  .  .  .  .  .  .  .  .  .  .  .  .  .  .  .  .  .  .  .  .  .  .  .  .  .  .  .  .  .  .  .  .  .  .  .  .  .  .  .  . 10
1.1   Read and retain instructions. .  .  .  .  .  .  .  .  .  .  .  .  .  .  .  .  .  .  .  .  .  .  .  .  .  .  .  .  .  .  .  .  .  .  .  .  .  .  .  .  .  .  .  .  .  . 10
1.2   Obtaining documentation and information .  .  .  .  .  .  .  .  .  .  .  .  .  .  .  .  .  .  .  .  .  .  .  .  .  .  .  .  .  .  .  .  .  . 10

2     Introduction .  .  .  .  .  .  .  .  .  .  .  .  .  .  .  .  .  .  .  .  .  .  .  .  .  .  .  .  .  .  .  .  .  .  .  .  .  .  .  .  .  .  .  .  .  .  .  .  .  .  .  .  .  .  .  .  .  .  .  .  . 12
2.1   Intended use. .  .  .  .  .  .  .  .  .  .  .  .  .  .  .  .  .  .  .  .  .  .  .  .  .  .  .  .  .  .  .  .  .  .  .  .  .  .  .  .  .  .  .  .  .  .  .  .  .  .  .  .  .  .  .  .  .  .  .  . 12
2.2   Technical specifications.  .  .  .  .  .  .  .  .  .  .  .  .  .  .  .  .  .  .  .  .  .  .  .  .  .  .  .  .  .  .  .  .  .  .  .  .  .  .  .  .  .  .  .  .  .  .  .  .  .  . 13
2.3   Product components. . . . . . . . . . . . . . . . . . . . . . . . . . . . . . . . . . . . . . . . . . . . . . . . . . . . . . 14
2.4   Fuse Sift user interface. .  .  .  .  .  .  .  .  .  .  .  .  .  .  .  .  .  .  .  .  .  .  .  .  .  .  .  .  .  .  .  .  .  .  .  .  .  .  .  .  .  .  .  .  .  .  .  .  .  .  .  . 17

3     Safety.  .  .  .  .  .  .  .  .  .  .  .  .  .  .  .  .  .  .  .  .  .  .  .  .  .  .  .  .  .  .  .  .  .  .  .  .  .  .  .  .  .  .  .  .  .  .  .  .  .  .  .  .  .  .  .  .  .  .  .  .  .  .  .  .  .  .   18
3.1   Component and subsystem safety .  .  .  .  .  .  .  .  .  .  .  .  .  .  .  .  .  .  .  .  .  .  .  .  .  .  .  .  .  .  .  .  .  .  .  .  .  .  .  .  .                                                        19
3.2   Personal protective equipment (PPE).  .  .  .  .  .  .  .  .  .  .  .  .  .  .  .  .  .  .  .  .  .  .  .  .  .  .  .  .  .  .  .  .  .  .  .  .  .  .                                                          21
3.3   Specification of tools to be used.  .  .  .  .  .  .  .  .  .  .  .  .  .  .  .  .  .  .  .  .  .  .  .  .  .  .  .  .  .  .  .  .  .  .  .  .  .  .  .  .  .  .                                                21
3.4   Emergency and exceptional situations.  .  .  .  .  .  .  .  .  .  .  .  .  .  .  .  .  .  .  .  .  .  .  .  .  .  .  .  .  .  .  .  .  .  .  .  .  .                                                            21

4      Preparation and setup.  .  .  .  .  .  .  .  .  .  .  .  .  .  .  .  .  .  .  .  .  .  .  .  .  .  .  .  .  .  .  .  .  .  .  .  .  .  .  .  .  .  .  .  .  .  .  .  .  .  .                                   23
4.1   Location and environs .  .  .  .  .  .  .  .  .  .  .  .  .  .  .  .  .  .  .  .  .  .  .  .  .  .  .  .  .  .  .  .  .  .  .  .  .  .  .  .  .  .  .  .  .  .  .  .  .  .  .  .                                23
4.2   Power and networking.  .  .  .  .  .  .  .  .  .  .  .  .  .  .  .  .  .  .  .  .  .  .  .  .  .  .  .  .  .  .  .  .  .  .  .  .  .  .  .  .  .  .  .  .  .  .  .  .  .  .  .                                  23
4.3   Unboxing the machine.  .  .  .  .  .  .  .  .  .  .  .  .  .  .  .  .  .  .  .  .  .  .  .  .  .  .  .  .  .  .  .  .  .  .  .  .  .  .  .  .  .  .  .  .  .  .  .  .  .  .  .                                  24
4.4   Accessing the serial name .  .  .  .  .  .  .  .  .  .  .  .  .  .  .  .  .  .  .  .  .  .  .  .  .  .  .  .  .  .  .  .  .  .  .  .  .  .  .  .  .  .  .  .  .  .  .  .                                        25
4.5   Installing the machine.  .  .  .  .  .  .  .  .  .  .  .  .  .  .  .  .  .  .  .  .  .  .  .  .  .  .  .  .  .  .  .  .  .  .  .  .  .  .  .  .  .  .  .  .  .  .  .  .  .  .  .  .                             26
4.6   Setting up a network connection.  .  .  .  .  .  .  .  .  .  .  .  .  .  .  .  .  .  .  .  .  .  .  .  .  .  .  .  .  .  .  .  .  .  .  .  .  .  .  .  .  .  .                                                  27
4.7   Updating firmware.  .  .  .  .  .  .  .  .  .  .  .  .  .  .  .  .  .  .  .  .  .  .  .  .  .  .  .  .  .  .  .  .  .  .  .  .  .  .  .  .  .  .  .  .  .  .  .  .  .  .  .  .  .  .  .                         28
4.8   Transporting the machine .  .  .  .  .  .  .  .  .  .  .  .  .  .  .  .  .  .  .  .  .  .  .  .  .  .  .  .  .  .  .  .  .  .  .  .  .  .  .  .  .  .  .  .  .  .  .  .  .                                      28

5     Recovering powder and filling powder cartridges.  .  .  .  .  .  .  .  .  .  .  .  .  .  .  .  .  .  .  .  .  .  .  .  .  .  . 31
5.1   Operational environment.  .  .  .  .  .  .  .  .  .  .  .  .  .  .  .  .  .  .  .  .  .  .  .  .  .  .  .  .  .  .  .  .  .  .  .  .  .  .  .  .  .  .  .  .  .  .  .  .  . 31
5.2   Cooling a print.  .  .  .  .  .  .  .  .  .  .  .  .  .  .  .  .  .  .  .  .  .  .  .  .  .  .  .  .  .  .  .  .  .  .  .  .  .  .  .  .  .  .  .  .  .  .  .  .  .  .  .  .  .  .  .  .  .  . 31
5.3   Unpacking a powder cake. . . . . . . . . . . . . . . . . . . . . . . . . . . . . . . . . . . . . . . . . . . . . . . . .33
5.4   Extracting parts:.  .  .  .  .  .  .  .  .  .  .  .  .  .  .  .  .  .  .  .  .  .  .  .  .  .  .  .  .  .  .  .  .  .  .  .  .  .  .  .  .  .  .  .  .  .  .  .  .  .  .  .  .  .  .  .  .  . 33
5.5   Filling a powder cartridge.  .  .  .  .  .  .  .  .  .  .  .  .  .  .  .  .  .  .  .  .  .  .  .  .  .  .  .  .  .  .  .  .  .  .  .  .  .  .  .  .  .  .  .  .  .  .  .  . 34
5.6   Managing the machine. .  .  .  .  .  .  .  .  .  .  .  .  .  .  .  .  .  .  .  .  .  .  .  .  .  .  .  .  .  .  .  .  .  .  .  .  .  .  .  .  .  .  .  .  .  .  .  .  .  .  . 34
6     Maintenance .  .  .  .  .  .  .  .  .  .  .  .  .  .  .  .  .  .  .  .  .  .  .  .  .  .  .  .  .  .  .  .  .  .  .  .  .  .  .  .  .  .  .  .  .  .  .  .  .  .  .  .  .  .  .  .  .  .  .  .            36
6.1   Tools and supplies. .  .  .  .  .  .  .  .  .  .  .  .  .  .  .  .  .  .  .  .  .  .  .  .  .  .  .  .  .  .  .  .  .  .  .  .  .  .  .  .  .  .  .  .  .  .  .  .  .  .  .  .  .  .  .                   36
6.2   Inspection and maintenance. .  .  .  .  .  .  .  .  .  .  .  .  .  .  .  .  .  .  .  .  .  .  .  .  .  .  .  .  .  .  .  .  .  .  .  .  .  .  .  .  .  .  .  .  .  .                                      37
6.3   Tasks between uses.  .  .  .  .  .  .  .  .  .  .  .  .  .  .  .  .  .  .  .  .  .  .  .  .  .  .  .  .  .  .  .  .  .  .  .  .  .  .  .  .  .  .  .  .  .  .  .  .  .  .  .  .  .                        37
6.4   Periodic maintenance.  .  .  .  .  .  .  .  .  .  .  .  .  .  .  .  .  .  .  .  .  .  .  .  .  .  .  .  .  .  .  .  .  .  .  .  .  .  .  .  .  .  .  .  .  .  .  .  .  .  .  .  .                         38
6.5   Intermittent maintenance.  .  .  .  .  .  .  .  .  .  .  .  .  .  .  .  .  .  .  .  .  .  .  .  .  .  .  .  .  .  .  .  .  .  .  .  .  .  .  .  .  .  .  .  .  .  .  .  .  .                              40

7     Troubleshooting .  .  .  .  .  .  .  .  .  .  .  .  .  .  .  .  .  .  .  .  .  .  .  .  .  .  .  .  .  .  .  .  .  .  .  .  .  .  .  .  .  .  .  .  .  .  .  .  .  .  .  .  .  .  .  .  .                 44
7.1   Collecting diagnostic logs.  .  .  .  .  .  .  .  .  .  .  .  .  .  .  .  .  .  .  .  .  .  .  .  .  .  .  .  .  .  .  .  .  .  .  .  .  .  .  .  .  .  .  .  .  .  .  .  .                               44
7.2   Performing a factory reset.  .  .  .  .  .  .  .  .  .  .  .  .  .  .  .  .  .  .  .  .  .  .  .  .  .  .  .  .  .  .  .  .  .  .  .  .  .  .  .  .  .  .  .  .  .  .  .  .                               44
7.3   Troubleshooting errors or abnormal activity.  .  .  .  .  .  .  .  .  .  .  .  .  .  .  .  .  .  .  .  .  .  .  .  .  .  .  .  .  .  .  .  .                                                              44

8     Disassembly and repair. .  .  .  .  .  .  .  .  .  .  .  .  .  .  .  .  .  .  .  .  .  .  .  .  .  .  .  .  .  .  .  .  .  .  .  .  .  .  .  .  .  .  .  .  .  .  .  .  .  . 46
8.1   Tasks. .  .  .  .  .  .  .  .  .  .  .  .  .  .  .  .  .  .  .  .  .  .  .  .  .  .  .  .  .  .  .  .  .  .  .  .  .  .  .  .  .  .  .  .  .  .  .  .  .  .  .  .  .  .  .  .  .  .  .  .  .  .  .  .  .  .  . 46

9     Recycling and disposal.  .  .  .  .  .  .  .  .  .  .  .  .  .  .  .  .  .  .  .  .  .  .  .  .  .  .  .  .  .  .  .  .  .  .  .  .  .  .  .  .  .  .  .  .  .  .  .  .  .  .                             47
9.1   Disposal of powder.  .  .  .  .  .  .  .  .  .  .  .  .  .  .  .  .  .  .  .  .  .  .  .  .  .  .  .  .  .  .  .  .  .  .  .  .  .  .  .  .  .  .  .  .  .  .  .  .  .  .  .  .  .  .                     47
9.2   Recycling of powder.  .  .  .  .  .  .  .  .  .  .  .  .  .  .  .  .  .  .  .  .  .  .  .  .  .  .  .  .  .  .  .  .  .  .  .  .  .  .  .  .  .  .  .  .  .  .  .  .  .  .  .  .  .                       47
9.3   Disposal of electronic components.  .  .  .  .  .  .  .  .  .  .  .  .  .  .  .  .  .  .  .  .  .  .  .  .  .  .  .  .  .  .  .  .  .  .  .  .  .  .  .  .                                                47
9.4   Disposal of packaging waste.  .  .  .  .  .  .  .  .  .  .  .  .  .  .  .  .  .  .  .  .  .  .  .  .  .  .  .  .  .  .  .  .  .  .  .  .  .  .  .  .  .  .  .  .  .                                       47

10     Index.  .  .  .  .  .  .  .  .  .  .  .  .  .  .  .  .  .  .  .  .  .  .  .  .  .  .  .  .  .  .  .  .  .  .  .  .  .  .  .  .  .  .  .  .  .  .  .  .  .  .  .  .  .  .  .  .  .  .  .  .  .  .  .  .  .  . 48

11    Glossary. . . . . . . . . . . . . . . . . . . . . . . . . . . . . . . . . . . . . . . . . . . . . . . . . . . . . . . . . . . . . . . . 50

12    Product compliance.  .  .  .  .  .  .  .  .  .  .  .  .  .  .  .  .  .  .  .  .  .  .  .  .  .  .  .  .  .  .  .  .  .  .  .  .  .  .  .  .  .  .  .  .  .  .  .  .  .  .  .  .  . 52

Read and understand this manual and its safety instructions before using the Fuse
            Sift. Failure to do so can result in serious injury or death.
WARNING

          DISCLAIMER
          Formlabs has made every effort to make these instructions as clear, complete, and correct
          as possible. The information provided in this documentation contains general descriptions
          and/or technical characteristics of the performance of the products contained herein. This
          documentation is not intended as a substitute for and is not to be used for determining
          suitability or reliability of these products for specific user applications. It is the duty of any
          such user or integrator to perform the appropriate and complete risk analysis, evaluation, and
          testing of the products with respect to the relevant specific application or use thereof. Neither
          Formlabs nor any of its affiliates or subsidiaries shall be responsible or liable for misuse of the
          information that is contained herein. Notify us if you have any suggestions for improvements
          or amendments or have found errors in this publication.
          Copyright © 2020 by Formlabs. All rights reserved.
          support.formlabs.com

          TRADEMARKS
          All product names, logos, and brands are property of their respective owners. All company,
          product, and service names used in this manual are for identification purposes only. Use of
          these names, logos, or brands does not imply endorsement.

          DOCUMENT REVISIONS
          Date                              Version                          Document changes
          Jan 2021                          REV 01                           Initial publication
          Apr 2021                          REV 02                           Minor text updates

                                                                                                   Disclaimer | 7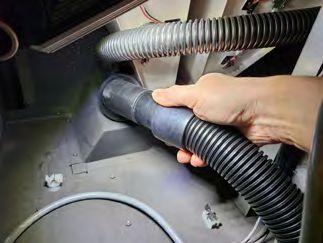
1     Preface
      Congratulations on purchasing the Fuse Sift. On behalf of the Formlabs team, we thank you
      for your purchase. The Fuse Sift is the powder recovery station for the Fuse 1, a Selective
      Laser Sintering (SLS) 3D printer.
      When a print is finished, the resulting parts are buried in loose, unsintered powder and need
      to be extracted. The workspace provided by the Fuse Sift allows users to extract parts from
      a build chamber, reclaim unsintered powder, store both reclaimed and fresh powder, as well
      as combining powder streams for printing. An air handling system helps reduce plumes from
      free floating powder, and integrates a vacuum for easy cleanup.
      This manual explains how to set up, use, and properly maintain the Fuse Sift, as well as
      provides design guidance for optimizing print results.
      The manual is intended for anyone who is installing, operating, maintaining, or otherwise
      interacting with the Fuse Sift. Supervise young or inexperienced users to ensure enjoyable
      and safe operation.

1.1    Read and retain instructions
      Read and understand this manual and its safety instructions before using the Fuse Sift. Failure
      to do so can result in serious injury or death. Keep all safety information and instructions for
      future reference and provide them to subsequent users of the product.
      Follow all instructions to avoid fire, explosions, electric shocks, or other hazards that may result
      in damage to property and/or severe or fatal injuries.
      The Fuse Sift shall only be used by persons who have fully read and understand the contents
      of this manual. Ensure that each person who uses the Fuse Sift has read these warnings and
      instructions and follows them. Formlabs is not liable for cases of material damage or personal
      injury caused by incorrect handling or non-compliance with the safety instructions. In such
      cases, the warranty will be voided.

1.2   Obtaining documentation and information
      Visit formlabs.com to:
      • Access your Formlabs store (formlabs.com/store) and Dashboard accounts (formlabs.
         com/dashboard).
      • Find certified service providers in your region (formlabs.com/company/partners).
      • Access the Terms of Service (formlabs.com/terms-of-service) and the Privacy Policy
         (formlabs.com/privacy-policy).
      Visit support.formlabs.com to:
      • Access the latest version of all Formlabs product documentation.
      • Contact Formlabs Support to request documentation, manuals, repair guides, and
         technical information.
      • Submit any comments or feedback regarding what is good and what can be improved.
         Formlabs values comments from its users.
      • Request additional training.

      8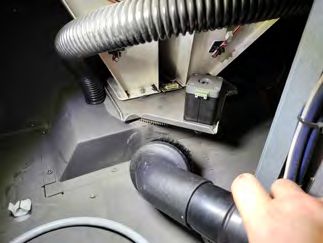
1.2.1   Support and service
        Retain a record of the original purchase to request warranty services. Service options depend
        on the status of the specific product’s warranty. Include the serial name of the product when
        contacting Formlabs Support or a certified service provider for product support.
        Instead of a serial number, Formlabs products have a serial name, which is a unique identifier
        to track the history of manufacturing, sales, and repair, and to distinguish usage when
        connected to a network. The serial name is on the back panel of the machine in the format
        AdjectiveAnimal.
        Service providers of Formlabs products also provide support and service. To the extent that
        Formlabs or a certified service provider offers other or extended warranties, the terms of the
        separate offer may apply.
        For products purchased from certified service providers, contact the original service provider
        for assistance before contacting Formlabs Support.
        For any support or service requests, including product information, technical assistance, or
        assistance with instructions, contact Formlabs Support:

        support.formlabs.com            USA                            Germany
                                        Formlabs, Inc.                 Formlabs GmbH
                                        35 Medford St.                 Nalepastrasse 18
                                        Somerville, MA, USA, 02143     12459 Berlin, Germany

1.2.2   Warranty
        This product is protected under warranty. Formlabs offers a warranty for all Formlabs branded
        hardware. Unless otherwise expressly stated, the Terms of Service, including the Warranty,
        constitute the entire agreement between you and Formlabs with respect to the Service and
        any product you purchase from Formlabs and supersedes all prior or contemporaneous
        communications, proposals, and agreements, whether electronic, oral, or written, between
        you and Formlabs.
        Read the warranty for more details on the Formlabs warranty for your region:
        US                              formlabs.com/terms-of-service
        EU (EN)                         formlabs.com/eu/terms-of-service
        EU (DE)                         formlabs.com/de/terms-of-service
        EU (FR)                         formlabs.com/fr/terms-of-service
        EU (ES)                         formlabs.com/es/terms-of-service
        EU (IT)                         formlabs.com/it/terms-of-service

                                                                                          Preface | 9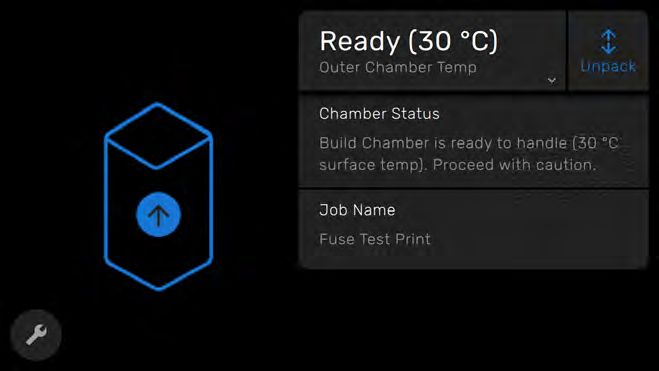
2         Introduction
2.1       Intended use
          The Fuse Sift is a commercial, precision tool intended for use in the additive manufacture of
          end-user supplied designs from SLS powder. The final performance characteristics of sintered
          SLS powder may vary according to your compliance with the instructions for use, application,
          operating conditions, material combined with, end use, or other factors.

               In some cases, the additive manufacturing process may inherently result in variable
NOTICE
               performance characteristics between manufacturing runs or within a specific part.
               Such variances may not be apparent and may result in unexpected defects in
               additively fabricated parts.

               You shall independently verify the suitability of additive manufacturing, Selective
WARNING
               Laser Sintering (SLS), the Fuse Sift, and any specific designs or materials employed
               for the application and intended purpose before use. In no event shall Formlabs be
               liable for any loss, death, or bodily injury that you suffer, or that you cause to any third
               party, in connection with your use of Formlabs products. To the fullest extent legally
               permitted Formlabs EXPRESSLY DISCLAIMS ANY IMPLIED OR EXPLICIT WARRANTY
               OF FITNESS for a particular usage, the particular nature and circumstances of said
               usage being unforeseen and unforeseeable to Formlabs.

               Formlabs is not a manufacturer of medical devices. Formlabs provides tools and
WARNING
               materials that may be used in many applications, but makes no claims as to the safety
               or effectiveness of any specific devices made using Formlabs products. Certain
               Formlabs products, such as those commonly known in the industry as “biocompatible”
               materials, have been engineered to comply with relevant industry standards. The
               specific standards and most relevant technical specifications may be identified
               within the technical data sheets and have been tested according to relevant testing
               protocols for those standards and specifications. Biocompatible materials are a
               speciality product, developed for use by medical professionals, and should be used in
               accordance with the instructions for use.

               Do not modify. The Fuse Sift is intended for use as-is. Modifying the machine without
WARNING
               explicit approval and directions from Formlabs or a certified service provider will void
               your warranty, and could potentially ruin the machine and cause you bodily harm.

          10
2.2 Technical specifications
Parameter Unit
Powder recovery station Fuse Sift
3D printing technology Selective Laser Sintering (SLS)
Minimum dimensions for convenient 221.1 × 122.0 × 218.0 cm | 87.1 × 48.0 × 85.8 in
access (W × D × H)
Powder recovery station dimensions 99.1 × 61.0 × 157.0 cm (188.8 cm with hood open)
(W × D × H) 39.0 × 24.0 × 61.8 in (74.3 in with hood open)
Powder recovery station weight 93 kg | 205 lb (without build chamber or powder)
Build chamber dimensions (W × D × H) 27.9 × 34.2 × 48.9 cm | 11.0 × 13.5 × 19.3 in
Build chamber weight 11 kg (17.6 kg, full with 20% packed powder)
24.3 lb (38.8 lb, full with 20% packed powder)
Build volume (W × D × H) 16.5 x 16.5 x 30.0 cm | 6.5 × 6.5 × 11.8 in (with radiused corners)
Material refresh rate Print with up to 70% recycled powder
Hopper capacity, fresh powder 10.7 kg PA12 nylon | 23.6 lb PA12 nylon
Hopper capacity, used powder 9.8 kg PA12 nylon | 21.6 lb PA12 nylon
Operating environment 18–28 ºC | 68–81 ºF
Air handling Negatively pressurized hood with replaceable HEPA filter
Power requirements With a vacuum that draws less than 6 A (230 VAC)/12 A (120
VAC):
EU: 230 VAC, 7.5 A (dedicated circuit)
US: 120 VAC, 15 A (dedicated circuit)
With a vacuum that draws more than 6 A (230 VAC)/12 A (120
VAC):
EU: 230 VAC, 10 A (dedicated circuit)
US: 120 VAC, 20 A (dedicated circuit)
Vacuum requirements Auxiliary vacuum that is grounded and bonded (e.g., a Class II,
Division 2 vacuum)
Connectivity Wi-Fi: 2.4 GHz
Ethernet: 1000 Mbit
USB: 2.0
Wi-Fi connectivity Protocol: IEEE 802.11 b/g/n
Frequency: 2.4 GHz
Supported security: WPA/WPA2
Ethernet connectivity RJ-45 Ethernet (10BASE-T/100BASE-TX/1000BASE-T) LAN
port
Connect with a shielded Ethernet cable (not included):
minimum Cat5, or Cat5e or Cat6 for 1000BASE-T.
USB connectivity USB (rev 2.0) B port with a USB A-B cable
Sound emission Does not exceed 84 dB(A).
Powder recovery station control Interactive touchscreen, physical buttons
Cartridge filling system Automated
Alerts Touchscreen alerts
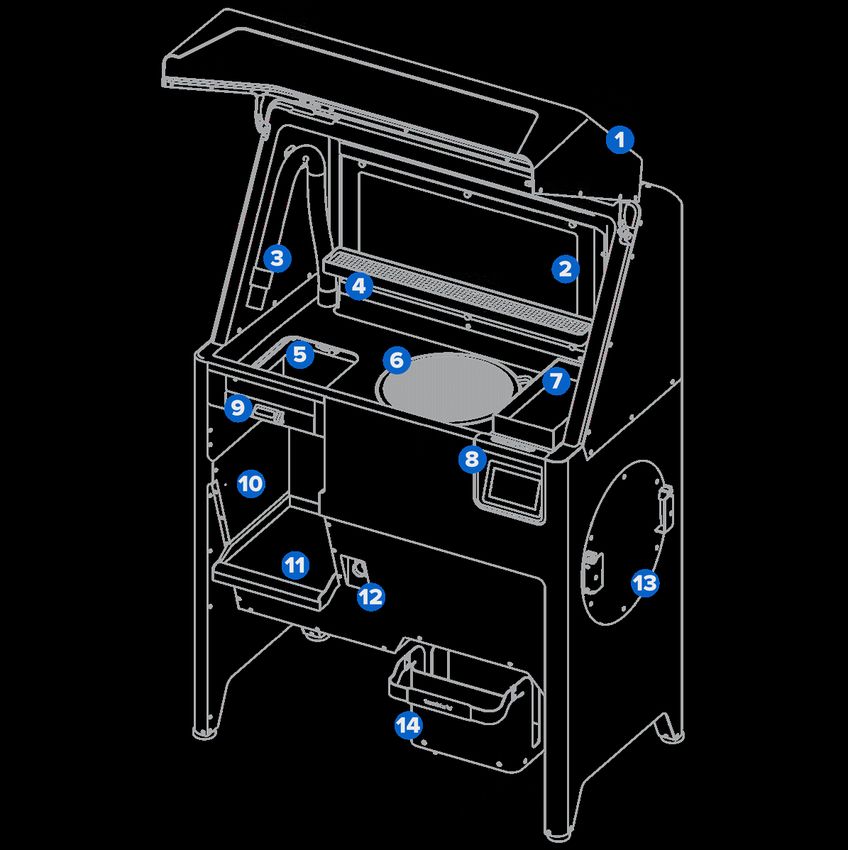
Introduction | 112.3 Product components
2.3.1 Fuse Sift
1 Hood: Prevents powder and debris from leaving the Fuse Sift’s workspace.
2 Vent: Collects pluming powder.
3 Vacuum: For cleaning the Fuse 1 and Fuse Sift after use.
4 Tool shelf: Storage for break-out tools and brushes.
5 Build chamber port: Access port for cooled cake to enter workspace.
6 Surface grate: Protective grate covering the sifter.
7 Fresh powder hopper lid: Access point for filling the fresh powder hopper.
8 Control panel: A touchscreen and physical controls for interfacing with the Fuse Sift.
9 Build chamber latch: Secures the build chamber.
10 Build chamber enclosure: Area for housing the build chamber with prints ready to be
ejected. The powder catch at the bottom of the build chamber enclosure is a removable
tray for catching loose powder.
11 Powder catch: Removable tray for catching loose powder.
12 Build chamber socket: For the build chamber’s plug.
13 Mixer: For mixing powder cartridges after filling.
14 Cartridge drawer: For storing and filling a powder cartridge.
122.3.2 Control panel
1 Touchscreen: Interactive touchscreen for controlling
subsystems and settings of the Fuse Sift.
2 Chamber bed controls: Physical controls for raising and
lowering the print bed into and out of the workspace.
3 Sifter button: Physical control for starting and
stopping the sifter.
4 Vacuum button: Physical control for turning on and
off the auxiliary vacuum.
5 Light button: Physical control for turning on and off
the workspace light and vent.
2.3.3 Mixer
1 Mixer turntable: The exterior face of the mixer that
turns with the cartridge.
2 Locking tabs: Two spring-loaded tabs for securing
the cartridge into the mixer.
3 Cartridge wing couplers: Two brackets that guide
the cartridge’s wings into place.
2.3.4 Powder cartridge
1 Cartridge wings: Two brackets for locking the
cartridge to the mixer.
2 Cartridge valve: The primary opening
for filling and depositing powder.
3 Valve knife: Used to close off and open the
cartridge valve.
4 Handles: For holding and lifting the cartridge.
Introduction | 132.3.5 Additional Fuse Sift package components
1 Power cable: Compatible with both the Fuse Sift and the Fuse 1.
2 Vacuum adapter cable: Adapter for connecting the vacuum directly to the Fuse Sift.
3 Build chamber port cover: Prevents airflow through the bed port in the workspace.
4 Parts basket: Storage container for extracted parts while processing a cake.
5 Vacuum hose: For using the vacuum within the workspace.
6 Surface grate: Covers the sifter to prevent objects from falling through.
7 Large brush: Main scrubbing brush for large or well-buried parts.
8 Double-sided brushes: Set of two, each with a medium and small head.
9 Wire brushes: Set of five. Best for cleaning out cavities, slots, tubes, or hard-to-reach features.
1 Picks: Set of two. Best for removing powder from pockets, seams, or channels.
11 Lifting straps: For two individuals to lift and move the Fuse Sift.
142.4 Fuse Sift user interface
For detailed guidance and visual assistance, visit support.formlabs.com.
The Fuse Sift’s display includes a touchscreen and physical buttons for controlling the print
bed height, sifter, and vacuum. The touchscreen displays system information, settings, status of
the sifter, build chamber, fresh and used powder levels, and error messages. The touchscreen
serves as the user interface for the powder recovery station.
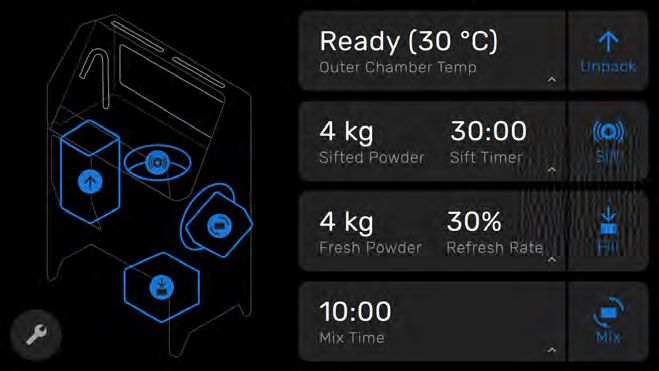
The Fuse Sift allows you to control its
subsystems by either tapping their respective
graphics on the left, or the cards on the right.
Tapping a card brings up the specific
subsystem’s current status and settings. In this
case, the inserted build chamber is cool and
ready for part recovery.
Tapping the icon next to a card activates the
subsystem. When a subsystem is running, its
card and icon are highlighted blue. A progress
bar indicates the state of a current operation.
The filling and mixing subsystems allow you to
access settings of each operation by tapping
their respective cards. The sifter, for example,
allows setting a desired run time while also
displaying the amount of used powder that has
been sifted and recaptured.
Introduction | 153 Safety
Read and understand this manual and its safety instructions before using the Fuse
WARNING
Failure to do so can result in serious injury or death.
Supervise young or inexperienced users to ensure enjoyable and safe operation.
The instructions contain warnings and safety information, as explained below:
DANGER indicates a hazard with a high level of risk which, if not avoided, will result in death or serious injury.
DANGER
WARNING indicates a hazard with a medium level of risk which, if not avoided, could result in death or
serious injury.
WARNING
CAUTION indicates a hazard with a low level of risk which, if not avoided, could result in minor or
CAUTION
moderate injury.
NOTICE indicates information considered important, but not hazard-related.
NOTICE
CAUTION: Mixing powder cartridges poses entanglement and pinch hazards. Keep hands, loose
clothing, and cables away from the mixer while running.
ENVIRONMENTAL HAZARD: Unsintered SLS powder is classified as a microplastic, a group of
plastics that are hazardous to aquatic life..
MANDATORY ACTION: Refer to instruction manual/booklet.
MANDATORY ACTION: Wear a respirator (N95 or better).
MANDATORY ACTION: Wear thermal-insulating silicone gloves when handling hot build chambers.
MANDATORY ACTION: Disconnect before carrying out maintenance or repair.
MANDATORY ACTION: Grounding required.
163.1 Component and subsystem safety
3.1.1 General
The Fuse Sift requires a 230 VAC (50 Hz), 7.5 A power supply (EU) or 120 VAC (60 Hz),
DANGER
15 A power supply (US) for nominal operation. Unless explicitly instructed by Formlabs
Support or a certified service provider, do not disassemble or tamper with the
product beyond what is explicitly outlined for typical maintenance. Tampering with,
or disassembling the Fuse Sift prior to disconnecting the power cable and waiting
approximately ten minutes can subject users to potentially fatal electrical hazards.
The Fuse 1’s print enclosure is designed to operate at up to 200 °C (392 °F) and
WARNING
incorporates high-intensity heaters. Do not open the print enclosure or any other
access doors on the printer during or immediately after a print. Do not handle parts
from a build chamber without allowing the entire print enclosure to cool for several
hours, or until the build chamber temperature has reached ≤ 100 ºC (212 °F). Use
the provided thermal-insulating silicone gloves when handling a hot build chamber.
Failure to follow these procedures will result in serious injuries, including burning and/
or scalding of skin.
Due to its size and weight, do not move or reposition the Fuse Sift alone. If the machine
CAUTION
needs to be moved, at least two individuals should unlock the casters and push the
entire unit by the metal frame. Avoid using the workspace hood as a push-off point.
Do not lift or reposition the Fuse Sift:
NOTICE
• By grabbing or pulling on the workspace hood, workspace lip, build chamber
enclosure, build chamber latch, or power cable.
• By pushing on any side of the unit while stationary.
• When the build chamber that is still hot inside is loaded in the build chamber
enclosure.
The Fuse Sift requires an operating environment that is low in ambient humidity and
NOTICE
static electricity. Refer to section 4.1 Location and environs for the recommended
operating environs. When performing maintenance or testing with the exterior
paneling of the machine removed, ground equipment to the grounding stud marked
with this protective earth symbol.
3.1.2 Vacuum
A typical Fuse Sift operation requires the use of a compliant vacuum that is grounded
NOTICE
and bonded, such as a Class II, Division 2 vacuum, which typically utilizes disposable
bags for collecting debris. Formlabs recommends that Fuse Sift operators regularly
check the accumulation of debris inside the vacuum’s collection chamber.
Safety | 173.1.3 Powder
Dust deposits should not be allowed to accumulate on surfaces. Clean dust residues
DANGER
at regular intervals. Do not use brooms or compressed air hoses to clean surfaces.
Only use a compliant vacuum that is grounded and bonded, such as a Class II,
Division 2 vacuum, for dust collection. Use only non-sparking tools. Keep powder
containers tightly closed when not in use.
In case of powder inhalation, swallowing or contact with eyes, follow these instructions:
WARNING
AFTER INHALATION: If inhaled, remove person to fresh air and place in a position
comfortable for breathing. Keep person at rest. If breathing is difficult, administer
oxygen. If breathing has stopped, provide artificial respiration. If symptoms develop or
persist, seek medical advice/attention.
AFTER SKIN CONTACT: Remove contaminated clothing and shoes. Rinse skin
with copious amounts of water [shower] for several minutes. Launder contaminated
clothing before reuse. If symptoms develop or persist, seek medical advice/attention.
AFTER SWALLOWING: If swallowed, DO NOT induce vomiting unless told to do so
by a physician or poison control center. Rinse mouth with water. Never give anything
by mouth to an unconscious person. If spontaneous vomiting occurs, place on the
left side with head down to prevent aspiration of liquid into the lungs. If symptoms
develop or persist, seek medical advice/attention.
Use appropriate personal protective equipment when handling loose or unsintered
WARNING
powder. Wear non-reactive nitrile gloves and safety glasses. Wear a respirator (N95
or better) if the occupational threshold limit value for airborne particle concentration
has been exceeded, if you are sensitive to dust or pollen, or you are concerned about
your respiratory health. Refer to section 3.2 Personal protective equipment (PPE)
for additional information. Handle loose or unsintered powder only with adequate
ventilation. Avoid breathing mist/vapor/spray/dust. Do not eat, drink, smoke, or use
personal products when handling powder. Avoid contact with skin, eyes, and clothing.
Consult the safety data sheet (SDS) as the primary source of information to
NOTICE
understand safety and handling of Formlabs powders. Respect Formlabs powder like
any household chemical. Follow standard chemical safety procedures and Formlabs
powder handling instructions. In general, Formlabs powder is not approved for use
with food, drink, or medical applications on the human body. Refer to the safety data
sheet (SDS) for each specific powder as well as support.formlabs.com for more detail.
3.1.4 Radio interference
Note: This equipment has been tested and found to comply with the limits for a Class A
digital device, pursuant to Part 15 of the FCC Rules. These limits are designed to provide
reasonable protection against harmful interference when the equipment is operated in a
18commercial environment. This equipment generates, uses, and can radiate radio frequency
energy and, if not installed and used in accordance with the instruction manual, may cause
harmful interference to radio communications. Operation of this equipment in a residential
area is likely to cause harmful interference, in which case the user will be required to correct
the interference at their own expense.
Changes or modifications to this product not authorized by Formlabs could void the electromagnetic
compatibility (EMC) and wireless compliance and negate your authority to operate the product.
This product has demonstrated EMC compliance under conditions that included the use
of compliant peripheral devices and shielded cables between system components. It is
important that you use compliant peripheral devices and shielded cables between system
components to reduce the possibility of causing interference to radios, televisions, and other
electronic devices.
3.2 Personal protective equipment (PPE)
Safe operation of the Fuse Sift can be achieved by implementing the following equipment:
• Particulate filtering respiratory protection (N95 or better)
Wear a respirator (N95 or better) if the occupational threshold limit value for airborne
particle concentration has been exceeded, if you are sensitive to dust or pollen, or you are
concerned about your respiratory health.
• Non-reactive nitrile gloves
Recommended when handling loose or unsintered powder, as it may draw moisture and
oils out of skin. If powder is handled at room temperature, it is not necessary to wear
protective gloves.
• Safety glasses
Required when performing maintenance on the Fuse Sift, as well as handling loose or
unsintered powder at any time. Polycarbonate-based lenses, including prescription glasses,
are acceptable so long as they provide peripheral protection.
3.3 Specification of tools to be used
The Fuse Sift shall only be used with supplied accessories and additional tools recommended
by Formlabs or a certified service provider. Third-party accessories and materials may cause
damage. Refer to sections 3.2 Personal protective equipment (PPE) and 6.1 Tools and
supplies for more information.
• Nylon wire brushes
Various sizes and shapes are provided to ease in the removal of parts from a cake. Avoid using
any metallic or ceramic tools for post-processing, as they may damage parts in the process.
• Compliant vacuum that is grounded and bonded (e.g., Class II, Division 2 vacuum)
Certified for use with materials whose fine particles present an explosive risk when in the
vicinity of potentially malfunctioning electrical equipment.
3.4 Emergency and exceptional situations
Formlabs has made every effort to provide updated safety data sheets (SDS) for every powder
product, in accordance with the latest government guidelines. Always consult the safety data
sheet (SDS) as the primary source of information to understand safety and handling of Formlabs
materials and required accessories.
Safety | 193.4.1 Fire
Do not use water to extinguish an electrical fire. Dousing an electrical fire with water
DANGER
increases the risk of electrocution, and may cause the fire to spread by allowing
electricity to conduct across additional flammable surfaces.
If a localized fire develops near the Fuse Sift, e.g., inside or outside the Fuse 1, immediately
take the following actions.
If the fire is inside the print enclosure:
1. Immediately disconnect the printer from its power source.
2. Open the filter door and locate the emergency chamber door release cable. Pull the cable
away from the printer until the print enclosure door unlocks.
3. Use an ABC fire extinguisher to cover the affected area generously.
If the fire is too large to control:
1. Immediately leave the area and close the door of the room behind you.
2. Evacuate the building according to your organization’s emergency protocols.
3. Call emergency services once you have reached a safe distance from the fire.
3.4.2 Powder
In an emergency involving powder, always refer to the safety data sheet (SDS) and/or
WARNING
seek help from a medical professional.
204 Preparation and setup
4.1 Location and environs
Prepare a space to install and operate the Fuse Sift and house the necessary accessories
and consumables.
To prepare the workspace for the Fuse Sift:
1. Choose a location separate from any machinery or tooling that generates dust or sparks,
such as wood or metal working equipment.
2. Maintain low ambient humidity. When printing with Nylon 12, keep the relative humidity
of the environment around the printer, the Fuse Sift and other post-processing tools, and
anywhere unsintered powder is stored to 50% or less at all times. Higher humidity will lead
to clumping, under-dosing, and print failures. If 50% RH cannot be achieved, remove the
debris catcher at the bottom of the printer’s hopper (though this will remove protection
against debris entering the print chamber). For SLS powders, humidity affects shelf life
significantly. For optimal results, follow Formlabs guidelines for storing and handling powder.
3. The Fuse Sift, build chamber, vacuum, and powder cartridge are free standing components.
Reserve the following minimum dimensions for the most convenient access:
• Fuse Sift: 221.1 × 122.0 × 218.0 cm (87.1 × 48.0 × 85.8 in)
° The Fuse Sift footprint is 99.1 × 61.0 × 157.0 cm
(39.0 × 24.0 × 61.8 in). With the hood open, the
Fuse Sift is 188.8 cm (74.3 in) in height. Leave at
least 61 cm (24 in) to the left, front, and right of the
unit free for access.
° Place the Fuse Sift at least 20.0 cm (8.0 in) from
nearby walls.
° Do not overlap with the Fuse 1 access footprint by
more than 30.5 cm (12.0 in).
4. Ensure proper ventilation is installed.
Sintering nylon powder produces laurolactam, a white powder that accumulates
CAUTION
within the print enclosure, filter mediums, and exhaust. Proper ventilation is required
whenever the Fuse 1 or Fuse Sift is operating.
5. Purchase additional supplies:
• Compliant vacuum that is grounded and bonded (e.g., Class II, Division 2 vacuum)
• Particulate filtering respiratory protection (N95 or better)
• Non-reactive nitrile gloves
• Safety glasses
4.2 Power and networking
For detailed guidance and visual assistance, visit support.formlabs.com.
The Fuse Sift requires a dedicated AC circuit, providing at least 7.5 A at 230 VAC (EU)
NOTICE
Preparation and setup | 21or 15 A at 120 VAC (US) , as well as reliable grounding. This circuit must be separate
from other devices—including the corresponding Fuse 1, fans, vacuums, power tools,
space heaters, or any large appliances. Power surges may disrupt mixing or filling
operations and/or permanently damage sensitive components, jeopardizing the
reliability of the product.
Maximum vacuum current draw Required circuit amperageprotect the machine during shipping. During unboxing, inspect the product for any damage
or missing items. In the case of damage or missing items, contact Formlabs Support or a
certified service provider.
Removing the machine from its packaging requires at least two people that are
CAUTION
comfortable lifting large and heavy objects.
To unbox the machine:
1. Position the Fuse Sift’s packaging near the designated area, leaving enough room for
two people to comfortably maneuver throughout the area. Stand the packaging upright
to ensure it is level.
2. Open the Fuse Sift’s box from the top by removing the lid, then consecutively remove the
two C-shaped shells.
3. Locate the accessories box sitting on the pallet underneath the Fuse Sift. Open the
accessories box and remove the lifting straps and wrench inside.
4. Locate the four steel brackets holding the unit’s feet to the pallet. Use the included wrench
to remove the 12 bolts, then disengage the brackets from the Fuse Sift. Retain all fastening
hardware for future use.
5. Loop both lifting straps under the machine from left-to-right, ensuring that the straps are
not crossed. With one person on each side, insert your forearms into each loop so they
do not go past your elbows.
6. With your back straight and knees slightly bent, brace against the machine with your palms
as you and a second person lift the unit up.
7. Carefully move the machine into its workspace and set the unit down gently.
If you need to readjust the machine, use the lifting straps to pick it back up. Do not
NOTICE
pick up the machine without lifting straps.
8. Remove any additional wrapping and packaging from the outside of the Fuse Sift before
connecting the machine to power.
9. Open the hood and remove the top foam ring from the sifter cavity.
10. Turn the turnbuckles to release the filter mesh and remove the bottom foam ring.
11. Place the filter mesh back inside the cavity and turn the turnbuckles to reinstall.
12. Remove the Fuse Sift tool shelf from the pallet. Hang the tool shelf from the pegs running
along the bottom of the vent at the back of the Fuse Sift workspace.
13. Remove the surface grate from the accessories box and place it over the sifter.
14. Remove the vacuum hose from the accessories box. Plug it into the vacuum port on the
inside-left wall of the Fuse Sift.
15. Remove the parts basket and cleaning tools from the accessories box and place them in
the workspace.
16. Remove the powder catch from the accessories box and place it on the bottom of the build
chamber enclosure.
17. Remove the build chamber port cover from its sleeve and place it over the build chamber
port, closing the space at the top of the build chamber enclosure.
Preparation and setup | 2318. Remove the power cord from the accessories box and connect the machine to power.
The original packaging is designed to be kept and reused for transporting or shipping the
NOTICE
machine for service. Save the complete packaging including any inserts for your convenience.
4.4 Accessing the serial name
For detailed guidance and visual assistance, visit support.formlabs.com.
The serial name is a unique identifier used to track the history of manufacturing, sales, and repair.
The serial name for the Fuse Sift is located on a sticker next to the A/C input on the back panel in
the format AdjectiveAnimal. For a Fuse Sift, the serial name is also available on the touchscreen.
To access the serial name on the touchscreen:
1. Tap the wrench icon in the bottom-left corner to enter the Settings menu. The Settings
menu appears.
2. Tap System. The System screen appears.
3. Tap Sift Details. The Sift Details screen appears.
4. The serial name is listed in the top-left corner.
4.5 Installing the machine
For detailed guidance and visual assistance, visit support.formlabs.com.
After selecting a location for the Fuse Sift, install the accessories if you did not do so during
the unboxing process: insert the sifter mesh and surface grate, connect the vacuum hose,
then connect the Fuse Sift to a power source to turn on the machine.
4.5.1 Inserting the sifter mesh and surface grate
Open the workspace hood. Insert the sifter mesh into the sifter cavity, then turn all eight (8) retention
clamps so they point into the center. Insert the surface grate into the recess above the sifter cavity.
4.5.2 Installing the tool shelf
Hook the tool shelf over the pegs on the vent at the back of the work area. When installed
correctly, the tool shelf sits level and is flush against the vent.
4.5.3 Installing the powder catch tray
Place the powder catch tray in the build chamber enclosure. When installed correctly, the
powder catch tray sits flat and is flush against the back wall of the enclosure.
4.5.4 Set up the build chamber port cover
The build chamber port cover is a removable cover that sits at the top of the build chamber enclosure.
Place the build chamber port cover over the build chamber port whenever a build chamber is not
installed to prevent tools, printed parts, or loose powder from escaping the work area.
4.5.5 Connecting the vacuum
Assemble the vacuum, then connect its hose and power cable to the port in the back-left
corner of the workspace. Loop the hose around the hook located above the port. Flip the
breaker switch on the vacuum to the ON position.
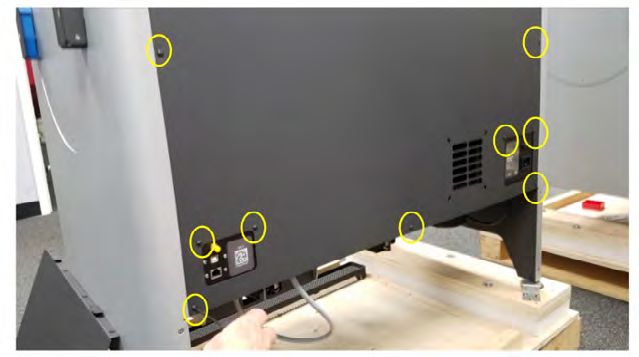
4.5.6 Connecting the cables
Plug the included power cable into the power port on the back of the unit and connect the
power cable to a dedicated circuit.
244.5.7 Installing the Wi-Fi antenna
Install the Wi-Fi antenna to connect the machine to a wireless network.
To install the Wi-Fi antenna, screw the Wi-Fi antenna onto the jack on the back of the unit, next
to the power, USB, and Ethernet ports.
4.5.8 Turning on
To turn on the machine:
1. Plug the included power cable into the power port on the back of the unit and connect the
power cable to a dedicated circuit.
2. Flip the breaker switch on the back of the Fuse Sift to the ON position to turn on the machine.
3. As the Fuse Sift initiates, the Formlabs logo with a progress bar appears on the touchscreen,
followed by the onboarding process. Follow the on-screen prompts to finish setting up the machine.
To turn off the machine, refer to section 5.6.2 Turning off.
4.6 Setting up a network connection
For detailed guidance and visual assistance, visit support.formlabs.com.
Connect the Fuse Sift to a secure network via Wi-Fi or Ethernet, providing it internet access for
remote troubleshooting, sending diagnostic logs, and receiving firmware updates. The Fuse
Sift can connect directly to a computer with a USB cable.
4.6.1 Connecting with Wi-Fi
The Fuse Sift’s built-in Wi-Fi (IEEE 802.11 b/g/n) supports WPA/WPA2 security. Use the
touchscreen to configure a wireless network connection.
To connect with Wi-Fi:
1. Tap the wrench icon on the Home screen. The Settings screen appears.
2. Tap Connectivity > Wi-Fi. The Wi-Fi screen appears.
3. Toggle Use Wi-Fi to ON. The toggle turns blue.
4. Tap the desired wireless network.
5. If prompted, enter your network password and tap the checkmark to confirm.
4.6.2 Connecting with Ethernet
The rear of the unit is equipped with a RJ-45 Ethernet (10BASE-T/100BASE-TX/1000BASE-T) 1000 Mbit
LAN Port. Use a shielded Ethernet cable (not included): minimum Cat5, or Cat5e or Cat6 for 1000BASE-T.
To connect with Ethernet:
1. Plug one end of the Ethernet cable into the Ethernet port on the back of the unit.
2. Connect the other end of the Ethernet cable to your LAN.
4.6.3 Connecting with a manual IP configuration
When connected to an active Ethernet connection or available wireless network, the Fuse Sift can
be configured with a static IP address. Use the touchscreen to configure a manual IP connection.
To connect with Wi-Fi or Ethernet using a manual IP configuration:
1. With an established Ethernet or available Wi-Fi connection, tap the wrench icon on the
Home screen. The Settings screen appears.
2. Tap Connectivity. The Connectivity screen appears.
° For Wi-Fi networks, tap Wi-Fi, then the desired wireless network. A new screen appears.
Tap the Manual IP button in the lower-left corner. The Manual IP Settings screen appears.
° For Ethernet connections, tap Ethernet. The Manual IP Settings screen appears.
3. Toggle Use Manual IP to ON. The toggle turns blue.
4. Enter the appropriate IP Address, Subnet Mask, Default Gateway, and Name Server.
Preparation and setup | 254.6.4 Connecting with USB
Use the included USB cable for connecting a computer directly to the machine.
To connect with USB:
1. Plug one end of the USB cable into the USB port on the back of the unit.
2. Connect the other end of the USB cable to a computer’s USB port.
4.7 Updating firmware
Formlabs regularly releases updated firmware to fix bugs and improve functionality. Download
the latest firmware version for your Formlabs device with PreForm, then upload and install the
firmware file on the machine. Review the firmware downloads and release notes to learn more
about the improvements that come with each version’s release.
To update the firmware via PreForm:
1. Open PreForm.
2. Connect the machine to the computer via USB or connect the device to an Ethernet network.
3. Click the < button. The Job Info dialog box opens.
4. Click the machine’s serial name. The Job Setup window opens.
5. Click the Select Sift arrow. The Sift List window opens.
6. Click the machine’s serial name. The Sift Details window opens.
7. Click Update in the upper-right corner of the Sift Details window. The Firmware Update
window opens.
8. Follow the on-screen instructions to download the latest firmware and then upload the file
to the machine. To upload firmware, the device must be connected to the computer via
USB or the machine must be connected to an Ethernet network.
9. The machine may automatically recognize that you have sent a firmware update. Tap
Continue on the touchscreen to finish the installation.
10. If you are not prompted to Continue, continue the firmware update manually. Tap Settings
> System > Firmware Update.
11. After the firmware update installs, confirm the system restart on the touchscreen or wait 30
seconds for an automatic restart.
4.8 Transporting the machine
For detailed guidance and visual assistance, visit support.formlabs.com.
Refer to section 4.3.1 Receiving for product weight and dimensions. Keep the packaging for
transportation or shipping.
The complete packaging kit consists of:
• one (1) pallet, wood and foam • one (1) inner C-fold, cardboard
• four (4) tie down brackets, steel • one (1) outer C-fold, cardboard
• twelve (12) M6 × 45 mm lag bolts • one (1) topper, cardboard
• one (1) protective bag, plastic • two (2) lifting straps
4.8.1 Preparing for transportation
Before repackaging, vacuum the workspace and empty the hoppers. Remove the powder
cartridge, parts bin, surface grate, tool shelf, build chamber, power catch, and all tools.
26The Fuse Sift is a heavy object. A two person lift is required to prevent injury and
avoid damage to the machine.
CAUTION
Do not ship the machine with the powder cartridge inserted in the drawer or mixer.
NOTICE
Powder left inside the machine can leak during transit, which may lead to additional
fees or void the warranty.
To prepare the machine for transport:
1. Vacuum the Fuse Sift’s workspace and the hoppers.
2. Open the hoppers. Scoop all powder out of the hoppers using a clean, dry scoop. The powder
can be reintroduced into your powder stream by running it through the sifter on the Fuse Sift.
Powder that comes into contact with fibers or other contaminants (e.g., in a vacuum
NOTICE
cleaner) cannot be filtered and should be disposed of.
3. Remove the powder cartridge from the cartridge drawer or mixer.
4. Remove the parts bin and surface grate.
5. Remove and empty the powder catch.
6. Remove all tools from the tool shelf and uninstall the tool shelf.
7. Unplug the vacuum hose from the port on the inside-left wall of the machine.
8. Remove the build chamber port cover and powder catch from the build chamber enclosure.
9. Flip the breaker switch on the back of the unit to the OFF position to turn off the machine.
10. Unplug all cables (power, Ethernet, and USB) from the back of the unit.
4.8.2 Packaging
Thoroughly read and follow the instructions to properly package the machine. Skipping any
of the following steps may result in shipping damage and void the warranty.
To package the machine:
1. Loop both orange lifting straps under the machine from left-to-right, ensuring that the straps
are not crossed. With one person on each side, insert your forearms into each loop so they
do not go past your elbows.
2. With your back straight and knees slightly bent, brace against the unit with your palms as
you and a second person lift the machine up.
3. Lift the machine onto the pallet using the lifting straps, aligning the unit’s feet with the black
markings. Each person should push at an upward angle when lifting to keep the machine
steady and level.
The Fuse Sift is a heavy object. Use appropriate precautions and correct lifting form
CAUTION
when moving the machine.
4. Remove the lifting straps.
5. Turn the turnbuckles to release the filter mesh and insert the bottom foam ring.
6. Place the filter mesh back inside the cavity and turn the turnbuckles to reinstall.
7. Place the top foam ring on top of the sifter mesh.
Preparation and setup | 278. Wrap the hood with stretch wrap at least four times, sealing the hood closed.
9. Wrap the cartridge drawer with stretch wrap at least four times, securing the drawer in place.
10. Place the included protective bag over the machine.
11. Extend the unit’s feet by unscrewing them from the leg until there is a gap of approximately
13 mm (0.5 in) between the top of each foot and the bottom of its respective leg.
12. Orient the tie down brackets facing diagonally inwards, hooking the brackets around the
unit’s feet bolts.
13. Secure the machine to the pallet using the included M6 × 45 mm lag bolts.
14. Encase the front and the back of the machine with a
C-fold segment (2), respectively.
15. Place the topper (3) on top of the C-fold segments.
16. Wrap a nylon binding strap (commercially available)
horizontally around the C-folds. Position the strap
approximately 50 cm (20 in) up from the bottom of
the C-fold. Tighten and crimp the strap.
17. Loop two nylon binding straps vertically around
the machine, passing them underneath the pallet.
Position the two straps approximately 25 cm (10
in) from the left and right sides of the machine,
respectively. Tighten and crimp the straps.
285 Recovering powder and filling powder cartridges
Use appropriate personal protective equipment when handling loose or
WARNING
unsintered powder. Wear non-reactive nitrile gloves and safety glasses. Wear a
respirator (N95 or better) if the occupational threshold limit value for airborne
particle concentration has been exceeded, if you are sensitive to dust or pollen,
or you are concerned about your respiratory health. Refer to section 3.2 Personal
protective equipment (PPE) for additional information. Handle loose or unsintered
powder only with adequate ventilation. Avoid breathing mist/vapor/spray/dust.
Do not eat, drink, smoke, or use personal products when handling powder. Avoid
contact with skin, eyes and clothing.
5.1 Operational environment
The operating temperature for the Fuse Sift is 18–26 °C (64–80 °F), with low ambient humidity.
For optimal post-processing, and particularly for recovering powder, do not exceed these
limits. When printing with Nylon 12, keep the relative humidity of the environment around the
printer, the Fuse Sift and other post-processing tools, and anywhere unsintered powder is
stored to 50% or less at all times. Higher humidity will lead to clumping, under-dosing, and
print failures. If 50% RH cannot be achieved, remove the debris catcher at the bottom of the
printer’s hopper (though this will remove protection against debris entering the print chamber).
For SLS powders, humidity affects shelf life significantly. For optimal results, follow Formlabs
guidelines for storing and handling powder.
5.2 Cooling a print
For detailed guidance and visual assistance, visit support.formlabs.com.
After printing, parts need to cool in the Fuse 1’s print enclosure before being moved into the
Fuse Sift to alleviate thermal stresses so your final geometry can be achieved. The Fuse 1
automatically starts cooling parts after printing completes, and indicates the recommended
time a print should remain inside the print enclosure. This is indicated by an on-screen
notification, as well as the status card in the top-right of the Home screen.
The Fuse 1’s print enclosure is designed to operate at up to 200 ºC (392 °F), and
WARNING
incorporates high-intensity heaters. Do not open the print enclosure or any other
access doors on the Fuse 1 during or immediately after a print. Do not handle parts
from a build chamber without allowing the entire print enclosure to cool for several
hours, or until the print bed temperature has reached ≤ 100 ºC (212 °F). Use the
provided thermal-insulating silicone gloves when handling a hot build chamber.
Failure to follow these procedures will result in serious injuries, including burning and/
or scalding of skin.
A full build chamber or a build chamber with many printed parts will be heavy. Use
CAUTION
Recovering powder and filling powder cartridges | 29appropriate precautions and correct lifting form when moving the build chamber.
5.2.1 Cooling the build chamber in the Fuse 1
After a print has completed, a message on the touchscreen displays the recommended cooling
time required for each print. All prints are subject to a subsequent cooling phase that allows
parts to steadily cool down to 100 ºC (212 ºF). Removing a build chamber from the printer before
parts have completed their initial cooling may result in warpage and deformation.
To cool the build chamber in the Fuse 1:
1. Check the estimated cooling time on the
touchscreen or on Dashboard. Allow the
print to remain inside the printer until the
estimated time has elapsed.
2. Once a print has completed the in-printer
cooling, open the print enclosure door.
3. Unplug the build chamber plug from the
printer and stow it in the plug holster on
the build chamber.
4. Use the silicone gloves to remove the build chamber from the print enclosure and load it
into the Fuse Sift.
5. Connect the build chamber plug to the Fuse Sift. The touchscreen displays the build chamber status.
6. Close the build chamber latch on the Fuse Sift.
5.2.2 Cooling the build chamber in the Fuse Sift
After a print has completed, leave the build chamber in the printer until the internal temperature
has fallen below 100 ºC (212 °F). At that point, the build chamber can be safely transferred
to Fuse Sift to finish cooling. Removing a build chamber from the printer before parts have
completed their initial cooling may result in warpage and deformation.
To cool the build chamber in the Fuse Sift:
1. Check the status of the build chamber
on the touchscreen. If the build chamber
graphic and icon are highlighted red
and the touchscreen displays the status
Hot, allow the build chamber to continue
cooling before ejecting the cake.
2. When the touchscreen displays the status
Ready, it is safe to recover and process
your printed parts.
3. Open the print enclosure door on the printer.
4. Open the build chamber latch on the printer and Fuse Sift.
5. Unplug the build chamber plug from the printer and stow it in the plug holster on the
build chamber.
6. Use the silicone gloves to remove the build chamber from the print enclosure and load it
into the Fuse Sift.
5.2.3 Cooling a build chamber outside of the Fuse 1 or Fuse Sift
30If you are unable to cool the build chamber in the Fuse 1 or Fuse Sift, you can allow the build
chamber to cool in the ambient air.
To cool a build chamber outside of the Fuse 1 or Fuse Sift:
1. When the build chamber temperature has fallen below 100 ºC (212 °F), open the Fuse 1’s
print enclosure door.
2. Remove the build chamber from the printer. Hold the build chamber by the coated handle.
Avoid coming into contact with the bare metal of the build chamber.
3. Place the build chamber on a heat proof surface in a safe location.
4. Allow the build chamber to cool for 30–50% of the original print time.
5. Insert the build chamber into the Fuse Sift and begin the part recovery process.
5.3 Unpacking a powder cake
For detailed guidance and visual assistance, visit support.formlabs.com.
Once the build chamber has fully cooled, raise the powder cake out of the build chamber
using the Fuse Sift.
If the build chamber graphic and icon are highlighted red and the touchscreen
WARNING
displays the status Hot, allow the build chamber to continue cooling before ejecting
the cake.
To unpack a cake:
1. Insert the build chamber into the Fuse Sift and close the build chamber latch.
2. Connect the build chamber plug to the Fuse Sift.
3. Check the build chamber status on the touchscreen. When the touchscreen displays the
status Ready, push the Light button on the control panel. This turns on the light and vents
the workspace.
4. On the touchscreen, tap Unpack to lift the print bed and eject the cake.
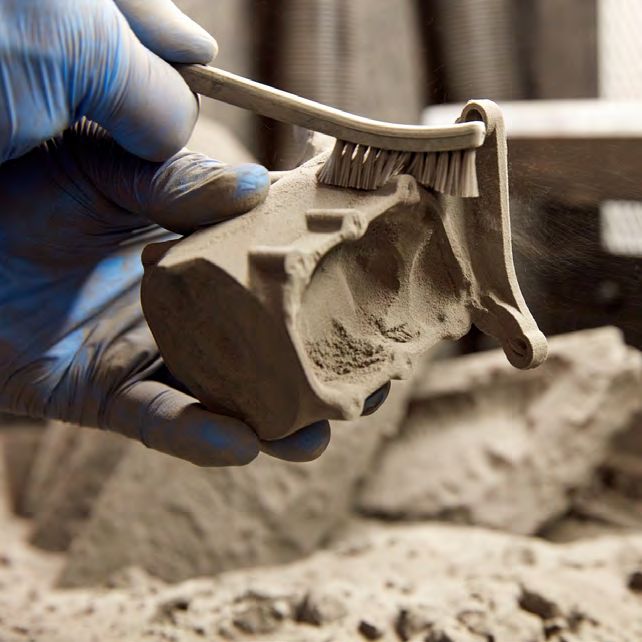
5.4 Extracting parts:
For detailed guidance and visual assistance,
visit support.formlabs.com.
After lifting the powder cake out of the build
chamber with the Fuse Sift, extract your
printed parts from the powder cake.
To extract parts:
1. Move the majority of the cake to the center
of the workspace, then tap Sift on the
touchscreen or push the Sift button on the
control panel. This vibrates the workspace,
causing loose powder to fall through the
grate and into the sifter mesh below, then
ultimately into the used powder hopper.
2. While recovering powder, use nylon wire
brushes to remove remaining powder. Brush the loose powder into the grate to reclaim as
Recovering powder and filling powder cartridges | 31much powder as possible.
3. Remove clean parts from the workspace. Move as much of the remaining powder as
possible into the grate using the nylon wire brushes.
4. Turn on the vacuum by pushing the Vac button on the control panel or by tapping the
vacuum hose icon on the touchscreen.
5. Lift the hood for easier access. Vacuum the loose powder inside the workspace and
under the hood.
6. Vacuum any remaining powder on the print bed and the surrounding port. The print bed
and build chamber must be free of all powder before beginning the next print.
7. Turn off the vacuum by pushing the Vac button on the control panel or by tapping the
vacuum hose icon on the touchscreen.
5.5 Filling a powder cartridge
For detailed guidance and visual assistance,
visit support.formlabs.com.
The Fuse Sift is used to store and eventually
fill powder cartridges, which are used to refill
the printer’s hopper as needed. Used powder
captured by the Fuse Sift can be recycled with
new powder for future prints. Each powder
cartridge holds 3 kg (6.6 lb) of powder. The
hopper can hold 9 kg (19.8 lb) of powder, or three full powder cartridges.
To fill a powder cartridge:
1. Open the cartridge drawer at the bottom of the Fuse Sift and insert an empty cartridge.
2. Ensure that the cartridge valve is open and the knife handle is facing the front of the
Fuse Sift.
3. Slide the cartridge drawer into the Fuse Sift.
4. Check that the Refresh Rate is set
to your desired ratio, then tap Fill on
the touchscreen.
5. The Fuse Sift fills the cartridge with powder
and runs its vacuum to capture loose powder.
This completes after about one minute.
6. Open the cartridge drawer, close the
cartridge valve, and remove the cartridge.
• Ensure that the valve knife is fully pushed into the cartridge before removing it from the
drawer, otherwise powder may leak out during mixing.
7. Slide the cartridge onto the mixer on the right side of the Fuse Sift until the locking tabs
click into place around the cartridge.
Mixing powder cartridges poses entanglement and pinch hazards. Keep hands, loose
CAUTION
clothing and cables away from the mixer while running.
8. On the touchscreen, tap Mix to begin mixing. A clock begins counting down the time remaining.
32You can also read