Meats March 17, 2021 Monthly Wednesday Night Demonstration - UC ANR
←
→
Page content transcription
If your browser does not render page correctly, please read the page content below

4145 Branch Center Road
                                                                           Sacramento, CA 95827-3823
                                                                           (916) 875-6913 Office
                                                                           (916) 875-6233 Fax
                                                                           Email: sacmfp@ucanr.edu
UCCE Master Food Preservers of Sacramento County                           Website: ucanr.edu/mfpsac

    Sacramento County Master Food Preservers
                 Monthly Wednesday Night
                      Demonstration
                       March 17, 2021
                           Meats

Resources:
•   Please visit the National Center for Home Food Preservation at http://nchfp.uga.edu
    for detailed information about research-based methods of home food preservation.
•   UC ANR Catalog (http://anrcatalog.ucanr.edu)

Should you need assistance or require special accommodations for any of our educational programs,
please contact us at 916-875-6913.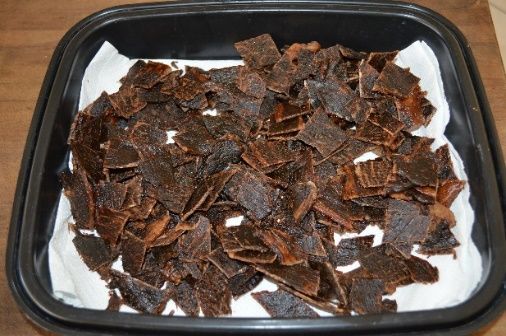
Table of Contents
BASIC SAUSAGE-MAKING AT HOME................................................................................. 1
  Breakfast Sausage ......................................................................................................... 1
  Spicy Italian Sausage ..................................................................................................... 2
  Polish Sausage .............................................................................................................. 3
  Mexican Chorizo Sausage ............................................................................................. 4
  All-Beef Summer Sausage ............................................................................................. 5
  Swedish Potato Sausage ............................................................................................... 6
  Chicken or Turkey Sausage ........................................................................................... 7
  Chicken Spinach Feta Cheese Sausage .......................................................................... 8
CHICKEN or RABBIT (Pressure Canning) ........................................................................... 9
PREPARING SAFER JERKY .............................................................................................. 11
  Jerky Marinade ........................................................................................................... 12
  Great Jerky.................................................................................................................. 14
  Teriyaki Jerky .............................................................................................................. 14
  Western Barbecue Jerky ............................................................................................. 14
  Mild Mexican Jerky ..................................................................................................... 15
  Hawaiian Jerky ............................................................................................................ 15
  Sweet and Sour Jerky .................................................................................................. 15
FREEZING ANIMAL PRODUCTS ....................................................................................... 16
METHODS OF FREEZER WRAPPING ................................................................................ 17
    Drugstore Wrap ....................................................................................................... 17
    Butcher Wrap .......................................................................................................... 17
    Casserole Wrap ........................................................................................................ 18
    Bundle Wrap ............................................................................................................ 18

--No endorsement of any product/company listing within this document is intended, nor is criticism implied of similar
products/companies not included.
--The University of California, Division of Agriculture and Natural Resources (UC ANR) prohibits discrimination against or harassment of
any person in any of its programs or activities on the basis of race, color, national origin, religion, sex, gender, gender expression, gender
identity, pregnancy (which includes pregnancy, childbirth, and medical conditions related to pregnancy or childbirth), physical or mental
disability, medical condition (cancer- related or genetic characteristics), genetic information (including family medical history), ancestry,
marital status, age, sexual orientation, citizenship, status as a protected veteran or service in the uniformed services (as defined by the
Uniformed Services Employment and Reemployment Rights Act of 1994 [USERRA]), as well as state military and naval service. UC ANR
policy prohibits retaliation against any employee or person in any of its programs or activities for bringing a complaint of discrimination
or harassment. UC ANR policy also prohibits retaliation against a person who assists someone with a complaint of discrimination or
harassment, or participates in any manner in an investigation or resolution of a complaint of discrimination or harassment. Retaliation
includes threats, intimidation, reprisals, and/or adverse actions related to any of its programs or activities. UC ANR is an Equal
Opportunity/Affirmative Action Employer. All qualified applicants will receive consideration for employment and/or participation in any
of its programs or activities without regard to race, color, religion, sex, national origin, disability, age or protected veteran status.
University policy is intended to be consistent with the provisions of applicable State and Federal laws. Inquiries regarding the University’s
equal employment opportunity policies may be directed to: John I. Sims, Affirmative Action Compliance Officer and Title IX Officer,
University of California, Agriculture and Natural Resources, 2801 Second Street, Davis, CA 95618, (530) 750-1397. Email:
jsims@ucanr.edu. Website: http://ucanr.edu/sites/anrstaff/Diversity/Affirmative_Action/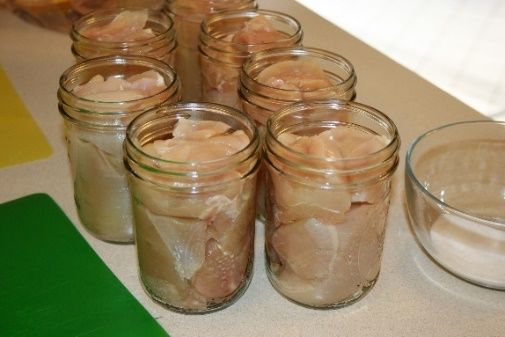
BASIC SAUSAGE-MAKING AT HOME
Fresh (Raw) and Cooked Sausage Recipes

Sausage made from the recipes included in this handout may be refrigerated or frozen
in bulk or linked using natural casings.

You can read “Basics of Sausage Making Formulation, Processing & Safety”
https://secure.caes.uga.edu/extension/publications/files/pdf/B%201437_1.PDF
for additional directions on preparing meat, grinding, stuffing casings, storing and
cooking sausage.

                                                   Breakfast Sausage

Source: Adapted from Alton Brown recipe
Yield: 2 pounds

2 pounds boneless pork shoulder, cut into 1-inch cubes
2 teaspoons salt
1-1/2 teaspoons ground black pepper
2-4 teaspoons dry, rubbed sage (to taste)
2 teaspoons dry thyme leaves
1 tablespoon brown sugar
1/2 teaspoon fresh ground nutmeg
1/2 teaspoon red pepper flakes
1/2 teaspoon cayenne pepper

1. Combine pork chunks with all other ingredients and chill in freezer for about 1 hour.
2. Using the fine blade, grind the seasoned pork.
3. Store in bulk. Refrigerate for 2-3 days or freeze for up to 3 months.

                                                          1
UCCE Master Food Preservers of Sacramento County                          March 17, 2021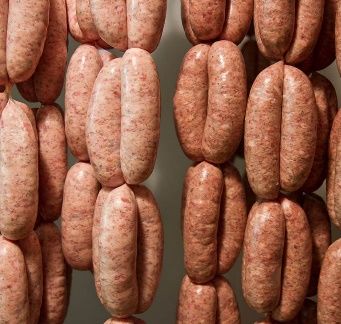
Spicy Italian Sausage

Source: Adapted from Bon Appetit recipe
Yield: 4 pounds

1 4-pound skinless, boneless pork shoulder (Boston butt), cut into 1-2 inch pieces
30 grams kosher salt or 3 tablespoons kosher salt
1 tablespoon fennel seeds, toasted
1 freshly ground black pepper
2 teaspoons cayenne pepper
2 teaspoons paprika
1 teaspoon smoked paprika
1 teaspoon crushed red pepper flakes
1 teaspoon powdered garlic
3 tablespoons dry red wine
Casings, cleaned and rinsed (Optional)

1. Chill all grinder parts. Place pork in a single layer on baking sheet; cover and freeze
   until meat is very firm but not frozen, about 30 minutes to 1 hour.
2. Combine salt and spices in a small bowl; set aside.
3. Grind pork on high speed, 3-4 pieces at a time, into chilled bowl.
4. Sprinkle spice mixture evenly over pork and knead until evenly distributed, about 1
   minute.
5. Add wine; knead mixture until holds together and is very stiff.
6. Cook small patty in a skillet over medium-low heat until meat is cooked through,
   about 4 minutes per side. Let rest 2 minutes. Taste test; adjust spices as necessary.

                                                            2
UCCE Master Food Preservers of Sacramento County                           March 17, 2021
Polish Sausage
Yield: 1-1/2 pounds
1-1/2 pounds coarsely ground pork
1/2 teaspoon ground allspice
3-1/2 teaspoon pepper
6 cloves garlic, crushed
1 teaspoon salt
1 to 2 teaspoon liquid smoke, to taste
1/2 cup ice water
2 tablespoons red wine
Casings, cleaned and rinsed (Optional)
1. In a large chilled bowl, mix all ingredients except the water, then add the water and
mix.
2. Roll into a sausage shape. Place shaped sausage in plastic bags that can be sealed
and are safe to cook in.
3. Place bag into boiling water. Boil for 45 minutes.
4. Remove sausages from bag and store in the refrigerator or freezer for later use.
5. Reheat by browning in a frying pan or grill, bake or broil to an internal temperature
of 160°F.
3
UCCE Master Food Preservers of Sacramento County March 17, 2021Mexican Chorizo Sausage
Source: Adapted from J. Kenji Lopez-Alt of Serious Eats
Yield: 1-1/2 pounds
1-1/2 pounds pork shoulder, cut into 1-inch cubes
2-1/2 teaspoons kosher salt
1 tablespoon ancho chili powder
1/4 teaspoon ground achiote (optional)
3 medium cloves garlic, minced (about 1 tablespoon)
2 teaspoon dried Mexican oregano
1 teaspoon ground onion powder
1 teaspoon smoked Spanish paprika
1 teaspoon ground cumin
1/2 teaspoon freshly ground black pepper
1/4 teaspoon ground cloves
1/4 teaspoon ground coriander seed
Pinch ground cinnamon
3 tablespoons red wine or apple cider vinegar
1. Combine all ingredients in a large bowl and toss until homogenous. Let rest for at
least 4 hours and up to overnight. When ready to grind, grind through a chilled meat
grinder fitted with a 1/4-inch plate. Alternatively, working in 1/4-pound batches,
pulse in a food processor until finely chopped.
2. Knead chopped meat by hand in a large bowl, or with the paddle attachment in the
stand mixer until slightly tacky. Cook as desired or refrigerate/freeze for later use.
4
UCCE Master Food Preservers of Sacramento County March 17, 2021All-Beef Summer Sausage
Source: Home Sausage Making, Susan Mahnke Peery & Charles G. Reavis
Yield: 3 pounds
3 pounds ground chuck with 25 percent fat
4 cloves garlic, minced
1 tablespoon kosher or coarse salt
2 teaspoons brown sugar
1 teaspoon whole mustard seed
1 teaspoon freshly ground black pepper (medium grind)
Curing salt (use supplier’s recommended quantity for 3 pounds of meat)
1 cup water
3/4 teaspoon liquid smoke, to taste
3 feet large beef casings, cleaned and rinsed
1. In a large bowl, combine the ground meat and the garlic. Mix well, using your hands.
2. In a smaller bowl, combine the salt, sugar, mustard seed, pepper, curing salt, water,
and liquid smoke. Stir until blended. Add the water mixture to the meat mixture. Mix
well, using your hands.
3. Stuff the mixture into the prepared casing, prick air pockets, and twist off into 6-inch
lengths. Cut the links apart with a sharp knife. Place the links on a platter, cover, and
refrigerate overnight to meld the flavors.
4. Preheat the oven to 200°F.
5. Arrange the links on a broiler pan and bake for 4 hours, or until the internal
temperature reaches 160°F on an instant-read thermometer. The meat will remain
bright red even when fully cooked. (Alternatively, the links can be smoked in a
smoker following manufacturer’s instructions.)
6. Cool the sausages. Eat immediately or refrigerate for up to 3 weeks.
5
UCCE Master Food Preservers of Sacramento County March 17, 2021Swedish Potato Sausage
Source: Home Sausage Making, Susan Mahnke Peery & Charles G. Reavis
Yield: 5 pounds
1 pound very lean beef
1/2 lean pork butt
1/2 pork fat
5 large potatoes
1 large onion, peeled and coarsely chopped
2 teaspoons kosher or coarse salt
1/2 teaspoon freshly ground black pepper (medium grind)
1/2 teaspoon freshly ground white pepper (medium grind)
1/4 teaspoon ground allspice
1/4 teaspoon ground mace
1/4 teaspoon freshly grated nutmeg
1 clove garlic, minced
Chicken broth for cooking sausage
4 feet medium hog casings, cleaned and rinsed
1. Cut the beef, pork, and pork fat into 1-inch cubes. Freeze the cubes for about 30
minutes to firm them up before grinding through the fine disk of a meat grinder.
Refrigerate until ready to use.
2. Peel and boil the potatoes in lightly salted water for 10 minutes. They will be quite
firm in the center. Allow them to cool before processing.
3. Cube the cooled potatoes and mix with the onion. Put the mixture through the fine
disk of the grinder.
4. In a large bowl, combine the ground meats and potato mixture. Add the salt and
spices. The mixture will be sticky, so dip your hands in cold water, then mix well,
using your hands.
5. Stuff the mixture into the prepared casing, prick air pockets, and twist off into 12-
inch links. With butcher’s twine, tie two separate knots between each link and one
knot at each end. Separate the links by cutting between the two knots, then bring
the ends of each link together and tie to form a ring.
6. Poach the rings in chicken broth to cover for 45 minutes. Serve warm or refrigerate
and serve cool. The sausages may be refrigerated for up to 3 days or frozen for up to
3 months.
6
UCCE Master Food Preservers of Sacramento County March 17, 2021Chicken or Turkey Sausage
Yield: 5 pounds
5 pounds of boneless, chicken or turkey (combination of light and dark meat), skin
included
1 cup finely chopped fresh onion or 2 tablespoons onion powder
3/4 cup chopped dried apples
1/2 cup dried apricots
1 tablespoon dried sage
1 tablespoon kosher salt
2 teaspoons ground black pepper
1 teaspoon ground nutmeg
1 teaspoon dried red pepper flakes
1 cup dry nonfat milk powder
Casings, cleaned and rinsed (Optional)
1. Cut the meat and skin into workable pieces, chill 1 hour in freezer, and grind through
the medium plate on your meat grinder.
2. Add the spices and milk powder to the ground meat and mix well by hand.
3. Grind the sausage mixture one more time through the medium plate on your meat
grinder.
4. Stuff immediately into natural or collagen casings or refrigerate/freeze in bulk for
later use.
7
UCCE Master Food Preservers of Sacramento County March 17, 2021Chicken Spinach Feta Cheese Sausage
Sources: National Center for Home Food Preservation: http://nchfp.uga.edu/
Cooperative Extension Offices (all 50 states)
University of Wisconsin Extension Meat Science, “Manufacturing guide to
Producing Processed Meat Products”
University of Georgia, Basics of Sausage Making, UGA Extension Bulletin
1437, December 2014
Yield: 4 pounds
3-1/2 pounds of boneless, skinless chicken (combination of light and dark meat), ground
1/2 bunch of fresh spinach, cleaned and stems removed, finely chopped
5 ounces crumbled feta cheese
1 tablespoon kosher salt
1-1/2 tablespoons white pepper
1-1/2 tablespoons dried marjoram
1 tablespoon dried onion flakes
1 tablespoon garlic granules
1 tablespoon dried basil
Casings, cleaned and rinsed
1. Put your ground meat in a large bowl and stir in the seasonings with a strong spoon
or using clean hands knead mixture.
2. Link or leave bulk.
3. Cook and use as desired or refrigerate/freeze for later use.
8
UCCE Master Food Preservers of Sacramento County March 17, 2021CHICKEN or RABBIT (Pressure Canning)
Source: National Center for Home Food Preservation
http://nchfp.uga.edu/index.html
http://nchfp.uga.edu/how/can_05/chicken_rabbit.html
Procedure: Choose freshly killed and dressed, heathy animals. Large chickens are more
flavorful than fryers. Dressed chicken should be chilled for 6 to 12 hours before canning.
Dressed rabbits should be soaked 1 hour in water containing 1 tablespoon of salt per
quart, and then rinsed. Remove excess fat. Cut the chicken or rabbit into suitable sizes
for canning. Can with or without bones. The hot pack is preferred for best liquid cover
and quality during storage. Natural poultry fat and juices are usually not enough to
cover the meat in raw packs.
Hot pack – Boil, steam or bake meat until about two-thirds done. Add 1 teaspoon salt
per quart to the jar, if desired. Fill jars with pieces and hot broth, leaving 1-1/4 inch
headspace.
Raw pack – Add 1 teaspoon salt per quart, if desired. Fill jars loosely with raw meat
pieces, leaving 1-1/4 inch headspace. Do not add liquid.
Adjust lids and process following the recommendations in Table 1 or Table 2 according
to the canning method used.
Table 1. Recommended process time for Chicken or Rabbit in a dial-gauge pressure
canner.
Canner Pressure (PSI) at Altitudes of
Style of Jar Size Process 0- 2,001 - 4,001 - 6,001 -
Pack Time 2,000 ft 4,000 ft 6,000 ft 8,000 ft
Without Bones:
Hot and Pints 75 min 11 lb 12 lb 13 lb 14 lb
Raw
Quarts 90 11 12 13 14
With Bones:
Hot and Pints 65 min 11 lb 12 lb 13 lb 14 lb
Raw
Quarts 75 11 12 13 14
9
UCCE Master Food Preservers of Sacramento County March 17, 2021CHICKEN OR RABBIT (continued)
Table 2. Recommended process time for Chicken or Rabbit in a weighted-gauge
pressure canner.
Canner Pressure (PSI) at Altitudes of
Style of Pack Jar Size Process Time 0 - 1,000 ft Above 1,000 ft
Without Bones:
Hot and Raw Pints 75 min 10 lb 15 lb
Quarts 90 10 15
With Bones:
Hot and Raw Pints 65 min 10 lb 15 lb
Quarts 75 10 15
10
UCCE Master Food Preservers of Sacramento County March 17, 2021PREPARING SAFER JERKY
Jerky is a lightweight, dried meat product that is a handy food for backpackers, campers
and outdoor sports enthusiasts. It requires no refrigeration. Jerky can be made from
almost any lean meat, including beef, pork, venison or smoked turkey breast. (Raw
poultry is generally not recommended for use in making jerky because of the texture
and flavor of the finished product.)
Raw meats can be contaminated with microorganisms that cause disease. These
harmful bacteria can easily multiply on moist, high protein foods like meat and poultry
and can cause illness if the products are not handled correctly. If pork or wild game is
used to make jerky, the meat should be treated to kill the trichinella parasite before it is
sliced and marinated. This parasite causes the disease trichinosis. To treat the meat,
freeze a portion that is 6 inches or less thick at 0ºF or below for at least 30 days.
Freezing will not eliminate bacteria from the meat.
Follow these recommendations for safe handling of meat and poultry:
• Always wash hands thoroughly with soap and running water for at least 20
seconds before and after handling raw meats.
• Use clean equipment and utensils.
• Keep meat and poultry refrigerated at 40ºF or below. Use ground beef and
poultry within 2 days, red meats within 3 to 5 days or freeze for later use.
• Thaw frozen meat in the refrigerator, not on the kitchen counter.
• Marinate meat in the refrigerator. Do not save and re-use marinade.
When preparing jerky from wild game, it is important to remember that the wound
location and skill of the hunter can affect the safety of the meat. If the animal is
wounded in such a way that the contents of its gut come in contact with the meat or the
hunter’s hands while dressing the meat, fecal bacteria can contaminate the meat. It is
best to avoid making jerky from this meat and use it only in ways that it will be
thoroughly cooked. Deer carcasses should be rapidly chilled to avoid bacterial growth.
The risk of foodborne illness from home-dried jerky can be decreased by allowing the
internal temperature of the meat to reach 160ºF, but in such a way as to prevent case
hardening. Two methods can be used: heating meat strips in marinade before drying or
heating the dried jerky strips in an oven after the drying process is completed.
Directions for both methods are below. When the strips are heated in a marinade
before drying, drying times will be reduced. Color and texture will differ from traditional
jerky.
11
UCCE Master Food Preservers of Sacramento County March 17, 2021Preparing the Meat - Partially freeze meat to make slicing easier. The thickness of the
meat strips will make a difference in the safety of the methods recommended in this
book. Slice meat no thicker than 1/4 inch. Trim and discard all fat from meat because it
becomes rancid quickly. If a chewy jerky is desired, slice with the grain. Slice across the
grain if a more tender, brittle jerky is preferred. A tenderizer can be used according to
package directions, if desired. The meat can be marinated for flavor and tenderness.
Marinade recipes may include oil, salt, spices and acid ingredients such as vinegar,
lemon juice, teriyaki, or soy sauce or wine.
Jerky Marinade
• 1 1/2 - 2 pounds of lean meat (beef, pork or venison)
• 1/4 cup soy sauce
• 1 tablespoon Worcestershire sauce
• 1/4 teaspoon each of black pepper and garlic powder
• 1/2 teaspoon onion powder
• 1 teaspoon hickory smoke-flavored salt
Combine all ingredients. Place strips of meat in a shallow pan and cover with marinade.
Cover and refrigerate 1-2 hours or overnight. Products marinated for several hours may
be more salty than some people prefer. If you choose to heat the meat prior to drying to
decrease the risk of foodborne illness, do so at the end of the marination time. To heat,
bring strips and marinade to a boil and boil for 5 minutes before draining and drying. If
strips are more than ¼ inch thick, the length of time may need to be increased. If
possible, check the temperature of several strips with a metal stem-type thermometer
to determine that 160ºF has been reached.
Drying the Meat - Remove meat strips from the marinade and drain on clean, absorbent
towels. Arrange strips on dehydrator trays or cake racks placed on baking sheets for
oven drying. Place the slices close together, but not touching or overlapping. Place the
racks in a dehydrator or oven preheated to 140ºF. Dry until a test piece cracks but does
not break when it is bent (10 to 24 hours for samples not heated in marinade). Samples
heated in marinade will dry faster. Begin checking samples after 3 hours. Once drying is
completed, pat off any beads of oil with clean, absorbent towels and cool. Remove
strips from the racks. Cool. Package in glass jars or heavy plastic food storage bags.
Vacuum packaging is also a good option. If the strips were not heated in marinade prior
to drying, they can be heated in an oven after drying as an added safety measure. Place
strips on a baking sheet, close together, but not touching or overlapping. For strips
originally cut 1/4 inch thick or less, heat 10 minutes in an oven preheated to 275ºF.
(Thicker strips may require longer heating to reach 160ºF.)
12
UCCE Master Food Preservers of Sacramento County March 17, 2021Making Jerky from Ground Meat - Jerky can be made from ground meat using special
presses to form or shape the product. Disease-causing microorganisms are more
difficult to eliminate in ground meat than in whole meat strips. (If ground meat is used,
follow the general tips for safe handling of meat and poultry, above.) Be sure to follow
the dehydrator manufacturer’s directions when heating the product at the end of drying
time. Again, an internal temperature of 160ºF is necessary to eliminate disease-causing
bacteria such as E. coli O157:H7, if present.
Storing the Jerky - Properly dried jerky will keep at room temperature two weeks in a
sealed container. For best results, to increase shelf life and maintain best flavor and
quality, refrigerate or freeze jerky.
This above information was extracted from "So Easy to Preserve", 6th ed. 2014. Bulletin 989,
Cooperative Extension Service, The University of Georgia, Athens. Revised by Elizabeth L.
Andress. Ph.D. and Judy A. Harrison, Ph.D., Extension Foods Specialists.
Additional Reading Material:
Making Jerky at Home Safely (PNW 632)
http://ccesaratoga.org/resources/making-jerky
13
UCCE Master Food Preservers of Sacramento County March 17, 2021Great Jerky
3/4 teaspoon salt 2 Tablespoons soy sauce
1/4 teaspoon cracked pepper 1 Tablespoon Worcestershire Sauce
1 Tablespoon brown sugar 1 lb. lean meat, thinly sliced (3/16 to 1/4“thick)
1 garlic clove, crushed
In a small bowl, combine all ingredients except meat. Stir to mix well. Place meat slices
in a single layer on a clean flat surface. Generously spread both sides with the salt
mixture. Place meat strips in a tightly covered glass, stoneware, plastic or stainless-steel
container. Marinate 6 to 12 hours in the refrigerator, stirring occasionally and keeping
the mixture tightly covered. Follow the general directions for drying.
Teriyaki Jerky
1/2 teaspoon salt 1 garlic clove, crushed
1/8 teaspoon pepper 1/4 cup soy sauce
1/2 teaspoon ground ginger 1 lb. lean meat, thinly sliced (3/16 to 1/4“thick)
1 Tablespoon brown sugar
In a small bowl, combine all ingredients except meat. Stir to mix well. Please meat 3 or
4 layers deep in a glass, stoneware, plastic or stainless-steel container, spooning mixture
over each layer. Cover tightly. Marinate 6 to 12 hours in the refrigerator, stir
occasionally and keep the mixture lightly covered. For general directs for drying.
Western Barbecue Jerky
1 teaspoon salt 1 teaspoon dry mustard
1/4 teaspoon pepper 3 Tablespoon brown sugar
1/8 teaspoon cayenne pepper 1/3 cup red wine vinegar
1 teaspoon onion powder 1/3 cup ketchup
½ teaspoon garlic powder 1 lb. lean meat, thinly sliced (3/16 to 1/4“thick)
In a small bowl, combine all ingredients except meat. Stir to mix well. Please meat 3 or
4 layers deep in a glass, stoneware, plastic or stainless-steel container, spooning mixture
over each layer. Cover tightly. Marinate 6 to 12 hours in the refrigerator, stir
occasionally and keep the mixture lightly covered. For general directs for drying.
14
UCCE Master Food Preservers of Sacramento County March 17, 2021Mild Mexican Jerky
1 teaspoon salt 1/2 teaspoon oregano, crushed
1/4 teaspoon pepper 1 teaspoon paprika
1 teaspoon chili powder 1 lb. lean meat, thinly sliced (3/16 to 1/4“thick)
1/2 teaspoon garlic powder
In a small bowl, combine all ingredients except meat. Stir to mix well. Place meat slices in a
single layer on a clean flat surface. Generously spread both sides with the salt mixture. Place
meat strips in a tightly covered glass, stoneware, plastic or stainless-steel container. Marinate
6 to 12 hours in the refrigerator, stirring occasionally and keeping the mixture tightly covered.
Follow the general directions for drying.
Hawaiian Jerky
Pineapple juice gives jerky an island flavor
1 teaspoon salt 1 garlic clove, crushed
1 teaspoon ground ginger 1/4 cup pineapple juice
1 Tablespoon brown sugar 1/4 cup soy sauce
1/4 teaspoon pepper 1 lb. lean meat, thinly sliced (3/16 to 1/4“thick)
1/8 teaspoon cayenne pepper
In a small bowl, combine all ingredients except meat. Stir to mix well. Please meat 3 or 4
layers deep in a glass, stoneware, plastic or stainless-steel container, spooning mixture over
each layer. Cover tightly. Marinate 6 to 12 hours in the refrigerator, stir occasionally and keep
the mixture lightly covered. For general directs for drying.
Sweet and Sour Jerky
You’ll be pleasantly surprised!
1 teaspoon salt 1 Tablespoon soy sauce
1/4 teaspoon pepper 1/4 cup red wine vinegar
1/2 teaspoon onion powder 1/4 cup pineapple juice
1 garlic clove, crushed 1 lb. lean meat, thinly sliced (3/16 to 1/4“thick)
3 Tablespoons brown sugar
In a small bowl, combine all ingredients except meat. Stir to mix well. Please meat 3 or 4
layers deep in a glass, stoneware, plastic or stainless-steel container, spooning mixture over
each layer. Cover tightly. Marinate 6 to 12 hours in the refrigerator, stir occasionally and keep
the mixture lightly covered. For general directs for drying.
15
UCCE Master Food Preservers of Sacramento County March 17, 2021FREEZING ANIMAL PRODUCTS
Source: National Center for Home Food Preservation
http://nchfp.uga.edu/index.html
Freezing is an excellent way to preserve animal products such as meat, poultry, fish and
shellfish. In some instances, eggs and dairy foods can also be frozen for later use.
Freezing does not sterilize food. The extreme cold simply retards growth of
microorganisms and slows down changes that affect quality or cause spoilage.
The quality and safety of the final product depends on how the product is handled before,
during and after freezing. Freezing affects the texture, color, juiciness and flavor of foods. Start
with high quality food, as freezing does not improve food quality. Follow directions in the fact
sheet for handling each individual food.
For highest quality, foods need to be tightly sealed in moisture-vapor resistant materials and
then frozen quickly at 0°F or below. Don’t freeze too much at one time because the food will
freeze slowly, resulting in a mushy final product. Add only the amount of unfrozen food that
will freeze within 24 hours, usually two to three pounds per cubic foot of freezer space. If you
have a large amount of food to freeze, plan to have it frozen for you by a meat-packing plant or
another commercial freezer.
Once the food is frozen, keep it solidly frozen at 0°F or below. Even slight fluctuations in
temperature can cause the food to thaw slightly, resulting in a mushy product. Don’t place
unfrozen food on top of frozen food; it could cause the frozen food to thaw.
Because animal products are very susceptible to the growth of microorganisms that can cause
foodborne illness, it’s important to handle them carefully. Never leave animal products at
room temperature for more than two hours. Also, be sure to clean surfaces and utensils used
for preparing the products for freezing.
________________________
Refer to the fact sheet http://nchfp.uga.edu/publications/uga/FreezingAnimalProducts.pdf
for specific information on:
• Packaging materials
• The “butcher” and the “drugstore” wrap for foods
• Freezing different specific meats, game, poultry, seafood, eggs, dairy
• Thawing instructions for the different foods
• Storage times for the different foods
________________________
16
UCCE Master Food Preservers of Sacramento County March 17, 2021METHODS OF FREEZER WRAPPING
Drugstore Wrap
Cut off enough wrapping material to wrap around the food about 1½ times or enough to make
three 1-inch fold down when wrapping.
1. Place meat in center of wrapping.
2. Bring two opposite edges of the wrap together centered above food.
3. Fold the edges down in a series of folds ½ to 1 inch deep until the fold lies against the food.
4. Press the fold down across the food, squeezing out the air.
5. Turn package over. Press ends to remove air.
6. Fold ends snugly with a double fold.
7. Bring ends up and fasten securely with cord or freezer tape. Label.
Butcher Wrap
Best for bulky and irregular shaped foods. Cut off enough wrap to go around the food twice.
1. Place food at one corner of the wrapping.
2. Fold the food and wrap over two times in the direction of the opposite corner.
3. Fold the ends up pushing the air out as you fold.
4. With ends tucked up, continue to fold food and wrapping over.
5. Pull end tight and seal with cord or freezer tape. Label.
17
UCCE Master Food Preservers of Sacramento County March 17, 2021Casserole Wrap
Allows for reuse of baking dish after food is frozen.
1. Line baking dish with heavy duty foil*, leaving a 1½ inch foil collar around the edge.
2. Place food in foil-lined dish. Cover with sheet of foil the size of dish and foil collar. Press air
out from center; fold edges together, sealing tightly.
3. Label and freeze. When frozen, lift from dish and return food to freezer.
*You can use a plastic-type freezer wrap can be used to line baking dishes. The wrap needs to
be large enough to fold over the top for sealing.
Bundle Wrap
Good for odd shapes and semi-moist foods. Foods may be baked or grilled in this wrap.
1. Center food on a square of heavy duty foil large enough for adequate wrapping.
2. Bring four corners of foil up together in a pyramid shape.
3. Fold open edges together in locked folds, pressing air out, until foil is tight against food.
Label.
Food Freezing Basics: Methods of Wrapping (FN613)
https://www.ag.ndsu.edu/publications/food-nutrition/food-freezing-basics-methods-of-wrapping
18
UCCE Master Food Preservers of Sacramento County March 17, 2021You can also read