Motion Perfect - Owner's Manual - Serta
←
→
Page content transcription
If your browser does not render page correctly, please read the page content below
Motion Perfect

Owner’s Manual
Actual product appearance and functionality may vary from photographs, illustrations and descriptions included in this manual.
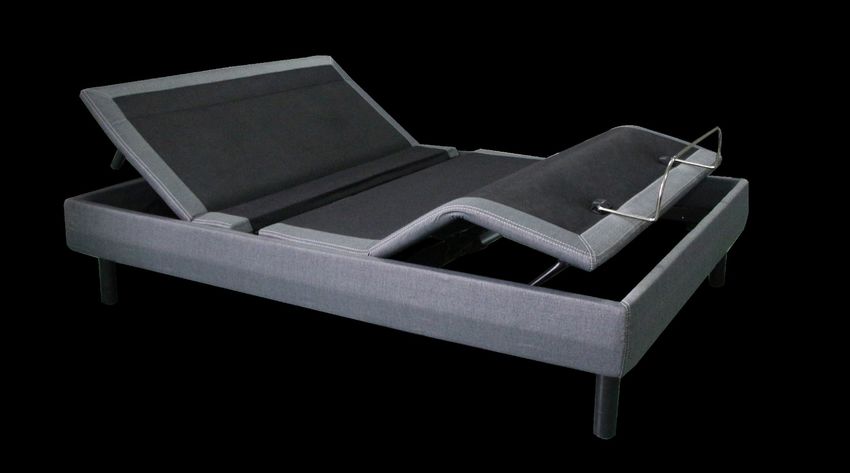
table of contents

Safety Precautions and Usage Statements .  .  .  .  .  .  .  .  .  .  .  .  .  .  .  .  .  .  .  .  .  .  .  .  .  .  .  .  .  .  .  .  .  .  .  .  .  .  .  .  .  .  .  .  .  .  .  .  .  .  .  .  .  .  .  .  .  .  .  .  .  .  .  .  .  .  .  .  . 1-4
Parts List .  .  .  .  .  .  .  .  .  .  .  .  .  .  .  .  .  .  .  .  .  .  .  .  .  .  .  .  .  .  .  .  .  .  .  .  .  .  .  .  .  .  .  .  .  .  .  .  .  .  .  .  .  .  .  .  .  .  .  .  .  .  .  .  .  .  .  .  .  .  .  .  .  .  .  .  .  .  .  .  .  .  .  .  .  .  .  .  .  .  .  .  .  .  .  .  .  .  .  . 5
Base Overview / Quick Reference Guide .  .  .  .  .  .  .  .  .  .  .  .  .  .  .  .  .  .  .  .  .  .  .  .  .  .  .  .  .  .  .  .  .  .  .  .  .  .  .  .  .  .  .  .  .  .  .  .  .  .  .  .  .  .  .  .  .  .  .  .  .  .  .  .  .  .  .  .  .  .  . 6-7
Installation Guide.  .  .  .  .  .  .  .  .  .  .  .  .  .  .  .  .  .  .  .  .  .  .  .  .  .  .  .  .  .  .  .  .  .  .  .  .  .  .  .  .  .  .  .  .  .  .  .  .  .  .  .  .  .  .  .  .  .  .  .  .  .  .  .  .  .  .  .  .  .  .  .  .  .  .  .  .  .  .  .  .  .  .  .  .  .  .  .  .  .  .  . 8-9
Remote Control .  .  .  .  .  .  .  .  .  .  .  .  .  .  .  .  .  .  .  .  .  .  .  .  .  .  .  .  .  .  .  .  .  .  .  .  .  .  .  .  .  .  .  .  .  .  .  .  .  .  .  .  .  .  .  .  .  .  .  .  .  .  .  .  .  .  .  .  .  .  .  .  .  .  .  .  .  .  .  .  .  .  .  .  .  .  .  .  .  .  .  . 10-11
Remote Control - Preset Programming .  .  .  .  .  .  .  .  .  .  .  .  .  .  .  .  .  .  .  .  .  .  .  .  .  .  .  .  .  .  .  .  .  .  .  .  .  .  .  .  .  .  .  .  .  .  .  .  .  .  .  .  .  .  .  .  .  .  .  .  .  .  .  .  .  .  .  .  .  .  .  .  .  . 12
Remote Control Pairing .  .  .  .  .  .  .  .  .  .  .  .  .  .  .  .  .  .  .  .  .  .  .  .  .  .  .  .  .  .  .  .  .  .  .  .  .  .  .  .  .  .  .  .  .  .  .  .  .  .  .  .  .  .  .  .  .  .  .  .  .  .  .  .  .  .  .  .  .  .  .  .  .  .  .  .  .  .  .  .  .  .  .  .  .  .  . 13
Syncing Two Bases . .  .  .  .  .  .  .  .  .  .  .  .  .  .  .  .  .  .  .  .  .  .  .  .  .  .  .  .  .  .  .  .  .  .  .  .  .  .  .  .  .  .  .  .  .  .  .  .  .  .  .  .  .  .  .  .  .  .  .  .  .  .  .  .  .  .  .  .  .  .  .  .  .  .  .  .  .  .  .  .  .  .  .  .  .  .  .  .  .  . 14
Bluetooth Setup.  .  .  .  .  .  .  .  .  .  .  .  .  .  .  .  .  .  .  .  .  .  .  .  .  .  .  .  .  .  .  .  .  .  .  .  .  .  .  .  .  .  .  .  .  .  .  .  .  .  .  .  .  .  .  .  .  .  .  .  .  .  .  .  .  .  .  .  .  .  .  .  .  .  .  .  .  .  .  .  .  .  .  .  .  .  .  .  .  .  .  .  .  . 15
Power Down Box .  .  .  .  .  .  .  .  .  .  .  .  .  .  .  .  .  .  .  .  .  .  .  .  .  .  .  .  .  .  .  .  .  .  .  .  .  .  .  .  .  .  .  .  .  .  .  .  .  .  .  .  .  .  .  .  .  .  .  .  .  .  .  .  .  .  .  .  .  .  .  .  .  .  .  .  .  .  .  .  .  .  .  .  .  .  .  .  .  .  .  .  . 16
Connecting Straps.  .  .  .  .  .  .  .  .  .  .  .  .  .  .  .  .  .  .  .  .  .  .  .  .  .  .  .  .  .  .  .  .  .  .  .  .  .  .  .  .  .  .  .  .  .  .  .  .  .  .  .  .  .  .  .  .  .  .  .  .  .  .  .  .  .  .  .  .  .  .  .  .  .  .  .  .  .  .  .  .  .  .  .  .  .  .  .  .  .  .  . 17
Headboard Brackets. .  .  .  .  .  .  .  .  .  .  .  .  .  .  .  .  .  .  .  .  .  .  .  .  .  .  .  .  .  .  .  .  .  .  .  .  .  .  .  .  .  .  .  .  .  .  .  .  .  .  .  .  .  .  .  .  .  .  .  .  .  .  .  .  .  .  .  .  .  .  .  .  .  .  .  .  .  .  .  .  .  .  .  .  .  .  .  .  . 18
Troubleshooting.  .  .  .  .  .  .  .  .  .  .  .  .  .  .  .  .  .  .  .  .  .  .  .  .  .  .  .  .  .  .  .  .  .  .  .  .  .  .  .  .  .  .  .  .  .  .  .  .  .  .  .  .  .  .  .  .  .  .  .  .  .  .  .  .  .  .  .  .  .  .  .  .  .  .  .  .  .  .  .  .  .  .  .  .  .  .  .  .  .  .  .  .  . 19

Español .  .  .  .  .  .  .  .  .  .  .  .  .  .  .  .  .  .  .  .  .  .  .  .  .  .  .  .  .  .  .  .  .  .  .  .  .  .  .  .  .  .  .  .  .  .  .  .  .  .  .  .  .  .  .  .  .  .  .  .  .  .  .  .  .  .  .  .  .  .  .  .  .  .  .  .  .  .  .  .  .  .  .  .  .  .  .  .  .  .  .  .  .  .  .  .  . 20-25
Notes . .  .  .  .  .  .  .  .  .  .  .  .  .  .  .  .  .  .  .  .  .  .  .  .  .  .  .  .  .  .  .  .  .  .  .  .  .  .  .  .  .  .  .  .  .  .  .  .  .  .  .  .  .  .  .  .  .  .  .  .  .  .  .  .  .  .  .  .  .  .  .  .  .  .  .  .  .  .  .  .  .  .  .  .  .  .  .  .  .  .  .  .  .  .  .  .  .  .  .  .  . 26
safety precautions and usage statements
Attention: Important Safety Disclaimers
Read all instructions before using your adjustable base. Save these instructions.

                                    WARNING                                                outlet. Unauthorized modification or failure to use a wall outlet or surge protector
                                                                                           could void the electrical portion of your warranty.

         Always unplug the base from the electrical outlet before servicing any
        part of the base. To reduce risk of electric shock, unplug the base before
                                                                                                                             WARNING
         cleaning. To safely disconnect, ensure the base is in a flat position with                    •   Keep bed in a flat position when not in use.
                      all motors off, and unplug from power source.                                    •   Stay clear of moving parts while in motion.
                                                                                                       •   Before adjusting, make sure children and pets are clear of
                                                                                                           moving parts and are not under bed base.
                                        SAFETY:                                                        •   Do not allow children to operate bed base without adult
                                                                                                           supervision
TO REDUCE THE RISK OF SHOCK, BURNS, FIRE OR INJURY:
For optimal safety and operation, plug bed base into a surge protector (not
included). The bed base should only be plugged directly into a wall outlet or              PETS AND CHILDREN:
surge protector (strongly recommended). Always unplug the base from the                    Immediately dispose of all packing materials as it may pose a smothering risk
electrical outlet before servicing any part of the base. To reduce risk of electric        to small children and pets. To avoid injury, it is not advised to allow children and
shock, unplug the base before cleaning. To safely disconnect, ensure the base              small pets to play on or under the bed. Children should not operate the bed
is in a flat position with all motors off, and unplug from power source. Keep the          base without adult supervision.
power cord away from heated surfaces. Never operate the base when the air
openings are blocked. Keep air openings free of lint, hair and the like. Do not            PACEMAKERS:
drop or insert any object into any opening. Discontinue use of the bed base                Some products contain Neodymium MAGNETS which may interfere with devices
and contact a qualified service center if: it has a damaged cord or plug, if it            such as pacemakers, ICD’s and any other device sensitive to magnetic fields.
is not working properly, or it has been dropped into water. Only use this bed              It is STRONGLY recommended that owners of such medical devices consult
base for its intended use as described in this manual. Do not use accessories/             their physician prior to using products that contain Neodymium MAGNETS. It is
attachments that are not recommended by the manufacturer. Close supervision                also possible that some pacemakers may falsely interpret the optional massage
is required when the bed base is used by or near children, convalescents,                  feature vibrations as movement/exercise. This is a common occurrence with any
disabled persons or pets. Improper connection of the equipment can result in               product that creates a vibrating movement and may not affect the pacemaker.
the risk of electrical shock, electrical fire or faulty operation of this bed base. If     Please consult your physician before using the massage feature.
the plug does not fit your outlet, contact a qualified electrician to install a suitable

                                                                                                                                                                                  1
safety precautions and usage statements
                                                                                             position. In normal base operation, the wheels which allow the bed to maintain
                                        WARNING                                              its distance from the wall, will make contact with the steel platform supports of
                                                                                             the base creating a contact noise. When entering, exiting or shifting weight on
            For optimal safety and operation, plug bed base into a surge protector
              (not included). The bed base should only be plugged directly into a
                                                                                             the base, this contact noise may be audible as the wheels make contact. This is
          grounded wall outlet or surge protector (strongly recommended). Improper           normal.
             connection of the equipment can result in the risk of electrical shock,
            electrical file or faulty operation of this bed base. If the plug does not fit   MATERIALS
              your outlet, contact a qualified Electrician to install a suitable outlet.     Ergomotion adjustable bases are constructed from various materials including
                                                                                             woods, metals, plastics and fabrics. Tension, pressure or movement applied to
    IN-HOME USE AND HOSPITAL STANDARDS:                                                      the frame, platform or shroud through general use may create an audible sound.
    Ergomotion adjustable bed bases are designed solely for in-home use. This
    base was not designed as a hospital bed and is not designed to meet hospital             MASSAGE OPERATION AND LOCATION ENVIRONMENT
    standards. Do not use this base with TENT TYPE oxygen therapy equipment or               The massage feature will emit a tone during operation. This is normal. As the
    near explosive gases.                                                                    massage intensity level is increased, the tone will intensify. The volume of
                                                                                             this tone is directly related to the location environment. For example, when
    ADDITIONAL SAFETY FEATURES                                                               demonstrated in a show room, the surrounding environmental noise will cover
    Casters (optional leg accessory) are equipped with locking wheels to prevent             some of the massage noise. However, when installed in a home setting with
    unwanted movement. Even when locked and unable to roll, it is possible for               wooden floors, carpeted or not, the massage volume will be more noticeable. To
    the casters to slide. Free release head and foot motors are designed to lower            minimize this resonance, place a piece of carpet, or rubber caster cups, under
    the mattress by retracting only with gravity, never pulling downwards, which             each leg or caster of the base. It is possible to experience vibration or noise
    minimizes pinch points.                                                                  from the exterior bed frame, headboard brackets, headboards or footboards if
                                                                                             mounting bolts are not firmly tightened.
                                            ACOUSTICS                                        Levels 1-6 of massage intensity represent the revolutions of the motor per
                                                                                             minute. Level 6 provides the maximum number of RPMs. However, this does not
    LIFTING/LOWERING MECHANISMS                                                              mean that the feeling of vibration is the strongest. Depending on the mattress
    The lift/lower feature will emit a minimal humming sound during operation. This          material, thickness, and positioning of the user, the feeling of vibrations will differ.
    is normal. During operation, the lift arm wheels make contact with the platform          We encourage the user to find the massage intensity setting that suits them best.
    support of the base. This contact may result in metal on metal or metal on plastic       It is important to understand the physics of vibrations. Just as an engine may run
    contact. This applies slight tension on the moving components and resonance              rough during idle, as the RPMs increase, the vibrations change concurrently.
    is reduced to a minimum level. If excessive noise or vibration is experienced,
    reverse the movement action (up or down) of the base with the remote control.            TOLERANCE
    This should realign the base’s activating mechanisms to the proper operational           All Ergomotion adjustable foundations, depending on make and model, are

2
safety precautions and usage statements
designed and manufactured to perform and function within designated quality                                                                          grandkids. The extra movement will help the adjustable base respond to weight
control parameters. Bases are subject to meticulous and rigorous inspections                                                                         and temperature changes. Some of the materials in our adjustable bases such
during the quality control process to ensure bases will operate within these                                                                         as the woods, metals and plastics used in the platform, frame and components
standards during normal operating use. Normal operating use is defined                                                     Adjustable
                                                                                                                                as the               are sensitive to moisture content and temperature and may make sounds in
following: Adjustable foundation is to be operated with a mattressBed                                               and load.  Tolerance             colder environments.
Testing procedures require lifetime cycle tests with up to 120kg distributed load.
The angle (designated “a”         inwithin
                                       figure      1) between               the back           section         and the         flat inspections during
                           All Ergomotion adjustable foundations, depending on make and model, are designed and manufactured to perform and
                           function         designated quality control parameters.     Bases are  subject to meticulous  and rigorous                PAIRED OPERATION:
section for various configurations of the mattress support platform shall be ± 3°,                                                                   When operating a “paired” split base setup there may be a time latency up to 1.5
                           the quality control process to ensure bases will operate within these standards during normal operating use.

                           Normal operating use is defined as the following:
which translates to a tolerance            of   up    to    1  ½”.
                                    -Adjustable foundation is to be operated with a mattress and load. Testing procedures require lifetime cycle
                                                                                                                                                     seconds between each bases articulation.
The angle (designated “B” intests      figure      1) between the flat section and foot section
                                          with up to 120kg distributed load.

for various configurations                                                                                                                           WEAR AND TEAR:
of the mattress support                                                                                                                              Wear and tear is damage that naturally and inevitably occurs as a result of
                                                                                                                                         (α°)
platform shall be ± 3°, which                                                                                                                        normal use or aging.
translates to a tolerance of
up to ¾”.                                                                                        (β°)                                                FABRIC CARE:
Any adjustable foundation                                                                                                                            To prolong the life of your fabric, protect from direct sunlight whenever possible.
deemed to be within these                                                                                                                            For spot cleaning, wipe area with a light damp sponge or vacuum with a soft
allocated tolerances is                                                                                                                              brush attachment to remove particles. Keep at a minimum of 30cm (12 inches)
considered to have met                                                                                                                               away from direct heat sources. For a deeper cleaning, blot liquid spills with a
the manufacturer’s quality                                                                                                                           clean dry cloth. Wipe with a clean cloth dampened with warm water. Do not wet
control standards.                                                                                                                                   excessively. A soft bristle brush may be used to remove ingrained soil. Avoid
                           The angle (designated “α” in figure 1) between the back section and the flat section for various configurations of the
                           mattress support platform shall be ± 3°, which translates to a tolerance of up to 1 ½”.                                   scratching by gentle brushing. Wipe with a clean cloth dampened with warm
THAT “NEW PRODUCT”              SMELL:
                           The angle                                                                                                                 water to remove residues. Dry in shade away from direct heat. If persistent marks
                                      (designated “β” in figure 1) between the flat section and foot section for various configurations of the mattress
                           support platform shall be ± 3°, which translates to a tolerance of up to ¾”.
Some people notice a slight           odor      to   their       new       adjustable            base—this              can     come
                           When operating a "paired" split base setup there may be a time latency up to 1.5 seconds between each bases articulation. remain visible after cleaning, seek professional advice.
from our material manufacturing               process.           This      smell       is   normal         and      usually
                           Any adjustable foundation deemed to be within these allocated tolerances is considered to have met the manufacturer’s

disappears before the product reaches you. Sometimes, however, this smell may                                                                        PRODUCT RATINGS:
                           quality control standards.

                           Blake Pettit
still be noticeable. It usually      disappears
                           Quality Assurance Manager         after      a  few      weeks,         providing            adequate                     The lift motors are not designed to operate continuously for more than
ventilation of the product      and      the
                           Ph 805-979-3875
                           Fx 805-979-9399
                                                environment.                                                                                         [2] minutes in an [18] minute time period or approximately 10% duty cycle.
                           www.ergomotion.com                                                                                                        Attempting to circumvent or exceed this rating will shorten the life expectancy of
BREAK IN PERIOD:                                                                                                                                     the product and may void the warranty. The massage motors are not designed
You can speed up the break-in period by simply spending time in the adjustable                                                                       to operate continuously for more than 30 minutes at a time. Please allow the
                         Ergomotion Inc. | ph 1-888-550-3746 | fx 805-979-9399 | www.ergomotion.com
bed through activities such as reading, watching TV or playing with the kids or                                                                      massaging system to rest for 30 minutes after automatic massage shut off before

                                                                                                                                                                                                                                           3
safety precautions and usage statements
    restarting.                                                                          •   Tinker with or modify base. This will void the warranty.
    WEIGHT LIMITS:                                                                       •   Press down on the head or foot while actuated can damage frame and
    This product is not rated to support weights exceeding 850 pounds. This product          motors.
    is not rated to support weights in excess of 850 pounds inclusive of the mattress
    and bedding. The base will structurally support this weight, provided it is evenly
    distributed across the bed base. The adjustable base is not designed to support
    or lift this amount in the head or foot sections alone. Exceeding this weight
    restriction could damage the bed and/or cause injury and will void the warranty.

    IMPORTANT DO’S AND DON’TS
    DO:
    •   Plug your adjustable base into a power surge protector.
    •   Evenly distribute weight when sleeping in a split setup. Uneven distribution
        of weight can cause the base to raise unevenly.                                      FCC Compliance:
    •   Call Customer Service for any technical issues. Do not try to force the base         This device complies with part 15 of the FCC Rules. Operation
        down, this can damage the motors or frame.                                           is subject to the following two conditions: (1) This device
    •   Use mild soap and water to clean your adjustable base if staining occurs.            may not cause harmful interference, and (2) this device must
    •   Keep in mind that adjustable bases are recommended to be used with                   accept any interference received, including interference that
        adjustable friendly mattresses                                                       may cause undesired operation.
    •   Lower to the flat (horizontal) position after use and in between presets.            To comply with the FCC RF exposure requirements, no
    •   Register your warranty as soon as your adjustable base has been delivered.           change to the antenna or the device is permitted. Any change
                                                                                             to the antenna or the device could result in the device
    DON’T                                                                                    exceeding the RF exposure requirement and void user’s right
    •   Sit on corners/edges of base, this may warp the frame, struts or foam.               to operate the device.
    •   Tilt the base on its side. This can damage the legs and/or leg screws.
                                                                                             Radio Frequency: 2.4 GHz
    •   Stand or jump on the adjustable base at any time, this can damage the
        frame and motors.
    •   Drag the base to move it. Dragging the base could damage the frame, strip
        the nut/bolts or break the legs. Purchase castors if you plan on moving your
        base routinely.
    •   Enter and exit the adjustable base with the head and/or foot in the
        articulated position. Enter or exit your adjustable in the flat (horizontal)
        position.
                                                                                              SAVE THESE INSTRUCTIONS.
4
parts list
                   Before discarding the packing materials, ensure all the parts are accounted for.

All electronics and components that need to be installed are
                                                                  A)                         B)*                       C)
located in boxes under the base or attached to the frame.
(Remote varies based on model.)

A)     Wireless Remote Control and (3) AAA Batteries
B)     Legs
                                                                  D)                         E)                        F)
C)     Mattress Retainer Bar *
D)     Power Cord
E)     Power Supply
                                                                  G)‡                        H)‡
F)     Power Down Strip (9 volt batteries not included)
G)     SmartSyncTM Cord ‡
H)     Connecting Strap ‡*                                        I)                         J)                        K)
I)     Manual
J)     Warranty Card
K)     Quick Start Guide
                                                                  L)                         M)                        N)
L)     Divided King Quick Start Guide
Misc. Parts (not included):
       Surge Protector
       9 Volt Batteries
                                                                       For Divided King parts and setup instructions, please refer to the
*   These items are attached to the base for shipping purposes.                        Divided King Quick Start Guide.
    Carefully remove from base and set aside.

‡   Only included in Twin Long and Cal King Split bases.

                                                                                                                                            5
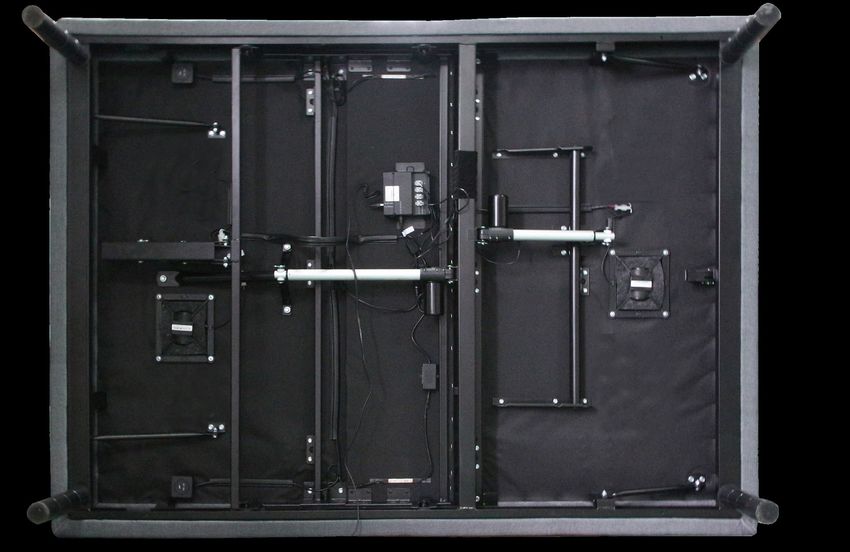
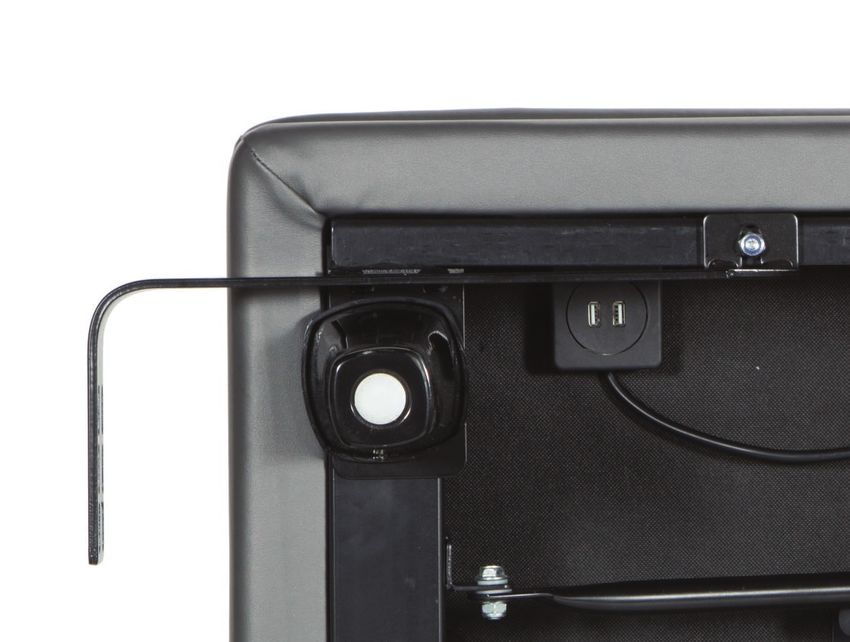
base overview

                            USB Ports                 Underbed          Foot Motor
                                        Control Box    Lights

         Head Motor

                                                                                     Foot Massage

       Head Massage

                USB Ports

                                                             Underbed
                                                              Lights

6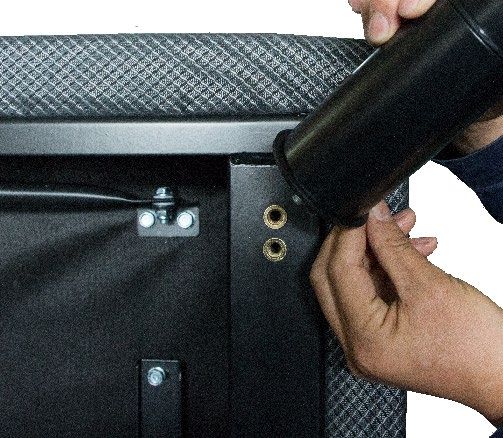
quick reference guide
               Not to scale. For illustration purposes only. Read all instructions before beginning installation.

CONTROL BOX OVERVIEW                                                   ELECTRONICS OVERVIEW

                                                                         Power Cord

                                                                                                                               Massage Motor
                                                                                                                                   Ports
                                                                                                                Control Box
                                                                                             Input Cord
                                   Pairing
                                    LED                                  Power Supply
  Multifunction Port      Reset              Input Power   Power LED
                          Button               Cord Port

                                                                             Underbed Lighting
 To remove control box, release
  metal clip and unplug cords.
                                                                                                          Splitter
                                                                                                                      Head Motor

                                                                         USB Ports

                                                                                     USB Charger

                                                                                                                                   Foot Motor

                                                                                      If installing a split unit, see page 14.

                                                                                                                                                7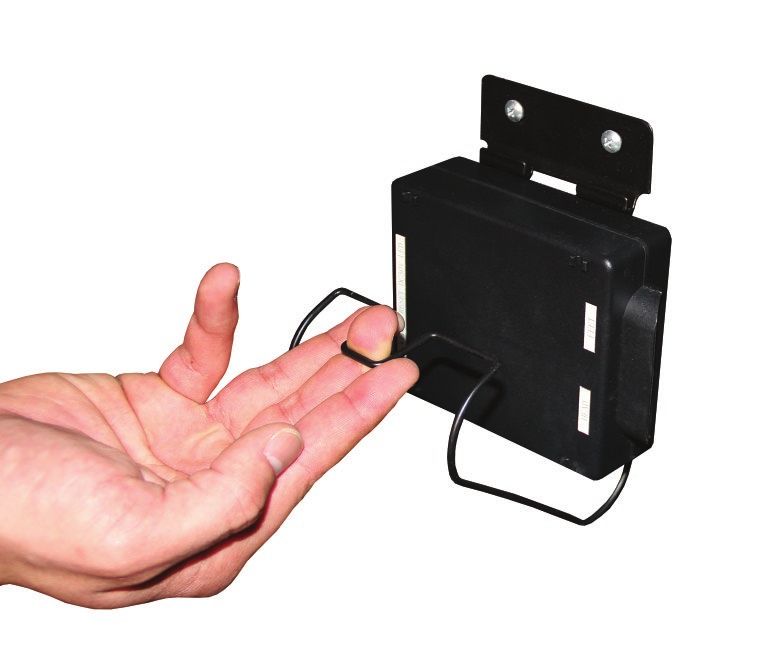
installation guide
    Always use two people when setting up the base.
    If installing a Divided King, please refer to the Divided King Quick Start Guide.
    STEP 1                                                               STEP 4
    Place the bed base box in a desired location with the top of the
    box facing up.                                                                  To sync two bases see detailed installation
                                                                                             instructions on page 14.
    Remove the binding straps and packing materials, making sure not
    to puncture the box with any sharp objects.                          Locate the battery backup strap and set it aside. Be sure that it is
                                                                         accessible after the base is set up.
     STEP 2
    Remove the bed base from the box keeping the bottom of the           STEP 5
    base facing upwards.                                                 Uncoil input Power Cord (connected to
                                                                         Control Box’s power port) and plug into
    STEP 3                                                               Power Supply.

              To install Headboard Brackets (sold separately)
                         see instructions on page 18.

    To install the legs, thread the washer over the screw on the leg.    STEP 6
    Next, screw the leg into the nutsert on the frame. Do not over       Uncoil the Power Cord and connect to the
    tighten.                                                             Power Supply. Place Power Supply on the
                                                                         ground and extend from the base. Ensure
                                                                         that the Power Supply and all attached
                                                                         cords are directed toward the desired surge
                                                                         protector.

    The legs untwist into separate sections for custom 3 different leg
    height options.
8                            For customer support, visit www.ergomotion.com or call: 1-888-550-3746
installation guide
STEP 7 STEP 10
Carefully flip the base over. Important: Two people are required to Install mattress retainer bars by inserting both ends of mattress
move the bed base. Do not drag across the floor. Do not rest frame retainers bar into holes on the platform and laying the bars
on its side, excessive pressure may damage the legs. down with curved side facing up.
STEP 8
Plug the power cord into a power source.
A surge protector is recommended. Setup is now complete! Test all functions on remote.
STEP 9
Quickly test remote functions to verify proper setup before
placing mattress on base. Return the base to a flat position before
placing the mattress on top.
For customer support, visit www.ergomotion.com or call: 1-888-550-3746 9remote control
Remote Control arrives paired to the adjustable base.
Three (3) AAA batteries are required to operate the remote.
MASSAGE FEATURE
The HEAD button will turn
on the head massage.
Cycle through 6 massage
intensities.
The FOOT button will
turn on the foot massage.
Cycle through 6 massage
intensities.
The Massage Timer button
will cycle through 3 levels
of massage intensity.
10remote control
ADJUST ONE TOUCH BUTTONS
Reprogrammable Position #1.
The HEADarrows lift and
lower the head section of the
base.
Anti- Snore Preset Position
The FOOTarrows lift and
lower the foot section of the
base. Reprogrammable Position #2
.One touch ZERO-G preset
ZERO G position. Zero-G adjusts your One touch FLAT preset
legs to a higher level than position.
your heart helping to relieve
pressure off the lower back
and promote circulation.
Use to turn the Underbed
Lighting ON/OFF
11remote control - preset programming
The programmable feature allows you to save custom positions.
Please read all the instructions below before setting your custom presets on the remote.
STEP 1
Articulate the head and foot to your desired position.
STEP 2
Press and hold one of the preset buttons
[I and II] for 7 seconds.
Position is now saved.
NOTE: To restore the preset buttons back to their original factory
settings, hold FLAT and ZERO-G simultaneously for at least 10
seconds. The original presets will be restored.
To adjust the saved position, repeat steps 1 and 2 and the new position will be stored.
12remote control pairing
Remote Pairing
The original remote that comes in the box is already paired to the adjustable base. No further action is required. In the event
that the remote is not paired with the base, follow the steps below.
STEP 1 STEP 3
Unplug the Power Cord from your power outlet. Wait 1 The remote is now paired to the adjustable base. Test all
minute, then plug it back in to your power outlet. Perform remote functions. If the remote buttons do not impact the
Step 2 within 10 seconds, while the control box light is adjustable base movements, please repeat the process
flashing. again.
Power Supply
Power Cord
STEP 2
Press and hold the PAIR button on the back of the remote.
The PAIR button will illuminate and start to flash. When the
PAIR button stops flashing, the LED light on the control box
will stop flashing. Release the PAIR button.
PAIR button
13syncing two bases (optional)
A Sync Cord is included with the base. Not available on Queen, Full or Full-Long size bases.
The Sync Cord connects the two control boxes to a single remote for the synchronization of two bases. This process is
most commonly used for connecting two TXL bases.
STEP 1
The system is now linked. Buttons pressed on either remote
Unplug bases from power source. will control both bases simultaneously.
STEP 2
Connect each end of the Sync Cord into the Multifunction port of
each control box.
STEP 3
Sync Cord
Plug bases back into the power source.
Control Box 1 Control Box 2
STEP 6
Check to ensure all cords are securely attached. Both remotes
will now operate both bases simultaneously. PERFORMANCE NOTES
If bases become mismatched, pressing the FLAT button will
re-sync the mechanical positions.
14emergency battery backup strap
For emergency use only, in case of a power outage.
Batteries are not to be used for normal operation of the bed.
STEP 1 STEP 3
Disconnect the Power Supply from the input power cord. Connect the end of the Battery Backup Strap to the input
power cord that is attached to the control box.
Control Box
STEP 2
Connect the Battery Backup Strap to the (2) Alkaline 9 Volt
batteries. Do not mix brand name Batteries. Battery Backup Strap Input Cord
Note: Detach the Battery Backup Strap after the emergency is
over, as the system will continue to draw power from the batteries
even if not in use.
15connecting strap (optional)
Connecting straps are secured to the base frame upon delivery.
Legs are required for the installation of the connecting straps.
STEP 1 STEP 2
With the bases in their desired location, slightly loosen both legs Slide side (a) of the connecting strap onto leg bolt. Swing the
to allow the strap to fit on the leg bolt, between the leg washer strap and connect side (b) to the leg bolt. Secure the strap by
and frame. shifting to the left.
a b
STEP 3
Re-tighten legs. Do not over tighten. Use the remaining strap and
repeat on other end of the base.
16headboard bracket installation guide (optional)
Headboard Brackets are optional accessories and are not included.
A 9/16” (14 mm) & 1/2” (13 mm) socket or wrench and legs are necessary to complete installation.
STEP 1 STEP 2
a.) Align the hole in the bracket to the brass sleeve into which the Attach the plastic spacer and T-Bracket.
leg threads. Hold the bracket in place and screw the leg into
the base until it is snug. DO NOT OVERTIGHTEN. Too much a.) Measure the distance between the mounting holes on the
force may cause the leg to spin freely. headboard and install the spacer and attachment plate to
accommodate the headboard.
b.) Align the tab with the hole in the frame (located towards the
foot of the base) and use a short bolt and nut to secure the b.) To install the plastic spacer and attachment plate, you
bracket. Make sure the bolt is tight. will need (2) long bolts and (2) nuts. Place the spacer and
attachment plate in the desired location and slip the bolts
through the holes with the head of the bolt facing outward.
Position the bolts diagonally on the spacer. Use the 9/16” (14
mm) socket and wrench to tighten the bolts.
STEP 3
You may now connect your headboard to the attachment plates
using the remaining short bolts and nuts to secure it to the
brackets. The heads of the bolts will face outward. Use a 9/16"
(14mm) socket and 1/2" (13mm) wrench to tighten the bolts.
17troubleshooting
• Check under the bed base to verify that the wired connections are secure and that there are no cords or bedding obstructing the
movement of the base.
• Check to ensure the green LED light is illuminated on the control box. If there is no light, verify that the input and power cords are
properly connected.
• Unplug the base for 1 hour to reset the electronic components.
• Plug bed base into a different electrical outlet, or test current outlet with another working appliance (a grounded, electrical surge
protector is recommended).
• Remove and replace full batteries in the remote control and re-pair the remote to the base (see page 13).
If issue is not resolved by following the instructions above, locate serial number on warranty card or back of remote and call
Ergomotion Customer Service: (888) 550-3746
18español
Pg. 1 -4 - Sobre las precauciones y el uso: Atención: Restricciones importantes sobre de asfixia para los niños pequeños y las mascotas. Para evitar lesiones, no se aconseja que
la seguridad Lea todas las instrucciones antes de usar su base ajustable. Guarde estas los niños y los animales domésticos pequeños jueguen encima o debajo de la cama. Los
instrucciones. niños no deben funcionar la base de la cama sin supervisión de un adulto.
MARCAPASOS:
ADVERTENCIA Algunos productos contienen imanes de Neodimio que pueden interferir con dispositivos
como marcapasos, Cardioversor Desfibrilador implantable o cualquier otro dispositivo
• Mantenga la cama en posición plana cuando no esté en uso. sensible a los campos magnéticos. Fuertemente se recomienda que los propietarios de
• Manténgase alejado de las piezas móviles mientras está en movimiento. este tipo de dispositivos médicos consulten a su médico antes de usar productos que
contienen imanes de neodimio. También es posible que algunos marcapasos pueden
• Antes de ajustar , asegúrese de que los niños y las mascotas estén alejadas de las interpretar erróneamente las vibraciones opcionales de masaje de la base como el
partes móviles y no están bajo somier antes de ajustar. movimiento / ejercicio. Esto es un caso común con cualquier producto que crea un
• No permita que los niños operen base de la cama y sin supervisión de un adulto. movimiento de vibración y puede no afectar el marcapasos. Por favor, consulte a su médico
antes de usar la función de masaje.
SEGURIDAD
USO EN EL HOGAR Y NORMAS DE HOSPITAL:
PARA REDUCIR EL RIESGO DE DESCARGA, QUEMADURAS, INCENDIO O LESIONES:
Las bases ajustables de Ergomotion están diseñadas exclusivamente para el uso en el
Para una óptima seguridad y operación, conecte el enchufe de la cama ajustable a un
hogar. Esta base no está diseñada como una cama de hospital y no está diseñada para
protector contra sobretensiones (no incluido). La base de la cama sólo debe de estar
cumplir con las normas del hospital. No use esta base con equipo de oxigenoterapia tipo
conectado directamente a una toma de corriente o protector contra sobretensiones (muy
tienda o cerca de gases explosivos.
recomendable). Desenchufe siempre la base de la toma eléctrica antes de reparar cualquier
parte de la base. Para reducir el riesgo de descarga eléctrica, desconecte la base antes de CARACTERÍSTICAS DE SEGURIDAD ADICIONALES
limpiarla. Para desconectar de forma segura, asegúrese que la base está en una posición Ruedas (accesorio opcional para los pies de la cama) están equipados con bloqueo para
plana con todos los motores apagados, y desenchufe la fuente de energía. Mantenga el evitar movimientos no deseados. Incluso cuando está bloqueado y no puede rodar, es
cable eléctrico alejado de superficies calientes. Nunca opere la base cuando las aberturas posible que las ruedas se deslicen. Motores de cabeza y de pie con versión de liberación
de aire están bloqueadas. Mantenga las aberturas libres de pelusas, cabellos y similares. están diseñados para bajar el colchón retrayendo únicamente con la gravedad, nunca
No deje caer o inserte ningún objeto en ninguna abertura. Suspenda el uso de la base y tirando hacia abajo, lo que minimiza los puntos de pellizco.
póngase en contacto con el centro de servicio al cliente calificado si: el cable o el enchufe
están dañados, si no funciona correctamente o si le ha caído agua. Utilice esta base ACÚSTICOS
ajustable para el uso destinado como se describe en este manual. No utilice o agregue MECANISMOS DE ELEVACIÓN / DESCENSO
accesorios no recomendados por el fabricante. Se requiere una estrecha supervisión La función de elevación/descenso emitirá un zumbido mínimo durante el funcionamiento.
cuando la base de la cama es utilizado por o cerca de niños, convalecientes, personas con Esto es normal. Durante la operación, las ruedas de los brazos de elevación hacen
discapacidad o los animales domésticos. La conexión incorrecta del equipo puede resultar contacto con el soporte de la plataforma de la base. Este contacto puede resultar en metal
en el riesgo de descarga eléctrica, incendio eléctrico o fallas en el funcionamiento de esta sobre metal o metal sobre plástico. Esto aplica una ligera tensión sobre los componentes
base ajustable. Si el enchufe no encaja en su toma de corriente, llame a un electricista en movimiento y la resonancia se reduce a un nivel mínimo. Si se experimenta ruido o
calificado para que instale una toma adecuada. La modificación o el fracaso no autorizado vibraciones excesivas, invertir la acción del movimiento (arriba o abajo) de la base con el
a utilizar una toma de corriente o protector contra sobretensiones pueden anular la parte control remoto. Esto debe realinear los mecanismos de activación de la base a la posición
eléctrica de la garantía. adecuada de funcionamiento. En una operación normal de la base, las ruedas, que
permiten distanciamiento de la cama a la pared, se pondrán en contacto con los soportes
MASCOTAS Y LOS NIÑOS: de la plataforma de acero creando un ruido al contacto. Al entrar, salir o cambiar el peso
Inmediatamente desechar los materiales de empaque, ya que puede representar un riesgo en la base, emitirá un ruido al contacto, será el contacto de las ruedas con la base. Esto es
19español
normal. cumplido con los estándares de control de calidad del fabricante.
MATERIALES EL OLOR DEL" NUEVO PRODUCTO ":
Las bases ajustables Ergomotion están hechas de diversos materiales como maderas, Algunas personas notan un ligero olor de su nueva base ajustable, puede provenir del
metales, plásticos y telas. La tensión, presión o el movimiento aplicados a la estructura, material de proceso. Este olor es normal y generalmente desaparece antes de que el
plataforma o cubierta a través del uso general puede crear un sonido audible. producto llegue a usted. A veces, sin embargo, este olor todavía puede ser notable. Por
lo general desaparece después de unas semanas, siempre y cuando se proporcione una
FUNCIONAMIENTO DE MASAJE Y UBICACIÓN
ventilación adecuada.
La función de masaje emitirá un tono durante la operación. Esto es normal. A medida que
aumenta el nivel de intensidad del masaje, el tono se intensificará. El volumen de este tono PERIODO DE ADAPTACION:
está directamente relacionado con la ubicación. Por ejemplo, cuando se demostró en una Puede acelerar el período de adaptación, simplemente pase tiempo en la cama ajustable
sala de ventas, el ruido ambiental alrededor cubrirá algunos de los ruidos de masajes. Sin haciendo actividades como leer, ver la televisión o jugar con los niños o nietos. El
embargo, cuando se instala en un hogar con pisos de madera, suelo con alfombra o no, el movimiento extra ayudará a la base ajustable a responder al peso y los cambios de
volumen de masaje será más notable. Para minimizar esta resonancia, coloque un pedazo temperatura. Algunos de los materiales en nuestras bases ajustables como las maderas,
de alfombra, o almohadilla redonda de goma, debajo de cada pie o rueda de la base. Es metales y plásticos utilizados en la plataforma, el marco y los componentes son sensibles a
posible experimentar vibración o ruido de la estructura exterior de la cama, soportes de la humedad y la temperatura y puede emitir sonidos en ambientes más fríos.
cabecera, cabeceras o tablero de pie, si los tornillos de ajuste no están bien apretados.
SINCRONIZACION DE DOS CAMAS:
Niveles 1-6 de la intensidad del masaje representan las revoluciones del motor por minuto. Cuando dos bases trabajan en conjunto, podría haber un retraso de hasta 1.5 segundos
Nivel 6 proporciona el número máximo de RPMs. Sin embargo, esto no significa que la entre cada base cuando están articulando.
sensación de vibración es el más fuerte. Dependiendo del material del colchón, el grosor, y
DESGASTE Y ROTURA:
el posicionamiento del usuario, la sensación de vibraciones será diferente. Recomendamos
El desgaste es el daño que se produce de forma natural e inevitablemente como resultado
a los usuarios a encontrar el ajuste de intensidad del masaje que más les convenga. Es
de un uso normal o envejecimiento.
importante entender la física de vibraciones. Al igual que un motor puede funcionar en bruto
durante el reposo, como el aumento de RPM, las vibraciones cambian simultáneamente. CUIDADO DE LA TELA:
Para prolongar la vida de la tela, proteja de la luz directa del sol siempre que sea posible.
TOLERANCIA
Para la limpieza de manchas, limpie el área con una esponja ligeramente húmeda o
Todas las bases ajustables Ergomotion, dependiendo de la marca y el modelo, están
aspiradora con un accesorio de cepillo suave para eliminar las partículas. Mantenga a un
diseñados y fabricados para realizar y funcionar dentro de los parámetros de control
mínimo de 30 cm (12 pulgadas) alejado de fuentes de calor directo. Para una limpieza más
de calidad designados. Las bases están sujetas a inspecciones minuciosas y rigurosas
profunda, como los derrames de líquidos, utilice un paño limpio y seco. Limpie con un paño
durante el proceso de control de calidad para asegurarse que las bases operen dentro de
limpio humedecido con agua tibia. No moje en exceso. Un cepillo de cerdas suaves se
estas normas durante el uso normal de funcionamiento. El uso normal de funcionamiento
puede utilizar para eliminar la tierra arraigada. Evite raspar, haga un ligero cepillado. Limpie
se define como la siguiente: la base ajustable se va a operar con un colchón y la carga.
con un paño limpio humedecido con agua tibia para eliminar cualquier residuo. Secar a la
Procedimientos de prueba requieren pruebas de ciclo de vida útil de hasta 120kg de carga
sombra lejos del calor directo. Si marcas persistentes permanecen visibles después de la
distribuida. El ángulo (designado “a” en la figura 1) entre la parte trasera y la sección plana
limpieza, busque asesoramiento profesional.
para diversas configuraciones de la plataforma de soporte del colchón será de ± 3°, que se
traduce en una tolerancia de hasta 1 ½”. CLASIFICACIONES DEL PRODUCTO:
Los motores de elevación no están diseñados para funcionar de forma continua durante
El ángulo (designado "b" en la figura 1) entre la sección plana y la sección de los pies para
más de [2] minutos en un periodo de tiempo [18] minutos o aproximadamente en un ciclo
diferentes configuraciones de la plataforma de soporte del colchón será de ± 3 °, que se
de trabajo del 10%. El evitar o exceder esta valoración acortará la vida útil del producto y
traduce en una tolerancia de hasta ¾”.
puede anular la garantía. Los motores de masaje no están diseñados para funcionar de
Cualquier base ajustable se considerará dentro de estas tolerancias asignadas ya que ha forma continua durante más de 30 minutos a la vez. Por favor, deje que el sistema de masaje
20español
descanse 30 minutos después de que el masaje se haya apagado automáticamente antes Cumplimiento con la FCC: Este dispositivo cumple con la Parte 15 de las Regulaciones de
de reiniciar. la Comisión Federal de Comunicaciones (FCC, en inglés). Su funcionamiento está sujeto a
las dos condiciones siguientes: 1) Este dispositivo no puede causar ninguna interferencia
LÍMITES DE PESO:
perjudicial y 2) Este dispositivo deberá aceptar cualquier interferencia recibida, incluso si la
Este producto no está clasificado para soportar un peso que exceda 850 libras (o) 650 libras.
interferencia causara un funcionamiento indeseado. Para cumplir los requerimientos sobre
Este producto no está evaluado para soportar pesos de más de 850 libras (o) 650 libras
exposición humana a la radiofrecuencia (RF) de la FCC, no se permite ningún cambio en la
incluyendo el colchón y ropa de cama. La base soportara estructuralmente el peso, siempre
antena o dispositivo. Cualquier cambio en la antena o dispositivo puede provocar que el
y cuando el peso se distribuya de manera uniforme en toda la base de la cama. La base
dispositivo exceda el requerimiento de exposición a la RF y quede anulado el derecho del
ajustable no está diseñada para levantar o sostener esta cantidad por si sola en la sección
usuario de operar el dispositivo.
de cabeza o los pies. Exceder esta restricción de peso podría dañar la cama y / o causar
lesiones y anulará la garantía. Radiofrecuencia: 2.4 GHz
IMPORTANTE LO QUE SE DEBE HACER Y NO HACER
Pg. 5 - Componentes: Antes de eliminar los materiales de empaque, verifique que tiene
HACER: todos los componentes.
• Conecte su base ajustable a un protector de sobretensión.
Todas las partes electrónicas y los componentes que necesitan instalarse están en cajas
• Distribuya uniformemente el peso al dormir en una sincronización de dos camas. La
debajo de la base o adheridos al marco.
distribución desigual de peso puede hacer que la base eleve de manera dispareja.
• Llame a Servicio al Cliente para cualquier problema técnico. No trate de forzar la base A) Control remoto inalámbrico y (3) pilas triple A.
hacia abajo, esto puede dañar los motores o el marco. B) Barra de retención del colchón
• Use jabón suave y agua para limpiar su base ajustable si hay manchas. C) Cable eléctrico
• Tenga en cuenta que con las bases ajustables se recomienda utilizar colchones aptos D) Cable de Alimentación
para bases ajustables E) Fuente de Poder
• Después de su uso y en medio de pre ajustes, baje a la posición plana (horizontal). F) Correa de respaldo de la batería *
• Registre su garantía en cuanto se le haya entregado su base ajustable. G) Cable SmartSync™ (1) ‡
H) Correa de conexión* ‡
NO HACER:
I) Manual
• Sentarse en las esquinas/bordes de la base, esto puede deformar el chasis, travesaños
J) Garantía
o espuma.
K) Guía de instalación rápida
• Inclinar la base de lado. Esto puede dañar las piernas y/o tornillos de la pierna.
L) Guía de instalación rápida Divided King
• Pararse o saltar sobre la base ajustable en cualquier momento, esto puede dañar el
marco y motores. Misceláneos (no incluidos):
• Arrastrar la base para moverla. Arrastrando la base podría dañar el marco, despojar las Protector de sobrecargas
tuercas/tornillos o romper las piernas. Se recomienda compra ruedas si usted planea Pilas de 9 voltios (2)
mover su base regularmente. Si está instalando una base King dividida, consulte la Guía de instalación rápida de
• Entrar y salir de la base ajustable con la cabeza y / o el pie en la posición articulada. Divided King.
Entre o salga de su cama ajustable en la posición plana (horizontal). * Estos componentes están adheridos a la base sólo para el envío. Retírelos con cuidado
• Alterar con o modificar la base. Esto anulará la garantía. de la base y sepárelos.
• Presionar hacia abajo, en la cabeza o el pie, mientras los motores están funcionando ‡ Sólo se incluyen con las siguientes bases: individual, individual larga y Cal King dividida.
puede dañar el marco y motores. Pg. 6 - Resumen sobre la base (Las agujas del reloj desde la parte superior)
GUARDE ESTAS INSTRUCCIONES. Foot motor = Motor de los pies
21español
Head motor = Motor de la cabecera PASO 4: Localice el cuadro de encendido y déjelo a un lado. Asegúrese de que está
Control Box = Caja de control accesible después de configurar la base.
Power Supply = Fuente de energía PASO 5: Desenganche el cable de alimentación de entrada (conectado al puerto de
Battery Backup Strap = Correa de respaldo de la batería alimentación de la caja de control) y enchúfelo a la fuente de alimentación.
Head Massage = Motor de masaje de la cabecera PASO 6: Desenrolle el cable de alimentación y conéctelo a la fuente de alimentación.
Foot Massage = Motor de masaje de los pies Coloque la fuente de alimentación en el suelo y extiéndala desde la base. Asegúrese de que
USB Ports = Puertos USB la fuente de alimentación y todos los cables conectados estén dirigidos hacia el protector de
Turn on head massage = Gire el masaje de la cabeza sobretensión deseado.
Turn on foot masssage = Activar el masaje de pies
Turn on head and foot massage = Encender masajes de cabecera y pies Pg. 9 - Guía de instalación
Turn off massage = Desactive masajes PASO 7: Con cuidado, vuelca la base. Importante: Se requiere que dos personas muevan la
Lifts and lowers foot = Elevar y bajar los pies base de la cama. No arrastre por el suelo. No coloque el marco sobre su lado, una presión
Lifts and lowers head = Elevar y bajar la cabecera
excesiva puede dañar las patas (si se usa).
Flat preset position = Posición horizontal predefinida
PASO 8: Conecte la base y el cable eléctrico del audio a la electricidad. Se recomienda el
Zero-G® Preset Position = Posición de gravedad cero predefinida
uso de un protector de sobrecargas.
Underbed lighting = Bajo la iluminación de la cama
Preset Position #1= Posición predefinida #1 PASO 9: Pruebe rápidamente las funciones remotas para verificar la configuración correcta
Preset Position #2= Posición predefinida #2 antes de colocar el colchón en la base. Vuelva la base a una posición plana antes de colocar
el colchón en la parte superior.
Pg. 7 - Guía de referencia rápida: No llevar a escala. Este diagrama sólo tiene el fin de ilustrar. PASO 10: Instale las barras de retención del colchón insertando ambos extremos de la barra
Lea las instrucciones antes de comenzar la instalación. de retenedores del colchón en los orificios de la plataforma y ponga las barras hacia abajo
Control Box = Caja de control con el lado curvado hacia arriba.
Power Cord = Cable de electricidad
Para servicio al cliente, visite www.ergomotion.com o llame al 1-888-550-3746.
Power Supply = Fuente de energía
Input Power Cord = Cable de entrada de electricidad Pg. 10-11 - Control remoto:
Battery Backup Strap = Correa de respaldo de la batería (Características del masaje)
El botón MASAJE activa el masaje de la cabeza y los pies al mismo tiempo. Una segunda
Connection ports to head and foot motors (massage and lift). Installed under the base.
prensa saca el masaje.
Puertos de conexión a todos los motores de la cabacera y motores de la pies (instalados
El botón HEAD + - activará el masaje de la cabeza. Ciclo a través de 3 intensidades del
debajo de la base)
masaje.
Pg. 8 - Guía de instalación: Siempre use a dos personas para instalar la base. El botón FOOT + - activará el masaje de los pies. Ciclo a través de 3 intensidades del
PASO 1: Coloque la caja de la cama en un lugar deseado con la parte superior de la caja masaje.
hacia arriba. Quite las cintas de seguridad y los materiales de empaque con cuidado de no El botón MASSAGE ALL OFF desactivará el masaje.
perforar la caja con algún objeto afilado.
PASO 2: Saque la base de la cama de la caja, dejando la parte de abajo de la base hacia (Ajustar)
arriba. Ajustes de posición de la cabeza - Utilícelo para subir y bajar la sección de la cabeza de
PASO 3: Para instalar los soportes de la cabecera, vea las instrucciones detalladas en la su base ajustable.
página 24 para su instalación. Ajustes de posición del pie - Utilícela para subir y bajar la sección del pie de su base
ajustable.
Las piernas son opcionales. Para instalar las patas, enrosque la arandela sobre el perno de la
pierna con el lado rebajado hacia la pierna y apriétela manualmente.
(Botones de un toque)
22español
Un toque ZERO G posición preajustada. - Zero G® ajusta sus piernas a un nivel más alto Presione y sostenga el botón que está detrás del remoto, el cual comenzará a parpadear.
que su corazón ayudando a aliviar la presión de la parte baja de la espalda y promover la Ambas luces se volverán continuas y luego se apagarán a la vez.
circulación.
Pg. 14 - Sincronizar Dos Bases (opcional)
Botón de la cama FLAT - Presione el botón para regresar tanto la cabeza como el pie a
una posición PLANO. Se incluye un cable de sincronización con la base. No está disponible para las bases tamaño
Posición preestablecida # 1 Queen, Full, Full-Largo, o King Dividido. El cable de sincronización conecta las dos cajas de
Posición preestablecida # 2 control a un solo control remoto para la sincronización de dos bases.
PASO 1: Desconecte las bases de los tomacorrientes.
Bajo la iluminación de la cama - Pulse una vez para activar la iluminación bajo la cama. PASO 2: Desconecte el cable de la bacteria de Reserva de cada Caja de Control o cable splitter.
Presione nuevamente para apagar.
Recuerde esta desconexión.
Para activar la linterna en el control remoto, manténgala presionada durante 3 segundos. PASO 3: Conecte el macho de cada Cable de Sincronización a la Caja de Control o cable
splitter. Insértelo en el mismo puerto donde desconecto la Batería de Reserva.
Pg. 12 - Control remoto - programación predefinida
PASO 4: Conecte cada conexión macho de las Baterías de Resera a la conexión hembra del
La función programable le permite guardar posiciones personalizadas. Cable de Sincronización (guíese por la imagen a la derecha).
Por favor, lea todas las instrucciones a continuación antes de configurar sus presets PASO 5: Vuelva a conectar las bases a sus tomacorrientes.
personalizados en el mando a distancia. PASO 6: Verifique que todos los cables estén conectados correctamente. Ahora ambos
remotos controlaran las bases simultáneamente.
PASO 1: Articular la cabeza y el pie a la posición deseada.
PASO 2: Presione y mantenga presionado uno de los botones de presintonía El sistema ahora esta sincronizado. Ahora ambos remotos funcionaran en las dos bases.
[I y II] durante 7 segundos. La posición se ha guardado. Pg. 15 - Correa de respaldo de la batería : Para uso de emergencia solamente, en caso
de un corte de energía. Las baterías no deben usarse para el funcionamiento normal de la
Nota: Para restablecer los valores predeterminados de fábrica de los botones de
cama.
presintonía, mantenga pulsados simultáneamente FLAT y ZERO-G durante al menos 10
PASO 1. Desconecte la fuente de alimentación del cable de alimentación de entrada.
segundos. Los ajustes preestablecidos originales se restaurarán.
Pg. 13 - Pareo del control remoto PASO 2. Conecte la correa de respaldo de la batería a las (2) baterías alcalinas de 9
El control remoto original que viene en la caja ya está sincronizado con la base de la cama. voltios. No mezcle pilas de marca.
No necesita hacer nada.
Si el remoto no estuviera sincronizado a la base, siga los pasos siguientes: PASO 3. Conecte el extremo de la correa de respaldo de la batería al cable de
alimentación de entrada que está conectado a la caja de control.
PASO 1: Retire la tapa del control remoto. Saque las baterías y cámbielas.
PASO 2: Dé un doble clic en el botón del Correa de respaldo de la batería (esto no hará Nota: Desconecte la correa de la batería de respaldo después de que finalice la
que la base se mueva). La luz se encenderá. emergencia, ya que el sistema seguirá consumiendo energía de las baterías, incluso si no
PASO 3: Presione y sostenga el botón que está detrás del remoto. La luz será intermitente se usa.
hasta que se vuelva continua.
PASO 4: La luz del generador auxiliar de corriente y la luz del remoto serán continuas y
luego ambas se apagarán a la vez. Sustituya la tapa del control remoto.
Pg. 16 - Correa de conexión (opcional): Las correas de conexión se aseguran al bastidor
Ahora el remoto y la base están pareados.
base al momento de la entrega. Se requieren patas para la instalación de las correas de
Si el generador auxiliar de corriente no está disponible, presione el botón de reinicio
conexión. Se requieren patas para la instalación de los soportes de la cabecera. Para
en la caja de control. La luz LED de pareo de la caja de control comenzará a parpadear.
comprar piernas, comuníquese con el Servicio de Atención al Cliente de Ergomotion
23español
llamando al (888) 550-3746. • Revise debajo del somier para verificar que las conexiones de cable son seguras y
que no haya cables o ropa de cama obstruyendo el movimiento de la base.
PASO 1: Con las bases en la ubicación deseada, afloje con cuidado ambas patas para que
la correa quepa en la tuerca de la pata, entre la arandela de la pata y el marco. • Compruebe que el LED verde se enciende en el cuadro de control. Si no hay
PASO 2: Deslice el lado (a) de la correa de conexión por la tuerca de la pata. Gire la ninguna luz, compruebe que los cables de entrada y la potencia están conectados
correa y conecte el lado (b) a la tuerca de la pata. Asegure la correa moviéndola hacia la correctamente.
izquierda.
• Desconecte la base durante 1 hora para reponer los componentes electrónicos.
PASO 3: Vuelva a ajustar las patas. No apriete demasiado. Use la otra correa para repetir
el paso anterior con el otro extremo de la base. • Plug base de la cama a una toma eléctrica diferente, o toma de corriente de prueba
con otro aparato de trabajo (se recomienda un protector de sobretensión eléctrica
Pg. 17 - Guía de instalación del soporte de la cabecera (opcional) con conexión a tierra).
Componentes del soporte de la cabecera:
Si el problema no se resuelve, siguiendo las instrucciones anteriores, busque el número
K) Soporte de la cabecera (2) de serie en la tarjeta de garantía, manual o posterior del mando a distancia y llame
L) Soporte en T (2)
Ergomotion Servicio al cliente: EE.UU. 1-888-550-3746
M) Separadores (2)
N) Tornillos largos (8)
O) Tornillos cortos (10)
P) Tuercas (18)
Para completar la instalación es necesario tener un socket y una llave inglesa de 9/16”
(14mm) y 1/2” (13mm).
PASO 1: a) Alinee el hueco del soporte con la manga de acero dentro de la cual se enrosca
la pata. Mantenga el soporte en su lugar y enrosque la pata a la base hasta que este segura.
NO APRIETE DEMASIADO. Si la deja demasiado ajustada, la pata se saldrá de rosca.
b) Alinee la etiqueta con el hueco del marco (ubicado hacia los pies de la base) y use un
tornillo u una tuerca pequeños para asegurar el soporte. Asegúrese de ajustar bien la tuerca.
PASO 2: Fije el separador plástico y el soporte en forma de T.
a) Mida la distancia entre los huecos del montaje de la cabecera e instale el separador y la
placa de ajuste para acomodar la cabecera.
b) Para instalar el separador plástico y la placa de ajuste necesitará (2) tornillos largos y (2)
tuercas. Fije el separador y la placa en el lugar deseado y ajuste los tornillos en los huecos
con la cabeza del tornillo hacia afuera. Ponga los tornillos diagonalmente sobre el separador.
Use el socket de 9/16” (14mm) y la llave inglesa para ajustar los tornillos.
PASO 3: Ahora puede conectar su cabecera con las placas de ajuste usando los tornillos
cortos y tuercas restantes para asegurarla a los soportes. Las cabezas de los tornillos
deben apuntar hacia afuera. Use un socket de 9/16” (14mm) y la llave inglesa para ajustar los
tornillos.
Pg. 18 - Solución de problemas
Si una o más funciones de la base de la cama han dejado de funcionar:
24français
Pg. 1-6 - Précaution de sécurité à prendre et consignes d’utilisation pourrait rendre nulle la section électrique de votre garantie.
ANIMAUX DOMESTIQUES ET ENFANTS :
Jetez immédiatement toutes les matières d’emballage comme elles peuvent
AVERTISSEMENT poser un risque d’étouffement pour les jeunes enfants et animaux domestiques.
• Garder toujours le lit en position à plat lorsqu’il ne sert pas.
Pour éviter les blessures, il est déconseillé de permettre aux enfants et petits
animaux de jouer sur ou sous le lit. Les enfants ne devraient pas opérer le
• Restez à l’écart des pièces mobiles en mouvement. sommier sans la supervision d’un adulte.
• Avant d'actionner le mécanisme du lit, assurez-vous que les enfants et les animaux STIMULATEURS CARDIAQUES :
sont tenus à l'écart de la base du lit. Quelques produits contiennent les aimants Neodymium qui pourraient interférer
• Ne pas laisser les enfants utiliser la base de lit sans la supervision d’un adulte . avec des appareils tels que les stimulateurs cardiaques, les défibrillateurs
implantables et tout autre appareil sensible aux champs magnétiques. Il est
FORTEMENT recommandé que les propriétaires de tels appareils médicaux
consultent leur médecin avant d’utiliser les produits qui contiennent les aimants
SÉCURITÉ Neodymium. Il est aussi possible que certains stimulateurs cardiaques puissent
mal interpréter les vibrations de la fonction massage comme du mouvement/de
POUR RÉDUIRE LE RISQUE DE DÉCHARGES ÉLECTRIQUES, BRÛLURES, FEU, OU
l’exercice. C’est un résultat fréquent avec tout produit qui crée un mouvement
BLESSURES :
de vibration et peut également ne pas affecter le stimulateur cardiaque. Veuillez
Pour l’opération et la sécurité optimales, branchez le sommier dans une barre consulter votre médecin avant d’utiliser la fonction massage.
d’alimentation contre les surtensions. Le sommier devrait seulement être
UTILISATION À DOMICILE :
branché directement dans une prise murale ou dans une barre d’alimentation
Les sommiers ajustables Ergomotion sont conçus seulement pour l’utilisation à
contre les surtensions (fortement recommandé). Débranchez toujours de la prise
domicile. Ce sommier n’a pas été conçu comme lit d’hôpital et n’est pas conçu
avant d’assurer l’entretien de toute partie du sommier. Pour réduire le risque de
pour satisfaire les normes hospitalières. N’employez pas ce sommier avec de
décharges électriques, débranchez toujours le sommier avant de le nettoyer.
l’équipement de thérapie d’oxygène TENT TYPE ou près de gaz explosifs.
Pour bien le débrancher, assurez-vous que la base se trouve en position neutre
et à plat avec tous les moteurs éteints et débranchez-le de la source d’énergie. CARACTÉRISTIQUES DE SÉCURITÉ SUPPLÉMENTAIRES :
Gardez le cordon d’alimentation loin des surfaces chauffées. N’utilisez jamais le Les roulettes (accessoires de pied facultatifs) sont équipées de roues
sommier quand les entrées d’air sont bloquées. Gardez les entrées d’air sans bloquantes pour éviter le mouvement involontaire. Même lorsque verrouillées et
peluches, cheveux ou toute autre matière. Ne laissez tomber ni insérez aucun bloquées, il est possible que les roulettes glissent. Les moteurs d’abaissement de
objet dans les ouvertures. Cessez l’emploi du sommier et contactez un centre de la tête et des pieds sont conçus pour baisser le matelas, se rétractant seulement
service qualifié si le sommier a un fil électrique ou une prise endommagé, s’il ne par la force de la gravité, jamais en tirant vers le bas, minimisant les points de
fonctionne pas correctement, ou s’il est tombé dans l’eau. Utilisez ce sommier pincement.
seulement pour son usage prévu comme désigné dans ce manuel. N’employez
pas d’accessoires ni pièces additionnelles qui ne sont pas recommandés par le ACOUSTIQUE
fabricant. La surveillance étroite est nécessaire quand le sommier est utilisé par MÉCANISMES DE LEVAGE/D’ABAISSEMENT
ou près des enfants, convalescents, personnes infirmes ou animaux domestiques. La fonction de levage et d’abaissement émettra un faible vrombissement lors
Un branchement incorrect de l’équipement peut amener un risque de décharge de l’opération. Ce bruit est normal. Pendant l’opération, les roues de levage de
électrique, feu électrique ou une mauvaise utilisation de ce sommier. Si la prise du bras entrent en contact avec le support du sommier. Ce contact peut occasionner
sommier n’est pas de bonne taille pour votre prise murale, contactez un électricien un contact entre métaux ou entre métal et plastique, ce qui apporte une légère
qualifié en faire l’installation. La modification non autorisée du sommier, la non- tension sur les composantes mobiles. La résonance est aussi réduite à un
conformité d’une prise ou l’absence de barre d’alimentation contre les surtensions
25You can also read