Enjoy it - CAR RADIO MANCHESTER 110 - BLAUPUNKT
←
→
Page content transcription
If your browser does not render page correctly, please read the page content below
CAR RADIO
MANCHESTER 110                            1 011 451 011 001

                                          Enjoy it.

Operating and installation instructions
Mode d'emploi et de montage
Instrucciones de manejo e instalación
Instruções de serviço e de montagem
Petunjuk Pengoperasian dan Pemasangan
LOCATION OF BUTTONS

1. SRC(source) button.                       14.   6 DIR+ (directory) button.
Select memory bank or audio source           15.   5 DIR- (directory) button.
2.     / MUTE” Power ON/OFF button.          16.   4 RDM (random) button
3. TS (travel store) button.                 17.   3 RPT (repeat) button.
4. DISC SLOT                                 18.   2 SCN (scan) button.
5. LCD display.                              19.   1    (play/pause) button.
6.       (SEEK DOWN) button.                 20.      (MP3 search) button
7. DISP button.                              21. VOL/SEL/ENT button.
8. EJECT button.                             In the menu: Select menu item, change setting
9. USB port                                  22. AF button.
10. AUX IN jack.                             23. TA button.
11.      (SEEK UP) button.                   24.     (panel release) button.
In the menu: Change menu level               25. RESET button.
Radio mode: Adjust the stations              Access only with detached control panel
Other operating modes: Track selection       26. SD card slot.
12. EQ/LOUD button.                          Access only with detached control panel
13. BAND button.

                                         1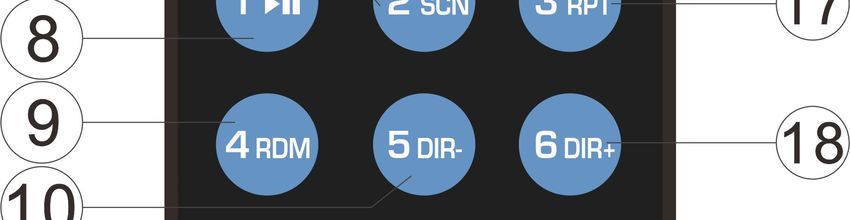
CONTENTS
                                                                E
Safety notes ....................................... 3          N
Symbols used ..................................... 3            G
Road safety ......................................... 3         L
General safety notes ........................... 3              I
Declaration of conformity .................... 4                S
Cleaning notes .................................. 5             H
Disposal notes .................................... 5
Scope of delivery .............................. 5
Optional equipment ............................ 6
Placing the device in operation ......... 6
Take out screw before installation ......... 6
Attaching/detaching the control panel ... 6
Removing the control panel .................. 6
Operation ............................................. 7
Turning the unit on/off ........................... 7
Sound adjustment ................................. 7
Loudness .............................................. 8
Display information ............................... 8
Set the time........................................... 8
Reset function ....................................... 8
Radio operation .................................... 8
   Switching to radio mode ................... 8
   Selecting a frequency band .............. 8
   Selecting a station ............................ 8
   Automatic storing .............................. 9
   Station storing ................................... 9
RDS operation ...................................... 9
CD/ MP3/ WMA operation ..................... 9
Changing to CD/MP3/WMA mode ........ 10
   Selecting tracks/files ......................... 11
   Scan play all tracks ........................... 11
   Repeating the same track...................11
   Playing all tracks at random.............. 12
   Ejecting a disc .................................. 12
Selecting directory up/down....................12
   Selecting files by           button ............. 12
USB play operation ............................... 12
SD operation ......................................... 12
Remote control handset ..................... 13
Specification ....................................... 14
Installation instructions ..................... 77

                                                            2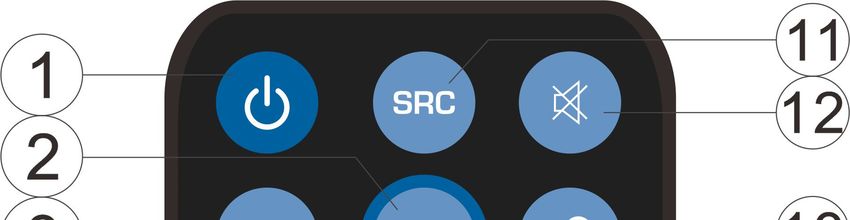
SAFETY NOTES

SAFETY NOTES                                       ROAD SAFETY
The car sound system was manufactured              Observe the following notes about road
according to the state of the art and              safety:
established safety guidelines. Even so,            •   Use your device in such a way that
dangers may occur if you do not observe                you can always safely control your
the safety notes in these instructions.                vehicle. In case of doubt, stop at a
                                                       suitable location and operate your
These instructions contain important
                                                       device while the vehicle is standing.
information to easily and safely install and
operate the car sound system.                      •   Detach or attach the control panel
                                                       only while the vehicle is standing.
•   Read these instructions carefully and
                                                   •   Always listen at a moderate volume
    completely before using the car sound
                                                       to protect your hearing and to be able to
    system.
                                                       hear acoustic warning signals (e.g.
•   Keep the instructions at a location so             police sirens). During mute phases
    that they are always accessible to all             (e.g. when changing the audio source),
    users.                                             changing the volume is not audible. Do
•   Always pass on the car sound system to             not increase the volume during a mute
    third parties together with these                  phase.
    instructions.
In addition, observe the instructions of the       GENERAL SAFETY NOTES
devices used in conjunction with this car          Observe the following notes to protect
sound system.                                      yourself against injuries:
                                                   •   Do not modify or open the device.
SYMBOLS USED                                           The device contains a Class 1 laser that
These instructions employ the following                can cause injuries to your eyes.
symbols:                                           •   Do not increase the volume during
                                                       mute phases, e.g. when changing the
             DANGER!                                   audio source. Changing the volume is
             Warns about injuries                      not audible during a mute phase.

            The CE mark confirms the
            compliance with EU directives.

•   Identifies a listing

                                               3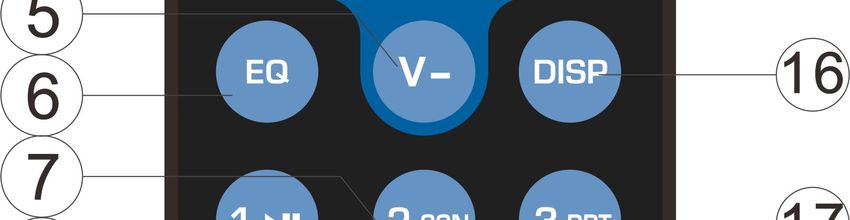
SAFETY NOTES

USE AS DIRECTED                                     E
This car sound system is intended for               N
installation and operation in a vehicle with        G
12-V vehicle system voltage and must be             L
installed in a DIN slot. Observe the                I
performance limits in the technical data.           S
Repairs and installation, if necessary,             H
should be performed by a specialist.

INSTALLATION INSTRUCTIONS
You may only install the car sound system
yourself if you are experienced in installing
car sound systems and are very familiar
with the electrical system of the vehicle.
For this purpose, observe the installation
instructions at the end of this manual.

DECLARATION OF CONFORMITY
The Blaupunkt Technology GmbH declares
that the car sound system complies with
the basic requirements and the other
relevant regulations of the directive
2004/108/EC.
The declaration of conformity can be found
on the Internet under www.blaupunkt.com.

                                                4
CLEANING NOTES | DISPOSAL NOTES | SCOPE OF DELIVERY

CLEANING NOTES
Solvents, cleaning and scouring agents as
well as dashboard spray and plastics care
products may contain ingredients that will
damage the surface of the car sound
system.
•   Use only a dry or slightly moistened
    cloth for cleaning the car sound system.
•   If necessary, clean the contacts of the
    control panel regularly using a soft cloth
    moistened with cleaning alcohol.

DISPOSAL NOTES
        Do not dispose of your old unit in
        the household trash!

Use the return and collection systems
available to dispose of the old device.

SCOPE OF DELIVERY
The scope of delivery includes:
1 Car sound system
1 Operating/installation instructions
1 Case for the control panel
1 Support frame
2 Disassembly tools
1 Remote control

OPTIONAL EQUIPMENT
(not part of the scope of delivery)
Use only accessories approved by
Blaupunkt. Information is available from
your Blaupunkt specialized dealer or on the
Internet under www.blaupunkt.com.

                                                 5
PLACING THE DEVICE IN OPERATION

                                                    •   Removing the control panel                    E
PLACING THE DEVICE IN
                                                        Press the button      (24) to unlock the      N
OPERATION                                                                                             G
                                                        control panel.
ATTENTION                                                                                             L
                                                        The left side of the control panel
TRANSPORT SECURING SCREWS                                                                             I
                                                        detaches from the device and is
Before the startup of the car sound system,                                                           S
                                                        secured by the bracket against falling
ensure that the transport securing screws                                                             H
                                                        out.
have been removed (see the chapter
                                                        Move the control panel slightly to the left
"Installation instructions").
                                                        until it disengages from the right
                                                        bracket.
ATTACHING/DETACHING THE
                                                        Carefully remove the control panel from
CONTROL PANEL
                                                        the left bracket.
The car sound system is equipped with a
detachable control panel (release panel) to             Note:
protect your equipment against theft. In the            The car sound system automatically
delivery state, the control panel is in the             switches off as soon as the control
supplied case. To start operating the radio             panel is removed.
after installation, you must first attach the
control panel (see the section "Attaching
the control panel" in this chapter).
Always take the control panel with you
when leaving the vehicle. The car sound
system is worthless to a thief without this
control panel.

CAUTION
DAMAGE TO THE CONTROL PANEL
Never drop the control panel.
Transport the control panel so that it is
protected against impacts and the contacts
cannot become dirty.
Do not expose the control panel to direct
sunlight or another heat source.
Avoid direct skin contact with the control
panel's electrical contacts.

•   ATTACHING THE CONTROL PANEL
    Push the control panel into the bracket
    at the right edge of the device.
    Push the control panel carefully into the
    left bracket until it clicks into place.

                                                6
OPERATION

                                                       LOC ON/OFF: Rotate the audio knob (21)
OPERATION                                              to turn local function on/off. In LOC ON
TURN THE UNIT ON/OFF                                   mode, the unit reduces the receiving
Turn on the unit by pressing the     button.
                                                       sensitivity when you search for stations.
When the system is on, press and hold the
                                                       That means, stations with strong signals
   button (2) for 2 seconds to turn off the
                                                       are received, stations with weak signals are
unit.
                                                       ignored. In LOC OFF mode, it increases
SOUND ADJUSTMENT                                       the receiving sensitivity when you search
Press the SEL button (21) briefly to select            for stations. That means, you can receive
the desired adjustment mode. The                       more stations.
adjustment mode changes in the following
order:                                                 STEREO/MONO: Rotate the audio knob
 -BAS-TRE-BAL-FAD- VOL-                                (21) to choose STEREO or MONO mode.
   BAS: bass                                           In STEREO mode, you can receive FM
   TRE: treble                                         stereo signals. In MONO mode, the stereo
   BAL: balance                                        signal is switched to mono. Sometimes
   FAD: fader                                          when the signal is poor, switching to MONO
   VOL: volume                                         mode will reduce the noise.

By rotating the audio knob (21), it is                 BEEP ON/OFF: The car audio device is
possible to adjust the desired sound quality.          equipped with 2 beep tone modes. Rotate
Press and hold the SEL button (21) for 2 seconds       the volume knob to choose one.
to call up the system menu.
                                                       - Beep On mode: The confirmation beep
Press SEL button (repeatedly):
                                                       sound is heard whenever a button is
TAVOL—LOC ON/OFF –STEREO/MONO –
                                                       pressed.
BEEP ON/OFF – EUROPE/USA
                                                       - Beep Off mode: The confirmation beep is
    TAVOL:TA volume
                                                       not heard whenever a key is pressed.
    LOC: local

                                                       EUROPE/USA: Rotate the volume to
TA volume:
                                                       select the region EUROPE or USA.
It defines the minimum volume for traffic
announcements. The adjustable range is
20–43. The default value is 25. Rotate the             EQ (Equalization)
volume knob to adjust the volume of the                Press it briefly to select the preset EQ
traffic announcement.                                  mode as shown below:

                                                       FLAT—CLASSICS—POP—ROCK—EQ
                                                       OFF

                                                   7
OPERATION
E
LOUDNESS RADIO OPERATION N
Press and hold the EQ button for 2 seconds
G
to activate the LOUD function. Press and SWITCHING TO RADIO MODE
L
hold it again to cancel the function. Press the SRC button (1) to select radio
I
mode, which appears in the display
DISPLAYING INFORMATION together with the memory bank and S
H
Press the DISP button (7) to show the time frequency.
for 5 seconds. Afterwards, it shows the SELECTING THE FREQUENCY
information again. BAND
SETTING THE TIME In radio mode, press the BAND button
(13) to select the desired band.
Press and hold the DISP button for 2
The reception band changes in the
seconds. The hour indicators are flashing.
following order:
Briefly press the / button to set the →FM1→ FM2→ FM3 → MW1(AM1)→ MW2(AM2)
correct hour. Briefly press the DISP button
to change to minutes. Use the /
button again to set the correct minute. SELECTING A STATION
Afterwards, press the SEL button to Press the button (11) or
confirm. button (6) briefly to activate automatic
AUXILIARY INPUT seek function. It automatically searches
The unit can be connected to a portable up/down for a station. Press it for 2
audio player through the AUX IN jack (10). seconds until “MANUAL” appears on
the display, to select the manual tuning
mode. In this mode, you can
RESET FUNCTION incrementally scan frequencies up or
The RESET button (25) must be activated down until a station has been located. If
with either a ballpoint pen or pointed metal both buttons have not been pressed for
object. 5 seconds, it will return to seek tuning
The RESET button is activated for the mode and “AUTO” appears on the
following reasons: display.
- Initial installation of the unit when all
wiring is completed.
- All the function buttons do not operate.
- Error symbol on the display.
Note: If the RESET button (25) is pressed
and the unit does not work, please use a
cotton swab moistened with isopropyl
alcohol to clean the socket on the front
panel.
8OPERATION
AUTOMATIC STORING & PROGRAM RDS (RADIO DATA SYSTEM)
SCANNING OPERATION
- Automatic storing Setting RDS mode
- Press the TS button (3) for 2 seconds Press the AF button (22) to switch the
the radio starts searchings from 87.5 AF function on or off.
MHz frequency and checks the signal Whenever AF is on, the “AF” symbol
strength until one cycle search is appears on the display.
finished. Then it stores the 6 stations The program name is displayed upon
with the strongest signal under FM3 receiving an RDS station.
preset number buttons. In the first cycle, “AF” starts blinking if the broadcasting
it scans in LOCAL ON mode for the signal deteriorates.
stations with the strongest signal. If less Regional Program Operation
than 18 stations are located, it scans When AF function is on, press the AF
stations in LOCAL OFF mode in the button (22) for several seconds to
second cycle. switch region mode on or off.
- Program scanning Some broadcasting stations change
Press the TS button (3) briefly to scan their program from normal broadcasting
preset stations. The radio stops at a to regional broadcasting for a certain
preset number for 5 seconds . Press the time period. When Region is on, the
TS button again to stop the program current listening program remains
scan. unchanged. When Region is off, it
STORING A STATION allows reception to move to the regional
To store a station, press one of the station.
preset buttons (1-6) for 2 seconds. The Listening to Traffic Announcements
current station is stored under the Press the TA button to activate the TA
number button. Briefly press the preset function.
button (1-6) to directly listen to the When TA mode is on and a traffic
station that was saved under the announcement is transmitted:
corresponding preset button. When the unit is in CD (MP3), USB, SD
or AUX IN mode, it temporarily switches
to radio mode.
9OPERATION
It temporarily switches over to an EON CD/MP3/WMA MODE E
linked station when EON detects a N
BASIC INFORMATION
traffic announcement on the other G
This car sound system can be used to play
program. L
audio CDs (CDDA) and CD-R/RWs with
If the volume level was below the I
audio, MP3 or WMA files as well as MP3 or
threshold point, it is raised to the S
WMA files on USB data carriers and
threshold point. If the current volume H
SD(HC)/MMC memory cards.
level is higher than the threshold point
Notes:
(min. TA volume level), it will be set to
the last level. • To ensure proper functioning, use only
CDs with the Compact-Disc logo.
TA interruption function • Blaupunkt cannot guarantee the
The current traffic announcement is flawless function of copy-protected CDs
cancelled by pressing this key. and all CD blanks, USB data carriers
But the TA mode is not switched off. and memory cards available on the
market.
The RDS data used are the PI, PS, AF, Note the following information when
TP, TA, EON and PTY data. preparing an MP3/WMA data carrier:
PI: Program Identification code • Naming of tracks and directories:
Code for identifying programs – Max. 32 characters without the file
PS: Program Service Name extension ".mp3" or ".wma" (the use
of more characters reduces the
Broadcast station name data
number of tracks and folders that the
expressed as alphanumeric
car sound system can recognize)
characters
– No umlauts or special characters
AF: Alternative Frequencies
• CD formats: CD-R/RW, Ø: 12 cm
Frequency list of broadcasting
• CD data formats: ISO 9669 Level 1 and
stations transmitting the same
2, Joliet
program
• CD burn speed: Max. 16x
TP: Traffic Program identification
(recommended)
Identification data for stations
• USB format/file system: Mass storage
broadcasting traffic information
device /FAT16/32
TA: Traffic Announcement identification
• Memory card file system: FAT16/32
Identification data showing traffic
• File extension of audio files:
information is being transmitted or
– .MP3 for MP3 files
not
– .WMA for WMA files
EON: Enhanced Other Networks
• WMA files only without Digital Rights
information
Management (DRM) and created with
Windows Media Player version 8 or
later
• MP3 ID3 tags: Version 1 and 2
• Bitrate for creating audio files:
10OPERATION
– MP3: 32 to 320 kbps SELECTING TRACKS/FILES
– WMA: 64 to 192 kbps Press the button (11) or
• Maximum number of files and button (6) to move to the previous or the
directories: Up to 20,000 entries next track/file. The track/file number is
depending on the data structure shown on the display.
Hold the button (11) or button
• CHANGING TO CD/MP3/WMA MODE (6) to fast reverse or fast forward. Disc
Press the SRC button (1) repeatedly play starts at the point you release the
until the desired audio source is button.
displayed:
PLAY/PAUSE
• "CD": Inserted CD
Press the button (19) to pause
• "SD(HC)": Inserted memory card playback. Press it again to resume
• "USB": Connected USB data carrier playback.
• "AUX": Connected external audio SCAN PLAY ALL TRACKS/FILES
source Press the SCN button (18) to play the
Notes: first seconds of each track/file. Press
• The respective audio source can be again to stop intro play and listen to the
selected only if a corresponding CD track/file.
is inserted or a corresponding device REPEATING THE SAME TRACK/FILE
is connected. Press the RPT button (17) to
• If the car sound system first has to continuously repeat the same track/file.
read the data of a connected device Press it again to repeat all the
data carrier before the playback, the tracks/files.
display shows "READING". The PLAYING ALL TRACKS IN RANDOM
duration of the reading depends on Press the RDM button (16) to play all
the data volume and design of the tracks/files in random order. Press it
device or data carrier. If the device again to cancel the random function.
or data carrier is defective or the
transferred data cannot be played EJECTING A DISC
back, a corresponding message Press the button (8) to stop disc
appears on the display (e. g. "USB play and eject the disc from the disc slot
ERROR"). (4).
SELECT DIRECTORY UP/DOWN
Press the DIR- button (15) or DIR+
button (14) to select the previous or
next directory. If the MP3/WMA disc
does not contain any directory, the
function DIR- button (15) or DIR+ button
(14) is not available.
11OPERATION
USB MP3 player is not a standard E
SELECTING FILES WITH N
which means different models have
BUTTON G
their own standard. Therefore, not
(20) is assigned as selection button every MP3 player is supported. L
in MP3/WMA operation. When connecting an MP3 player which I
has a regular battery (non rechargeable S
Search From Folder battery), you should remove the battery H
Press the button once. It enters from the MP3 player first, then connect
the “Searching from folder” mode. it to the USB interface. Otherwise, it
Rotate the VOL knob to select the may cause the battery to burst.
desired folder. Next, press the knob
(21) to enter the folder. Rotate the SD OPERATION
knob (16) to select the desired file. When you insert an SD card in the SD
Then press the knob (21) again to interface, the unit searches the MP3/WMA
play it. files on the card and starts to play them.
Pressing the button returns you The operation is the same as the
to the previous folder. MP3/WMA operation described above.
Search File number In any other mode, you can also press the
Press the button twice. It SRC (1) button to select SD mode.
activates the “Search file number”
mode. Rotate the knob (21) to select SUPPORTED MP3/WMA DECODING
the file number, then press the knob MODES
(21) to confirm. The unit searches The main unit supports MP3/WMA
the selected file to play. decoding modes as shown below.
If the file number was selected, the
unit waits for the knob (21) for Bit Rate
Standard
seconds. The unit searches the (kbps)
track after few seconds, even if the MPEG1 Audio 32,48,64,96,
knob (21) is not pressed. Layer 3 (44.1 128,192,256,
kHz) 320
USB PLAY OPERATION Windows 64,96,128,192
Media Audio
When you connect a USB media, the unit
(44.1 kHz)
will search the MP3/ WMA files and start to
play them. In any other mode, you can also The USB solution can support:
press the SRC button to select USB mode. 1. Number of folders: 500 max.
When playing the MP3/WMA files in the 2. Number of files: 999 max.
device, the operation is the same as the 3. Depth of folder: 8 layers
CD/MP3/WMA operation described above. 4. Size up to: 16 GB
Note:
The main unit can only support the
standard USB memory disc approved
by Microsoft.
12REMOTE CONTROL HANDSET
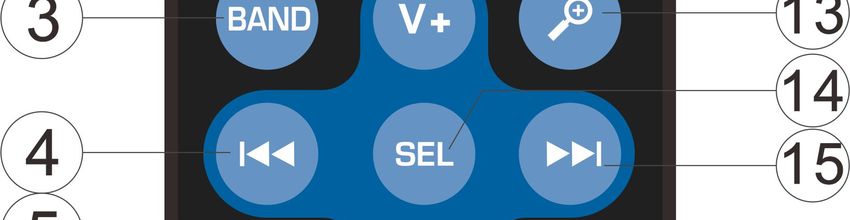
FUNCTION KEY & CONTROL
Power ON/OFF Button.
1. :
2. VOL+: Volume up button.
3. BAND: To select FM1/FM2/FM3/ /MW1/MW2 band in RADIO mode.
1. : In RADIO mode: Press briefly for seek down function. Press and hold it for manual seek
down.
In MP3/WMA mode: Press briefly for skip previous one track/file. Press and hold it for fast
reverse.
5. VOL- : Volume down button.
6. EQ: Press to select desired audio equalization.
7. 2 SCN: In RADIO mode: Number 2.
In MP3/WMA mode: Press to turn SCANNING function on/off.
8. 1 : In RADIO mode: Number 1.
In MP3/WMA mode: Press to pause/resume playing.
9. 4 RDM: In RADIO mode: Number 4.
In MP3/WMA mode: Turn random function on/off.
10. 5 DIR-: In RADIO mode: Number 5.
In MP3/WMA mode: Press to return to previous folder.
11. SRC: Switching to a source: RADIO/ USB /AUX.
Press to mute/recover the sound.
12. :
13. : In MP3/WMA mode: File searching function. (See page 12)
14. SEL: Press briefly for audio menu. Press and hold for system menu.
In MP3/WMA searching mode, press for confirm function.
15. : In RADIO mode: Press briefly for seek down function. Press and hold for manual seek up.
16. DISP: Press DISP to show the time.
17. 3 RPT: In RADIO mode: Number 3.
In MP3/WMA mode: Press to turn repeat function on/off.
18. 6 DIR+: In RADIO mode: Number 6.
In MP3/WMA mode: Press to go to next folder.
13GENERAL
Power Supply Requirements : DC 12 Volt, Negative Ground E
Dimensions : 178 (W) x 160 (D) x 50 (H) N
Tone Controls G
- Bass (at 100 Hz) : ±10 dB L
- Treble (at 10 kHz) : ±10 dB I
Maximum Output Power : 4x50 watts S
Current Consumption : 10 Ampere (max.) H
CD PLAYER
Signal to Noise Ratio : > 55 dB
Channel Separation : > 45 dB
Frequency Response : 40 Hz – 18 kHz
RADIO
FM
Frequency Coverage 65 to 74 MHz
Frequency Coverage 87.5 to 108 MHz
MW
Frequency Coverage 522 to 1620 kHz
14EMPLACEMENT DES TOUCHES
1. Touche SRC(source). 14. Touche 6 DIR+ (répertoire).
Sélection du niveau de mémoire ou de la 15. Touche 5 DIR- (répertoire).
source audio 16. Touche 4 RDM (aléatoire).
2. Touche marche/arrêt / coupure du son 17. Touche 3 RPT (répétition).
« MUTE ». 18. Touche 2 SCN (balayage).
3. Touche TS (travelstore). 19. Touche 1 (lecture/pause).
4. Fente d'insertion du CD. 20. Touche (recherche MP3).
5. Écran LCD. 21. Bouton VOL/SEL/ENT.
6. Touche (recherche descendante). Dans le menu : sélection de l'option de menu,
7. Touche DISP. modification du réglage
8. Touche d'éjection du CD. 22. Touche AF.
9. Prise USB. 23. Touche TA.
10. Prise AUX-IN frontale. 24. Touche (retrait de la face avant).
11. Touche (recherche ascendante). 25. Touche RESET.
Dans le menu : changement de niveau de Accès uniquement lorsque la face avant est
menu enlevée
Mode radio : réglage des stations 26. Fente d'introduction des cartes SD.
Autres modes de fonctionnement : sélection Accès uniquement lorsque la face avant est
du titre enlevée
12. Touche EQ/LOUD.
13. Touche BAND.
15TABLE DES MATIÈRES
Consignes de sécurité ...................... 17 Mode SD ............................................... 27
Symboles utilisés ................................ 17 Télécommande .................................... 28
Sécurité routière .................................. 17 Caractéristiques techniques .............. 29
Consignes de sécurité générales ........ 17 Notice de montage .............................. 77
Déclaration de conformité ................... 18
Instructions de nettoyage ................ 19
Instructions pour l'élimination........... 19 F
Composition de la fourniture ........... 19 R
Accessoires spéciaux (non fournis) . 19 A
Mise en service ................................... 20 N
Retrait des vis de transport avant Ç
installation ............................................. 20 A
Mise en place et retrait de la face I
avant ..................................................... 20 S
Retrait de la face avant ......................... 20
Fonctionnement .................................. 21
Mise en marche et arrêt ........................ 21
Réglage du son..................................... 21
Réglage du relèvement des graves à
faible volume sonore (Loudness) .......... 22
Informations d'affichage ........................ 22
Réglage de l'heure ................................ 22
Fonction de remise à zéro .................... 22
Mode radio ............................................ 22
Passage au mode radio .................... 22
Sélection d'une bande de
fréquences ........................................ 22
Sélection d'une station ...................... 22
Mémorisation automatique &
balayage des stations ....................... 23
Mémorisation d'une station ............... 23
Mode RDS ............................................ 23
Mode CD/MP3/WMA............................. 24
Sélection du mode CD/MP3/WMA ........ 25
Sélection des titres/fichiers ............... 26
Balayage de tous les titres................ 26
Répétition de la lecture d'un titre ...... 26
Lecture des titres dans un ordre
aléatoire ............................................ 26
Éjection du CD.................................. 26
Sélection d'un répertoire ........................ 26
Sélection des fichiers avec la
touche ......................................... 26
Mode USB ............................................ 27
16CONSIGNES DE SECURITE
CONSIGNES DE SECURITE SECURITE ROUTIERE
L'autoradio a été fabriqué en fonction de Tenez compte des remarques suivantes
l'état actuel des connaissances techniques relatives à la sécurité routière :
et selon les règles techniques de sécurité • Utilisez l'appareil de manière à
reconnues. Vous prenez cependant des pouvoir toujours conduire votre
risques si vous ne suivez pas les consignes véhicule en toute sécurité. En cas de
de sécurité qui se trouvent dans cette doute, arrêtez-vous dans un endroit
notice. approprié et manipulez l'appareil alors
que le véhicule est immobilisé.
Cette notice contient des informations
importantes pour un montage et une • Retirez la face avant ou remettez-la
utilisation simples et sûrs de l'autoradio. en place uniquement lorsque le
véhicule est à l'arrêt.
• Lisez cette notice avec soin et
• Réglez toujours un volume sonore
intégralement avant d'utiliser
modéré de manière à protéger votre
l'autoradio.
ouïe et à pouvoir entendre les signaux
• Conservez cette notice de façon à ce
d'alerte (par ex. de la police). Si vous
qu'elle soit accessible à tout moment à
modifiez le volume sonore pendant une
tous les utilisateurs.
coupure momentanée du son (par ex.
• Remettez toujours l'autoradio à un tiers
lors d'un changement de source audio),
avec cette notice.
la différence ne sera audible qu'une fois
Tenez également compte des notices le son rétabli. N'augmentez pas le
jointes aux appareils utilisés conjointement volume sonore pendant la coupure
à cet autoradio. momentanée du son.
SYMBOLES UTILISES CONSIGNES DE SECURITE
Les symboles suivants sont utilisés dans GENERALES
cette notice : Tenez compte des remarques suivantes
pour ne pas vous exposer à un risque de
DANGER ! blessure :
Avertit d'un risque de blessure • N'ouvrez pas l'appareil, ne le
modifiez pas. L'appareil comporte un
laser de classe 1 qui est susceptible de
Le sigle CE confirme que les blesser vos yeux.
directives UE sont respectées.
• N'augmentez pas le volume sonore
pendant la coupure momentanée du
• Identifie une énumération
son, par ex. lors d'un changement de
source audio. La modification du
volume sonore n'est pas audible
pendant la coupure du son.
17CONSIGNES DE SECURITE
UTILISATION CONFORME
Cet autoradio est prévu pour le montage et
le fonctionnement dans un véhicule
disposant d'une tension de bord de 12 V et
il doit être monté dans une baie DIN. Tenez
compte des limites de puissance indiquées
dans les caractéristiques techniques.
Confiez les réparations, et au besoin le F
montage, à un spécialiste. R
A
INSTRUCTIONS DE MONTAGE N
Vous n'êtes autorisé à monter l'autoradio Ç
que si vous possédez une expérience dans A
le montage d'autoradios et disposez de I
bonnes connaissances en électricité S
automobile. Tenez compte pour cela de la
notice de montage qui se trouve à la fin de
cette notice d'utilisation.
DECLARATION DE CONFORMITE
Blaupunkt Technology GmbH certifie que
l'autoradio satisfait aux exigences de base
et aux exigences des autres dispositions
applicables de la directive 2004/108/CE.
Vous trouverez la déclaration de conformité
sur le site Internet www.blaupunkt.com.
18INSTRUCTIONS DE NETTOYAGE | INSTRUCTIONS POUR L'ELIMINATION | COMPOSITION DE LA FOURNITURE
INSTRUCTIONS DE
NETTOYAGE
Les solvants, les produits de nettoyage, les
abrasifs et les produits pour l'entretien du
poste de conduite et du plastique
contiennent des substances susceptibles
d'attaquer les surfaces de l'autoradio.
• Pour nettoyer l'autoradio, utilisez
uniquement un chiffon sec ou
légèrement humide.
• Nettoyez au besoin les contacts de la
face avant avec un chiffon doux imbibé
d'alcool de nettoyage.
INSTRUCTIONS POUR
L'ELIMINATION
Ne jetez pas votre ancien appareil
avec les ordures ménagères !
Utilisez les systèmes mis à votre
disposition pour le retour ou la collecte des
anciens appareils en vue de leur
élimination.
COMPOSITION DE LA
FOURNITURE
La fourniture comprend les articles
suivants :
1 Autoradio
1 Notice d'utilisation et de montage
1 Etui pour la face avant
1 Cadre support
2 Outils de démontage
1 Télécommande portable
ACCESSOIRES SPECIAUX
(non fournis)
Utilisez uniquement les accessoires
spéciaux agréés par Blaupunkt.
Renseignez-vous auprès de votre
revendeur Blaupunkt ou sur Internet à
l'adresse www.blaupunkt.com.
19Mise en service...
MISE EN SERVICE Appuyez sur la touche (24) pour
ATTENTION déverrouiller la face avant.
VIS DE BLOCAGE Le côté gauche de la face avant se
Avant la mise en service de l'autoradio, détache de l'appareil, mais celle-ci ne
assurez-vous que les vis de blocage pour peut pas tomber car elle est retenue par
le transport ont été enlevées (voir chapitre la fixation droite.
« Notice de montage »). Déplacer la face avant légèrement vers
la gauche jusqu'à ce qu'elle se détache F
de la fixation droite. R
MISE EN PLACE ET RETRAIT DE LA
Détacher la face avant avec précaution A
FACE AVANT
de la fixation gauche. N
Votre autoradio est équipé d'une face avant
Ç
détachable (Release-Panel) qui le protège Remarque :
A
contre le vol. Lors de la livraison, la face L'autoradio s'arrête automatiquement dès
I
avant se trouve dans un étui. Pour mettre que la face avant est retirée.
S
l'autoradio en marche une fois monté, vous
devez d'abord mettre la face avant en place
(voir section « Mise en place de la face
avant » dans ce chapitre).
Prenez toujours la face avant avec vous
chaque fois que vous quittez le véhicule.
Sans cette face avant, l'autoradio n'a
aucune valeur pour le voleur.
ATTENTION
RISQUE D'ENDOMMAGEMENT DE LA
FACE AVANT
Ne laissez pas tomber la face avant.
Transportez la face avant de manière à ce
qu'elle soit protégée des coups et que les
contacts ne puissent pas être encrassés.
N'exposez pas la face avant directement
au rayonnement solaire ou à d'autres
sources de chaleur.
Evitez que la peau ne touche directement
les contacts de la face avant.
• MISE EN PLACE DE LA FACE AVANT
Poussez la face avant dans la fixation
qui se trouve sur le bord droit du boîtier.
Appuyez avec précaution sur la face
avant jusqu'à ce qu'elle se verrouille
dans la fixation qui se trouve à gauche.
• RETRAIT DE LA FACE AVANT
20MISE EN SERVICE
uniquement les stations avec un signal fort
MISE EN SERVICE et ignore les stations avec un signal faible.
MISE EN MARCHE/ARRÊT En mode LOC OFF, la sensibilité de
Appuyez sur la touche pour allumer
réception est accrue lorsque vous
l'autoradio. Pour éteindre l'autoradio,
recherchez des stations. Davantage de
appuyez sur la touche (2) pendant
stations peuvent être diffusées.
2 secondes.
RÉGLAGE DU SON STEREO/MONO : tournez le bouton de
Appuyez brièvement sur le bouton SEL (21) réglage du volume (21) pour sélectionner le
pour sélectionner le mode de réglage mode STEREO ou MONO. En mode
souhaité. Le mode de réglage s'affiche STEREO, vous pouvez recevoir des
dans l'ordre suivant : signaux FM stéréo. En mode MONO, le
-BAS-TRE-BAL-FAD-VOL- signal passe en mono. Parfois, lorsque le
BAS : graves signal est faible, le fait de passer en mode
TRE : aiguës MONO permet de réduire le bruit.
BAL : répartition gauche/droite (balance)
FAD : répartition avant/arrière (fader) ACTIVATION/DÉSACTIVATION DU BIP
VOL : volume sonore SONORE : l'autoradio propose 2 modes de
bip. Tournez le bouton de réglage du
Tournez le bouton de réglage du volume (21) volume pour en choisir un.
pour ajuster la valeur.
- Mode d'activation du bip : vous entendez
Appuyez sur le bouton SEL (21) pendant
un bip de confirmation lorsque vous
2 secondes pour accéder au menu système.
appuyez sur une touche.
Appuyez sur le bouton SEL (plusieurs fois) :
- Mode de désactivation du bip : vous
TAVOL—LOC ON/OFF –STEREO/MONO –
n'entendez pas de bip de confirmation
BEEP ON/OFF – EUROPE/USA
lorsque vous appuyez sur une touche.
TAVOL :volume des informations routières
LOC : local
EUROPE/ÉTATS-UNIS : tournez le bouton
de réglage du volume pour sélectionner la
Volume des informations routières :
zone EUROPE ou ÉTATS-UNIS.
Vous pouvez régler le volume sonore
minimal pour les messages d'information
routière. La plage de réglage va de 20 à 43. EQ (égaliseur)
La valeur par défaut est 25. Tournez le Appuyez brièvement sur cette touche pour
bouton de réglage du volume pour régler le sélectionner le mode EQ préréglé parmi les
volume sonore pour les informations suivants :
routières.
FLAT—CLASSICS—POP—ROCK—EQ
LOC ON/OFF : tournez le bouton de OFF
réglage du volume (21) pour activer ou
désactiver la fonction de recherche locale.
En mode LOC ON, l'autoradio réduit la
sensibilité de réception lorsque vous
recherchez des stations. Il diffuse
21MISE EN SERVICE
fonctionne toujours pas, utilisez un
RÉGLAGE DU RELÈVEMENT DES
coton-tige humidifié avec de l'alcool
GRAVES À FAIBLE VOLUME SONORE
isopropylique pour nettoyer la prise sur la
(LOUDNESS)
Appuyez sur la touche EQ pendant face avant.
2 secondes pour activer la fonction LOUD.
Pour la désactiver, appuyez à nouveau MODE RADIO
longuement sur cette touche.
F
PASSAGE AU MODE RADIO
AFFICHAGE DES INFORMATIONS R
Appuyez sur la touche SRC (1) pour
Appuyez sur la touche DISP (7) pour A
sélectionner le mode radio qui apparaît
afficher l'heure pendant 5 secondes. N
sur l'écran avec le niveau de mémoire et
L'écran affiche ensuite à nouveau ses Ç
la fréquence.
informations. A
SÉLECTION D'UNE BANDE DE I
RÉGLAGE DE L'HEURE FRÉQUENCES S
En mode radio, appuyez sur la touche
Appuyez sur la touche DISP pendant
BAND (13) pour sélectionner la bande
2 secondes. Les chiffres de l'heure
de fréquences souhaitée.
clignotent. Appuyez brièvement sur les
La bande de réception s'affiche dans
touches / pour régler l'heure.
l'ordre suivant :
Appuyez brièvement sur la touche DISP
→FM1→FM2→FM3→MW1(AM1)→MW2(AM2)
pour sélectionner les minutes. Utilisez à
nouveau les touches / pour régler
les minutes. Appuyez ensuite sur le bouton SÉLECTION D'UNE STATION
SEL pour valider. Appuyez brièvement sur la touche
ENTRÉE AUXILIAIRE (11) ou (6) pour activer la recherche
L'autoradio peut être connecté à un lecteur automatique de stations. L'autoradio
audio portable via la prise AUX IN frontale recherche alors automatiquement une
(10). station vers les fréquences plus hautes
ou plus basses. Appuyez sur cette
touche pendant 2 secondes jusqu'à ce
FONCTION RESET
que la mention « MANUAL » s'affiche,
Appuyez sur la touche RESET (25) avec la afin de sélectionner le mode de réglage
pointe d'un stylo ou d'un objet métallique
manuel des stations. Ce mode vous
pointu.
permet de modifier la fréquence pas à
La touche RESET peut être activée dans pas jusqu'à ce que vous trouviez une
les cas suivants : station. Si les deux touches ne sont pas
- Première installation de l'appareil une activées pendant 5 secondes, l'écran
fois le branchement terminé. revient au mode de recherche des
- Absence de réponse des touches de stations et la mention « AUTO »
fonction. s'affiche.
- Symbole d'erreur sur l'écran.
Remarque : si vous appuyez sur la touche
RESET (25) et que l'autoradio ne
22MISE EN SERVICE
MÉMORISATION AUTOMATIQUE & MODE RDS (RADIO DATA SYSTEM)
BALAYAGE DES STATIONS Réglage du mode RDS
- Mémorisation automatique Appuyez sur la touche AF (22) pour
- Appuyez sur la touche TS (3) pendant activer ou désactiver la fonction AF.
2 secondes pour lancer la recherche de Si la fonction AF est activée, le symbole
fréquences à partir de 87,5 MHz. « AF » s'affiche.
L'autoradio vérifie la force du signal et Le nom de la station s'affiche s'il s'agit
se règle sur la station suivante pouvant d'une station RDS.
être reçue. Il mémorise alors les La mention « AF » commence à
6 stations avec le signal le plus puissant clignoter si le signal radio perd de son
sous les touches numérotées FM3. Lors intensité.
du premier cycle, il recherche par Mode régional
balayage les stations locales avec le Si la fonction AF est activée, appuyez
signal le plus fort. S'il trouve moins de sur la touche AF (22) pendant quelques
18 stations, il recherche par balayage secondes pour activer ou désactiver le
les stations nationales lors du second mode régional.
cycle. La diffusion des programmes de
- Balayage des stations certaines stations varie parfois entre
Appuyez brièvement sur la touche TS (3) une diffusion normale et une diffusion
pour balayer les stations préréglées. régionale. Lorsque le mode régional est
L'autoradio s'arrête pendant 5 secondes activé, la diffusion du programme en
sur un numéro préréglé. Appuyez à cours d'écoute n'est pas affectée.
nouveau sur la touche TS pour arrêter le Lorsque le mode régional est désactivé,
balayage des stations. la réception de stations locales est
MÉMORISATION D'UNE STATION possible.
Pour mémoriser une station, appuyez Messages d'information routière
sur l'une des touches de présélection (1 Appuyez sur la touche TA pour activer la
à 6) pendant 2 secondes. La station fonction TA.
actuelle est mémorisée sous la touche Lorsque le mode TA est activé et qu'un
numérotée. Appuyez brièvement sur la message d'information routière est
touche de présélection (1 à 6) pour diffusé :
écouter directement la station affectée à Si l'autoradio est en mode CD (MP3),
cette touche. USB, SD ou AUX-IN, il bascule
provisoirement en mode radio.
23MISE EN SERVICE
Il passe sur une station de radio EON MODE CD/MP3/WMA
qui diffuse actuellement un message INFORMATIONS DE BASE
d'information routière. Cet autoradio vous permet de lire des CD
Si le niveau du volume est inférieur au audio (CDDA) et des CD-R/RW avec des
seuil défini, il est ramené au niveau du fichiers audio, MP3 ou WMA ainsi que des
seuil. Si le volume actuel est supérieur à fichiers MP3 ou WMA sur des supports de
la valeur seuil (niveau de volume sonore données USB et sur des cartes
mini. TA), il est ramené au niveau du F
SD(HC)/MMC.
seuil. R
Remarques : A
Fonction d'interruption TA • Pour éviter tout problème de N
Un appui sur cette touche annule le fonctionnement, utilisez uniquement Ç
message d'information routière des CD portant le logo Compact-Disc. A
actuellement diffusé. • Blaupunkt ne peut pas garantir le bon I
Cependant, le mode TA reste activé. fonctionnement de ses appareils avec S
des CD protégés contre la copie ainsi
Les données RDS utilisées sont des qu'avec certains CD vierges, supports
données PI, PS, AF, TP, TA, EON et de données USB et cartes mémoire
PTY. disponibles sur le marché.
PI : code d'identification de la station Pour préparer un support de données
Code permettant d'identifier les stations MP3/WMA, tenez compte des remarques
PS : nom de la station suivantes :
Nom de la station diffusée en • Noms pour les titres et les répertoires :
caractères alphanumériques – 32 caractères au maximum,
extension « .mp3 » ou « .wma » non
AF : fréquences alternatives
comprise (un nombre de caractères
Liste des fréquences alternatives de plus grand limite le nombre de titres
stations diffusant le même et de dossiers que l'autoradio peut
programme reconnaître)
TP : identification de la station de – Pas de caractères spéciaux
radioguidage • Formats de CD : CD R/RW, Ø : 12 cm
Données d'identification des stations • Formats de données de CD : ISO 9669
diffusant des informations routières Level 1 et 2, Joliet
TA : identification du message • Vitesse de gravage des CD : max. 16x
d'information routière (recommandé)
Données d'identification indiquant si • Format/système de fichiers USB : Mass
des informations routières sont en Storage Device (mémoire de masse) /
cours de diffusion FAT16/32
EON : information étendue aux autres • Système de fichier de carte mémoire :
réseaux FAT16/32
• Extensions des fichiers audio :
– .MP3 pour les fichiers MP3
24MISE EN SERVICE
– .WMA pour les fichiers WMA transférer ne peuvent pas être
• Fichiers WMA uniquement sans Digital reproduites, un message
Rights Management (DRM) et établis correspondant apparaît sur l'écran
avec Windows Media Player à partir de (par ex. « USB ERROR » (Erreur
la version 8 USB)).
• Balise ID3 du MP3 : versions 1 et 2
• Vitesse de transmission pour la
génération des fichiers audio :
– MP3 : 32 à 320 kbps
– WMA : 64 à 192 kbps
• Nombre maximal de fichiers et de
dossiers : jusqu'à 20 000 entrées en
fonction de la structure des données
• SELECTION DU MODE CD/MP3/WMA
Appuyez sur la touche SRC (1) autant
de fois qu'il est nécessaire pour faire
apparaître la source audio souhaitée :
• « CD » : CD introduit
• « SD(HC) » : carte mémoire
introduite
• « USB » : support de données USB
raccordé
• « AUX » : source audio externe
raccordée
Remarques :
• La source audio en question peut
être sélectionnée uniquement
lorsqu'un CD approprié est introduit
ou que l'appareil correspondant est
raccordé.
• Dans le cas où l'autoradio doit lire
les données de l'appareil ou du
support de données raccordé avant de
procéder à la reproduction,
« READING » (Lecture en cours) est
affiché pendant ce temps sur l'écran.
La durée de lecture dépend de la
capacité et du type de l'appareil ou du
support de données. Dans le cas où
l'appareil ou le support de données est
défectueux ou que les données à
25MISE EN SERVICE
SÉLECTION DES TITRES/FICHIERS SÉLECTION
Appuyez sur la touche (11) ou ASCENDANTE/DESCENDANTE D'UN
(6) pour passer au titre/fichier précédent RÉPERTOIRE
ou suivant. Le numéro du titre/fichier Appuyez sur la touche DIR- (15) ou DIR+
s'affiche. (14) pour sélectionner le répertoire
Maintenez enfoncée la touche (11) précédent ou suivant. Si le disque
ou (6) pour effectuer un retour ou MP3/WMA ne contient aucun répertoire,
une avance rapide. La lecture du disque la touche de fonction DIR- (15) ou DIR+ F
reprend dès que vous relâchez la (14) n'est pas disponible. R
touche. A
N
LECTURE/PAUSE SÉLECTION DE FICHIERS AVEC LA Ç
Appuyez sur la touche (19) pour TOUCHE A
interrompre la lecture. Appuyez à La touche (20) est une touche de I
nouveau sur cette touche pour sélection pour le mode MP3/WMA. S
reprendre la lecture.
BALAYAGE DE TOUS LES Recherche dans les dossiers
TITRES/FICHIERS Appuyez une fois sur la touche .
Appuyez sur la touche SCN (18) pour Vous accédez au mode de
écouter les premières secondes de recherche dans les dossiers.
chaque titre/fichier. Appuyez à nouveau Tournez le bouton de sélection du
sur cette touche pour arrêter cette volume pour sélectionner le dossier
fonction et écouter l'intégralité des souhaité. Appuyez ensuite sur le
titres/fichiers. bouton (21) pour ouvrir le dossier.
RÉPÉTITION DU MÊME Tournez le bouton (16) pour
TITRE/FICHIER sélectionner le fichier souhaité.
Appuyez sur la touche RPT (17) pour Appuyez ensuite à nouveau sur le
répéter en boucle le même titre/fichier. bouton (21) pour lire le fichier.
Appuyez à nouveau sur cette touche Un appui sur la touche vous
pour répéter tous les titres/fichiers. permet de retourner au dossier
précédent.
LECTURE DE TOUS LES TITRES EN
Recherche par numéro de fichier
MODE ALÉATOIRE
Appuyez sur la touche RDM (16) pour Appuyez deux fois sur la touche .
Le mode de recherche par numéro
lire tous les titres/fichiers dans un ordre
de fichier est activé. Tournez le
aléatoire. Appuyez à nouveau sur cette
bouton (21) pour sélectionner le
touche pour désactiver la fonction
numéro de fichier, puis appuyez sur
aléatoire.
le bouton (21) pour valider.
ÉJECTION DU CD L'autoradio recherche le fichier
Appuyez sur la touche (8) pour sélectionné pour le lire.
arrêter la lecture du disque et l'éjecter Si le numéro de fichier est déjà
de la fente d'insertion (4). sélectionné, l'autoradio attend une
action de votre part sur le bouton (21)
26MISE EN SERVICE
pendant quelques secondes. Si vous COMPATIBILITÉ DES MODES DE
n'appuyez pas sur le bouton (21), il DÉCODAGE MP3/WMA
recherche automatiquement le titre L'autoradio accepte les modes de
au bout de quelques secondes. décodage MP3/WMA suivants.
MODE USB Débit binaire
Standard
Lorsque vous branchez un support de (kbits/s)
données USB, l'appareil recherche les MPEG1 Audio 32,48,64,96,
fichiers MP3/WMA et commence à les lire. Layer 3 128,192,256,
Dans les autres modes, vous pouvez (44,1 kHz) 320
également appuyer sur la touche SRC pour Windows 64,96,128,192
sélectionner le mode USB. Media Audio
Le mode de lecture des fichiers MP3/WMA (44,1 kHz)
est identique à celui du mode Capacité du mode USB :
CD/MP3/WMA décrit plus haut. 5. Nombre de dossiers : 500 maxi.
6. Nombre de fichiers : 999 maxi.
Remarque : 7. 8 niveaux de sous-répertoires
L'autoradio ne peut lire que les clés 8. Taille maxi. : 16 Go
USB standard homologuées par
Microsoft.
Le lecteur MP3 USB n'est pas standard.
Par conséquent, tous les lecteurs MP3
ne sont pas forcément compatibles
avec l'autoradio.
Avant de brancher un lecteur MP3 avec
une pile classique (non rechargeable)
sur le port USB, retirez la pile du lecteur
MP3. Autrement, celle-ci peut exploser.
MODE SD
Lorsque vous insérez une carte SD dans
l'interface SD, l'autoradio recherche les
fichiers MP3/WMA sur la carte et
commence leur lecture. Le mode de
fonctionnement est identique à celui du
mode CD/MP3/WMA décrit plus haut.
Dans les autres modes, vous pouvez
également appuyer sur la touche SRC (1)
pour sélectionner le mode SD.
27TÉLÉCOMMANDE
F
R
A
TOUCHES DE FONCTION & COMMANDES N
Touche marche/arrêt. Ç
1. : A
2. V+ : Touche d'augmentation du volume sonore. I
3. BAND : Sélection de la bande FM1/FM2/FM3/ /MW1/MW2 en mode RADIO. S
1. : En mode RADIO : appuyez brièvement sur cette touche pour utiliser la fonction de recherche
descendante. Appuyez longuement sur cette touche pour une recherche manuelle descendante.
En mode MP3/WMA : appuyez brièvement sur cette touche pour passer le titre/fichier précédent.
Appuyez longuement sur cette touche pour un retour rapide.
5. V- : Touche de diminution du volume sonore.
6. EQ : Appuyez sur cette touche pour sélectionner la répartition du volume sonore.
7. 2 SCN : En mode RADIO : numéro 2.
En mode MP3/WMA : appuyez sur cette touche pour activer/désactiver la fonction de balayage.
8. 1 : En mode RADIO : numéro 1.
En mode MP3/WMA : appuyez sur cette touche pour interrompre/reprendre la lecture.
9. 4 RDM : En mode RADIO : numéro 4.
En mode MP3/WMA : appuyez sur cette touche pour activer/désactiver la fonction aléatoire.
10. 5 DIR- : En mode RADIO : numéro 5.
En mode MP3/WMA : appuyez sur cette touche pour revenir au dossier précédent.
11. SRC : Changement de source : RADIO/USB/AUX.
Appuyez sur cette touche pour couper le son/réactiver le son.
12. :
13. : En mode MP3/WMA : fonction de recherche de fichiers (voir page 12).
14. SEL : Appuyez brièvement sur cette touche pour le menu audio. Appuyez longuement sur cette touche
pour le menu système.
En mode de recherche MP3/WMA, appuyez sur cette touche pour valider la fonction.
15. : En mode RADIO : appuyez brièvement sur cette touche pour utiliser la fonction de recherche
ascendante. Appuyez longuement sur cette touche pour une recherche manuelle ascendante.
16. DISP : Appuyez sur DISP pour afficher l'heure.
17. 3 RPT : En mode RADIO : numéro 3.
En mode MP3/WMA : appuyez sur cette touche pour activer/désactiver la fonction de répétition.
18. 6 DIR+ : En mode RADIO : numéro 6.
En mode MP3/WMA : appuyez sur cette touche pour passer au dossier suivant.
28GÉNÉRAL
Alimentation requise : C.C. 12 volts, masse négative
Dimensions : 178 (l) x 160 (P) x 50 (H)
Commandes de tonalité
- Graves (à 100 Hz) : ±10 dB
- Aiguës (à 10 kHz) : ±10 dB
Puissance de sortie maximale : 4x50 watts
Courant absorbé : 10 ampères (maxi.)
LECTEUR DE CD
Rapport signal/bruit : > 55 dB
Séparation des canaux : > 45 dB
Bande passante : 40 Hz – 18 kHz
AUTORADIO
FM
Gamme de fréquences 65 à 74 MHz
Gamme de fréquences 87,5 à 108 MHz
OM (PO)
Gamme de fréquences 522 à 1 620 kHz
29UBICACIÓN DE LOS BOTONES
1. Botón SRC(fuente) 14. 6 Botón DIR+ (directorio)
Selección de un banco de memoria o de una 15. 5 Botón DIR- (directorio)
fuente de audio 16. 4 Botón RDM (aleatorio) E
2. Botón /MUTE ON/OFF 17. 3 Botón RPT (repetir) S
3. Botón TS (travel store) 18. 2 Botón SCN (explorar) P
4. RANURA PARA DISCO 19. 1 Botón (reproducción/pausa) A
5. Pantalla LCD 20. Botón (búsqueda MP3) Ñ
6. Botón (SEEK DOWN) 21. Botón VOL/SEL/ENT O
7. Botón DISP En el menú: selección de opción de menú, L
8. Botón EJECT cambio de ajuste.
9. Puerto USB 22. Botón AF
10. Conector de entrada auxiliar 23. Botón TA
11. Botón (SEEK UP) 24. Botón (expulsión del panel)
En el menú: cambio de nivel de menú. 25. Botón RESET
Modo de radio: ajuste de las emisoras. Acceso únicamente con el panel de control
Otros modos de funcionamiento: selección de extraído.
títulos. 26. Ranura para tarjeta SD
12. Botón EQ/LOUD Acceso únicamente con el panel de control
13. Botón BAND extraído.
30You can also read