MYOB EXO BUSINESS 8.7 - Release Notes EXO BUSINESS
←
→
Page content transcription
If your browser does not render page correctly, please read the page content below

MYOB EXO BUSINESS 8.7
           Release Notes

                   EXO
                   BUSINESS
             MYOB ENTERPRISE SOLUTIONS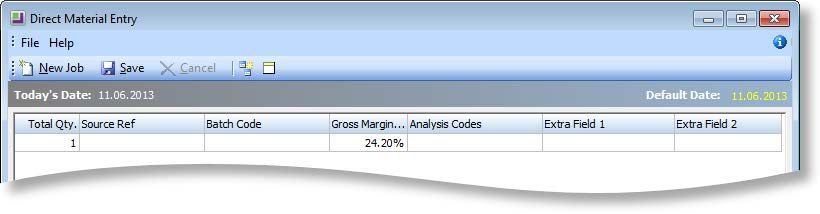
Important Notices
This material is copyright. It is intended only for MYOB Enterprise Solutions Business Partners and their
customers. No part of it may be reproduced in any way without the prior permission of MYOB.
MYOB has carefully prepared this material but excludes (to the extent allowed by legislation) any direct or
indirect liability arising from errors or omissions or from its use. Any case studies (including the application of
particular accounting standards or legislation) are representative examples only, and will not directly apply to
the user’s own circumstances. They are not a substitute for professional advice. Users must check that third
party materials, for example from the IRD and the ATO, are current at the time they are used.
   Trademark Rights
MYOB is an internationally registered trademark of MYOB Technology Pty Ltd. The use of this trademark and
MYOB’s other trademarks is prohibited without prior consent. Other products mentioned may be service
marks, trademarks or registered trademarks of their respective owners.
Contents
Introduction                                                                                                                    1
  What’s New in this Release? ........................................................................ 1

Installation                                                                                                                    2
  Pre-Install Requirements .............................................................................. 2
     Database Server ........................................................................................................... 2
     Client Workstation........................................................................................................ 3
     Other Requirements ..................................................................................................... 3

  Installing MYOB EXO Business ...................................................................... 4
  Post-Installation ......................................................................................... 11
     Logging in to EXO Business ......................................................................................... 11

  Installing EXO Business Services ................................................................. 12
     Setting up the Services ............................................................................................... 15

New Features                                                                                                                  17
  Changes to Supported Platforms ............................................................... 17
     Office 2013 Support ................................................................................................... 17

  Changes to Job Costing............................................................................... 17
     Support for Perpetual Inventory in Job Costing ......................................................... 17
     Changes to Progress Billing and Job Invoicing ........................................................... 21
     Sub Job Roll-up ........................................................................................................... 24
     Job Costing Extra Field Events .................................................................................... 25
     Extra Fields on the Details Tab ................................................................................... 26
     Extra Fields on Direct Time/Material Entry ................................................................ 28
     Foreign Currency Debtors .......................................................................................... 28
     Changes to the Job Search Tab .................................................................................. 29
     Link between Job Transactions and Stock Transactions ............................................ 29
     Hiding the Resource Planning Tab.............................................................................. 29
     Job Costing Dashboard Tabs....................................................................................... 30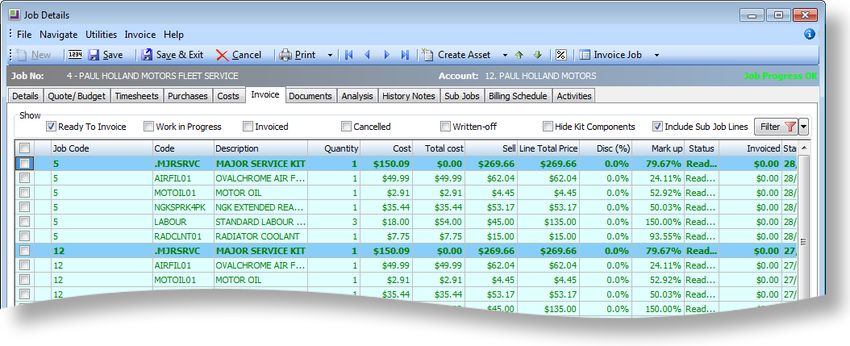
Custom Filters ............................................................................................................. 31

  Grid Column Extra Fields ............................................................................ 32
     Extra Fields on the Sales Order Supply Grid ............................................................... 33

  GL Codes on Debtor Invoices ..................................................................... 33
  Improvements to GL Posting ...................................................................... 34
  Business Alerts ........................................................................................... 35
     Rule Conditions .......................................................................................................... 38
     Rule Actions ................................................................................................................ 40
     Applying Rules to Users .............................................................................................. 42
     Business Alert Auditing............................................................................................... 42

  EXO API ....................................................................................................... 43
  EXO Email Service ....................................................................................... 43
     Installing the Service .................................................................................................. 43
     Configuring the Service .............................................................................................. 45

  EXO Education Centre ................................................................................ 47
     Online Help ................................................................................................................. 48

  Widget Enhancements ............................................................................... 48
     Loading Widgets ......................................................................................................... 49

  Support for Windows Aero......................................................................... 49
  Taxable Payments (Australia Only)............................................................. 50
     Tracking Creditors ...................................................................................................... 50
     Tracking Payments ..................................................................................................... 51
     Reporting on Taxable Payments................................................................................. 52

Resolved Issues                                                                                                                 55
  EXO Business Core ...................................................................................... 55
  EXO Job Costing .......................................................................................... 56
  EXO CRM .................................................................................................... 60
  Clarity Reports ............................................................................................ 61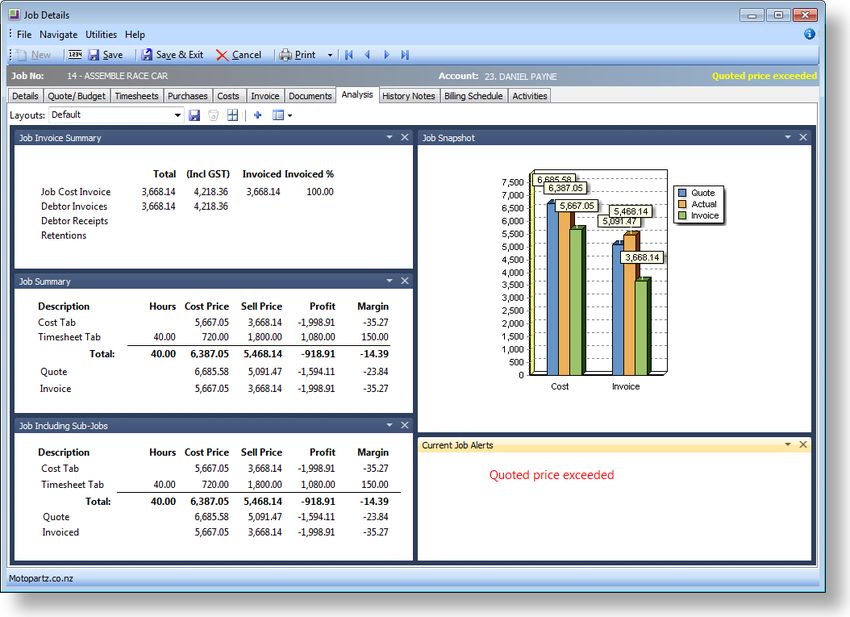
Service Packs .............................................................................................. 62
     8.6 Service Pack 1 ....................................................................................................... 62
     8.6 Service Pack 2 ....................................................................................................... 64
     8.6 Service Pack 2 Hot Fix 1 ........................................................................................ 65
     8.6 Service Pack 3 ....................................................................................................... 65

Known Issues                                                                                                                 66

Appendix 1: Profile Settings                                                                                                 67
  Billing Schedule Form Profiles .................................................................... 68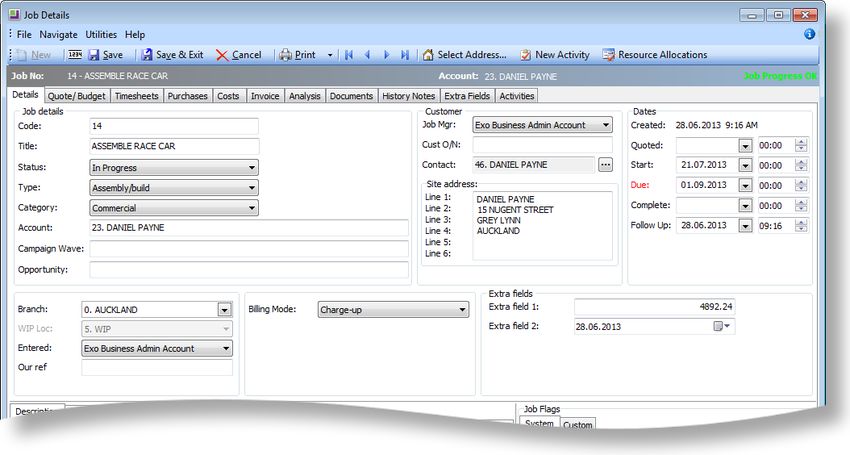
Introduction
What’s New in this Release?
   The focus of the 8.7 release is on enhancing the functionality of the EXO Business Job
   Costing module. Other new features include:
       •     Customisable Business Alerts.
       •     The EXO Business Education Centre, an online documentation repository,
             including new online Help files.
       •     The EXO Email Service, a service for automating the sending of emails from the
             EXO Business system.
       •     Support for the EXO API.
          Note: The necessary local components for the EXO Email Service and EXO API are
                installed and set up using new service installation and configuration
                utilities—see “Installing EXO Business Services” on page 12.
   This release also addresses issues identified by users and business partners.
   The purpose of this document is to provide essential information on the installation
   and use of this release:
      •     The Installation section provides an overview of the installation process,
            including pre-installation requirements and post installation steps.
      •     The New Features section describes all new features introduced in this release.
      •     The Resolved Issues section describes all issues that have been addressed by
            this release.
      •     The Known Issues section details any issues in this release that have been
            identified as requiring attention.
      •     The New Profile Settings appendix at the end of this document summarises all
            changes to EXO Business profile settings included in this release.
          Note: This release introduces very significant changes for EXO Job Costing users;
                it fundamentally changes the way in which inventory and work in progress
                are accounted for in the balance sheet. Existing users will need to plan for
                these changes and follow a series of manual steps outlined in the white
                paper Transitioning to the 8.7 Job Costing Work in Progress Methodology
                under the guidance of a trained EXO Business partner. Even if you
                periodically post stock valuations and work in progress valuations, while
                the transition will be simpler, you will still not be able to process
                transaction in EXO Job Costing immediately after the upgrade until you
                have completed these steps.

MYOB EXO Business 8.7 Release Notes                                               Page 1 of 68
                                                         Copyright 2013 MYOB Technology Pty Ltd.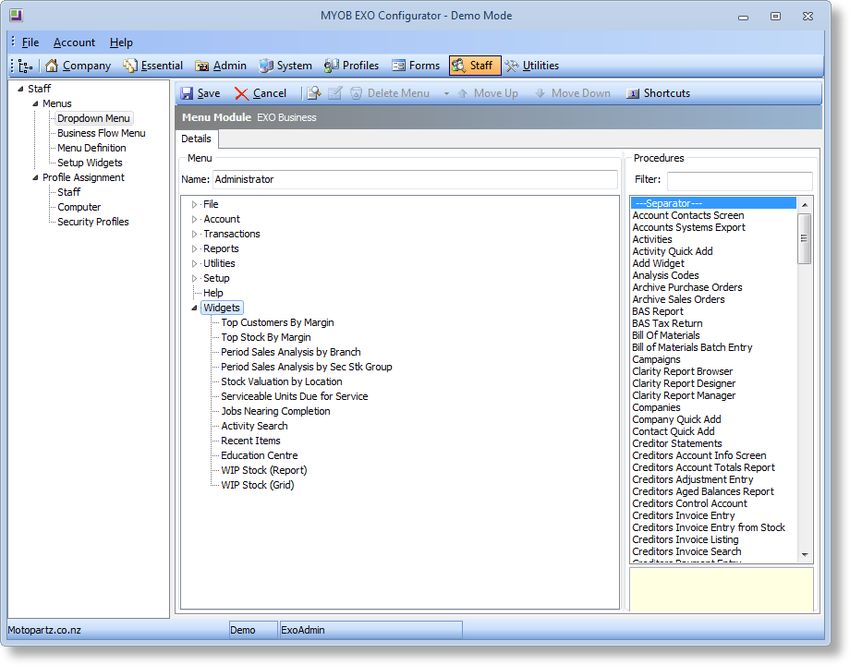
Installation
Pre-Install Requirements
   Minimum system requirements for PCs running MYOB EXO Business components are
   detailed below. Full details of requirements and supported operating systems for
   MYOB EXO Business are available on the Minimum System Requirements page on the
   MYOB website.
   The performance of the EXO Business system is not assured if these requirements are
   not met. Similarly, performance cannot be assured if the EXO Business system is
   installed on a server that is already under load from other processes, or a RDBMS that
   is not suitable for the organization’s volume of data (see “SQL Express” on page 3).

Database Server
   Any server where an MYOB EXO Business database is installed should meet the
   following minimum requirements:
      •    Windows Server 2008, Windows Server 2012
      •    The latest Service Pack for the Windows operating system
      •    Intel Pentium® 4 2.4Ghz processor (or equivalent)
      •    2 GB RAM
      •    20 GB of hard disk space + 10 MB per user
      •    Microsoft Data Access Components (MDAC) 2.8 or later
      •    A supported version of Microsoft SQL Server:
           o Microsoft SQL Server 2008 R2/SQL 2008 R2 Express Edition
           o   Microsoft SQL Server 2012/SQL 2012 Express Edition
      •    The latest Service Pack for the version of SQL Server you are using

   SQL Server
   Microsoft SQL Server must be present on the EXO Business Database Server. If you
   want to use a specific edition of SQL Server, make sure it is installed before running the
   Installation Wizard. If SQL Server is not installed, the EXO Business Installation Wizard
   can install SQL Server 2008 R2 SP1 Express Edition (SQL Express) as part of the
   installation process (see page 7). Whichever version of SQL Server you use, it must be
   set up to use Mixed Mode authentication.

MYOB EXO Business 8.7 Release Notes                                              Page 2 of 68
                                                        Copyright 2013 MYOB Technology Pty Ltd.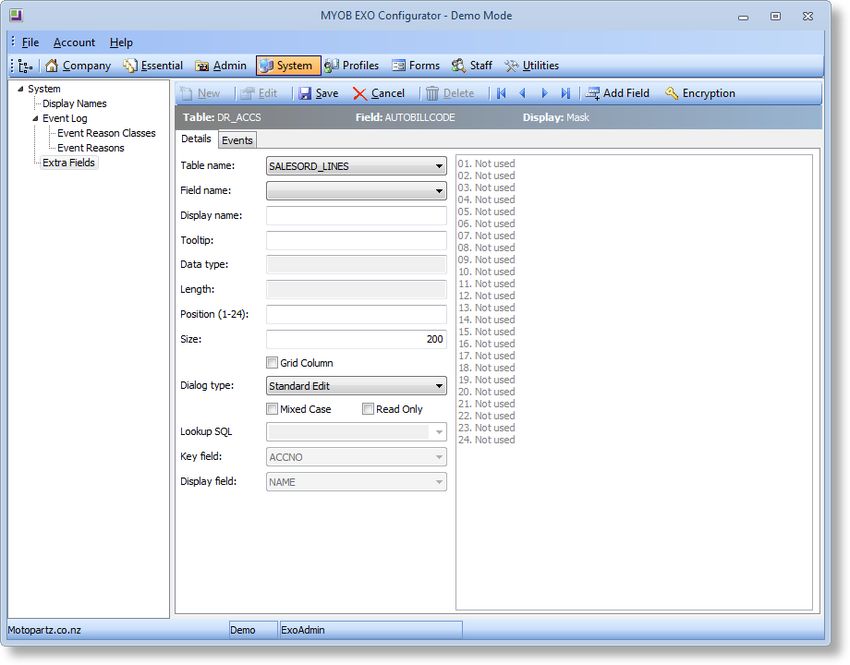
The blank and demo databases supplied with EXO Business have their compatibility
   levels set to “SQL Server 2008 (100)”. When upgrading from a previous version of EXO
   Business, database compatibility levels are updated automatically as follows:
       •   SQL Server 2008 and later databases are set to compatibility level 100.
       •   Older versions of SQL Server are not updated.
   See the following web page for information on compatibility levels:
   http://msdn.microsoft.com/en-us/library/bb510680.aspx

   SQL Express
   SQL Express may not be suitable for businesses with many users. SQL Express has limits
   on the amount of RAM and number of processors it can use, which affects the number
   of concurrent users that the EXO Business database can support. See the following
   MSDN article for more information:
   http://msdn.microsoft.com/en-us/library/ms165672.aspx

Client Workstation
   Any client workstation running the MYOB EXO Business application modules should
   meet the following minimum requirements:
      •    Windows 7 Enterprise, Windows 7 Professional, Windows 7 Ultimate,
           Windows 8
      •    The latest Service Pack for the Windows operating system
      •    Intel Pentium® 4 1.3 GHz processor (or equivalent)
      •    Hard disk space as required for the operating system
      •    16-bit colour, 1024×768 screen resolution

Other Requirements
   Certain features of MYOB EXO Business require one or more of the following:
      •    Internet access
      •    Microsoft Internet Explorer 7.0 or later
      •    Adobe® Acrobat Reader 7.0 or later
   Microsoft Office connection requires Microsoft Word/Excel 2010 to 2013.
   Contact synchronisation requires Microsoft Outlook 2010 to 2013.
   MYOB EXO Business 8.7 requires ExonetLib.dll version 8.6.0 or later. Version 8.6.0 is
   included with this release.
   When installing manually on 64-bit operating systems, the file RwEasyMAPI64.exe
   must be copied from the Supporting Files\RapWare folder of the EXO Business DVD to
   the install directory. Register this file by running RwEasyMAPI64.exe /regserver
   from a command prompt.

MYOB EXO Business 8.7 Release Notes                                              Page 3 of 68
                                                        Copyright 2013 MYOB Technology Pty Ltd.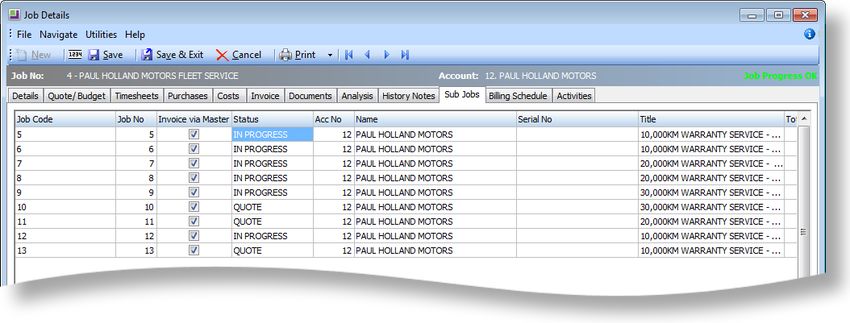
Installing MYOB EXO Business
       Note: Before you install this release, we recommend you take the precaution of
             backing up your data. Ensure there are no EXO Business modules running,
             locally or on your network.

   To perform the installation:
      1.   Insert the MYOB EXO Business CD and select Install MYOB EXO Business on the
           Install tab. If the install menu does not run automatically, run the
           ExoBusinessInstaller.exe program in the Supporting Files directory of the CD.
      2.   Click Next on the Welcome screen.

      3.   Read the licence agreement, then select I accept the agreement and click Next.

MYOB EXO Business 8.7 Release Notes                                            Page 4 of 68
                                                      Copyright 2013 MYOB Technology Pty Ltd.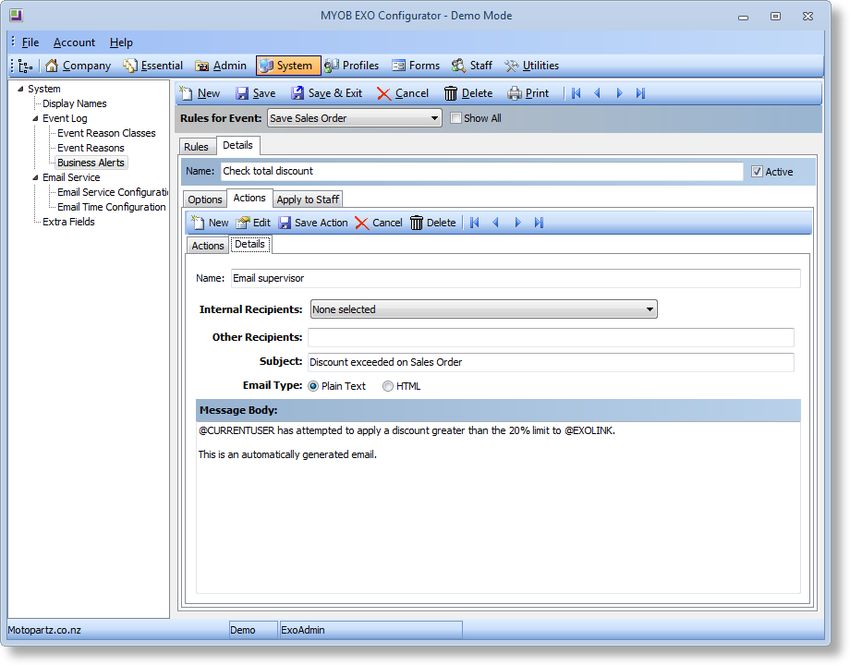
4.   Select the country you are based in and click Next.

       Note: Your selection here affects certain country-specific default settings that are
             set up during the install, e.g. tax rates and banks.
      5.   Select the components to install. Choose from:
           •   MYOB EXO Business Application Modules
           •   Documentation files
           •   EXO Business utilities
           •   A blank “live” MYOB EXO Business Database
           •   A pre-configured demonstration database
           •   EXO Business Common Files
           Click Next to continue.

MYOB EXO Business 8.7 Release Notes                                              Page 5 of 68
                                                        Copyright 2013 MYOB Technology Pty Ltd.
6. If you chose to install the MYOB EXO Business Application Modules, click
Browse to choose the directory where you want to install the program files,
then click Next.
7. If the MYOB EXO Business Common Files are not installed on this PC, click
Browse to choose the directory where the Common Files are located, then click
Next.
MYOB EXO Business 8.7 Release Notes Page 6 of 68
Copyright 2013 MYOB Technology Pty Ltd.8. If you chose to install the MYOB EXO Business Database components, you must
specify where to install the database:
• To install on an existing SQL Server instance, select the instance and enter a
user ID and password for that instance.
• To create a new instance for the installation, select New SQL Server
instance on this computer, then click Browse to choose the location of the
new instance. This will install SQL Server 2008 R2 SP1 Express Edition.
Note: See the Known Issues section on page 66 for information on the install pre-
requisites for SQL Server 2008 R2 SP1.
Click Next.
Note: The installer may appear unresponsive while it tries to detect SQL Server
instances on the PC (this process may take a minute or more). Do not
cancel the installer; simply wait until the detection operation is complete.
If you select to install a new instance of SQL Express, the logon details for the
new instance will be:
• Username: sa
• Password: $ExoAdmin7000
You will need to supply these details when migrating data, or if you want to
connect to the SQL Express instance for any other reason.
MYOB EXO Business 8.7 Release Notes Page 7 of 68
Copyright 2013 MYOB Technology Pty Ltd.9. Click Browse to choose where the MYOB EXO Business shortcuts should be
located in the Windows Start menu, then click Next.
10. If you want to create a desktop icon or Quick Launch icon for MYOB EXO
Business, tick the relevant box(es), then click Next.
MYOB EXO Business 8.7 Release Notes Page 8 of 68
Copyright 2013 MYOB Technology Pty Ltd.11. The installation is ready to begin. Review the details and click Install to
proceed. If you need to change any details, click Back to return to the previous
screen and change your selections.
12. The installation progress is displayed.
Note: During installation, other windows may appear if SQL Express is being
installed.
MYOB EXO Business 8.7 Release Notes Page 9 of 68
Copyright 2013 MYOB Technology Pty Ltd.13. If you chose to install the application modules but not the database
components on this PC, you must enter the details of the database once the
installation has completed. Click Test Connection to check that the details you
have entered work. If the test passes, click Next.
Note: Once a computer successfully connects to the database, a Computer profile
is created for it in EXO Business Config.
14. The installation is now complete. Choose what to do next and click Finish:
• Run MYOB EXO Business to explore the demonstration database.
• Run the Configuration Assistant to set up your new MYOB EXO Business
database.
• Return to Windows.
MYOB EXO Business 8.7 Release Notes Page 10 of 68
Copyright 2013 MYOB Technology Pty Ltd.Post-Installation
Once MYOB EXO Business software is installed, it must be configured for use.
Optionally, data can be migrated into the EXO Business system from another MYOB
product. The configuration and migration processes are detailed in the MYOB EXO
Business Implementation Guide.
Logging in to EXO Business
New MYOB EXO Business databases are installed with one or more default user
accounts. When logging in to EXO Business for the first time, you must supply the
following login details.
For a new blank database (EXO_LIVE):
• Default admin user = ExoAdmin
• Default admin password = ExoAdmin
For the demonstration database (EXO_DEMO):
• Default admin user = ExoAdmin
• Default admin password = ExoAdmin
• Default demo user = demo
• Default demo password = DEMO
Note: Passwords are case-sensitive.
MYOB EXO Business 8.7 Release Notes Page 11 of 68
Copyright 2013 MYOB Technology Pty Ltd.Installing EXO Business Services
Once the EXO Business system is set up, you can install supporting services for the EXO
API and EXO Email Service using the EXO Business Service Setup Wizard, EXO Business
Services Installer.msi. This installer is supplied with the main EXO Business installer. It
must be run on a server that already has EXO Business installed on it, and must be run
from an account with administrative permissions.
To perform the installation:
1. Double-click on the installer to run it. The welcome screen appears:
2. Click Next. The MYOB EXO End User Licence Agreement is displayed:
MYOB EXO Business 8.7 Release Notes Page 12 of 68
Copyright 2013 MYOB Technology Pty Ltd.3. Tick I accept the terms in the Licence Agreement and click Next to continue.
4. Select which components to install. Choose from:
• The EXO API Service
• The EXO Messaging Service
Note: The API configuration utilities are always installed (see “Error! Reference
source not found.” on page Error! Bookmark not defined.).
5. The install location is displayed at the bottom of the window. Click Browse to
choose a different location if necessary.
6. Click Next. You are now ready to install the EXO Business services.
MYOB EXO Business 8.7 Release Notes Page 13 of 68
Copyright 2013 MYOB Technology Pty Ltd.7. Click Install to being the installation. The progress of the installation is
displayed:
8. Once the installation is complete, click Finish to close the wizard. You can
choose to open the EXO Business Service Configuration utility to set up details
of the EXO API services.
Note: The EXO Business Service Configuration utility is installed in the same
location as the EXO API services. You can run the utility
(MYOB.ED.EXO.Cloud.ServiceConfig.exe) from this location at any time.
MYOB EXO Business 8.7 Release Notes Page 14 of 68
Copyright 2013 MYOB Technology Pty Ltd.Setting up the Services
The EXO Business services must be set up for each EXO Business database connection,
using the MYOB EXO Business Service Configuration utility. This utility,
MYOB.ED.EXO.Cloud.ServiceConfig.exe, can be run immediately after installation, or
you can open it from the EXO services install directory at any time.
Note: All setup must be performed on the server that the EXO Business services
are installed on, using an account with administrator privileges.
The utility displays configuration settings for the following services:
• EXO API Configuration
o API Services – this is the main EXO API service.
o API Provider Services – this service connects the EXO API to the online
relay. This service is only needed this if you want to communicate with
the EXO API remotely.
• EXO Business Alerts Configuration
o Message Services – this is the EXO Business messaging (email) service.
To configure an API service, select an EXO Business database connection, then click the
relevant Add Service button. For the API Service, you must also enter a Base URL,
which is the location and port the API is accessible on (the default should be suitable in
most cases, unless you want to use a different directory and/or port).
Note: For local API access, ensure that your firewall is configured to allow the
relevant ports, services and/or applications.
To validate that the EXO API has been successfully installed and set up, navigate to the
Base URL in a web browser or REST client to see a list of available endpoints.
MYOB EXO Business 8.7 Release Notes Page 15 of 68
Copyright 2013 MYOB Technology Pty Ltd.The configuration process for the messaging service is slightly different; where the API
services create a separate instance for each EXO Business database connection, the
messaging service has a single instance, which can have multiple connections to it.
To install the messaging service instance, select a database connection and click Add
Connection. This adds the service and sets up a connection to the selected database.
To add new connections, select them from the EXO Connection dropdown and click
Add Connection.
MYOB EXO Business 8.7 Release Notes Page 16 of 68
Copyright 2013 MYOB Technology Pty Ltd.New Features
Changes to Supported Platforms
Office 2013 Support
MYOB EXO Business now supports use with Microsoft Office 2013, including Outlook
2013. 64-bit and 32-bit editions are supported.
This feature was introduced in MYOB EXO Business 8.6 Service Pack 2.
Changes to Job Costing
Support for Perpetual Inventory in Job Costing
In previous versions, perpetual inventory integration was not recommended and not
officially supported in EXO Job Costing. This release includes process changes that
allow EXO Job Costing to fully support a perpetual inventory system.
Note: When EXO Job Costing is installed, the “Stock” option on the Post Ledgers
to GL window now becomes “Stock and Work in Progress”.
Work In Progress Changes
A new Work in Progress control account has been added to the General Ledger
Control Accounts. The new account can be configured in the EXO Business
Configurator at Business Essentials > GL Control Accounts > Custom tab. By default
the Work in Progress account is set to the Stock on Hand Account; you may need to
edit the chart of accounts to add a Work in Progress account to set the new control
account to.
Note: If the Work in Progress control account remains set to the Stock on Hand
account, the system will behave as it did in previous versions.
MYOB EXO Business 8.7 Release Notes Page 17 of 68
Copyright 2013 MYOB Technology Pty Ltd.Any Stock Location can now be flagged as a Work in Progress (WIP) location, by ticking
the new Job Costing Work in Progress Location flag on the Stock Locations setup
screen:
The ability to specify locations as WIP locations allows restrictions to be placed on
various location selection fields in the EXO Business system:
• When selecting a Stock Location for WIP, only locations that are marked as WIP
locations can be selected.
• When selecting a location elsewhere in the system, in most cases Stock
Locations that are marked as WIP locations are excluded from the choices. (On
some screens, e.g. Stock transactions, any location can be selected.)
• The Default job work in progress stock location profile setting only displays
Stock Locations that are marked as WIP locations.
• All other profile settings that set a default location only display Stock Locations
that are not marked as WIP locations.
Note: Average costs are now affected by Stock on Hand levels only, not Work in
Progress levels.
Negative stock warnings appear as normal when moving stock into Work in Progress
from Stock on Hand, but no longer apply when moving stock out of WIP.
Note: At this time, the Recalculate Weighted Average utility can only be run in
EXO Business 8.7 if EXO Job Costing is not installed, due to the
complications of working through the transition to the new stock
movement handling with WIP. Going forward, it will only be possible to
execute the recalculation from the point of transition onwards, based on a
snapshot valuation taken as part of the transition process. There is no
effect on users without EXO Job Costing users (although internally the
recalculation process is now converted to a viewable stored procedure in
the database).
The Only Move stock when invoicing and Stock on jobs is moved out of stock on hand
settings have been removed from the Business Essentials > EXO Job Costing section of
EXO Config, as they no longer apply.
MYOB EXO Business 8.7 Release Notes Page 18 of 68
Copyright 2013 MYOB Technology Pty Ltd.The Ledger Reconciliation widget on the EXO Accountant’s Assistant now includes a
WIP Control section when EXO Job Costing is installed:
New Recoverable Flag for Stock Items
When EXO Job Costing is installed, a new Recoverable flag is available on the Stock
Item Details window:
This flag is only enabled if the item is a lookup item. When ticked, it designates the
stock item as a recoverable expense for Job Costing, meaning that transactions relating
to it will generate General Ledger WIP journals. Non-recoverable lookup items do not
affect the General Ledger.
By default, the flag is ticked for all stock items, except for linked stockcodes.
MYOB EXO Business 8.7 Release Notes Page 19 of 68
Copyright 2013 MYOB Technology Pty Ltd.New Jobs Tab on Stock Items
A new Jobs tab is available on the Stock Item Details window when EXO Job Costing is
installed. This tab displays any in progress jobs that are using the stock item:
The tab consists of a dashboard interface, with two widgets available to display the job
details:
• WIP Stock (Grid) – displays job details on an ExoGrid.
• WIP Stock (Report) – displays job details on a Clarity report.
By default, only the grid version of the WIP Stock widget is displayed on the Jobs tab.
The Clarity report version is available, but must be added to the dashboard using the
Add Widget button on the dashboard ( ).
Written Off Lines
When job lines are written off, costs of those lines are now stored in the new
LINECHARGE_WRITEOFF fields in the JOBCOST_HDR and JOB_TRANSACTIONS tables.
This means that lost sales can be now reported on, and WIP write-offs can potentially
be posted to a separate General Ledger account from stock adjustments.
Write-off journals are now recorded differently; a new Non-Stock Write-offs GL
Control Account is available, which is used as follows:
• Written off stock item lines credit Work in Progress and debit Stock
Adjustments.
• Written off lookup item lines credit Work in Progress and debit Non-Stock
Write-offs.
Note: The ability to un-write off lines has been removed in this release, as it
resulted in incorrect journals due to the changes in this release. This
feature may be reactivated in a future release.
MYOB EXO Business 8.7 Release Notes Page 20 of 68
Copyright 2013 MYOB Technology Pty Ltd.Changes to Progress Billing and Job Invoicing
As of EXO Business 8.7, the progress billing feature is enabled by default (in an upgrade
to 8.7, this feature is turned on). This means that the Billing Schedule tab is now always
visible on all jobs. This tab has been updated to display all invoices relating to the job,
not just progress billing invoices. In an upgrade, the tab is populated for each job with
any existing invoices for that job.
Invoices and credit notes can also be entered into the grid manually.
Note: The Billing Schedule tab can now be hidden by entering “B” into the Hide
tabs in Job management screen profile setting.
Crediting Job Invoices
Invoices created from EXO Job Costing cannot be edited; however, they can be
reversed/credited. Credit notes can be created for job invoices by right-clicking on the
on the Billing Schedule tab and selecting Generate Credit Note. Credit notes for job-
related invoices can also be generated from the Transactions tab on the Debtor
Account Details window—when right-clicking on a job invoice, the existing Generate
Credit Note option becomes Generate Credit for Job Invoice. Once generated, credit
notes also appear on the Billing Schedule tab.
Crediting a job invoice completely reverses the transaction, including all stock
movements and progress invoice allocations. Credited invoice lines appear on the
Invoice tab, where they can be cancelled or written off as required. A Select Lines
From Credit Note right-click option on the Billing Schedule tab takes you to the Invoice
tab, filtered to show only the credited lines.
Read-Only Debtor Invoice Window
The Debtor Invoice window now opens in a read-only mode when opened from an
exo:// URL or when opening a Progress Billing Invoice (see page 22).
When in read-only mode, the Debtor Invoice window includes a new Print button in
the toolbar.
MYOB EXO Business 8.7 Release Notes Page 21 of 68
Copyright 2013 MYOB Technology Pty Ltd.New Send All to Invoice Button
This release adds a Send All to Invoice button to the Timesheets tab of the Job Details
window:
Clicking this button sends all lines on this tab to the Invoice tab.
Progress Billing Invoicing
In previous versions, each line of a Billing Schedule could be invoiced individually and
would generate a one-line invoice in EXO Business; this has been extended to now
allow users to create and manage a “proforma invoice” for each line in the Billing
Schedule, which forms the body of the invoice created.
Proforma invoices allow users to record multiple invoice lines against a single Billing
Schedule line, allowing for extensive detail to be recorded and invoiced:
Note: Proforma invoices are stored in the tables DR_TRANS_PARK and
DR_INVLINES_PARK. (These tables are also used to store parked
transactions for the EXO POS module.)
MYOB EXO Business 8.7 Release Notes Page 22 of 68
Copyright 2013 MYOB Technology Pty Ltd.When invoicing a Billing Schedule line, the invoice form is now populated based on the
related proforma invoice line, if it exists. If no proforma lines exist for the schedule, the
invoice is created as normal, i.e. based on a single default general revenue line.
Proforma invoices support both line and header narratives. Header narratives are also
displayed in the Billing Schedule tab of the Job Details window, against the relevant
Billing Schedule line:
These new narratives replace the Notes field that existed previously for Billing
Schedule lines; all notes data is migrated to narratives during the upgrade to 8.7.
When a schedule is invoiced, narratives are copied to the invoice as appropriate.
The Billing Schedule Proforma Invoice form (JobProforma.CLF) has been updated to
display line-level information. The Job Quotation form (JobQuote.clf) has been
updated to use the DR_TRANS_PARK and DR_INVLINES_PARK tables where
appropriate. New form profiles are available for Billing Schedule quotes and Proforma
invoices (see page 68).
Note: In previous versions, it was possible to allocate costs to an un-invoiced
Billing Schedule—in this case, the system would delay posting Cost of Sale
until the invoice was generated with Work in Progress. This workflow has
been changed: Billing Schedules must be invoiced before any allocations
can be made, and the appropriate journal for the allocation occurs
immediately.
Billing Schedule Stock Codes
Billing schedules now always default to the stock code “@”—the Code field has been
removed from the Billing Schedule window when creating a billing schedule, and the
Code column has been removed from the Billing Schedule tab.
Note: See “GL Codes on Debtor Invoices” on page 33 for more information on the
“@” stock code.
The profile setting SQL statement to refine stock item search for Progress Invoice has
been removed, as it is no longer relevant.
MYOB EXO Business 8.7 Release Notes Page 23 of 68
Copyright 2013 MYOB Technology Pty Ltd.Converting Quotes to Invoices
When selecting the Convert Quote to Invoice option on the Quote tab toolbar, the
system now displays warning messages if any of the lines to be invoiced contain
serialised or batch-tracked stock items:
Freight on Job Invoices
Users are no longer automatically prompted to add freight to invoices created from
EXO Job Costing, regardless of whether or not freight is automatically added to
invoices elsewhere in the EXO Business system.
Sub Job Roll-up
It is now possible to display the sub jobs of master jobs on job grids. A new Include Sub
Job Lines option is available on the Quote, Timesheets, Costs and Invoice tabs of the
Job Details window when viewing a master job—when this option is ticked, the lines of
all of the job’s sub jobs are displayed:
In addition, the Job Code column on the Quote, Timesheets and Costs tabs is now a
dropdown that allows you to select the master job or any of its sub jobs, allowing users
to quickly switch lines between jobs.
The addition of these features makes it possible to perform bulk actions on all sub-jobs
of a master job, e.g. converting all quote lines to actuals or invoicing all lines, giving
you more freedom to manage jobs by splitting them into sub-jobs.
When choosing to Invoice Job with Sub Jobs from the Invoice Job dropdown on the
Invoice tab, the generated invoice has the correct Job Code for each sub job on the
MYOB EXO Business 8.7 Release Notes Page 24 of 68
Copyright 2013 MYOB Technology Pty Ltd.invoice lines and the Job Code for the master job on the invoice header. (Previously, all
lines were set to the Job Code of the job that the invoice was generated from).
Note: The existing Allow invoicing of sub jobs from master jobs profile setting
must be ticked to enable the Invoice Job with Sub Jobs option.
A new Check for Alerts option is also available under the Invoice Job dropdown.
Selecting this option checks all lines for errors that would prevent invoicing.
A new Allow Invoice via Master Job option is available on the Details tabs of sub jobs.
When this option is ticked, the job can be invoiced from the master job.
This option can also be set for all sub jobs on the Sub Jobs tab of a master job:
If this option is unticked for a sub job, it will not be possible to select the job for
invoicing on the Invoicing of Sub Jobs from Master Job window.
Job Costing Extra Field Events
Event logic has been added to Extra Fields in EXO Job Costing. This functionality, which
was previously available for Sales Orders and Opportunities, allows Extra Fields on job
headers and lines to be populated automatically.
Extra Fields on the job header can be configured to update their values when the
company account number on the job is first specified or when it is changed; similarly,
MYOB EXO Business 8.7 Release Notes Page 25 of 68
Copyright 2013 MYOB Technology Pty Ltd.Extra Fields on job quote lines or job transaction lines (timesheets, costs) can be
configured to update whenever the stock code on the line is specified/changed.
Setting up events on job Extra Fields means that it is possible for the Extra Fields set up
on a company/stock item to flow through to the job.
When setting up Extra Fields in EXO Business Config, if JOB_TRANSACTIONS,
JOBCOST_HDR or JOBCOST_LINES is selected for the Table name, an Events tab
becomes available:
The Event Field Name field displays the field on the Job Details window that will
trigger the Extra Field update. For Extra Fields on the job header, this is ACCNO; for
Extra Fields on job quote and transaction lines, it is STOCKCODE.
The Event SQL field contains the SQL statement that will be used to populate the Extra
Field when the relevant Opportunity field is set or changed. The following parameters
can be used to pass in details:
Job Header Job Quote Line Job Transaction
• :Accno • :Stockcode • :Stockcode
• :Current_User • :Current_User • :Jobno
• :MasterJobno
• :Accno
• :Current_User
Note: Extra Field events override default values—if a default value is specified for
an Extra Field that is populated by events, it will be ignored.
Extra Fields on the Details Tab
Extra Fields in positions 1 – 5 are now displayed on the Details tab of the Job Details
window:
MYOB EXO Business 8.7 Release Notes Page 26 of 68
Copyright 2013 MYOB Technology Pty Ltd.Extra Fields in position 6 – 24 are displayed on the Extra Fields tab as in previous
versions. When adding a new job, the Extra Fields on the Extra Fields tab can now be
edited before saving the job.
MYOB EXO Business 8.7 Release Notes Page 27 of 68
Copyright 2013 MYOB Technology Pty Ltd.Extra Fields on Direct Time/Material Entry
Any Extra Field defined for the JOB_TRANSACTIONS table will now appear on the
Direct Time Entry and Direct Material Entry windows:
If event logic has been set up for Extra Fields on the JOB_TRANSACTIONS table (see
page 24), these Extra Fields will auto-populate based on the event logic when
displayed on the Direct Time Entry and Direct Material Entry windows.
Foreign Currency Debtors
Debtor accounts that use a foreign currency can now be used in EXO Job Costing if the
Allow foreign currency debtors in Job Costing Company-level profile setting is
enabled.
Note: This profile setting existed in previous versions as a hidden setting; it is
now available as an “Occasionally Used” setting.
MYOB EXO Business 8.7 Release Notes Page 28 of 68
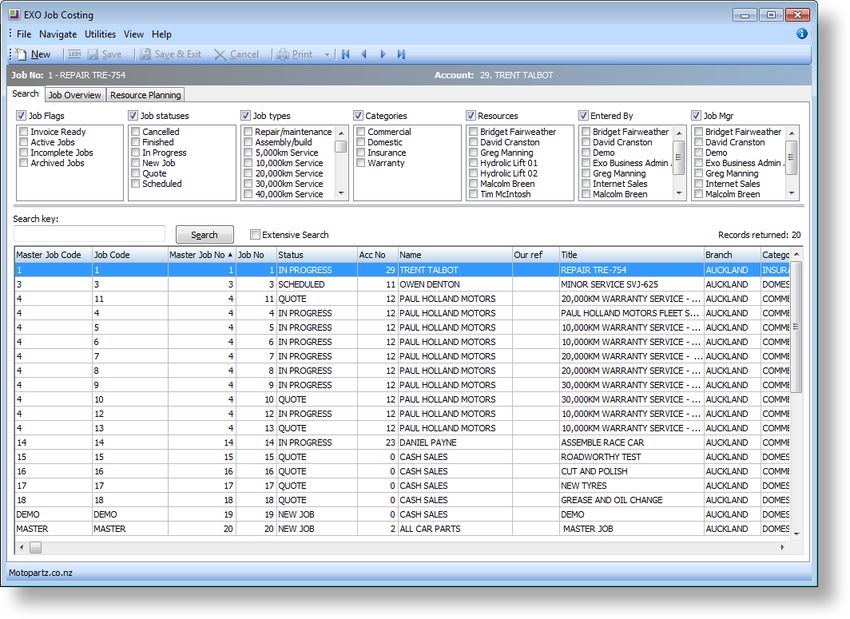
Copyright 2013 MYOB Technology Pty Ltd.Changes to the Job Search Tab
The following improvements have been made to the Search tab on the Job
Management screen:
1
2 3
1. The screen now remembers the statuses of the filter panels, so that when they
are turned on or off using the View menu, they will remain on or off when the
screen is closed and re-opened. If all filters are turned off, the filter area now
disappears, giving more screen space for the search results.
2. The search grid now includes columns for master job codes and ID numbers, so
that related sub jobs can be grouped together and jobs can be searched for by
their master job.
3. The search grid now includes a Branch column, so that search results can be
sorted by branch.
Link between Job Transactions and Stock Transactions
A new STOCK_TRANS_SEQ_IN fields has been added to the JOB_TRANSACTIONS table.
If the job transaction is related to a stock transaction, e.g. a Purchase Order, this field
contains the ID number of the stock transaction. This field can be used in reports to
provide a link between job and stock transactions.
Hiding the Resource Planning Tab
The Resource Planning tab (which displays all resource allocations in the system in the
form of a Gantt chart) can now be removed from the Job Management and Setup Job
Resource Allocation windows by enabling the new Hide Resource Planning Gantt Form
User-level profile setting.
MYOB EXO Business 8.7 Release Notes Page 29 of 68
Copyright 2013 MYOB Technology Pty Ltd.Job Costing Dashboard Tabs
The Analysis tab on the Job Details window in MYOB EXO Job Costing is now a
Dashboard interface, containing the following widgets:
• Job Invoice Summary
• Job Summary
• Job Including Sub-Jobs
• Job Snapshot
• Current Job Alerts
These widgets are based on Clarity reports, and can be customised to suit your needs.
A second Dashboard tab has been added to the Job Details window. This Dashboard is
blank by default, and can be customised with whatever widgets you require.
Both new Dashboards accept the following input parameters:
• Current Job No
• Current Master Job No
The Hide tabs in Job management screen profile setting has been updated to allow
the new Dashboard tabs to be hidden if necessary—the Dashboard tab is hidden by
default.
MYOB EXO Business 8.7 Release Notes Page 30 of 68
Copyright 2013 MYOB Technology Pty Ltd.Custom Filters
New custom filtering options are available on the Quote/Budget, Timesheets, Costs
and Invoice tabs of the Job Details window. To create and apply filters, click the new
Filter dropdown button:
Any filters that have already been defined are available in the dropdown. You can also
select None to turn off filtering, or Maintain Filters to create and edit filters on the
Maintain Filters window:
To edit an existing filter, select it from the Filter dropdown. To create a new filter, click
New. Filters are edited using the same interface that is currently available when
creating Contact Lists and searching for Debtors in Advanced Search mode. Users can
create one or more filtering conditions based on the fields for the relevant table
(JOBCOST_HDR, JOBCOST_LINES or JOBCOST_TRANSACTIONS).
Note: Computed fields are not supported in custom filters.
As users add filtering conditions, the resulting query is displayed at the bottom of the
window. Users can tick the Manual filter option to edit this query manually; doing so
disables the filter building controls.
MYOB EXO Business 8.7 Release Notes Page 31 of 68
Copyright 2013 MYOB Technology Pty Ltd.Click Save after editing a filter to save the changes and apply the filter immediately.
The icon on the Filter dropdown changes from red to green to indicate that a filter is
currently applied. You can also apply an existing filter by selecting it from the
dropdown and clicking Select and Close. Filters are saved separately for each tab, e.g.
filters set up on the Costs tab will not be available on any other tabs.
Grid Column Extra Fields
In previous versions, “Grid Column” was an option in the Dialog type dropdown, which
would make Extra Fields appear as standard edit columns in the Sales Order, Job and
Opportunity grids. This release adds the ability to have other types of Extra Field, e.g.
check boxes or dropdown lists as a grid column.
When configuring Extra Fields in the MYOB EXO Configurator, a new Grid Column
option has been added separately from the Dialog type dropdown, so that multiple
dialog types can be used as a grid column Extra Field:
For header tables, the Grid Column option is always unticked and for line tables it is
always ticked. The only exception is the SALESORD_LINES table, where the option can
be changed—if it is ticked, Extra Fields will appear in the grid; if it is not, they will
appear in the line periscope.
MYOB EXO Business 8.7 Release Notes Page 32 of 68
Copyright 2013 MYOB Technology Pty Ltd.When the Grid Column option is ticked, the following options are available in the
Dialog type dropdown:
• Standard Edit
• Check Box
• Drop-Down Edit
• Drop-Down Selection
• Drop-Down SQL Selection
• Date Picker
Grid column Extra Fields support the Read Only option. This means it is possible, for
example, to create an Extra Field that cannot be edited when displayed in grids and is
only populated by an Extra Field event.
Extra Fields on the Sales Order Supply Grid
Any Extra Fields added to the SALESORD_LINES table will now appear on both the
Order Details grid and the Supply Details grid, provided the new Grid Column option is
ticked.
GL Codes on Debtor Invoices
This release adds the ability to enter GL codes on Debtor Invoices in the core EXO
Business module (but not EXO POS). When the new Enable GL code entry into the
stock code field on a debtors invoice User-level profile setting is enabled, GL codes
can be entered into the Stock Code column of the Invoice Entry window.
Note: This feature is enabled by default—if you want to restrict its use for some
users, disable the setting for those users’ profiles.
To enter a GL code, enter “@” followed by the code. You can also enter “@” by itself
or “@” and a partial GL code, then press ENTER to search for a GL code. Once entered,
lines containing GL codes are highlighted in green:
This feature is compatible with the existing Enable display and override of GL code
from stock item profile setting, which displays a GL Code column on the Debtor
MYOB EXO Business 8.7 Release Notes Page 33 of 68
Copyright 2013 MYOB Technology Pty Ltd.Invoice window. In this case, the GL code entered in the Stock Code column is also
displayed in the GL Code column.
Note: To ensure backward compatibility with existing custom reports and add-
ons, the “@” stock code must exist as a placeholder for a valid stock code.
The DBUpdate process creates an “@” stockcode when updating the EXO
Business database to 8.7 if one does not already exist (it always exists by
default, but may have been removed). No other stock codes should contain
an @ symbol—this can be enforced by configuring the Prohibited
characters in stock codes Company-level profile setting.
The Invoice.clf, EmailInvoice.clf and ViewInvoice.clf forms have been updated with
new line-formatting logic to display GL code lines differently from Stock or Lookup
lines.
Note: To take full advantage of this feature, it may be useful to modify
customized invoice formats to format General Ledger code lines differently
from stock lines based on the new database field DR_INVLINES.CODETYPE
(GL Code lines have a CODETYPE of “G”).
Improvements to GL Posting
When right-clicking on the batch details displayed on the Post to GL Ledgers window,
the View Pre Posted Transactions right-click option is now a sub-menu with two
options: Selected Account or All Accounts:
The Selected Account option behaves the same as the View Pre Posted Transactions
option in previous versions, showing the pre-journals that will be posted for the
account that was right-clicked on. The All Accounts option displays a consolidated view
of all accounts in the grid:
MYOB EXO Business 8.7 Release Notes Page 34 of 68
Copyright 2013 MYOB Technology Pty Ltd.In both cases, the Pre-Posted GL Transactions window now displays additional
columns, showing more information about the batch.
Business Alerts
This release adds the ability to set up custom business rules and alerts that are
triggered when one of the following transactions is saved:
• Sales Order • Opportunity Quote
• Purchase Order • Job Quote
• Creditor Invoice • Job Transaction
• Debtor Invoice • Direct Material Entry
• Direct Time Entry
Note: Alerts on Debtor and Creditor Invoices are only triggered from Invoice
Entry screens, e.g. the Creditor Invoice Entry screen or the Invoice Entry
screen in EXO Job Costing. They are not triggered when creating the invoice
from another screen, e.g. when creating a Debtor Invoice from a Sales
Order. Similarly, creating an Opportunity by copying an existing one will
not trigger alerts on Opportunities.
Rules using custom conditions can be attached to each of these system events; when a
rule’s conditions are met, a message can be displayed to the user and a notification
email can optionally be sent to one or more addresses.
Business Alerts are set up in the EXO Business Configurator at System > Event Log >
Business Alerts:
MYOB EXO Business 8.7 Release Notes Page 35 of 68
Copyright 2013 MYOB Technology Pty Ltd.The Rules tab displays all rules defined in the system for the selected event;
alternatively you can tick the Show all box to display all rules for all events. A selection
of example alerts is installed with the system.
Rules are listed in order of priority, i.e. in the order that they will be applied. To change
priorities, move rules up or down using the up and down arrow buttons.
Double-click on a rule to edit it or click New to create a new rule for the selected event
(the New button is disabled when the Show All box is ticked). When adding or editing
a rule, the Details tab appears. The Options sub-tab displays the conditions that must
be met for the rule to be activated.
MYOB EXO Business 8.7 Release Notes Page 36 of 68
Copyright 2013 MYOB Technology Pty Ltd.The Run Against option determine whether the rule should be applied to all lines
related to the record, or to the record header.
The Rule Type option determines how the rule’s conditions (see page 38) will be
applied. Choose from:
• Record Condition – applies conditions against the record.
• SQL Query – applies a SQL query to each line individually.
Once the rule is saved, this property cannot be changed.
MYOB EXO Business 8.7 Release Notes Page 37 of 68
Copyright 2013 MYOB Technology Pty Ltd.The Behaviour section specifies what should happen in the EXO Business interface
when the rule is triggered:
• Silent – no message is displayed to the user, although the fact that the rule was
triggered is still logged (see “Business Alert Auditing” on page 42).
• Warning – a warning message is displayed to the user with Yes and No options.
The user can click Yes to proceed with the action or No to cancel.
• Blocking – a message is displayed to the user indicating that the action cannot
proceed.
For “Warning” or “Blocking” rules, enter the message to display to the user in the
section below. This message can contain the same parameters that are used to build
rule conditions—see below.
Rule Conditions
The bottom section of the Details tab is where you enter the conditions that must be
met to trigger the rule.
Rules with the type “Record Condition” are entered in the form of a filter that can
include the parameters detailed below.
Rules with the type “SQL Query” are entered in the form of a SQL statement to run
against the EXO Business database. The parameters below can also be used in SQL
statements.
Parameter Meaning
General (available for all rules)
@CURRENT_USER The ID number of the logged on user.
@STAFFNAME The name of the logged on user.
@NOW The current date and time.
@TODAY The current date.
@EXOLINK A formatted exo:// protocol hyperlink to the transaction, e.g.
exo://saleorder(10001). Can be used in notification emails.
Sales Orders
@ACCNO The ID number of the Debtor account on the Sales Order.
@ACCOUNTNAME The name of the Debtor account on the Sales Order.
@ORDERNO The ID number of the Sales Order.
@SALESNO The ID number of the salesperson on the Sales Order.
@SUBTOTAL The Sub Total amount on the Sales Order.
@TAXTOTAL The GST Total amount on the Sales Order.
MYOB EXO Business 8.7 Release Notes Page 38 of 68
Copyright 2013 MYOB Technology Pty Ltd.Parameter Meaning
@TOTALDISC The total discount on the Sales Order.
@UNDISCOUNTED The undiscounted total of the Sales Order.
@H A specified field from the SALESORD_HDR table, e.g. @H.DUEDATE.
@L A specified field from the SALESORD_LINES table, e.g. @L.STOCKCODE.
Purchase Orders
@PURCHORDNO The ID number of the Purchase Order.
@ACCNO The ID number of the Creditor account on the Sales Order.
@ACCOUNTNAME The name of the Creditor account on the Sales Order.
@SALESPERSON The ID number of the staff member in the Purchase Order’s Ordered by
field.
@H A specified field from the PURCHORD_HDR table, e.g. @H.ORDERDATE.
@L A specified field from the PURCHORD_LINES table, e.g. @L.UNITPRICE.
Creditor Invoices
@SEQNO The ID number of the invoice.
@ACCNO The ID number of the Creditor account on the invoice.
@ACCOUNTNAME The name of the Creditor account on the invoice.
@H A specified field from the CR_TRANS table, e.g. @H.TRANSDATE.
@L A specified field from the CR_INVLINES table, e.g. @L.TAXRATE.
Debtor Invoices
@SEQNO The ID number of the invoice.
@ACCNO The ID number of the Debtor account on the invoice.
@ACCOUNTNAME The name of the Debtor account on the invoice.
@H A specified field from the DR_TRANS table, e.g. @H.SUBTOTAL.
@L A specified field from the DR_INVLINES table, e.g. @L.DISCOUNT.
Jobs
@ACCNO The ID number of the Debtor account on the job.
@ACCOUNTNAME The name of the Debtor account on the job.
@JOBNO The job number.
MYOB EXO Business 8.7 Release Notes Page 39 of 68
Copyright 2013 MYOB Technology Pty Ltd.Parameter Meaning
@H A specified field from the JOBCOST_HDR table, e.g. @H.STATUS.
@F A specified field from the JOBCOST_FLAGS table, e.g. @F.ISACTIVE.
@Q A specified field from the JOBCOST_LINES table, e.g. @Q.STOCKCODE.
@T A specified field from the JOB_TRANSACTIONS table, e.g. @T.QUANTITY.
Opportunities
@ACCNO The ID number of the company account on the opportunity.
@ACCOUNTNAME The name of the company account on the opportunity.
@OPPORTUNITYID The ID number of the opportunity, or “New” if it has not been saved yet.
@CONTACTID The ID number of the contact associated with the opportunity.
@CONTACTNAME The name of the contact associated with the opportunity.
@H A specified field from the OPPORTUNITY table, e.g. @H.PROBABILITY.
@L A specified field from the OPPORTUNITY_QUOTE table, e.g.
@L.QUANTITY.
The alias parameters that give access to the fields of a table (@H, L@, etc.) can be used
to access Extra Fields; however, computed fields are not supported in Business Alerts.
Note: While these parameters are not case-sensitive, the values of table fields
are, e.g. @F.ISACTIVE would need to look for the value “Y”, not “y”.
Rule Actions
The Actions sub-tab defines a list of actions to perform when the rule is triggered. At
present, the only available action is to send an email to specified recipients using the
new EXO Email Service (see page 43).
MYOB EXO Business 8.7 Release Notes Page 40 of 68
Copyright 2013 MYOB Technology Pty Ltd.All actions set up for the rule are displayed in the order that they will be applied.
Actions can be re-ordered using the arrow buttons on the right. Click New to create a
new action.
On the Details sub-tab, enter a descriptive name for the action, then specify who to
send the email to. One or more EXO Business staff members can be selected as
recipients from the Internal Recipients dropdown, and other email addresses can be
entered manually into the Other Recipients field.
Enter a subject line and the message text to send/display. The message body can
include any of the parameters that are available for the rule (see page 38). In
particular, the @EXOLINK parameter can be used to insert a formatted exo:// protocol
hyperlink to the relevant record into the email.
Once all information has been entered, click Save Action to add the action to the rule.
Note: Clicking Save Action adds the action to the rule, but does not save the rule
itself—click the Save button on the main toolbar to save the rule and all of
its actions to the EXO Business database. Rules that have been added but
not yet saved are listed on the Actions sub-tab with the ID “New”.
MYOB EXO Business 8.7 Release Notes Page 41 of 68
Copyright 2013 MYOB Technology Pty Ltd.You can also read