Operating instructions - repaBAD
←
→
Page content transcription
If your browser does not render page correctly, please read the page content below
Operating instructions
                             for steam baths and steam bath technology
                                           with generator
                               DE 510 Star / DE 3000 E/R / DE 4000 E/R
                                         DE 1005 / DE 1050
                                      Vision 2000 sensor
repaBAD GmbH

                                                 Please be sure to read these operating
                                                 instructions carefully before using the
                                                 steam bath!
  BEDDBV2000.1 E © 05/2010

                                                 Make sure that you observe the care
                                                 instructions!
                                                 Repabad cannot be held liable for da-
                                                 mages caused by inappropriate use.
Table of contents
Safety information                                           3
„Night design“ sensor illumination                           3
Keylock                                                      3
Overview of the display and control elements                 4
Switching the steam bath on and off                          6
Displaying / setting the steam cubicle temperature           6
Displaying / setting the timer runtime                       6
Displaying / setting the time                                7
Steam bath lighting (optional)                               8
Manual addition of scents                                    8
Aromatherapy (optional)                                      8
Colour therapy (optional)                                    9
Mist nozzles (optional)                                     11
MP3 docking station (optional)                              11
Thermostat control (if installed in the panel)              11
Servicing                                                   12
Exchanging the scent                                        12
Changing the illuminants                                    12
Decalcifying the steam generator                            12
Determination of the water hardness                         13
Setting the water hardness range                            13
Anti-lime management (ALM) and decalcification programmes   13
Error Messages                                              17
Care instructions for repaBAD steam baths                   17
Care instructions for repaCLEAR coated glass partitions     17

2
Safety information
         Danger to life! Danger of electric shock!
         When taking a steam bath or showering, no electrical devices may be
 operated in the steam bath cubicle or its proximity. Any contact between an
 electrical device which is plugged in and steam or water can cause a fatal
 electric shock. Before changing the illuminants, all phases of the steam bath‘s
 power supply must be switched off!

 Danger of scalding!
 Hot steam is conveyed to the steam bath through the steam nozzle. There is
 a risk of scalding if there is skin contact with the steam nozzle or steam in the
 direct vicinity of the steam nozzle!
 Children may not use the steam bath unsupervised.
 Anybody with a healthy cardiovascular system can take a steam bath. Should
 you be uncertain or if you have questions, please consult your doctor.
 You should not use the steam bath after alcohol consumption or directly after
 eating. This could burden the cardiovascular system.
 You can only use the repaBAD DD 1000 ... liquid aromas. Other liquid aro-
 mas may destroy the steam bath system.
 The steam bath steam generator must be decalcified. The decalcifying cycle
 can vary according to the respective existing water hardness.
 Only use repaBAD decalcifying agents (art. no. EK 500).
 If other agents are used, you run the risk of damaging the steam bath.

„Night design“ sensor illumination
All individual keys retain subdued lighting for some 60 minutes after the last
input. Power consumption for this is extremely low (LED technology).

Keylock
 The keylock is activated when the display shows ---- irrespective of which key
 is pressed. All functions are blocked.
 The keylock can only be activated if all the functions are switched off.

In order to avoid accidental or unauthorised activation of steam bath functions
(for example by children), the keylock can be activated.
Switching the keylock on:     Press the   key until ---- is shown on the display
                              (the    key is illuminated).

                                                                                     3
Switching the keylock off: Press the key until the time is shown on the dis-
play (the key is illuminated).
If the keylock is activated, the night design lighting of the sensor is switched
off.
The current keylock status is maintained even if it is disconnected from the
electrical power supply.
Overview of the display and control elements
The keylock is activated when the display shows ---- irrespective of which
key is pressed. All functions are blocked (please refer to page 3).
If a function is selected by pressing a key, this key is illuminated as long as the
function is active.
Standard functions
.
38.0 C Display: the display of all functions.
Keys for setting all functions.
Switching the steam bath on and off.
Setting the water hardness range.
Displaying and setting the temperature. Displaying and setting the
time.
Displaying and setting the time.
Displaying and setting the timer.
Switching the steam bath lighting on and off (white).
The steam bath lighting can also be switched on when the steam
bath is off.
Aromatherapy (optional), please refer to page 8
Switching the aromatherapy on and off and setting the intensity of the
addition of scent.
4Colour therapy (optional), please refer to page 9
Switching the coloured lights on and off and dimming them.
Switching the (white) steam bath lighting on and off and dimming it.
Starting the colour therapy programmes.
Mist nozzles (optional), please refer to page 11
Switches the mist nozzles on. The key is illuminated when the mist noz-
zles are switched on.
MP3 docking station (optional), please refer to page 11
Volume adjustment for the MP3 player switched on
5Switching the steam bath on and off
Press the button briefly to switch the steam bath on.
When the steam bath is on, the key is illuminated.
The current steam bath temperature is shown on the display and the steam ge-
nerator is heated. After a few minutes, steam flows into the steam bath cubicle.
If the FlLL, message appears on the display after switching on, there is too
little water in the steam generator. The steam generator fills automatically
with the correct water supply.
IF FL.. , appears for the DE 510, DE 2000, DE 3000 and DE 4000 steam genera-
tors, the flushing function is active.
To switch it off, also press the key briefly. The key is no longer illuminated.
Displaying / setting the steam cubicle temperature
Displaying the steam cubicle temperature (only for a steam bath which is swit-
ched on)
Press the key once to show the steam bath temperature on the display. The
key is illuminated whilst the temperature is displayed.
Setting the steam cubicle target temperature
Press the key longer (approx. 2 seconds) to switch over to temperature set-
ting mode. The key flashes.
The set target temperature is then shown on the display. The target temperature
can be set as desired using the and keys.
Pressing the key again saves the changed target temperature or saves it
automatically after approx. 5 seconds.
The target temperature value remains saved until a new input is made.
Displaying / setting the timer runtime
Switching on the steam bath automatically starts the timer.
You can use the timer to end your steam bath automatically after a settable
time.
Display of the remaining timer running period (only for a steam bath which is
switched on)
Press the key briefly once to show the remaining timer running period on the
display. The key is illuminated whilst the timer running period is displayed.
6Setting the timer running period
Press the key longer (approx. 2 seconds) to switch over to timer setting mode.
The key flashes.
The desired total timer running period is then shown on the display.
You can set the timer running period as desired between 1 minute and 90 mi-
nutes using the and keys.
By briefly pressing the key or automatically after approx. 5 seconds the chan-
ged timer running period is saved and the timer restarts.
The steam generator switches off automatically after the timer running period
has expired.
You can also switch the steam bath off independent of the timer by pressing
the key briefly. The latest set timer running period remains saved.
If the timer period expires and lighting is switched on (also colour therapy),
the white steam bath lighting automatically illuminates for a further 3 minutes.
Displaying / setting the time
Displaying the time
When the steam bath is switched on, briefly press the key once to show the
time on the display. The key is illuminated whilst the time is displayed.
When the steam bath is switched off, the time is permanently shown on the
display.
Setting the time
Press the key longer (approx. 2 seconds) to switch over to clock setting
mode. The key flashes.
Only the hours are now shown on the display.
Set the hours using the and keys.
Press the key to show the minutes on the display. Likewise, use the and
keys to set the minutes.
After briefly pressing the key or automatically after approx. 5 seconds, the
complete time is shown again on the display.
7Steam bath lighting (optional)
Use the key to switch the (white) steam bath lighting on and off. The key is
illuminated when the steam bath lighting is on.
The steam bath lighting can also be switched on when the steam bath is off.
It switches off automatically after 45 minutes.
This key is also used to select the (optional) colour therapy programme.
Manual addition of scent
A scent can be administered by drops to the upper hollow of the steam nozzle
/ aroma bowl (steam fountain Victoria). In this way, the aroma substances are
better absorbed by the steam flowing past and can spread in the steam bath
cubicle.
Aromatherapy (optional)
For aromatherapy, dosed scents are added to the steam. Up to 2 scents can
be optionally selected.
Switching on the aromatherapy (only for a steam bath which is switched on)
Briefly press the or key to switch the mixing of the respective scent on or
off. The corresponding or key illuminates if addition of scent is activated.
Setting the intensity of the aromatherapy
Press the or key longer (approx. 2 seconds) to switch over to the intensity
setting mode for the respective scent. The respective key or flashes.
The intensity currently set for the scent addition is shown on the display.
1 Means minimum scent addition, 2 medium and 3 maximum scent addition.
Use the and keys to change the intensity of the scent addition.
Press the or key to save the new value which is automatically saved after
approx. 5 seconds.
8Colour therapy (optional)
If colour therapy is integrated in the steam bath, a red, blue, yellow and green
lamp is installed for colour therapy in addition to the white steam bath lighting.
The colour lamps for colour therapy can be controlled manually or using a
programme.
The lamp functions can also be used when the steam bath is off.
Allocation of the keys to the lamp colours
Key Yellow
Key Red
Key Blue
Key Green
Key White
Manual switching on of the individual lamps
By briefly pressing the keys , , , or the lamp allocated to the respec-
tive key is either switched on or off. The respective key is illuminated when the
lamp is switched on.
Manual brightness setting
Repressing the corresponding key for the lamp which is switched on , , ,
or will activate the brightness setting mod. The respective key flashes.
You can then set the brightness of the corresponding lamp using the and
keys.
If the key is pressed longer whilst the steam bath lighting is on, P0 appears
on the display and all the lamps in the steam bath are switched off.
Calling up the colour therapy programmes
A total of six programmes are available.
If the key is pressed longer whilst the steam bath lighting is off, P1 appears on
the display and you can select a colour therapy programme.
To select a programme, now briefly press the several times consecutively until
the desired programme number is shown on the display.
The programme starts automatically after a few seconds and the display swit-
ches back to the initial status.
9If the key is pressed during a programme, P0 appears on the display and all the lamps in the steam bath are switched off. The duration of the programmes P1 and P6 idepends on the timer running period programmed. After timer runtime has expired, the program is termina- ted. The duration of the programmes P2 to P5 is 15 minutes. If a shorter timer running period is programmed, the programme is finished when the timer running period expires. After the programme is finished, the white steam bath lighting goes on. Colour therapy programmes P1 Joy programme The ideal programme for getting to know colour therapy. All the lamps light up in different combinations, transitions flow due to the dim- mer function. P2 Relax programme The predominant colours in this programme are red and blue. Both lamps toge- ther provide a meditative, violet-coloured light, unifying the differences bet- ween the elements fire and water which are embodied by red and blue. The complementary colour of yellow at the end of the programme ensures equilibrium, reinforcing the special effectiveness of this programme. P3 Power programme The energy colour red dominates in this programme, augmented by yellow. Green light moderates the strong activating power of the red light, preventing too strong an effect. It may be advisable to abort the programme early if the exposure to red light over a longer period feels unpleasant. P4 Slow-down programme The relaxation programme mostly uses the soothing colours of blue and green. Orange-coloured light is created by the simultaneous use of the red and yellow lamps, creating variation and balance. P5 Happy sun programme This programme has its special fascination due to the intense use of yellow light. The red lamp transforms to orange, toning down the transition to the final phase during which the red and blue lamps are activated. P6 Kids programme This programme makes full use of all the colour therapy options available: the 10
result is a colourful picture in motion which will specially impress and fascinate
children.
Mist nozzles (optional)
To switch on the mist nozzles, press the key.
The key is illuminated when the mist nozzles are switched on.
Press the key again to switch on the interval function for the mist nozzles.
If you press the key a third time, the mist nozzles are switched off. The key is
no longer illuminated.
MP3 docking station (optional)
With the optional MP3 docking station and the MP3 player switched on, the
volume can be adjusted with the and keys. The and keys must not be
activated by another function.
The volume can also be adjusted when the steam bath is switched off.
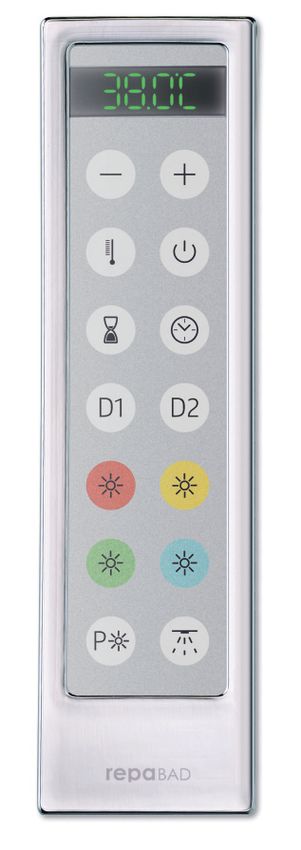
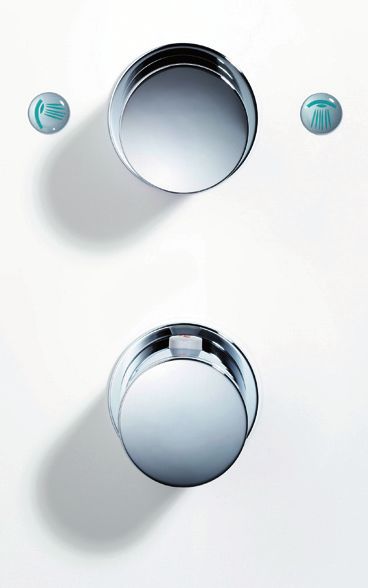
Thermostat control (if installed in the panel)
Thermostat Thermostat
with a 2-way stop valve with two 2-way stop valves
Two-way stop valve for Two-way stop valve for
riser rail shower and a 2 additional loads.
further load. Flow rate
settable by turning.
Two-way stop valve for
Scalding protection at riser rail shower and a
38°, higher temperatures further load. A maxi-
possible if the key is mum of 2 loads can be
pressed. applied simultaneously.
Manual thermostat
Scalding protection at
38°, higher temperatures
possible if the key is
pressed.
Manual thermostat
11Servicing
Exchanging the scent
You can exchange the scent container against any other scent you like.
After the scent has been exchanged, the scent pump tube must be inserted
in the opening down to the bottom of the scent container.
It can take approx. 3 runs of the steam bath until the new scent is effective in
the cubicle.
Attention!
We can only guarantee perfect functioning of the scent pumps if Repabad
scents are used! You can purchase them from your specialist Repabad dealer.
Changing the illuminants
Before changing the illuminants, all phases of the steam bath‘s power supply
must be switched off!
Halogen lights in the steam bath ceiling:
-- Stand in the steam cubicle to pull out the socket of the luminaire in a straight
downward movement (do not twist it!).
-- Exchanging luminaires.
-- Re-inserting the socket.
-- At the same time, ensure that the retaining clips for the luminaire are positi-
oned on the grooves intended for this purpose.
Decalcifying the steam generator
Danger of chemical burn!
Concentrated decalcifying agents can cause chemical burn.
If these agents come into contact with the skin or eyes, rinse well with
clear water and consult a doctor.
Be sure to adhere to the safety instructions for the decalcifying agents!
Store decalcifying agents inaccessible for children!
The steam bath steam generator must be decalcified. Due to the respective
existing water hardness, the decalcification cycle varies. Only use repaBAD
decalcifying agents (art. no. EK 500). If other agents are used, you run the risk
of damaging the steam bath.
Decalcifying takes 12 hours!
12Due to physical/chemical decalcification process, the formation of
steam may be reduced immediately after decalcification.
Please continue to use the steam bath normally, the formation of visible
steam stabilises again after approx. 2-3 steam bath runs.
The decalcification cycle for the steam generator depends on the water hard-
ness. The different water hardness areas result in varying running times (steam
times), before the steam generator needs to be decalcified.
Determination of the water hardness
You can use the test strips supplied and the corresponding colour table to de-
termine the water hardness range.
-- Plunge the test strip in fresh tap water for approx. 1 second and shake off
surplus water.
-- After waiting for approx. 1 minute, compare the test strip with the colour table.
Based on the colour of the test strip, you can read off the degree of water hard-
ness from the colour table.
Setting the water hardness range.
The steam bath is factory set for the water hardness area 4 (very hard).
-- Keep the key pressed for approx. 5 seconds until H is shown on the left of
the display.
The water hardness range currently set (1 to 4) is shown on the right of the dis-
play. Use the and keys to set the water hardness range required.
Press the key again to save the changed target water hardness range or it is
saved automatically after approx. 5 seconds.
Anti-lime management (ALM) and decalcification programmes
Three hours before reaching the decalcification cycle (dependent on the
water hardness range set), CALC is displayed when the steam bath is switched
on and off (flashes 3 x, AKM).
If no decalcification takes place before the remaining steam period expires, the
control mechanism automatically blocks the operation of the steam bath.
If the steam bath is then switched on, the information CALC flashes on the
display for approx. 10 seconds. Following this, the steam bath switches off again
automatically.
The display shows the time again.
The decalcification programme for all repaBAD steam generators with the Vision
2000 sensor and filling opening on the DE 1005 (6 KW) / DE 1050 steam generator
If the steam generator DE1005 is not connected to a drain, a bucket (10
litres) must be placed under the drainage tube when decalcifying.
13-- The steam bath must be switched off.
-- Keep the key approx. 5 seconds until CALC is shown on the display.
The key flashes.
After approx. 10 seconds, PU1 is shown on the display.
The steam generator is automatically pumped empty.
Once the steam generator has been pumped empty, the display will show FlLL
and ACld alternately.
-- Unscrew the filling opening clasp on the steam generator.
-- Dissolve 8 tablespoons of repaBAD decalcification agent (art. no. EK 500)
in 5 litres of water in a separate container and fill through the filling opening
using a funnel.
Filling opening
for
decalcification
agents
Steam
generator
DE 1005
-- Screw the filling opening clasp on the steam generator closed.
The steam bath control automatically recognises when the decalcification
agent is filled and starts the decalcification period of 12 hours. The remaining
decalcification time is shown on the display.
After expiry of the decalcification period, PU 2 is shown on the display.
The steam generator is automatically pumped empty.
PA 3 is shown on the display, as soon as the steam generator is emptied.
After approx. 1 minute, the steam generator is automatically filled with fresh
water.
Following this, the time is again shown on the display.
Use the key to interrupt the decalcification process early. The steam gene-
rator is automatically pumped empty and re-filled with fresh water.
The stipulated steam time which is based on the water hardness area only
starts anew once decalcification has been completed (12 hours)! Time spent
on decalcifications (aborted) is not cumulated!
14Decalcification programme for all repaBAD steam generators with the Vision 2000
button sensor and the filling opening on the column, steam generators DE 510/DE
2000 (3 kW) and DE 3000 (6 kW)/ DE 4000 (6 kW)
-- The steam bath must be switched off.
-- Keep the key approx. 5 seconds until CALC is shown on the display.
The key flashes and the steam generator heats up.
When the display shows FlLL and ACld alternately:
-- Screw open the filler neck on the column and screw in the decalcification
tube (please refer to page 16)
-- Dissolve 8 dessert spoons of repaBAD decalcification agent (art. no.. EK
500) in 1 litre of water in a separate container and fill through the filling ope-
ning using a funnel.
-- Unscrew the decalcification tube and screw the filler neck closed
The steam bath control automatically recognises when the decalcification
agent is filled and starts the decalcification period of 12 hours. The remaining
decalcification time is shown on the display.
Once the decalcification time has expired, the steam generator is automatical-
ly rinsed with fresh water. Following this, the time is again shown on the display.
Use the key to interrupt the decalcification process early. The steam gene-
rator is automatically rinsed with fresh water.
The steam bath can be used again until the set decalcification cycle is rea-
ched.
The stipulated steam time which is based on the water hardness area when
decalcification has been completed (12 hours)! Time spent on decalcifica-
tions (aborted) is not cumulated!
15Filling opening on all
acrylic and aluminium
panels (shown using
steam bath Las Vegas
as an example)
Examples of individual
generators
16Error messages
Error message Cause Rectification
Er 01 The steam bath has 1. Switch the steam bath on again.
too little water This repeats the filling process.
2. Decalcify the steam generator.
3. If no remedy is possible, inform
the specialist fitter.
Er 02 Temperature sensor Connect or replace the temperature
not connected or sensor
defective.
Er 04 Steam generator Connect steam generator detection
detection not
connected
Care instructions for repaBAD steam baths
Do not use cleaning agents which contain solvents, are aggressive or abra-
sive! They damage the acrylic surface / glass cubicle.
Only use soft, non-abrasive and lint-free cloths for cleaning!
The acrylic surface / glass cubicle must be freed of abrasive dust etc. before
cleaning, e.g. by rinsing it with clear water.
Chemical drain cleaners may not be used.
Clean the steam bath with a household cleaning agent after use.
Use a wiper to remove all water drops on the glass cubicle.
Clean the acrylic parts at regular intervals with anti-static acrylic and plexiglass
cleaner repaBAD „Spezial-Reiniger“ [special cleaner] (art. no. RR).
repaBAD’s „Care set“ (art. no. PF) is suitable for the elimination of minor
scratches in the acrylics.
Care instructions for repaCLEAR coated glass partitions
Do not use concentrated cleaning agents containing vinegar or citrus, stain-
less steel cleaners, micro fibre cloths or similar to clean glass partitions coated
with repaCLEAR.
We recommend repaCLEAR glass cleaner (art. no. Glasreiniger) as the ideal
care and cleaning agent for repaCLEAR coated glass partitions. With repa-
CLEAR glass cleaner, you can freshen up the glass refinement.
1718
19
Only send the warranty card in case of a complaint.

 Warranty card
 For repaBAD steam baths

 We grant a 5-year warranty on all acrylic parts for the repaBAD steam baths
 supplied by us provided the care instructions are observed and it is used
 correctly and carefully in accordance with our general terms and conditions
 of use. The warranty period for the steam bath technology and electronics is
 2 years. This warranty begins on the day of delivery by repaBAD. Any possi-
 ble claim must be notified to the specialist fitter from whom our product was
 purchased, specifying the data provided below.

 Delivered on:                                         Customer‘s address:

 Invoice no..:

 Reason for complaint:

                                                       Specialist fitter‘s address

                                                       Fitter‘s stamp / signature

                                          Technical hotline             +49 (0)7024/94 11 -88

                                          repaBAD GmbH                  repaBAD Schweiz GmbH
                                          Bosslerstr. 13-15             Unterer Rebberweg 129
                                          D-73240 Wendlingen            CH-4153 Reinach
                                          Tel. +49 (0)7024/94 11 -0     Tel. +41 (0)61/71 39 13 4
                                                                                                    ✁

                                          Fax +49 (0)7024/94 11 -30     Fax +41 (0)61/71 10 82 6
                                          e-mail: info@repabad.com      e-mail: info@repabad.com
BEDDBV2000.1 E © 05/2010   repaBAD GmbH   www.repabad.com               www.repabad.com
You can also read