OPERATION MANUAL NEWCO'S MODEL CX-TOUCH W/QR CODE SPECIALTY DRINK SINGLE CUP BREWER WITH AUTO EJECT SYSTEM - Newco Coffee
←
→
Page content transcription
If your browser does not render page correctly, please read the page content below
PN 782389_02102012

              OPERATION MANUAL
NEWCO’S MODEL CX-TOUCH W/QR CODE
SPECIALTY DRINK SINGLE CUP BREWER
          WITH AUTO EJECT SYSTEM
3650 NEW TOWN BLVD. ST. CHARLES MO 63301 WWW.NEWCOCOFFEE.COM 1.800.325.7867
Table of Contents

Machine Labels                                  Page: 3

Introduction & NEWCO Product Warranty           Page: 4

Machine Dimensions & Specifications             Page: 5

Machine Features                                Page: 7

Plumbing connections                            Page: 8

Electrical Hook-Up                              Page: 8

Installation Instructions                       Page: 9

Set-Up Instructions                             Page: 10

Brewing and beverage selections                 Page: 12

Programming Instructions                        Page: 14

Custom Logo-Wi-Fi Setup                         Page: 15

Install Custom Logo                             Page: 16

Service Notes & Troubleshooting                 Page: 18

QR Code Brewing Instructions                    Page: 19

Machine Access Points                           Page: 20

Pod Brew Mechanism Removal                      Page: 21

Whipper Assembly                                Page: 22

Tank Assembly [780048]                          Page: 23

Whipper & Cannister Assembly                    Page: 24

Brew Mechanism Assembly [780052 – 61MM]         Page: 25

Wiring Diagram                                  Page: 26
Warning Labels

   NOTICE: Read and follow all notices posted on this machine.
Do not damage or destroy these notices as they are for your protection
Introduction & Newco Product Warranty
                                       INTRODUCTION
 This machine is intended to brew 8-12-ounce single serving of coffee and / or
 powdered hot drinks into a cup. This machine will also dispense hot water for allied
 beverage use. It is intended for indoor use only on a sturdy counter or shelf.

            Newco warrants equipment manufactured by it for 1-year parts and labor.
                          Accessories and Dispensers 1 Year parts only.
               Electronic Circuit and Control Boards- 3 years parts, 1-year labor.
             Equipment manufactured by others and distributed by Newco-please see
                original equipment manufacturers warranty, Newco will follow.

These warranty periods run from the date of sale Newco warrants that the equipment manufactured by it will be
commercially free of defects in material and workmanship existing at the time of manufacture and appearing within
the applicable warranty period. This warranty does not apply to any equipment, component or part that was not
manufactured by Newco or that, in Newco’s judgment, has been affected by misuse, neglect, alteration, improper
installation or operation, relocation or reinstallation, improper maintenance or repair, incorrect voltage applied to
the unit at any time, damage or casualty. This warranty does not apply to any equipment failures related to poor
water quality, excessive lime and chlorine and non-periodic cleaning and descaling. Warranty is null and void if
muriatic or any other form of hydrochloric acid is used for cleaning or deliming. In addition, this warranty does not
apply to replacement of items subject to normal use including but not limited to user replaceable parts such as
faucet seat cups, sight gauge tubes, washers, O-rings, tubing, seals and gaskets.

This warranty is conditioned on the Buyer 1) giving Newco prompt notice of any claim to be made under this
warranty by telephone at (800) 556-3926 or by writing to 3650 New Town Blvd, Saint Charles, MO 63301; 2) if
requested by Newco, shipping the defective equipment prepaid to an authorized Newco service location; and 3)
receiving prior authorization from Newco that the defective equipment is under warranty.

THE FOREGOING WARRANTY IS EXCLUSIVE AND IS IN LIEU OF ANY OTHER WARRANTY, WRITTEN
OR ORAL, EXPRESS OR IMPLIED, INCLUDING, BUT NOT LIMITED TO, ANY IMPLIED WARRANTY OF
EITHER MERCHANTABILITY OR FITNESS FOR A PARTICULAR PURPOSE. The agents, dealers or
employees of Newco are not authorized to make modifications to this warranty or to make additional warranties
that are binding on Newco. Accordingly, statements by such individuals, whether oral or written, do not constitute
warranties and should not be relied upon.

If Newco determines in its sole discretion that the equipment does not conform to the warranty, Newco, at its
exclusive option while the equipment is under warranty, shall either 1) provide at no charge replacement parts
and/or labor (during the applicable parts and labor warranty periods specified above) to repair the defective
components, provided that this repair is done by a Newco Authorized Service Representative; or 2) shall replace
the equipment or refund the purchase price for the equipment.

THE BUYER’S REMEDY AGAINST NEWCO FOR THE BREACH OF ANY OBLIGATION ARISING OUT OF
THE SALE OF THIS EQUIPMENT, WHETHER DERIVED FROM WARRANTY OR OTHERWISE, SHALL
BE LIMITED, AT NEWCO’S SOLE OPTION AS SPECIFIED HEREIN, TO REPAIR, REPLACEMENT OR
REFUND.

In no event shall Newco be liable for any other damage or loss, including, but not limited to, lost profits, lost sales,
loss of use of equipment, claims of Buyer’s customers, cost of capital, cost of down time, cost of substitute equipment,
facilities or services, or any other special, incidental or consequential damages.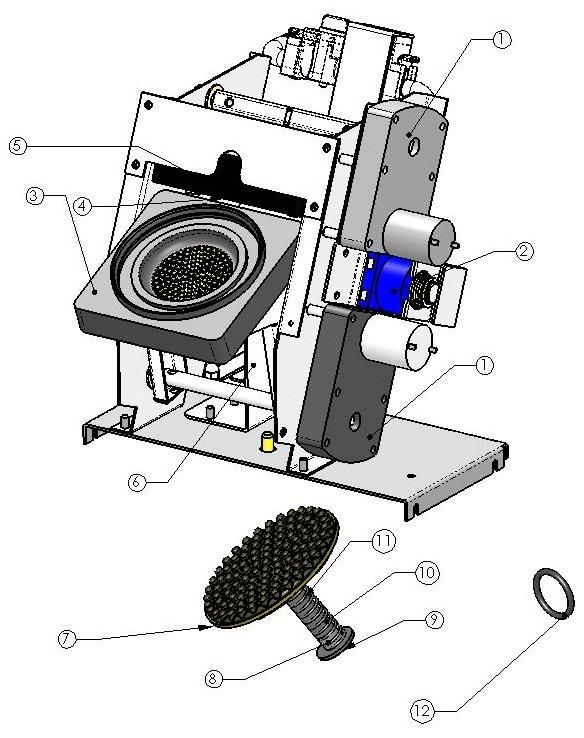
Machine Dimensions & Specifications
                      120 VAC-1700W HEATER-15A USA POWER SUPPLY

               1 GALLON TANK 8-12 OZ CUP SIZE TEMPERATURE RANGE 180-205F

                             Machine Functions

      Product                               Brewing Door
     Selection
      Display

                                            Coffee POD
                       Chocolate & Latte    Waste Drawer
                       Ingredient Cabinet

 Water Inlet                                                      Drip Tray
     &                                                                &
Power Switch                                                   Drip Tray Stand
Machine Dimensions & Specifications – Continued

                      FRONT VIEW

            Powder   Hoppers

                           RINSE

                                   Rinse Button

             Whipping Chamber
                                     Coffee POD
                                    Waste Drawer

                                   Overflow Drip Tray
Machine Features

 •   TOUCH SCREEN DISPLAY
 •   FACTORY CALIBRATED-PLUG & PLAY
 •   AUTOMATED POD DRAWER
 •   AUTOMATIC POWDER LEVEL RESET OPTION
 •   POD DRAWER COUNT & COUNT RESET
 •   88 PRE-PROGRAMMED DRINKS AVAILABLE
 •   WHIPPER RINSE BUTTON
 •   INDEPENDENT POWDER HOPPER COUNTDOWN
     & RESET OPTION
 •   CUSTOM CALL FOR SERVICE NUMBER OPTION
 •   POWER SAVE & POWER DOWN OPTION
 •   WATER FILTER MONITORING OPTIONS
 •   POD WASTE DRAWER SENSOR
 •   POD AUTO EJECTION SYSTEM
 •   CUP BREW LED LIGHT
 •   PUSH & HOLD HOT WATER BUTTON
 •   COFFEE VOLUME FLOWMETER CONTROL
 •   DUMP VALVE DELIVERY FOR POWDERS

THIS MACHINE IS FACTORY CALIBRATED AND
IS CONFIGURED AND READY TO DISPENSE 8
OUNCE DRINKS. TO CHANGE RECIPES, SEE
PROGRAMMING SECTION, MACHINE SET-UP.
Plumbing Connections
This machine must be connected to a cold-water system with operating pressure between 20 and 90 psi
(138 and 620 kPa) from a 1/2” or larger supply line. A shut-off valve should be installed in the line before
the machine. Install a regulator in the line when pressure is greater than 90 psi (620 kPa) to reduce it to
50 psi (345 kPa). The water inlet fitting is 1/4" flare.
NOTE –Newco recommends 1/4” copper tubing for installations of less than 25 feet and 3⁄8" for more than
25 feet from the 1/2” water supply line. A tight coil of copper tubing in the water line will facilitate moving
the machine to clean the countertop. Newco does not recommend the use of a saddle valve to install the
brewer. The size and shape of the hole made in the supply line by this type of device may restrict water
flow.
This equipment must be installed to comply with the Basic Plumbing Code of the Building Officials and
Code Administrators International, Inc. (BOCA) and the Food Service Sanitation Manual of the Food and
Drug Administration (FDA). For models installed outside the U.S.A., comply with the applicable Plumbing
/Sanitation Code.
Flush the water line and securely attach it to the inlet fitting at the rear of the brewer.
Turn on the water supply and check for leaks.

                    Plumber’s Installation Instructions
     CAUTION: Disconnect Power to machine before proceeding with plumbing installation.

1)      Attach water line to water filter, rear of machine.
2)      Flush water line before installing machine. Machine should be connected to COLD WATER LINE
        ONLY.
3)      Water pressure should be at least 40 lbs. For less than a 25 ft run, use 1/4" copper tubing and
        connect to 1/2" or larger water line. For longer runs, use 3/8" copper tubing & connect to 1/2" or
        larger water line and provide an adapter fitting for connection to the brewer. A dedicated water
        line is necessary for this machine.
4)      If installed with saddle valve, the valve should have a minimum of 1/8" porthole for up to 25 ft run,
        and 5/16" porthole for over 25 ft runs.
5)      Manufacturer recommends connecting to copper tubing.

                                     Electrical Hook-Up
                                                 WARNING

The brewer must be disconnected from the power source until specified in
Installation Instructions.

Determine the available on-site electrical requirements.

Refer to Data Plate on the Brewer, and local/national electrical codes to determine
circuit requirements.

CAUTION – Improper electrical installation will damage electronic components.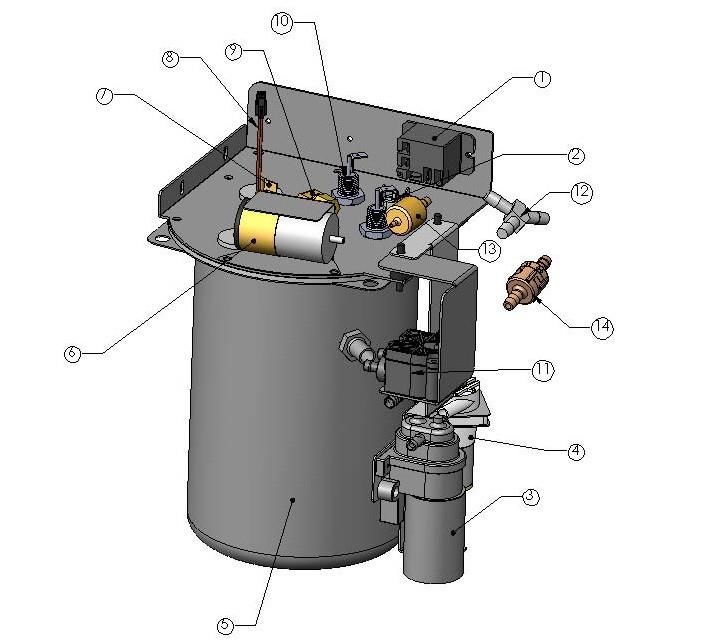
Installation Instructions
WARNING: - Read and follow installation instructions before plugging or wiring in machine to
  electrical circuit. Warranty will be void if machine is connected to any voltage other than that
  specified on the nameplate serial tag.

1)        Machine must be on a flat and level surface. Plug or wire in machine to appropriate voltage
          as noted on the brewer serial tag. Serial tag is located on side of machine.
2)        With water line connected, turn machine power ON (power switch located lower right rear
          of machine). Install Drip tray and drip tray grate under brew area (slide tray between guide
          rails until seated).
3)        Tank will automatically fill, and machine will start heating. If tank does not fill in 8
          minutes, a “tank fill error” will occur. (Note: To reset error power machine on/off with
          power switch).
4)         Allow 10 to 15 minutes for water in tank to heat to brewing temperature. (Additional water
          may drip into drip tray on initial expansion of water in the tank). This will not occur
          thereafter.
5)        Heater will turn on when water in tank is at probe level. If brew is initialized before tank
          temperature is reached, machine will display “Preparing to Brew” until temp is reached,
          then will start brewing.
6)        In higher altitude locations (3000 feet above sea level) the thermostat may
          have to be adjusted lower to prevent boiling:

         Brew water temperature is factory set at 200o F (92.3o C) Areas of high altitude will require lowering this
     temperature to prevent boiling. This chart should be used as a guide when readjusting the brew water temperature.

             Altitude (Feet)              Boiling point of water o F o C     Recommended water temperature o F o C
                 -1000                             213.8 101.0                                200 93.3
                  -500                             212.9 100.5                                200 93.3
                    0                              212.0 100.0                                200 93.3
                  500                               211.1 99.5                                200 93.3
                  1000                              210.2 99.0                                200 93.3
                  1500                              209.3 98.5                                200 93.3
                  2000                              208.4 98.0                                200 93.3
                  2500                              207.4 97.4                                200 93.3
                  3000                              206.5 96.9                                199 92.8
                  3500                              205.6 96.4                                198 92.2
                  4000                              204.7 95.9                                197 91.7
                  4500                              203.8 95.4                                196 91.1
                  5000                              202.9 94.9                                195 90.6
                  5500                              201.9 94.4                                195 90.6
                  6000                              201.0 93.9                                194 90.0
                  6500                              200.1 93.4                                193 89.4
                  7000                              199.2 92.9                                192 88.9
                  7500                              198.3 92.4                                191 88.3
                  8000                              197.4 91.9                                190 87.8
                  8500                              196.5 91.4                                189 87.2
                  9000                              195.5 90.8                                188 86.7
                  9500                              194.6 90.3                                187 86.1
                 10000                              193.7 89.8                                186 85.6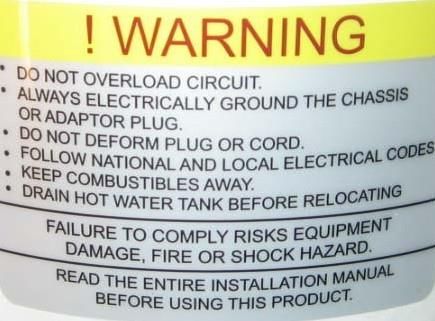
Set up instructions for CX TOUCH Machine
CX Touch, battery-less units operate differently than older units that contain batteries in
the tablet. It is no longer necessary or desirable to use the power switch on the tablet
display. The display will power on and off with the brewer automatically. Note that since
the tablet does not contain a battery, the tablet will go through a bootup sequence any
time the power is cycled to the brewer.

 Note: This machine is designed to be run with power turned on at all times.
Machine
                        Startup Instructions
 Fill and install 2lb hoppers with nozzles turned up, Chocolate on left and Milk on right.
 Make sure “button” on bottom of hopper is seated in slot in sheet metal. Slight manual
 rotation of the auger gear may be necessary to seat hopper in correct location.
 Rotate dispense nozzles down into whipper bowl.

 Ensure that there is a proper water supply connected to the machine
 and water is turned on. Ensure that the machine is plugged into a
 proper power outlet and there is power supplied to the machine. Turn
 machine power switch on, machine should start filling, will shut off
 when full. The Touch Screen Display will indicate when the machine is
 filling.

 Heater will turn on when water in tank is at probe level and will display
 Heating: Please Wait. The heating process can take 10-15 minutes
 before the machine is ready to brew.

  When machine temperature reaches brew temp, display will change
 to the Drink Instruction Screen. The machine is now ready for
 operation.

Touching the screen will bring up the Drinks Menu Selection Screen

Place an empty cup in the brewing area, open the powdered hopper
door, and depress the “Rinse” button next to the whipper bowl until the
water runs clear.
Brewing Drinks
To dispense a drink, place a cup under the dispense area, press a brew selection and
place a pod flat side up (not necessary if the drink selection does not use a pod)
Once a selection is made a Submenu for Drink Settings will appear-see page 13
Coffee Drinks
Small –Medium- Large
Mild-Regular-Bold
Espresso Drinks
Single-Double-Triple
Specialty Drinks
Small –Medium- Large Shot Drinks
Mild-Regular-Bold One Ounce Shot
(Coffee Topping)
Tea Drinks
Small –Medium- Large
Mild-Regular-Bold
Hot Water
Push and Hold
To Dispense
ICED DRINKS ARE SIZED FOR CUP TO
BE PRE-FILLED WITH 2/3 CUP OF ICEDrinks Submenus
Cup Size Coffee Strength
Indicator Indicator
Cup Size Selections Cup Strength Selections
Small –Medium- Large Mild –Regular- Bold
Use to Change Use to Change
Cup Size Coffee Strength
Default Regular
Return Button
Brew Button
Returns to Main
Starts Brewing
Drink Selection
Cycle
Menu
Cancel Button
Stops Brewing
CycleProgramming Instructions
TAP 3 TIMES TO ENTER PROGRAMMING
MODE
IF A BREWING ICON IS ACCIDENTLY
TOUCHED USE THE RETURN ARROW TO
TRY AGAIN
Screen will change to Program Menu Screen:
Powder Tracking –Toggle
Water Temperature --180 Powder Tracking On-Off
– 203 Deg F
Set DC Pump Speed , 1-87
Waste Bin Size—OFF , 2-50
Energy Save Mode—OFF,
Air Blow Strength—3-10 SEMI, FULL
Air Blow Time—2-15 Energy Save Time—Timer
seconds from last dispense till
Energy Save kicks in
Water Filter Size—OFF ,
500-3000 Gallons Default Cup Size—Sets Cup
Size displayed As Default
Call For Service #--# will
be shown on “Call for Drink Selection Menu-See
Service “ Screens Below
Exit Setup Mode Restore Factory Settings
Total run cycles-Total drinks
Water Filter Remaining Gal* dispensed Primary Newco Server
*NOT SHOWN IF NOT USING (Future Use)
A WATER FILTER Pod brew cycles—Tea & Coffee
drinks dispensed Secondary Server (Future
Water filter Reset--Select Use)
this after changing filters to Total Water Usage—Total Gallons of
reset water filter water dispensed* Sleep Timeout—time brewer
countdown* will stay awake before
Waste Bin Contents –Used Pods in entering sleep screen
Whipper Seal Remaining-- Bin
Remaining powdered drink Brewing Screen-Toggles
cycles before changing the Chocolate Grams Remain--Chocolate between Slates & Movies or
Whipper Seal grams remaining in Hopper** display Installed Logo Screen
Milk Grams Remain--Milk grams Install Logo & Load Software Drink Selection Menu
Whipper Seal Reset—Reset
count after changing remaining in Hopper** Update *See Page 16
Ability to turn Drink Selections
Whipper Seal
Exit Local Setup Mode and/or Cup Sizes On or Off
Exit Statistics Mode
Exit Maintenance Mode Exit Drink Selection Mode
**NOT SHOWN IF POWDER
TRACKING IS DISABLED
Waste Bin Contents (Pods inCustom Logo--Wi-Fi Setup
SETTING UP A CUSTOM LOGO SCREEN REQUIRES A WI-FI CONNECTION TO THE CX-TOUCH MACHINE.
NOTE THAT AFTER THE LOGO IS INSTALLED, THE WI-FI CONNECTION MUST BE TURNED BACK TO “OFF” STATUS.
UPDATES THAT MAY OCCUR IF WI-FI IS LEFT ON WILL CAUSE OPERABILITY ISSUES WITH THE BREWER.
ACCESS THE BREW SELECTION SCREEN
TAP THE “TEA & WATER” BAR 3 TIMES TO SELECT LOCAL SETUP FROM PROGRAMMING MENU
ENTER PROGRAMMING MODE. - IF A BREWING AND THEN CHOOSE NETWORK SETUP. THIS WILL TAKE SELECT WI-FI FROM THE SETTINGS
ICON IS ACCIDENTLY TOUCHED USE THE YOU TO THE ANDROID SETTINGS SCREEN WHERE YOU SCREEN. TURN WI-FI ON. SELECT
RETURN ARROW TO TRY AGAIN WILL BE ABLE TO CONNECT TO WI-FI NETWORK. THE NETWORK WHEN IT APPEARS.
ENTER THE PASSWORD AND
CONNECT.
ONCE CONNECTED, YOU WILL NEED
TO TURN POWER TO THE BREWER
OFF AND THEN BACK ON AGAIN TO
EXIT THE ANDROID SETTINGS MENU
AND RETURN TO THE CX
PROGRAMMING SCREENS. POWER
SWITCH IS ON THE LOWER RIGHT
REAR OF BREWER. WHEN THE
TABLET REBOOTS, ENTER THE LOCAL
SETUP SCREEN AS DESCRIBED AT
LEFT.
CHOOSE INSTALL LOGO
THIS ADDRESS IS UNIQUE FOR EVERY
MACHINE. NOTE THAT IT IS USED FOR THE
HOST ADDRESS WHEN SETTING UP
COMMUNICATION WITH ANOTHER DEVICE
TO TRANSFER LOGO (SEE NEXT PAGE).Install Logo Instructions-Custom Sleep Screen
(IOS Apple Version) 1. OPEN THE APP AND SLELCT
FTP/FTPS/ SFTH, ADD SERVER,
INSTALL THE “ITRANSFER” APP ONTO A LOCAL CHECK FTP
PHONE OR TABLET. CONNECT THE LOCAL PHONE
OR TABLET TO THE SAME WIFI NETWORK AS THE
CX-TOUCH.
APPLICATION EXAMPLE SHOWN IS “ITRANSFER”
FOR I-PHONE/IOS/APPLE
SETUP FTP CONNECTION AS SHOWN-COPY HOST
ADDRESS FROM CX-TOUCH AS SHOWN ON SCREEN-
NOTE-EACH MACHINE HAS A UNIQUE ADDRESS
PASSWORD IS ftp
2. FOR SERVER 3. FOR HOST IP ADDRESS 4. FOR REMOTE PATH INFO
NAME ENTER CX COPY IP ADDRESS INFO ENTER -
FROM CX-TOUCH /data/data/com.newcocoffee.cx
3/cache
192.168.3.227 /data/data/com.newcocoffee.cx3/cache
6. TAP SERVER CX TO CONNECT TO CX-TOUCH MACHINE
5. ENTER PORT 2121, USERNAME ftp, PASSWORD ftp THEN
PRESS Save BAR-SERVER NAME IS NOW SHOWN AS CXInstall Logo Instructions-Custom Sleep Screen (IOS Apple
Version) Cont’d
7. STATUS ON CX-TOUCH MACHINE 8. TO SELECT A FILE TO TRANSFER 9. SELECT THE DIRECTORY WHERE
CHANGES TO Connected-Waiting SELECT THE UPLOAD BUTTON THE IMAGE FILE TO BE
for transfer TRANSFERRED RESIDES
10. SELECT THE IMAGE TO BE 11. FILE WILL TRANSFER TO THE CX- 12. SELECT FINISH TO COMPLETE TRANSFER, THEN
TRANSFERRED THEN SELECT TOUCH MACHINE EXIT FROM PROGRAMMING SCREENS. TURN OFF
Upload WI-FI, SEE BELOW.
FINISH
Turning off WI-FI Mode – MUST FOLLOW THIS PROCEDURE
TAP THE “TEA & WATER” BAR 3 TIMES TO SELECT LOCAL SETUP FROM PROGRAMMING MENU
ENTER PROGRAMMING MODE. - IF A BREWING AND THEN CHOOSE NETWORK SETUP. THIS WILL TAKE SELECT WI-FI FROM THE SETTINGS
ICON IS ACCIDENTLY TOUCHED USE THE YOU TO THE ANDROID SETTINGS SCREEN WHERE YOU SCREEN. TURN WIFI OFF.
RETURN ARROW TO TRY AGAIN WILL BE ABLE TO DISCONNECT FROM THE WI-FI
NETWORK. ONCE DISCONNECTED, YOU WILL
NEED TO TURN POWER TO THE
BREWER OFF AND THEN BACK ON
AGAIN TO EXIT THE ANDROID
SETTINGS MENU AND RETURN TO
NORMAL CX OPERATION. POWER
SWITCH IS ON THE LOWER RIGHT
REAR OF BREWER. THE TABLET WILL
REBOOT AND ENTER THE CX
APPLICATION FOR NORMAL BREWER
OPERATION.Service Notes &
Troubleshooting
These error screens will display a service phone number to call if entered in “Setup” Menu (Page 15)
*Usually repairing a bad connection or replacing the indicated motor will remedy the problem.
Display Reads Possible Cause(s) Remedies Notes
Initial fill time longer than 8
Fill Timeout Error Water shut off to Machine Check Water Supply Shutoff
minutes
Supply Line Blocked or too small Repair or Replace as needed Fill time Longer than 1 Minute
Water Probe has a 30 second
Water Filter Restricted Replace-Service Required
Hysteresis cycle
Inlet Solenoid valve Faulty Replace-Service Required
Control Board Failure Replace-Service Required
Thermistor Error Thermistor not plugged in Make sure plug-in housing is latched Open or Shorted Thermistor
Faulty Thermistor Replacement
Control Board Failure Replace-Service Required
Heater Error Faulty Thermistor Replacement 4 Minute Continuous Heater Run
Faulty Heater Element Replace-Service Required
Control Board Failure Replace-Service Required
Motor Errors* Wiring Disconnect Brew Mech Check Brew Mech Wires, Harness
DRAINING THE HOT WATER TANK
THE DRAIN TUBE IS CLIPPED TO THE TANK PLATE IN FRONT OF
THE TANK. TANK HOLDS APPROX 1 US GALLON.
THE HOT WATER TANK CAN BE DRAINED FROM THE FRONT OF
THE MACHINE – UNPLUG MACHINE FROM POWER SOURCE.
REMOVE POD WASTE TRAY. CAUTION-UNLESS THE TANK IS LEFT
TO COOL THE WATER IS EXTREMELY HOT AND CAN CAUSE
HARMFUL BURNS. REPLACE DRAIN PLUG, ENSURE HOSE CLAMP
IS TIGHT AND REPOSITION DRAIN HOSE BEFORE RE-FILLING THE
HOT WATER TANK.Brewing Instructions for CX Touch W/QRC Option Hold smart phone here to On smart phone, choose & Choose Drink Strength and download & access menu. touch selection. Cup Size. Touch “Next”. Point smart phone at QR code scanner. The pod door will open and The brew cycle can be pod holder will extend. Place pod in mechanism. Re-scan code to start stopped by touching brew cycle. “CANCEL”.
To change from default Touch to highlight the “Combined” box.
After the brew cycle is complete, “Combined” mode to Using the minus sign (-) tap until “ON”
the above screen will appear and “Touchless” only mode tap appears. If Touch only is desired, repeat
remain for 2-minutes before the TEA & WATER bar 3- the procedure and tap until “OFF”
returning to the blue QRC screen. times to access the appears. Tap “Exit Setup Mode” when
Programming screen. finished. Then tap “Exit Programming”.
Upper Programming mode Lower Programming mode
To get into the Upper Programming mode, tap the upper left corner 3x then the lower right corner 3x. Lower
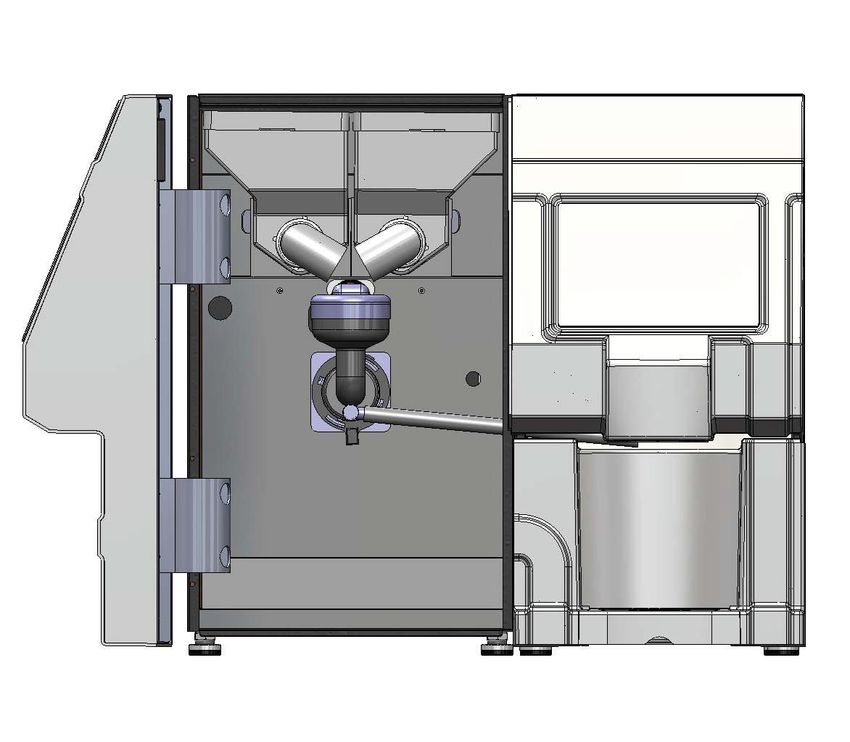
Programming mode: tap the lower right corner 3x only.Machine Access Points
Top Cover Brew
Mech Access Tank
Access
Main Rear Cover
Tank, Pump Access,
Transformer, Fill Valve Sidecar Cover
Control Board AccessPod Brew Mechanism Removal
Front View From Drip Tray
1. Remove (2) Outer
Brass Nuts
Save for Re-Assembly
Front
View - Cover Off
3. Unsnap Water Fitting:
Pull out Water fitting
4. Unsnap Wiring Harness-Lift Brew
Mech Up and Out of MachineWhipper Assembly PN 767377
ITEM # PART NUMBER & DESCRIPTION
1 767376 WHIPPER STEAM CAP
2 767195 WHIPPER MOTOR
3 767196 BASE, WHIPPER MOUNTING
3.5 767390,O-RING WHIPPER BASE RED [NOT SHOWN]
4 767197 WHIPPER IMPELLER
5 767365 WHIPPER BOWL
6 767200 WHIPPER NOZZLE
7 781566 WHIPPER SEAL (REPLACE AFTER 5000 CYCLES)
7
2
1
6
3
5 4Tank Assembly PN 780048
ITEM # PART NUMBER DESCRIPTION QTY/EA
1 110958 RELAY, 12 VDC SPST 30A 1
2 111593 HI-LIMIT THERMOSTAT 1
3 109937 GEAR PUMP ASS’Y 1
4 781772 PUMP ASS’Y W/ELBOW (HOT WATER) 1
5 780253 TANK ONLY 1
6 773056 AIR PUMP, POD 1
7 500396 LIQUID LEVEL PROBE& BUSHING 2
8 151677 DUAL TEMP THERM PROBE 1
9 100149 ELBOW ¼ C X 1/8 NPT 1
704166-10 (1700W) TANK HEATING ELEMENT (US)
10 1
704161-10 (1400W) TANK HEATING ELEMENT (CAN)
11 120682 FLOWMETER 1
12 767281 “WYE” HOSE FITTING 1
13 202165 AIR PUMP CHECK VALVE 1
14 202166 WATER PUMP CHECK VALVE 1Whipper (767377) & Cannister (767385 & 767386) Assembly
10 11
9 1
8 2
3
4
5
6
ITEM # PART NUMBER & DESCRIPTION
1 780796-HOPPER ASS’Y, RH (LATTE)
2 767202-ELBOW, 7CM,RH
3 767376-WHIPPER CAP
4 767365-BOWL, WHIPPER, 767197-IMPELLER
5 767196-WHIPPER BASE, 767195- MOTOR
6 767200-NOZZLE, WHIPPER
7 781040-BULKHEAD, WATER (NOT SHOWN)
8 767201-ELBOW, 7CM,LH
9 780197-HOPPER ASS’Y, LH (CHOCOLATE)
10 780153 -HOPPER LID-BROWN
11 780154-HOPPER LID-WHITE61mm Pod Brew Mech Ass’y PN 780052
ITEM # PART NUMBER DESCRIPTION QTY/EA
1 780230 BREW MECH MOTOR 2
2 780231 DELTROL SOLENOID 1
3 780553 LOWER BREW CHAMBER 1
4 773246 U-CUP SEAL RING 1
5 780257 UPPER BREW CHAMBER 61MM 1
6 780554 EJECT SLOPE CAM ASS’Y 1
7 780528 MOLDED BUMP DISC PAD 1
8 780422 ¼” X 3/16” NYLON SPACER 1
9 780546 KICKER SLIDE WASHER 1
10 780254 ¼” X 1” STAINLESS STANDOFF SPACER 1
11 780421 COMPRESSION SPRING 1
12 780264 LOWER BREW CHAMBER O-RING 1
NOTE: Your CX-3 can be equipped with various optional brew mechanisms to provide
brewing choices tailored to your specific needs. For information on these optional brew
mechanisms and associated replacement parts contact NEWCO Technical Services at
1-800-556-3926 or NEWCO Customer Service at 1-800-325-7867.Wiring Diagram
782305 CONTROL BOARD ONLY
782306 C O N T R O L BOARD AND BRACKET ASS'YLeft Blank Intentionally
You can also read