OUTDOOR SAFETY & SURVIVAL
←
→
Page content transcription
If your browser does not render page correctly, please read the page content below
CURRENT ISSUES
            5TH-8TH GRADE STUDY PACKET

    OUTDOOR SAFETY &
        SURVIVAL
                    Envirothon 2022

             Part 1:                     Part 2:
Preparing for an Outdoor      Survival Tools and
Adventure. What to take and   Techniques. What to do if
what to know before you go.   something goes wrong?
• Survival Equipment          • Basic Rules if You Are Lost
• Celestrial Navigation       • Shelter
• Map & Compass Navigation    • How to Build a Campfire
• Weather                     • Useful Survival First Aid
• Poisonous Plants
• Venomous Snakes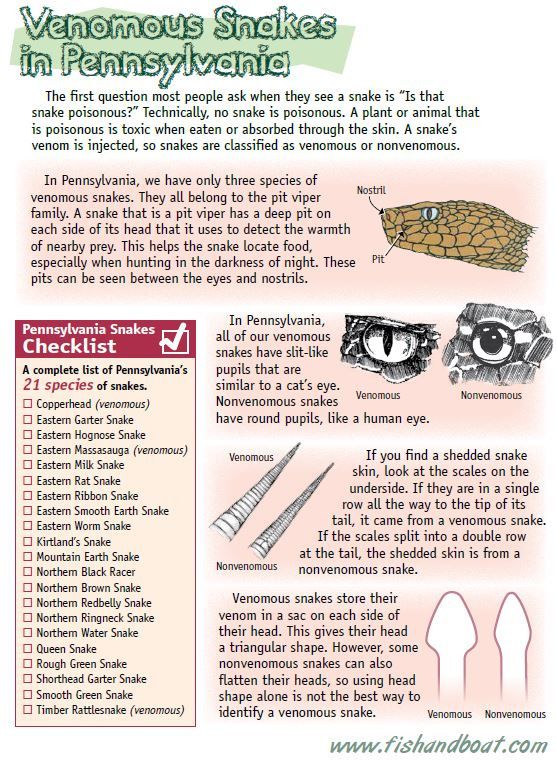
PART 1: PREPARING FOR AN
     OUTDOOR ADVENTURE
        SURVIVAL EQUIPMENT
Outdoor safety isn’t so much a game of survival AS IT IS AN EXERCISE IN
PREPARATION. Know your limits, understand your environment, and prepare the
right equipment.

      Identification and/or Medical Alert Tag or Bracelet
      (vital if unconscious when found)
      Brightly-colored Bandana (blaze orange is ideal)
      1-2 Large Garbage Bags
      1-2 Bottles or Canteens of Fresh Water
      Pocket Knife (sturdy, locking, folding knife is
      recommended)
      Fire Starter (lighter, matches, flint and steel)
      Portable Snacks (granola bars, nuts, pretzels, etc.)
      Loud Whistle
      Flashlight
      First Aid Kit
      Rope
      Compass
      Cell Phone
      Map or GPS

     Note: In many wilderness areas, cell phone coverage may be inconsistent or unavailable.
       Additionally, leaf cover and geographic conditions may affect the use of a GPS unit.
      While both are good to have, please be aware that technological limitations may occur
                           that can affect the use of a cell phone or GPS.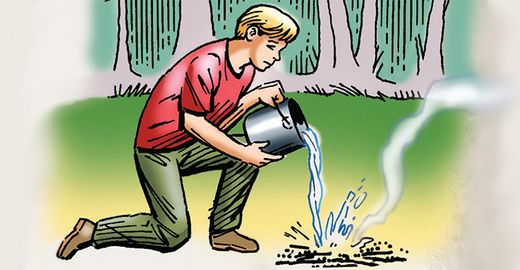
CELESTIAL NAVIGATION
Everyone that enjoys being outdoors should be able to use a map, compass,
or GPS. In some survival situations, you may not have any of these. In these
situations, we must turn to two things used by our ancestors – the Sun and
the stars. The word “celestial” refers to anything pertaining to the sky or
visible heaven. There are a number of ways to use the sun, moon and stars to
find your way on the earth. The following are a few examples that may be
employed easily in nature.
                                         Using the stars & night sky to
                                                find your way

     Using the sun & moon to             The night sky can be used for
          find your way                  orientation and navigation. This is
                                         done by first finding the North Star,
                                         or Polaris. Locate the Big Dipper in
 To find direction when the Sun is       the northern sky. Depending upon
                                         the time of the year, constellation
 shining, remember that the Sun          of stars may be tipped in different
 rises in the East and sets in the       directions as it rotates around the
                                         polestar. As shown in the diagram,
 West. At midday in the Northern         locate the two stars that form the
 Hemisphere, the Sun will be             outer edge of the Big Dipper. Draw
 roughly South. Additionally, the        an imaginary line straight through
                                         the two stars of the dipper edge
 moon rises in the east and sets in      and toward the Little Dipper. The
 the west                                line will point very close to the
                                         handle of the Little Dipper. The
                                         brightest star in the Little Dipper is
                                         at the end of its handle. This is the
                                         North Star, or Polaris, which is
                                         directly over the North Pole.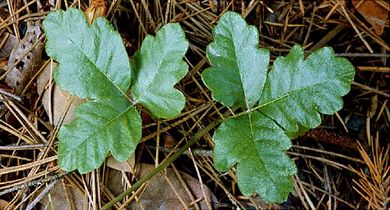
MAP & COMPASS NAVIGATION
No one should venture for a wilderness trip without a map and a compass.
Being able to find direction by map and compass is a required skill for all
wilderness travelers. Be sure to bring a map with you or obtain one at the
park office. Maps that show topography, streams and other features are
useful and recommended.
How a compass works: There is a huge magnetic field around the earth. It is
huge, but not very strong. A compass has a small, magnetized needle inside
the compass housing that floats in air, water or oil. The red end of the needle
will always turn to point to magnetic north of the earth. When you know
where north is, you can find any direction.
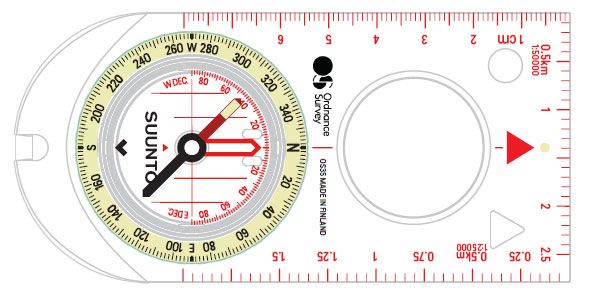
How to Use the Compass: The compass housing is surrounded by a dial, which
is marked with the 360 degrees of a circle. The dial also is marked with the
four cardinal points, north, south, east, and west. If you look at the dial on the
compass housing and divide 360 by four (4), you will find each of the cardinal
points at the following degree reading: North is at 0 degrees or 360 degrees,
East is at 90 degrees, South is at 180 degrees and West is at 270 degrees.
Compass Transparent
Housing Dial Base
Cardinal
Points
Magnetic
Needle
Degree
Readings or
bearings Orienting Direction-of-Travel
Arrow Arrow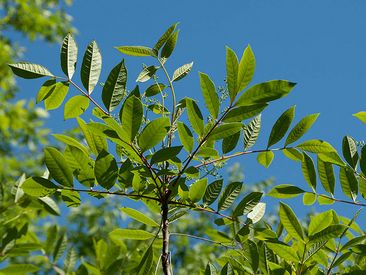
Finding North:
Hold the compass in front of you at waist
height, with the direction-of-travel arrow
pointing straight ahead. To find north,
turn the compass housing until north is on
the direction-of-travel arrow. Now, slowly
turn yourself until the red end of the
magnetic needle is pointing in the same
direction as the orienting arrow and the
direction-of-travel arrow. You are now
facing north. Whenever you are facing
north, the east is to your right, the west is
to your left and south is behind you.

Finding the Direction of Travel:
Hold the compass in front of you at waist
height, with the direction-of-travel arrow
pointing in the direction you are traveling.
Turn the compass housing until the
orienting arrow is pointing in the same
direction as the red end of the magnetic
needle. Now, look at the degree reading
which lines up with the direction-of-travel
arrow and this is the direction in which
you are traveling (remembering the
degree readings described above).
WEATHER
    When you are on your wilderness trip, some basic knowledge about weather
    will help you to take appropriate action to not get into trouble and risk your
    safety. It is always a good idea to check the weather forecast before
    heading out. Knowing what to expect can help you to be best prepared.

  Advisory                             Watch                            Warning
 An advisory is issued           A watch is used when the risk      An advisory is issued
 when a hazardous                of a hazardous weather or          when a hazardous
 weather or hydrologic           hydrologic event has               weather or hydrologic
 event is occurring,             increased significantly, but       event is occurring,
 imminent or likely.             its occurrence, location or        imminent or likely. A
                                 timing is still uncertain. It is   warning means weather
 Advisories are for less         intended to provide enough         coniditions pose a threat to
 serious conditions than         lead-time so those who need        life or property. People in
 warnings that cause             to set their plans in motion       the path of the storm need
 significant                     can do so. A watch means           to take protective action.
 inconvenience and if            that hazardous weather is
 caution is not exercised,       possible. People should have
 could lead to situations        a plan of action in case a
 that may threaten life          storm threatens and they
 or property.                    should listen for later
                                 information and possible
                                 warnings especially when                 WARNING!
                                 planning travel or outdoor
                                 activities.
                                                                      Cheesesteaks on the
                WATCH!                                                  table for dinner!
              We have the
            ingredients for a
              cheesesteak!

Source: National Oceanographic
and Atmospheric Administration
            (NOAA)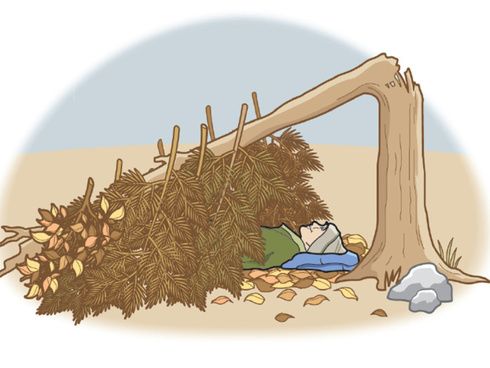
POISONOUS PLANTS
                 Poison Ivy, Poison Oak, Poison Sumac

The most common ill effect on humans is a rash caused by contact with the plants or with their oil,
called urushiol (yoo-ROO-she-ol). Rashes and blisters erupt on the skin, sometimes oozing and
always itchy. The rash is NOT contagious. You must have contact with the oil in order for it to spread.
Poison ivy and oak favor ground that has been disturbed and multiplies freely on embankments and
along forest trails. Poison sumac, the largest plant of the three, contains the same allergen as poison
ivy and oak and causes the same reaction, but grows predominantly in swamps. To prevent contact,
do the following:

        Wear shoes and socks, not open sandals
        Look carefully at plants before walking through or touching them
        Be cautious when wiping sweat from your forehead with your arm; you may have had
        contact with urushiol on your sleeve, transferring it onto your face and in your eyes
        Wear loose clothing
        Be careful in water, plants growing at the water’s edge can release enough urushiol
        into water to cause a reaction
        Wash pets that may have traveled through poison
        Decontaminate your belongings

Poison Ivy: The trademarks of this plant are its solid
green, pointed leaves that hang from the stem in
groups of three. It grows as both a vine and a shrub.
The look of poison ivy can change with the seasons.
It produces yellow-green flowers in the spring and its
green leaves can change to yellow and red in
autumn.

Poison Oak: Like its ivy counterpart, poison oak
leaves also cluster in sets of three. The edges of the
solid green leaves, while similar to an oak leaf, are
less dramatic. Poison oak is most often seen in shrub
form, but it can also grow as a vine.

Poison Sumac: This rash-producer thrives in the
water. It is usually found in swampy or boggy areas
where it grows as small tree or tall shrub. Poison
sumac leaves can have urushiol-filled black or
brownish-black spots. The leaf stems contain seven
to thirteen leaflets.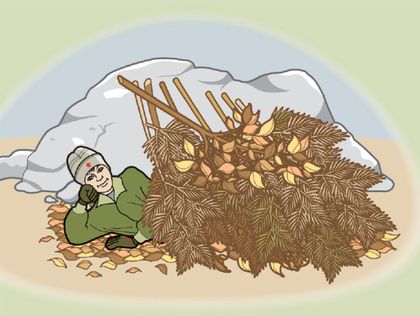
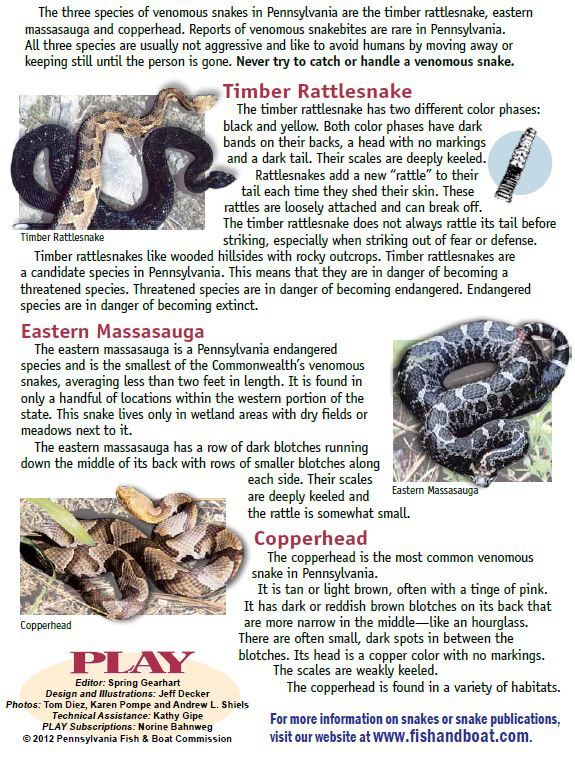
VENOMOUS SNAKES
VENOMOUS SNAKES
PART 2: SURVIVAL TOOLS
     AND TECHNIQUES
   RULES IF YOU ARE LOST
             Sit down and stay put until the fear,
1. Stop      anger, and/or frustration has gone away

             THINK through your situation: What do
             you have that can help you in this
             situation? Your mind is your greatest
2. Think     survival tool!

             Observe your surroundings: Where
             should you stay? If you told someone
3. Observe   where you were going, people might be
             searching for you. Is there an open area
             where searchers would have a better
             chance of seeing you?

             Plan your action: In most cases, the
             priority should be:
                     find or make shelter
4. Plan
                     build a fire for heat
                     signal to attract attention
                     find water
SHELTER
Building a survival shelter is an absolute priority if you are facing a survival
situation in harsh or unpredictable weather. A good shelter must protect
you from the elements and be comfortable enough for resting and
sleeping. Most people cannot survive unprotected from rough weather for
more than a couple of hours
Suitable Shelter Site Unsuitable Shelter Site
Too close to water (because of
insects)
Dry, well drained, and reasonably Dry riverbeds. Heavy rainfall can
flat cause flash floods
Comfortable distance from water Loose rocks, dead trees, or other
Close to firewood sources natural growth that could fall onto
Availability of building materials the shelter
for shelter Low/High ground. Ravines or
Easily seen by search and rescue valleys could be damp and collect
teams heavy cold air at night. Conversely,
the tops of mountains are exposed
to higher winds and other weather
If you have added a garbage bag, shelter tarp, an emergency blanket or an extra
poncho to your gear, you are almost done with your shelter building. However, if
you lack equipment, local conditions and materials will determine the type of
wilderness shelter you build. Look for natural formations that could provide
shelter. Examples include caves, rocky crevices and large trees with low-hanging
limbs. (Remember, these may also be habitats for snakes, so be careful). If no
natural formation is available to provide shelter, you will need to build your own.
Make your shelter just large enough to accommodate you, especially in cold
climates, because you are going to have to heat it. One of the best wilderness
shelters is called the "debris hut.” If you do not want to spend too much time
and effort to build your shelter, the quickest type of wilderness shelter to build is
the lean-to shelter.SHELTER TYPES
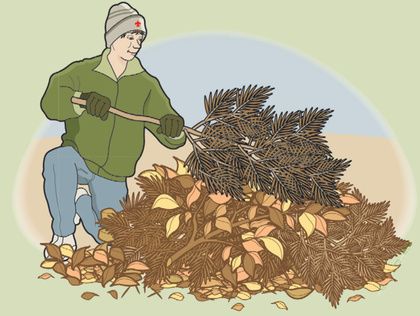
The Cocoon
If it’s almost dark and you can quickly
collect dry debris (leaves, pine
needles, bark) from the forest floor,
make a pile two or three feet high and
longer than you are tall. When you
burrow into the pile, you are in a
natural sleeping bag that protects
against heat loss.
The Fallen Tree
The simplest shelter is a fallen
tree that has enough room under
it for you to crawl in. Lean
branches against the windward
side of the tree (so the wind is
blowing into it and not against it)
to make a wall. Make the wall
thick enough to keep out wind. If
you can build a fire on the open
side of your shelter, the heat will
help keep you warm.
The Lean-To
If you find a fallen tree without
enough room under it, or a rock or a
small overhang, you can build a
simple lean-to. Start by leaning fallen
limbs against the object, such as the
top edge of an overhang, to create a
wall. Lean the limbs at an angle to
help shield rain. Cover the leaning
limbs with leaves, boughs, pine
needles, bark or whatever the forest
offers. When you have built a thick
wall, you can crawl underneath into
your shelter. Remember to make your
shelter no bigger than you need to fit
you and anybody else with you.HOW TO BUILD A CAMPFIRE
Step 1- The Right Spot Step 2- The Right Material
The three types of natural fuel are tinder
A safe fire site is one on which nothing
(material that burns easily such as dry
will burn except the fuel you feed the
grass or shavings whittled from a stick),
flames. Fire cannot spread from this spot.
kindling (slightly larger material such as
Many camping areas have fire rings, grills,
twigs that will burn with a little
or stone fireplaces. Use those existing fire
encouragement) and firewood (dry
sites whenever you can. If an existing spot
branches that will be the main fuel of
is not available, clear the area of debris,
the fire). No shortcuts allowed — never
avoid overhanging branches and make
use flammable liquids.
sure your fire is a safe distance from tents
and other flammable materials. One
option is to build your fire on an earthen
pad, but make sure to do it in a way that
leaves no trace when you’re done.
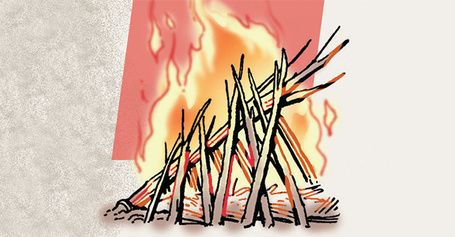
Step 3- The Right Shape Step 4- Put it OUT
Two ways to build your fire are the tepee, in
which you arrange the kindling in the Pour water on the fire, stir the
shape of a tepee over the tinder, and the ashes with a stick, pour some more.
It’s not out until you can run your
lean-to, in which you push a small stick in bare hands through the coals.
the ground at a 45-degree angle with the
upper end pointing into the wind. Place the
tinder beneath the stick and lean the
kindling against it. Light the tinder and add
kindling as needed. Add the larger
branched last. Never leave a fire
unattended.USEFUL SURVIVAL FIRST AID
What is First Aid?
First aid is the first help given to the victim of an accident or other health
emergency. If more attention is needed, first aid keeps an injured or ill person as safe
as possible until trained medical personnel arrive. The goals of first aid include:
Stop life threatening medical emergencies
Protect person who is injured or ill from further harm
Get the person under professional medical care
Wilderness Survival: First Aid and Health
When traveling into the wilderness, it is important to carry a complete first
aid kit. If an accident happens in the wilderness, it is your responsibility to
deal with the situation. The following sequence of actions to remember
when dealing with situations should be followed every time:
1. Remain calm.
2. Check the scene. What caused the accident? Are there dangers? How many
victims?
3. Call for help. Know the location, description of injury, time of injury, treatment
received, and number of people.
Step 4- Put it OUT
4. Approach safely. Look for dangers. Tell the victim your name.
5. Provide urgent treatment. Is the personPour conscious
waterandonbreathing? Is there
the fire, stir the
ashes
severe bleeding? Is there evidence of pills, with a
chemicals, orstick,
other pour some more.
poisons?
It’s not out until you can run your
6. Protect from further injury. Avoid moving someone
bare handswho is injured
through the unless
coals. it is
impossible to perform urgent first aid or the person is in a dangerous location.
7. Treat every accident victim for shock.
8. Make a thorough examination. Looks for other injuries that may be hidden
and ask the victim questions if they are alert
9. Plan a course of action. If help is on the way, keep the victim comfortable. If
help will be delayed, decide on a clear course of action.Wilderness Survival: First Aid and Health, continued
Emergency Treatment: 1st step, call for help
Shock
Shock is a depression of all of the Try to eliminate the causes of shock by restoring breathing and
body processes and may follow circulation, controlling bleeding, relieving severe pain and
any injury, regardless of how treating wound
minor. Signs of shock include:
Monitor victim closely to make sure airway stays open for
Restlessness or irritability
breathing
Confusion, fear, dizziness
Skin that is moist, clammy, Help victim to lie down. If you do not suspect injuries to the back,
cool and pale neck or head, or fractures to the hip or leg, raise the feet about 12
A quick, weak pulse inches to move blood from the legs to vital organs
Shallow, rapid and/or Keep victim warm with blankets, coats or sleeping bags
irregular breathing
Nausea and vomiting Don’t let the person eat or drink
Extreme thirst
Sudden Cardiac Arrest According to the American Heart Association, Hands-Only CPR is
CPR without mouth-to-mouth breaths. It is recommended for use
Sudden cardiac arrest is a by people who see a teen or adult suddenly collapse in an “out-of-
leading cause of death. When a hospital” setting (such as at home, at work or in a park). It consists of
teen or adult has a sudden two easy steps:
cardiac arrest, survival depends Call 911 or send someone to do that
on immediately getting CPR Push hard and fast in the center of the chest to the beat of
from someone nearby. "Staying Alive"
Cover with sterile bandage or clean cloth
Use direct pressure to stop bleeding
Bleeding
Elevate injured body part above heart to slow blood flow
Use pressure at the pulse point between the injured area and the
heart if bleeding fails to stop
After bleeding has been controlled, wash wounded area and
apply a dressing or bandage
Fracture
A fracture is classified as either Splint the joints above and below the fracture
simple (closed) or compound
Splint suspected fractures in the same position as you
(open). Signs that a fracture is
found them. Do not try to reposition an injured bone.
present include:
Pain in the affected area Be sure to pad the splints
Deformity in the area Check the splint ties frequently to be sure they aren’t
The victim is unable to put hindering circulation or on the fracture
weight on the area without Cover all open wound with clean dressing before splinting
pain Treat for shock but do not raise a leg that may be broken
Swelling or a bluish color at Apply an ice pack
the injury siteWilderness Survival: First Aid and Health, continued
Emergency Treatment: 1st step, call for help
Concussions
Concussions or other head
injuries are often accompanied Keep the victim warm
by leakage of watery blood from Dispense pain reliever regularly
the nose or ears. Other Allow time for the body to rest and repair; if victim were to fall
symptoms may include: asleep, wake periodically to check for signs of a concussion
Convulsions
Unresponsive pupils
Headache
Vomiting
Hypothermia
Is when the body is losing more
heat than it is able to produce, Move person to a warm place
causing the core body Monitor breathing and circulation
temperature to drop. Remove any wet clothing
Hypothermia can quickly Warm the person slowly by wrapping blankets or by putting dry
become life threatening. clothing on the person. Rapid warming may cause dangerous
Signs of hypothermia: heart arrhythmias. Apply hot water bottles or hot packs that are
Shivering uncontrollably first wrapped in towels or blankets. Warm the core first (trunk,
Feel cold and numb abdomen) not the extremities (hands, feet). Warming hands and
Become tired and unable to feet first can cause shock.
think straight If fully conscious and able to swallow, have the person drink
Make poor decisions warm liquids.
Stumble, fall or lose
consciousness
Frostbite
Is the freezing of a specific body Move person to a warm place
part such as fingers, toes, Handle the affected area gently, never rubbing
earlobes, etc. Signs of frostbite: Gently warm affected by soaking in warm water (99-108 degrees
Lack of feeling in the F) until it appears red and feels warm
affected area Avoid breaking any blisters
Skin that appears waxy, cold Do not allow to refreeze
to the touch or is discolored
(flushed, white or grey,
yellow, or blue)Vocabulary
Celestial Anything pertaining to the sky or visible heaven
Compound A broken bone resulting in an open wound through
Fracture which bone fragments usually protrude
First Aid First help given to the victim of an accident or other
health emergency
GPS Global Positioning System, often the handheld
varieties are used on outdoor adventures
Hydrologic Pertaining to hydrology, the science dealing with
the properties, distribution and circulation of water
on and below the Earth’s surface and in the
atmosphere
Hypothermia Subnormal temperature of the body
Poisonous Full of or containing poison; a substance with an
inherent property that tends to destroy life or impair
health
Safety The quality or state of being free from danger
Simple Broken bone that does not result in an open wound
Fracture
Shock The depression of all the body process and may
follow any injury, regardless of how minor
Survival The condition of living or the state of being alive
Topography The surface features of a place or region
Venomous Having a gland for secreting venom; able to inflict a
poisoned bite, sting or woundYou can also read