New Collection 2021 2022 - Westerhope Tile Centre
←
→
Page content transcription
If your browser does not render page correctly, please read the page content below
New Collection
2021 - 2022
Design Inspiration                        Accessories                    Installation Advice
Get inspired and learn how to        Everything you need to install           Our simple guide shows you
 create the perfect space to         your outdoor porcelain tiles to         the many ways you can install
  relax, entertain and enjoy             the highest standard.                  outdoor porcelain tiles.

                                w w w. a l f r e s c o t i l e s .c o. u k
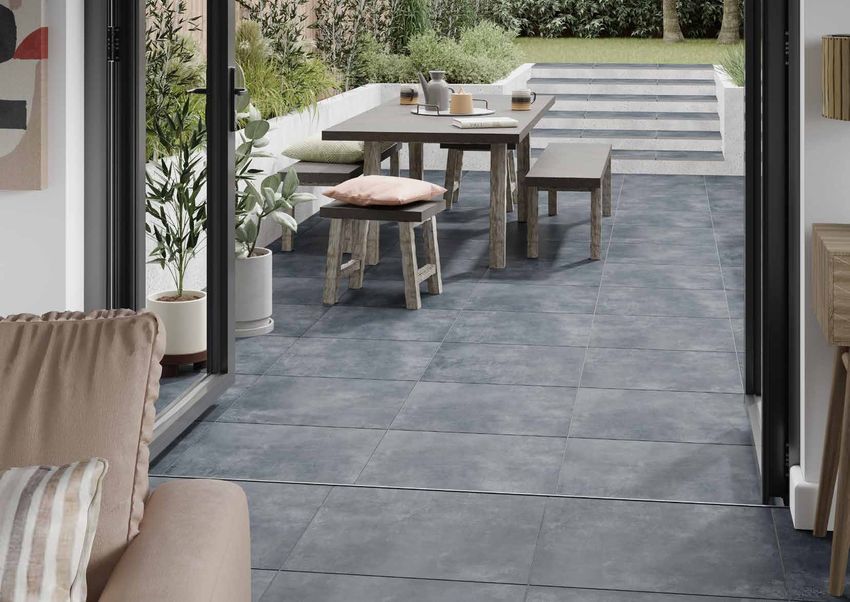
Extend your home to
    the great outdoors...
    Our premium porcelain Al Fresco range features 10mm tiles for
    indoor use and 20mm tiles for outdoor use to create seamless
    open plan living spaces. Our premium porcelain outdoor tiles
    offer a stylish alternative to stone or concrete flagstones and our
    wood effect range creates the look of high-end timber decking
    but with many added benefits such as good slip resistance. Hard
    wearing and practical, these tiles have a 10 year guarantee,
    are simple to install and require no sealing - the perfect way to
    create a durable and low maintenance living space that’s great
    for the whole family.

2                                                                         3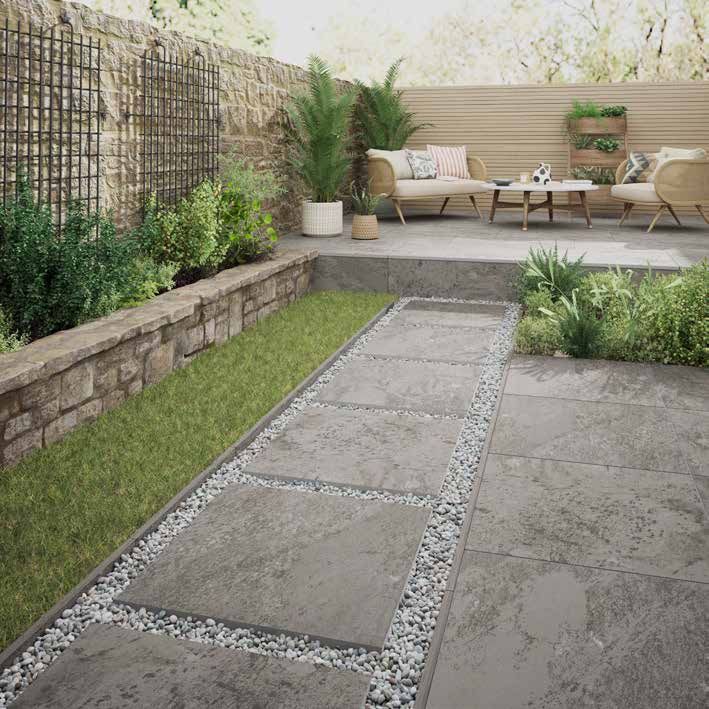
Feature & Benefits
    Not only do Al Fresco indoor and outdoor tiles look amazing, they also have many other benefits. Tiles have been used
    within the home for decades to create amazing spaces, why not extend that to the great outdoors? Al Fresco tiles are
    manufactured in a way that avoids all imperfections associated with natural stone and traditional paving slabs. Pressed in a
    raw state and heated at very high temperatures, Al Fresco tiles are stylish, strong and durable.

                                   Uniform Thickness                                                                               Frostproof
        Al Fresco tiles are manufactured under extremely tight                                                                     Natural stone and timber is porous and allows water to
     tolerances ensuring an even thickness and stable surface                                                                      enter the surface. When this freezes, this can crack the
    every time. They also feature precision cut rectified edges                                                                    material. Durable under extreme tempreratures, Al Fresco
                               for a premium finish every time.                                                                    porcelain is completely frostproof.

                             Algae & Moss Resistant                                                                                Easy to Clean
          Unlike natural materials such as stone or timber, our                                                                    Al Fresco outdoor porcelain tiles are extremely low
        outdoor Al Fresco tiles are resistant to algae and moss                                                                    maintenance. To clean, simply brush with a mix of washing
         - no need to worry about your tiles turning green and                                                                     up liquid and water. For more stubborn stains, use Al
                                             becoming slippery!                                                                    Fresco residue remover, see page XX.

                                Good Slip Resistance                                                                               Colour Bodied
     Al Fresco tiles have a good slip rating of R11 making them                                                                    Sometimes, accidents happen - but don’t worry! The core
           safe and practical in all weather conditions. For more                                                                  of our Al Fresco outdoor porcelain tiles are colour bodied,
                       information on slip ratings, see page XX.                                                                   meaning that any unfortunate small chips that may occur
                                                                                                                                   will barely be noticeable.

                                        Simple to Install                                                                          Fade Resistant
      Create a traditional patio, or loose lay outdoor porcelain                                                                   Perfect for sunny spots, Al Fresco tiles are created using
      tiles onto grass, gravel or sand without the need for any                                                                    high definition printing techniques with inks that will not
          specialist installation equipment. If you already have                                                                   fade or lose their colour.
           a solid surface, why not try our pedestal installation
          system? For further installation advice, see page XX.

4                                                                                                                                                                                                5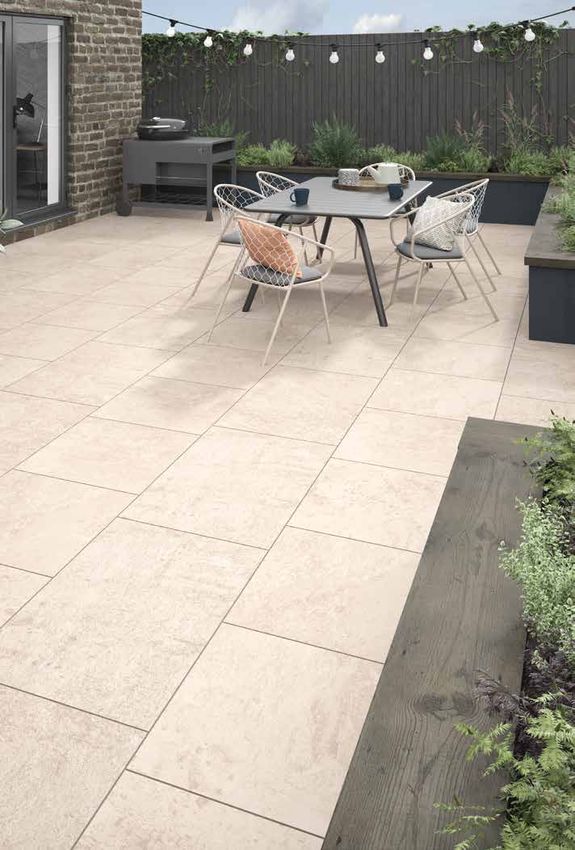
Abbey Black Multi
    Create an authentic look in a classic black and multi-shade slate effect design with a look of natural stone but in a low
                                                                                                                                                                    Newby Grey Multi
                                                                                                                                       Featuring a softer blend of shades than Abbey Black Multi, Newby Grey Multi is perfect for creating a relaxing and rustic
    maintenance tile that won’t fade or deteriorate, whatever the British weather may bring. Each tile features a varied mix of   outdoor space. Each tile features a unique blend of soft grey and natural shades , carefully crafted from durable porcelain to
    black and natural shades that are indistinguishable from real slate making it a practical and low maintenance option for a      look just like natural stone but without the need for sealing or excessive maintenance. Relax and enjoy your time outdoors
    variety of outdoor spaces. Remember to always mix up your tiles prior to fixing to create a pleasing blend of shades.         on a beautiful patio area, rather than investing all your time with upkeep. Remember to always mix up your tiles prior to fixing
                                                                                                                                                                                                                          to create a pleasing blend of shades.

    Available in size 600x600x20mm outdoor                                                                                                                                                                          Available in size 600x600x20mm outdoor
    See specification table on page 35 for more information                                                                                                                                          See specification table on page 35 for more information

6                                                                                                                                                                                                                                                                    7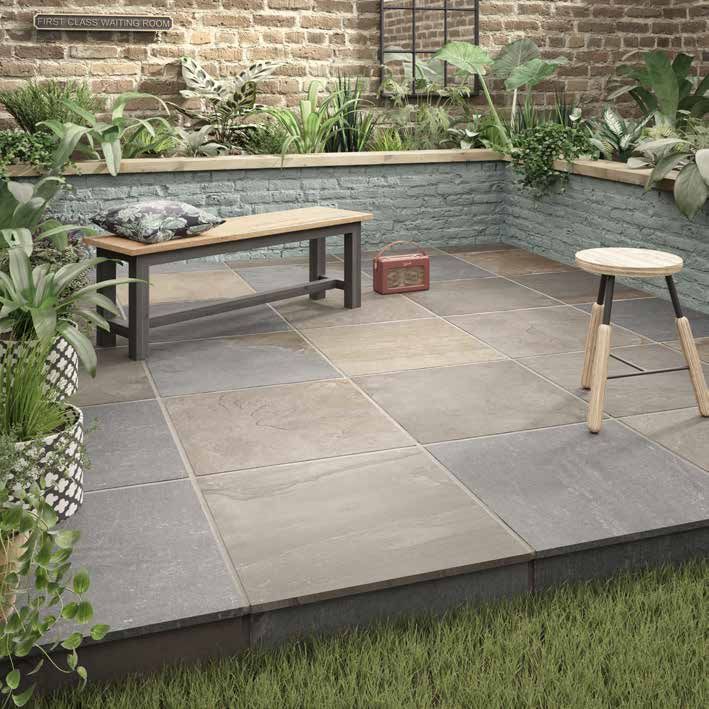
Chatsworth
         The Chatsworth collection features a subtley shaded pattern with tonal flecks of stone effect detailing. Opt for the
     contemporary and versatile Light Grey shade, or create a bolder statement with the striking Dark Grey shade that really
    makes plants and foliage pop. For a softer and more natural look the Ivory shade is perfect for creating a relaxed and clam
                                         feel. Frost and fade resistant, these tiles are a practical choice for any outdoor space.

                               Ivory, Light Grey & Dark Grey available in sizes 600x600x20mm & 600x900x20mm outdoor
                                                                  See specification table on page 35 for more information

8                                                                                                                                    9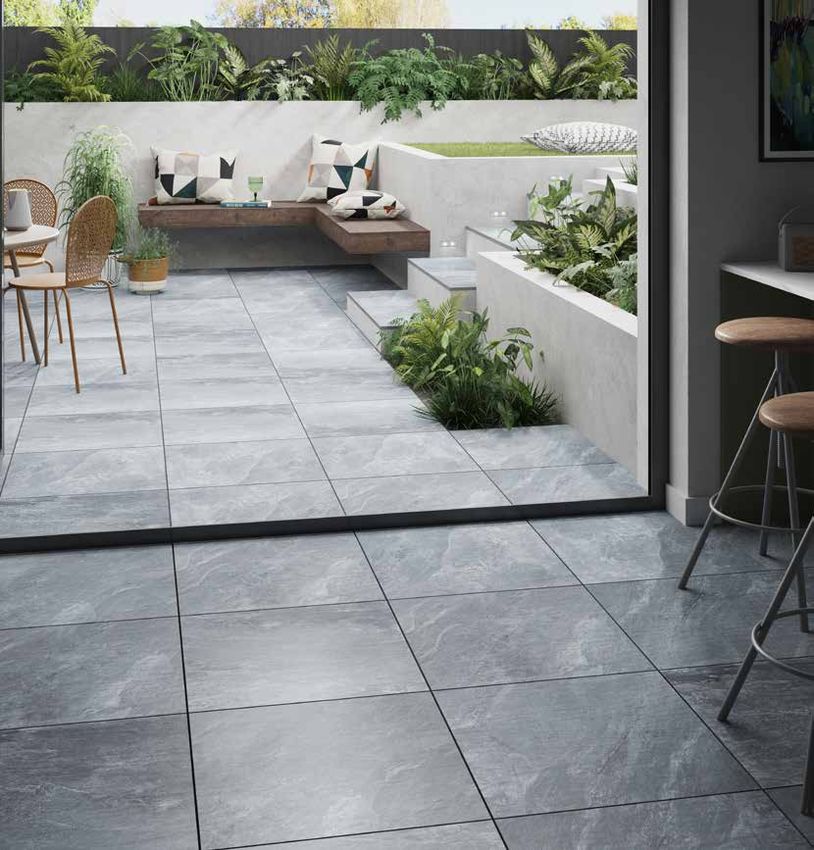
Exbury
     Create a rustic feel in your outside space with the authentic veining and natural stone look of Exbury. This striking design
     has been created using high definition priniting techniques that create a look of natural stone, but without the need for
     sealing and maintenance. Exbury is available in two shades - modern classic Grey, and traditional warming Beige. Coordinate
     10mm thick tiles through to your interior spaces too for a seamless finish from garden to home.

     Beige & Grey available in sizes 595x595x10mm indoor, 600x600x20mm outdoor & 600x900x20mm outdoor
     See specification table on page 35 for more information

10                                                                                                                                  11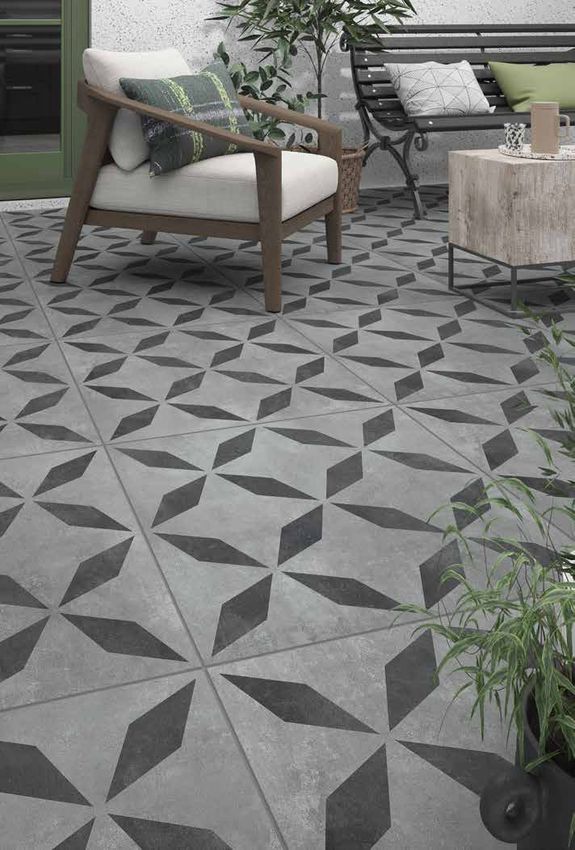
Harewood
     If you love the look of natural wood or timber decking, then Harewood is the perfect collection to create a hard wearing
     and durable patio area. Unlike timber, our porcelain tiles do not require sealing to protect them and will not rot or become
     slippery in wet weather. Contemporary Grey creates a cool and stylish space, whilst the Oak shade grounds gardens and
     offers natural charm. Our indoor 11mm thick tiles come in a slightly smaller format to better suit indoor spaces and blur the
     boundaries between indoor and outdoor living.

     Grey & Oak available in sizes 195x1200x11mm indoor & 300x1200x20mm outdoor
     See specification table on page 35 for more information

12                                                                                                                                   13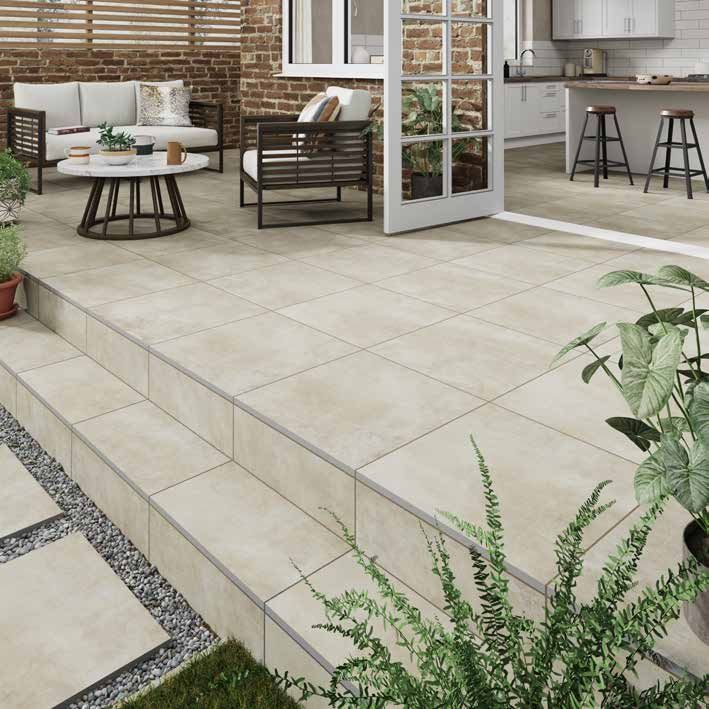
Harlow
        Easy to install in a variety ways including onto sand, grass or gravel, Harlow brings natural warmth to your outdoor space.
           The Harlow collection features a subtly textured surface and gentle mottling detail which enhances the realistic stone
          nature. Harlow works harmoniously with an array of exterior styles and is available in warm and inviting Beige and stylish
     Grey. Combine both 600x600mm and 600x900mm sizes together for an organic and modular effect that will look beautiful
                                                                                                                  for years to come.

                                                   Beige & Grey available in sizes 600x600x20mm & 600x900x20mm outdoor
                                                                     See specification table on page 35 for more information

14                                                                                                                                     15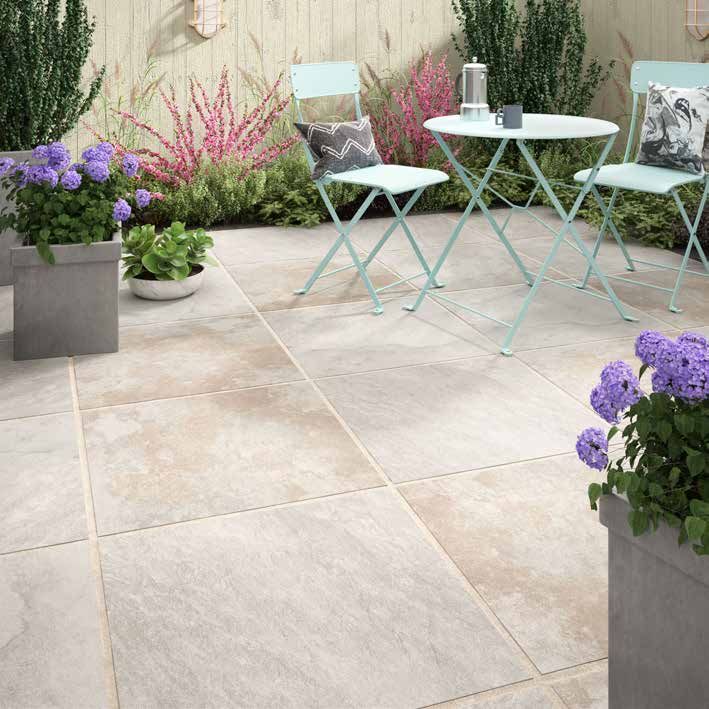
Adlington White
     Adlington features a fresh and light white colouring mixed with traces of natural tones that’s ideal for creating an illusion of
                                                                                                                                                             Sherborne Graphite
                                                                                                                                        In stark contrast to Adlington, Sherborne is the darkest shaded tile in the Al Fresco collection featuring a striking black tone
     space in small gardens. Coordinate with bright pops of colour and a mixture of florals for a bright and exciting space, or for a       with a subtle stone effect pattern. The deep shading of this tile creates the ideal backdrop to allow plants and foliage to
     more traditional mediterranean look add terracotta pots and deep aqua blue tones reminiscent of the sea and summer sky.              pop with colour. Style with shades of grey and white for an ultra-sleek monochrome look that’s both hardwearing and low
     Fade resistant in strong sunlight and resistant to algae and moss, Adlington will look perfect for many years to come.                                                                                                                               maintenance.

     Available in size 600x600x20mm outdoor                                                                                                                                                                              Available in size 600x600x20mm outdoor
     See specification table on page 35 for more information                                                                                                                                              See specification table on page 35 for more information

16                                                                                                                                                                                                                                                                         17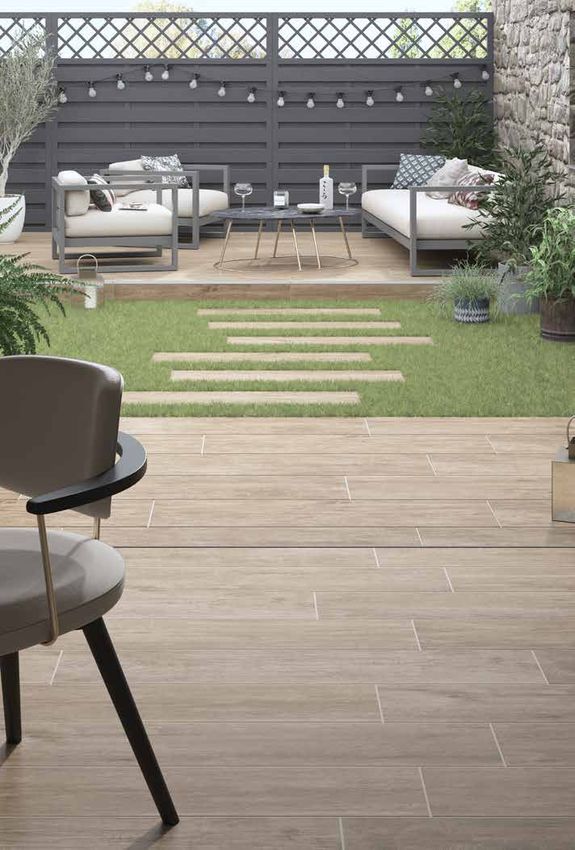
Rosemoor
        Create a striking and unique look with a look of natural stone but in a low maintenance tile that won’t fade over time. Each
     tile features a varied mix of natural patterningm and stone-style veining that replicates the real thing. Rosemoor is available
         in two shades - soft and calming grey, and warm and inviting sand. Remember to always mix up your tiles prior to fixing to
                                                                                     create a pleasing blend of patterns and shades.

                                                                         Sand & Grey available in size 600x900x20mm outdoor
                                                                       See specification table on page 35 for more information

18                                                                                                                                     19
Welford
Add a contemporary touch to your outside space with the subtle concrete style patterning of Welford. This modern design
has been created using high definition priniting techniques that create a look of weathered stone, but without the need for
sealing and maintenance. Welford is available in three shades - dark and moody Anthracite, classic and chic Grey, and warm
and inviting Ivory. Coordinate 10mm thick tiles through to your interior spaces too for a seamless finish from garden to
home.
Ivory, Grey & Anthracite available in sizes 595x595x10mm indoor & 600x600x20mm outdoor
See specification table on page 35 for more information
20 21Anthracite Geometric & Grey (see pages XX & XX)
Welford Geometric
Looking for something a little bit different? Our Welford Geometric tiles are the perfect choice to create a unique outdoor
living area. Embrace the great outdoors and create a feature floor that is sure to get your friends and family talking.
Combine with Welford non-patterned tiles to create zoned areas - ideal for defining entertaining and relaxing spaces.
Extremely hard wearing and simple to install, Welford Geometric tiles are the easy way to create a statement on-trend
outdoor space.
Grey Geometric Grey Geometric & Anthracite Geometric available in size 600x600x20mm outdoor
See specification table on page 35 for more information
22 23Installation Accessories
From small and intimate patios, to large scale landscaping projects, the Al Fresco collection offers a comprehensive range
Brush-in Grout
•
•
Use to fill the gaps between tiles for a seamless finish
Fast and easy application Black
of installation accessories to perfect any project. If you are fixing your tiles with mortar, Instarmac Pro-Prime Slurry is an • Permeable - allows drainage
absolute essential to ensure your tiles bond to the base below. Use Al Fresco Tile Protector to create a protective seal • Walk on in just 24 - 48 hours
against installation residues such as mortar and grouting compounds and for any stubborn stains after installation, use the • Use in all weather
Al Fresco Residue Remover. For a perfect finish, Instarmac ProPave Brush-In Grout infills joints with minimal effort. • Resistant to frost and extreme weather conditions
An alternative installation method is our pedestal support system which creates an elevated patio area without the need for • No waste - left over material can be re-used
lots of equipment. It can also be easily moved around or adjusted as the tiles are not fixed with adhesive. • 15kg tub covers up to 25sqm**
Grey
Buff
Slurry Primer
• Provides an exceptional bond • Quick and easy application
between outdoor porcelain tiles • 20kg paper bag covers 15sqm*
and a wet mortar bed • NBS Plus registered
• Just add water on-site • BS 7533 compliant
Tile Protector
Available in • Apply before grouting to create a protective seal against
Pedestals
a handy twin cement, grout & jointing compounds • Create a patio without the need
• Apply after grouting to protect both exterior and interior
pack! porcelain tiles against the dirt of everyday living
for lots of equipment
• Pedestals allow for drainage
• 1 Litre covers approx 25m2* and you can hide cables and
equipment underneath
Residue Remover
• As the tiles are not attached with
Small Pedestal Medium Pedestal Large Pedestal adhesive, you can easily move
Height 25-37mm Height 60-105mm Height 94-169mm
them around
• Rapid action cleaner for removing cement residues, • Can be laid over any solid surface
grout stain and other similar deposits such as patios, concrete or
• Suitable for exterior porcelain and also interior porcelain balconies
tiles • Self levelling pedestal head
• Use diluted or concentrated to remove a variety of stains creates a stable surface on
and residues uneven ground
• 1 Litre covers approx 25m2* • Create a clean step front to
raised patios using the edge &
corner clips
• Easily adjust the patio level using
* Coverage is provided as a guide only and reflects typical application without any wastage. It should
not be used as an exact material calculation. Edge Clips Corner Clips Pedestal Height the adjustment key
Adjustment Key
Base & Head Base & Head
** Based on 600x600mm tile, 20mm joint depth & 3mm joint width.
24 25Design Inspiration
When it comes to laying tiles in your garden, many people choose a regular grid of square or rectangular slabs, all the same
size and colour. It’s surprisingly easy to create a practical yet beautiful space by playing with different textures, colours and
patterns. Here are some simple yet creative ideas to inspire you and help you to design your perfect space.
Stack Bond Third Bond Diamond
Herringbone Modular-Style Random Stagger
Stack bond is the simplest and most common way to lay a patio. Coordinate
your grout colour for a seamless look, or use a contrasting colour to add a
simple statement. Third bond is a great way to lay planks and larger tiles for a
contemporary look. Staggering the tiles in this way creates an organic feel and
helps to define the tiles shape. You can create an interesting twist on a simple
pattern with the diamond layout - perfect for square tiles. Using a random
stagger is a great way to create a natural look and the herringbone pattern is a
good way to create a sense of space in small areas - both of these layouts work
especially well for planks. Some of our Al Fresco collection features both square
and rectangle tiles in the same design and colour - you can mix these together
in rows to create a modular-style effect which is really effective in larger spaces.
Larger porcelain tiles inherently have a slight curvature to them, which means
that fixing them in a brick bond layout can make the floor appear slightly uneven.
Although we don’t recommend it, if you try laying your tiles in a brick bond
pattern and you’re happy with the level of evenness between each row of tiles
Brick Bond then there’s no reason why you can’t lay them in this way.
26 27Installation Advice
With the right materials and preparation, you can easily install your own Al Fresco tiles. Follow these simple steps to create
Scan here with your smart
phone to view all our detailed
installation videos
your own seamless indoor & outdoor space. Installing your own Al Fresco tiles is both rewarding and satisfying but you
could be exposed to various risks if the correct safe methods of work are not followed. Before you begin, be sure you have
the correct tools and the appropriate protective equipment. Always wear gloves and safety footwear when working with
outdoor porcelain tiles. Handle your tiles with care to avoid breakages and seek assistance if needed when lifting.
How to install a porcelain patio on wet mortar
Step One Step Two Step Three Step Four
Firstly, mark out the area where you want your patio Although outdoor porcelain tiles don’t need to be Before you lay your tiles, you will need to prepare the Fill with hardcore (gravel and crushed hard rock) to
to be with posts and string. Measure the length and sealed to protect them from water penetration, you ground, by digging to a depth of around 150-200mm. a depth of 100-150mm and use a rake to distribute
width of your area and multiply these values together may find the installation process easier if you coat the Your ground should have a slight slope to allow for the mixture. Compress the hardcore using a whacker
to calculate the square meterage. If your area is not tiles before installation with Al Fresco Tile Protector. drainage. power plate, building up in layers. Remember to check
a straight forward square or rectangle, break each This prevents mortar and slurry from becoming that your ground still has a slight slope.
area down into smaller rectangles. Calculate each ingrained in the surface of the tiles and makes cleaning
rectangle, then add these values together. Once up after installation even easier, though this is entirely
you’ve calculated the total square meterage, multiply optional. Apply to the surface of the tile with a foam
this number by 1.1. This adds 10% extra on to your roller, taking care not to coat the edges.
total to allow for cuts and wastage.
Step Five Step Six Step Seven Step Eight
Add a layer of mortar on top of the compressed Place 7 litres of clean water in a suitable container. Add Place the tile into position, using a corner as a starting If you wish to infil any joint gaps, we recommend using
hardcore. We recommend 4 parts sand to 1 part UltraScape Pro-Prime powder slowly and mix for 3 to 5 point - for example next to a wall or the house. Press ProPave brush-in grout designed for outdoor porcelain
cement. minutes to create a smooth lump-free slurry. Coat the into place and use a rubber mallet and spirit level to tiles. Use a brush to mix over the joints, gradually and
underside of the first tile with priming slurry. secure and adjust the level, remembering to take evenly filling them all in. Once the joints are filled, use a
drainage into consideration. Continue to lay tiles in this pointing trowel to firm the grout into place. Add more
way leaving a 3-5mm gap between each one. Use a grout if needed to create a clean and level finish.
bucket and sponge to clean up any mortar or slurry as
you go.
28 29How to create a raised patio with pedestals
Step One Step Two Step Three Step Four
Pedestals are a great way to create a patio area Before you begin, you will need to calculate how many Prepare your pedestals for the edges and corners. For Use a corner as a starting point such as next to a
without the need for lots of messy equipment or tools. pedestals you need. The easiest way to do this, is to the edges, cut along the base line to remove one side. wall, house or fence, and place the first pedestal.
They can be laid on top of any solid surface such as measure and sketch out your patio plans. Each tile For the corners, cut along an additional base line to Place three more pedestals in a grid layout to fit the
existing patios, tarmac driveways or even balconies. requires one pedestal in each corner. The spacer tabs remove two sides and create a right angle. measurements of your tile. Twist the pedestal by hand
It’s a good idea to lay a layer of weed membrane down in the top of the pedestal head hold the tile corners in or with the adjustment key to alter the height. Align
under the pedestals so that you don’t get weeds place. For edges and corners, you will need to remove the pedestal head so that the cross shaped keyhole is
growing up through the cracks. If your sub-surface is some or all of the spacer tabs so that the tile sits at a right angle to the tile corner. Place the tile on top
completely solid such as a concrete slab or balcony, flush on top. For larger tiles you may wish to place an of the pedestals ensuring that the corners sit flush
you can skip this step. If you don’t already have a solid additional pedestal without spacer tabs in the centre into the tabs.
sub-base, you will need to create one before you begin for extra support.
installation.
Step Five Step Six Step Seven Step Eight
Continue to lay your tiles, adjusting the height and level If you need to create a step front, measure and Place the cut tile piece in between the clips to hold it Place your tiles back in place on top of the pedestals to
as you go by inserting the adjustment key between the cut your tile to the correct height (see page XX for in place. If you wish, you can secure the edging clips complete the look.
tile joints and twisting. Once the whole pedestal patio cutting advice). Temporarily remove any tiles from the with silicone or glue but this is not essential. Repeat
area is complete, review the level again and adjust if main patio area that lay on top of an edge or corner this process for the corner clips until your step front is
needed. and prepare the edging clips by laying one piece completed.
underneath the pedestal, and one piece on top. The
top piece should slot on top of the spacer tabs.
Scan here with your smart
phone to view all our detailed
installation videos
30 31How to cut outdoor porcelain tiles
Important Information DIMENSIONS, COLOUR & SHADING
Although we have made every effort to display the colours accurately, we cannot guarantee that this printed brochure
directly reflects the colours of the actual product. As products can vary slightly from these images, we advise you to order
a sample for true colour representation. Please note that tiles are created in batches and some shade variation may occur
between batches. Products with the same colour name, such as “grey”, are not necessarily the same exact colour shade as
another product with “grey” in its name. Please do not order using colour names or product names as your guide to colour.
We manufacture our tiles to extremely tight tolerances, however due to the nature of the manufacturing process, sizes,
weights, capacities, dimensions and measurements indicated may vary slightly.
HEALTH AND SAFETY
Installing your own Al Fresco tiles is both rewarding and satisfying but you could be exposed to various risks if the correct
safe methods of work as described in this booklet are not followed. Before you begin, be sure you have the appropriate
Step One Step Two protective equipment.
Outdoor porcelain tiles are super strong and cannot Measure and mark a line where you would like to • Always wear gloves and safety footwear.
be cut using traditional hand tools. In order to minimise cut the tile. Cut from the top surface with the blade • Always wear goggles & respiratory protection when using cutting equipment.
breakages and spoiled cuts, we recommend using a running at half-revs. Bring the blade into contact • Handle your Al Fresco tiles with care to avoid breakages and chipping that may result from mishandling. • Larger tiles may
water fed cutter with a diamond blade. This will also with the tile. As the blade bites the tile, increase the require assistance when lifting.
help to minimise dust. Always wear gloves, safety revs if necessary and progress along the marked line.
footwear, goggles & respiratory protection when using Ensure the blade is water fed throughout and remains GOODS
cutting equipment. Handle your tiles with care to avoid evenly balanced. Do not attempt to plunge the blade We take care to ensure that all of our Goods leave us in perfect condition. All orders must be examined on delivery and
breakages and seek assistance if needed when lifting. throught the tile in one go - progress steadily and any shortages, damages or other discrepancies should be brought to the supplier’s attention before installation. Confirm
repeat the process until the tile is cut. that all products have been inspected and approved before installation begins, as the installation of the product signifies
acceptance.
How to lay stepping stones or staggered patios MAINTENANCE
Use Al Fresco Tile Protector to protect surfaces against staining from cement, grout and jointing compounds during
the installation process. To keep your tiles looking their best, sweep the surface to clear away dust, dirt and debris. Fill a
bucket with warm soapy water. Washing up liquid will work fine – do not use acid based or abrasive cleaning products. Wet a
scrubbing brush with the soapy water and scrub the surface of the tiles until clean. Leave to dry naturally. For tougher stains
or residues such as cement and grout stain, use Al Fresco Residue Remover.
GUARANTEE
Al Fresco tiles have a 10 year structural guarantee. We warrant that the structural integrity of the product will
not fail, under normal conditions, within a period of 10 years from date of purchase. Because specific installation details,
structural design and environmental conditions are beyond the control of the Company, we cannot accept responsibility
for the improper installation and/or care and maintenance of our products after they are installed. However, in the event of
latent defects in the product caused by improper manufacturing, the Company will replace any defective product, provided
the Company is notified in writing. The Company will also not be responsible if tiles are installed with a visible defect. The
Company must pre-approve the cost of the replacement, in writing, prior to commencement of any warranty work.
Step One Step Two
SLIP RESISTANCE
It’s easy to create walkways and staggered patios by If the ground is soft or uneven in any way, you will need
R Ratings are determined via testing in accordance with DIN 51130:2004, which is the “Testing of floor coverings;
loose laying your outdoor tiles. If your surface is solid to make the surface stable. To do this, create a base
determination of the anti-slip properties; workrooms and fields of activities with slip danger; walking method; ramp test
and secure, outdoor porcelain tiles can be simply with a layer of sharp sand or fine gravel, then place your
German National standard 2004”. This is fully recognised and adopted in the UK. The “R” values range from R9, which has
placed on the ground. tile on top.
a small degree of slip resistance, up to R13 which is the highest slip resistance. R9 & R10 ratings are suitable for indoor
domestic areas, wheres R11 ratings and above are also suitable for external applications.
Aftercare & Maintenance
Maintaining your porcelain tiles is easy, simply sweep away any loose dirt regularly, and brush with warm soapy water for an
extra clean as and when needed. Outdoor porcelain tiles do not require sealing, however you may wish to apply Al Fresco
Tile Protector after grouting to protect your tiles against the dirt of everyday living. For any mild stains and residues, dilute
1 part Al Fresco Residue Remover in 4 parts water. Dampen a cloth or sponge and wipe thoroughly. For tougher stains and
residues, dilute 1 part Al Fresco Residue Remover with 1 part water. Apply liberally over the surface of the tile and agitate
with a scrubbing brush. Leave for 5-10 minutes before rinsing with clean water. For extremely stubborn stains, use undiluted
Al Fresco Residue Remover and agitate with a scrubbing brush. Always rinse the surface with clean water afterwards.
Scan here with your smart
phone to view all our detailed
installation videos
32 33Specification
Guide to Variations
V1 V2 V3 V4 V5
Uniform appearance Slight variation Moderate variation Substantial variation Extreme variation
Pattern, shading and Distinguishable yet Varying pattern and Random colour and Contrasting
colour differences are subtle differences in shading but with a pattern differences colour and pattern
minimal pattern with similar similar colour identity that create a totally differences that
colouring unique look create a striking
statement look
34 3536
You can also read