SERIES: CBBQ OPERATION MANUAL - ULTIMATE SERIES OUTDOOR CHARBROILERS
←
→
Page content transcription
If your browser does not render page correctly, please read the page content below
OPERATION MANUAL
   ULTIMATE SERIES OUTDOOR CHARBROILERS

             SERIES: CBBQ

B U I LT BY C R A F T S M E N . T E S T E D BY T I M E ®.
OUTDOOR GAS CHARBROILER OPERATION MANUAL

OUTDOOR GAS CHARBROILERS

Outdoor Gas CharBroiler Models:
CBBQ-30S & CBBQ-60S

                                                             This equipment is design engineered for commercial
                                                             use only.
All gas operated Bakers Pride® charbroilers are intended
for use with the type of gas specified on the rating plate
and for installation will be in accordance with National
Fuel Gas Code ANSI Z223.1 (latest edition).

Please retain this manual for future references.

                      WARNING
  FOR YOUR SAFETY: Do not store or use gasoline
  or other flammable vapors or liquids in the vicinity
  of this or any other appliance.

                      WARNING
  California Residents Only
  WARNING: This product can expose you to
  chemicals including chromium which is known to
  the State of California to cause cancer and birth
  defects or other reproductive harm. For more
  information go to www.P65Warnings.ca.gov.

                      WARNING
  Improper installation, adjustment, alteration,
  service or maintenance can cause property
  damage, injury or death. Read the installation,
  operating and maintenance instructions
  thoroughly before installing or servicing this
  equipment.

                                           BAKERS PRIDE OVEN COMPANY, LLC.
                                            1307 N. Watters Rd., Suite 180
                                                   Allen, TX 75013

                         Phone: 800.527.2100 | Fax: 914.576.0605 | www.bakerspride.com
                                                                                                 P/N 8839300 4/19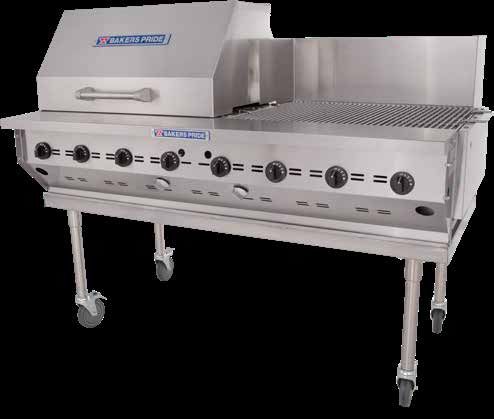
OUTDOOR GAS CHARBROILER OPERATION MANUAL

TABLE OF CONTENTS
INSTALLATION INSTRUCTIONS                               1        MAINTENANCE INSTRUCTIONS                                    7
    Safety Precautions                                  1             Cleaning Instructions                                  7
    Unpacking Instructions                              3             Burner/Orifice Inspection                              7
    Assembly                                            3             Troubleshooting Chart                                  8
    Connecting The Gas Lines To The Propane Tanks       4        ACCESSORIES                                                 9
    Installing Side Tank Mounting Brackets              5             Instructions for Installing Char Broiler Accessories   9
    Installing Optional Tank Caddies                    5        EXPLODED VIEWS & PARTS LISTS                                10
    Leak Testing                                        5
                                                                 WARRANTY                                                    13
LIGHTING INSTRUCTIONS                                   6
    Lighting Instructions                               6
    Shutdown Instructions                               6

                                                     Gas Specifications
               Model Number                             Propane Gas                                    Natural Gas
                                                     BTU/HR @ 10” W.C.                              BTU/HR @ 3.5” W.C.
                   CBBQ-60S                               160,000                                        160,000
                   CBBQ-30S                                80,000                                        80,000
                                                      Model Definitions
                             Model Number                                                      Width
                              CBBQ-30 S                                                Overall Width = 32”
                              CBBQ-60 S                                               Overall Width = 62 1/2”

INSTALLATION INSTRUCTIONS

Safety Precautions

                            DANGER                                                            CAUTION
  This symbol warns of imminent hazard which will                   This symbol refers to a potential hazard or unsafe
  result in serious injury or death.                                practice, which may result in or moderate injury or
                                                                    product or property damage.

                         WARNING
  This symbol refers to a potential hazard or unsafe                                       NOTICE
  practice, which could result in serious injury or                 This symbol refers to information that needs
  death.                                                            special attention or must be fully understood even
                                                                    though not dangerous.

                                                             1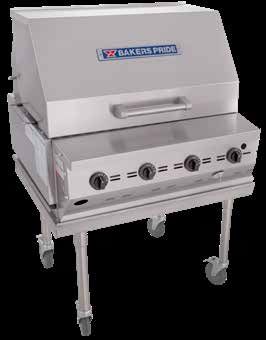
OUTDOOR GAS CHARBROILER OPERATION MANUAL

INSTALLATION INSTRUCTIONS
Safety Precautions                                           8. Broiler must be disconnected from gas supply
(Must Be Posted In A Prominent Location)                        during any pressure testing of pipelines in excess
                                                                of ½ psig (3.45 kPa), and isolated (by turning off
                                                                gas shut-off valve) during any testing less than ½
                     WARNING                                    psig.
  For your safety, the following safety precautions
                                                             9. Inspect the flexible gas hose(s) prior to each use.
  should be followed and enforced.
                                                                If excessive abrasion or wear occurs, or if the
                                                                hose is cracked or damaged it must be replaced.
If You Smell Gas:
                                                             10. LP cylinders used with the broiler must conform
• Shut off gas supply to appliance
                                                                 to the specifications of the US Department
• Extinguish open flames                                         of Transportation (DOT), or in Canada to the
• Immediately call your gas supplier                             Canadian Transport Commission. The construction
                                                                 must include a collar to protect the service valve
                                                                 from physical damage; they must have a safety
                     NOTICE                                      relief device that communicates directly with
  Instructions must be posted in a prominent                     the vapor space of the cylinder and a system
  location. All safety precautions must be taken in              to withdraw vapor in the vertical position. The
  the event the user smells gas. Safety information              cylinder must have proper marking, shutoff valve
  can be obtained from your local gas supplier.                  and a Type I (QCC1) service outlet connection.
                                                             11. Any attempt to fit the regulator(s) with anything
                                                                 other than the mating Type I (QCC1) connector
1. This unit should be only operated outdoors.
                                                                 will negate the important safety features designed
2. LIGHTING: Follow the instructions in the Lighting             into the Type I system. Fitting a standard #510
   Instructions section and from the label attached              POL connector will not provide the flow control or
   to right side of the broiler.                                 temperature shutoff safety features build into the
3. Do not place or use unapproved accessories or items           complete Type I system.
   on the broiling area or on any part of this unit.         12. Propane cylinders must be stored outdoors in a
4. Do not place combustibles or non-combustible                  well-ventilated area out of the reach of children.
   materials in the proximity of the broiler as this         13. The handling, filling, use, storage and
   could cause fires or obstruct airflow to the main             transportation of all sizes of LP gas cylinders
   burners.                                                      must be in accordance with NFPA 58, Storage
5. This unit may be operated with 0” minimum                     and Handling of LP Gases, or CAN/CGA B149.2,
   clearance to non-combustible construction in                  Propane Gas Installation Code.
   areas that are non- combustible locations. For            14. Surfaces of unit will become hot during normal
   combustible construction installations: Minimum               operation and can cause burns and/or serious
   12” each side, 24” back.                                      injury. Do not touch a hot unit without protective
6. This installation must conform to local codes, or             clothing. Allow the unit to cool before cleaning or
   in absence of local codes to the National Fuel                disassembling.
   Gas Code ANSI Z223.1, latest edition. In Canada,          15. High winds may adversely affect burner
   it must conform to current National Standard                  performance.
   CAN/CGA B 149. 1 & 2. - natural gas/propane
                                                             16. The minimum ambient temperature for proper
   installation code.
                                                                 operation of this appliance is 50°F (10° C).
7. Use only the legs and casters provided with the
                                                             17. Retain this manual for future reference.
   unit. Always lock the caster brakes to prevent
   movement while the appliance is in use.

                                                         2
OUTDOOR GAS CHARBROILER OPERATION MANUAL
INSTALLATION INSTRUCTIONS
Unpacking Instructions: 5. Lift frame assembly from carton and set aside.
Carefully unpack the broiler and inspect immediately for 6. Lift base from carton and place it upside down on
shipping damages. Your outdoor boiler was shipped in a ground.
carton designed to give maximum protection in normal
7. Install legs & caster assemblies and flip the stand
handling. It was thoroughly inspected before leaving the
over into the upright position.
factory and the carrier accepted and signed for it. File
any claims for shipping damage or irregularities with the 8. Mount side tank brackets to the unit (see Figures
carrier. A-1 & A-2).
9. Place the broiler on the stand.
Assembly: (Refer To Figure “A”)
10. Place the carryover tubes cover(s) on their
These unassembled parts should be included in your
brackets to cover the tubes.
charbroiler package:
11. Place the radiants on their front and rear support
1 Grate (s) 3 Frame assembly 5 Water Pan (s) 7 Leg & Caster pins over each burner.
Assemblies 12. Place grates into frame assembly.
2 Radiants 4 Carryover tube 6 Base
cover (s)
1. Remove shipping bands from carton.
2. Remove top of carton.
3. Remove grates from the unit and set them aside.
4. Remove and unwrap any small parts packages
that are located underneath the grates. If
stainless steel parts are coated with PVC film,
remove it prior to installation.
Figure A
3OUTDOOR GAS CHARBROILER OPERATION MANUAL
INSTALLATION INSTRUCTIONS
Connecting The Gas Lines To The Propane Tanks NOTICE
• New propane tanks are shipped empty with no
pressure and must be purged of air and filled All 20-lb LP cylinders are provided with the new
with propane per NPGA (national propane gas Type I ACME valve with an OPD (overfill protection
Association) device) installed. The 40-lb LP cylinders have a
Type I ACME service valve with a one-way valve
• Tank brackets must be mounted to the charbroiler that only allows propane to flow out of the valve.
stand (refer to on the Lighting Instructions The 40-lb cylinder cannot be filled through this
section). Type I ACME service valve as the 20 lb cylinders
• Tanks must be mounted securely to the mounting are. The 40-lb cylinders have a 1-3/4” ACME
brackets (refer to paragraph “E” below). male fill connection with a built in OPD to protect
the cylinder from being overfilled. Be sure that
• Install the green plastic connector onto the
your local propane supplier has the correct
external thread on the tank valve. Turn it
adapter to fill through a 1-3/4” ACME male filling
clockwise and hand tighten. The plastic nut is
connector.
designed for easy grip and allows user friendly,
wrench-less connection. It is thermally sensitive 20-lb cylinders must be used in the vertical
and will shut off the flow of gas if subjected to (upright) position and 40-lb cylinders must be
temperatures between 240°F and 300°F. Type I used in the horizontal (laying down) position.
(Q.C.C. 1) connection system will not allow gas
to flow until a positive seal has been made (See
Figure “A-3”).
• Make sure the vent on the regulator is facing
down (toward the ground) so that water and other
liquids do not get into the regulator.
Installing Side Tank Mounting Brackets
Figure A1 Figure A2
4OUTDOOR GAS CHARBROILER OPERATION MANUAL
INSTALLATION INSTRUCTIONS
Side Rack Installation: Leak Testing:
• Side racks have to be installed on both sides of The plumbing must now be tested for gas leaks before
the 60” stand and on the right side of the 30” use. Turn all propane tank, burner control and carryover
stand if your unit came with 20-lb LP cylinders. control valves to the OFF position. Wet all gas line
Optional 40-lb horizontal cylinders come with fittings and connectors with a solution of soapy water
single or double tank caddy. (or commercial leak disclosing liquid). Slowly open the
• Attach the tank rack to the side of the stand propane tank valve(s) and look for bubbles of foam at
with two 1/4-20” thumb screws provided (see any of the joints of the system. If a leak is found, close
fig. A-1). Make sure the screws are properly the tank valves immediately and call your local dealer or
tightened. the manufacturer. If the gas connections are leak-free,
the unit is ready to use. Follow the lighting instructions.
• Clamp mounting bracket to the legs with the
clamps and fasten with (2) thumb screws.
• Hang the 20-lb cylinder on the rack with service
valve outlet facing the front of the unite (see fig.
A-2).
• Fasten the tank with tank brace and wingnut.
• Make sure the tanks are secure in their racks and
cannot move.
Installing Optional Tank Caddy:
• If your unit is equipped with optional tank caddy,
it has to be placed underneath the broiler and
secured in place by (2) hooks provided (see fig.
“A-3”). The front of the caddy will be raised off
the ground to prevent possible movement and
putting strain on connection hoses.
• LP gas cylinder(s) have to be securely mounted to
the caddy with thumb screws. They will only work
in the horizontal position.
Figure A3
5OUTDOOR GAS CHARBROILER OPERATION MANUAL
LIGHTING INSTRUCTIONS
Lighting Instructions: front panel. If the carryover tube(s) will not light
Fill water pans to within 1/2” of top edges (this will or stay lit, shut off the gas supply and do not use
control grease flare-ups, provide for ease of cleaning the unit. Wait 5 minutes before attempting to re-
and keep cooked food moist). Re-fill pans with water light the unit. (See Figure “B”)
when they evaporate to within 1/2” of the bottom of the 5. After lighting the crossover tube(s), open the
pans. Failure to keep water in the water pans could lead desired burner valves and observe that the burners
to grease fires and will void the warranty. light completely from the crossover tube(s).
1. Check that the tank mounting brackets are
securely mounted on the unit. NOTICE
2. Open the roll-up hood if so equipped. Turn all the If the tank valves are not opened very slowly, an
burner knobs and carryover tube knobs to the OFF excess flow valve in the tank connector fitting
position and slowly open the gas tank valves. (a safety feature) may restrict the flow of gas
3. Turn the carryover tube knob on one side to the unit resulting in little or no flame at the
fully counter-clockwise to the ON position. burners. Should this happen, follow the shutdown
Insert a lit, extra-long match or a gas lighter instructions and be sure to shut off tanks and
flame though the hole on the same side in the remove and re-attach the tank connectors as
front panel. For 60” broilers repeat the same instructed. This is necessary to re-set a closed
procedure for the other side. excess flow valve. Repeat all steps of the lighting
instructions. The appliance should now function
4. Check that the entire crossover tube is lit by normally.
looking through the lighter hole(s) located on the
Figure B
Shutdown Instructions
To shut down the unit, turn all burners and carryover
tube knobs clockwise to the OFF position. Close gas
tank valve(s), disconnect propane tank(s) and leave
them outdoors.
6OUTDOOR GAS CHARBROILER OPERATION MANUAL
MAINTENANCE INSTRUCTIONS
Cleaning Instructions Burner / Orifice Inspection
• Clean the unit regularly after use. 1. Remove the front shelf by removing the two screws
• Top Grates: after removing from the unit, use warm at the ends.
soapy water and a stiff bristled brush or plastic 2. Slide front shelf forward and then lift it off the
pad. Cooking grates must be removed to steam unit.
clean or pressure wash. Do not use steel wool 3. The front of the burners, the valve bodies, and
or abrasive pads as they may degrade the metal orifices are now exposed for inspection. Looking
finish. Always clean stainless steel panels along down into the unit, compare each assembly with
the grain. figure “C” for alignment.
• Radiants/Covers: These will need little or no 4. If the components are not aligned as shown in
cleaning due to high in-use temperatures. If the diagram, discontinue use and contact the
necessary, clean as top grates. appliance manufacturer.
• Broiler body: Use warm, soapy water and a stiff 5. If the components are aligned, carefully replace
bristle brush or plastic pad. Do not use chlorine, the service shelf and re-insert and tighten the
bleach or other caustic chemicals. Be careful not screws. Your unit is ready for use.
to get water into the burners or carryover tubes. Do
not pressure wash.
• Water Pans/Stand: Clean like top grates.
Figure C
7OUTDOOR GAS CHARBROILER OPERATION MANUAL
MAINTENANCE INSTRUCTIONS
Troubleshooting Guide
Problem Probable Cause Solution
Burners & carryover Main gas supply not turned on (Natural Turn on main gas supply.
will not turn on Gas).
L.P. tank empty Replace with fresh tank.
L.P. tank valve closed. Open valve.
Burners produce Incorrect gas type. Supply correct type gas.
excessive carbon Incorrect gas pressure Call local gas supplier.
deposits Incorrect orifices. Call Bakers Pride® authorized service center.
Primary air not adjusted properly. Adjust air shutter.
Carryover will not Carryover flame adjusted incorrectly. Adjust carryover flame.
remain lit. Draft condition. Remove draft.
Carryover clogged w/grease or debris. Clean carryover.
Excessive flare-up Overload of fatty meat Maintain adequate water level in water pan.
Broiler does not Orifices may be dirty/clogged. When unit cools, check & clean orifices.
seem hot enough Low gas pressure. Increase gas pressure to 3.5" W.C. (Nat) or 10" W.C. (L.P.)
Grates &/or radiants Usually improper cleaning methods ie; Never cover top grates w/sheet pans. This causes the firebox area to overheat excessively.
&/or burners &/or users cover grate top w/sheet pans &
gas valves warp crank up heat to burn-off debris
Not enough gas to Tank is empty. Fill tank.
the burners Cylinder is frozen. If the CBBQ is operated at the full 80k btu output with a 20lb propane cylinder, the cylinder
(L.P. ONLY) may not be able to generate enough vapor pressure to support that flow when the cylinder is
less than half full. If there is frost on the bottom of the cylinder and gas flow is restricted,
this can be improved by placing the cylinder in a container of water. The water will help
heat the cylinder and prevent the ice build-up that prevents the needed vapor from forming
inside the cylinder.
Outside temperature is below 50°F. As the temperature gets below 70 deg. F, the ability to produce the vapor needed to burn
decreases. The lower the temperature, the lower the performance of the grill because of less
vapor available. At temperatures below the 50’s there is just not enough vapor available to
support adequate combustion in these high capacity burners.
Regulator Freezes Water in the liquid propane. Small amounts of water in liquid propane can form ice crystals in the regulator and prevent
(L.P. ONLY) it from working properly. Bakers Pride LP models use a two-stage regulator that reduces,
but does not eliminate this problem.
Drawing liquid propane rather than gas On a 40# horizontal tank it is possible to have liquid propane in the discharge rather than
from a 40# tank. propane gas (vapor). This can happen if the tank is overfilled or if it is bounced around
during transportation. A short “J” shaped tube is located inside the tank. This is called a
“dip tube” and it is the point where the propane vapor is taken into the discharge and then
into the regulator. If liquid propane fills this tube it will be drawn into the regulator where
it expands into gas. This will cause frost and ice to build up on the outside of the regulator
and supply hose and will interfere with normal operation. This can cause the excess flow
valve to close and severely restrict the amount of propane gas allowed to pass through the
regulator and hose. If you suspect an overfilled tank, or that there is liquid in the dip tube,
it can be corrected by running the unit with the tank(s) in the upright or vertical position in
front of the CBBQ. Make sure that the tanks are properly secured in the vertical position so
they cannot be knocked over! After the liquid propane in the dip tube has been burned off,
the tank(s) can be returned to their normal position. Be careful when returning the tank(s)
to the horizontal position so that you don’t cause more liquid propane to be “sloshed” into
the dip tube again or it will be necessary to repeat the process again.
8OUTDOOR GAS CHARBROILER OPERATION MANUAL
ACCESSORIES
Instructions For Installing Outdoor Charbroiler
Accessories
Your new Charbroiler has been shipped in several
cartons, partly assembled. Please follow the instructions
below which detail the assembly of shelves, hoods, wind
guards, tank brackets, tank caddy and stand.
1. To install the optional undershelf, mount it over the (4) legs &
casters and tighten w/screws provided.
2. Clamp the optional side mount tank bracket(s) over either the left,
right (or both) two legs w/thumb screws provided.
3. Mount top of stand on legs and tighten w/screws provided.
4. Place broiler on stand. Note that mounting screws for hoods,
wind guards and shelves are provided and must be removed from
outer flange and used to mount accessories.
5. Remove top grate(s) and snap optional side shelves(s) and/or rear
shelf onto unit (screw holes must line up).
6. Re-install top grate(s).
7. Place either the optional Hood and/or optional Wind Guard on top
of the shelve(s) with the screws provided.
8. Position the optional second Wind Guard or optional second Hood
on the unit and fasten with the screws provided.
9. If your unit is equipped with a Tank Caddy, slide it under the
broiler (in the center) and attach with the two Hooks provided for
this purpose.
10. If your unit was ordered with a Richlite Work Deck, place it on the
stainless steel front shelf.
9OUTDOOR GAS CHARBROILER OPERATION MANUAL
EXPLODED VIEWS & PARTS LISTS
Exploded View – CBBQ-30S & CBBQ-60S Exterior / Interior
10OUTDOOR GAS CHARBROILER OPERATION MANUAL
EXPLODED VIEWS & PARTS LISTS
Exterior/Interior
Item P/N Description Item P/N Description
1 G6013K Radiant 25 G6017K Work Deck, S/S, 8" (CBBQ60)
2 T1237A Grate, 24” 26 G6021U Work Deck, S/S, Richlite (CBBQ30)
3 S1316U Door Handle Kit, 10” 27 G6017U Work Deck, S/S, Richlite (CBBQ60)
4 Q2041A Screw, 1/4-20 x 1/2 28 T1240A Richlite Deck (CBBQ30)
5 U1345A Warning Label 29 T1239A Richlite Deck (CBBQ60)
6 U1346A Lighting Instructions 30 G6043U Tank Side Bracket Assy, 20# Cylinder
7 U1044A Name Plate, BP Logo, 8” 31 R1137A Cylinder, 20#, LP
8 Q1043A Name Plate, BP Logo, 13 1/4” 32 G6045T Tank Caddy Assy, Single 40# Cylinder
9 G6062T STAND ASSY, 30” 33 G6044T Tank Caddy Assy, Double 40# Cylinder
10 G6063T STAND ASSY, 30” 34 R1139A Cylinder, 40#, LP
11 S1351A STAND ASSY, 30” 35 Q2009A Thumb Screw, 1/4-20
12 S1349A STAND ASSY, 30” 36 G6029K Outer Side, Right, S/S
13 Q5001A STAND ASSY, 30” 37 G6030K Outer Side, Left, S/S
14 T1241U Griddle Plate Assy, 11” 38 G6042K Outer Back, S/S, 30"
15 G6033T Hood Assy, (CBBQ30) 39 G6022K Front Panel, 30”
16 G6025T Hood Assy, (CBBQ60) 40 G6019K Front Panel, 60”
17 G6056T Hood Assy, 1/2 Size (CBBQ60) 41 Q2046A Nut, 1/4-20
18 G6037K Side Shelf, 12" 42 Q2043A Screw, 1/4-20 x 1/2
19 G6038K Shelf Support, Left 43 Q3005A Washer, Split-Lock, 1/4
20 G6039K Shelf Support, Right 44 98US3030 Undershelf (CBBQ30)
21 G6057K Windshield, 1/2 size (CBBQ60) 45 98US3060 Undershelf (CBBQ60)
22 G6020K Windshield, 60" (CBBQ60) 46 G6074K Rear Shelf (CBBQ-30)
23 G6033T Windshield, 30" (CBBQ30) 47 G6041K Rear Shelf (CBBQ-60)
24 G6021K Work Deck, S/S, 8" (CBBQ30)
Accessories
Item P/N Description Item P/N Description
48 9822F4 Pan, S/S 4 Deep Food, Full Size *54 T1244U In-Line Griddle
49 98DWP200 Pan, S/S 4 5/8 Deep Water, Full Size *55 CBQOPT17 Vinyl Cover, 30"
50 98DC200F Cover, 4 5/8 Deep, Dome Pan, Full Size CBQOPT18 Vinyl Cover, 60"
51 98200H4 Pan, S/S 4 Deep Food, 1/2 Size 56 G6034U Steamer Support (Full Size)
52 98DC200H Cover, 4 5/8 Deep, Dome Pan, 1/2 Size *NOT SHOWN
53 T5104V Twin Head Grate Brush
Note: When ordering, ALWAYS specify Part #, Model #, Serial #, Voltage/Phase & type of Gas.
11OUTDOOR GAS CHARBROILER OPERATION MANUAL
EXPLODED VIEWS & PARTS LISTS
Exploded View – Manifold, Burner, Valve, Orifice, Pilot Tube
Item P/N Description Item P/N Description
57 L5103A Burner 71 R3194A Carry-over Tube, Left
58 R3032X Gas Valve (no knob) 72 R3195A Carry-over Tube, Right
59 S1094A Knob, Gas Valve, ON-OFF 73 Q1459A Screw, 10-32 x 3/8
60 N3023A Plug, 1/8” 74 Q2027A Screw, 1/4-20 x 1/2
61 N3081A Elbow, 3/8” (Prior to 6/03 Only) 75 N3079A Adapter, 1/8NPT
62 R3196A Hose Assy 76 N5855P Pilot Tube
63 R1135P Manifold Assy, Right (CBBQ30/60 LP) 77 G6014K Runner Tube Cover
64 R1136P Manifold Assy, Left (CBBQ60 LP) 78 G6012K Runner Tube Bracket
65 R1140P Manifold Assy, (CBBQ60 Nat. only) 79 G6011K Water Pan
66 R3130A Orifice #44, Nat. (Burner) 80 M1184A Pressure Regulator, 3.5"WC, Nat.
67 R3199P Orifice #60, Nat. (Pilot) 81 N3091A Reducing Elbow, 3/4 x 3/8 (Natural only)
68 R3197P Orifice #53 L.P. (Burner) 82 N5818A Nipple, 3/8 x 3 1/2 (LP only)
69 R3198P Orifice, #74 L.P. (Pilot) 83 N3019A Coupling, 3/4 (Natural only)
70 R1141P Manifold Assy, Right (CBBQ30 Nat only) 84 N5218A Nipple, 3/4 x 3 (Natural only)
Note: When ordering, ALWAYS specify Part #, Model #, Serial #, Voltage/Phase & type of Gas.
12HEAVY DUTY GAS CHARBROILER OPERATION MANUAL
BAKERS PRIDE LIMITED WARRANTY
WHAT IS COVERED This warranty covers defects in material and workmanship under normal use, and applies only to the original purchaser
providing that:
• The equipment has not been accidentally or intentionally damaged, altered or misused;
• The equipment is properly installed, adjusted, operated and maintained in accordance with National
and local codes and in accordance with the installation instruction provided with the product;
• The serial number rating plate affixed to the equipment has not been defaced or removed.
WHO IS COVERED This warranty is extended to the original purchaser and applies only to equipment purchased for use in the U.S.A.
COVERAGE PERIOD Cyclone Convection Ovens: BCO Models: One (1) Year limited parts and labor; (1) Year limited door warranty.
GDCO Models: Two (2) Year limited parts and labor; (2) Year limited door warranty.
CO11 Models: Two (2) Year limited parts and labor; (5) Year limited door warranty.
All Other Products: One (1) Year limited parts and labor. Warranty period begins the date of dealer invoice to customer
or ninety (90) days after shipment date from Bakers Pride - whichever comes first.
WARRANTY This warranty covers on-site labor, parts and reasonable travel time and travel expenses of the authorized service
COVERAGE representative up to (100) miles, round trip, and (2) hours travel time. The purchaser, however, shall be responsible for
all expenses related to travel, including time, mileage and shipping expenses on smaller counter models that may be
carried into a Factory Authorized Service Center, including the following models: PX-14, PX-16, P18, P22S, P24S, PD-4,
PDC, WS Series and BK-18.
EXCEPTIONS All removable parts in Bakers Pride® Charbroilers, including but not limited to: Burners, Grates, Radiants, Stones
and Valves, are covered for a period of SIX MONTHS. All Ceramic Baking Decks are covered for a period of THREE
MONTHS. The installation of these replacement decks is the responsibility of the purchaser. The extended Cyclone door
warranty years 3 through 5 is a parts only warranty and does not include labor, travel, mileage or any other charges.
EXCLUSIONS • Negligence or acts of God, • Thermostats and safety valves with broken capillary
tubes,
• Failures caused by erratic voltages or gas supplies,
• Fuses,
• Thermostat calibrations after (30) days from
equipment installation date, • Char-broiler work decks and cutting boards,
• Unauthorized repair by anyone other than a BAKERS • Tightening of conveyor chains,
PRIDE Factory Authorized Service Center,
• Adjustments to burner flames and cleaning of pilot
• Air and Gas adjustments, burners,
• Damage in shipment, • Tightening of screws or fasteners.
• Light bulbs, • Accessories — spatulas, forks, steak turners, grate
lifters, oven brushes, scrapers, peels. etc.,
• Alteration, misuse or improper installation,
• Freight — other than normal UPS charges,
• Glass doors and door adjustments,
• Ordinary wear and tear.
INSTALLATION Leveling and installation of decks as well as proper installation and check out of all new equipment —per appropriate
installation and use materials — is the responsibility of the dealer or installer, not the manufacturer.
REPLACEMENT PARTS Bakers Pride genuine Factory OEM parts receive a (90) day materials warranty effective from the date of installation by a
Bakers Pride Factory Authorized Service Center.
This Warranty is in lieu of all other warranties, expressed or implied, and all other obligations or liabilities on the manufacturer’s part. Bakers Pride
shall in no event be liable for any special, indirect or consequential damages, or in any event for damages in excess of the purchase price of the unit.
The repair or replacement of proven defective parts shall constitute a fulfillment of all obligations under the terms of this warranty.
Form #U4177A 1/07
13IMPORTANT FOR FUTURE REFERENCE
Please complete this information and retain this manual for the life of the equipment. For Warranty Service and/or
Parts, this information is required.
Model Number Serial Number Date Purchased
NOTESNOTES
1307 N. Watters Rd, Ste. 180 Allen,Texas 75013
Phone 800.527.2100 | Fax 914.576.0605 | bakerspride.com

           Be sure to keep up with new product
        announcements and events on social media!
                         Social icon

                         Square
                         Only use blue and/or white.

                         For more details check out our
                         Brand Guidelines.

                                                          4.15.2019
You can also read