STAR WARS: EPISODE V - THE EMPIRE STRIKES BACK TABLE GUIDE - BY SHORYUKENTOTHECHIN
←
→
Page content transcription
If your browser does not render page correctly, please read the page content below
Page 1 of 39

Star Wars: Episode V - The Empire Strikes Back Table Guide
                 By ShoryukenToTheChin

                         4

                                                 10
                                 6
                                         8
                             5                   11
                                     7       9

                     3
             2

                                                 12   13

                 1
Page 2 of 39

Key to Table Overhead Image – Thanks to Cloda on the Zen Studios Forums for the Image

   1. Tie Fighter Targets

   2. Left Orbit

       *Note – a Left Ramp (3) hit changes the Left Orbit diverter – either to the Left Sink Hole (4) or the
       Right Inlane*

   3. Left Ramp

       *Note – hitting this will remove the Star Target (7) & Wars Target (9) to reveal Mini –Orbits in
       their place (These are the Training Mini – Orbits; explained later in the Guide under ‘Jedi
       Training’ Section).

       Hit the Ramp again to re-erect the Targets, as these are needed to start up one of the Table’s many
       Movie Scenes (explained later in the Guide under ‘Scenes’ section) which are essentially the
       Table’s Missions.*

   4. Left Sink Hole

   5. Jedi Cross - Orbit

   6. Blue Lightsaber Mini – Orbit

   7. Star Target

   8. Vader Target

   9. Wars Target

   10. Red Lightsaber Mini – Orbit

   11. Sith Cross - Orbit

   12. Right Orbit/Ramp

       *Note – Left Orbit (2) & Force Target (13) hits change the Right Orbit/Ramp (12) diverter – either
       to the…

           •   Cloud City Spinner (explained later in the Guide under ‘Multiball Modes – Cloud City
               Multiball Mode’ Section).

           •   ‘SKYWALKER’ Multipliers (explained later in the Guide under ‘Raising the Multipliers’
               Section).

           •   Right Inlane.*

   13. Force Target

In this guide when I mention a Ramp etc. I will put a number in brackets which will correspond to the above
Key, so that you know where on the table that particular feature is located.
Page 3 of 39

                                         TABLE SPECIFICS
 Notice: This Guide is based off of the Zen Pinball 2 (PS3/Vita) version of the Table on default controls.
 Some of the controls will be different on the other versions (Pinball FX 2, Star Wars Pinball, etc...), but
                              everything else in the Guide remains the same.

INTRODUCTION
This Table came about as a result of the partnership between Zen Studios and LucasArts; this license
allowed Zen to produce Tables based on the Star Wars License, as of which Zen will be releasing 10 Star
Wars Themed Table’s.

The first batch of Table’s was release in a 3 Pack; which included such Tables as Boba Fett, Star Wars: The
Clone Wars & Star Wars: Episode V - The Empire Strikes Back.

This Table is of course the Star Wars: Episode V - The Empire Strikes Back; it features breath-taking
Artwork and various Audio cues ripped straight from LucasArts vast Library from the Star Wars Films
themselves etc. It’s a real treat to play such a Table as it contains the longest Rule Sheet in a Zen’s history
since so much is packed into it.

I hope my Guide will help you understand the Table better.
Page 4 of 39

Skill Shot -
To collect a Skill Shot award you must launch the Ball from the Plunger at the right time, as to hit the Probe
Spinner which is moving in an Up/Down motion.

You should try to release the Ball from the Plunger when the Probe Spinner is on its way Down, this way the
Ball will hit the Spinner causing it to spin thus resulting in a Skill Shot award. The more it spins, the more
Points you will amass from the Skill Shot –

                                                              Power Gauge – As you pull back
                                                               the Plunger (Analogue Stick on
                                                              your Controller controls this) The
                                                                     Gauge will increase.

                                                                Pull it down as far as you can,
                                                              then wait for the right moment to
                                                                release it, make sure to release
                                                               when the Probe Spinner is on its
                                                                           way down.

If done correctly you will gain a Skill Shot award –

                                             Skill Shot Award – as you
                                              can see the Probe Spinner
                                            has been hit and is spinning,
                                            thus resulting in a Skill Shot
                                                        award.

Super Skill Shot Award – Once you have collect a Skill Shot award you will have a short amount of time
to hit the Vader Target (8) which will say ‘SUPER SKILL SHOT’ on it, this will award 1 Million Points.

                                        Super Skill Shot – Vader
                                               Target (8)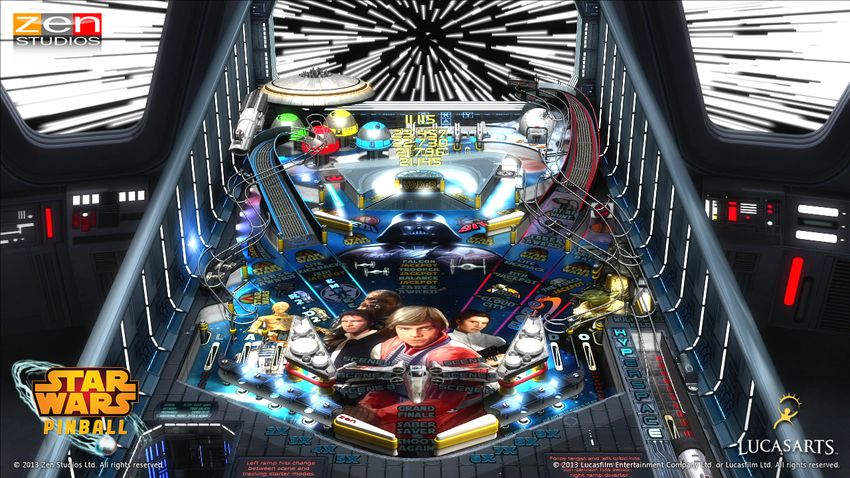
Page 5 of 39

Lightsaber Ball Return Mechanic
On the left side of the Table you will see a Lightsaber; this becomes active when the Ball passes through it
by hitting various Targets, like for example when you sink the Ball into the Left Sink Hole (4) –

                                             Lightsaber Return
                                            – Ball being returned

Now when it’s being returned via the Lightsaber you are able to change which Inlane the Ball is going to
returned to;

   •   Holding the Left Flipper Button – returns the Ball to the furthest Left Inlane (‘N’).

   •    Holding the Right Flipper Button – returns the Ball to the furthest Right Inlane (‘D’).

    *Note – Be Careful! As when you press a Flipper Button to choose the return route for the Ball, if
                         pressed at the wrong time it can lead to Ball drains.*

Split Dot - Matrix

    Split Dot – Matrix; as
    you can see this Dot –
     Matrix has a separate
      section to display
         information.

This Table features a unique split Dot – Matrix; which allows you to keep a better track of all the Modes you
can have active at the same time (stackable Modes).
Page 6 of 39

Kick Back & Ball Save
Kickback – To activate the Kickbacks you must light all of the 5 ‘LANDO’ Rollovers on the In’s &
Outlanes –
              ‘L’        ‘A’       ‘N’                                         ‘D’     ‘O’

          Left Kickback                                                               Right Kickback
             Activated                                                                   Activated
         Notification Light                                                          Notification Light

After you light all of the Letters a Hurry Up Mode will then begin; 2 Ramps will then have a ‘LITE
KICKBACK’ Notification Light on them, you will need to hit 1 of those quickly as you have a short time
frame to do so. If you manage to hit it then you will activate the corresponding Kickback, otherwise you will
need to light all the Letters on the Rollovers again to retry -

An example of this can be seen in the below Image –

                                                                            ‘LITE
                                                                       KICKBACK’
                                                                      Notification Light

    •   Left Ramp (3); hitting this in time will activate the Left Kickback.

    •   Right Orbit/Ramp (12); hitting this in time will activate the Right Kickback.

Repeat the process after lighting up 1 of the Kickbacks to then attempt to activate the opposite Kickback by
hitting the corresponding Ramp.

                 *Note - This Table doesn’t reset the Kickbacks earned if you lose a Ball*
Page 7 of 39

Ball Save – There are 2 Ball Save mechanics on this Table -

   1. Ball Save – activates at the start of the Ball and on some Modes etc.

      *Note – Ball Save remains active until you lose the Ball or the Ball Save time limit runs out!*

   2. Saber Saver – this can be activated upon activating both Kickbacks, then repeating the process
      detailed on the above Page, to activate a Kickback to hit 1 of those Ramps and then finally repeating
      it again to hit the other Ramp. Upon doing that the Saber Saver will activate –

                                                                       ‘Saber Saver’ Activated
                                                                          Notification Light

                       *Note – Saber Saver remains active until you lose the Ball.*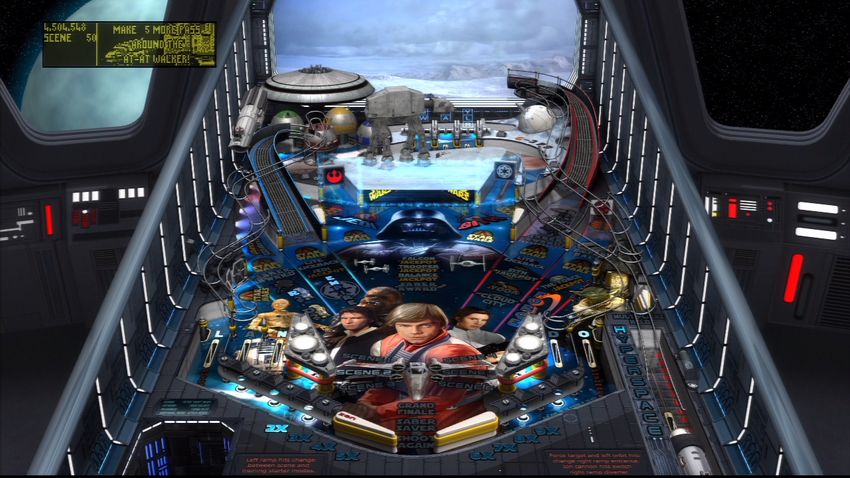
Page 8 of 39

Extra Balls
There are 5 Ways to achieve an Extra Ball – the Extra Ball is collected by hitting the Force Target (13) -

                                     ‘Extra Ball’ Available
                                       Notification Light

   •   Method 1: Empire Award; given as an Empire Award, look later in the Guide at the Section titled
       ‘Empire Award’ for information on obtaining these for the Extra Ball.

   •   Method 2: Training Mode Completion; complete the Training Mode once, look later in the Guide
       at the Section titled ‘Training Mode’ for information on how to attain these letters for this Extra
       Ball.

   •   Method 3: Starting up all Force Hurry Up Modes; look later in the Guide at the Section titled ‘Path
       of The Force’ for information on how to raise them for this Extra Ball.

   •   Method 4: Completion of any 3 Scenes; look later in the Guide at the Section titled ‘Scenes’ for
       information on how to complete them for this Extra Ball.

   •   Method 5: Maxing out the multiplier (9x); look later in the Guide at the Section titled ‘Raising the
       Multiplier’ for information on how to raise them for this Extra Ball.
Page 9 of 39

Raising the Multiplier
You can raise the Multiplier Level on this Table by making the Ball roll down the ‘SKYWALKER’
Multiplier Rollovers (located at the top centre of the Table’s Playfield).

Every time you light up a row of 3 Letters for example ‘SKY’ on the 3 Rollovers, the Multiplier Level will
advance to the next Level –

                                 ‘S’               ‘K’                ‘Y’
                                ‘W’                ‘A’                ‘L’
                                ‘K’                ‘E’                ‘R’

                                                                                         Row 1 - ‘SKY’ row
  Row 2 - ‘WAL’ row
                                                                                          Row 3 -‘KER’ row

Upon lighting up a row of those the Multiplier Level will advance to 2x Multiplier, repeat the above again to
reach 3x Multiplier and so forth.

The max Multiplier Level is 9x Multiplier, reaching the max Multiplier will light up ‘EXTRA BALL’ for
collection by hitting the Force Target (13).

                         *Note – Multiplier Level resets upon draining the Ball.*
Page 10 of 39

Assemble C-3PO

                                                                                   ‘C – 3PO’ Letters

To assemble C-3PO you must make the Left Orbit (2) divert to the Right Inlane; this is done by first hitting
the Ball up the Left Ramp (3) so that the Star Target (7) & Wars Target (9) retract, thus this now activates
the divert on the Left Orbit (2) towards the Right Inlane.

Now the score you get for completing the Letters is dependent on the elapsed time between 2 Letters as this
gets added to the score attained from completing them.
Page 11 of 39
R2-D2 Astro Bumpers -
To collect the letters of ‘R2 - D2’ you must make the Left Orbit (2) divert to the R2 - D2 Bumpers; this is
done by making sure that the Star Target (7) & Wars Target (9) are erected, if not hit the Ball up the Left
Ramp (3) to do so.
‘R2 – D2’ Letters
Collect the Letters of ‘R2 - D2’ with shots around the Left Orbit (2); Each time you send the Ball around the
Left Orbit (2) a Bumper will be added to the Mode with a certain value dependent on how many times it was
hit with that Ball –
R2 – D2 Bumpers
Once you collect the entire ‘R2 - D2’ Letters the Mode will start and the 4 Bumpers will be worth the
previous values before starting the Mode.Page 12 of 39
Empire Awards –
To claim an Empire Award you must first hit the Ball up the Left Ramp (3), each time it will light up a letter
of ‘EMPIRE’ which can be seen just below the Ramps entrance –
‘EMPIRE’ Letters
After successfully hitting the Left Ramp (3) a total of 6 times thus lighting ‘EMPIRE’ the Trap Door will
raise in the Middle of the Table’s Playfield –
Hit the Ball into this Trap Door to gain access to the Awards Screen on the
Dot – Matrix; once you have done that you will have a short amount of time
to select one of the Characters, you can cycle through the Characters by
pressing either of the Flipper Buttons on your Controller.
When you wish to select a Character press the ‘Launch’ Button on your
Controller, otherwise when the time runs out the Game will select for you.
The Awards given can range from Points to lighting up EXTRA BALL at the
Force Target (13) etc.
Trap DoorPage 13 of 39
Yoda’s Hideout *Tied to the Wizard Mode (After all 6 Scenes are completed!) -
*Note – this Mode is connected to the Grand Finale which occurs after completion of the 6 Scenes.*
To find Yoda's Hideout you first need to light up all the 4 Letters of ‘YODA’.
You first need to make each of the ‘YODA’ letters flash. You do this by resetting the Right Orbit/Ramp (12)
Diverter to the Orbit position. If the Diverter is set to the Ramp, then you need hit the Left Orbit (2) or Force
Target (13) once. If it's already set to the Orbit, then you need to hit the Left Orbit (2) or Force Target (13)
twice. This will make 1 of the ‘YODA’ letters flash. Now just hit the Right Orbit (12) to collect that Letter.
You need to rinse and repeat this process 3 more times to be able enter Yoda's Hideout.
‘YODA’ Letters
Each time you successfully find Yoda, you will get the chance to choose a specific ability which will
actively affect the Grand Finale (Wizard Mode).
These abilities are as follows –
• Force Speed; adds 15 Seconds to the Grand Finale Wizard Mode.
• Force Jump; adds a special Jackpot in the Grand Finale Wizard Mode.
• Force Rush; increases the Jackpot Value in the Grand Finale Wizard Mode.
• Lightsaber Throw; adds a Jackpot Lane to the Grand Finale Wizard Mode.Page 14 of 39
Vader Frenzy *60 or so Seconds* -
To start the Vader Frenzy you must hit the Vader Target (8), each time you will collect a Letter of ‘VADER’
and upon collecting all of the 5 Letters the Frenzy will begin –
Darth Vader
Jump Ramp
Darth Vader will then appear on the Table’s Playfield; the goal is to hit the Ball at him using the erected
Jump Ramp (located at the Centre of the Table’s Playfield), each time you do that Vader will crush the Ball
and you will be awarded some Points.
Repeat this as many times as you can within the time limit.Page 15 of 39
Jedi Training -
First you must hit the Left Ramp (3) to retract the Star Target (7) & Wars Target (9) so that the 2 Training
Mini – Orbits can be accessed –
Training Mini - Orbits
Now hit the Ball through those Mini – Orbits; each time it will light a Letter of ‘TRAINING’ and when it
has been fully lit the Jedi Training Mode can be accessed via the Vader Target (8) which will now say 'JEDI
TRAINING' on it.
Once you hit that you will be taken into a First Person View Mode –
Droid
Lightsaber – deflecting Blast
The Goal here is to deflect the Blasts from the Droid using you Lightsaber; this is done by moving the
Lightsaber to block the Blasts path –
• To move Left – hold the Left Flipper Button, this will deflect Blasts directed to the Left.
• To deflect a Centre blast – hold the ‘Launch’ Button, this will deflect Blasts directed to the Centre.
• To move Right - hold the Right Flipper Button, this will deflect Blasts directed to the Right.
You are given 5 retries before the Mode ends; within that you must successful deflect 5 Blasts.
Upon completion of a Training Mode you will light ‘EXTRA BALL’ at the Force Target (13), hit that to
claim it.Page 16 of 39
Lightsaber Hurry Up Mode -
Hitting either of the Spinners on the Blue Lightsaber Mini – Orbit (6) & Red Lightsaber Mini – Orbit (10)
will display 2 Lightsabers crossed being filled up on the Dot – Matrix.
Now if you keep hitting the Spinners those Lightsabers on the Dot – Matrix will eventually get filled up,
when they do the Lightsaber Hurry Up Mode will automatically begin –
‘SABER AWARD’ Notification Light example
You will see the ‘SABER AWARD’ Notification Light being lit up on a Lane; follow the Ball through that
Lane to get the Ball into the Left Sink Hole (4) which will in turn give out High Score awards, you will then
see the ‘SABER AWARD’ Notification Light being lit up on another Lane like the Right Orbit/Ramp (12)
as well as the Trap Door opening up with the ‘SABER AWARD’ Notification Light being lit up beneath it.
The Saber Awards remain available until the time runs out.Page 17 of 39
Path of The Force *Force Hurry Up Modes*-
Hitting the Force Target (13) causes a Letter of ‘FORCE’ to light; the Goal is to hit that enough times to
light all of the Letters up –
‘FORCE’ Letters
Once that is achieved a random Force Hurry Up Mode will begin, of which there are 6 –
• Cloud City Spinner Hurry Up Mode – This requires you to constantly hit the Ball into the Cloud
City Spinner, you may need to change the diverter on the Right Orbit/Ramp (12) so that the Ball
travels to the Spinner (Left Orbit (2) & Force Target (13) hits change the Right Orbit/Ramp (12)
diverter).
• Use The Force Hurry Up Mode – Hitting the Force Target (13) will gain a Jackpot award until the
time expires.
• Star Wars Frenzy – Hitting the lit Lanes etc. will score Jackpot awards.
• AT – ST Rush Hurry Up Mode – Hit the R2 – D2 Bumpers to score points.
• Tie Fighter Ambush Hurry Up Mode – Hit the Tie Fighter Targets (1) (this can be done by hitting
the Force Target (13) then as the Ball rolls down the Lower Top Right Flipper you hit it towards the
Targets) while within the time limit. The more you hit the greater the score attained will be.
• Probe Hunting – Hitting the Probe Spinner (look back very earlier in the Guide under ‘Skill Shot’
section to see where this is located etc.) will award you with 1 Million Points then for every other hit
within the time limit the award will increase by 1 Million Points.
To hit the Target you will have to make sure that either the Left Orbit (2) or Right Orbit/Ramp (12)
is being diverted towards the Probe Spinner–
Left Orbit (2) – Left Ramp (3) hits change the Left Orbit Diverter.
Right Orbit/Ramp (12) - Left Orbit (2) & Force Target (13) hits change the Right
Orbit/Ramp (12) Diverter.
Starting all of these 6 will make an ‘EXTRA BALL’ available to collect at the Force Target (13)Page 18 of 39
AT – AT Hunt Mode -
Once you light all the ‘SKYWALKER’ Multiplier Rollovers –
‘S’ ‘K’ ‘Y’
‘W’ ‘A’ ‘L’
‘K’ ‘E’ ‘R’
Not only will it advance the Multiplier but it will also light ‘AT – AT’ at the Right Orbit/Ramp (12) –
‘AT – AT Hunt’ Available Notification
Once you hit that Orbit/Ramp, the Hunt will begin –
AT – AT
Mini - Orbits
Hit the Flashing Mini – Orbits to defeat it - Blue Lightsaber Mini – Orbit (6) & Red Lightsaber Mini – Orbit
(10).Page 19 of 39
Multiball Modes
There are 4 Multiball Modes available on this Table;
Cloud City Multiball *4 Balls* -
To start this Multiball Mode you must first turn the Cloud City Spinner enough times to activate the Ball
Locking mechanic; access the Cloud City Spinner by making sure the Right Orbit/Ramp (12) is diverted to
the Cloud City Spinner (Left Orbit (2) & Force Target (13) hits change the Right Orbit/Ramp (12)
diverter).
After the Spinner has been rotated enough times, you will be able to lock 4 Balls into it. Once done the
Multiball Mode will begin -
Stormtrooper
Jump Ramp
Jackpots can be scored on the Right Orbit/Ramp (12) and Stormtrooper Jackpots can be score by hitting
the Ball up the Jump Ramp (shown in the above Image) to hit the Stormtrooper.
The Multiball will continue as long as you have a minimum of 2 Balls in play, you will have to repeat the
above process again if you wish to re-enter this Multiball Mode again.Page 20 of 39
Hyperspace Multiball *2 Balls* -
To start this Multiball Mode you will first need to have the Right Orbit/Ramp (12) divert to the Right Inlane
(Left Orbit (2) & Force Target (13) hits change the Right Orbit/Ramp (12) diverter). Now each time you
hit the Ball up the Right Orbit/Ramp (12) as its diverted into the Right Inlane you will collect a letter of
‘HYPERSPACE’ continue to do this until you light them all –
‘HYPERSPACE’ Letters
After which the Multiball Mode will begin;
Jackpots will be available via the Blue Lightsaber Mini – Orbit (6) & Red Lightsaber Mini – Orbit (10),
and after you have collected 5 Jackpot awards you then can collect a Hyperspeed Jackpot via the Left Orbit
(2).
The Multiball will continue as long as you have a minimum of 2 Balls in play, you will have to repeat the
above process again if you wish to re-enter this Multiball Mode again.Page 21 of 39
Imperial Multiball *3 Balls* -
To start this Multiball Mode you will need to lock 3 Balls into the back of the Tie Fighter Targets (1);
3 Tie Fighter Targets (1)
Lower Top Right Flipper
This is done by hitting the Force Target (13) then as the Ball rolls down the Lower Top Right Flipper you hit
it towards the Targets. After you do that 3 times (knocking down the 3 Tie Fighter Targets (1)) you then hit
the Ball one more time towards the area of the Tie Targets (1) but instead of hitting the Targets you will
instead land into a hidden Sink Hole thus locking the Ball.
After which the 3 Tie Fighter Targets will re-erect and you will need to repeat the above to lock a further 2
Balls to start the Imperial Multiball Mode.
Once the Multiball Mode starts 2 Tie Jackpot Lanes will be available at the centre Mini – Orbits –
Training Mini - Orbits
This Jackpot can be raised by hitting the Vader Target (8) which will instead be a Sink Hole rather than a
Target in this Multiball Mode.
You then gain access to the Falcon Jackpot which can be collected via hitting the Ball up the Jump Ramp
(erects from the centre of the Table’s Playfield) to hit the Tie Fighter.
The Multiball will continue as long as you have a minimum of 2 Balls in play, you will have to repeat the
above process again if you wish to re-enter this Multiball Mode again.Page 22 of 39 Jedi/Sith Multiball *2 or 4 Balls* - With the 2 Top Flippers you are able to hit 2 Cross – Orbits, hitting either of those will either light a Letter of ‘JEDI’ or ‘SITH’ dependent on which Cross – Orbit was hit – • Jedi Cross – Orbit (5) – will light a Letter of ‘JEDI’ • Sith Cross Orbit (11) – will light a Letter of ‘SITH’ Hitting either of the above 4 times will light all the Letters needed to either start the Jedi or Sith Multiball (dependent on which Cross – Orbit you hit 4 times). Now the Jedi & Sith Multiball Modes are exactly the same, both of which are 2 Ball Multiball Modes you can score Jackpot awards by hitting the Left Ramp (3) & Right Orbit/Ramp (12) and you can raise said Jackpot by hitting the 2 Mini – Orbits; Blue Lightsaber Mini – Orbit (6) & Red Lightsaber Mini – Orbit (10). You can also start both the Jedi & Sith Multiball Modes at the same time, resulting in a 4 Ball Multiball Mode. This will then engage the Balance Jackpot which will be available on the Left Ramp (3) & Right Orbit/Ramp (12), this Jackpot will be equal in terms of Points whichever one is hit. The Multiball will continue as long as you have a minimum of 2 Balls in play, you will have to repeat the above process again if you wish to re-enter this Multiball Mode again.
Page 23 of 39

                                              Scenes
To start a Scene you must first hit both of the Star Wars Targets – Star Target (7) & Wars Target (9), once
done the Trap Door will open up in the centre of the Table’s Playfield, and you can either hit the Trap Door
to sink the Ball into it or if the Ball manages to land into the Left Sink Hole (4). Doing either will now
enable the ‘Choose Scene’ display on the Dot - Matrix –

                                           Star Wars Targets

                                                Trap Door

*Tip! – While you are within a Scene if you hit the Star Wars Targets - Star Target (7) & Wars Target (9)
            you will increase the Scene Bonus given out upon complete that specific Scene.*

You can cycle through the Scenes available by using the Flipper Buttons on your Controller, and when you
wish to select a Scene you merely need to press the ‘Launch’ Button to select it.

I will now detail how to complete each Scene on this Table (Scene 6 is only available after completion of the
Scenes 1 – 5) –

                       Scene 1                                                 Scene 4

                       Scene 2                                                 Scene 5

                       Scene 3
                                                                            Scene 6 - *Only
                                                                             available after
                                                                          completion of Scenes
                                                                             1 through 5!*

  *Note – Completion of a Scene’s Chapter will be saved as a checkpoint, this means that if you fail the
           next Chapter you will start at that Chapter the next time you attempt that Scene!*
Page 24 of 39
Scene 1 -
Scene 1
Chapter 1 *40 Second Time Limit*
This Chapter requires you to hit the Left Sink Hole (4) a total of 3 times;
Left Sink Hole (4)
This can be done by hitting the ball through the lit Lane – these Lanes will either be the Left Orbit (2), the
Jedi Cross – Orbit (5), the Sith Cross - Orbit (11) or sometimes the Right Orbit/Ramp (12). I tend to just
constantly hit the Left Orbit (2) to do this Stage of the Chapter.
After you have done the above you then have to sink the Ball 3 times into the Sink Hole behind the Vader
Target (8) –
Vader Target (8)Page 25 of 39
Chapter 2 *40 Second Time Limit*
This Chapter requires you to help Han Solo find Luke; all of the Lanes etc. will be lit –
Just keep hitting the lit Lanes until you eventually find Luke as he is in one of them but this is random so it
won’t be the same all the time.
Chapter 3 *60 Second Time Limit*
Now this Chapter requires you to hit the Probe Spinner a total of 3 times –
Probe Spinner
To hit the Probe Spinner you must hit the lit Lane - these Lanes will either be the Left Orbit (2), the Jedi
Cross – Orbit (5) or sometimes the Right Orbit/Ramp (12). I tend to just keep hitting the Left Orbit (2) as its
always lit, but I still have trouble in this Chapter since the timing is very strict for when the Ball travels near
the Probe Spinner.
After 3 hits the Chapter will be completed, thus Scene 1 will be completed.Page 26 of 39
Scene 2 -
Scene 2
Chapter 1 *40 Second Time Limit*
Upon starting this Chapter a Stormtrooper will in front of the Star Wars Targets –
Stormtrooper
The goal of this Chapter is to hit the Stormtrooper 3 times, now I discovered an easy way to complete this –
just hit the Force Target (13) then allow the Ball to drop into the Up – Kicker, this will launch the Ball
towards the Stormtooper and hit him. Repeat a further 2 times to complete the Chapter.Page 27 of 39
Chapter 2 *60 Second Time Limit*
Once this Chapter begins an AT – AT will appear above the Star Wars Targets –
AT - AT
The goal here is to bring down the AT – AT this is done by hitting the lit Mini – Orbits; Blue Lightsaber
Mini – Orbit (6) & Red Lightsaber Mini – Orbit (10). After hitting the lit Mini – Orbits 4 times, you then
will need to send the Ball round the Left Orbit (2) to complete the Chapter, and thus you will
complete Scene 2.Page 28 of 39
Scene 3 -
Scene 3
Chapter 1 *60 Second Time Limit*
Upon starting this Chapter you will see 2 Asteroid’s hovering over the Star Wars Targets, as well as a Tie
Fighter flying around the area –
Jump Ramp
The objective here is to use the Jump Ramp that pops up in the Centre of the Table’s Playfield to jump the
Ball up between the 2 Asteroids. But remember to be careful not to hit the Asteroids or the TIE Fighter
flying around or the Ball will be knocked down which can result in unwanted Ball drains. Your goal is to get
the Ball into the Left Sink Hole (4) 3 times via the Jump Ramp. Once you do that the Chapter will be
completed.Page 29 of 39
Chapter 2 *30 Second Time Limit*
Upon this Chapter starting the Force Target (13) will be lit; you need to hit the Ball at that,
After which the Ball will be sent round the Training Mini – Orbits (These are available as the Star Wars
Targets are retracted). After which you will then need to send the Ball round the lit Training Mini – Orbit
below shows an example of this –
Right Training Mini –
Left Training Orbit is lit (example);
Mini - Orbit therefore you need to hit
the Ball through it to
proceed in the Chapter.
*Tip! – if the Left Training Orbit is lit then you can just hit the Force Target again, allow the Ball to roll
into the Up – Kicker below it and it will automatically send the Ball round that particular Mini – Orbit.*
Repeat the above a further 2 times, hitting the lit Training Mini – Orbit. Upon hitting the 3rd Training Mini –
Orbit the Chapter will be completed.Page 30 of 39
Chapter 3 *60 Second Time Limit*
Now as you begin this Chapter you will notice every Lane will be lit –
6 lit Lanes
You must hit all the lit Lanes within the time limit, every few Seconds another Lane will light up so be
quick. Once you hit all 6 Lanes the Chapter will be completed, thus you will have completed Scene 3.Page 31 of 39
Scene 4 -
Scene 4
Chapter 1 *30 Second Time Limit*
This Chapter requires you to find Lando for permission to land the Millennium Falcon; basically you just
need to repeatedly hit the lit Lanes etc. and even the Trap Door –
When you must
When you must turn accelerate - both
left – the Left Orbit Mini-Orbits - Blue
(2), Left Ramp (3) & Lightsaber Mini –
Blue Lightsaber Mini Orbit (6) & Red
– Orbit (6), will be Lightsaber Mini –
lit. Orbit (10), and the
Vader Target (8) will
be lit.
When you must turn
When you must go right - the Red
straight – the Trap Lightsaber Mini –
Door will erect for Orbit (10), Right
you to sink the Ball Orbit (12) & Force
into. Target (13) will be
lit.
I believe after you hit 4 Lit Lanes etc. the Chapter is completed.Page 32 of 39
Chapter 2 *60 Second Time Limit*
Upon starting this Chapter the Jump Ramp will raise from the Centre of the Table’s Playfield and Darth
Vader will appear at the top of the Star Wars Targets -
Darth Vader
Jump Ramp
The objective here is to hit the Jump Ramp so that the Ball hits Darth Vader; after 6 hits you will complete
this Chapter, this also means that Scene 4 will be completed.Page 33 of 39
Scene 5 -
Scene 5
Chapter 1 *60 Second Time Limit*
This Chapter requires you to do a certain combo of shots – first you must hit the Ball up the Right
Orbit/Ramp (12) it will then head towards the Bumpers,
Ball being sent up Right
Orbit (12)Page 34 of 39
Now it will be returned just above the Force Target (13) you then need to time your shot with the Lower Top
Right Flipper as the goal is to send the Ball towards the Tie Fighter Targets (1) on the other side of the
Table’s Playfield –
Ball heading towards the Toe
Fighter Targets (1)
If you fail to hit the Target you must repeat the Right Orbit/Ramp (12) shot etc. After doing the above a
total of 3 times you will complete this Chapter.
Chapter 2 *30 Second Time Limit*
You will start of this Chapter by controlling the Lightsaber (moving it to the Right) with the Right Flipper
Button. The goal here is to time your pressing of the Right Flipper Button so that you deflect the
Stormtroopers Blast;
Blast being deflected by
Lightsaber.
It seemed to me that the Stormtrooper would fire at 3 Second intervals so try to use that as a base for your
timing to deflect the Blasts, after you do this 3 times the the Ball will be back in play on the Playfield.
Now you must hit both Mini – Orbits; Blue Lightsaber Mini – Orbit (6) & Red Lightsaber Mini – Orbit (10).
Luke using the Stormtrooper’s
weapon against him.
After which you then need to hit the Vader Target (8) to sink the Ball and to complete the Chapter, this also
means Scene 5 will be completed.Page 35 of 39
Scene 6 *The Final Confrontation!*-
Scene 6 - *Only
available after
completion of Scenes
1 through 5!*
Chapter 1 - *Darth Vader Lightsaber Fight*
Upon starting this Chapter you will be taken into a First Person View Mode (similar to what you
encountered playing through the Jedi Training Mode) –
Luke blocking Darth Vader’s
Lightsaber attack!
The goal here is to defend against Darth Vader’s attacks a total of 5 times using you Lightsaber; this is done
by moving the Lightsaber to counter his attacks –
• To move Left – hold the Left Flipper Button, this will defend Darth Vader’s Attacks directed to
the Left.
• To deflect a Centre blast – hold the ‘Launch’ Button, this will defend Darth Vader’s Attacks
directed to the Centre.
• To move Right - hold the Right Flipper Button, this will defend Darth Vader’s Attacks directed to
the Right.
Try to watch his movements and anticipate his next attack so that you can move there to defend against it.
You are given 5 retries before the Mode ends; within that you must successful defend 5 of Darth Vader’s
attacks. If you manage to defend against 5 attacks you will move on to Chapter 2.Page 36 of 39
Chapter 2 *Disable Darth Vader’s Defences*
Darth Vader will now begin to throw stuff from the environment at you -
The Goal here is to break through his defences by hitting the alternating lanes etc. upon hitting enough of
them you will complete the Chapter and up the final Chapter – Chapter 3.
Chapter 3 *Final Battle*
Luke & Darth Vader locked in
Mortal Battle!
This Chapter is split into a 3 phased Battle –
1.
Hit the 2 Mini – Orbits; Blue Lightsaber Mini – Orbit (6) & Red Lightsaber Mini – Orbit (10) each
time as the Spinners on the Mini – Orbits spin you will increase the Power Percentage shown on the
Dot – Matrix. Hit the Mini – Orbits as fast as you can so that you can raise the Power up to 100%,
failure to do so will result in failure of the Chapter.Page 37 of 39
2.
You now will need to hit the lit Lanes etc.; they will alternate but always 3 will be lit each time.
3. Repeat the above 2nd Phase of the Battle.
Once the above is done Scene 6 will be completed.
“I am your FATHER!”
“NOOOOOOOOO!!!”Page 38 of 39
Grand Finale *WIZARD FRENZY MODE –
Normal Timer is 60 Seconds*
Once you beat Scene 6, you need to get the Ball into the Left Sink Hole (4) to start up Grand Finale –
GRAND FINALE –
Activates after completion of
the 6 above Scenes.
*BIG TIP FOR HIGHSCORING IN THIS MODE – Now before you complete all 6 Scenes I recommend
you get as many Yoda Hideout Bonuses as possible –
To find Yoda's Hideout you need to light up all 4 of the ‘YODA’ letters –
‘YODA’ Letters
You first need to make each of the ‘YODA’ letters flash. You do this by resetting the Right Orbit/Ramp
(12) Diverter to the Orbit position. If the Diverter is set to the Ramp, then you need hit the Left Orbit (2)
or Force Target (13) once. If it's already set to the Orbit, then you need to hit the Left Orbit (2) or Force
Target (13) twice. This will make 1 of the ‘YODA’ letters flash. Now just hit the Right Orbit (12) to collect
that Letter. You need to rinse and repeat this process 3 more times to be able enter Yoda's Hideout.Page 39 of 39
Each time you successfully find Yoda, you will get to choose a specific ability which will actively affect
the Grand Finale.
These abilities are –
• Force Speed; adds 15 Seconds to the Grand Finale Wizard Mode.
• Force Jump; adds a special Jackpot in the Grand Finale Wizard Mode.
• Force Rush; increases the Jackpot Value in the Grand Finale Wizard Mode.
• Lightsaber Throw; adds a Jackpot Lane to the Grand Finale Wizard Mode.
Now if you complete all 6 Scenes without gaining any of the above Yoda Abilities then the Mode will
consists of –
• 60 Second timer to amass as much Points as possible.
• 2 Jackpot Lanes etc. will be lit; by hitting them you can score some decent Points.
*Upon the timer reaching 0 the Scene progress etc. will reset, thus Table reset!*
Special Thanks to all the Zen Studios Forum Community! Members such as Cloda, shogun00, E113,
snakeman07, surf1der & Beliskner I couldn’t have completed the Guide without your help either
directly or indirectly - you are all awesome!!!
In closing I hope you enjoyed this Table, I certainly have and I hope by using this Guide it increases that
Fun factor for you and everyone else who plays with you etc.
Check out the other Tables available, they are all available to download on the Xbox Live Marketplace in
Add-Ons section or download it straight from the PFX2 Platform itself. Zen Pinball 2 on PlayStation
Network, Zen Pinball on the Apple AppStore, Zen Pinball 3D on Nintendo 3DS and Zen Pinball THD on
Android Marketplace.
Thanks for viewing my Guide, Mortals
“My Ally is the Force!”
Yours
ShoryukenToTheChinYou can also read