PROSPECTOR PRO UTV TRACK SYSTEM - NET
←
→
Page content transcription
If your browser does not render page correctly, please read the page content below

UTV TRACK SYSTEM
PROSPECTOR PRO
2016 USER MANUAL
                   9925638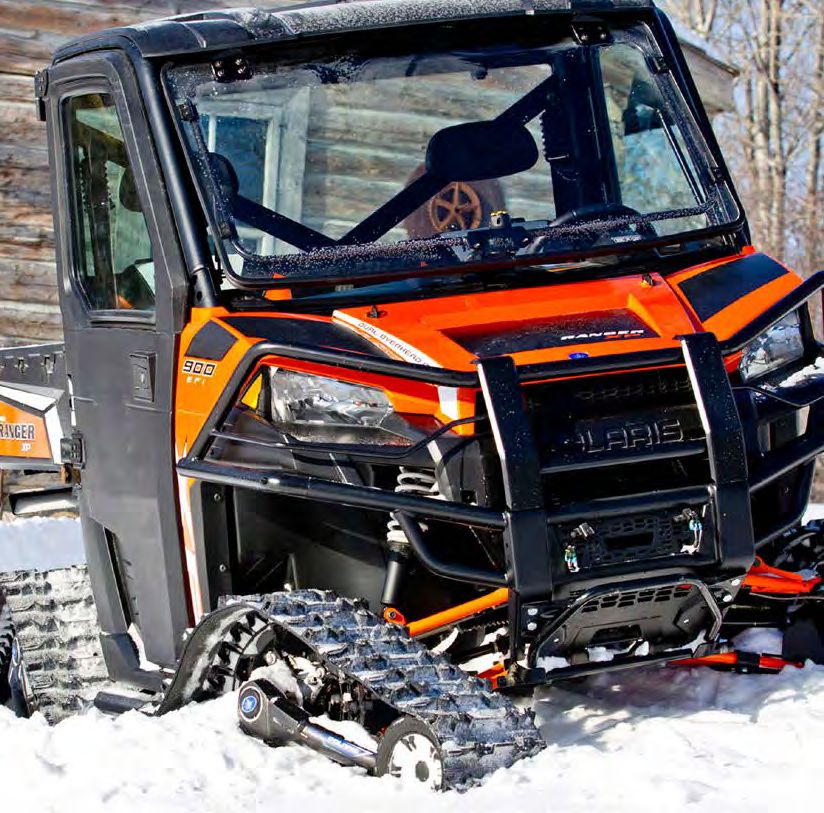
PROSPECTOR PRO®
                        UTV Track Kit User Manual

    NOTICE: Driveline and power train warranty coverage under the POLARIS
            Extended Service Contract (if purchased) is terminated upon
            installation of a track kit.

    POLARIS® and PROSPECTOR PRO® are registered trademarks of POLARIS
    Industries Inc.
    LOCTITE® is a registered trademark of Henkel Corporation.
    Copyright 2015 POLARIS Sales Inc. All information contained within this publication is
    based on the latest product information at the time of publication. Due to constant
    improvements in the design and quality of production components, some minor
    discrepancies may result between the actual vehicle and the information presented in this
    publication. Depictions and/or procedures in this publication are intended for reference
    use only. No liability can be accepted for omissions or inaccuracies. Any reprinting or
    reuse of the depictions and/or procedures contained within, whether whole or in part, is
    expressly prohibited.
    The original instructions for this product are in English. Other languages are provided as
    translations of the original instructions.
    Printed in Canada
    POLARIS PROSPECTOR PRO UTV Track Kit User Manual

2
TABLE OF CONTENTS

Introduction . . . . . . . . . . . . . . . . . . . . . . . . . . . . 4
Safety . . . . . . . . . . . . . . . . . . . . . . . . . . . . . . . . . 6
Operation . . . . . . . . . . . . . . . . . . . . . . . . . . . . . . 7
Installation, Removal, Re-Installation . . . . . . . 15
Adjustments . . . . . . . . . . . . . . . . . . . . . . . . . . . 18
Rubber Track Installation . . . . . . . . . . . . . . . . 26
Track System Break-In . . . . . . . . . . . . . . . . . . . 27
Maintenance . . . . . . . . . . . . . . . . . . . . . . . . . . . 28
Troubleshooting . . . . . . . . . . . . . . . . . . . . . . . . 40
“CE” Declaration of Conformity . . . . . . . . . . 41
Service kits . . . . . . . . . . . . . . . . . . . . . . . . . . . . . 42

                                                     P/N 9925638 - VERSION D

                                                                             3
INTRODUCTION
INTRODUCTION

    The following signal words and symbols appear in this manual and on
    safety labels. Your safety is involved when these words and symbols are
    used. Become familiar with their meanings before reading the manual.

    The safety alert symbol indicates a potential personal injury hazard.

    DANGER
    A DANGER indicates a hazardous situation that, if not avoided, will
    result in death or serious injury.

    WARNING
    A WARNING indicates a hazardous situation that, if not avoided, could
    result in death or serious injury.

    CAUTION
    A CAUTION indicates a hazardous situation that, if not avoided, could
    result in minor or moderate injury.

    NOTICE
    A NOTICE indicates a situation that could result in property damage.

               The Prohibition Safety Sign indicates an action NOT to take in
               order to avoid a hazard.

               The Mandatory Action Sign indicates an action that NEEDS
               to be taken to avoid a hazard.

4
INTRODUCTION
WARNING
Failure to heed the warnings and safety precautions contained in this
manual can result in severe injury or death. A collision or rollover can
occur quickly, even during routine maneuvers like turning, or driving on
hills or over obstacles, if you fail to take proper precautions.
• Always read this user manual and the PROSPECTOR PRO Track Kit
installation instructions for your model before attempting to assemble,
install or operate the track system.
• Every user must read this user manual. Understand all safety
warnings, precautions and operating procedures before operating a
POLARIS vehicle equipped with the track system. Keep this manual
with the vehicle. If track systems are sold or transferred to a new user,
the user manual must also be transferred to the new user.
• Always follow all inspection and maintenance procedures described
in this user manual and in the track kit installation instructions.
Track System Serial Numbers
Track System Rubber Track
Serial Number Serial Number
Record your PROSPECTOR PRO track system serial numbers below.
Track System Serial Number: ________________________________________
Rubber Track Serial Number: ________________________________________
5SAFETY
SAFETY
Safety/Information Labels
Warning labels have been placed on the track system for your protection.
Read and follow the instructions on each label carefully. If any of the
labels shown in this manual differ from the labels on your track system,
always read and follow the instructions of the labels on the track system.
Do not remove the warning labels from the track system. If an
informational or graphic label becomes illegible or comes off, contact
your POLARIS dealer to purchase a replacement.
General Warning Label
USER MANUAL - Every user must read this user manual.
Understand all safety warnings, precautions and operating
procedures before operating a POLARIS vehicle equipped with
a PROSPECTOR PRO track system. Keep this manual with
the vehicle. If track systems are sold or transferred to a new
user, the user manual must also be transferred to the new user.
MOVING PARTS - Moving parts can crush and cut. Keep hands
and body clear of moving parts. Turn the engine off before
servicing track systems.
TECHNICAL MANUAL - Read and understand the technical
manual before servicing this machine. Follow the instructions
contained in the Maintenance Schedule section of the user
manual.
Tensioner Bolt Warning Label
DO NOT loosen the tensioner assembly bolt
under any circumstance. DO NOT loosen this bolt
when adjusting track tension. This bolt is used to
assemble and align the tensioner with the frame.
If this bolt is loosened, tensioner realignment
MUST be performed.
6OPERATION
OPERATION
WARNING
Failure to operate a track-equipped vehicle properly can result in a
collision, loss of control, accident or rollover, which may result in serious
injury or death. Every user must read and understand this user manual.
Always check with local authorities in your intended area of operation to
understand laws and restrictions pertaining to the operation of this track-
equipped vehicle.
Serious injuries may result if hands, feet or clothing become entangled
in a moving track. Stay clear of all moving tracks.
Pre-Use Inspection
WARNING! Operating the vehicle with a damaged track increases the
possibility of track failure, which could cause loss of control resulting in
serious injury or death. Always inspect the track for damage before
using the vehicle.
1. Inspect the track and all
track system components
for wear or damage.
Never operate with a
damaged track.
2. Inspect wheels and
moving parts for
excessive mud, snow, ice
and debris. Make sure the
system can operate freely
and that components are
not bound by these
elements.
3. Clear away any snow, mud or debris that may hinder or block
proper operation of the vehicle’s cooling and steering systems, air
intakes and exhaust outlets.
4. After the initial installation, and after every future reinstallation of the
tracks, always adjust track angle of attack, system alignment and
track tension after the first use of the vehicle. See pages 18-25.
Survival Preparation/Remote Terrain Operation
When traveling off trails in remote terrain, always carry survival
equipment appropriate to the conditions you may encounter. Such
equipment may include, but is not limited to: a shovel, a first aid kit, extra
clothing, a sleeping bag, a flashlight, food and water, a signaling mirror, a
means of building a fire and a two-way radio or cellular telephone. If
possible, carry essential spare parts for emergency repairs.
7OPERATION
Safe Operation Practices
1. Read and understand this user manual and all warning and instruction
labels before operating a track-equipped vehicle.
2. Read the vehicle owner’s manual before operating with tracks.
Follow all safety and operation warnings and procedures.
3. Never exceed the maximum weight capacity of the vehicle. When
determining the weight you are adding to the vehicle, include the
weight of the operator, passenger, accessories, loads in the rack or
box and the load on the trailer tongue. You must also include the
added weight due to removing wheels and adding track systems. The
combined weight of these items must not exceed the maximum weight
capacity.
4. When cargo load is 220 lbs. (100 kg) or more, always reduce speed
significantly and operate with extra caution on rough terrain.
5. Operate the vehicle in 4X4 mode when operating with tracks. This will
significantly reduce the possibility of derailing.
6. The vehicle will handle differently when a track system is installed.
Select an open area that allows room to familiarize yourself with
vehicle operation and handling. Drive slowly at first. On level
surfaces, practice starting, stopping, turning, maneuvering, using the
throttle and brakes and driving in reverse. Learn how the vehicle
handles when making both left and right turns at a slow speed.
7. Track systems are designed to reduce ground pressure and increase
vehicle traction. For the best traction, drive at slow speeds. Traction is
reduced at faster speeds.
8. Moving track systems can propel objects. Drive slowly when
operating near bystanders and when traveling in a group with other
vehicles. Alert others in your group to the potential for propelled
objects in the wake of a track-equipped vehicle.
8OPERATION
Safe Operation Practices
9. Always travel at a speed appropriate for your skills and operating
conditions. Avoid unexpected or aggressive maneuvers.
10. Operate the vehicle off-road only. Never operate the vehicle on
pavement or on any public street, road or highway, including dirt and
gravel roads.
11. Travel slowly and use extra caution when operating on unfamiliar
terrain. Not all obstacles are immediately visible.
12. When driving in deep snow, avoid spinning the tracks, which could
cause the vehicle to become stuck. When under power, tracks will
continue to turn in deep snow even if the vehicle fails to move.
13. When driving in snow, allow for a greater braking distance.
Periodically apply the brakes while driving to prevent ice buildup on
brake components.
14. Never operate on a frozen body of water.
9OPERATION Steep Descents POLARIS does not recommend operation of this vehicle on steep hills. Refer to your vehicle owner’s manual for proper operating procedures when driving on inclines. WARNING! Turning a track-equipped vehicle while making a steep descent creates higher stress on steering and track systems, which can lead to component damage and result in an accident or rollover. If making a steep descent is unavoidable, drive straight downhill. Avoid making turns during steep descents. Towing a Stuck Vehicle If your track-equipped vehicle must be towed from deep snow, always tow in the opposite direction of vehicle travel. Do not attempt to tow the vehicle in the same direction it had been traveling when it became stuck in the deep snow. 10
OPERATION
Freeing a Vehicle Stuck While Backing
Downhill
POLARIS does not recommend
backing downhill with this vehicle.
Refer to your vehicle owner’s
manual for proper operating pro-
cedures when driving on inclines.

If backing downhill is unavoidable,
back slowly and back straight
downhill. If the vehicle becomes
stuck in snow while backing
downhill, avoid towing or
operating the vehicle rearward, as
damage could occur. Operate in
forward gear to free the vehicle.

If unsuccessful, stop the engine, place the transmission in forward gear
and engage the park brake (if equipped). Remove any snow from the top
of the rear track systems and pack down the snow lodged behind the
tracks, or use a shovel to clear away the snow.

                                                                       11
OPERATION Driving Over Obstacles Obstacles are not always visible, especially in areas with deep snow or mud. Avoid operating in areas that are likely to contain hidden obstacles. Refer to your vehicle owner’s manual for proper operating procedures when driving over obstacles. Do not attempt to operate over large obstacles, such as large rocks, tree trunks, stumps or steep ridges. Large obstacles may lodge between the front and rear track systems and immobilize the vehicle. Do not attempt to operate over obstacles more than 12 inches (30.5 cm) in height. If unavoidable, always place a smaller log or rock near the obstacle to serve as a ramp for the track. 12
OPERATION
Exceeding Anti-rotation Stroke/Rough Terrain
Never exceed anti-rotation stroke of the front and rear track systems.
Track system or vehicle failure may occur. Always drive on a surface that
fully supports the track systems.

Sharp Turns in Locked Differential 4X4 Mode
Never make sharp turns in locked
diffential 4X4 mode on a sticky
terrain without lubrication. The
track system is designed to slip into
the drive system, preventing the
vehicle from being overloaded.
NOTE:    Somes vehicles do not
         have unlocked 4X4 mode
         on the rear differential.
         These vehicles should
         avoid the situation
         described above and take
         wider turns instead.

                                                                        13
OPERATION Track Damage While Loading/Unloading A track may tear while loading or unloading the vehicle into a truck box if it snags or catches the tailgate latch post. Carefully observe track clearance on both sides of the vehicle while loading or unloading the vehicle. Use caution when operating near extended bolts, bars or similar appendages that could cause tears to a moving track. Tow Cable Use If the track-equipped vehicle must be towed, always attach the tow cable to the frame of the disabled vehicle. Never attach the tow cable to the track system. No Jumps and Stunts Attempting jumps and other stunts increases the risk of an accident or rollover. Never attempt jumps or other stunts. Avoid exhibition driving. 14
INSTALLATION/REMOVAL
INSTALLATION/REMOVAL

    Safe Service Practices
    Service and adjustments are important for proper vehicle operation. If
    you’re not familiar with safe service and adjustment procedures, have a
    qualified dealer perform these operations.
    Always follow safe shop practices. The work space should be clean,
    bright and well ventilated. Always turn the engine off before performing
    service.
    WARNING! Severe injuries could occur if an elevated vehicle falls or moves.
    Never place body parts under an elevated vehicle unless the vehicle is properly
    immobilized on appropriate stands.
    Do not use a floor jack or other lifting device as a stand. Always place
    appropriate stands under an elevated vehicle and block any wheels that
    remain in contact with the ground to prevent vehicle movement. Never
    place body parts under an elevated vehicle unless the vehicle is properly
    immobilized on appropriate stands.
    To avoid injury to hands while
    installing or removing track
    systems, position hands on the
    frame as shown.
    WARNING! Serious injuries may
    result if hands, feet or clothing
    become entangled in a moving
    track. Stay clear of all moving
    tracks. We recommend having
    your dealer perform all track
    system service and alignment
    procedures.

    Track System Installation
    CAUTION! Hot exhaust system parts can cause burns. Allow components to
    cool sufficiently before proceeding.

    Initial Installation
    POLARIS recommends having your authorized POLARIS dealer
    perform the initial installation of a track system.
    1. Install the track system using the instructions provided with the
        installation kit.
    2. After the initial installation, and after every future reinstallation of the
        tracks, always adjust track angle of attack, system alignment and
        track tension after the first use of the vehicle. See pages 18-25.

                                                                                  15
INSTALLATION/REMOVAL
Track System Installation
Reinstallation
1. Using a suitable lifting
device, elevate the vehicle
and place appropriate stands
under the frame. Make sure
the vehicle is stable.
2. Remove the wheels.
3. Clean the wheel hubs.
Components may not
seatproperly on soiled hubs.
4. Reinstall the rear track
systems, then reinstall the
front track systems.
5. Tighten fasteners in a criss-cross pattern to the manufacturer’s
recommended torque specification. Refer to your vehicle owner’s
manual or service manual.
6. After the initial installation, and after every future reinstallation of the
tracks, always adjust track angle of attack, system alignment and
track tension after the first use of the vehicle. See pages 18-25.
16INSTALLATION/REMOVAL
Track System Removal
1. Position the vehicle on a level surface.
2. Stop the engine.
3. Elevate the vehicle and place suitable stands under the frame. Make
sure the vehicle is immobilized.
4. Remove the anti-rotation
bracket cover (1). Remove
the anchor bracket (2) from
the suspension arm, but
leave it attached to the anti-
rotation device on the track
system. The bracket should
remain attached to the sta-
bilizing rod (3).
NOTICE: Leaving the anchor
brackets attached to the
suspension arms can
result in severe damage to the vehicle when operating with wheels.
Skid plate and footrest reinforcement parts are the only components
that can remain on the vehicle when reinstalling wheels.
5. Remove the track system.
6. Clean the wheel hubs. Components may not seat properly on soiled
hubs.
7. Reinstall the wheels. Make sure all original components that were
removed for track installation are reinstalled properly for wheeled
operation. Refer to your vehicle owner’s manual or service manual.
Off-Vehicle Track System Storage
After removing the track
systems from the vehicle, pour
5cc of oil under the wheel caps
to help prevent corrosion. Place
each system on its side and
store away from direct sunlight.
17ADJUSTMENTS
ADJUSTMENTS
WARNING! Incorrect adjustments can decrease the performance of the system
and create premature wear of components. After the initial installation, and after
every future reinstallation of the tracks, always adjust track angle of attack,
system alignment and track tension after the first use of the vehicle.
Front Track Angle of Attack
To obtain the correct angle of attack on front tracks systems, use the
following procedure. Refer to the track kit installation instructions for
more information as needed. Perform steps 3-6 for both front track
systems.
1. Position the vehicle on a level surface.
2. Stop the engine.
3. Using the handlebars or steering wheel, make sure the tracks are in
the straight-ahead position.
4. Verify that the stabilizing arm
(1) is attached to the front
anchor bracket (2).
5. Verify that the spring
assembly bolt (3) is
tightened to specification.
Torque: 29.5 ft. lbs. (40 Nm)
6. Verify that stabilizing arm
components are installed in
the correct order. Refer to
the track kit installation
instructions for more information as needed.
18ADJUSTMENTS
Front Track Angle of Attack
NOTE: While performing the measurements in the following steps, apply light
downward pressure to the front of the track to ensure it stays flat on the
ground.
7. Position a flat bar across both rear wheels of the front track system.
Apply light downward pressure to the front of the track while
measuring the distance from the bar to the ground. The
recommended distance from bar to ground is 12 1/8 inches (308 mm).
NOTE: Increasing the distance from bar to ground will result in easier steering,
but will produce a wobbling effect at high speeds. Decreasing the
distance from bar to ground will result in harder steering, but will
provide more stability at higher speeds.
8. If adjustment is necessary, loosen the jam nut (1).
9. Rotate the stabilizing arm (3) to adjust the length of the rod end (2).
Adjust until the distance measurement from the flat bar to the ground
is 12 1/8 inches (308 mm). Apply light downward pressure to the front
of the track while measuring the distance from the bar to the ground.
10. Tighten the jam nut (1) against the stabilizing arm.
11. Repeat the bar-to-ground measurement to verify the adjustment.
19ADJUSTMENTS
Rear Track Angle of Attack
To obtain the correct angle of attack on rear track systems, use the
following procedure. Refer to the track kit installation instructions for
more information as needed. Perform steps 1-3 for both rear track
systems.
1. Verify that the stabilizing
arm (1) is attached to the
rear anchor bracket (2).
2. Verify that the spring
assembly bolt (3) is
tightened to specification.
Torque: 29.5 ft. lbs. (40 Nm)
3. Verify that stabilizing arm
components are installed in
the correct order. Refer
to the track kit installation
instructions for more
information as needed.
4. Loosen the anti-rotation
bracket bolts (1) and (2) to
allow the anti-rotation
retainer (3) to rotate on its
axis.
20ADJUSTMENTS
Rear Track Angle of Attack
5. Loosen the jam nut (1).
Rotate the stabilizing arm
to adjust the length of the
rod end so that no
pressure is applied to the
rubber cone (2).
6. Position the anti-rotation
retainer at a 90-degree
angle to (perpendicular to)
the stabilizing rod. Tighten
the two anti-rotation bracket
mounting bolts (1) and (2).
Torque: 37 ft. lbs. (50 Nm)
7. Turn the stabilizing arm nut
to adjust the length of the
rod end so that the rubber
cone (2) applies light
pressure on the anti-rotation
retainer (3).
Tip: A wider gap at the rubber cone
bushing provides better
obstacle climbing and flotation
capability in powdered snow
while moving forward.
Compressing the rubber cone
bushing will help prevent
contact with the footrest, but too much compression will adversely affect
operation of the track systems.
8. Tighten the jam nut (1) against the stabilizing arm.
9. Verify that the rubber cone (2) applies light pressure on the anti-
rotation retainer (3).
21ADJUSTMENTS
Front Track System Alignment
Inspect steering system components for damage before performing the
following front track system alignment procedures. Damaged steering
components can adversely affect vehicle operation and prevent proper
adjustments to track system alignment.
Alignment Inspection
1. Operate the vehicle in a
straightahead direction for
approximately 10 ft. (3 m). Stop the
vehicle on a level surface.
2. Stop the engine. Place the
transmission in park (if equipped) or
in forward gear. Engage the park
brake (if equipped).
3. Perform the following measurements
on the front track systems:
• Measure the distance between the
two front inner 241mm wheels (A).
Measurement A
• Measure the distance between the
two rear inner 241 mm wheels (B).
Measurement B
22ADJUSTMENTS
Front Track System Alignment
Alignment Inspection
A - B = 0 to 1/8 inch (0 to 3 mm)
4. Subtract measurement B from measurement A. The result must be 0
to 1/8 inch (0-3 mm). If the result is not within this range, adjust
alignment. See page 24.
NOTE: Adjustments will be easier and more precise if you begin when
measurement A is greater than measurement
23ADJUSTMENTS
Track System Alignment
Alignment Adjustment
1. Release the coupling lock nuts (1).
NOTE: Some nuts have reverse threads. Be sure to unlock the nuts in the
proper direction.
2. Screw or unscrew the
coupling rods (2) equally on
both sides of the vehicle.
3. Tighten the lock nuts to
specification. Refer to your
vehicle-specific service
manual.
4. To verify the adjustment,
operate the vehicle in reverse
for 15-20 feet (5-6 m), then
repeat steps 1-4 of the
alignment inspection procedure on page 22.
Rubber Track Tension
Measure and adjust rubber track tension using a tension testing tool and
a flat bar. Apply the recommended force (1) to measure deflection (2).
Refer to the chart below for track tension data. If adjustment is needed,
see page 25.
Track Tension Data Chart
Track Force Deflection
Front 24 lbs. (11 kg) 3/4 inch (19 mm)
Rear 24 lbs. (11 kg) 3/4 inch (19 mm)
24ADJUSTMENTS
Rubber Track Tension
Use the following procedure to make track tension adjustments.
CAUTION! DO NOT loosen the
tensioner assembly bolt when
adjusting track tension. This bolt is
used to assemble and align the
tensioner with the frame. If this bolt is
loosened, tensioner realignment
MUST be performed.
1. Loosen the tensioner rod jam
nut (1).
2. Turn the tensioner rod
adjustment nut (2) clockwise
or counter-clockwise as
needed to adjust tension to
the recommended
specification.
Tip: Higher rubber track tension
reduces the risk of derailing
and reduces drive “ratcheting”.
Lower rubber track tension
provides better performance,
better rolling and better fuel
economy.
3. When adjustment is complete, tighten the jam nut (1) securely
against the adjustment nut (2).
4. Operate the vehicle at a slow speed for approximately one mile (1.5
km). Evaluate track system performance and readjust as needed.
25RUBBER TRACK INSTALLATION
RUBBER TRACK INSTALLATION
1. Position the vehicle on a level surface.
2. Stop the engine.
3. If desired, elevate the vehicle and place appropriate stands under the
frame.
CAUTION! DO NOT loosen the tensioner assembly bolt under any circumstance.
This bolt is used to assemble and align the tensioner with the frame. If this bolt is
loosened, tensioner realignment MUST be performed.
4. Loosen the tensioner rod jam nut
and adjusting nut to slide the
tensioner assembly to the mini-
mum position.
5. Remove the two 9.5-inch (241
mm) wheels from the track ten-
sioner.
7. Install the rubber track. Rear tracks
can be installed in both directions of
rotation. For front tracks, a mark on
the track indicates correct
orientation.
8. Reinstall the two wheels.
9. Adjust track tension. See page 24.
NOTE: In applications where installation
of traction studs is needed, the
threaded portion of the stud to be
screwed in the track lug should not
exceed 1 inch (25 mm) in length.
NOTICE: Rubber Track warranty
coverage is terminated upon
installation of traction studs.
26RUBBER TRACK INSTALLATION
TRACK SYSTEM BREAK-IN
Break-In Period
The break-in period for a new track system is four hours, or 50 miles (80
km). A proper break-in will result in more efficient performance and a
longer life for components. Follow these recommendations during the
break-in period:
• Perform the break-in inspections during the break-in period as
recommended. See the Break-In Inspection Chart below.
• Avoid operating in dry, clean, non-lubricated conditions (such as on
asphalt or on hay or straw fields).
• Operate the vehicle in a lubricated environment (water, mud, snow,
soft soil, sand, dust and similar terrain). Failure to operate in these
conditions during break-in can result in smoke and odor from rubber
components, as well as plastic deposits on the sprocket and/or frame.
• Operate below 6 MPH (10 km/h) when making sharp turns.
Break-In Inspection Chart
Item Inspection Interval/Condition
After After 1 Hour After 2 Hours After 3 Hours
Installation Max Speed Max Speed Max Speed
9 MPH 15 MPH 22 MPH
(15 km/h) (25 km/h) (35 km/h)
Visual Inspection X X X X
Track Tension X X
Angle of Attack X X
System Alignment X X
Bolt Torque
X
(Anchor Brackets)
27MAINTENANCE
MAINTENANCE
Periodic Maintenance Chart
Careful periodic maintenance will help keep your system in safe and
reliable condition. Inspect, clean, lubricate, adjust and replace parts as
necessary. Perform all inspection and service procedures at the intervals
outlined in the Periodic Maintenance Chart. Procedures are outlined in
further detail in the following pages.
NOTICE: Failure to perform regular maintenance and adjustments at the
recommended intervals can result in premature wear and damage to
the track systems that will not be covered under warranty. Always
perform service as recommended in this manual and in the vehicle
owner’s manual.
WARNING! Serious injuries may result if hands, feet or clothing become
entangled in moving parts. Stay clear of all moving parts. Keep hands and feet
clear of the track systems until the vehicle is stopped, the engine is off and the
park brake is engaged (if equipped). We recommend having your dealer perform
all track system service and alignment procedures.
For vehicles subjected to normal use, refer to the chart on page 29. For
vehicles subjected to severe or heavy use, refer to the maintenance chart
on page 30.
Task Definitions
Refer to the following task definitions when performing the maintenance
procedures outlined in the periodic maintenance chart.
Task Definition
Examine components with care. Repair or replace any worn
INSPECT
or damaged components promptly.
Clean away any mud, dirt, dust, debris or other substances
CLEAN
that could impair the proper operation of the track system.
Always adjust components as recommended in this manual.
ADJUST
See pages 18-25.
Always lubricate components as recommended in this
LUBRICATE
manual. See pages 34-36.
Replace worn or damaged parts with new parts to prevent
REPLACE
additional damage or damage to other components.
28MAINTENANCE
Periodic Maintenance Chart
Normal Winter Conditions
INITIAL INTERVALS
Every Every
See First Use 30 55 Annually
Page Hours Hours
TRACK SYSTEM
Visual Inspection 31 Clean; Inspect Clean; Inspect Clean; Inspect
Adjustments 31 Adjust Inspect; Adjust -- Inspect; Adjust
System Alignment 31 Adjust -- Inspect; Adjust Inspect; Adjust
Bolt Torque 31 -- -- -- Inspect; Adjust
TRACK
Tension 31 Adjust Inspect; Adjust -- Inspect; Adjust
Wear 31 -- -- -- Inspect
WHEELS
Side Wear 31 -- -- -- Inspect; Replace
Bearings 31 -- -- Inspect Inspect; Replace
Seal Lubrication 31 -- -- Inspect; Lubricate Lubricate
FRAME
Hub Bearings 32 -- -- -- Inspect; Replace
Hub Bearing Seal 32 -- -- Lubricate Inspect; Lubricate
Track Guide Wear 32 -- -- -- Inspect; Replace
Stabilizers 32 -- -- -- Inspect; Replace
Cracks 32 -- -- -- Clean ; Inspect
SPROCKET
Wear 32 -- -- -- Clean; Inspect
ANTI-ROTATION
Lubrication 32 -- -- Clean; Lubricate Clean; Lubricate
Bolt Torque 32 Inspect; Adjust -- Inspect; Adjust --
Crack, Deformation 32 -- -- -- Inspect
VEHICLE
Suspension Arm Bolt
33 -- Inspect; Adjust -- Inspect; Adjust
Torque
Steering Column 33 -- Inspect; Adjust -- Inspect; Adjust
29MAINTENANCE
Periodic Maintenance Chart
Industrial/Commercial Use/Abrasive Conditions
INITIAL INTERVALS
See Every Every Every
Page First Use 15 40 100
Hours Hours Hours
TRACK SYSTEM
Visual Inspection 31 Clean; Inspect Clean; Inspect Clean; Inspect
Adjustments 31 Adjust Inspect; Adjust -- Inspect; Adjust
System Alignment 31 Adjust -- Inspect; Adjust Inspect; Adjust
Bolt Torque 31 -- -- -- Inspect; Adjust
TRACK
Tension 31 Adjust Inspect; Adjust -- Inspect; Adjust
Wear 31 -- -- -- Inspect
WHEELS
Side Wear 31 -- -- -- Inspect; Replace
Bearings 31 -- -- Inspect Inspect; Replace
Seal Lubrication 31 -- -- Inspect; Lubricate Lubricate
FRAME
Hub Bearings 32 -- -- -- Inspect; Replace
Hub Bearing Seal 32 -- -- Lubricate Inspect; Lubricate
Track Guide Wear 32 -- -- -- Inspect; Replace
Stabilizers 32 -- -- -- Inspect; Replace
Cracks 32 -- -- -- Clean ; Inspect
SPROCKET
Wear 32 -- -- -- Clean; Inspect
ANTI-ROTATION
Lubrication 32 -- -- Clean; Lubricate Clean; Lubricate
Bolt Torque 32 Inspect; Adjust -- Inspect; Adjust --
Crack, Deformation 32 -- -- -- Inspect
VEHICLE
Suspension Arm Bolt
33 -- Inspect; Adjust -- Inspect; Adjust
Torque
Steering Column 33 -- Inspect; Adjust -- Inspect; Adjust
30MAINTENANCE
Perform all inspection and service procedures at the intervals outlined in
the Periodic Maintenance Chart beginning on page 28.
Track System Maintenance
1. Visually inspect all components of each track system for wear or
damage. Clean away any mud, dirt, dust, debris or other substances
that could impair the proper operation of the track system. Repair or
replace any worn or damaged components.
NOTICE: Brake cleaning solvent may damage seals and labels. Do not use
brake cleaner to clean the track system.
2. Verify front and rear track angle of attack. Adjust as needed. See
pages 18-21.
3. Verify track system alignment. Adjust as needed. See pages 22-23.
4. Check the torque of critical bolts as identified in the Exploded Views
section of this manual beginning on page 42. Tighten any loose bolts
to specification using a high strength threadlocker such as Loctite®
263. Do not over-tighten.
Track Maintenance
1. Verify track tension. Adjust as needed. See pages 24-25.
2. Inspect tracks for wear or damage. See page 38. A worn or damaged
track can result in premature wear of system components. Replace a
worn or damaged track.
Wheel Maintenance
1. Inspect track system wheels for side wear. See page 37. Replace
worn or damaged wheels.
2. Inspect wheel bearings for restriction, noise or abnormal play in
rotation. Replace the wheel if any of these defects are present. See
page 29.
3. Inspect wheel seals. Clean away any mud, dirt, dust, debris or other
substances. Lubricate seals to maintain sealing performance and
prolong wheel lifespan. Replace any worn or damaged seals. See
page 34.
31MAINTENANCE
Frame Maintenance
1. Inspect hub bearings for restriction, noise or abnormal play in
rotation. Promptly replace all hub bearings if a bearing displays one
of these defects. Always replace all bearings any time one bearing
requires replacement.
2. Clean and lubricate the hub seal to maintain sealing performance
and prolong hub bearing lifespan. See page 35.
3. Inspect track guides for wear. See page 38. Replace worn or
damaged track guides.
4. Inspect the condition of the rubber cones on the stabilizer assembly
of the front track systems and rear track systems. If cone bores
show oval-shaped wear, replace the cones. Use new bolts and
washers.
5. Inspect frames for cracks or defects. Damaged components can
impair proper operation of the systems. Replace any damaged
components.
Sprocket Maintenance
Inspect sprockets for wear. See page 37. Replace worn sprockets.
Anti-Rotation Maintenance
1. Clean and lubricate the stabilizing arms (anti-rotation arms). See
page 36.
2. Check the torque of assembly bolts on anchor brackets and
stabilizing arms (anti-rotation arms).
3. Inspect stabilizing arms (anti-rotation arms) for cracks or bent parts
that can impair proper operation. Replace damaged components.
32MAINTENANCE
Vehicle Maintenance
1. Check the torque of suspension arm bolts. Tighten to specification.
Refer to your vehicle owner’s manual or service manual.
2. Inspect and adjust the steering column. Refer to the owner’s manual
or service manual for your vehicle.
Special tool usage
Some components require special tools for servicing. Always use the
appropriate tools to avoid damage to components.
Pressure Washer Use
If a high pressure water system is used for cleaning (not recommended),
exercise extreme caution. The water may damage components. Avoid
directing the water stream at wheel bearing seals and rubber caps.
33MAINTENANCE
Lubrication
Lubricate track system components at the intervals outlined in the
Periodic Maintenance Chart beginning on page 28. We recommend the
use of a high quality water-resistant anti-friction grease.
A. 132 mm Wheel Bearing Seal - Apply 1- A
1.5 cc of grease evenly on and between
the wheel bearing seal lips.Apply over
the entire circumference.
B. 241 mm Wheel Bearing Seal - Apply 1-
1.5 cc of grease evenly on and between
the wheel bearing seal lips. Apply over
the entire circumference.
B
34MAINTENANCE
Lubrication
C. Wheel Shaft and Seal Bearing -
Apply 1-1.5 cc of grease on the
wheel shaft and seal bearing. Apply C
grease evenly over the entire width
and circumference.
D. Hub - After replacing hub housing D
bearings and reinstalling hub, slowly
pour 2 teaspoons (8-10 cc) of 80W90
grade oil through the hole on the top of
the hub housing. Do not overfill, pour the
recommended amount of oil.
E. Hub Bearing Seals - Apply 1.5-2 cc of
grease evenly between the hub seal’s E
lips and over the entire circumference of
the seal.
IMPORTANT: Make sure the hub seal is installed
flush with the hub face. It should
not extend beyond the hub face.
F. Hub Speed Sleeve - Apply 1-1.5 cc of
grease over the entire width and
circumference of the sleeve.
F
G. Frame Tubing, Tensioner Side - Slide
the tensioner to its furthest point out.
Apply evenly a thin coat of grease,
oil or spray lubricant on the outside
of the tensioner tubing, over the
entire circumference. Always realign
the tensioner when it has been
disassembled.
NOTICE : Application of lubricant on the tensioner tubing prevents corrosion
inside the frame’s tube. Lubrication allows the tensioner to move
freely when adjusting track tension.
35MAINTENANCE
Lubrication
H. Stabilizer Shaft - Using a
grease gun, apply 1.5-2 cc
of grease to the stabilizer
shaft through the grease
fitting. Do not overfill. The
protective plastic cap could
be forced off.
H
I. Stabilizing Arms - Apply
spray lubricant around the I
compression spring and
over its entirelength on both
front and rear track
systems.
Front
I
Rear
I. Stabilizing Arms - Apply
spray lubricant to rod end.
36MAINTENANCE Wear Inspections Wheel Wear Inner Surface Excessively worn wheels will not offer enough support for track guidance. Inspect for wheel wear, especially on the interior guiding strips. Replace a wheel if the inner surface is perforated or if the width of the rolling band has worn down to less than 1.75 inches (45 mm). Urethane Tire Excessively worn wheels will not offer enough support for track guidance. Inspect for wheel wear, especially on the interior guiding strips (1) and between the wheel profiles (2). Replace a wheel if the inner surface is worn out or if cracks appear between the wheel profiles. Sprocket wear Replace if < 3/4 in. (
MAINTENANCE
 Wear Inspections
 Track Guide Wear
 Operating with excessively worn track guides could result in premature
 wear to other track guidance components.
 Measure track guide width at multiple positions. Replace the guide if:
 • any measurement is less than 5 mm or
 • the concave shape of the guiding strip is no longer visible

 Track Wear
 Operating with a worn or damaged track could result in damage to the
 wheels and to the track guide.
 • Inspect track condition on both the inner and outer sides of the track.
 • Inspect the rolling path, the driving lug and the profile.
 • Inspect the entire length and width of the track for wear, cracks and
   other damage. If a track’s internal structure is visible at cracks or worn
   areas, replace the track before operating.

38
MAINTENANCE
Wear Inspections
Anti-Rotation Wear

 Ball joint damage could
 adversely affect track system
 performance.
 Inspect the anti-rotation system
 for wear, especially at the ball
 joint.
 • Make sure the ball joint is
    neither seized nor extremely
    loose.
 • Make sure the ball rotates
    freely in the housing (1).
 • Make sure there is not
    excessive play between the
    ball and housing (2).

                                             39
TROUBLESHOOTING
TROUBLESHOOTING
Problem Potential Cause Correction
Debris in system Clean/remove all debris.
Severe, localized wheel
Replace the part.
wear (flat spot)
Frozen sprocket or Remove ice/snow build-up. Store vehicle at
wheel temperatures above 32° F. (0° C).
Verify system alignment. Ensure track is
Beginning of derailing properly guided by wheels and track guide.
Abnormal vibration Adjust as needed. See pages 22-23.
Soiled hubs when system Remove system, clean hub surfaces,
was installed reinstall system.
Replace damaged bearings; always replace
Damaged hub bearing
bearings annually/every 100 hours as
or wheel bearing
recommended.
Damage to hub or track
system due to impact or Replace damaged parts.
abusive use
Incorrect angle of attack Adjust front and rear track angle of attack. See
adjustments pages 18-21.
Unstable behavior Incorrect system
Adjust system alignment. See pages 22-23.
alignment
Track tension too high Adjust track tension. See page 24-25.
Attempt to free wheel; replace if
Blocked wheel
necessary.
Overheated guiding Incorrect system Adjust system alignment. See pages 22-23.
components alignment
(burned rubber Vary turning radius; operate in lubricated
odor) Constant turning
environment.
Exit ruts occasionally to vary direction;
Constant operation in ruts
operate in lubricated environment.
Lower track tension.
Clean mud, snow, other build-up from
Track tension too high sprockets.
Loss of power Remove ice/snow build-up from wheels.
Remove compacted snow from frame and wheels.
Snow infiltrated
Remove snow; promptly see your dealer for
vehicle air intake
service.
system
Verify system alignment. See pages 22-23. Inspect
Severe wear to one or more
for wear on track guide, inside driving lugs and
components
wheels.
Partial or total Track tension too low Adjust track tension. See page 24-25.
derailing
Incorrect system Adjust system alignment. See pages 22-23. Adjust
alignment; incorrect angle front and rear track angle of attack. See pages 18-
of attack adjustments 21.
Adjust front and rear track angle of attack. See
Insufficient Incorrect adjustment of pages 18-21.
snow flotation anti-rotation (stabilizing)
arm Replace worn or damaged rubber damper on
stabilizing arm.
40“CE” DECLARATION OF CONFORMITY
“CE” DECLARATION OF CONFORMITY
DECLARATION
OF CONFORMITY
WE:
MANUFACTURER: Camso inc.
ADDRESS: 4162, rue Burrill, Local A
Shawinigan QC, Canada G9N 0C3
PHONE:
FAX:
WEB SITE: www.camso.co
HEREBY DECLARE THAT THE PRODUCT SERIES:
PRODUCT: Polaris Prospector Pro UTV
CUSTOMER:
IS IN CONFORMITY WITH THE FOLLOWING STANDARDS:
NUMBER : TITLE: DATE:
EN 62079 Preparation of Instruction 2001
EN 12100-1 & -2 Safety of Machinery 1996
EN 17050-1 & -2 Conformity Assessment 2005
AND IN CONFORMITY WITH THE FOLLOWING EC DIRECTIVE:
NUMBER: TITLE: DATE:
2006/42/EEC Safety of machinery directives 2006
DONE AT:
Shawinigan QC, Canada
PERSON-IN-CHARGE:
TITLE:
SIGNATURE:
DATE:
41SERVICE KITS
SERVICE KITS
Exploded Views
Check the torque of critical bolts as identified in this section of the user
manual. Tighten any loose bolts to specification using a high strength
threadlocker such as Loctite® 263. Do not over-tighten.
Front Left Frame Kit / Ensemble châssis avant gauche
ITEM # PART # DESCRIPTION QTY
A TBD K-FRAME, CMPLST, FL, UTV 1
1 -- LH FRONT FRAME / CADRE AVANT GAUCHE -- UTV 1
2 -- TENSIONNER - TENSIONNEUR -- UTV 1
3 -- 2 LIPS CAP, 1-3/4" O.D. TUBE / BOUCHON 2 LÈVRES, TUBE DIA EXT 1-3/4 PO 1
4 -- 2 LIPS CAP, 2" O.D. TUBE / BOUCHON 2 LÈVRES, TUBE DIA EXT 2 PO 1
5 -- CAP NUT / CAPUCHON DE BOULON 1
6 -- HUB CAP POLARIS ASSY / CAP DE MOYEU POLARIS 1
7 -- HSBS, M6-1X10, 10.9, ZP 1
8 -- HFCS, M8-1.25X70, 10.9, ZP, IFI536 1
9 -- CP, 1/8, 1-3/4, ZP 1
10 -- SDSQWS, #12-24X1.5, ZP 7
11 -- TENSIONNER BUSHING / COUSSINET, TENSIONNEUR 1
12 -- W, 9.9X6X0.9, AL 1
13 -- FNN, M8-1.25, 8, ZP, DIN6926 1
14 -- TENSIONNER ROD - HEX NUT ASS'Y / ENS. TIGE TENSIONNEUR - ÉCROU HEX 1
15 -- STICKER - ALIGNMENT / AUTOCOLLANT - ALIGNEMENT 1
16 -- STICKER - WARNING / AUTOCOLLANT - AVERTISSEMENT 1
17 -- STICKER / AUTOCOLLANT -- POLARIS UTV 1
18 -- TRACK GUIDE FRONT / GUIDE CHENILLE AVANT -- UTV 1
19 -- ERR, 35, 2.4, ZP, SHR-137 1
20 2205871 K-BEARING, CMPLST, UTV MY15 1
42SERVICE KITS
Exploded Views
Front Right Frame Kit / Ensemble châssis avant droit
ITEM # PART # DESCRIPTION QTY
B TBD K-FRAME, CMPLST, FR, UTV 1
1 -- RH FRONT FRAME / CADRE AVANT DROIT -- UTV 1
2 -- TENSIONNER - TENSIONNEUR -- UTV 1
3 -- 2 LIPS CAP, 1-3/4" O.D. TUBE / BOUCHON 2 LÈVRES, TUBE DIA EXT 1-3/4 PO 1
4 -- 2 LIPS CAP, 2" O.D. TUBE / BOUCHON 2 LÈVRES, TUBE DIA EXT 2 PO 1
5 -- STEEL CAP NUT / CAPUCHON DE BOULON 1
6 -- HUB CAP POLARIS ASSY / CAP DE MOYEU POLARIS 1
7 -- HSBS, M6-1X10, 10.9, ZP 1
8 -- HFCS, M8-1.25X70, 10.9, ZP, IFI536 1
9 -- CP, 1/8, 1-3/4, ZP 1
10 -- SDSQWS, #12-24X1.5, ZP 7
11 -- TENSIONNER BUSHING / COUSSINET, TENSIONNEUR 1
12 -- W, 9.9X6X0.9, AL 1
13 -- FNN, M8-1.25, 8, ZP, DIN6926 1
14 -- TENSIONNER ROD - HEX NUT ASS'Y / ENS. TIGE TENSIONNEUR - ÉCROU HEX 1
15 -- STICKER - ALIGNMENT / AUTOCOLLANT - ALIGNEMENT 1
16 -- STICKER - WARNING / AUTOCOLLANT - AVERTISSEMENT 1
17 -- STICKER / AUTOCOLLANT -- POLARIS UTV 1
18 -- TRACK GUIDE FRONT / GUIDE CHENILLE AVANT -- UTV 1
19 -- ERR, 35, 2.4, ZP, SHR-137 1
20 2205871 K-BEARING, CMPLST, UTV 1
43SERVICE KITS
Exploded Views
Rear Left Frame Kit / Ensemble châssis arrière gauche
ITEM # PART # DESCRIPTION QTY
C TBD K-FRAME, CMPLST, RL, UTV 1
1 -- LH REAR FRAME / CADRE ARRIÈRE GAUCHE -- UTV 1
2 -- TENSIONNER - TENSIONNEUR -- UTV 1
3 -- 2 LIPS CAP, 1-3/4" O.D. TUBE / BOUCHON 2 LÈVRES, TUBE DIA EXT 1-3/4 PO 1
4 -- 2 LIPS CAP, 2" O.D. TUBE / BOUCHON 2 LÈVRES, TUBE DIA EXT 2 PO 1
5 -- STEEL CAP NUT / CAPUCHON DE BOULON 1
6 -- HUB CAP POLARIS ASSY / CAP DE MOYEU POLARIS 1
7 -- HSBS, M6-1X10, 10.9, ZP 1
8 -- HFCS, M8-1.25X70, 10.9, ZP, IFI536 1
9 -- CP, 1/8, 1-3/4, ZP 1
10 -- SDSQWS, #12-24X1.5, ZP 7
11 -- TENSIONNER BUSHING / COUSSINET, TENSIONNEUR 1
12 -- W, 9.9X6X0.9, AL 1
13 -- FNN, M8-1.25, 8, ZP, DIN6926 1
14 -- TENSIONNER ROD - HEX NUT ASS'Y / ENS. TIGE TENSIONNEUR - ÉCROU HEX 1
15 -- STICKER - ALIGNMENT / AUTOCOLLANT - ALIGNEMENT 1
16 -- STICKER - WARNING / AUTOCOLLANT - AVERTISSEMENT 1
17 -- STICKER / AUTOCOLLANT -- POLARIS UTV 1
18 -- TRACK GUIDE REAR / GUIDE CHENILLE ARRIÈRE -- UTV 1
19 -- ERR, 35, 2.4, ZP, SHR-137 1
20 2205871 K-BEARING, CMPLST, UTV 1
44SERVICE KITS
Exploded Views
Rear Right Frame Kit / Ensemble châssis arrière droit
ITEM # PART # DESCRIPTION QTY
D TBD K-FRAME, CMPLST, RR, UTV 1
1 -- RH REAR FRAME / CADRE ARRIÈRE DROIT -- UTV 1
2 -- TENSIONNER - TENSIONNEUR -- UTV 1
3 -- 2 LIPS CAP, 1-3/4" O.D. TUBE / BOUCHON 2 LÈVRES, TUBE DIA EXT 1-3/4 PO 1
4 -- 2 LIPS CAP, 2" O.D. TUBE / BOUCHON 2 LÈVRES, TUBE DIA EXT 2 PO 1
5 -- STEEL CAP NUT / CAPUCHON DE BOULON 1
6 -- HUB CAP POLARIS ASSY / CAP DE MOYEU POLARIS 1
7 -- HSBS, M6-1X10, 10.9, ZP 1
8 -- HFCS, M8-1.25X70, 10.9, ZP, IFI536 1
9 -- CP, 1/8, 1-3/4, ZP 1
10 -- SDSQWS, #12-24X1.5, ZP 7
11 -- TENSIONNER BUSHING / COUSSINET, TENSIONNEUR 1
12 -- W, 9.9X6X0.9, AL 1
13 -- FNN, M8-1.25, 8, ZP, DIN6926 1
14 -- TENSIONNER ROD - HEX NUT ASS'Y / ENS. TIGE TENSIONNEUR - ÉCROU HEX 1
15 -- STICKER - ALIGNMENT / AUTOCOLLANT - ALIGNEMENT 1
16 -- STICKER - WARNING / AUTOCOLLANT - AVERTISSEMENT 1
17 -- STICKER / AUTOCOLLANT -- POLARIS UTV 1
18 -- TRACK GUIDE REAR / GUIDE CHENILLE ARRIÈRE -- UTV 1
19 -- ERR, 35, 2.4, ZP, SHR-137 1
20 2205871 K-BEARING, CMPLST, UTV 1
45SERVICE KITS
Exploded Views
18-Tooth Sprocket Kit / Ensemble barbotin 18 dents
ITEM # PART # DESCRIPTION QTY
E 2205433 K-SPROCKET, CMPLST, 18 TOOTH 1
1 -- SPROCKET-CMPLST XP, 18 TOOTH / BARBOTIN-CMPLST XP 18 DENTS 1
2 -- HFSCS, M10-1.5X30, 10.9, ZP, TL, DIN6921 4
20-Tooth Sprocket Kit / Ensemble barbotin 20 dents
ITEM # PART # DESCRIPTION QTY
F 2205432 K-SPROCKET, CMPLST, 20 TOOTH 1
1 -- SPROCKET-CMPLST XP, 20 TOOTH / BARBOTIN-CMPLST XP 20 DENTS 1
2 -- HFSCS, M10-1.5X30, 10.9, ZP, TL, DIN6921 4
46SERVICE KITS
Exploded Views
32mm Hub Kit / Ensemble moyeu 32 mm
ITEM # PART # DESCRIPTION QTY
G 2205870 K-HUB, CMPLST, 32mm 1
1 -- HUB-CMPLST XP HD 32mm, ASSY 1
2 -- HFSCS, M10-1.5X30, 10.9, ZP, TL, DIN6921 4
3 -- ERR, 35, 2.4, ZP, SHR-137 1
47SERVICE KITS
Exploded Views
Mid Wheel Kit / Ensemble roue 132mm
ITEM # PART # DESCRIPTION QTY
H 2205127 K-WHEEL, CMPLST, MID, UTV 1
1 -- HD WHEEL ASSY / ROUE HD ASSEMBLÉE -- 132mm X 50mm 1
2 -- WHEEL CAP / CAP DE ROUE 1
3 -- HCSW, M10-1.5X25, 8.8, ZP, TL, DIN933 1
Idler Wheel Kit / Ensemble pneu 241mm
ITEM # PART # DESCRIPTION QTY
i 2205447 K-WHEEL, CMPLST, IDLER, UTV 1
1 -- WHEEL ASSY / ROUE ASSEMBLÉE -- UTV 241 MM 1
2 -- WHEEL CAP / CAP DE ROUE 1
3 -- HCSW, M10-1.5X25, 8.8, ZP, TL, DIN933 1
48SERVICE KITS
Exploded Views
Outer Rocker Kit / Ensemble stabilisateur mâle
ITEM # PART # DESCRIPTION QTY
J 2205446 K-ROCKER, CMPLST, OUTER, UTV 1
1 -- UTV STABILIZER ASSY MALE / STABILISATEUR UTV ASSEMBLÉ, MALE 1
2 -- HD WHEEL ASSY / ROUE HD ASSEMBLÉE -- 132mm X 50mm 2
3 -- WHEEL CAP / CAP DE ROUE 2
4 -- HCSW, M10-1.5X25, 8.8, ZP, TL, DIN933 2
5 -- URETHANE CONE, STABILIZER / CÔNE URÉTHANE, STABILISATEUR 1
Inner Rocker Kit / Ensemble stabilisateur femelle
ITEM # PART # DESCRIPTION QTY
K 2205126 K-ROCKER, CMPLST, INNER, UTV 1
1 -- UTV STABILIZER FEMALE ASS'Y / STABILISATEUR UTV ASSEMBLÉ, FEMELLE 1
2 -- DUST CAP, STABILIZER / CAPUCHON, STABILISATEUR 1
3 -- HCS, M10-1.5X45, 10.9, ZP, TL, DIN931 1
4 -- TANDEM “T” BUSHING / COUSSINET TANDEM 1
5 -- W, 7/16X1.0X0.072, 8, ZP, USS 1
6 -- URETHANE CONE, STABILIZER / CÔNE URÉTHANE, STABILISATEUR 1
7 -- TW, 1”X 5/8” X 1/16” 2
49SERVICE KITS
Exploded Views
Bearing Kit / Ensemble de roulements
ITEM # PART # DESCRIPTION QTY
L 2205871 KIT - BEARINGS, CMPLST, UTV 1
1 -- INTERNAL SPACER / ESPACEUR ROULEMENTS 1
2 -- BEARING / ROULEMENT -- 6007 2
3 -- BEARING / ROULEMENT -- 6908 1
4 -- SHAFT SEAL / JOINT D'ÉTANCHÉITÉ, ARBRE MOYEU -- 50 x 62 x 10 TC 1
Track Adjuster/Tensioner Kit -- Ens. tensionneur
ITEM # PART # DESCRIPTION QTY
M 2205445 K-TRACK ADJUSTER, CMPLST, UTV 1
1 -- TENSIONER / TENSIONNEUR -- UTV 1
2 -- 2 LIPS CAP, 1-3/4" O.D. TUBE / BOUCHON 2 LÈVRES, TUBE DIA EXT 1-3/4 PO 1
3 -- CAP NUT / CAPUCHON DE BOULON 1
4 -- HFCS, M8-1.25X70, 10.9, ZP, IFI536 1
5 -- CP, 1/8, 1-3/4, ZP 1
6 -- TENSIONNER BUSHING / COUSSINET, TENSIONNEUR 1
7 -- FNN, M8-1.25, 8, ZP, DIN6926 1
8 -- TENSIONNER ROD - HEX NUT ASS'Y / ENS. TIGE TENSIONNEUR - ÉCROU HEX 1
9 -- STICKER - ALIGNMENT / AUTOCOLLANT - ALIGNEMENT 1
50SERVICE KITS
Exploded Views
Front Track Guide Kit / Ensemble guide chenille avant
ITEM # PART # DESCRIPTION QTY
N 2205443 K-HYFAX, CMPLST, FRONT, UTV 1
1 -- SDSQWS, #12-24X1.5, ZP 7
2 -- TRACK GUIDE FRONT/ GUIDE CHENILLE AVANT 1
Rear Track Guide Kit / Ensemble guide chenille arrière
ITEM # PART # DESCRIPTION QTY
O 2205444 K-HYFAX, CMPLST, REAR, UTV 1
1 -- SDSQWS, #12-24X1.5, ZP 7
2 -- TRACK GUIDE REAR / GUIDE CHENILLE ARRIÈRE 1
51SERVICE KITS
Exploded Views
Anti-Rotation -- Front (Stabilizing) Arm Kit / Ensemble
bras stabilisateur avant
ITEM # PART # DESCRIPTION QTY
P 2205436 KIT- ANTI ROTATION, FRT, UTV 1
1 -- SHORT ANTI-ROTATION TUBING WELDMENT / TUBE ANTI-ROTATION COURT, SOUDÉ 1
2 -- HCS, M10-1.5X60, 10.9, ZP, DIN931 1
3 -- HFSCS, M12-1.75X50, 8.8, ZP, DIN6921 1
4 -- X-LONG ROD END / TIGE À ŒIL X-LONG 1
5 -- ROD END SPACER / ESPACEUR, EMBOUT À ROTULE 2
6 -- W, 374X13X3, ZP, DIN 9021 1
7 -- W, 7/16X1.0X0.072, 8, ZP, USS 1
8 -- FNN, M10-1.5, 8, ZP, DIN6926 1
9 -- STABILIZING ROD SPRING / RESSORT BRAS STABILISATEUR 1
10 -- RUBBER DAMPER / AMORTISSEUR DE CAOUTCHOUC 1
52SERVICE KITS
Exploded Views
Anti-Rotation -- Rear (Stabilizing) Arm Kit / Ensemble
bras stabilisateur arrière
ITEM # PART # DESCRIPTION QTY
O 2205437 KIT- ANTI ROTATION, REAR, UTV 1
1 -- LONG ANTI-ROTATION TUBING WELDMENT / TUBE ANTI-ROTATION LONG, SOUDÉ 1
2 -- HCS, M10-1.5X80, 10.9, ZP, DIN931 1
3 -- HFSCS, M12-1.75X50, 8.8, ZP, DIN6921 1
4 -- X-LONG ROD END / TIGE À ŒIL X-LONG 1
5 -- ROD END SPACER / ESPACEUR, EMBOUT À ROTULE 1
6 -- SPACER ANTI-ROTATION / ESPACEUR ANTI-ROTATION 1
7 -- W, 7/16X1.0X0.072, 8, ZP, USS 1
8 -- W, 374X13X3, ZP, DIN 9021 1
9 -- FNN, M10-1.5, 8, ZP, DIN6926 1
10 -- COMPRESSION SPRING, LONG / RESSORT COMPRESSION, LONG -- 480LBS/IN 1
11 -- RUBBER DAMPER / AMORTISSEUR DE CAOUTCHOUC 2
53SERVICE KITS
Exploded Views
Hardware kit / Ensemble de quincaillerie
ITEM # PART # DESCRIPTION QTY
R 2205128 K-HDWR, CMPLST, UTV 1
1 -- BACK PLATE / PLAQUE DE FIXATION ARRIÈRE 1
2 -- STEEL CAP NUT / CAPUCHON DE BOULON 1
3 -- HSBS, M6-1X10, 10.9, ZP 1
4 -- HCSW, M10-1.5X25, 8.8, ZP, TL, DIN933 8
5 -- HCS, M10-1.5X45, 10.9, ZP, TL, DIN931 1
6 -- HFCS, M8-1.25X70, 10.9, ZP, TL, IFI536 1
7 -- HFSCS, M10-1.5X30, 10.9, ZP, DIN6921 6
8 -- CP, 1/8, 1-3/4, ZP 1
9 -- SDSQWS, #12-24X1.5, ZP 7
10 -- TANDEM “T” BUSHING / COUSSINET TANDEM 1
11 -- TENSIONER BUSHING / COUSSINET TENSIONNEUR 1
12 -- W, 7/16X1.0X0.072, 8, ZP, USS 3
13 -- W, 9.9X6X0.9, AL 1
14 -- FNN, M8-1.25, 8, ZP, DIN6926 1
15 -- URETHANE CONE, STABILIZER / CÔNE URÉTHANE, STABILISATEUR 2
16 -- ERR, 35, 2.4, ZP, SHR-137 1
17 -- TW, 1”X 5/8” X 1/16” 2
54SERVICE KITS
Exploded Views
Anti-Rotation -- Bracket Kit / Ensemble d’ancrage
ITEM # PART # DESCRIPTION QTY
S 2205448 KIT-ANTIROTATION, BRACKET 1
1 -- MAIN PLATE, UNIVERSAL ANTI-ROT. (IS) / PLAQUE PRINCIPALE UNIV. ANTI-ROT. (SI) 1
2 -- HCS, M10-1.5X80, 10.9, ZP, DIN931 2
3 -- W, 25X11X2, 8, ZP, USS 4
4 -- FNN, M10-1.5, 8, ZP, DIN69261 2
5 -- RETAINER, ANTIROTATION / ANTI-ROTATION, PLAQUE PIVOTANTE 1
Anti-Rotation -- Short bolt Kit / Ensemble boulon court
ITEM # PART # DESCRIPTION QTY
T 2205449 K-HDWR, ANTI ROTATION, SHORT 1
1 -- HCS, M10-1.5X60, 10.9, ZP, DIN931 1
2 -- ROD END SPACER / BAGUE ESPACEUR, EMBOUT À ROTULE 2
3 -- W, 7/16X1.0X0.072, 8, ZP, USS 1
4 -- FNN, M10-1.5, 8, ZP, DIN6926 1
55SERVICE KITS
Exploded Views
Anti-Rotation -- Long bolt Kit / Ensemble boulon long
ITEM # PART # DESCRIPTION QTY
U 2205450 K-HDWR, ANTI ROTATION, LONG 1
1 -- HCS, M10-1.5X80, 10.9, ZP, DIN931 1
2 -- ROD END SPACER / BAGUE ESPACEUR, EMBOUT À ROTULE 1
3 -- SPACER ANTI-ROTATION / ESPACEUR ANTI-ROTATION 1
4 -- W, 7/16X1.0X0.072, 8, ZP, USS 1
5 -- FNN, M10-1.5, 8, ZP, DIN6926 1
Decals (Labels) Kit / Ensemble autocollants (étiquettes)
ITEM # PART # DESCRIPTION QTY
V 2205453 K-DECALS, CMPLST, UTV 1
1 -- STICKER - ALIGNMENT / AUTOCOLLANT - ALIGNEMENT 1
2 -- STICKER - WARNING / AUTOCOLLANT - AVERTISSEMENT 1
3 -- HUB CAP POLARIS ASSY / CAP DE MOYEU POLARIS ASSEMBLÉ 1
4 -- STICKER / AUTOCOLLANT -- POLARIS UTV 1
56SERVICE KITS
Exploded Views
Caps Kit / Ensemble de bouchons
ITEM # PART # DESCRIPTION QTY
W 2205120 KIT- CAPS 1
1 -- 2 LIPS CAP, 1-3/4" O.D. TUBE / BOUCHON 2 LÈVRES, TUBE DIA EXT 1-3/4 PO 1
2 -- 2 LIPS CAP, 2" O.D. TUBE / BOUCHON 2 LÈVRES, TUBE DIA EXT 2 PO -- LDPE 1
3 -- WHEEL CAP / CAP DE ROUE 12
4 -- DUST CAP, STABILIZER / CAPUCHON, STABILISATEUR 1
5 -- HUB CAP POLARIS ASSY / CAP DE MOYEU POLARIS ASSEMBLÉ 1
Front Track /Chenille avant
ITEM # PART # DESCRIPTION QTY
X 5414846 TRACK-CMPLST, FRONT, UTV 1
57SERVICE KITS
Exploded Views
Rear Track / Chenille arrière
ITEM # PART # DESCRIPTION QTY
Y 5414848 TRACK-CMPLST, REAR, UTV 1
Cone Bushing Kit/ERR -- Ensemble cône uréthane/ ERR
ITEM # PART # DESCRIPTION QTY
Z 2205462 K- CONE BUSHING, CMPLST, UTV 1
AA 2205454 ERR, 35, 2.4, ZP, SHR-137 1
58DÉCLARATION «CE» DE CONFORMITÉ
DÉCLARATION «CE» DE CONFORMITÉ
DÉCLARATION
DE CONFORMITÉ
NOUS:
MANUFACTURIER : Camso inc.
ADRESSE : 4162, rue Burrill, Local A
Shawinigan QC, Canada G9N 0C3
TÉLÉPHONE :
TÉLÉCOPIEUR :
SITE INTERNET : www.camso.co
DÉCLARONS SOUS NOTRE SEULE RESPONSABILITÉ
QUE NOTRE PRODUIT:
PRODUIT : Polaris Prospector Pro UTV
CLIENT :
AUQUEL SE RÉFÈRE LA PRÉSENTE DÉCLARATION
EST CONFORME AUX NORMES :
NUMÉRO : TITRE: DATE:
EN 62079 Établissement des instructions 2001
EN 12100-1 & 2 Sécurité des machines - Analyse des risques 1996
EN 17050-1 & 2 Évaluation de la conformité 2005
ET, S’IL Y A LIEU, EST CONFORME AUX DISPOSITIONS
DE LA OU DES DIRECTIVES SUIVANTES :
NUMÉRO : TITRE: DATE:
2006/42/EEC Directive relative aux machines 2006
FAIT À :
Shawinigan QC, Canada
RESPONSABLE :
TITRE :
SIGNATURE :
DATE :
AUPARAVANT
CAMOPLAST
SOLIDEAL
41DÉPANNAGE
DÉPANNAGE
Problème Cause potentielle Correctif
Débris dans le système Nettoyer/retirer tout débris.
Usure avancée et localisé
Remplacer la pièce.
d’une roue (méplat)
Retirer accumulation de glace/neige. Entreposer
Barbotin ou roue gelé
véhicule à plus de 32° F. (0° C).
Vérifier l’alignement du système. S’assurer que la
Début de déraillement chenille est bien guidée par les roues et le guide de
Vibration anormale chenille. Ajuster au besoin. Voir les pages 22-23.
Saletés sur moyeux à Retirer système, nettoyer les surfaces du moyeu,
l’installation du système réinstaller système.
Remplacer roulement endommagé; toujours
Roulement de moyeu ou de
remplacer roulements annuellement/aux 100 hres
roue endommagé
tel que recommandé.
Moyeu ou système de trac-
tion endommagé en raison Remplacer pièces endommagées.
d’un impact ou usage abusif
Mauvais ajustement de Ajuster l’angle d’attaque avant et arrière. Voir les
l’angle d’attaque pages 18-21.
Mauvais alignement du Ajuster l’alignement du système. Voir les pages 22-
Conduite instable
système 23.
Tension des chenilles trop
Ajuster la tension des chenilles. Voir la page 24-25.
élevée
Roue bloquée Tenter de libérer la roue ; remplacer si nécessaire.
Surchauffe des Mauvais alignement du Ajuster l’alignement du système. Voir les pages 22-
composantes de système 23.
guidage (odeur de Varier raryon de braquage ; rouler dans un
Virage en continu
caoutchouc brûlé) environnement lubrifié.
Rouler dans des ornières en Sortir des ornières occasionnellement pour varier la
continu direction; rouler dans un environnement lubrifié.
Diminuer la tension des chenilles.
Nettoyer tout accumulation de boue, neige, ou
Tension des chenilles trop autre contaminant sur les barbotins
élevée
Retirer tout accumulation de glace/neige des roues.
Perte de puissance
Retirer la neige compactée du cadre et des roues.
Neige infiltrée dans la prise Enlever la neige ; voir votre concessionnaire pour
d’air du véhicule faire l’entretien.
Vérifier alignement du système. Voir les pages 22-
Usure importante d’un ou
23. Inspecter usure sur guide de chenille, dents de
plusieurs composantes
traction internes et roues.
Tension des chenilles trop
Déraillement partiel Ajuster la tension des chenilles. Voir la page 24-25.
faible
ou total
Mauvais alignement du Ajuster l’alignement du système. Voir les pages 22-
système ; mauvais ajuste- 23. Ajuster l’angle d’attaque avant et arrière. Voir
ment de l’angle d’attaque les pages 18-21.
Ajuster l’angle d’attaque avant et arrière. Voir les
Manque de
Mauvais ajustement du bras pages 18-21.
flottaison dans la
anti-rotation (stabilisateur) Remplacer amortisseur en caoutchouc usé ou
neige
endommagé sur le bras stabilisateur.
40You can also read