Rotproof Fences Keep water moving and seal up the end grain for a long-lasting fence in a wet climate - Culpeper Wood Preservers
←
→
Page content transcription
If your browser does not render page correctly, please read the page content below

Rotproof
              Fences                               by Michael Davis

                Keep water moving and seal
                up the end grain for a long-
                lasting fence in a wet climate

1   Professional Deck Builder • July/August 2007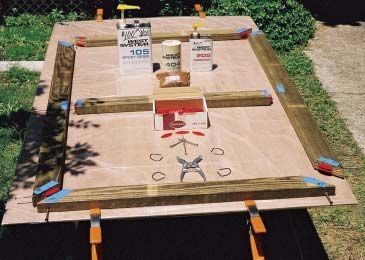
Rotproof Fences

    A     long with providing security and
          privacy, a nice wood fence can
    serve as a property’s crowning design
                                                                             A WATER-SHEDDING FENCE

    element. Leaving wood outside in a                                                                                      Copper-topped
    wet climate like mine, though, borders                       2x PT cap rail with 15°                                    post cap
    on criminal behavior — which is why,                         bevel cut on top and
    as a restoration carpenter working in                        continuous drip grooves
    New Orleans, I’ve focused throughout                         cut into bottom                                            4x4 PT post
    my career on making exterior wood                                                                                       (shown beyond)
    last as long as possible.
      Early in 2005, my best rot-prevention
                                                                                                                           1 1/ 2" x 1 3/ 4"-wide
    techniques were put to the test when
                                                                                                                           PT spindle top rail
    some past clients approached me
                                                                           Stainless-steel                                 with dado
    about building a fence on one side of                                  framing angle
    their restored house. Natives of New                      1'-3"
                                                             spindle       (shown beyond)                                2x2 PT spindle with 15°
    Orleans, these folks knew how fast                                                                                   bevel cut at bottom,
                                                            assembly
    things decay here and they wanted                                                                                    fastened to rails with 3"
    something that would be around for a                                                                                 stainless-steel screws
    long time.
                                                                   1/ 2"   gap
      To prevent rot and discourage in-
    sects, I keep in mind five simple rules
    whenever I’m building a fence — or                                                                                   1 1/ 2" x 1 3/ 4"-wide
    anything outdoors, for that matter.                                                                                  PT spindle bottom rail
                                                   8'-0"                                                                 with 15° bevel cut
      1) Keep joints — which hold water —
    to a minimum.                                   post
                                                                         Bottom cap rail
                                                   height                                                                    Middle framing rail
      2) Avoid applied moldings. They                                    with dado to
    trap water and organic material, the                                 receive fence boards;                               with 15° bevel cut,
    prime ingredients for rot and mildew.                                fastened to post                                    fastened to post
      3) Pooling — or sitting — water is                                 with stainless-steel                                with stainless-steel
    much more destructive than flowing                                   framing angles                                      framing angles
    water; if you can’t properly shield a
                                                                                                                         3"-wide strip of
    joint, open it up so water can move                       6'-0"         1x6 fence boards                             drainage matting
    through freely.                                         fence rail      fastened to rails                            fastened with
      4) If there are enclosed spaces like                  assembly        with 2" stainless-                           stainless-steel
    column wraps or boxed beams, pro-                                       steel screws                                 staples, creates a
    vide some form of ventilation to dry                                                                                 drainage gap
    the inside.                                                          Base trim board                                 Bottom framing rail
      5) Seal all end grain.                                             with bevel cut,                                 with bevel cut
                                                                         fastened with 3"
    Materials                                                            stainless-steel                                 Drainage matting
    Basically, my clients wanted a spindle                               screws                                          strips both sides
    section above a vertical-board fence,
    dressed up with a trim board at the bot-                                                                                 Concrete pier
    tom (Figure 1). Complicating matters,                                                                                    domed above grade
    they also wanted fence panels between                                                                                    to shed water

                                                                                                    PT posts set in
                 Figure 1. The beveled surfaces and                                              10"-dia. x 2'-0"-deep
                 drainage spaces on this fence prevent                                              concrete piers
                 water from pooling and promote drying.

2   Professional Deck Builder • July/August 2007
Rotproof Fences

    the posts.                                     inch auger. I flared the hole bottoms
      Given the rough parameters, the              by hand and then filled them with sev-
    first order of business was picking a          eral inches of coarse gravel for
    type of post. I like to use 21 ⁄ 4-inch hot-   drainage. Some fence builders, I know,
    dipped galvanized metal pipe because           object to installing fence posts in con-
    it holds up very well in our climate.          crete, but our “gumbo” soils down
    However, my clients didn’t like the            here make it a necessity.
    pipe’s appearance, and wrapping it               I put the two straightest 4x4s aside
    with wood wasn’t in the budget, so the         for the gate posts and used the two
    only option was No. 2–grade pressure-          next best for the end posts. I set the
    treated 4x4s.                                  end posts first, doming the concrete
      We chose a clear-grade PT for the            several inches above grade to shed
    rest of the fence; it’s not as expensive       water. The posts were braced off in
    as redwood or exotics and it warps             both directions while the concrete set
    less and machines better than the              up. The next day I installed the re-
    other PT grades.                               maining posts, using string lines
      When using a lesser grade, I gener-          stretched between the end posts.
    ally try to air-dry it out of the weather        There are two things to keep in mind
    and sun for at least a month. That             here: First, no matter how careful you
                                                                                               Figure 2. The top of every
    way, I can cut up the worst material           are, the fence won’t be dead straight. If
                                                                                               horizontal member gets a
    and put pieces with bows, crooks,              you want it perfectly straight, you’ll
                                                                                               15-degree bevel to shed
    twists, and checks in places where             have to go with wrapped metal or red-
                                                                                               water and debris. Rain grooves
    they’ll be less visible.                       wood posts.
                                                                                               on the bottom of the top rail
      Also, despite what the lumber sales-           Second, concrete footings like the        break surface tension so that
    men may tell you, .25-pcf pressure-            ones I used here are very good, but if      water drips off instead of fol-
    treated wood will rot above ground in          you want the fence to stay as straight      lowing the fence to the bottom.
    the Deep South, so we used lumber              as the day you built it, you’ll need to
    with a .40-pcf treatment.
      Stainless steel is my preferred mate-
    rial for exterior applications. Grade
    304 or 305 stainless is generally fine
    — unless you’re near saltwater, in
    which case you will want Grade 316.
      After balancing cost considerations
    against expected longevity, we settled
    on USP’s MP34-SS connectors (800/
    328-5934, www.uspconnectors.com) to
    fasten the fence rails to the posts. The
    only nonstainless hardware that went
    into this fence was a black powder-
    coated gate latch, installed with stain-
    less screws.

    Post Installation
    Laying out and setting the 4x4 posts               Figure 3. Feather boards prevent kickback and help produce better-
    was done in the standard manner of                 quality saw cuts and dadoes. A sturdy magnet holds the shop-made
    setting batter boards and pulling a                wood feather board on the saw’s cast-iron table. The plastic feather
    centerline string.                                 board mounted on the table in the miter-gauge slot and the vertical
      I spaced the posts 8 feet on-center              feather boards on the rip fence are made by Bench Dog Tools.
    and dug 2-foot-deep holes with a 10-

3   Professional Deck Builder • July/August 2007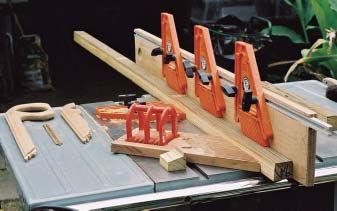
Rotproof Fences

       Figure 4. The 2x2 spindles capping the fence are laid into the jig and
       screwed to the rails with 3-inch-long #7 trim-head screws. The tops of
       panels are predrilled and screws are started to make final assembly
       easier (above). Keeping the spindles away from the posts helps hide
       slight discrepancies in the panel caused by warped posts and varying
       panel sizes (right).

    link the post footings together with a
    small grade beam. This adds signifi-
    cantly to the project’s cost and com-
    plexity, but it’s often a good idea,
    especially for heavier fences built on
    wet soil.

    Assembly Prep
    I started assembling the fence sections
    by putting a 15-degree bevel on the
    top of each horizontal member and
    drip grooves on the bottom of the top
    rail. This would prevent water from
    sitting on the surface and make it drip
    off instead of following the wood
    (Figure 2, page 3).                                                         Figure 5. The screw pattern on
                                                                                the first full-sized fence board
       For safer and more precise cutting, I
                                                                                is laid out by hand, but then it
    typically use feather boards from
                                                                                becomes a jig for the rest of
    Bench Dog Tools (800/786-8902,
                                                                                the boards when the author
    www.benchdog.com) to hold the lum-
                                                                                screws registration blocks on
    ber tight to the fence and table (Figure
                                                                                one end and one side (above).
    3, page 3). Once all the pieces are cut, I
                                                                                Smaller boards next to the
    prestain them, which saves a lot of                                         post get their own jig. A WL
    time down the road. In this case, the                                       Fuller Co. tapered bit (401/
    client coated everything with reddish-                                      467-2900, www.wlfuller.com)
    brown semitransparent stain.                                                does the drilling and counter-
       When the pieces were ready, I figured                                    sinking in one step (left).
    out the highest part of the yard and

4   Professional Deck Builder • July/August 2007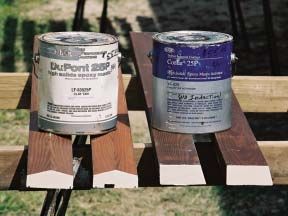
Rotproof Fences

                                                                                 Figure 6. A 1 ⁄ 8-inch gap behind the fence
                                                                                 boards — created by fastening Enkamat to the
                                                                                 rails with stainless-steel staples — keeps water
                                                                                 from being trapped (left). Similar gaps are left
                                                                                 where the horizontal rails meet the posts. The
                                                                                 author fastened the L-shaped brackets secur-
                                                                                 ing the rails with 11 ⁄ 2-inch-long #8 pan-head
                                                                                 screws and oriented them so that the brackets
                                                                                 are hidden behind the fence boards (above).
                                                                                 Some rail ends were cut on a slight angle or
                                                                                 bevel to match warped or twisted posts.

    added 2 inches. This would be the ele-         made, I screwed them into the top rail
    vation of the bottom of the fence and          (Figure 4, page 4).
    would keep the bottom trim board 2 to
    5 inches above grade. I then used a            Fence Boards
    level/transit to mark the location of          The fence boards started out as 12-
    the horizontal rails on all the posts, so      foot 1x6s. After cutting them in half, I
    I could install the angle brackets that        turned them around and cut off both
    would hold the fence panels.                   factory ends at 5 feet 11 inches. Since
      Next, I sorted through all the shaped        they were already prestained, the
    rails and placed the best pieces toward        boards were ready for pilot holes —
    the front, with increasingly twisted           which, though they are not absolutely
    ones going toward the rear. I cut the          necessary, make installation much eas-
    rails 1 ⁄ 2 inch short of the actual mea-      ier. Plus, level screws look better on the
    surement to obtain a 1 ⁄ 4-inch drainage       finished product.
    gap on each end.                                 Before drilling, I arranged the boards
                                                   with the flat grain pointing down, so if
    Spindle Assembly                               the grain lifts in the future it will still
                                                                                                  Figure 7. In the New Orleans
    The spindle assembly on top of the             shed water. Then I made a jig to drill
                                                                                                  area, wood structures cannot
    fence came next. I juggled the spindle         the pilot holes (Figure 5, page 4).
                                                                                                  be attached directly to a
    spacing so that a common spacing                 Prior to installing the fence boards,
                                                                                                  house, so the author secures
    would work in all the post bays. And to        I cut 3-inch strips of Colbond’s Enka-
                                                                                                  fence sections abutting the
    hide slight discrepancies in the 8-foot        mat 7010 drainage matting (800/                home with stainless-steel car-
    post spacing, I didn’t place spindles          365-7391, www.colbond-usa.com) and             riage bolts that pass through
    against the posts.                             applied them to the fence rails. Enka-         eyebolts into brass inserts
      I was able to get three spindles from        mat — a matrix of black spun nylon —           epoxied into the framing. This
    a 3-foot-long PT baluster. I put a             creates a slight drainage gap where two        method prevents direct wood-
    15-degree cut on the spindle bottom            pieces of wood are placed together             to-wood contact and allows
    to correspond with the bevel I made            (Figure 6).                                    inspection during annual ter-
    on the bottom spindle rail. After lay-           To ease installation, I made a “side-        mite treatments.
    ing the cut spindles into a jig I’d            ways” story pole, marking it out with

5   Professional Deck Builder • July/August 2007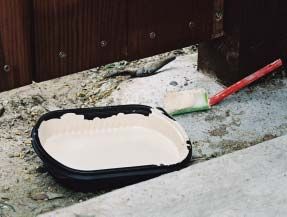
Rotproof Fences

                                                                                                 Figure 8. The gate’s mitered
                                                                                                 corners are assembled with
                                                                                                 4-inch stainless-steel screws,
                                                                                                 Lamello K-20 plastic biscuits,
                                                                                                 and two-part epoxy. Ulmia
                                                                                                 miter clamps from Garrett
                                                                                                 Wade (800/221-2942,
                                                                                                 www.garrettwade.com) hold
                                                                                                 the assembly together while
                                                                                                 the epoxy sets. The author
                                                                                                 prefers an intermediate rail to
                                                                                                 the more traditional diagonal
                                                                                                 brace because it matches the
                                                                                                 rest of the fence and provides
                                                                                                 space to mount the latch.

    the nominal board width of 51 ⁄ 2
    inches, separated by 1 ⁄ 8-inch gaps.
    With the story pole I could center the
    layout so that both end pieces would
    come out about the same width. I
    could also easily determine whether
    starting with full boards on the ends
    and making the center board different
    would be a better option, as it was
    with the gate.
      Once the fence boards were ready for
    installation, I sorted them for grain-         house, the termite guys want a sight-     matches the rest of the fence and pro-
    ing. The ones with the best vertical           ing gap, so you often have to get cre-    vides solid stock for mounting a latch.
    grain were set aside for the gate; other       ative. In this case I used 1 ⁄ 4-inch       I actually started working on the
    vertically grained boards were set aside       stainless-steel eyebolts and 3 ⁄ 8-inch   gate frame immediately after setting
    for ripping into each bay’s end boards.        carriage bolts to attach the fence to     the posts, because I wanted the epoxy
    The rest were arranged in agreeable            the house (Figure 7, page 5).             to fully cure before the gate went into
    patterns, with the best arrangements             With everything straight and secure,    service.
    placed toward the front.                       I marked and cut off the fence posts        Once the frame was complete, I used
      Before installing the boards on the          and installed copper-topped post caps.    three 8-inch stainless-steel T hinges to
    horizontal rails, I ran a bead of Tite-                                                  mount it. To give the gate a little
    bond III along each board’s top edge.          The Gate                                  more pizzazz, I accented the front
    Then I slid the boards into the dadoes         The construction method for gates         with a piece of canary wood, which is
    and fastened them with 2-inch-long             has become standard for me. The           a dense tropical species with distinc-
    #10 square-head screws.                        perimeter and intermediate rails are      tive grain.
                                                   made from 2x4s with plastic biscuits
    House Attachment                               and epoxy connecting the joints           Coatings
    Down here in New Orleans, Formosan             (Figure 8). I prefer this method — even   Rot tends to get its foothold in any of
    termites are a serious problem. If you         though I’ve used traditional diagonal     several places — fastener penetrations
    attach any wood structure to the               braces in the past — because it better    and areas that hold water rank high

6   Professional Deck Builder • July/August 2007
Rotproof Fences
Figure 9. Designed primarily for industrial
applications, two-part coatings have better
adhesion and a higher percentage of solids
than conventional one-part paints. The
author uses them to prevent water from
entering vulnerable end grain (above left
and right). Bending the handle on a foam
brush makes coating the bottom of fence
boards easier (left).
on the list — but the most common brown and applied two coats to the the owners. I like Dow Corning’s 795
starting point is probably end grain. same areas. The color blended in with Silicone, but anything is better than
I protect end grain with DuPont the stain pretty well. nothing.
Corlar 2.1 ST, formerly Corlar 25P I prefer Imron to regular paint I can say with some pride that despite
(800/438-3876, www.performance because it dries fast enough on a Hurricane Katrina’s 105-mph sus-
coatings.dupont.com). This two-part warm day that you don’t need to wait tained winds and even stronger gusts,
high-build epoxy is thick enough that between coats. Also, since Corlar and which knocked down fences, light
it doesn’t totally disappear into the Imron are part of the same system, poles, and traffic signs everywhere, my
end grain, so I get a complete seal with Imron bonds chemically to Corlar fence came through unscathed. The
one coat. (Figure 9). only visible evidence of the storm was a
West System epoxy (866/937-8797, Had it been my call, I would have line about 3 feet up, a reminder of the
www.westsystem.com) works, too, but used the same paint recipe on the rail weeks it spent under water. ❖
it costs more and generally takes sev- tops. This would have gone a long way
eral coats. toward protecting these components, Michael Davis is a restoration carpenter in
After applying the Corlar, I mixed up which get the brunt of sun and rain. New Orleans.
some DuPont Imron 2.8 HG high- I also recommended installing back-
gloss polyurethane, formerly Imron er rod and caulking the joint between Reprinted with the permission of The
333 (800/438-3876, www.performance the posts and top rail to shed water; in Journal of Light Construction.
coatings.dupont.com), in reddish- this project, those tasks were left up to
7 Professional Deck Builder • July/August 2007You can also read