Sametime Unified Telephony Lite Client: Configuring SIP trunks to third-party audio/video equipment
←
→
Page content transcription
If your browser does not render page correctly, please read the page content below
Sametime
Version 8.5.2

                    From Zero to Hero
   Sametime Unified Telephony Lite Client:
  Configuring SIP trunks to third-party audio/video equipment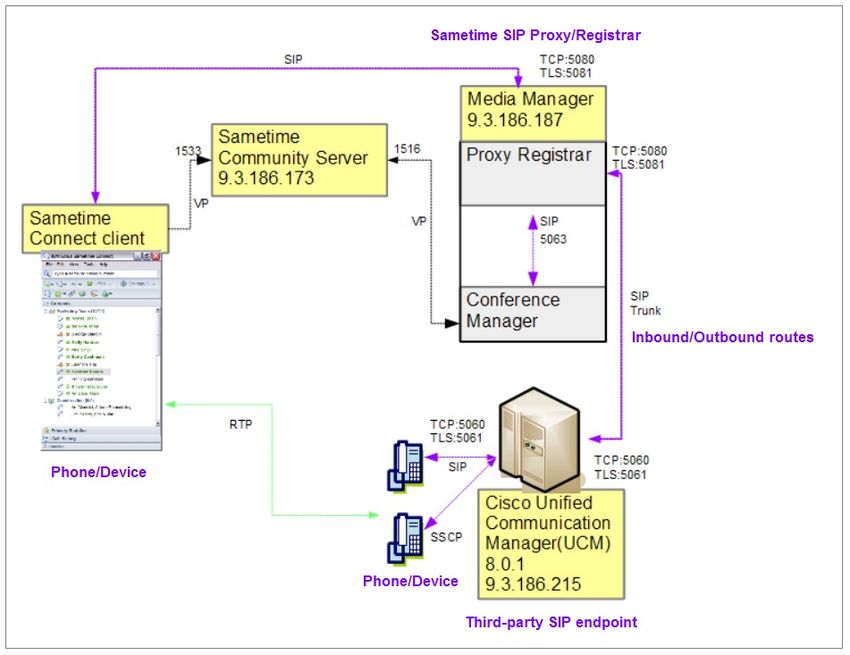
Contents
Edition Notice..........................................................................................................................................................4
1 Introduction..........................................................................................................................................................5
    1.1 What is Sametime Unified Telephony Lite Client?.....................................................................................5
    1.2 How Sametime Unified Telephony Lite Client uses SIP trunking...............................................................5
    1.3 Terms used in this guide...............................................................................................................................6
    1.4 Making calls with Sametime Unified Telephony Lite Client.......................................................................7
    1.5 Sametime Unified Telephony Lite Client limitations................................................................................10
    1.6 Example Sametime Unified Telephony Lite Client configuration.............................................................11
2 Designing the dial plan......................................................................................................................................12
    2.1 Customizing telephone numbers................................................................................................................12
    2.2 Mapping dial strings to SIP endpoints.......................................................................................................12
    2.3 Planning routing rules................................................................................................................................13
        2.3.1 Defining routing conditions...............................................................................................................13
        2.3.2 Defining routing destinations.............................................................................................................14
3 Enabling Sametime Unified Telephony Lite Client...........................................................................................16
    3.1 Activating the Sametime Unified Telephony Lite Client license...............................................................16
    3.2 Enabling the Sametime Unified Telephony Lite Client feature.................................................................18
    3.3 Modifying the Sametime policy to allow SIP trunking calls.....................................................................20
4 Verifying the ports used by the Sametime Media Manager components..........................................................21
    4.1 Verifying the ports for a single Media Manager server.............................................................................21
    4.2 Verifying the ports for a stand-alone SIP Proxy/Registrar or Conference Manager..................................22
    4.3 Verifying the ports for a cluster of SIP Proxy/Registrars...........................................................................23
5 Disabling SIP security.......................................................................................................................................24
    5.1 Changing the security role for the SIP Proxy/Registrar.............................................................................24
    5.2 Disabling TLS on the SIP Proxy/Registrar................................................................................................25
6 Configuring a custom attribute for authentication.............................................................................................27
7 Configuring the inbound and outbound routes for Sametime...........................................................................28
    7.2 Configuring the inbound route to Sametime..............................................................................................28
    7.3 Configuring the outbound route to Cisco UCM........................................................................................31
8 Configuring Cisco UCM as a SIP endpoint for Sametime calls........................................................................34
    8.1 Launching the UCM Administration Web Page.........................................................................................34

From Zero to Hero: Sametime Unified Telephony Lite Client                                                                                                            2
8.2 Disabling auto-registration.........................................................................................................................34
8.3. Configuring region settings........................................................................................................................35
8.4. Configuring the SIP trunk security profile.................................................................................................35
8.5 Verifying the Standard SIP Profile configuration......................................................................................36
8.6 Adding the SIP Trunk.................................................................................................................................38
8.7 Adding a route pattern for calling Sametime.............................................................................................40
9 Verifying the configuration................................................................................................................................42
9.1 Verifying calls between the different phone systems.................................................................................42
9.2 Calling scenarios supported by the example configuration.......................................................................43
Appendix A Using regular expressions in routing rules.......................................................................................44
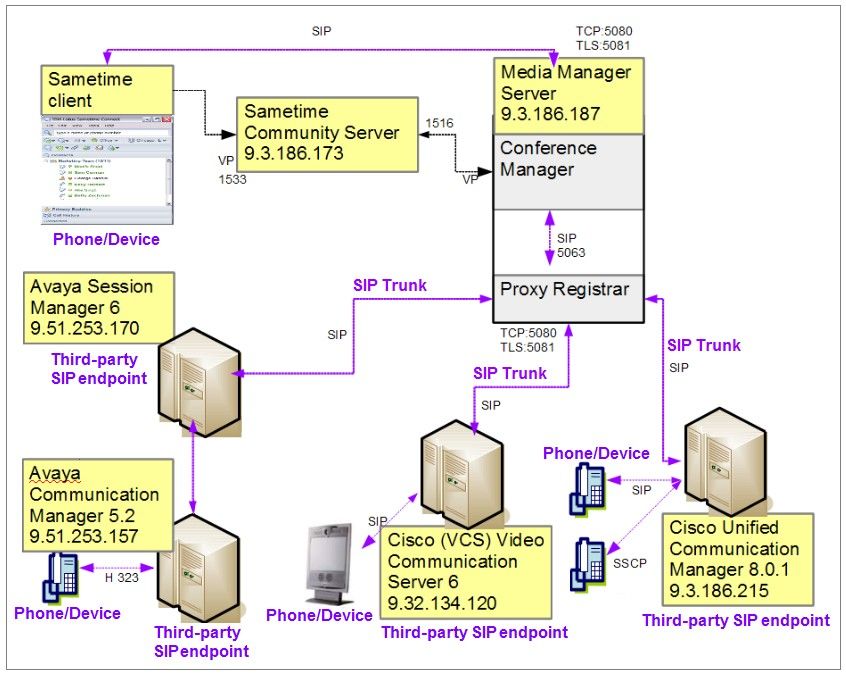
Appendix B Other example configurations..........................................................................................................45
Enabling video calls with an MCU...................................................................................................................46
Configuring an outbound route from Sametime to Cisco Video Conferencing Server................................46
Configuring an inbound route from Cisco Video Conferencing Server to Sametime..................................47
Configuring an inbound route from Avaya Session Manager to Sametime.................................................47
Configuring an outbound route from Sametime to Avaya Session Manager...............................................47
Notices...................................................................................................................................................................48
Trademarks........................................................................................................................................................49
From Zero to Hero: Sametime Unified Telephony Lite Client 3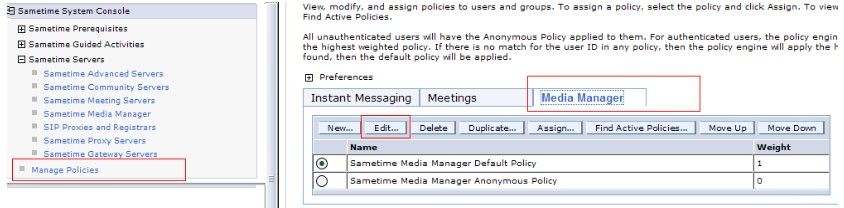
Edition Notice

Note: Before using this information and the product it supports, read the information in "Notices."

This edition applies to version 8.5.2 of IBM Sametime Unified Telephony Lite Client (program number 5724–
J23) and to all subsequent releases and modifications until otherwise indicated in new editions.

© Copyright IBM Corporation 2011.
US Government Users Restricted Rights – Use, duplication or disclosure restricted by GSA ADP Schedule
Contract with IBM Corp.

From Zero to Hero: Sametime Unified Telephony Lite Client                                               4
1 Introduction
The IBM® Unified Communications and Collaboration (IBM UC²®) vision makes easy to find, reach, and
collaborate with others through a unified user experience. This strategy is implemented by means of the IBM
Sametime® Unified Telephony and Sametime Unified Telephony Lite Client software offerings that make it
easy for you to access and manage telephone communications from inside the Sametime Connect or Lotus
Notes® client.
This guide examines the rich set of features, architecture, and configuration options for Sametime Unified
Telephony Lite Client by walking you through an example configuration of the SIP trunking feature with third-
party audio/video equipment.

1.1 What is Sametime Unified Telephony Lite Client?
Sametime 8.5.2 introduces Sametime Unified Telephony Lite Client, which provides a new SIP trunking feature
for the integration of the Sametime Connect client with third-party audio and video equipment used within your
organization. Sametime Unified Telephony Lite Client is a separately licensed feature that builds on your
Sametime Standard deployment to add SIP-based telephony to the feature set.
Sametime Unified Telephony Lite Client's SIP trunking feature provides the ability for a Sametime Connect
client to make and receive point-to-point calls, using the Sametime Audio/Video Conferencing service provider,
across the Internet to external SIP endpoints such as Cisco Unified Communications Manager. When the
Sametime Connect user dials a phone number or SIP URI (a SIP-based address), Sametime Unified Telephony
Lite Client establishes a SIP-based internet telephone call.

1.2 How Sametime Unified Telephony Lite Client uses SIP trunking
A SIP trunk is a direct IP network connection between the Sametime Media Manager's SIP Proxy/Registrar
component and an external SIP endpoint. During deployment, the Sametime Administrator defines a unique
static route that the SIP trunk uses for this connection.
Once the SIP trunk is configured, both inbound and outbound SIP-based calls are supported by the Sametime
Media Manager's Conference Manager component, which facilitates the interaction of the Sametime
Audio/Video Conferencing Service with the Sametime client's softphone components (used for telephony).

From Zero to Hero: Sametime Unified Telephony Lite Client                                                     5
1.3 Terms used in this guide
This guide uses the following specialized terms when explaining how you can configure the Sametime Unified
Telephony Lite Client feature in your Sametime deployment:

       Term                                                   Meaning

dial plan        The set of dial strings (phone numbers), routes (connections), and rules (conditions) that enable
                 one user to place a telephone call to another user.
dial string      A numbering scheme that establishes the format (expected number and pattern of characters) for a
                 telephone number. The dial string specifies how to interpret character sequences dialed by the
                 user, and how to convert those sequences into a telephone number for an outbound call.
MCU              Multipoint Control Unit: a bridge that interconnects calls from multiple sources, enabling three or
                 more endpoints to participate in a single call. Also known as a mixer.
PSTN             Public Switched Telephone Network: the traditional international telephone system based on
                 copper wires carrying analog voice data. Telephone service carried by the PSTN is sometimes
                 called plain old telephone service (POTS).
(S)RTP           (Secure) Real-time Transport Protocol: a standardized packet format used for delivering audio and
                 video data over the Internet.
SIP              Session Initiation Protocol: a signaling protocol used for negotiating an audio/video session over
                 the Internet.
SIP endpoint     A user agent that implements Session Initiation Protocol to send and receive audio/video data.
SIP trunk        A transmission channel between two points using Session Initiation Protocol. SIP trunking is
                 an advanced form of VoIP that supports conference calls (multiple people can speak) and
                 multicast sessions (one person speaks, many listen) in addition to traditional two-party phone
                 calls.
SIP URI          An address used for calling someone with internet-based telephony using the SIP protocol;
                 think of it as the person's internet-based telephone number. A SIP URI resembles an email
                 address and is written in the following format: sip:user@host:port; for example:
                 sip:tjwatson@example.com or sip:16175551212@phonesystem.example.com.
                 Just as a phone number identifies a particular telephone or mobile phone user, a SIP URI
                 identifies a particular computer phone user or desktop video conferencing device in Sametime
                 Unified Telephony Lite Client.
softphone        A component of the Sametime Connect client (stand-alone or embedded in Lotus Notes) that acts
                 as an interface allowing you to dial numbers and carry out other phone functions using a
                 screen (that of your computer or mobile device) and your mouse, keyboard, or keypad.
TLS              Transport Layer Security: an encryption protocol that provides secure communications over the
                 Internet. Early versions of TLS were called SSL (Secure Socket Layer).

VoIP             Voice over Internet Protocol: a generic term used to describe the routing of voice conversations
                 over the Internet or through any other IP-based network. In its basic implementation, VoIP
                 enables a two-party conversation but does not support phone conferences (multiple people
                 can speak) or multicast sessions (one person speaks, many listen) as SIP trunking does.

From Zero to Hero: Sametime Unified Telephony Lite Client                                                             6
1.4 Making calls with Sametime Unified Telephony Lite Client
To the user, the only difference between making calls with conventional Sametime audio/video capabilities and
Sametime Unified Telephony Lite Client is the use of SIP URIs. Just like a phone number identifies a telephone
or mobile phone user, a SIP URI identifies a computer phone or desktop video-conferencing device in
Sametime Unified Telephony Lite Client.
As in previous releases of Sametime, users can initiate calls from several different areas of the user interface.
When Sametime Unified Telephony Lite Client is configured, the user can enter either a phone number or a SIP
URI:
Right-click options                                         Quickfind

Action Bar icons                                        Phonebook

Dialing keypad                                              Call History

From Zero to Hero: Sametime Unified Telephony Lite Client                                                      7

If the user searches for a contact using QuickFind, Sametime searches the call history, the phone book, and the
LDAP directory for the specified telephone number or SIP URI. For example, if the user types "sip:" in the
QuickFind box, Sametime searches for SIP URIs (contacts beginning with "sip:"):

When Sametime locates the telephone number or SIP URI, a call is initiated. When the call is connected, the
Call Status dialog box appears to let the user know that the connection is complete. In this picture, user Sam
Curman is placing a call with Sametime Unified Telephony Lite Client:

The callee (the person receiving the call) is notified next. If the call is made to the callee's telephone, the
telephone rings. If the call is made to a computer softphone, the Call dialog box appears on the callee's
computer, allowing that person to accept or decline the call:

From Zero to Hero: Sametime Unified Telephony Lite Client                                                         8
From Zero to Hero: Sametime Unified Telephony Lite Client 9
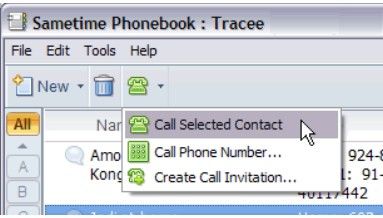
Adding SIP URIs to the Sametime Phonebook
You can add SIP URIs to your Sametime Phonebooks just as you add telephone numbers. For example:
1.   In the Connect client, open the Sametime Phonebook by clicking Tools Sametime > Phonebook.
2.   Fill in the New Entry form, and then click the Add button to add this entry to the phonebook:

3.   If you want this user to appear in your Contacts list, click the Show in Contact List that appears above the
     form.
4.   When you have finished adding contacts, click the Save button to save your updates to the phonebook.

From Zero to Hero: Sametime Unified Telephony Lite Client                                                     10
1.5 Sametime Unified Telephony Lite Client limitations
Sametime Unified Telephony Lite Client's SIP Trunking functionality has the following features and limitations:
• Sametime Unified Telephony Lite Client's SIP trunking feature is limited to point-to-point calls with the
Sametime Audio/Video Conferencing service provider.
• Only Sametime Connect stand-alone and embedded clients (within Lotus Notes) are supported; browser-
based clients cannot serve as an endpoint for SIP-based calls.
• Users cannot call into a Sametime meeting using Sametime Unified Telephony Lite Client.
• NAT traversal via Sametime 8.5.2 TURN server is not supported.
• Call-routing rules and preferences are not supported.
• Point-to-point calls are supported between one Sametime Connect Client user and one external SIP
endpoint (including conference bridges).
The SIP Trunking functionality is implemented according to the following Internet Engineering Task Force
(IETF) standards publications:
• RFC 3261 Session Initiation Protocol
• RFC 3264 An Offer/Answer Model with the Session Description Protocol (SDP)
• RFC 3551 RTP Profile for Audio and Video Conferences with Minimal Control
• RFC 2833 RTP Payload for DTMF Digits, Telephony Tones and Telephony Signals
• RFC 4568 Session Description Protocol (SDP) Security Descriptions for Media Streams
• RFC 4796 The Session Description Protocol (SDP) Content Attribute
From Zero to Hero: Sametime Unified Telephony Lite Client 111.6 Example Sametime Unified Telephony Lite Client configuration The example configuration used in this guide includes a Sametime Community Server and a Sametime Media Manager server in the Sametime 8.5.2 deployment, plus Cisco Unified Communications Manager 8.0.1. In this configuration, the Sametime user is running Sametime Connect client, which hosts the Sametime Softphone. The Sametime Media Manager is installed on a single computer, which hosts the SIP Proxy/Registrar, Conference Manager, and Packet Switcher components. The SIP Proxy/Registrar functions as a SIP endpoint, routing calls to and from the Sametime client. The Cisco UCM (Unified Communication Manager) is installed on its own computer and functions as the SIP endpoint for users with Cisco desk phones. Cisco UCM serves as a PBX, or trunk, to the desk phone users; the connection between Cisco UCM and the Sametime SIP Proxy/Registrar is called the SIP trunk. From Zero to Hero: Sametime Unified Telephony Lite Client 12
2 Designing the dial plan
Before you begin configuring Sametime Unified Telephony Lite Client, you should figure out how calls from
Sametime will connect to the third-party SIP endpoint by working out a dial plan. A dial plan is the set of dial
strings (phone numbers), rules (conditions), and SIP endpoints (destinations) that enable one user to place a
telephone call to another user. Planning the dial plan now means you won't have to stop and figure this out while
stepping through the configuration screens later.

2.1 Customizing telephone numbers
The Sametime 8.5.2 Software Development Kit includes documentation and a sample application for a new
Telephone Number Service extension that allows you to control the retrieval and formatting of telephone
numbers used to make telephone calls from the Sametime client. This extension is useful when phone numbers
retrieved from the corporate directory, or entered by users, might require modification to meet dialing plan
requirements; for example during the telephony integration of a deployment that depends on LDAP entries
other than the default telephoneNumber attribute. For more information, see Chapter 5 of the Sametime
Telephony API Guide (ClientTelephony.pdf), available in the Sametime SDK at the IBM developerWorks site.

2.2 Mapping dial strings to SIP endpoints
For each type of phone or video device supported by your deployment, define the format of the dial string (what
the user enters to make a call), the SIP endpoint that will route the call, and the device that will receive calls
from that SIP endpoint.
Later, you will configure routes that map each device's dial string to its designated SIP endpoint, and rules that
define how that mapping works. When a user dials a string to initiate a call, the routing rules are consulted and
if a matching dial string format is found, the call is routed to the associated SIP endpoint, which in turn directs
the call to the corresponding telephone or device.
Create a table like the one shown here, where you specify a dial string pattern, the name of the SIP endpoint that
services calls matching that pattern, and the name of the end-user device that receives the call. This will help
you define routes and routing rules.
The dial string specifies a pattern that the user must exactly match when initiating a call to a particular device.
In the dial string, each "X" represents exactly one digit from 0 through 9. For example, if you use the mapping
shown in the table, 14XXX means that the Sametime user could dial 14[0-9][0-9][0-9] and this five-digit
number would route to the Cisco UCM and from there be directed to a user's Cisco desk phone. Notice that the
row just below in the table assigns the particular dial string "14000" to be routed to voice mail; this can be
configured with a routing rule that looks for the specific dial string and is prioritized higher than the more
generic dial string "14XXX".

      Dial String                      SIP endpoint                                  Phone/Device

512250300X              Sametime SIP Proxy/Registrar                 Sametime Softphone
14XXX                   Cisco Unified Communications Manager Cisco Desk Phone
14000                   Cisco Unified Communications Manager Cisco Unity Voice mail
9XXXXXXXXXXX Cisco Unified Communications Manager PSTN (traditional telephone system)
@vcs.lotus.com          Tandberg Video Conferencing                  Video Conferencing device
514XX                   Avaya Session Manager                        Avaya Communication Manager Desk
                                                                     Phone

From Zero to Hero: Sametime Unified Telephony Lite Client                                                        13
Note The example configuration used in this guide includes only the Sametime softphone (used by Sametime
clients) and the Cisco desk phone; however, Appendix B presents a more complex configuration that includes
the additional devices shown in this table and demonstrates how to prioritize the routing rules.
2.3 Planning routing rules
Routing rules tell Sametime where to direct calls under certain conditions. The rule consists of one or more
conditions, and a destination (SIP endpoint) where call requests that meet the conditions will be routed.
When you create routing rules for the example configuration in section 7, "Configuring the inbound and
outbound routes for Sametime", the conditions and destination addresses are provided for you. When you
deploy Sametime Unified Telephony Lite Client for yourself, you should take the time to plan the routing rules
in advance to ensure an error-free configuration.
Note Some of the fields used to define routing rules must be formatted as regular expressions. Appendix A
contains information on constructing regular expressions.
2.3.1 Defining routing conditions
A routing rule must include at least one condition; if it includes multiple conditions, the SIP call request must
satisfy all of them to be matched to the associated route. As soon as a match is found, Sametime stops checking
other conditions and routes the call; however, you can configure multiple routes with a different condition for
each and then prioritize them.
The routing rule can include conditions in any or all of these SIP request fields:
SIP request field Description Example condition
Method A predefined value indicating the type INVITE, INFO, MESSAGE, or ANY
of request. Select the appropriate value
from the field's list.
If you do not select a method, then all
methods are accepted by this
condition.
Source Address The originating caller's IP address, You could specify a single IP address:
which must match the pattern specified 9\.3\.186\.215
in the regular expression that you Or use an expression to specify a range of IP
provide. addresses:
9\.3\.186\.215|9\.3\.186\.216
Notice that the . is preceded with the escape
character \ so it can be interpreted as a period and
not the "any character" symbol.
Request URI The resource, usually the origin server, For example:
on which to apply the request. The .*example\.com.* matches these incoming
URI must match the pattern specified initial requests :
in the regular expression that you sip:example.com:5060;transport=tcp
provide. SIP/2.0
sips:subdomain.example.com:5061
SIP/2.0
Contact Header The SIP URI of the originating caller. For example:
The URI must match the pattern
From Zero to Hero: Sametime Unified Telephony Lite Client 14specified in the regular expression that .*20100@192\.192\.0\.2\.12:506[01].*
you provide. matches incoming initial requests with either of
these contact header values:
2.3.2 Defining routing destinations
The routing destination is the SIP endpoint where the call will be directed. For incoming calls, the destination
is the Sametime Media Manager's SIP Proxy and Registrar component. For outgoing calls, the destination is the
third-party SIP endpoint.
You will specify a call's destination by constructing its address. There are two ways to construct the destination
address: by pushing address information into one of the route's header fields, or by replacing the original
request URI with the destination address.
Push a Route header field
Pushing a Route header field lets you define the destination address using the following fields in the outgoing
call request's Route header:
Field Value
Scheme The scheme can be either SIP or SIPS (the secure version of SIP); the default is SIP. This field
is required.
IP/FQDN The IP address or fully qualified host name of the destination server (the SIP endpoint).
For incoming calls, use the fully qualified domain name of the Sametime Media Manager's
Conference Manager component.
This field is required.
Port The port that the destination server (the SIP endpoint) is listening on for SIP-based
communications.
For incoming calls, use the port that the Sametime Media Manager's Conference Manager
component is listening for SIP communications (typically port 5063 for unsecured
communications and port 5062 for secure communications).
This field is optional; if you do not provide a value, the server uses the correct port.
Transport The network transport protocol to use for sending SIP messages: TCP or TLS over TCP (UDP
is not supported).
Use the same transport protocol throughout the entire route (from the Sametime client to the
SIP Proxy/Registrar to the third-party SIP endpoint). For example, if the Media Manager is
configured to use TLS for SIP communications, you must use TLS for all routes.
This field is optional. If you do not provide a value, the server supplies a transport protocol.
From Zero to Hero: Sametime Unified Telephony Lite Client 15Replace a Request-URI
Replacing the Request URI lets you substitute the destination address for the original Request URI in the
outgoing call request. Supply values for the Request-URI pattern and Output pattern to create a destination
address formed by a regular expression.
Field Value
Request-URI pattern A regular expression defining the pattern of the original Request URI.
Use this field to extract fields or parameters from a Request-URI of a SIP request. A
variable stores the part of the Request-URI matched by the part of the regular
expression inside the parentheses, indicated by a number. The variables are recalled
with the dollar-sign, for example, $1, $2, and so on. These fields or parameters can be
used to build the Output pattern.
This field is optional.
Output pattern A regular expression defining the pattern of the destination's URI (address).
This field can contain either a SIP URI or a replacement expression with variables for
example, $1, $2, and so on. Variables store the portion of a parenthesized pattern
captured from the Request-URI pattern field. After processing any captured variables,
the resulting field value must be a valid SIP or SIPS URI.
Note If you do not provide a value in the Request-URI pattern field , this field must
contain a valid SIP or SIPS URI.
The URI created using the output pattern is substituted into the original Request URI and then used for routing
the call request.
Examples:
• Route all incoming SIP requests to this specific destination: sip:example.com;transport=tcp
Request-URI pattern: empty
Output pattern: sip:example.com;transport=tcp
• Route incoming SIP requests to a new host, keeping the original user name
Request-URI pattern: sip:(.+)@.*
Output pattern: sip:$1@example.com
The variable $1 in the Output pattern refers to the first submatch in the Request-URI pattern, which is the
first match enclosed in parentheses (in this example, the user name). In this example, the $1 will match the .
+ portion of the Request-URI pattern.
• Route incoming SIP requests to "host," keeping the original user name if the user-name prefix in the
Request-URI is "45":
Request-URI pattern: sip:(45.+)@.*
Output pattern: ssip:$1@host
From Zero to Hero: Sametime Unified Telephony Lite Client 163 Enabling Sametime Unified Telephony Lite Client
Configuring Sametime Unified Telephony Lite Client requires you to activate a special product license, enable
the Sametime Unified Telephony Lite Client feature, and set a new policy to allow SIP trunking calls.
You will perform all of the tasks in this section on the Sametime System Console.
3.1 Activating the Sametime Unified Telephony Lite Client license
Sametime Unified Telephony Lite Client is a separately licensed application that adds SIP trunking functionality
to a Sametime Standard deployment. You must purchase the "IBM Sametime Unified Telephony Lite Client
V8.5.2 Multiplatform Multilingual" product and then activate the license to enable configuration settings in the
Sametime user interface.
1. On the computer hosting the Sametime System Console, open a browser and download the "IBM Sametime
Unified Telephony Lite Client V8.5.2 Multiplatform Multilingual" image from the Passport Advantage web
site to a temporary folder.
2. Open a command window, change to the folder containing the license enablement tool that you
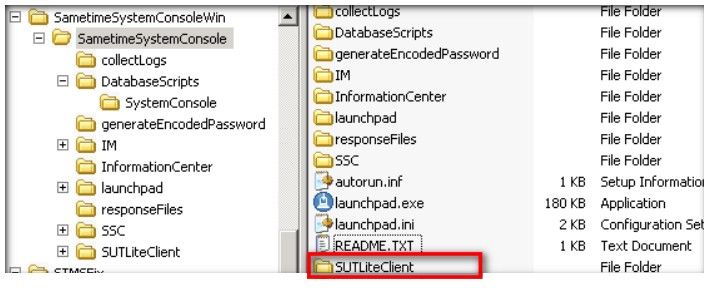
downloaded, and extract the files to the SametimeSystemConsole installation directory.
3. The license enablement files are stored in a subdirectory called SUTLiteClient; change to that directory.
4. Run the following command to activate the Sametime Unified Telephony Lite Client license:
Linux: ./LiteClient.sh path_to_STSCServerCell
From Zero to Hero: Sametime Unified Telephony Lite Client 17Windows: LiteClient.bat path_to_STSCServerCell
where path_to_STSCServerCell is the full path to the "STSCServerCell" (Sametime System Console
cell) directory on that computer.
For example:
Linux: ./LiteClient.sh /opt/IBM/WebSphere/STSC/STSCServerCell
Windows: LiteClient.bat C:\IBM\WebSphere\STSC\STSCServerCell
5. Accept the license agreement when prompted.
From Zero to Hero: Sametime Unified Telephony Lite Client 183.2 Enabling the Sametime Unified Telephony Lite Client feature
Enabling the Sametime Unified Telephony Lite Client feature allows the Sametime Media Manager to support
the SIP trunking feature implemented in Sametime Unified Telephony Lite Client so that Sametime clients can
make calls to third-party SIP endpoints, which in turn route calls to end-user devices such as telephones,
softphones, and conference room video systems.
Note This setting is not available in the Sametime user interface until you activate the special product license in
the previous task.
1. Log in to the Sametime System Console:
a) From a browser, enter the following URL, replacing serverhostname.domain with the fully
qualified domain name of the Sametime system console server:
http://serverhostname.domain:8700/ibm/console
For example:
http://sametime.example.com:8700/ibm/console
b) Log in to the Integrated Solutions Console using the WebSphere® Application Server administrator ID
and password that you created when you installed the Sametime System Console.
c) On the navigation tree, click Sametime System Console.
2. Navigate to the Sametime Media Manager's administration pages:
a) On the navigation tree, click Sametime Servers > Sametime Media Manager.
b) In the list of Deployment Identifiers, click one of the following:
• If you installed all of the Media Manager components on a single computer, click the Media Manager
server.
• If you installed the Media Manager components on separate computers, click the Media Manager
server and select the name of the Conference Manager deployment.
3. On the Configuration page, locate the "Sametime Unified Telephony Lite" section, click Allow the use of
Sametime Unified Telephony Lite clients, and then click OK.
From Zero to Hero: Sametime Unified Telephony Lite Client 19From Zero to Hero: Sametime Unified Telephony Lite Client 20
From Zero to Hero: Sametime Unified Telephony Lite Client 21
You do not need to restart the server at this point; you will restart it when you complete the remaining tasks
   in this section. Stay logged in to the Sametime System Console for the next task.

From Zero to Hero: Sametime Unified Telephony Lite Client                                                      22
3.3 Modifying the Sametime policy to allow SIP trunking calls
Now that the Sametime Unified Telephony Lite Client feature has been enabled, set the policy that allows
clients to use SIP trunking so they can take advantage of the new feature.
1. On the navigator, click Sametime System Console > Manage Policies.
2. On the Policies page, click the Media Manager tab.
3. On the Media Manager tab, select Sametime Media Manager Default Policy in the table, and then click
the Edit button at the top of the table.
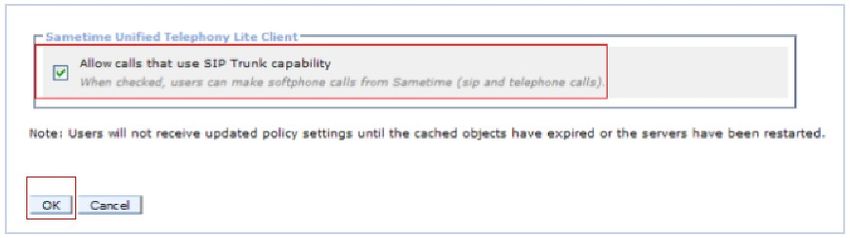
4. On the Media Manager default policies page, locate the "Sametime Unified Telephony Lite Client" section,
select Allow calls that use SIP Trunk capability, and then click OK.
From Zero to Hero: Sametime Unified Telephony Lite Client 234 Verifying the ports used by the Sametime Media Manager
components
Before you can set up static routes for SIP trunk calls, you must ensure that SIP traffic is directed to the correct
ports. Connections from the third-party SIP trunk should be directed to the SIP Proxy/Registrar, which in turn
routes communications to the Conference Manager so they can be directed to the Sametime client.
In the example (unsecured) configuration, the Conference Manager is listening on Port 5063 and the SIP
Proxy/Registrar is listening on Port 5080. You will configure the SIP trunk connection (to the Cisco UCM in
our example) to send inbound traffic to port 5080 so it can be handled by the SIP Proxy/Registrar, which will
redirect the call to the Conference Manager (on port 5063) so routing to the Sametime client.
4.1 Verifying the ports for a single Media Manager server
If all of the Sametime Media Manager components are hosted in a single computer, follow these steps to verify
the ports for both the SIP Proxy/Registrar component and the Conference Manager component.
1. On the Sametime System Console, log in to the Integrated Solutions Console as the WebSphere
administrator (it may already be open from the last task).
2. In the navigation tree, click Servers > Server Types > WebSphere application servers.
3. In the list of WebSphere application servers, click STMediaServer.
4. On the Configuration page, locate the "Communications" section and click Ports.
5. In the Ports table, look for the port used by the Conference Manager, and write down the value:
• If you are configuring TCP (unsecured) communications: SIP_DEFAULTHOST
• If you are configuring TLS (secure) communications: SIP_DEFAULTHOST_SECURE
6. Next, check the port used by the SIP Proxy/Registrar, and write the value down:
• If you are configuring TCP (unsecured) communications: SIP_ProxyRegHOST
• If you are configuring TLS (secure) communications: SIP_ProxyRegHOST_SECURE
7. Skip to section 5, "Disabling SIP security".
From Zero to Hero: Sametime Unified Telephony Lite Client 244.2 Verifying the ports for a stand-alone SIP Proxy/Registrar or Conference
Manager
If the Sametime Media Manager components are hosted on separate computers, follow these steps to verify the
ports for the SIP Proxy/Registrar component and the Conference Manager component. The procedure is similar
for both components--the only difference is when you select which server look at (step 3) and which port to
write down (step 5 or 6).
1. On the Sametime System Console, log in to the Integrated Solutions Console as the WebSphere
administrator (it may already be open from the last task).
2. In the navigation tree, click Servers > Server Types > WebSphere application servers.
3. In the list of WebSphere application servers, click the name of the server where the SIP Proxy/Registrar or
the Conference Manager is hosted.
4. On the Configuration page, locate the "Communications" section and click Ports.
5. Conference Manager: In the Ports table, look for the port used by the Conference Manager, and write down
the value:
• If you are configuring TCP (unsecured) communications: SIP_DEFAULTHOST
• If you are configuring TLS (secure) communications: SIP_DEFAULTHOST_SECURE
6. SIP Proxy/Registrar: In the Ports table, look for the port used by the SIP Proxy/Registrar, and write the
value down:
• If you are configuring TCP (unsecured) communications: SIP_ProxyRegHOST
• If you are configuring TLS (secure) communications: SIP_ProxyRegHOST_SECURE
7. Skip to section 5, "Disabling SIP security".
From Zero to Hero: Sametime Unified Telephony Lite Client 254.3 Verifying the ports for a cluster of SIP Proxy/Registrars
In a clustered environment, multiple SIP Proxy/Registrar instances are installed on separate nodes. Each set of
nodes is clustered with a WebSphere Proxy servers deployed in front of the cluster to provide load balancing
and failover. If you deploy two or more WebSphere proxy servers in front of the cluster, you must additionally
deploy a load balancer to front the proxy servers.
For this task, you only need to check the ports used by the SIP Proxy/Registrar cluster. If a load balancer is in
use, check its SIP ports; otherwise, check the WebSphere Proxy server's SIP ports.
Determining the SIP ports used by a Load Balancer
Check the port configured for SIP communications. and write down the value. Refer to your vendor
documentation for information on configuring ports for the load balancer.
Determining the SIP ports used by WebSphere proxy server
1. Log in to the WebSphere proxy server's Integrated Solutions Console as the WebSphere administrator.
2. In the navigation tree, click Servers > Server Types > WebSphere proxy servers.
3. In the table listing the proxy servers, click the name of the WebSphere proxy server that operates with the
SIP Proxy/Registrar cluster.
4. On the Configuration page, locate the "Communications" section and click Ports.
5. In the Ports table, look for the following port and write down thee value:
• If you are configuring TCP (unsecured) communications: PROXY_SIP_ADDRESS
• If you are configuring TLS (secure) communications: PROXY_SIPS_ADDRESS
From Zero to Hero: Sametime Unified Telephony Lite Client 265 Disabling SIP security
TLS encryption is fully supported for secure communications but to simplify configuration of Sametime
Unified Telephony Lite Client, you should temporarily disable TLS before configuring the SIP Trunk. You can
enable security again after the configuration is complete and verified.
5.1 Changing the security role for the SIP Proxy/Registrar
Modify the WebSphere security setting for the SIP Proxy/Registrar server or cluster.
1. On the computer hosting the complete Sametime Media Manager, the stand-alone SIP Proxy/Registrar
component, or the deployment manager for a cluster of SIP Proxy/Registrars, log in to the Integrated
Solutions Console as the WebSphere administrator.
2. In the navigation tree, click Applications > Application Types > WebSphere enterprise applications.
3. In the list of applications, click IBM Lotus SIP Registrar.
4. On the Configuration page, locate the "Detail Properties" section and click Security role to user/group
mapping.
5. In the mapping table, select All AuthenticatedUsers.
6. Click the Map special Subjects list at the top of the table, and select Everyone.
7. Click OK.
8. Save the changes by click the Save link in the "Messages" box at the top of the page.
From Zero to Hero: Sametime Unified Telephony Lite Client 275.2 Disabling TLS on the SIP Proxy/Registrar
Use the Sametime System Console to disable TLS encryption through the Media Manager's administration
page.
1. On the Sametime System Console, log in to the Integrated Solutions Console as the WebSphere
administrator.
2. Navigate to the Sametime Media Manager's administration pages:
a. On the navigation tree, click Sametime System Console > Sametime Servers > Sametime Media
Manager.
b. In the list of Deployment Identifiers, click one of the following:
• If you installed all of the Media Manager components on a single computer, click the Media
Manager's name.
• If you installed the SIP Proxy and Registrar as a stand-alone component or a cluster, click the SIP Proxy
and Registrar’s name.
3. On the Configuration page, locate the "SIP proxy registrar" settings in the "Server Integration" section and:
a. Change the Port to use the unsecured port (typically 5080) that you wrote down in section 3, "Verifying
the ports used by the Sametime Media Manager".
b. Change the Transport Protocol to TCP.
4. In the "Audio Video Media" section, click Disable for the Secure Real-time Transport Protocol (SRTP)
Encryption setting.
5. Click OK.
From Zero to Hero: Sametime Unified Telephony Lite Client 286. Restart the Packet Switcher server.
7. Restart the Conference Manager component's server or cluster:
• For a stand-alone Media Manager or Conference Manager, restart it now as follows:
a. In the server’s Integrated Solutions Console, click Servers > Server Types > server_type.
b, In the list of servers, select your server and click the Restart button at the top of the table.
c. Click the Refresh button and verify that all of the server components are active.
• For a cluster of Conference Managers, synchronize and then restart the nodes:
a. In the Deployment Manager's Integrated Solutions Console, click System Administration > Nodes.
b. Select all nodes in the cluster, and then click the Full Resynchronize button at the top of the table.
c. Back in the navigation tree, click System Administration > Node Agents.
d. Select all nodes in the cluster, and then click the Restart button at the top of the table.
From Zero to Hero: Sametime Unified Telephony Lite Client 296 Configuring a custom attribute for authentication
By default, the SIP Proxy/Registrar is configured to use the mail attribute for authentication. If you are using a
different attribute for the SIP trunking telephone number, modify the configuration to use that attribute for
authentication.
Note This step is needed only if you are using an attribute other than mail for authentication.
1. On the computer hosting the deployment manager of SIP Proxy/Registrar, navigate to the server's directory:
DM_install_root/config/cells/Cell_name/nodes/Node_name/servers/Server_name
2. Open the authorization.xml file in a text editor and add the statements to define the property that will be
used for authentication against the LDAP directory:
Telephone number for SIP trunking
telephoneNumber
LDAP_attribute
Where LDAP_attribute is the LDAP attribute that holds the telephone number used for SIP trunking.
3. Save and close the file.
4. If you are working with a cluster of SIP Proxy/Registrar, make this change to every instance of the file on
the Deployment Manager's server (you can copy the modified file to the additional profiles).
5. Restart the SIP Proxy/Registrar server or cluster:
• For a stand-alone Media Manager or SIP Proxy/Registrar, restart it now as follows:
a. In the server’s Integrated Solutions Console, click Servers > Server Types > server_type.
b, In the list of servers, select your server and click the Restart button at the top of the table.
c. Click the Refresh button and verify that all of the server components are active.
• For a cluster of SIP Proxy/Registrars, synchronize and then restart the cluster:
a. In the Deployment Manager's Integrated Solutions Console, click System Administration > Nodes.
b. Select all nodes in the cluster, and then click the Full Resynchronize button at the top of the table.
c. Back in the navigation tree, click Servers > Clusters > WebSphere application server clusters.
d. Select the SIP Proxy/Registrar cluster and click Stop.
e. Wait until the cluster stops.
f. Click the Start button to start the cluster.
From Zero to Hero: Sametime Unified Telephony Lite Client 307 Configuring the inbound and outbound routes for Sametime
Now that you have enabled the SIP trunking feature and set up the telephoneNumber attribute in the LDAP
directory, you are ready to configure inbound routes for calls from third-party SIP endpoints to Sametime, and
outbound routes for calls from Sametime to third-party SIP endpoints.
Configuring the call routes is a broad topic and may be dependent on your company's audio/video infrastructure
and policies. The example configuration presented in this guide covers the scenario where you configure SIP
trunking between Sametime and Cisco UCM to support calls between Sametime clients and Cisco desk phones.
This requires that you define one inbound route (from Cisco UCM to Sametime) and one outbound route (from
Sametime to Cisco UCM).
Appendix B presents a more complex scenario with trunks configured to multiple third-party PBXes and video
conferencing systems.
7.2 Configuring the inbound route to Sametime
The SIP Proxy/Registrar uses inbound routes to receive call requests from third-party audio/video devices and
then direct those calls to Sametime clients. For the example configuration, you will set up a static inbound route
with a routing rule that tells the SIP Proxy/Registrar to direct all calls from the Cisco UCM's IP address to the
Sametime Media Manager's Conference Manager component.
Configure an inbound route from Cisco UCM to Sametime as follows:
1. On the Sametime System Console, log in to the Integrated Solutions Console as the WebSphere
administrator.
2. In the navigation tree, click Sametime System Console > Sametime Servers > SIP Proxies and
Registrars.
3. On the SIP main menu page, look in the proxies table and click the Deployment Identifier of the SIP
Proxy/Registrar.
4. On the SIP Proxy and Registrar page, click Proxy Administration.
5. In the routing rules table, click New to create a new rule.
6. On the Add New Rule page, type a name and description of the new inbound route in the Name and
Description fields.
7. Use the "Conditions" section to configure the routing rule.
For the example configuration, create a rule that routes all calls from the Cisco UCM to the Sametime
Media Manager's Conference Manager component as follows:
a. Click INVITE in the Method field.
b. Click Source Address and type the IP address of the Cisco UCM.
c. Leave the Request URI and Contact Header fields blank.
From Zero to Hero: Sametime Unified Telephony Lite Client 318. Use the "Destination" section to configure the route from Cisco UCM to Sametime:
a. Click Push a Route header field.
b. Click Source Address and type the IP address of the Cisco UCM.
c. Click Using fields and fill in the fields in that subsection as follows:
Field Value
Scheme Click SIP.
IP/FQDN Type the fully qualified domain name (FQDN) of the Sametime Media Manager's
Conference Manager component.
Port Type the port that the Sametime Media Manager's Conference Manager component is
using for SIP communications -- this is the port you looked up in section 3, "Verifying
the ports used by the Sametime Media Manager".
Transport Click TCP.
Supported transport protocols are TCP and TLS over TCP (UDP is not supported).
Use the same transport protocol throughout the entire route (from the Sametime client to
the SIP Proxy/Registrar to the SIP endpoint). For example, if the Media Manager is
configured to use TLS for SIP communications, you must use TLS for all routes.
Note The example configuration will use TCP for unsecured communications. For
information on configuring TLS encryption, see "Configuring Transport Layer Security
for the Sametime Media Manager" in the Sametime documentation wiki.
From Zero to Hero: Sametime Unified Telephony Lite Client 329. Click OK to save the new inbound route. From Zero to Hero: Sametime Unified Telephony Lite Client 33
7.3 Configuring the outbound route to Cisco UCM
The SIP Proxy/Registrar uses outbound routes to receive call requests from Sametime clients and then direct
those calls to third-party SIP endpoints, which in turn route calls to the callee’s audio/video devices. For the
example configuration, you will set up a static outbound route with a routing rule that tells the SIP
Proxy/Registrar to direct all outgoing calls to the Cisco UCM.
Configure an outbound route from Sametime to Cisco UCM as follows:
1.   On the Sametime System Console, log in to the Integrated Solutions Console as the WebSphere
     administrator.
2.   In the navigation tree, click Sametime System Console > Sametime Servers > SIP Proxies and
     Registrars.
3.   On the SIP main menu page, look in the proxies table and click the Deployment Identifier of the SIP
     Proxy/Registrar.
4.   On the SIP Proxy and Registrar page, click Proxy Administration.
5.   In the routing rules table, click New to create a new rule.
6.   On the Add New Rule page, type a name and description of the new outbound route in the Name and
     Description fields.
7.   Use the "Conditions" section to configure the routing rule.
     For the example configuration, create a rule that routes all calls from Sametime to the Cisco UCM as
     follows:
     a. Click INVITE in the Method field.
     b. Click Request URI and type sip:140.*

From Zero to Hero: Sametime Unified Telephony Lite Client                                                          34
This regular expression resolves to the SIP URI of the Sametime users in the example configuration.
c. Leave the Source Address and Contact Header fields blank; in this example you don't need to set
conditions on them because you want all outgoing messages to be selected.
8. Use the "Destination" section to configure the route from Sametime to Cisco UCM:
The inbound route was based on values in a header field that was added to the SIP request; the additional
values allow Sametime to finish routing the call. The outbound route is more complicated because it must
change the Request URI to a format that Cisco UCM will accept before routing the call to the UCM.
The SIP requests for outgoing calls are generated by the Sametime client using the format sip:xxxxx@sip-
pr-domain where "xxxxx" is the telephone number to call and sip-pr-domain is the domain name of the SIP
Proxy/Registrar; for example: sip:14044614851@st852primary.austin.ibm.com. If the request is routed to
Cisco UCM as-is, it will result in a “404-User not found” error because the UCM can only process requests
that use its own domain and will reject all other requests.
To resolve this, your route definition will modify the Request URI by replacing the Sametime domain with
the UCM's own domain. This is accomplished by specifying the pattern used by a Sametime URI, and then
providing a new pattern to replace it. Both patterns include the "sip:" and "@" in the same positions, so
there is no need to copy those values; and of course you do not want to copy the Sametime domain name --
only the user name needs to be copied over into the new Request URI. In effect, this drops the Sametime
domain from the Request URI and replaces it with the UCM domain.
a. Click Replace a Request-URI.
From Zero to Hero: Sametime Unified Telephony Lite Client 35b. Click Using a regular expression.
c. In the Request-URI pattern field, type sip:(.+)@.*
d. In the Output pattern field, type sip:$1@9.3.186.215
In the Request URI pattern, the expression within the parentheses (.+) will be assigned to a
corresponding variable $1 in the Output pattern (everything between "sip:" and "@"; everything else is
left alone). The Output pattern will copy that information into a new URI format that uses the UCM's
domain before sending the modified request to the UCM.
For example, if the Sametime Request URI looks like this:
sip:14044614851@st852primary.austin.ibm.com
then it will be modified to look like this:
sip:14044614851@9.3.186.215
9. Click OK to save the new outbound route.
10. Restart the SIP Proxy/Registrar server or cluster:
• For a stand-alone Media Manager or SIP Proxy/Registrar, restart it now as follows:
a. In the server’s Integrated Solutions Console, click Servers > Server Types > server_type.
b, In the list of servers, select your server and click the Restart button at the top of the table.
c. Click the Refresh button and verify that all of the server components are active.
• For a cluster of SIP Proxy/Registrars, synchronize and then restart the nodes:
a. In the Deployment Manager's Integrated Solutions Console, click System Administration > Nodes.
b. Select all nodes in the cluster, and then click the Full Resynchronize button at the top of the table.
c. Back in the navigation tree, click System Administration > Node Agents.
d. Select all nodes in the cluster, and then click the Restart button at the top of the table.
From Zero to Hero: Sametime Unified Telephony Lite Client 368 Configuring Cisco UCM as a SIP endpoint for Sametime calls
The Cisco UCM (Unified Communications Manager) is a software-based call-processing system that manages
VoIP telephone calls. In the example configuration, you will configure the Cisco UCM to connect to the
Sametime Media Manager's SIP Proxy/Registrar so it can complete IP-based telephony calls.
This section describes the relevant configuration of the Cisco UCM used in this example scenario.
8.1 Launching the UCM Administration Web Page
Cisco UCM provides a web-based administration tool that you will use for this task.
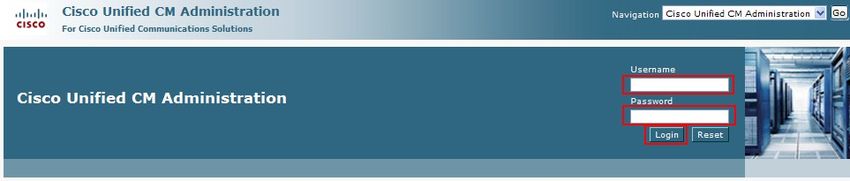
1. Open a browser and navigate to the following URL:
https://IP_address_of_UCM:8443/ccmadmin/showHome.do
2. Log in using the UCM administration credentials.
3. Click System > Cisco Unified CM.
4. Click Find and select the CallManager.
8.2 Disabling auto-registration
When auto-registration of phone lines is enabled, UCM will not allow you to add lines manually. Disable auto-
registration lines so that you can add phones and Directory Number (DN) lines manually.
1. In the "Auto-registration Information" section, click Auto-registration Disabled on this Cisco Unified
CallManager to select it.
2. In the "Cisco Unified CallManager TCP Port Settings for this Server" section, fill in the following fields:
SIP Phone Port: type 5060
SIP Phone Secure Port: type 5061
From Zero to Hero: Sametime Unified Telephony Lite Client 373. Click Save.
8.3. Configuring region settings
Configure the region settings to use the audio codec and video call bandwidth supported by Sametime.
1. Select System > Region.
2. Click Find and select the Default region.
3. Verify the following settings:
• Audio Codec: G.711
• Video Call Bandwidth: 384
4. If either setting is incorrect, change it as follows:
a. In the Modify Relationship to other Regions field, select Default.
b. In the Audio Codec field, click G.711.
c. In the Video Call Bandwidth field, click 384.
8.4. Configuring the SIP trunk security profile
Configure the UCM's SIP trunk to use the same transport setting that you configured in Sametime. In the
example configuration, Sametime uses TCP.
1. Select System > Security > SIP Trunk Security Profile.
2. On the SIP Trunk Security Profile Configuration page, click Add New.
From Zero to Hero: Sametime Unified Telephony Lite Client 383. Configure the new profile with the following settings:
Field Value
Name Sametime SIP Trunk profile
Device Security Mode Non Secure
Incoming Transport Type TCP+UDP
Outgoing Transport Type TCP
Incoming Port 5060
4. Click Save.
8.5 Verifying the Standard SIP Profile configuration
Verify that the Standard SIP Profile uses the settings required for supporting internet telephony calls to
Sametime.
1. Click Device > Device Settings
2. Click SIP Profile.
3. Click Find to list configured SIP Profiles, and then click Standard SIP Profile.
From Zero to Hero: Sametime Unified Telephony Lite Client 39You can also read