SchoolMessenger App Parent and Student User Guide - Website - West Corporation - Comox Valley Schools
←
→
Page content transcription
If your browser does not render page correctly, please read the page content below
SchoolMessenger
App
Parent and Student User Guide - Website

West Corporation
100 Enterprise Way, Suite A-300

Scotts Valley, CA 95066

800-920-3897

www.schoolmessenger.com
Contents
WELCOME! ............................................................................................................................................................................ 3

    SCHOOLMESSENGER AND THE TCPA ..............................................................................................................4
WELCOME PAGE .................................................................................................................................................................... 4
CREATING A SCHOOLMESSENGER APP ACCOUNT ............................................................................................................... 5

    SIGN UP ........................................................................................................................................................5
    LOG IN ..........................................................................................................................................................6
    LOG OUT .......................................................................................................................................................7
WHEN YOU FIRST SIGN IN… ..................................................................................................................................................7

    WHEN YOUR EMAIL ADDRESS ISN’T ASSOCIATED WITH SCHOOL-ENABLED RECORDS… ........................................... 8
        Claim by Phone ......................................................................................................................................................8
NOTIFICATION PREFERENCES............................................................................................................................................... 9
CONTACTS...........................................................................................................................................................................11

    PLUS DATA .................................................................................................................................................11
    MANUAL CONTACT DATA REFRESH ...............................................................................................................12
GROUPS AND GROUP TYPES............................................................................................................................................... 13

    AUTOMATIC GROUPS.................................................................................................................................... 13
    TEACHER-CREATED GROUPS .........................................................................................................................14
        Joining a Group ....................................................................................................................................................14
        Leaving a Group ...................................................................................................................................................15
MESSAGES ......................................................................................................................................................................... 15

    BROADCAST MESSAGE ................................................................................................................................16
    TEACHER MESSAGING ..................................................................................................................................18
        Responding to a SchoolMessenger App Message ............................................................................................19
        Delete Your Comment ..........................................................................................................................................19
        Add an Attachment to a Comment .....................................................................................................................19
        Receiving New Messages ................................................................................................................................... 20
SCHOOLMESSENGER APP WITH SAFEARRIVAL .................................................................................................................. 21

    VIEWS......................................................................................................................................................... 22
        Calendar View ......................................................................................................................................................22
        List View ............................................................................................................................................................... 22
    ABSENCES...................................................................................................................................................23
        Reporting an Absence ......................................................................................................................................... 23
        Editing an Absence ..............................................................................................................................................23
        Deleting an Absence ............................................................................................................................................ 24
        Explaining an Absence ........................................................................................................................................24
    MANAGE PIN SETTINGS...............................................................................................................................24
        When more than 2 or more parents/guardians are connected to a student… .................................................24
        Set a PIN for a Student ........................................................................................................................................25
QUESTIONS? ....................................................................................................................................................................... 25

©2019 West Corp. [03042019]. All rights reserved. May not be reproduced without express written permission.                                                                          2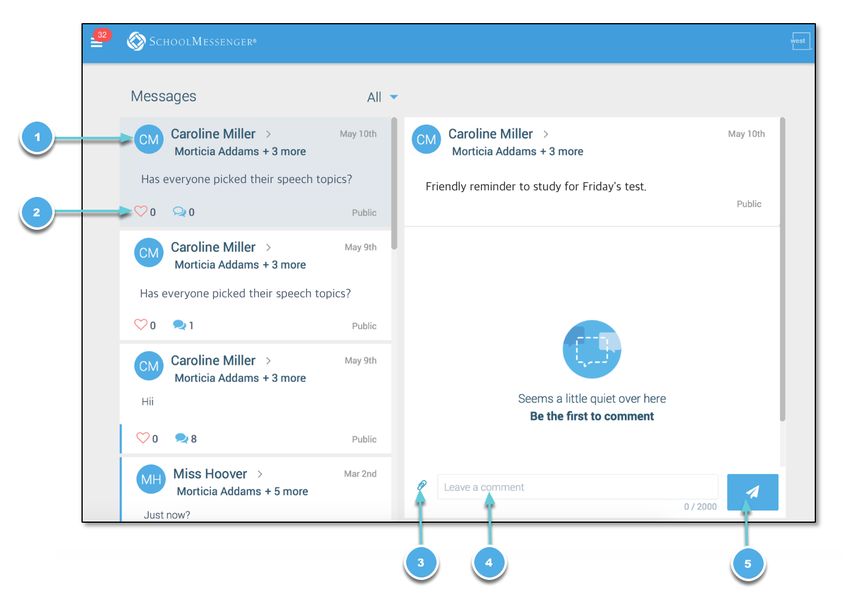
Welcome!
         Important: Parents and student users who and require further assistance, please contact your school or
         district.

The SchoolMessenger app allows schools and school districts to inform you about school-related emergencies,
school closures, attendance or other school-related issues.

Once you've created your account, we'll automatically link the records associated with your email address. You
can then:

    •    View the records associated with your account - student, staff, parent records.

    •    Review the last 30 days-worth of messages for all your associated records.

    •    View your contact information and configure how you would like to receive notifications.

Depending on your district’s settings, you’ll be able to:

     •    Receive teacher-sent messages from groups automatically associated with your account or groups
          you’ve joined manually.

     •    Join groups with generated codes provided to you by a teacher.

For schools subscribing to SchoolMessenger’s SafeArrival system, parents have the ability to report planned
absences, late arrivals, early departures to the school in advance.

For schools subscribing to SchoolMessenger’s Plus Data system, parents have the ability to view student
grades, lunch balance data, class and bus schedules, etc.

You will find all of these messages in an easily-accessible inbox. If you are associated with students in different
schools or districts, all matching records will be linked to your account. With flexible preference controls, most
kinds of communication can be configured to be accessed exclusively via the SchoolMessenger app.

©2019 West Corp. [03042019]. All rights reserved. May not be reproduced without express written permission.          3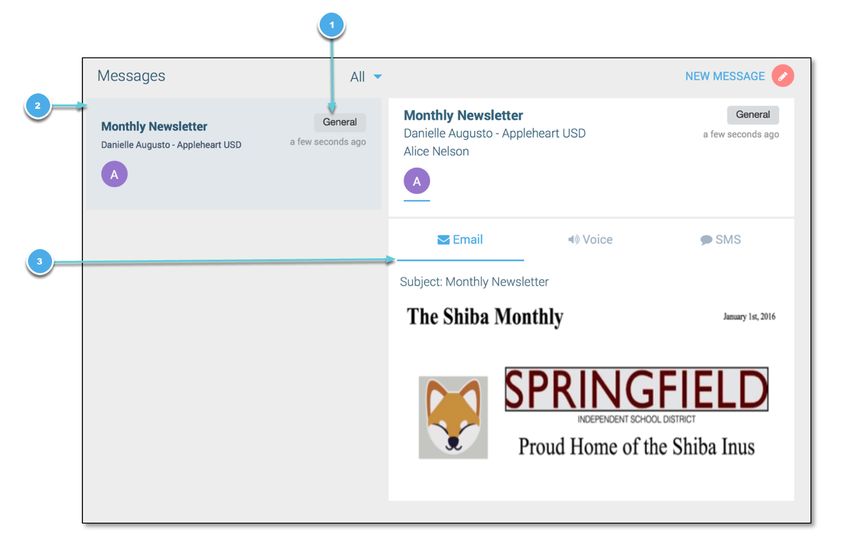
SchoolMessenger and the TCPA
Welcome Page
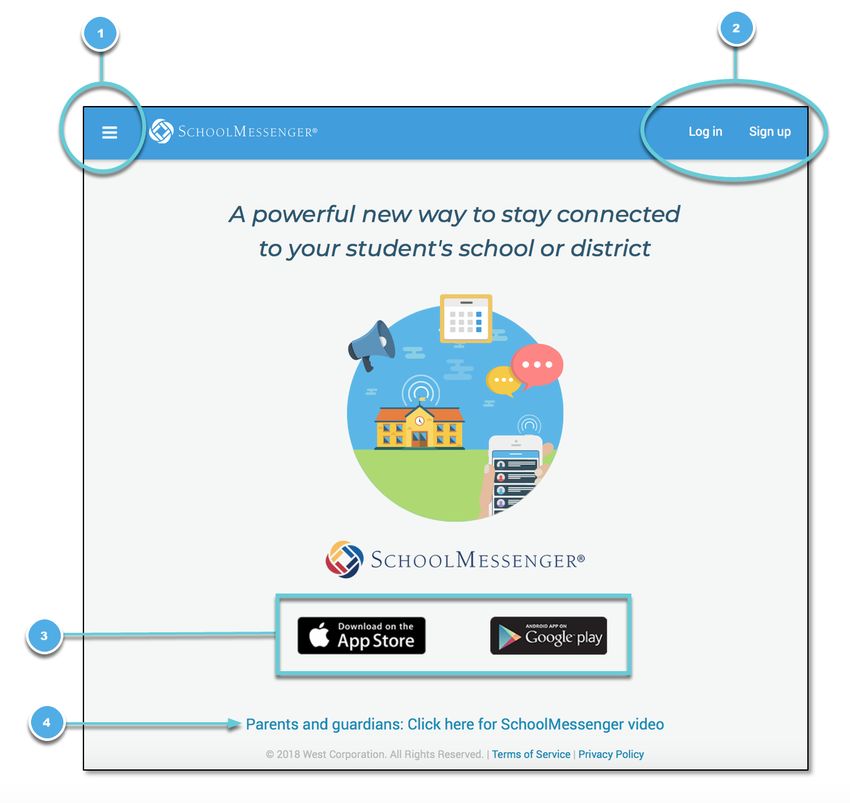
The SchoolMessenger app
welcome page is simple and
uncluttered.
1. Click the menu icon to
access more options.
2. Click either Log in or
Sign up to access the
SchoolMessenger app.
3. Download the mobile
app from either Apple’s
App Store or Android’s
Google Play page.
4. Click the link for a
quick informational
video.
©2019 West Corp. [03042019]. All rights reserved. May not be reproduced without express written permission. 4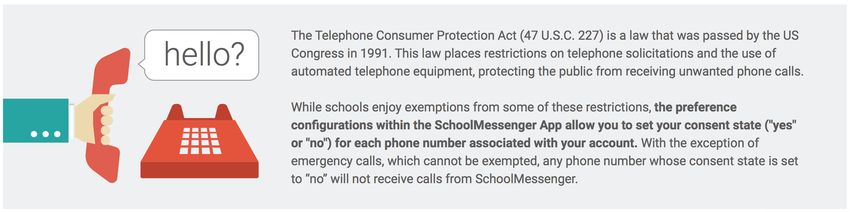
Creating a
SchoolMessenger App
Account
You must create an account in the SchoolMessenger app before you can start using it.

Sign Up
    1. Enter the following URL in your browser’s address bar: go.schoolmessenger.com

    2. Click Sign up on the menu.

        Important: If you already have an email address that the school has on record, use this email address
        when you sign up.

    3. Enter your email address, your location and a password.

Your password must contain have at least:

    •    1 lowercase letter

    •    1 uppercase letter

    •    1 number

    •    6 characters

You will be sent an email at the email address provided. Click the link in the email to verify your account. A new
page will open on your browser.

©2019 West Corp. [03042019]. All rights reserved. May not be reproduced without express written permission.          5
Note: The link in the email is only valid for 24 hours. If you
        don’t click on it and log into the SchoolMessenger app within
        that time period, it will expire and be of no further use. You
will have to restart the registration process and have a new email
sent to you with a renewed link.

As your information is registered in the school or district records,
you will receive all the messages you have subscribed to receive
from the school. You must use this same email address in creating
your SchoolMessenger app account.

Your school’s district admin will configure your message settings
and what features you will see when you log in.

    4. Return to the SchoolMessenger app.

    5. Enter the same email address and password you used to
        create the account.

    6. Click Log In. A message appears that you’ve successfully
        logged in. You may now launch the app on the web and log in
        using the same email address and password you used to
        create the account.

Log In
To log into the SchoolMessenger app:

    1. Click Log in on the menu bar.

    2. Enter the email address you used to register in the
         SchoolMessenger app.

    3. Enter your password.

    4. Select your location. United States is selected as default. If
         your school is in Canada, click Switch location.

    5. Click Log in.

Click on Forgot your password? if you forgot your password. An
email will be sent to you allowing you to register a new password.

©2019 West Corp. [03042019]. All rights reserved. May not be reproduced without express written permission.   6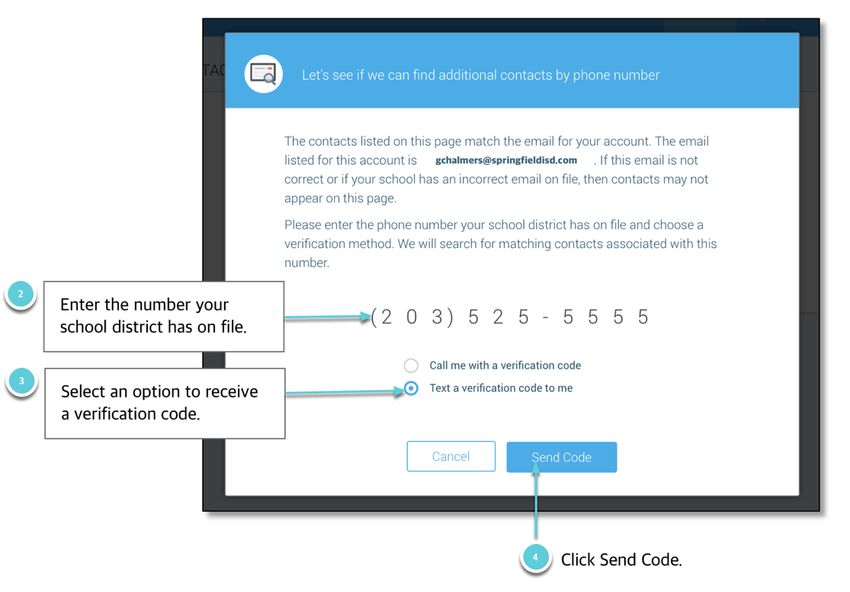
Log Out

     1. Click the           icon in the upper left corner of your screen.

     2. Click Log out.

When You First
Sign In…
After successfully logging in with a verified email, you should expect to see any messages that you’ve recently
received for any Contacts - student, staff, and/or guardian records - associated with your account email address.
You can navigate through your district-enabled options by using the left navigation bar.

Your account information and contacts will already be inputted into the system based on the information you’ve
provided to your school or district.

©2019 West Corp. [03042019]. All rights reserved. May not be reproduced without express written permission.       7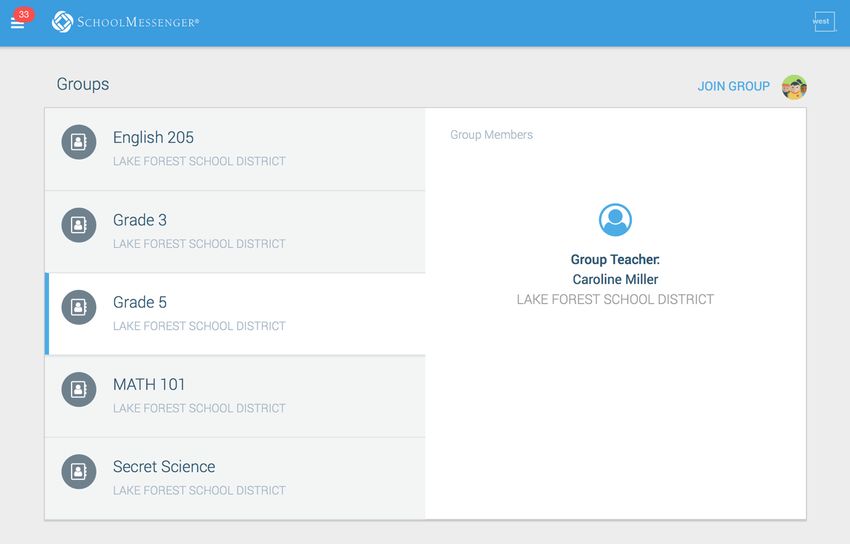
When your email address isn’t associated with school-
enabled records…
If your email address doesn’t match
with any records kept by the school,
you’ll see the below screen after your
log in:

Claim by Phone
If the SchoolMessenger app isn’t able to match your email to any contact data in their systems, your message
inbox will appear empty. You’ll have the option to try to match a potential school record using your phone
number.

    1. Click the “…search for
          contacts by phone” link at
          the bottom of the screen.
          A window pops up asking
          you to input your phone
          number.

    2. Enter your phone number
          your school district has
          on file.

    3. Select an option to
          receive a verification
          code.

    4. Click Send Code. A
          verification code will be sent to the number you entered.

©2019 West Corp. [03042019]. All rights reserved. May not be reproduced without express written permission.    8
5. Input the verification code your received and click Verify.
If verification was successful, you’ll see the following screen:
• If the system found additional contacts, they will be automatically added to your app under CONTACTS.
• If the system didn’t find additional contacts, you can:
o try another number by clicking the “Try another phone number?” link.
o contact your school district to verify that you have the correct phone number and/or
email address they have on file.
Notification Preferences
This page allows you to view and edit how you’re contacted by your district when they send broadcast
messages. The preferences on this page affect SchoolMessenger Broadcasts that may be sent to you from the
school/district. They do not affect messages sent and received through teacher messaging within the
SchoolMessenger app.
Access your notification preferences by clicking the menu icon and clicking Preferences.
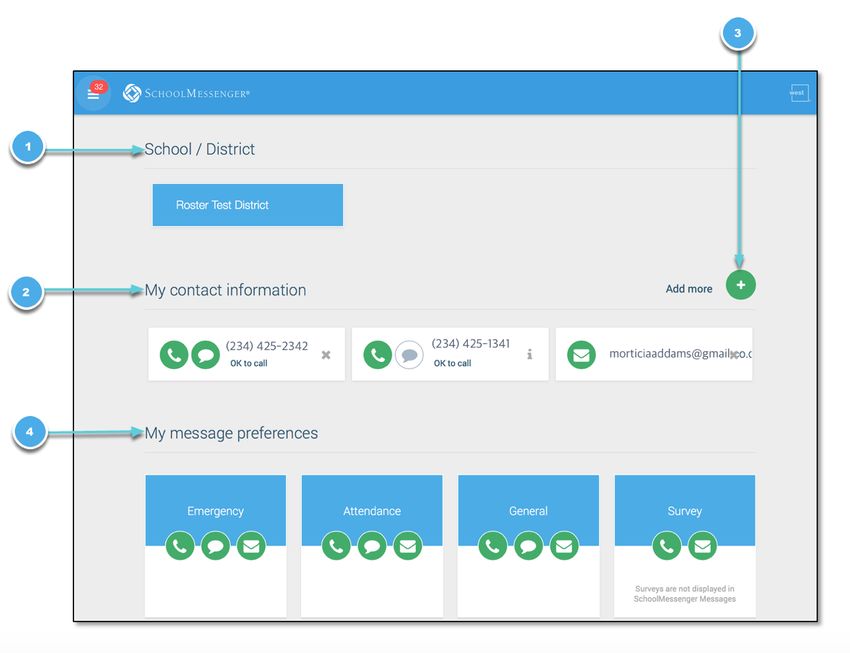
1. School / District: The school district in which your email address is associated with is listed here.
2. My contact information: Displays all the email addresses and phone numbers (voice and SMS text) at
which you can be contacted via that message type (phone, text, or email). The icons in green indicate
that you’ve given your consent to be contacted. The icons in grey indicate you’ve chosen not to be
notified on that number via that message type.
©2019 West Corp. [03042019]. All rights reserved. May not be reproduced without express written permission. 9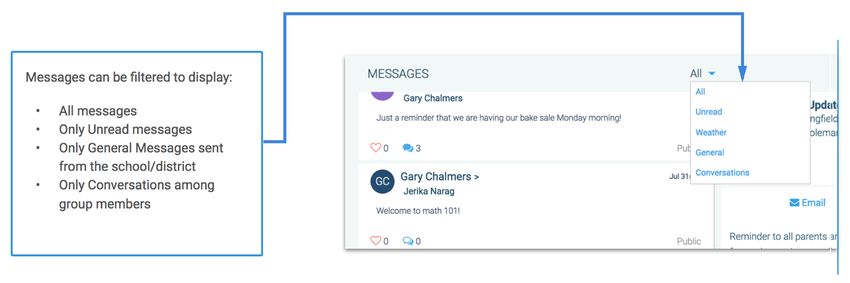
Note: Your district will control over whether you’ll be able to edit or delete this information. You
                   will know which phone numbers or email addresses can be deleted if they have a small X next to
                   it. While the ability to edit or delete contact information may be limited by your school district,
         you can change your consent selections and preferences at any time.

    3. Add more: Click this button to add more email addresses or phone numbers that aren’t already listed. If
         this button is not present, your district has disabled this ability.

    4. My message preferences: Click each message category (emergency, attendance, etc.) to view which
         contact email addresses and phone numbers will be contacted. You can also adjust your notification
         preferences for each message type here.

       Note: The maximum number of phone numbers and email numbers you can enter into the system is
       controlled by your district admin.

©2019 West Corp. [03042019]. All rights reserved. May not be reproduced without express written permission.               10
Contacts
Important: The contacts listed here are connected to the email address for your account. If this email is
not correct or if your school has an incorrect email on file, then contacts may not appear on this page.
Parent and guardian records in SchoolMessenger are linked to students attending one or more schools or
districts.
Access your contacts by clicking the icon and clicking Contacts.
Note: If you are missing contacts, click the “Is someone still missing?” link at the bottom of the screen to
claim possible missing contacts using your phone number. You should also click the “Synchronize
contacts with your school district” link to upload the most up-to-date information (more information
below). If that doesn’t work, please contact your school or district.
Plus Data
You will see more information for each contact if your school or district have subscribed and purchased the
SchoolMessenger App Plus Module. The data shown depends on what your school and district have chosen to
record and display.
©2019 West Corp. [03042019]. All rights reserved. May not be reproduced without express written permission. 11You will know if your school has purchased the Plus Module if you see the small
arrow beneath the contact. Clicking the contact displays the Plus data.
In the example to the right, this school district has chosen to display the
student’s meal balance, attendance, bus and class schedule.
Manual Contact Data Refresh
If you’re not seeing all of the contacts you’re expecting, you must manually refresh your app to reflect the most
up-to-date information. A manual refresh is required for every subsequent change to your contact data in order
to see the changes reflected in the SchoolMessenger app.
Important: Updates to your account will not be reflected until you manually refresh your contact
data.
1. Click the main menu icon in the top left corner.
2. Click Contacts.
3. Click the “Synchronize contacts with your school district” link.
4. Once the sync is complete, you’ll receive a “Synchronization Complete” message.
5. Click OK to
return to the
Contacts
page.
©2019 West Corp. [03042019]. All rights reserved. May not be reproduced without express written permission. 12Groups and Group Types
If enabled by your district, you will see a option in your menu. On this page you can:
• see all the groups you’re a member of.
• see only the name of the group teacher, not the other participants in the group.
• join, leave and view groups you have the access code for.
• view all of the groups you’re linked to automatically as a participant based on your account.
Depending on what your district has enabled, there are two types of groups:
• Automatic Groups: Groups you’re automatically joined with linked to your account.
• Teacher-Created Groups: Groups created by a teacher that you can join and leave using a unique
access code they’ve provided to you.
Automatic Groups
Automatic groups will have an address book icon next to its name. Clicking the group will display the
Group Teacher and the
district connected to the
group. Other than the Group
Teacher, you won’t be able to
see any of the other
members of the group.
If you’re a member of an
automatic group, you will not
have the option to leave it.
These groups are created at
the district level and you will
need to speak with your
school if you’re a part of a
group you shouldn’t be in.
©2019 West Corp. [03042019]. All rights reserved. May not be reproduced without express written permission. 13Teacher-Created Groups
If enabled by their district, teachers can create conversation or discussion groups in which students, guardians
and other school staff can participate. But before such participation can occur, participants must be invited and
provided an access code to join the group.
Participants can join as
many groups as they are
invited to participate in.
Joining a Group
Teachers can set up conversation or discussion groups in which students, guardians, and other school staff can
participate. But before such participation can occur, you must be invited and provided an access code to join the
group.
You can join as many groups as you are invited to participate in. To join a group:
1. Obtain the access code from your student’s teacher.
2. Click on the menu option.
3. Click on the link at the top of the
screen.
4. In the Join Group window, enter the access code that
was provided to you.
5. Click Join. You’ll be taken back to the Join Groups
page.
The group you’ve just joined will appear at the bottom of the list.
©2019 West Corp. [03042019]. All rights reserved. May not be reproduced without express written permission. 14Leaving a Group
You can only leave teacher-created groups. You will not be able to leave automatic groups you’ve been assigned
to. If you’re a participant of a group you’re not supposed to be a part of, contact your school district to correct
this.
1. Click on the menu
option.
2. Click on Leave Group link to the left of
the group you wish to leave,
3. Confirm that you no longer want to be
part of the group in the next window.
Messages
The SchoolMessenger app's Messages page displays all broadcast messages (voice, email, or text) sent to you
from your school and/or district during the last 30 days, as well as the messages and conversations that have
taken place in the SchoolMessenger app group(s) you have joined. They are sorted newest first, oldest last.
©2019 West Corp. [03042019]. All rights reserved. May not be reproduced without express written permission. 15There are two types of messages:
• Broadcast Messages: Sent by the school or
district as SchoolMessenger Broadcasts
(Emergency, Attendance, General, etc.). These will
expire and be removed from your messages page
after 30 days.
• Teacher-Sent Messages: Messages sent initially
by teachers either publicly or privately to
participants who are members of a
SchoolMessenger app group. Unless deleted by
the teacher, these remain in your message page
indefinitely.
Note: The SchoolMessenger app automatically
assigns the color and initial of the each of the
student-identification circles. Neither the color nor
the initial are editable.
Broadcast Message
Unlike with teacher-sent messages, these are messages sent by the school or district and not meant to be
replied to or engaged with within the SchoolMessenger app. These will expire and be removed from your
messages page after 30 days.
1. Broadcast messages are labelled with their type in the upper right-hand corner of the message.
2. Selected messages to be read will be highlighted in blue.
3. The message view type (Email, Voice or SMS) will be highlighted with a blue line.
©2019 West Corp. [03042019]. All rights reserved. May not be reproduced without express written permission. 16©2019 West Corp. [03042019]. All rights reserved. May not be reproduced without express written permission. 17
Teacher Messaging
If enabled by your district, you will see messages sent by teachers to groups you’re a participant in. Unless
deleted by the teacher, these remain in your message page indefinitely. These are different from Broadcast
messages in that as a participant, you may be able to reply and engage with the sender and other participants.

Your ability to comment depends on the message settings determined by either the district, teacher, or both.

Below is an example of what your Messages Page will look like.

    1. Message senders will have their own colored icon with their initials.

    2. Recipients can like a message.

If enabled…

    3. Attach a file to your comment.

    4. Write your comment in the provided field.

    5. Click the paper airplane button to send your comment.

©2019 West Corp. [03042019]. All rights reserved. May not be reproduced without express written permission.    18
Responding to a SchoolMessenger App Message
Anyone receiving a message created by a teacher may read the message, and, under the appropriate
circumstances, read the comments of other group members and offer their own comments.
The circumstances are defined by the teacher who created the original message or the district. Messages may
be configured so that:
• comments can be entered and read by everyone.
• comments can be entered by group members but
will be received privately and read only by the
teacher.
• no comments are allowed.
• group members won’t see each other’s names.
If comments are enabled:
1. Enter your response in the comment box below.
2. Click the blue paper airplane button to respond.
Delete Your Comment
Participants can delete their own comments by clicking the button to the right of their comment.
Add an Attachment to a Comment
Use attachments to send the following file types in your reply:
• images (PNG, JPG)
• documents (PDF, DOC, DOCX, PPT, PPTX)
• video (MP4)
• audio (MP3, WAV, M4A)
Note: The max file size is 20MB and you can only send 1 attachment per message.
©2019 West Corp. [03042019]. All rights reserved. May not be reproduced without express written permission. 19To attach a file:
1. Click the blue paperclip icon. After clicking the Attachment icon, the Upload box appears.
2. Upload your file by either selecting it from your computer or dragging and dropping it into the space
provided.
Once your file is attached:
3. Write a corresponding comment to your picture (required).
4. If the attachment is correct, click the paper airplane icon to send. If you wish to remove the attachment,
click the X to the right of the attachment and tap the paperclip icon to attach a new file.
Click the attachment in the message to view the attachment fully.
Receiving New Messages
If the user receives new comments within a
conversation thread, the entire conversation counts
as only 1 unread message. No matter how many
unread messages a conversation thread contains,
the unread messages count will only increment by 1.
In the example to the right, the unread messages
number displays as 2 because there are 2
conversations in the user’s message inbox that are
either unread or contain unread comments. The
example shows how both scenarios look like.
Unread comments within an already opened
conversation are marked with a half blue line. Unread
conversations not yet opened are marked by a full
blue line.
©2019 West Corp. [03042019]. All rights reserved. May not be reproduced without express written permission. 20SchoolMessenger App with
SafeArrival
If your email address is associated with at least one child in a school that is actively using SafeArrival, you will
see the option on the menu.
Note: If you don’t see the Attendance option or your children, go to the Contacts page and click the
“Synchronize contacts with your school district” link to upload the most up-to-date information. If that
doesn’t work, check with the school to ensure they are using SafeArrival and that you signed up with the
email address they have on record for you.
©2019 West Corp. [03042019]. All rights reserved. May not be reproduced without express written permission. 21Views You can review and edit your child’s reported absences in two views: Calendar and List View. Select the student’s name in the Student Absences section to filter submitted absences displayed. Calendar View Click the icon to see your child’s absences in a calendar. To go to the previous or next month, click the < or > at the top of the calendar. List View Click the icon to view your child’s absences in a list. To scroll through the list of absences, the scroll bar on the right- hand side of the screen to move the list. ©2019 West Corp. [03042019]. All rights reserved. May not be reproduced without express written permission. 22
Absences
Absences can be reported in advance for the school year. On the day of the absence however, absences cannot
be reported after the school’s cut-off time. The cut-off time is determined by the school and may vary. If
SafeArrival tells you it is past the cut-off time for reporting absences for the current day, you will need to contact
the school directly.

Reporting an Absence

    1. Select !                                 .

    2. Be sure to enter your selections for all of the requested items:

           •    Select which student will be
                absent.

           •    Select the type and reason for
                the absence.

           •    Select the date(s) and any
                time(s) of the absence.

         If the Send button is not activated, it
         means you’ve missed something.

    3. Select Send to report the absence.

Editing an Absence
If you have reported an absence in advance and decide that you need to edit the absence BEFORE the cut-off
time on the day of the absence, follow these steps:

    1. Click the absence (in List View) or the day of the absence (in Calendar View), then Edit.

    2. Make the required changes then click Send.

If you need to change the details for an absence after the cut-off time on the day of the absence, contact the
school directly.

©2019 West Corp. [03042019]. All rights reserved. May not be reproduced without express written permission.         23
Deleting an Absence
If you have reported an absence in advance and decide that you need to delete the absence BEFORE the cut-off
time on the day of the absence, follow these steps:
1. Click the absence (in List View) or the day of the absence (in Calendar View), then Delete.
2. Click Delete to confirm that you want to delete the absence.
If you need to delete an absence after the cut-off time on the day of the absence, contact the school directly.
Explaining an Absence
If your student is marked absent and you have not reported the absence in advance, you will be notified of the
absence. You can use the mobile apps or website to explain your student’s absence.
Manage PIN Settings
Parents/guardians may assign their own 4-digit Personal Identification Number (PIN) to an individual student
through their SchoolMessenger app. If guardian assigns a student a PIN, this number will need to be entered
before an absence can be reported or explained for this particular student when using the SafeArrival phone
system (using a mobile device or a landline). This provides an additional layer of security and also prevents
students from reporting their own absences.
When more than 2 or more parents/guardians are connected to a
student…
Once a PIN is set for a child, a PIN must always be used to report or explain that child’s absences. Multiple
guardians connected to the same students can share and use the same PIN, or they can set their own individual
PINs for the same student. All PINs assigned will work when reporting or explaining an absence for that child.
Note: PINs are not associated with the phone number the parent calls from to report the absence or the
mobile device the parent is using the app on. PINs are managed within the app and all guardians
associated with the student who know/share a PIN or set their own PIN for that child will be able to
report or explain an absence for that student from any device or landline they choose.
For parents/guardians who do not use the SchoolMessenger app, staff with access to the SchoolMessenger
Communicate Contacts page can manage the PIN settings.
©2019 West Corp. [03042019]. All rights reserved. May not be reproduced without express written permission. 24Set a PIN for a Student
Using the SchoolMessenger app website, parents click the Manage your PIN settings link at the bottom of the
Attendance page.
On the SafeArrival PIN Settings screen, the parent can choose the district in which the student is enrolled (if the
parent has students enrolled in more than 1 district). The parent will see a list of his/her students and will be
able to tap the checkbox to request that a PIN be required
for when reporting and explaining absences for this
student by phone. A 4-digit PIN can then be entered.
1. Click the “eye” icon to see the PIN. Tap the PIN to
modify the it.
2. Click Save to save any changes.
This screen will be slightly different for Districts who do
not use the Guardian Data Model. In that case, a separate
PIN is required for each STUDENT.
Questions?
If you have any questions regarding the above, please contact your school or district.
Feel free to forward app inquiries or feedback to the following:
appfeedback@schoolmessenger.com
©2019 West Corp. [03042019]. All rights reserved. May not be reproduced without express written permission. 25You can also read