Secure Erase Instructions for The X11/X12/B11/B12 Motherboards - USER'S GUIDE Revision 1.0
←
→
Page content transcription
If your browser does not render page correctly, please read the page content below
Secure Erase Instructions
           for
   The X11/X12/B11/B12
     Motherboards

        USER'S GUIDE
          Revision 1.0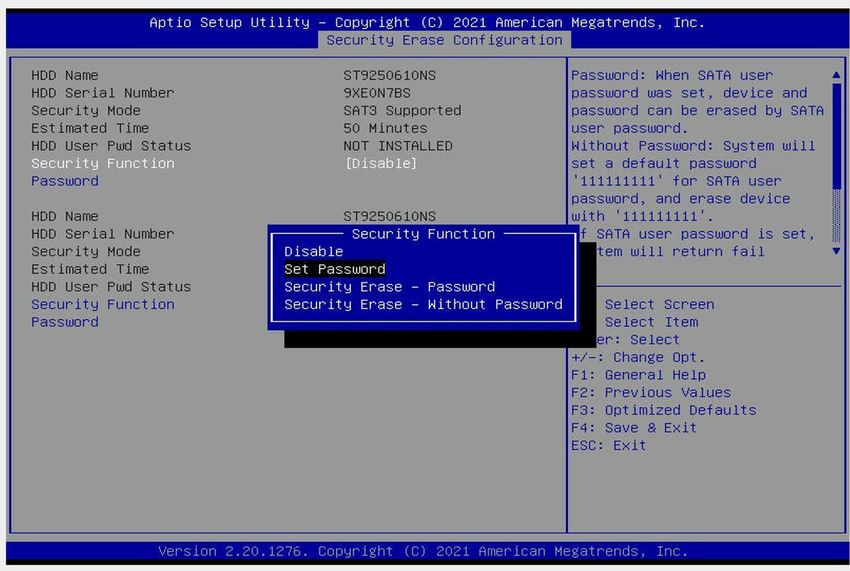
The information in this user’s guide has been carefully reviewed and is believed to be accurate. The manufacturer
assumes no responsibility for any inaccuracies that may be contained in this document, and makes no commitment to
update or to keep current the information in this user’s guide, or to notify any person or organization of the updates.
Please Note: For the most up-to-date version of this user’s guide, please see our website at www.supermicro.
com.

Super Micro Computer, Inc. ("Supermicro") reserves the right to make changes to the product described in this
user’s guide at any time and without notice. This product, including software and documentation, is the property of
Supermicro and/or its licensors, and is supplied only under a license. Any use or reproduction of this product is not
allowed, except as expressly permitted by the terms of said license.

IN NO EVENT WILL SUPER MICRO COMPUTER, INC. BE LIABLE FOR DIRECT, INDIRECT, SPECIAL,
INCIDENTAL, SPECULATIVE OR CONSEQUENTIAL DAMAGES ARISING FROM THE USE OR INABILITY TO
USE THIS PRODUCT OR DOCUMENTATION EVEN IF ADVISED OF THE POSSIBILITY OF SUCH DAMAGES.
IN PARTICULAR, SUPER MICRO COMPUTER, INC. SHALL NOT HAVE LIABILITY FOR ANY HARDWARE,
SOFTWARE, OR DATA STORED OR USED WITH THE PRODUCT, INCLUDING THE COSTS OF REPAIRING,
REPLACING, INTEGRATING, INSTALLING, OR RECOVERING SUCH HARDWARE, SOFTWARE, OR DATA.

Any disputes arising between manufacturer and customer shall be governed by the laws of Santa Clara County in the
State of California, USA. The State of California, County of Santa Clara shall be the exclusive venue for the resolution
of any such disputes. Supermicro's total liability for all claims will not exceed the price paid for the hardware product.

FCC Statement: This equipment has been tested and found to comply with the limits for a Class A digital device
pursuant to Part 15 of the FCC Rules. These limits are designed to provide reasonable protection against harmful
interference when the equipment is operated in an industrial environment. This equipment generates, uses, and can
radiate radio frequency energy and, if not installed and used in accordance with the manufacturer’s instruction manual,
may cause harmful interference with radio communications. Operation of this equipment in a residential area is likely
to cause harmful interference, in which case you will be required to correct the interference at your own expense.

California Best Management Practices Regulations for Perchlorate Materials: This Perchlorate warning applies only
to products containing CR (Manganese Dioxide) Lithium coin cells. “Perchlorate Material-special handling may apply.
See www.dtsc.ca.gov/hazardouswaste/perchlorate”.
                                             WARNING: This product can expose you to chemicals including
                                         !   lead, known to the State of California to cause cancer and birth
                                             defects or other reproductive harm. For more information, go
                                             to www.P65Warnings.ca.gov.

The products sold by Supermicro are not intended for and will not be used in life support systems, medical equipment,
nuclear facilities or systems, aircraft, aircraft devices, aircraft/emergency communication devices or other critical
systems whose failure to perform be reasonably expected to result in significant injury or loss of life or catastrophic
property damage. Accordingly, Supermicro disclaims any and all liability, and should buyer use or sell such products
for use in such ultra-hazardous applications, it does so entirely at its own risk. Furthermore, buyer agrees to fully
indemnify, defend and hold Supermicro harmless for and against any and all claims, demands, actions, litigation, and
proceedings of any kind arising out of or related to such ultra-hazardous use or sale.

User’s Guide Revision 1.0

Release Date: July 12, 2021

Unless you request and receive written permission from Super Micro Computer, Inc., you may not copy any part of this
document. Information in this document is subject to change without notice. Other products and companies referred
to herein are trademarks or registered trademarks of their respective companies or mark holders.

Copyright © 2021 by Super Micro Computer, Inc.
All rights reserved.
Printed in the United States of America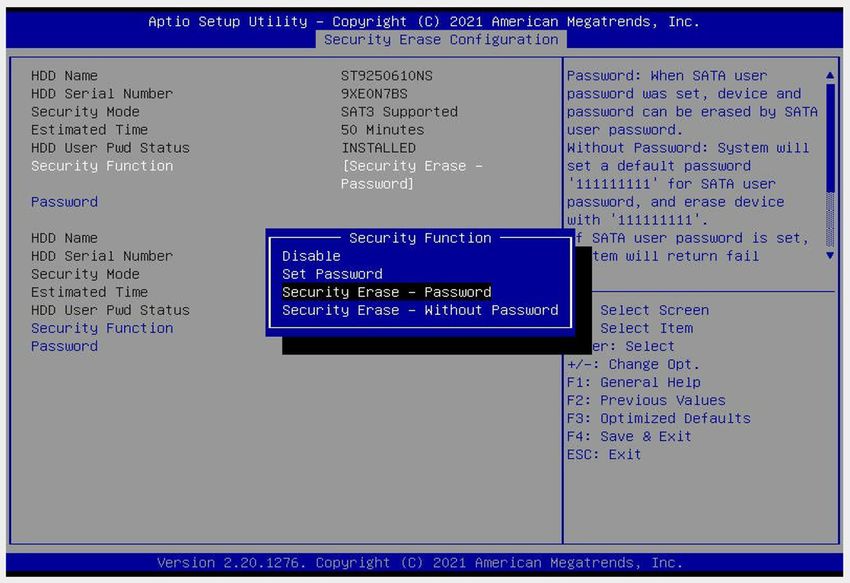
Preface

                                      Preface

The Intended Audience
 This user's guide is written for system integrators, IT technicians, and knowledgeable end
 users. It provides secure erase instructions used in the BIOS setup utility for the X11/X12/
 B11/B12 motherboards.

About This User's Guide
 This user's guide provides detailed instructions on how to use the secure erase features in
 the UEFI BIOS for the X11/X12 and B11/B12 (Blade) motherboards that are based on the
 Intel® Xeon® Scalable-SP/2nd Gen/3rd Gen processors to securely remove data from the
 disk drives in a computer system to achieve data sanitization and system security. Using
 the overwrite command in the ATA standard to overwrite existing data and erase unwanted
 information from the hard drive disks (HDDs) or solid state drives (SSD's) of your machine
 will ensure that your system not only meets the most stringent security requirements in the
 industry but also complies with the strictest privacy laws in the world such as those set up
 by the State of California and by the European Union.
 Please note that all Supermicro's products are intended to be installed, configured, and
 serviced by professional technicians only.
 For hardware product information updates, please refer to our website at http://www.
 supermicro.com/products/. For software/firmware support, please refer to the configuration
 guides posted on the web page under the link: http://www.supermicro.com/support/manuals/.

Conventions Used in the Manual
 Special attention should be given to the symbol below for proper system configuration and
 for prevention of accidental damage to your system components:

       Note: Important Information given for proper system setup or for proper firmware
       configuration.

                                            3
Super Secure Erase for the X11/X12/B11/B12 Motherboards User's Guide

Contacting Supermicro

       Headquarters
       Address:          Super Micro Computer, Inc.
                         980 Rock Ave.
                         San Jose, CA 95131 U.S.A.
       Tel:              +1 (408) 503-8000
       Fax:              +1 (408) 503-8008
       Email:            marketing@supermicro.com (General Information)
                         support@supermicro.com (Technical Support)
       Website:          www.supermicro.com

       Europe
       Address:          Super Micro Computer B.V.
                         Het Sterrenbeeld 28, 5215 ML
                         's-Hertogenbosch, The Netherlands
       Tel:              +31 (0) 73-6400390
       Fax:              +31 (0) 73-6416525
       Email:            sales@supermicro.nl (General Information)
                         support@supermicro.nl (Technical Support)
                         rma@supermicro.nl (Customer Support)
       Website:          www.supermicro.nl

       Asia-Pacific
       Address:          Super Micro Computer, Inc.
                         3F, No. 150, Jian 1st Rd.
                         Zhonghe Dist., New Taipei City 235
                         Taiwan (R.O.C)
       Tel:              +886-(2) 8226-3990
       Fax:              +886-(2) 8226-3992
       Email:            support@supermicro.com.tw
       Website:          www.supermicro.com.tw

                                             4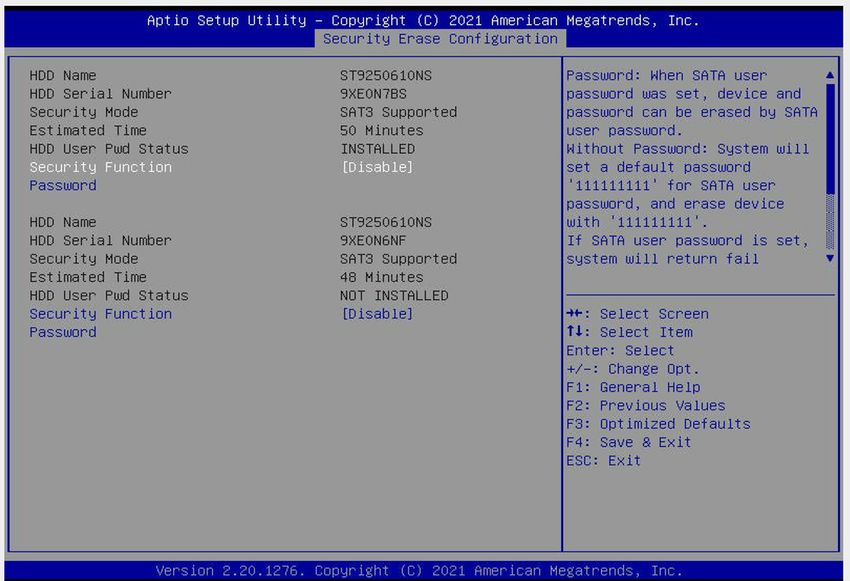
Preface

                                           Table of Contents
Preface
Chapter 1 Secure Erase Overview
1.1 Secure Erase Defined...........................................................................................................6
       1.1.1 Secure Erase for SATA HDD/SSD Devices................................................................6
       1.1.2 Secure Erase for ATA SED SSD Devices...................................................................7
       1.1.3 Secure Erase for NVMe SSD Devices.......................................................................8
       1.1.4 Summary of Secure Erase Implementation for Supermicro's Products.....................8
1.2 Platform Support...................................................................................................................8
       1.2.1 The X11 and B11 Platforms........................................................................................8
       1.2.2 The X12 and B12 Platforms.......................................................................................9
Chapter 2 Configuring the Secure Erase Settings in the BIOS
2.1 Secure Erase in a Drive without a Password Pre-installed................................................10
2.2 Apply the Password to the Target Drive.............................................................................14
2.3 Secure Erase in the Drive with a Password Pre-installed..................................................18

                                                                   5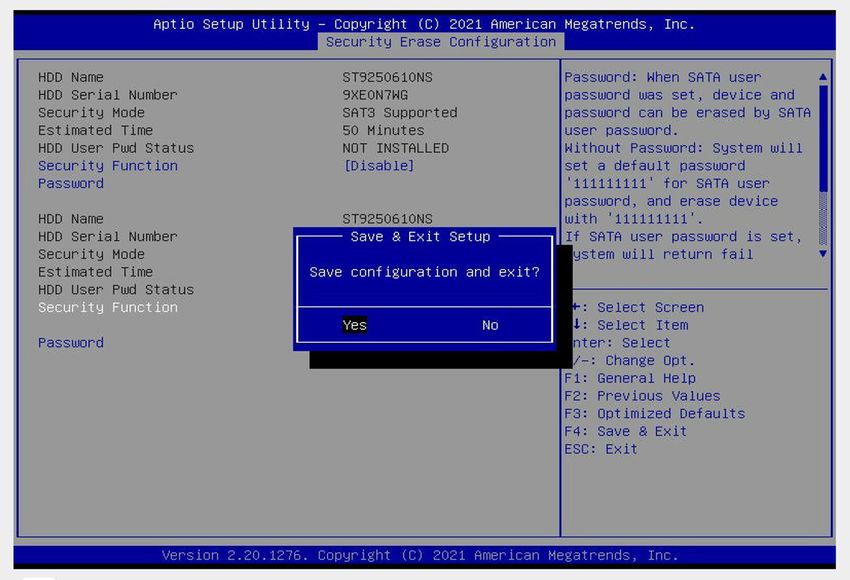
Super Secure Erase for the X11/X12/B11/B12 Motherboards User's Guide

                                       Chapter 1

                         Secure Erase Overview

1.1 Secure Erase Defined
  Secure Erase (Security Erase) implemented in Supermicro's products is, primarily, a firmware-
  based process that utilizes an overwrite command in the ATA standard to overwrite existing
  data from a media drive, such as a hard disk drive (HDD) or a solid state drive (SSD), and
  effectively remove the existing data from your computer by writing over it. This overwrite
  command, also known as "Security_Erase_Unit" command in the ATA standard, works
  substantially faster than the "rewrite through read and write" command, and its execution is
  so thorough that all existing data in a disk is completely written-over and erased from the disk
  drive. Due to its efficiency in data removal and cleansing, the overwrite command is commonly
  used in secure erase to help achieve the uttermost data sanitization and system security that
  will comply with the most stringent privacy laws and meet most rigorous security requirements
  in the world as those that are set up by the State of California and the European Union (EU).

    1.1.1 Secure Erase for SATA HDD/SSD Devices

    Normal Erase Method Used
    Since the Overwrite command is very efficient in removing data from disk drives, Supermicro
    uses this command for SATA HDD and SSD devices, and out of the two methods of the
    Overwrite command: Normal Erase and Enhanced Erase, we use Normal Erase for secure
    erase to further enhance our product performance as mentioned below.
     •   Normal Erase: This is the primary method that Supermicro uses for secure erase. Uti-
         lizing the Normal Erase method in the "Security_Erase_Unit" command, also known as
         the Overwrite command, all contents stored in the sector of LBA 0 through the greater
         "Read Native Max" or "Read Native Max Ext" will be overwritten and replaced with
         "0's" and "1's." This method of data erasing is considered very effective and safe, so
         it is commonly used in the industry. Supermicro currently uses "Normal Erase" of the
         Overwrite command to securely erase data from a disk device, especially from an SATA
         SSD device, by executing the Security_Erase_Unit (Overwrite) command in the "Security
         Erase" setting of the UEFI BIOS Setup Utility used for a motherboard.

     •   Enhanced Erase: The Enhanced Erase command will overwrite and erase all data that
         has previously been written by the user, including the sectors that are no longer in use
         as well as the contents that have already been "sanitized" or cleansed" in the HDDs/
         SSDs. Often these contents contain data considered "vendor-unique". To preserve the
         contents that are uniquely created by Supermicro, we do not use the "Enhanced Erase"
                                                6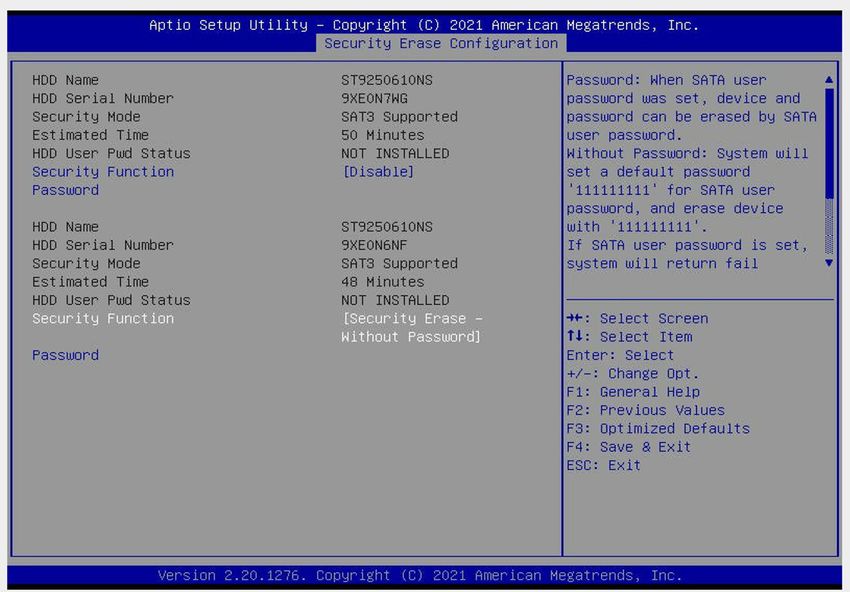
Chapter 1: Secure Erase Overview

    command for secure erase on our products to avoid any accidental removal of firmware
    instructions or security keys that are designed to enhance our product performance.

1.1.2 Secure Erase for ATA SED SSD Devices

Trusted Computing Group (TCG) Locking Range Erase Method Used
The chief concern in secure erase is how to avoid damaging the media drive while
performing a secure erase. There are two common techniques that can be used to help
safeguard your devices when a secure erase is performed: TCG and ATA.
•   TCG (Trusted Computing Group): This technique uses an internal encryption key to
    encrypt a media drive and then destroys the encryption key by performing a secure
    erase to overwrite and to erase the instructions of the encryption key. In other words,
    TCG uses an encryption key to encrypt and mask off the data in a drive and then
    destroys that particular encryption key by overwriting it via a secure erase. Since this
    technique is especially effective in securely erasing data from self-encrypting-drives
    (SEDs), Supermicro uses the "LockingRangeErase" method under the "TCG Storage
    Security Subsystem" to securely remove unneeded data from the ATA SED SSD de-
    vices, especially those devices with vendor passwords pre-installed. However, when
    "LockingRangeErase" cannot securely erase data from such a device, Supermicro will
    use the "RevertSP" process to revert the device to its original factory state for secure
    erase. These high-end SED SSD devices are commonly used in our High Performance
    Computing (HPC) servers and Enterprise class systems.

ATA Technique Explained
•   ATA: Instead of overwriting/erasing all data from the disk drive, this technique uses a
    "reset" command in the ATA standard to reset an SSD device to a clean memory state
    which will further trigger a "flush" command to flush all stored electrons and effectively
    cause all stored data in the SSD drive to be "forgotten" and become "unavailable" for use.
    Since the "ATA" technique will reset all available disk blocks in a disk drive and remove
    all data therein, this technique will also inadvertently destroy the "vendor-specific" firm-
    ware settings or software instructions in our computers that are created by Supermicro
    or our vendors to maximize system performance and optimize user experience, and
    thus we do not use the ATA block erase command or block reset command in order to
    avoid unintentional removal of any data or instructions, resulting in degraded system
    performance or user experience.

                                            7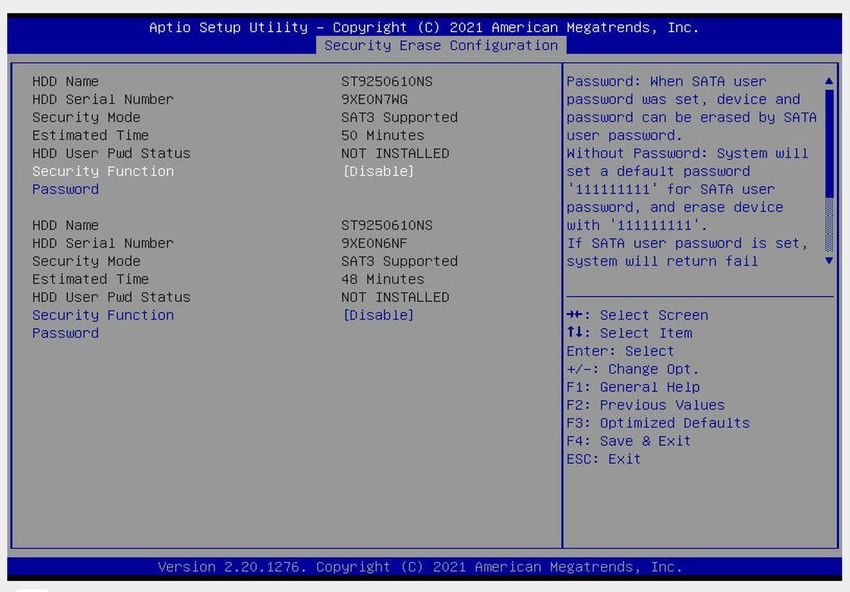
Super Secure Erase for the X11/X12/B11/B12 Motherboards User's Guide

      1.1.3 Secure Erase for NVMe SSD Devices

      Format NVM Command Used
      As for the data stored in the NVMe SSD devices, Supermicro uses the "format NVM
      command" to erase data from these devices, for the format NVM command is considered
      very effective in removing data from non-self encrypting devices, especially for NVMe solid
      state devices.

      1.1.4 Summary of Secure Erase Implementation for Supermicro's
      Products
      To best meet the demands for personal privacy and system security and to best leverage
      the dichotomy between system performance and data security, Supermicro applies different
      methods to securely erase data stored in different types of devices to ensure best product
      performance and user experience. Our methods of secure erase can be summarized as
      follows:
  •   For HDD/SSD/SATA SSD devices: Normal Erase in the "Security_Erase_Unit command"
      (-the Overwrite command) in the ATA standard is used for secure erase.

  •   For ATA Self-Encrypting Device (SED) SSD devices: the "LockingRangeErase" method
      under the "TCG Storage Security Subsystem" is used for secure erase, especially on
      the ATA SED SSDs with vendor passwords pre-installed. If "LockingRangeErase" cannot
      securely remove data from an ATA SED SSD device, the "RevertSP" procedure will be
      performed to revert this device to itself original factory state with all data removed and
      cleansed.

  •   For NVMe SSD devices: the "Format NVM command" is used for secure erase to achieve
      data sanitization and cleansing.

1.2 Platform Support
  Supermicro's secure erase is supported by the motherboards that are based on Intel's Xeon
  Scalable series processors.

      1.2.1 The X11 and B11 Platforms
      The X11 and B11 platforms, which are based upon Intel® Xeon® Scalable-SP or 2nd Gen.
      processors, include the following series motherboards:
      •   X11MP Motherboards

      •   X11DP Motherboards

                                                8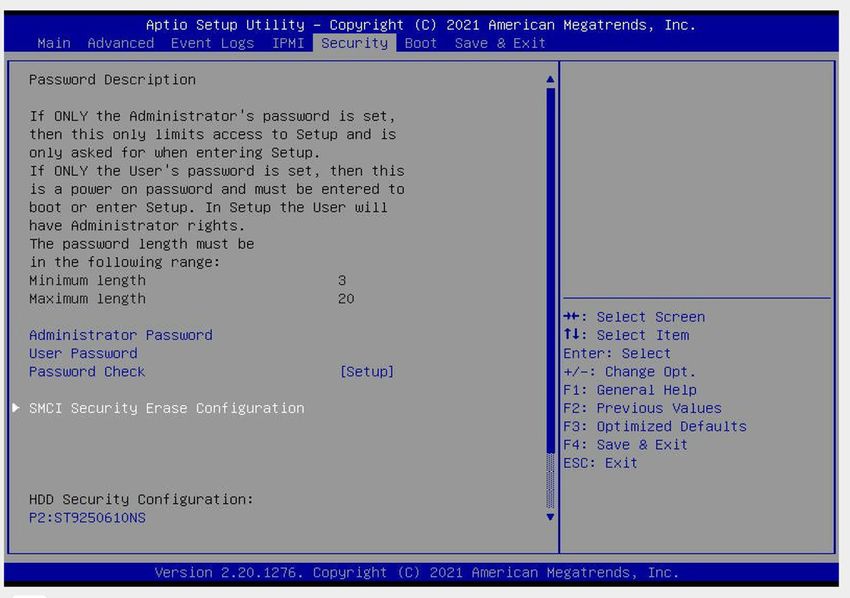
Chapter 1: Secure Erase Overview

•   X11SP Motherboards

•   B11DP Motherboards

1.2.2 The X12 and B12 Platforms
The X12 and B12 platforms, which are based upon the 3rd Gen Intel® Xeon® Scalable
processors, include the following series motherboards:
•   X12MP Motherboards

•   X12DP Motherboards

•   X12SP Motherboards

•   B12DP Motherboards

                                     9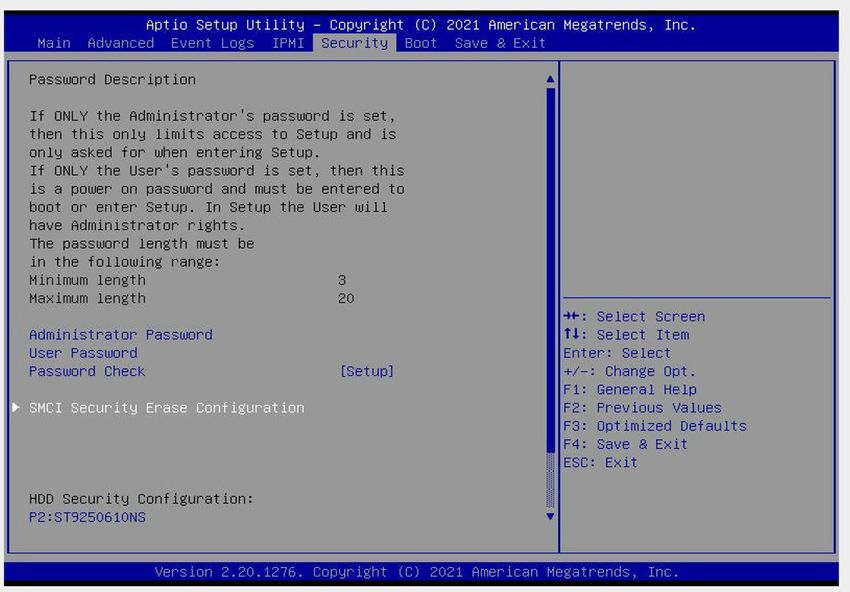
Super Secure Erase for the X11/X12/B11/B12 Motherboards User's Guide

                                      Chapter 2

    Configuring the Secure Erase Settings in the
                       BIOS

2.1 Secure Erase in a Drive without a Password Pre-
installed
  Power on the system and press  to enter the BIOS Setup utility upon bootup. After
  entering the BIOS setup utility, use the arrow keys to select the Security tab on the top of the
  menu bar and press  to invoke the Security menu. From the Security menu, select
  the "SMCI Security Erase Configuration" submenu and press  to invoke the submenu
  as shown below.

                                               10
Chapter 2: Configuring Secure Erase Settings in the BIOS
The "Security Erase Configuration" submenu will appear and display all drives that are
connected to the PCH.
To enable the secure erase feature on a selected drive, scroll down the screen and select the
"Security Function" feature of that particular drive that you want to perform a secure erase
to enable it by selecting "Enable" from the options (under that drive) and press as
shown below.
11Super Secure Erase for the X11/X12/B11/B12 Motherboards User's Guide
Use the arrow keys to select the desired Security Function from the pop-up menu and press
to confirm your selection. The options are Disable, Get Password, Security Erase -
Password, and Security Erase - Without Password.
In this illustration, we want to demonstrate how to perform a secure erase from a drive
without a password installed previously, so the option: "Security Erase - Without Password"
is selected. After selecting this option, press to enable secure erase support on the
selected drive.
12Chapter 2: Configuring Secure Erase Settings in the BIOS
Press to invoke the dialogue box as shown below. Select and press to
save the setting and reboot the system which will allow the configuration you have just set
up to take effect.
The system will be booted into "Security Erase" mode with the secure erase feature enabled
on the selected drive of you've selected.
13Super Secure Erase for the X11/X12/B11/B12 Motherboards User's Guide
After the secure erase process is complete, the system will continue to boot.
2.2 Apply the Password to the Target Drive
Press upon system boot to enter the BIOS Setup utility. After entering the BIOS setup
utility, use the arrow keys to select the Security tab on the top of the menu bar and press
to invoke the Security menu as shown below. From the Security menu, select the
"SMCI Security Erase Configuration" submenu and press to invoke the submenu.
14Chapter 2: Configuring Secure Erase Settings in the BIOS
To select the drive that has a password pre-installed for secure erase, use the arrow keys
to select its Security Function option and press to invoke the Security Function
submenu.
Use the arrow keys to select "Set Password" from the pop-up options menu as shown below
and press to invoke the password input dialogue box as shown below.
15Super Secure Erase for the X11/X12/B11/B12 Motherboards User's Guide
Enter the desired password in the password pop-up box as shown below for the selected
drive and press .
Press to invoke the dialogue box as shown below, and select and press
to save the setting and reboot the system.
16Chapter 2: Configuring Secure Erase Settings in the BIOS
The system will ask for a password during the boot process. Enter your password that you've
just set up to apply it to your selected drive.
After the password has been successfully entered and applied, the selected drive will be
shown as "INSTALLED" indicating that a password has been installed to the selected drive.
17Super Secure Erase for the X11/X12/B11/B12 Motherboards User's Guide
2.3 Secure Erase in the Drive with a Password Pre-installed
Press upon system boot to enter the BIOS Setup utility. After entering the BIOS setup
utility, use the arrow keys to select the Security tab on the top of the menu bar and press
to invoke the Security menu as shown below. From the Security menu, select the
"SMCI Security Erase Configuration" submenu and press to invoke the submenu.
To select the drive that needs to be erased, use the arrow keys to select its Security Function
option and press to invoke the Security Function submenu.
18Chapter 2: Configuring Secure Erase Settings in the BIOS
Use the arrow keys to select the desired Security Function. In this illustration, we want to
erase the drive that has a password previously installed, so we select the option: "Security
Erase - Password" and press .
Enter the correct password for the selected drive on the Password pop-up box and press
to securely erase data from the drive.
19Super Secure Erase for the X11/X12/B11/B12 Motherboards User's Guide
Press to invoke the dialogue box as shown below, and select and press
to save the new setting and reboot the system.
The system will be booted into "secure erase" mode with the "drive erase" command executed
on the drive you've selected.
20Chapter 2: Configuring Secure Erase Settings in the BIOS
After the "secure erase" process is complete, the system will continue to boot.
21You can also read