HOWTO AVIRA EXCHANGE SECURITY VERSION 12
←
→
Page content transcription
If your browser does not render page correctly, please read the page content below
Avira Exchange Security
Version 12

HowTo
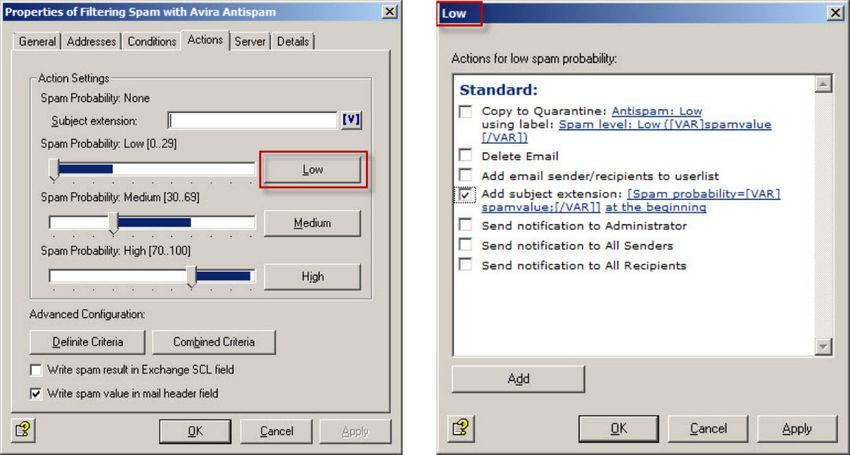
Table of contents

1. General information.............................................................................. 3

2. System requirements............................................................................. 3

3. Installation of Avira Exchange Security..............................................4

4. Licensing ................................................................................................. 5

5. Configuration of Email Filters..............................................................6
    5.1 Creation of new Email Filters....................................................................... 6
    5.2 Configuration of the Email Filter ............................................................. 8

6. Information Store Jobs.........................................................................12
     6.1 Activation of the “Informations Store Scan“...................................... 12
     6.2 Manually start of the “Informations Store Scan“.............................13

7. Exchange Quarantine...........................................................................13
    7.1 Default Quarantines.......................................................................................13
    7.2 Summary Reports............................................................................................15

8. Update settings.....................................................................................17
    8.1 Update via Proxy Server................................................................................17

9. Job recommendations ......................................................................................................................... 19
     9.1 Remove addition in subject........................................................................ 19
     9.2 Block unwanted attachments..................................................................20
     9.3 Advanced Spam Filtering with separate Quarantines................... 21
     9.4 Add recipient automatically to the Whitelist....................................22
     9.5 Password protected archives....................................................................23

Avira Exchange Security 12 (Status: Jan 16, 2014)                                                                                                2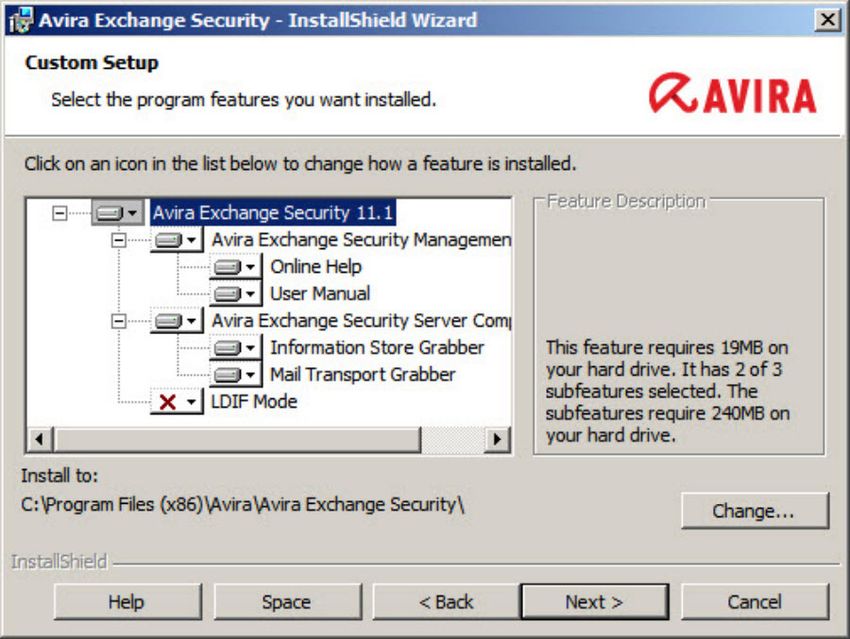
1. General information
The necessary package for the installation and all manuals as pdf-files are available for down-
loead on our Avira website.

    Note
    Because the Avira support for the Windows operating system Server 2003 has expired on
    14.07.2013, the Avira Exchange Sercurity version 12 does not officially support Server 2003
    anymore.

2. System requirements
The minimum system requirements must be met prior to any installation of “Avira Security
Exchange“.

•    Operating systems
     ∧∧ Windows Server 2008 (including latest service packs and patches)
     ∧∧ Windows Server 2008 R2 (including latest service packs and patches)
     ∧∧ Windows Server 2012 (including latest service packs and patches)

•    MS Exchange Server
     ∧∧ MS Exchange Server 2007 SP1 Update Rollup 4 (64-bit) (or higher, i.e. SP2/ SP3 inclu
        			                      ding latest Update Rollups)
     ∧∧ MS Exchange Server 2010 (64-bit) (or higher, i.e. SP1/ SP2 including all Rollups up-to-
        			                      date)
     ∧∧ MS Exchange Server 2013 (64-bit)

•    RAM
     ∧∧ Exchange recommended + additional 64 MB

•    HDD
     ∧∧ At least 400 MB for the installation

•    Other
     ∧∧ CD-ROM drive or network access
     ∧∧ Microsoft .NET Framework 3.5 plus 4.0 .NET Framework Client Profile
     ∧∧ 100 MB for event logging recommended
     ∧∧ Internet access for engine updates
     ∧∧ User access rights: Active Directory user with full reading access to the Active
        Directory

Avira Exchange Security 12 (Status: Jan 16, 2014)                                                 3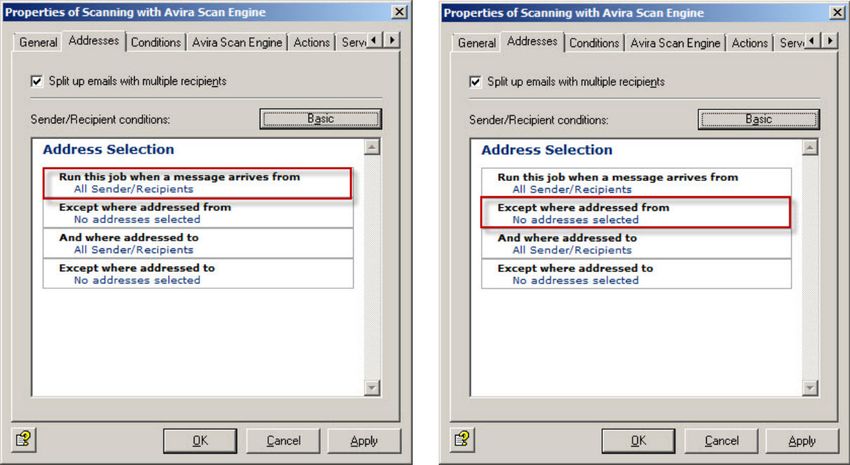
•    Operating systems for Avira Exchange Management Console
     ∧∧ Windows Server 2008
     ∧∧ Windows Server 2008 R2
     ∧∧ Windows Server 2012
     ∧∧ Windows XP Professional
     ∧∧ Windows Vista
     ∧∧ Windows 7
     ∧∧ Windows 8

3. Installation of Avira Exchange Security
After downloading the installation package for Avira Exchange Security, please start the
installation on your “Microsoft Exchange Mailserver“. During the installation a window will be
displayed which allows you to choose the components you need to install. Please make sure
that the management console as well as the server components are selected.

After selecting the features for the installation, you are prompted for an existing configura-
tion. This issue is only of interest, if you already have a previous Avira Exchange installation,
which should be replaced now.

You can select between three different possibilities:

•    Create local configuration
     Select this item if there is no previous configuration, if this is an initial installation

•    Use existing configuration
     Here can be specified when reinstalling, whether the previous stored configuration should
     be maintained during a reinstallation. Therefore, the file configdata.xml has to be saved
     into the installation directory of Avira Exchange Security

Avira Exchange Security 12 (Status: Jan 16, 2014)                                                   4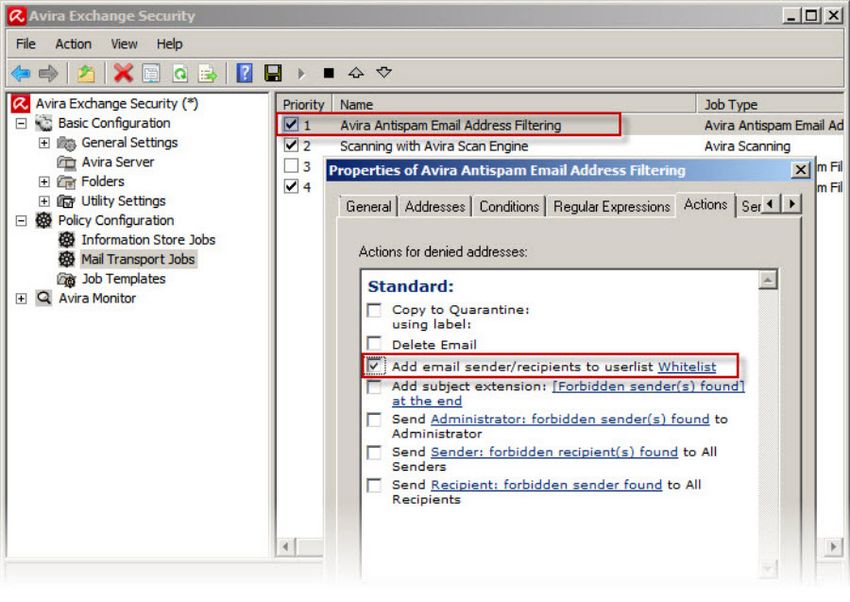
•    Specify path to configuration manually
     If the configuration should be located in a different directory, you have the possibility to
     specify the path here

    Note
    The specified directory path cannot be changed afterwards!

In the next steps, you are prompted to configure certain administrative presettings. These
include the Email address of the responsible administrator and a possibly existing proxy server
for the internet update.

These settings will be stored during the installation in the savapi.ini file, where they can be
adjusted manually afterwards

4. Licensing
During installation, the license file will be be queried and properly integrated. For a subse-
quent change of license, please proceed as follows:

•    Copy the file HBEDV.key, which you have received via Email into the installation directory
     of Avira Exchange Security. There is already a directory named “license” into which the file
     has to be saved. The directory “license” contains already a file named oem.lic, which has to
     remain there

•    After copying the license file into the corresponding directory, a restart of the service “Avi-
     ra Exchange Security Control” is necessary. During the restart, you receive a hint that the
     service “Avira Exchange Security” has to be rebooted as well. Please confirm with Yes

Avira Exchange Security 12 (Status: Jan 16, 2014)                                                   5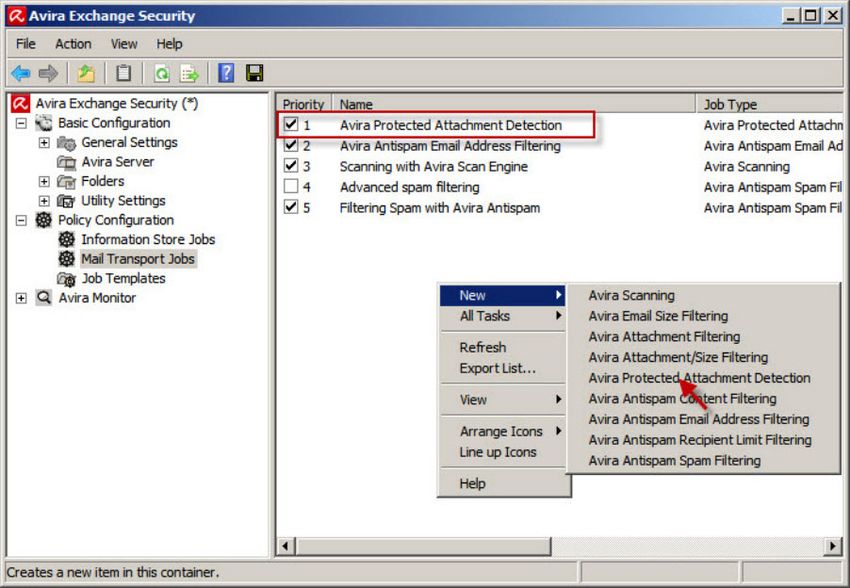
In order to check if the license file has been entered properly, start the “Avira Exchange Ma-
nagement Console“ and open the menu “Avira Monitor“. Open the properties of the server in
the following window in order to check the license information:

Here you can see your license information. The values “Mode: FULL“ and “State: VALID“ show
that the license has been installed properly and that it is valid. If this is not the case, check via
the text file lic_info.txt, if you have used the correct license file.

If necessary, please contact the Avira support and send the license file for scrutiny.

5. Configuration of Email Filters

5.1 Creation of new Email Filters
Directly after the installation the product is already preconfigured. Incoming Emails will alrea-
dy be checked for viruses and moved into quarantine in case of a virus detection. In order to
extend the Email filtering and integrate new jobs, you can use the predefined job templates.

You will find preconfigured jobs which extend the already activated virus scanner with spam
filtering or a content / attachment filter.

Avira Exchange Security 12 (Status: Jan 16, 2014)                                                       6
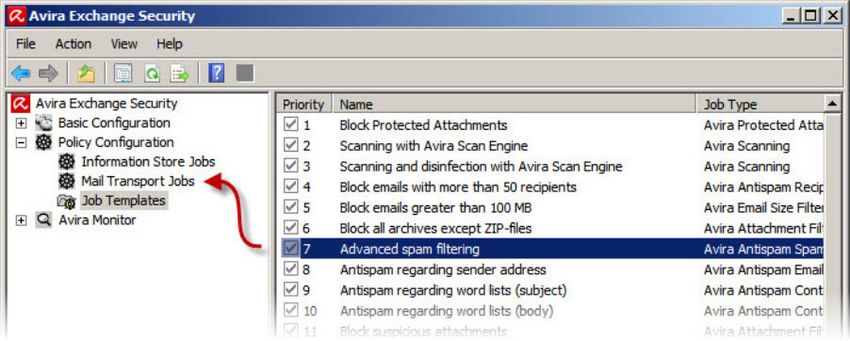
In order to activate a filter job of your choice, simply “drag & drop“ it into the “Mail Transport
Jobs”. There, it can be enabled and configured.

    Note
    If you are not sure which filter to choose, we recommend the “Advanced spam filtering”
    job. This job includes already several filtering methods and provides therefore a good
    detection rate.

Other jobs filter the content of Emails based on fingerprints. A so called Fingerprint is the pat-
tern of the respective file. These patterns are classified by the file extension or its binary code.

e.g.: Basic Configuration > Utility Settings > Fingerprints > Images

Single fingerprints are summarized in groups. The “Images”-group for example contains a mul-
tiplicity of known file extensions and patterns. Such a fingerprint group (e.g. Images) is now
being assigned to a job. This job filters Emails and checks if it contains such a fingerprint.

•    Block image files
     This job accesses the fingerprint group “Images“, where it gets the information what an
     image file is and how to recognize it.

•    Block video files
     It is the same principle as before. The difference is the group and so the patterns. Accessed
     group: “Video“.

•    Block archive, except ZIP-files
     This job accesses the fingerprint group ”Archive“. But the fingerprint “ZIP Archive“ is set as
     an exception in the properties of this job.

Avira Exchange Security 12 (Status: Jan 16, 2014)                                                     7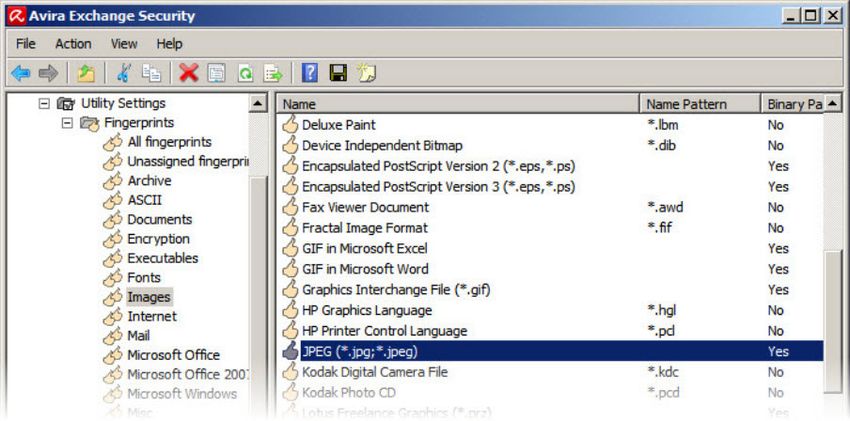
5.2 Configuration of the Email Filter
Considering that most filters are already preconfigured, an adjustment is not mandatory. If you
should not use these default settings, the filters can be individually customized. In order to
open the properties for the configuration, you may double-click on the desired job.

    Note
    The addition [Avira checked], which appears in the subject of an Email, is added by the
    job “Scanning with Avira Scan Engine”. If you do not want this addition, you can remove it
    via the properties of the job.

Every new job is deactivated by default. In order to activate it, please change the settings in
the tab “General” to “Enabled: Yes”.

By default, each job will be applied for all incoming and outgoing Emails. In order to change
this and optionally to use black- / whitelists, please switch to the tab “Addresses”.

Avira Exchange Security 12 (Status: Jan 16, 2014)                                                 8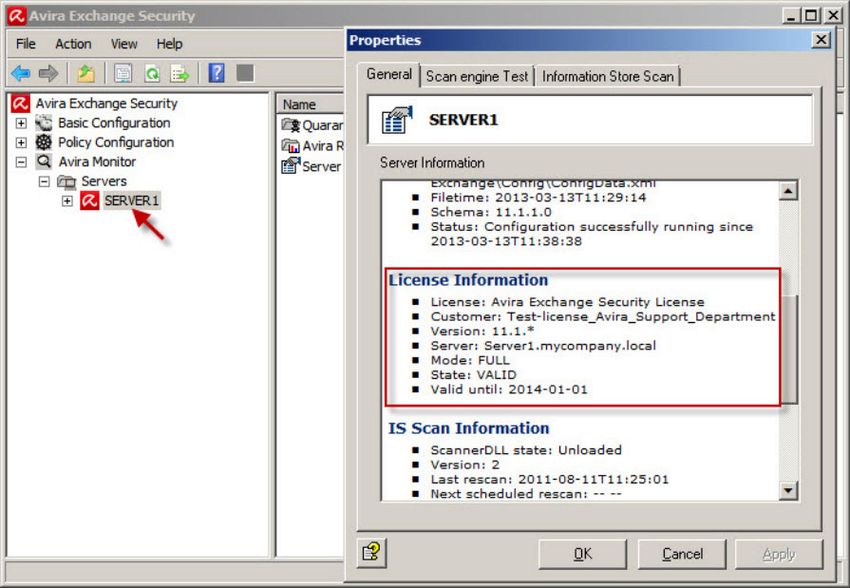
Via the menu item Advanced, the view of the window will change and you have the possibility
to enter addresses/address lists as exceptions.

 Every Email from external or to You can add own addresses or
 external will be checked by this address lists which are excepted
 job.                             from the job. (e. g. whitelists)

As already displayed in the screenshot, the addresses can be adjusted. You can add an address
list via a simple mouse-click on “No addresses selected” in the menu “Except where addressed
from”.

All senders that are stored in this address list will be excepted from this job. This means, the
Emails will be sent to the recipient in each case.

Avira Exchange Security 12 (Status: Jan 16, 2014)                                                  9
If you decide to use one of the stored lists, an adjustment might be necessary.

This adjustment can be done subsequently via the program menu Basic Configuration > Gene-
ral Settings > Address lists > Antispam: Whitelist.

To determine what should be done in case of a classification as spam/virus, you have to cus-
tomize the settings in the “Actions“. (Policy Configuration > Mail Transport Jobs). Here you have
various possibilities, depending on the spam probability.

Every job has to be configured separately via the tab “Actions”. Modifications take effect only
for the particular adjusted job.

Avira Exchange Security 12 (Status: Jan 16, 2014)                                                 10
After the configuration is complete, confirm this with a click on OKand then save the changes
in Avira Security Exchange, by clicking on the floppy disk icon.
Note
Without saving the performed modification, the changes will not be applied and are
therefore ineffective. This concerns all alterations in the program.
• Definite no-spam criteria (Whitelist)
Addresses of all known senders who are always permitted and who definitively do not
send spam. In principle, these are all regular communication partners and the domains of
customers and suppliers. The more complete this list, is the less the system will have to
carry out unnecessary checks
• Definite spam criteria (Blacklist)
Addresses from all senders who are always identified as spam senders. The default confi-
guration already contains a list of known addresses. You can define additional addresses of
your own
• Combined Criteria
The combined criteria will be applied only if the definite criteria were not applicable. For
spam detection via combined criteria, multiple analysis (criteria matching) are performed
in parallel. Subsequently, after the analysis of the Email all criteria are offset against each
other.
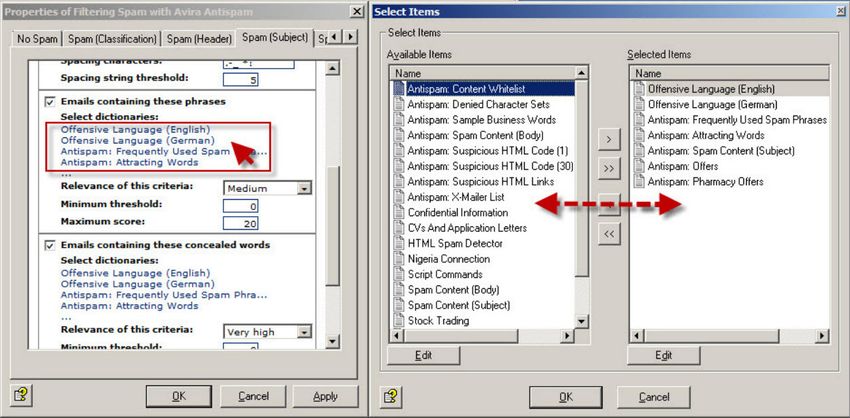
In addition, a word list recognition for the subject line and the message text is used. The
word lists are static and are not automatically updated. However, the word lists can be
adjusted manually.
(Policy Configuration > Mail Transport Jobs > Filtering Spam with Avira Antispam > Properties >
Actions > Combined Criteria > Spam[Subject])
Avira Exchange Security 12 (Status: Jan 16, 2014) 116. Information Store Jobs
In addition to the virus scanning at the transport level (Email traffic), Avira Exchange Security
is also able to verify the data within the public or private information store of the MS Ex-
change (including drafts).
Thus, the “Information Store Scan“ is a server setting, for each server is only one information
storage scan job available.
Basically, this filter is disabled by default, but can be activated on request.
Note
After enabling or disabling the “Information Store Scan Job“, it may take up to two
minutes before the modification takes effect in the Exchange Store.
6.1 Activation of the “Informations Store Scan“
To activate the “Informations Store Scan“ go to the following menu item: Avira Exchange
Security > Policy Configuration> Information Store Jobs > Double click Information Store Scan on
“server“.
Activate via the tab “General“ the “Information Store Scan“. Using the drop-down menu, you
can select which of the three information stores should be checked (Private Information Store
/ Public Store / Private and Public Information Store).
Additionally, you have the option to perform a scan in real time or time-controlled. When
selecting a scheduled virus scanning, you can determine time periods for virus scanning.
By using the tabs “Options“, “Avira Scan Engine“, “Actions“ and “Details“, further configurations
may be applied. Confirm all configurations with a click on Apply and OK.
Avira Exchange Security 12 (Status: Jan 16, 2014) 126.2 Manually start of the “Informations Store Scan“
With a start of the “Information Store Scan“ all the elements within the information store will
be rescanned again. Consequently, the search will be time and resource intensive. Therefore, it
is recommended to perform a manual scan of the “Information Store Scan“ in off-peak times.
A manually start of the “Information Store Scan“ can be performed via the menu Avira
Exchange Security > Avira Monitor > Server > right-click on „Server Name“ > Properties > Informati-
on Store Scan > Rescan now.
7. Exchange Quarantine
7.1 Default Quarantines
Avira Exchange Security has a central quarantine available, which can be displayed via the
menu Avira Monitor > Server > “Your server“ > Quarantine Areas.
After the product installation, the most important quarantines are predefined by default. A
spam filter checks all incoming Emails for viruses and moves them to defined quarantines in
case of a detection.
The following quarantines are available in addition to the familiar quarantines, e.g. “Default
Quarantine“ and “Infected Mails“.
• Information Store Quarantine
This is the quarantine for Information Store policy restrictions. This quarantine contains
Information Store documents. Normally, these documents will be Email attachments or
Exchange Public Folder documents. Depending on your Information Store policy configura-
tion, the documents contain:
∧∧ a virus (unwanted program)
∧∧ or those that failed to be checked by the Avira Scan Engine
• Antispam: Low
This quarantine keeps the Emails of the last days with low spam probability. Check these
Emails from time to time, and if required, adjust the spam filter settings accordingly. To
improve the classification results, add all spam senders to the “Antispam: Blacklist“
• Antispam: Medium
The „Medium“ quarantine covers the range of “uncertain“ Spam/NoSpam classification.
Check these Emails regularly for misclassified NoSpam Emails (“false positives“), or activate
the User Accessible Quarantine features for this quarantine to allow the recipients check
their Emails themselves.
Avira Exchange Security 12 (Status: Jan 16, 2014) 13To keep the rate of Emails in the “Medium“ spam probability as small as possible, you
might use the e-mails to improve your spam filter settings, e.g.
∧∧ add the sender of newsletter Emails you want to receive to the Antispam Whitelist
address lists
∧∧ add the sender of newsletter Emails you want to block to the Antispam Blacklist
address lists
• Antispam: High
This Antispam quarantine keeps Emails of the last days with high spam probability
In case another quarantine is needed, you can create it in the sector Basic Configuration >
Folders > Quarantines.
Please take into consideration that the predefined quarantines were already assigned to each
individual job and that further adjustments might be necessary.
In order to use your new quarantine, it has to be saved into the chosen job in the tab
“Action”.
Avira Exchange Security 12 (Status: Jan 16, 2014) 147.2 Summary Reports
The “Summary Report“ notifies the recipients or groups regarding the Emails that have been
quarantined. Any required supplementary information of a message can be configured within
the “Summary Report“.
In order to use the “Summary Report“ function, please proceed as follows:
• First enable the quarantine access: Basic Configuration > General Settings > Avira Server >
double-click on“server name” > Quarantine Access > Allow users to request quarantined items
by HTTP
• Then, please go to: Basic Configuration > Folders > Quarantines.There, you open the pro-
perties of the chosen job by double-clicking on it. Then, click on Add in the tab “Summary
Reports”
In the properties of the summary report, you can define who should receive this message. In
addition, you define a name and the contents here.
Avira Exchange Security 12 (Status: Jan 16, 2014) 15In the tab “Summary Fields”, you define which possibilities the recipient should have.
Note
As the quarantine access was set to HTTP, only a HTTP access is possible here. In case the
Email access should be used, this has to be activated also in the quarantine access.
Once the possible actions are defined, it is left to configure the schedule time, which defines
when the summary reports should be sent. The point “Add to user white- / blacklist” in the re-
gister “Summary Fields” refers to separate address lists and not to the lists in the sector Basic
Configuration > General settings > Address lists.
Avira Exchange Security 12 (Status: Jan 16, 2014) 168. Update settings
Since version 8, the update settings can be configured within the Avira Exchange Management
Console.
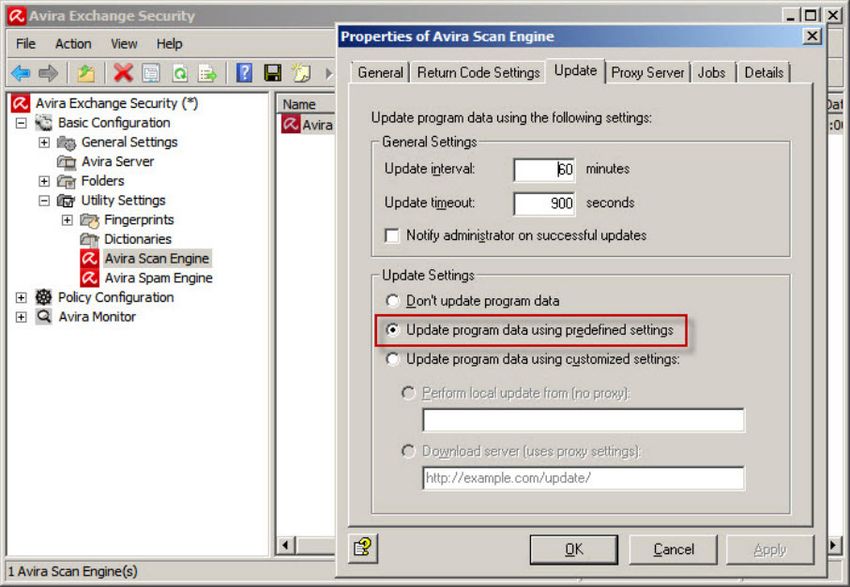
Navigate to Basic Configuration > Utility Settings. Open the properties of Avira Scan Engine
(virus signatures) and accordingly Avira Spam Engine (AntiSpam signatures). In the Tab “Up-
date“ the option “Update program data using predefined settings“ is preselected. This designa-
tes the Avira update servers in the Internet.
It is also possible to choose your own update server or to disable the update completely
(which is not recommended).
All relevant logfiles can be found in the following directories:
• Avira Spam Engine:
C:\Program Files (x86)\Avira\Avira Exchange Security\Bin\SPACE\Update\avupdate.log
• Avira Scan Engine:
C:\Program Files (x86)\Avira\Avira Exchange Security\Bin\Savapi\Update\avupdate.log
8.1 Update via Proxy Server
It is also possible to configure your proxy via the Avira Exchange Management Console.
The necessary configuration must be done in different places. First, you have to specify one or
more proxy servers. Navigate to the Basic Configuration > General Settings > Proxy Server and
create a new entry.
Avira Exchange Security 12 (Status: Jan 16, 2014) 17Within the properties, enter the DNS-name or IP-address as well as the port and possibly the user name and password. This server must be selected in the properties of your Server under Basic Configuration > Avira Server > Tab “Proxy Server“ Thus, you have defined a global proxy server, which will be recorded by default in the following modules: • Avira Scan Engine • Avira Spam Engine These modules can be found under Basic Configuration > Utility Settings. Open the properties of the according module and make sure that the option “Proxy server of AntiVir Server” is selected in the proxy tab. Avira Exchange Security 12 (Status: Jan 16, 2014) 18
Note
    It is possible to configure multiple proxy servers and to assign a different server to each
    module. In this case, select the option “Custom proxy sever” and choose the concerning
    server from the list.

9. Job recommendations

9.1 Remove Addition in subject
In the default configuration, Avira Exchange Security adds the subject [Avira checked] in each
Email.

To turn the Subject extension on or off, each job has to be configured separately (Policy Confi-
guration > Mail Transport Jobs > Scanning with Avira Scan Engine > General > Subject extension).

Open the properties of each job and verify in the tab “General“ if the addition is set.

Avira Exchange Security 12 (Status: Jan 16, 2014)                                                 19
9.2 Block unwanted attachments In order to block certain unwanted file attachments, Avira Exchange Security offers some pre- configured “Job Templates“. These are referred in the column “Job Type“ as “Avira Attachment Filtering”. Therefore, you can either use those pre-configured jobs and add criterias accordin- gly, or simply create a new job. The detection based on fingerprints is the best way to block unwanted attachments. Navigate to thePolicy Configuration > Mail-Transport-Jobsand create a new job, in this case “Avira Attachment Filtering”. Open the properties of this job and configure conditions and/or exceptions in the tab “Fingerprints“. Fingerprints can be blocked here (even an entire fingerprint group, e.g. image files). Additionally, exceptions can be set for certain fingerprints (e.g. all image files except JPEG). Avira Exchange Security 12 (Status: Jan 16, 2014) 20
If you want to notify the sender about blocked attachments, activate the option “Send Sender:
forbidden attachment found to All Senders”.

It is recommendable that the administrator does not receive an Email each time an attach-
ment is blocked. Disable the option according to your requirements.

9.3 Advanced Spam Filtering with separate Quarantines

    Note
    Please note, that the following job proposal (Advanced spam filtering) is included and
    activated by default in Avira Exchange Security.

With the job “Advanced spam filtering”, the detected spam can be divided into three catego-
ries. Navigate therefore to: Basic Configuration > Folders > Quarantine.

•    Antispam: High
•    Antispam: Low
•    Antispam: Medium

A separate quarantine folder can be selected for each category for incoming Emails and may
thus be stored in different quarantine folders.

After that, the job “Advanced spam filtering“ under “Mail Transport Jobs“ must be configured
accordingly. The previously created quarantines must be defined in the properties of this job
within the tab “Actions“.

Avira Exchange Security 12 (Status: Jan 16, 2014)                                               21
Now, configure each category (in the example High) and select the appropriate quarantine
folder:
Repeat this process for the category Medium and Low.
9.4 Add recipient automatically to the Whitelist
You can add a recipient automatically to the whitelist in the following way:
• Create a new job under “Mail Transport Jobs”: „Avira Antispam Email Address Filtering“
• Navigate to the tab “Actions” and set the check mark *only* on “Add Email sender/ recipi-
ents to userlist Whitelist” (like shown in the screenshot below)
• Move the job in “Mail Transport Jobs“ to the first place (right mouse-click on Avira Anti-
spam Email Address Filtering > All tasks > To the top)
Avira Exchange Security 12 (Status: Jan 16, 2014) 22Now, every following Anti-spam job must be configured like this, so that the job will be igno- red if the sender is listed in the Whitelist. • Open the properties of the corresponding job and navigate to the tab “Conditions” • Add a new condition: “…sender is *not* in the user list ‘Whitelist’” After you have saved the configuration, all recipients will be added automatically to the Whi- telist and ignored by the following Antispam jobs. 9.5 Password protected archives All password protected archives will be blocked by default. However, a new job exists since version 8: “Avira Protected Attachment Detection“. As this job is not activated by default, you have to enable it first. Configure the mentioned job under “Mail Transport Jobs” and move it to the first place. Avira Exchange Security 12 (Status: Jan 16, 2014) 23
Now, you can configure the job and define how an Email is processed after password protec-
ted files have been detected. Open the properties of the job and navigate to the tab “Actions”.
Please do not forget to save the configuration to activate the changes you made.

Avira Exchange Security 12 (Status: Jan 16, 2014)                                             24
This manual was created with great care. However, errors in design
and contents cannot be excluded. The reproduction of this publication
or parts thereof in any form is prohibited without previous written
consent from Avira Operations GmbH & Co. KG.

Issued Q1-2014

Brand and product names are trademarks or registered trademarks of
their respective owners. Protected trademarks are not marked as such
in this manual. However, this does not mean that they may be used freely.

© 2014 Avira Operations GmbH & Co. KG. All rights reserved.
Errors and omissions excepted.

Avira Operations GmbH & Co. KG
Kaplaneiweg 1
88069 Tettnang
Germany

Telephone: +49 7542-500 0
Facsimile: +49 7542-500 3000
www.avira.com
You can also read