Simulating Learning Environments in Virtual Reality - Minja Silvennoinen - Theseus
←
→
Page content transcription
If your browser does not render page correctly, please read the page content below
Minja Silvennoinen

Simulating Learning Environments
in Virtual Reality

Metropolia University of Applied Sciences
Master of Engineering
Information Technology
Master’s Thesis
7 February 2022
PREFACE

I have been working with Augmented Reality and Virtual Reality technologies as a
software developer in a consultancy company for few years. I wanted my thesis to be
about something that I am enthusiastic about and that could be benefited in my work.
I’m happy I had a possibility to work on something meaningful and learn even more
about the subject!

The project itself was very interesting for me, because often when we are building quick
prototypes, it is not possible (or useful) to spend that much time on designing the
architecture. The goal has often been to just get a working prototype as quickly as
possible.

During this project I was able to spend couple months developing a system which will
save us time in later projects, and it will hopefully also make them better structured and
easier to read even after a while has passed.

It has been few years since I was writing my bachelor’s thesis, and it was nice to see
how much I have progressed during this time. Writing the thesis was also easier, and
I wrote a lot alongside the project work. Any time I had developed a feature to the
project, I also wrote notes about what I had done. I had heard from many people how
the master’s thesis could become a larger obstacle than it really is, so I decided to just
do it, and three months after choosing the topic the work finally is done.

Helsinki, 7 February 2022
Minja Silvennoinen
Abstract

Author:                     Minja Silvennoinen
Title:                      Simulating Learning Environments in Virtual Reality
Number of Pages:            42 pages
Date:                       7 February 2022

Degree:                     Master of Engineering
Degree Programme:           Information Technology
Professional Major:         Networking and Services
Supervisors:                Ville Jääskeläinen, Principal Lecturer

The purpose of the thesis was to create a proof-of-concept application that can be used
as an example of how Virtual Reality (VR) technology can be utilized for training. The
importance of this project is emphasized by the social distancing and travel bans
caused by the global Covid-19 pandemic. Training the use of machinery must be done
regularly and the training can be held using VR even if it would not be possible to
physically go to the training place.

The scope of this project included an example solution to teach a short introduction to
the operation of one machine. The application contains a training with couple of steps
for the user to go through and a summary of the learned skills in the end. The proof-
of-concept application works as a base project for this type of training and the
simulation can easily be switched to be about a different vehicle that can be used as
an example that matches the possible client’s context better.

The proof-of-concept application was successfully developed, and it can be used as a
base for virtual reality training projects. However, the importance of using a suitable
3D model was noticed during the creation of the application as well as the usefulness
of a proper design.

Keywords:                   Virtual Reality, training, simulation
Contents

List of Abbreviations

1   Introduction                                             1

    1.1 Case Company                                         1
    1.2 Business Challenge and Objective                     1
    1.3 Structure of Thesis                                  2

2   Virtual Reality Technology                               4

    2.1 Definition and History of Technology                 4
    2.2 Possibilities and Practical Use                      7
    2.3 Industry and Companies                               10

3   Planning Phase                                           13

    3.1 Project Specifications                               13
    3.2 Designing Simulation Software                        14
         3.2.1 Guidelines for Visual and Experience Design   14
         3.2.2 Planning Training Game Flow                   15
    3.3 Architecture and Unity Guidelines                    17

4   Implementation Phase                                     21

    4.1 Base Project Creation                                21
         4.1.1 Unity Game Project Creation                   21
         4.1.2 Adding Oculus Quest features                  22
    4.2 Creating Simulation Application                      23
         4.2.1 Environment and Basic Controls                24
         4.2.2 Game Flow                                     27
         4.2.3 User Interface                                31

5   Results and Value of Product                             35

    5.1 Analysis of Software                                 35
    5.2 Future Use and Additional Features                   35

6   Conclusion                                               37

References                                                   38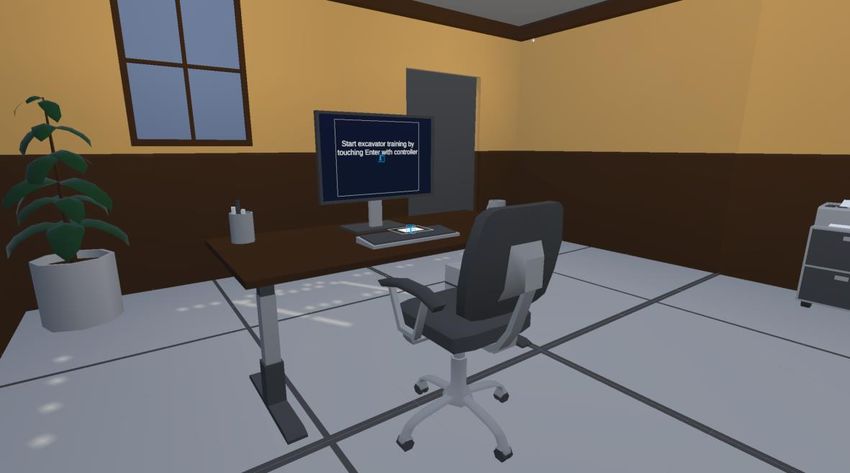
List of Abbreviations

AR       Augmented Reality
ASTC     Adaptable Scalable Texture Compression
HMD      Head-Mounted Device
LTS      Long Time Support
SDF      Signed Distance Field
SDK      Software Development Kit
UI       User Interface
VR       Virtual Reality

1

1 Introduction

The purpose of this thesis was to create a proof-of-concept application that can
be used as an example of how Virtual Reality (VR) technology can be utilized for
training. The importance of the project is emphasized by the social distancing and
travel bans caused by the global Covid-19 pandemic. Training the use of
machinery must be done regularly and the training can be held using virtual reality
even if it would not be possible to physically go to the training place.

1.1 Case Company

Futurice is a digital engineering and consultancy company found in 2000. The
company is originally from Finland, but nowadays it has in total seven offices in
Finland, Sweden, and Germany.

Futurice offers help to the clients for example in cloud and data platforms, design,
software development and artificial intelligence. Futurice has five subsidiaries
that broaden the offering to include intelligent automation at Aito.ai, digital sales
consultation at Columbia Road, Microsoft specialized consultation at Meltlake,
data engineering for business data at Recordly and tech talent agency at Thriv.

In addition to offering traditional software engineering help, Futurice is utilizing
new technologies and leveraging them to unlock growth potential for the client
organizations.

1.2 Business Challenge and Objective

To arrange training for operating industrial machinery can be expensive and time-
consuming. In some cases, a plant's operation must be stopped to arrange a
training, which means it can be held perhaps only once or twice a year. Today,
the machinery can even be physically located in a different country than the
people operating it.

2

The objective of this study is to develop a proof-of-concept Virtual Reality (VR)
application for a standalone head-mounted VR device to demonstrate how VR
can be used in this type of training.

The scope of this project includes an example solution to teach a short
introduction to the operation of one machine. The application will have a training
containing couple steps for the user to go through and a summary of the learned
skills in the end.

The proof-of-concept application will work as a base project for this type of
training and the simulation can easily be switched to be about different type of
machine which can be used as an example that matches the possible client’s
context better.

1.3 Structure of Thesis

This thesis has been divided into four main sections: theoretical background,
planning, implementation and results and value of product.

Theoretical background introduces the technologies used in the project. It
provides a brief history of virtual reality and presents the possible use cases of it
as well as introduces the companies of the field.

The next part concentrates on the proof-of-concept project plan. It explains the
goal of the project in more detail and goes through the steps for designing virtual
reality application. Furthermore, it presents the chosen architecture of the project.

Implementation section explains in detail how the project was executed. It first
explains how Unity project was created and how VR capabilities were added to
it. Then it presents how the training simulation was added in three parts: adding
the surrounding environment, the training flow, and the User Interface (UI).
3

The last main section concentrates on the results and value of the project. It
analyses the proof-of-concept application and lists the possible features that
could be added in the future.
4

2 Virtual Reality Technology

This section first introduces the definition and a brief history of virtual reality. It
then covers the possibilities and practical use of it and lastly there is an overview
of the companies currently manufacturing virtual reality headsets.

2.1 Definition and History of Technology

Virtual Reality (VR) can be described as an experience which represents an
alternative to reality by using many of our senses, such as sight, hearing, and
touch. [1] It is not a new concept as it dates to the late 1950s [2] though it was
not until 1980s when Jaron Lanier coined the term. [1]

In 1950s Morton Heilig developed the Sensorama, which was an arcade-style
cabinet that used stereoscopic 3D images, stereo speakers, fans, and a vibrating
chair for stimulating the senses of the user of the device. [2] It was meant to be a
movie-watching experience which immersed the viewers by cutting most of their
senses from the outside world. Even though Sensorama can be considered as
one of the first examples of immersive virtual reality devices, it can be argued that
stereo photographs are the technology that got us initially closer to the modern
idea of virtual reality. [1]

The idea of tricking brain into seeing in three-dimensions by putting two
photographs side by side with mirrors in an ocular device was developed already
in the 1830s by Charles Wheatstone. [1] He was the first person to analyze
binocular vision and made considerable contributions to optics. [3] This idea was
later improved by William Gruber, who invented the View-Master in the 1930s. It
was a device which used reels consisting of seven pairs of images for displaying
them in 3D. [4]
5

Figure 1. A picture of View-Master [4]

After the success of the Sensorama, Heilig also developed a device called
Telesphere Mask in 1950s. It was the first actual virtual reality headset, though it
did not have any motion tracking capabilities and was only meant for watching
movies. Shortly after Heilig, Philco Corporation released a headset called the
Headsight, which included motion tracking by utilizing a remote camera. [1]

First virtual reality headset connected to a computer was released in 1960s by
Ivan Sutherland. [1] He wrote an essay in 1965 where he introduced a concept
of a virtual world called “The Ultimate Display”. The world would consist of a room
and the subjects visible there could be controlled by a computer. Only three years
later Sutherland created a head-mounted virtual reality device called “The Sword
of Damocles” which was displaying stereoscopic images that were combined
using a computer program. [5] The device had to be hanged from the ceiling
because of its weight, but it could track the movement of the user’s head and it
displayed wireframe images in the direction the user was watching. [2]
6

Figure 2. A picture of the first head-mounted computer connected virtual reality
headset called "The Sword of Damocles". [6]

Twenty years later gaming companies, such as Nintendo and Sega, started the
development of their own virtual reality headsets in 1980s and early 1990s.
However, neither was able to succeed because of technical difficulties and the
high cost of the device. The first succeeded virtual reality headset is the Oculus
Rift which developer’s kit was released in 2013. [1]

Modern virtual reality headsets can be classified as standalone and tethered
types. Tethered headsets contain the needed sensors but require a separate
computer to do all the processing, whereas standalone headset contains all the
components required to work in virtual reality without needing any additional
external hardware. The advantages of a standalone headset include increased
mobility and easier set-up when beginning to use it. However, the device being
7

mobile means there is less processing power in the hardware which leads to
restrictions on which type of applications can be developed for the headset.
Tethered headsets are only limited by the computer which they are tethered into,
meaning the available processing power can be significantly greater compared
to standalone headsets. [7]

The reduction of cost and the technological steps forward have made it possible
for virtual reality to undergo rapid development and be available for consumers
and businesses. Nowadays virtual reality is used in many professional areas,
such as entertainment, education, manufacturing, and medicine. [7]

2.2 Possibilities and Practical Use

Rubio-Tamayo, Barrio and Francisco conducted a literature review with over 70
papers, books and chapters related to virtual reality. Some of the main practical
uses of virtual reality included education, simulation, art, and entertainment. [8]

There are many studies done about using virtual reality for education. The
technology has been used in various educational contexts within higher
education, such as science, math, and languages. Virtual reality could be used
for mastering new skills using for example simulations or serious games, which
are games mostly focusing on educating rather than being an entertainment. [9]

Research done by Baxter and Hainey for students undertaking technical studies
such as games development, computer animation and information technology,
provides an analysis of student views about the usage of virtual reality and if it
has potential to support teaching in higher education. 68% of participants strongly
agreed or agreed when asked if they believed using virtual reality would
strengthen their learning experience and 78,5% strongly agreed or agreed when
asking if they believed virtual reality would help teaching cognitive skills and
knowledge. [9]
8

A concrete example of how virtual reality can be used for teaching new skills was
done by Li Zhang and LiPeng Zhang. They conducted research about teaching
table tennis to university students by using virtual reality. They selected 20
participants from two parallel classes in table tennis elective course and divided
them to two groups where another utilized virtual reality, and another used
traditional methods for learning table tennis. After the course they competed
against each other in singles match, doubles match and team competitions. The
group trained using virtual reality won 80% of singles matches, 70% of doubles
matches and 90% of team competitions. [10]

Another study by Saab, Hegarty, Murphy and Landers for students undertaking
nurse education concluded that virtual reality was enhancing learning because
students were able to do the tasks themselves rather than just see or hear a
lecture. Furthermore, it gave the students more confidence by providing a safe
environment where they were able to learn by trial and error, which would not be
possible with real patients. Virtual reality could also support refreshing previously
acquired knowledge. The students were not necessarily able to repeat a task
again after practicing it once during their studies. [11]

Even though the questionnaires provide promising results, there were concerns
about the usage of technology among the answers. The students studying in
technical field were worried that the complex nature of virtual reality would require
great amount of training of the staff for them being able to properly teach the
students. The high cost of the devices makes them inaccessible for most students
and would require a high investment from institutions to acquire enough hardware
for teaching. Furthermore, they mentioned the possible health problems some
people experienced, such as eye strain and motion sickness. [9]

Similar concerns were raised by the nurse students. If there were not enough
devices for all students, some students might fall behind if they were able to go
through the teaching few days later after the lecture than others. Some of the
students also experienced motion sickness and dizziness. [11]
9

Other than education, virtual reality could be used for training employees in work
situations. For example, safety training is most often done by traditional methods
when teaching the employees to work in complex and technical environments. A
joint study by Stanford University, University of California-Berkeley and University
of Washington compared confidence and competency levels of employees who
had gone through traditional safety training and a training done in Augmented
Reality (AR) or Virtual Reality. The results suggest the interactive and immersive
training left the employees feeling more confident and more capable to handle
hazardous situations. [12]

Immersive experiences seem to be important also when trying to invent new ways
for people to access art. There has been a decrease in number of visitors in
museums and cultural institutions, especially in young people. Raya, Garcia-
Rueda, López-Fernández and Mayor created a virtual reality experience called
ImmersArt, where the user was able to explore two paintings: The Persistence of
Memory by Salvador Dali and The Garden of Earthly Delights by Hieronymous
Bosch. [13]

They made the artwork accessible in three different formats: an illustrated book,
an interactive audio-visual presentation and the ImmersArt VR experience. Next,
they asked three groups consisting of university students studying in various
fields to each access the work of art in one of the formats and asked them to
answer an anonymous questionnaire about the experience. The results indicated
the satisfaction with the experience and desire to repeat it was higher when using
virtual reality than other two formats. 90% of the students who experienced the
virtual reality work of art said they would like to see another artwork presented in
VR too. [13]

One recent example of using virtual reality for art is Radiohead’s Kid A Mnesia
Exhibition which was released in November 2021. It is a gamified and interactive
virtual art museum experience which features music and art from Radiohead’s
albums Kid A and Amnesiac. [14]
10

Not only gamified applications, but videogames itself are one concrete example
of how virtual reality can be utilized. Rubio-Tamayo, Barrio and Francisco noted
in their research that video game industry has found many possibilities to create
new game mechanics and narratives by using virtual reality and on the other hand
virtual reality is exploring the potential of gameplay factors to develop
applications. There exists a convergence between the influence of virtual reality
in videogames and vice versa. Virtual reality and immersive 3D environments
represent new ways to interact with them in ways that were not possible before.
[8]

2.3 Industry and Companies

There are various virtual reality manufacturers building both tethered and
standalone headset models. For example, companies making tethered models
include HTC, Valve, Varjo and Sony. [15-18] Some examples of standalone
headset manufacturers include HTC and Meta. [15,19]

At the time of writing, HTC has two lineups of tethered virtual reality headsets:
VIVE Pro and VIVE Cosmos. The first is meant for more demanding users or
enterprises who want a professional quality headset, whereas the second is more
approachable to consumers because of its lower price. [15]

Valve Index is a headset manufactured by Valve, which is a company that has
created digital content distribution channel Steam. Steam is mostly known for
being a platform for publishing games. [20] Valve is advertising Index as a
headset which is hardware agnostic, meaning it can run any virtual reality content
bought on Steam made for HTC VIVE, Oculus Rift or Windows Mixed Reality
headsets. [16]

Varjo’s vision is to be revolutionizing the advances in virtual reality. They are
manufacturing their headsets for professionals first, as their headsets are more
expensive, but ultimately for everyone. [21] At the time of writing, they have three
lineups of headsets: Varjo XR-3, Varjo VR-3 and Varjo Aero. [17] Varjo XR-3 is a
11

mixed reality headset, which means it contains a video pass-through allowing it
to be used also as an augmented reality headset. It allows virtual objects, which
can be seen through the headset, to be rendered in the real world. [22] Varjo VR-
3 and Varjo Aero can be used only for virtual reality. VR-3 is meant for enterprises
and Aero is available for individuals. [17]

Most of the tethered virtual reality headsets are connected to a computer, but
Sony has released a headset which is used with their PlayStation gaming
console. [18] The current headset was released already in 2016 but they are
developing a second version, which will be published later. [23,24]

Figure 3. A screenshot of Meta Quest virtual reality headset. [19]

Meta Quest is one of the standalone headsets available and it is one of the least
expensive ways to get into virtual reality. It was previously known as Oculus
Quest, but after Facebook rebranded to Meta, they switched the name of the
headset. [25] Along with the rebranding, Meta laid out their vision of metaverse,
which they want to be a successor to the mobile internet. Metaverse is meant to
be a digital platform which could accommodate different use cases, such as work
12

and entertainment, and it would allow people to be together no matter where in
the world they are located. Even though metaverse is still far away, Meta Quest
is one of the early parts of Meta’s vision of metaverse. [26]

HTC has also made two standalone virtual reality headsets: VIVE Focus 3 and
VIVE Flow. The first one is a powerful and premium headset meant for
professionals and enterprises, whereas Vive Flow is a compact and lightweight
headset powered by a phone it is connected to. It is mostly designed for
entertainment and wellness. [27,28]
13

3 Planning Phase

This section introduces the project specifications in more detail. This is followed
by the design phase of the project and lastly it covers the chosen architecture
and other technical details.

3.1 Project Specifications

The proof-of-concept application works as an example of how to use virtual reality
for training the operation of an industrial machine. The application trains the user
to operate one machine in couple predefined steps and it works as a base for
other similar training applications. Switching the example machine to another
should be as smooth as possible, therefore the project was created adaptivity in
mind.

The application consists of three main parts: main menu, instructions of how to
use the application, and the training simulation.

The main menu connects the experience together. It is the first view which is
loaded when the application is started, and it has options to start the training and
to quit the application.

Instructions of how to use the controllers are displayed when the training is
started from the main menu. It guides the user of how the simulation is meant to
be played. The instructions include teaching the player the needed inputs, such
as which button is used to go forward in the training or how the training can be
restarted.

Last part consists of the linear training game flow. It will guide the player to
execute couple predefined steps to learn how the machine is operated. The
application will display a summary of the training when all the steps have been
finished.
14

The most important aspect of the proof-of-concept application is modularity.
Every part of the tutorial, such as environment and trainings, should be easy to
replace when building a demo for another vehicle. The main application
components, such as a game manager, which controls the game flow, or a tutorial
manager, which makes sure all tutorial modules are started and finished, can be
utilized for possible new demo application.

3.2 Designing Simulation Software

This section first covers some guidelines for designing software for virtual reality
and then introduces the simulation game flow design.

3.2.1 Guidelines for Visual and Experience Design

Motion sickness, or cyber sickness as it is sometimes called, is one of the main
causes of discomfort when experiencing virtual reality. The frequently perceived
symptoms are headache, nausea, fatigue, disorientation, and general discomfort.
Some people are more sensitive to experience the symptoms than others. [29]
Advances in Head-Mounted Device (HMD) technology, such as wider field of
view, higher resolution, and better framerates, may have increased the
occurrence of motion sickness due to increased levels of immersion and realism
in virtual reality. [30]

Porcino, Rodrigues, Bernardini, Trevisan and Clue conducted research using
machine learning to identify causes of cyber sickness. They observed the
exposure time, acceleration and rotation are most likely the top factors
contributing to cyber sickness. Furthermore, rapid movement which is controlled
by the player was perceived leading to higher occurrence of symptoms. A game
using low complexity controls was better for non-experienced users. [29]

Another research done by Saredakis, Szpack, Birckhead, Keage, Rizzo and
Loetsher found that depending on the locomotion type, the symptoms of cyber
sickness were increased. Controller-based movement was displaying the highest
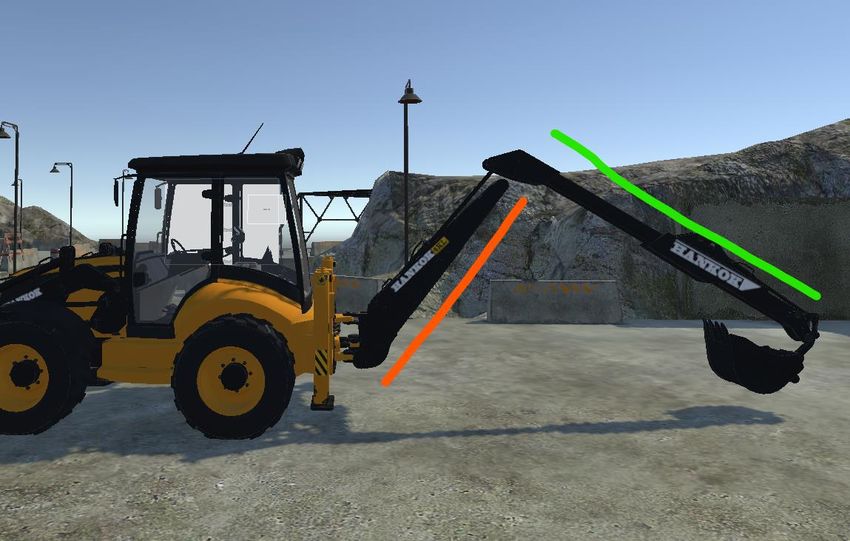
15

number of symptoms, whereas physical walking had been found to reduce the
occurrence of cyber sickness compared to controller-based navigation. [30]

There are best practices available for developers for creating virtual reality
applications. For example, Unity game engine has a tutorial series which help
designing virtual reality applications. They suggest the user tests should be done
to discover if the chosen locomotion is causing discomfort to the players.
Moreover, the same series touches upon other matters about virtual reality
development, such as how the UI differs from the traditional game development
or how the player should be taught to use the controllers. [31]

Another aspect to consider is if the headset should be tethered or standalone. As
mentioned in the chapter 2.1, there are advantages and disadvantages on both
systems, and it depends on the planned application which type suits better. The
proof-of-concept application in this thesis was created as a tool for sales,
therefore mobility was more important factor than having plenty of processing
power. This was the reason Oculus Quest was chosen to be the target platform
for development.

3.2.2 Planning Training Game Flow

The tutorial in the proof-of-concept was chosen to be about using an excavator,
because it is quite common machine to see in a streetscape and is probably
familiar to many people. The tutorial itself was not the most important aspect of
the project since the goal was to have a starting point for any type of tutorial
modules. This is the reason the excavator tutorial had only three modules
planned. It was enough to test if the modularity of the application works properly.
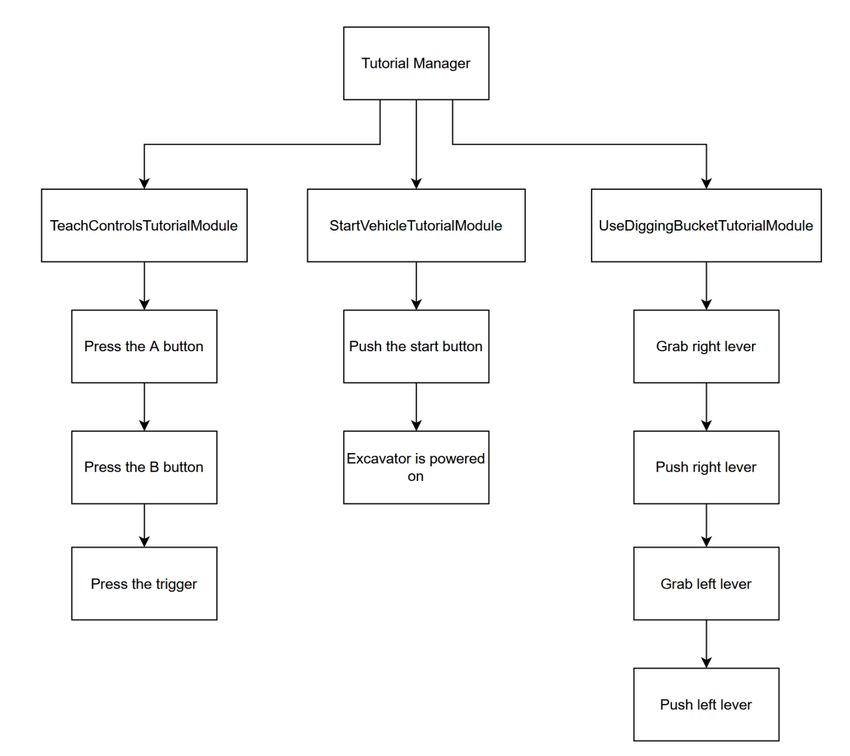
16

Figure 4. An image displaying the three modules planned for the tutorial.

As seen in the Figure 4, the first module is teaching how the virtual reality
controllers work in this particular tutorial. The way controllers are used might differ
depending on the tutorial, therefore the application should ensure the player
knows what to do. The module goes through all the needed buttons one by one
and asks the player to press each of the buttons in order. First button taught in
the module is A, which is used for going forward or starting the next step in tutorial
module. Next is B, which will restart the current module if the player wants to try
it again. The last needed button is trigger, which is used for interacting with the
tutorial objects.

The second module is teaching the user how the excavator is started. It is a small
module which does not require many interactions but is a logical first step after
17

teaching the controls. The player is asked to interact with the excavator start
button, which will then light a small LED indicating the excavator has been
powered on.

The last module is the most complex of the three. It teaches the player how to
use the digging bucket which is attached to the excavator arm. The player
interacts with two levers, which each rotates a part of the excavator arm. The
player is asked to rotate the excavator arms enough that they touch a sphere that
is visible in the environment.

3.3 Architecture and Unity Guidelines

Unity provides a large collection of learning material and best practises in various
forms such as their documentation, tutorials, and videos. Furthermore, they
organize a yearly event called Unity Unite where industry professionals are
invited to deliver a keynote speech about their expertise. [32]

Game development with Unity consists of three main blocks: GameObjects,
Components and Variables. Unity uses an object-oriented, GameObject-
Component concept, where each object in a game is a GameObject which
consists of various Components. Components define and control the
GameObject they have been attached to. Components contain Variables which
can be edited either using the Unity Editor or a script. [33]

A script is connected to Unity by implementing a class called MonoBehaviour.
When attached to a GameObject, it allows the object to use Awake, Start and
Update functions. Awake function is for initialization, and it is called before the
other two. Start is called before Update begins and both Awake and Start are only
called once at the beginning of the object’s lifecycle. Update is called continuously
because it handles the frame update. It can take care of the gameplay, such as
moving the GameObject, triggering actions or handling user inputs. [34]
18

Scenes are used for working with the content which is added in the application.
They are assets containing a specific part of the game, such as different levels
which all could have their own environments, characters, and UIs. [35] The
created GameObjects are put in the Scene Hierarchy, which displays every object
placed in the Scene, including Cameras and Lights. If a GameObject is removed
from the Scene, it will also be removed from the Hierarchy. [36]

Figure 5. Unity folder hierarchy

Figure 5 displays the folder hierarchy chosen for the project. The folders starting
with underscore are self-created folders and the ones without it are from
downloaded packages or libraries. _Data folder contains all the data which should
be kept constant. It has for example the dialogues used in the application and the
names of all referenced GameObjects. _Materials folder includes all the Unity
materials that have been created for the project, such as the material used in LED
light indicating if the excavator is turned off or on. _Models folder contains all the
downloaded 3D models which are used in the project.

_Prefabs folder includes the created Unity Prefabs, which are Unity’s way to allow
the GameObjects to be used as a reusable Asset. It acts as a template for
19

creating new instances of the Prefab in the Unity scene. [37] _Scenes folder
contains the two Unity scenes which were created for this project:
MainMenuScene and TutorialScene.

_Scripts folder includes few subfolders called Events, General and Tutorials.
These folders include all the created scripts. The folder was organized into
multiple smaller folders, making it easier to locate the needed script.

Oculus, TextMesh Pro, XR and XRI folders include the downloaded packages
needed in the project. Plugins and Resources are special Unity folders, which
have to be named correctly for them to work. Plugins include Android specific
files such as AndroidManifest.xml and Resources folder is for loading Assets on-
demand from a script instead of creating instances in a Scene. [38] The Oculus
package is using Resources for configurations and other settings.

The project was chosen to use Observer pattern, which is one of the most widely
used and know patterns. The pattern uses an observer, which will be notified by
a subject by triggering an event, when the subject’s state changes. It provides a
way for GameObjects to interact between each other without being coupled to
one another. [39]
20

Figure 6. An image of the Observer pattern used in the project.

As seen in Figure 6, a GameObject called GameManager is sending an
OnTutorialHasStarted event to TutorialManager, which will then start the first
tutorial module by sending an OnModuleHasStarted event. The tutorial module
will update the UI and listen to user inputs. After the module is finished, it will
send an OnModuleHasFinished event back to TutorialManager. After all the
modules have been finished, TutorialManager sends an OnTutorialHasFinished
event back to the GameManager, which will then quit the TutorialScene and
switch to the MainMenuScene.
21

4 Implementation Phase

This section explains how the Unity game project was created and how the
virtual reality capabilities were added to it. Then it covers how the training
simulation was created in three parts: adding the surrounding environment,
building the training game flow, and adding the User Interface.

4.1 Base Project Creation

This section first introduces the Unity game project creation process and then
covers the needed features for Oculus Quest virtual reality headset.

4.1.1 Unity Game Project Creation

The project was created using Unity Hub. It is an application, which allows the
user to download multiple versions of Unity Editor and it works as an easy way to
switch between the projects created with different versions of Unity. [40] There is
a possibility to use templates for getting projects started quickly, but the default
empty project was used in this case.

At the time of project creation, the stabile, Long Time Support (LTS) version of
Unity was 2020.3.24f1. The installation requires Android build support because
the chosen Oculus Quest VR device runs on Android.

The package containing the Oculus VR integration was downloaded from the
Unity Asset Store. It is a catalogue containing material, such as 3D models,
Software Development Kits (SDK) or other tools, for Unity projects. [41] The
Oculus package used in the project was version 35.0 which was released on 10th
of December 2021. It contains development support for Oculus VR devices by
offering for example scripts to directional sounds, configuration to Oculus
Platform solution and scripts and components for VR development.
22

The project had to be configured for the VR use because these settings are
disabled by default. The Build Settings were first to be modified. Build Settings
are meant for changing the target platform, adjusting the settings for the
applications build file and the application build process is done through it. [42]
Oculus VR development uses Android as the target platform.

Next the Player Settings needed to be configured. Each platform has its own
settings which determine how Unity will build and display the final application.
[43] Under Android, the minimum API level that Oculus Quest supports is Android
6.0 Marshmallow and Target API level was set to automatic so the application will
support the highest version available. VR Build support was enabled from XR
Plug-in Management tab and choosing Oculus under Android installed the
needed packages for building. From Project Quality settings it was important to
change the Anti-Aliasing to be 4 x Multi Sampling because VR applications need
to compensate for stereo rendering.

Oculus Quest applications need to generate an Android Manifest file, which
contains for example permissions, supported Android version, package details
and other important configurations. [44] It is generated using the editor tools
installed with Oculus Unity package.

4.1.2 Adding Oculus Quest features

The Oculus VR headset had to be enabled for development. When using the
headset for the first time, it required the owner to connect the device with a mobile
app. The same app was used for activating the developer mode. After the
developer mode was set, the default Unity scene was built to the device using
USB-C cable to test if everything was set up correctly.

The camera was the first object to be configured. The MainCamera from Unity
scene was deleted and OVRPlayerController prefab from Oculus package was
added to the scene instead. It contains predefined settings for the Player
Character in the game. It has the OVRCameraRig, which is the Oculus VR
23

camera that follows the VR headset’s location and rotation. The VR controllers
are added to the tracking space under the VR Camera.

Character Camera Constraint script was added to the OVRPlayerController. The
script contains useful helper functions which are responsible, for example moving
the character capsule or fading out the camera when collision occurs.

OVRCameraRig contains a tracking space, which takes care of the offsets of left
and right eye stereo cameras and tracks the controllers. VR controllers need a
Sphere Collider, Rigidbody and OVRGrabber components. A collider is a
component which allows the GameObject to detect physical collisions. When a
collision occurs, the physics engine in Unity calls specific functions which can be
used to respond in collision events. [45] A main component to enable physical
behaviour in GameObject is called Rigidbody. When Rigidbody is attached to a
GameObject together with a collider, the GameObject can be moved by incoming
collisions. [46] OVRGrabber is a script which allows the user to grab a
GameObject which has OVRGrabbable script attached. It is used for testing the
basic controller inputs.

A plane and a cube were added to the Unity scene for testing if the VR setup had
been done correctly. The cube had a Rigidbody, a collider and OVRGrabbable
script attached to it. The scene was built to the VR headset and the cube could
be lifted from the plane using the VR controller.

4.2 Creating Simulation Application

This section covers in detail how the training simulation was created in three
parts: adding the surrounding environment, building the training game flow, and
adding the User Interface.
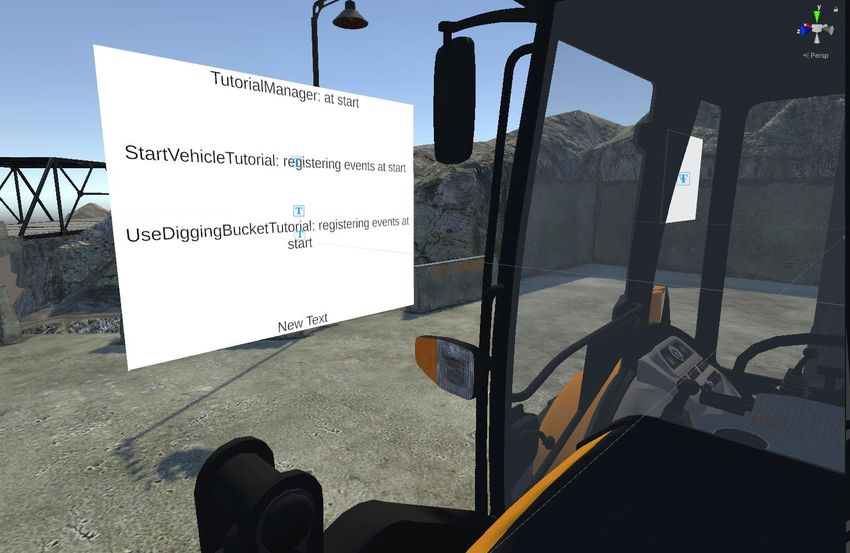
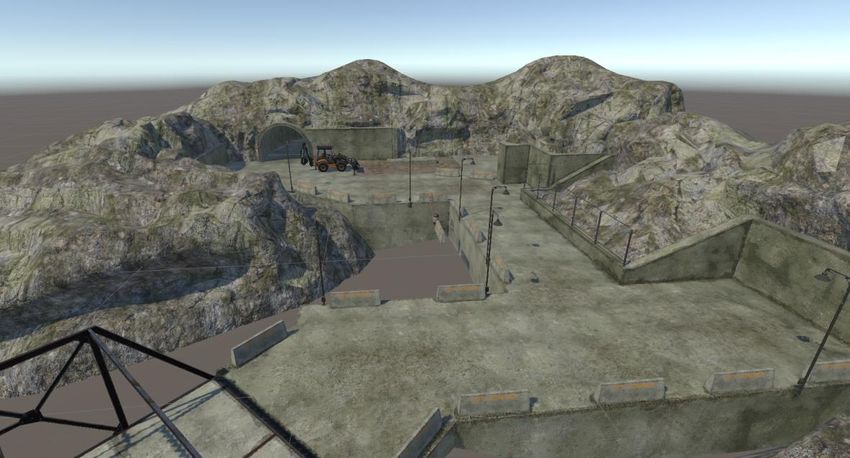
24

4.2.1 Environment and Basic Controls

After configuring a Unity project for virtual reality, the actual project work was
started by creating an environment for the tutorial. 3D model of an excavator and
a suitable construction site environment was bought from Asset Store. The
package had an animated excavator model with multiple attachments, an
animated truck, and a construction site model. These were used as a starting
point for the tutorial environment.

Figure 7. A screenshot of Unity scene containing a construction site environment
and an excavator 3D model.

All the needed GameObjects were put into Scene Hierarchy and the required
components were added to them. The construction site needed a collider,
because without it the excavator model would fall through the environment. The
collider was created using Unity’s build-in box collider.

At first the plan was to allow the player to move around the construction site, but
this was left out since most of the time the player will be seated in the excavator.
It could potentially cause a dangerous situation when switching between seated
and standing experience without properly designing it. The player could for
25

example bump into the chair since they would not be able to see it in the virtual
environment. It was tested if moving around the environment could be done in
seated position, but it made the experience feel weird and it felt like the player
was moving around in a wheelchair.

The excavator 3D model did not have all the needed parts cut into separate
layers, therefore it needed to be done manually using Blender. It is a free and
open-source application for creating 3D models. [47] Parts such as gear stick,
start and the levers for handling the digging bucket, were cut using a knife tool
and pasted on new layers. The modified 3D model was then exported to Unity.

Figure 8. Screenshot of Scene Hierarchy where the excavator 3D model has
been divided into multiple layers.

The 3D model was restructured using GameObjects, because the original 3D
model was cluttered and had many unnecessary layers. The needed layers in the
project were grouped under a parent GameObject making it easier to locate them.
Parenting a GameObject is one of the most important concepts to understand
when using Unity. When a GameObject is made a child of another GameObject,
it will rotate, move and scale exactly as its parent does. [48] As seen in Figure 8,
the root parent GameObject called Excavator is ensuring every part which was
cut out earlier, such as a gear stick or a lever, is moving jointly with the excavator
model. OVRCameraRig was put as a child of Excavator for the same reason. The
26

player needs to move together with the excavator if they were for example driving
it.

OVRCameraRig was positioned inside the cabin of the excavator model. The
scale of the cabin was modified to suit better for virtual reality, but it was noticed
the model does not have correct proportions for a usage like this. The cabin floor
is too high; therefore, the player might feel like their feet are through the floor.
Since the project is a proof-of-concept, the flaw was accepted.

Figure 9. A world space canvas was used as a console for logging.

A white canvas was added outside of the excavator before the actual game flow
development was started. There is often a need to see debug messages inside
virtual reality, therefore the temporary canvas was used as a console for logging
messages.
27

4.2.2 Game Flow

TutorialManager GameObject was created in the Scene Hierarchy. It contains a
list of all tutorial modules needed in the tutorial, and it sets them active and
deactive accordingly. Since the project was created modularity in mind,
TutorialManager does not know anything about the game itself. It just begins to
go through the tutorials one by one when it is asked to. The list of tutorial modules
can be changed and played in any order. The modules do not have any
references to each other because it would make the application less modular.

Figure 10. TutorialManager contains a list of tutorial modules which can be
played in any order. One module does not have references to any other
module.

Event bus was used to remove the need to subscribe to each tutorial finish event
one by one. TutorialManager sends an event, which informs the next tutorial
module it should be started. After the module is finished, it sends an event back
to TutorialManager. TutorialManager can then either ask the next module to start,
or if there are no modules left, it will inform the GameManager the tutorial is
completed.
28

Three tutorial modules were created for the proof-of-concept application:
TeachControlsTutorialModule,              StartVehicleTutorialModule           and
UseDiggingBucketTutorialModule. First module teaches the player how to use
the controllers, the second helps the player to start the excavator and the third
module teaches the player how to control the digging bucket that is attached to
the excavator.

TeachControlsTutorialModule covers how the controllers are used. It first asks
the player to press the A button on the right controller, then the B button and at
last the trigger. These are all the needed inputs in the proof-of-concept
application. The instructions to press each button are displayed in the monitor,
which is located inside the excavator cabin. InputManager is registering the
buttons which are pressed in the controllers and it sends an event whenever any
of them is pressed. TeachControlsTutorialModule subscribed to these events and
moves to the next phase whenever the correct button has been triggered.

StartVehicleTutorialModule needs a reference to the right controller, start button
and two LED lights, which indicate the online or offline status of the excavator.
The player needs to push the start button with a controller to start the excavator.

A script for registering which GameObject a controller is colliding into was
attached to the right controller. The collider in the VR controller was set being a
trigger, which means OnTriggerEnter, OnTriggerStay and OnTriggerExit Unity
methods can be used. These methods send a message when another
GameObject is entering, staying, or exiting their collider. [45]
29

Figure 11. OnTriggerStay Unity method recognizes if the GameObject needed in
the tutorial module is entering the close range of the controller.

The method was set to check if the trigger button in the controller has been
pressed down and if it is done near the start button. If both are true, an event is
sent to the StartVehicleTutorialModule informing it the user has pushed the start
button.

Update method in the StartVehicleTutorialModule is waiting for the player to push
the start button. When that happens, the excavator LED indicator will switch its
color from red to white and the tutorial module is finished.

UseDiggingBucketTutorialModule is more complex than the previous modules. It
needs references to both controllers, right and left levers and spheres which
indicate the correct position of the excavator arm. The player has to rotate the
levers enough that the collider attached to the excavator arm touches the sphere.

A similar script was used for the controllers as in the StartVehicleTutorialModule.
The script is registering GameObjects entering the close range of the controller
and if the trigger button is pressed down near the left or right lever, it sends and
event to the UseDiggingBucketTutorialModule saying the levers can be rotated,
and the excavator arm position can be modified.
30

Figure 12. Orange is the parent GameObject called ExcavatorArmBack, and
green is the child GameObject, called ExcavatorArmFront.

GameObject parent-child relation, which was explained earlier, was used to
enable moving the different parts of the excavator arm. The first arm is a parent
to the second part, therefore when the first part is rotated, the second part will
rotate along it. As illustrated in Figure 12, the part highlighted with orange is the
parent GameObject, named ExcavatorArmFront, and the part highlighted in
green is the child GameObject, named ExcavatorArmBack.

RotateExcavatorArmFront script was attached to the right lever. It contains a
reference to the ExcavatorArmFront GameObject, which is rotated relative to the
lever rotation. When the UseDiggingBucketTutorialModule Update method
changes the rotation of RightLever depending on how much the player pushes
the lever, it will move the arm accordingly. When the arm is rotated enough it will
activate the second part of the module, which is rotating the left lever and
ExcavatorArmBack.
31

After successfully rotating both of the excavator arms, the tutorial module sends
an event informing it has been finished. Since this is the last module built in the
proof-of-concept application, TutorialManager will let the GameManager know
the tutorial is finished and it will then return the player to the MainScene.

4.2.3 User Interface

User Interface (UI) works differently in virtual reality applications than in traditional
games. The canvas should be created in world-space, which means the canvas
is located in the environment and not attached to the screen of the headset. There
are some design principles which should be considered when developing for
virtual reality. For example, smooth scrolling in a UI can cause the player
discomfort, because the movement can trick the brain thinking the player is
moving when they are actually standing still. Another aspect to consider is if the
UI is too wide, the player might miss what a button does, if they do not see the
whole UI in their field of view. Moreover, the UI should be consistent, therefor if
the UI buttons are always at the bottom, there should not suddenly be a UI
window where the buttons are at the top. [49]

The UI should not use a standard sprite-based font because it will get pixelated
and uncomfortable to read, therefore Unity TextMesh Pro should be used instead.
It uses Signed Distance Fields (SDF) which will approximate the shape of the
character before rendering it into a texture. This means SDF shader will
interpolate between distance samples and it allows the text to render crisp within
Unity independent of the screen resolution, scale or zoom. [50] Figure 13 below
illustrates a difference between TextMesh Pro and a standard text object in Unity.
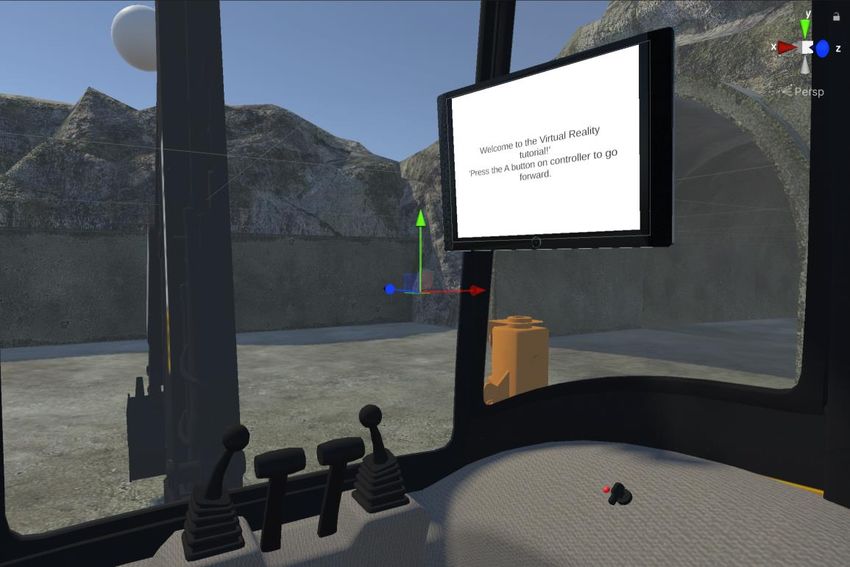
32

Figure 13. Comparison of TextMesh Pro and a standard text object.

The tutorial is displaying instructions to the player on a monitor screen located
inside the excavator. A 3D model of a monitor was downloaded from Asset store.
A Unity canvas was created and set to world-space with resolution 800 width and
600 height and it was parented with the monitor 3D model. The size of the canvas
in the environment needs to be calculated by dividing the width in meters by the
width of the canvas. The monitor 3D model was set to be 35cm wide, therefore
the calculation to get the correct scale was 0,35/800 = 0,0004375. This was then
set as x, y, and z scale of the monitor canvas. [51]
33

Figure 14. A monitor displays instructions to the player inside the excavator cabin.

UIs pointing to the current interactable object were built in a similar way. The
created canvases were parented with the start button, right and left levers and
the right controller. The UIs attached to parts of the excavator model are
displaying an arrow above the GameObject which is supposed to be interacted
with during the tutorial to make it clear what the player should do next. The UI
attached to the right controller is displaying which button should be pressed
during the controller training.

At last, the TutorialScene is connected with the MainMenuScene, which will work
as a starting point for the whole application. The menu scene was built to be a
neutral office space because the environment of the tutorial depends on the
training. In this case the environment was a construction site, but it might not be
in some other situation and an office as a starting point should work with most
tutorials.
34

Figure 15. A screenshot of MainMenuScene.

A set of open-source office furniture 3D models were downloaded from the Asset
Store and a basic room with office supplies was put together. As seen in Figure
15, there is a table with a monitor and a keyboard in the middle of the room. The
monitor is displaying the tutorials and the keyboard is used for starting the chosen
tutorial. The keyboard contains one button, which will trigger an event when it is
touched with a controller, causing the TutorialScene to be loaded and the training
started.
35

5 Results and Value of Product

This section describes the analysis of the software as well as covers the future
use and the features which could be added to the application later.

5.1 Analysis of Software

The created proof-of-concept application delivers all the planned features. It
includes an example training of how to use an excavator and the created tutorial
modules can be run in any order. This allows an easy way to add new modules
to the training, or the possibility to remove unnecessary ones. Furthermore, it
guides the player how to use the controllers and it uses UIs to help the player
through the training.

All the manager GameObjects added to the application can be repurposed when
building a new demo training application. GameManager handles the game loop,
TutorialManager ensures all the created tutorial modules are run one by one and
InputManager registers all the controller inputs, even the ones not used in the
proof-of-concept.

The proof-of-concept application works as a base for future demos, but the Unity
editor version and the Oculus VR integration package should be updated to the
more recent version when the new demo is built.

5.2 Future Use and Additional Features

Even though the project successfully delivered the planned features, it is still a
proof-of-concept. There are few improvements which could be considered when
the application is used for creating a demo for a client.

It is important to have a suitable 3D model which works well with the planned
training. It can break the immersion if the surroundings are not looking real or if it
provides the player a sensation something is wrong. The excavator 3D model
36

bought for the proof-of-concept was not meant to be used in virtual reality. The
scale was too small which caused the players feet go through the cabin floor.
Even though the player can not see their feet in the virtual world, they feel them
going further than where the cabin floor is located. Furthermore, the 3D model
did not have the needed parts cut into separate layers and the details inside the
cabin were insufficient.

When building an actual training, it would be beneficial to have someone read
through the instructions out loud. The monitor screen is important for displaying
the instructions in case the player forgets what they were meant to do, but it can
be tiring to only receive instructions by reading them. Having other sound effects
added could make the simulation feel more real.

The project would benefit having a professional designer to design the training
flow. Furthermore, it would be useful to involve someone who knows how to
operate the machine in the design phase.
37

6 Conclusion

The objective of this thesis was to create a proof-of-concept application which
could be used as an example of how virtual reality can be utilized for training. The
application works as a base project for this type of simulation applications and
the training could easily be switched to be about a different vehicle or context.

The first main section of this thesis concentrated on theoretical background of
virtual reality technology. It covered a brief history of the technology and the
possibilities and practical use of it. Furthermore, it introduced the industry and the
companies currently manufacturing the VR headsets.

The next section focused on the proof-of-concept project plan. It went through the
project specifications in more detail and explained what each part of the software
did. It then described how the training simulation was designed. Lastly it covered
the application architecture and guidelines of Unity development.

The third main section explained how the base Unity project was created and the
virtual reality capabilities added. It covered the detailed process of implementing
the planned features in three parts: adding the environment and basic controls,
adding the game flow, and adding the UI.

The last section described the analysis of the software. The proof-of-concept
application was successfully developed, and it can be used as a base for virtual
reality training projects. The importance of using a suitable 3D model was noticed
during the creation of the application as well as the usefulness of having a
professional designer in the project.
38

References

1   Pope H. Introduction to Virtual and Augmented Reality. Library
    Technology Reports. 2018 Aug [cited 2022 Jan 5];54(6):5-7. Available
    from:
    https://www.proquest.com/docview/2099872876/fulltextPDF/284B3249362
    B471APQ/1?accountid=11363

2   Crofton E.C, Botinestean C, Fenelon M, Gallagher E. Potential
    applications for virtual and augmented reality technologies in sensory
    science. Innovative Food Science & Emerging Technologies. 2019 Aug
    [cited 2022 Jan 5];56. Available from: https://www-sciencedirect-
    com.ezproxy.metropolia.fi/science/article/pii/S1466856418314449 DOI:
    10.1016/j.ifset.2019.102178

3   Metz D. The Scientific Instruments of Charles Wheatstone and the
    Blending of Science, Art, and Culture. 2015 Feb [cited 2022 Jan
    5];46(1):19-29. Available from:
    https://www.proquest.com/docview/1682349638/fulltextPDF/4EE052018D
    84A39PQ/3?accountid=11363 DOI: 10.1007/s10780-015-9233-y

4   Widzinski L. “Step away from the machine”: A Look at Our Collective Past.
    Library Trends. 2010 [cited 2022 Jan 5];58(3):358-377. Available from:
    https://www.proquest.com/docview/347840538?accountid=11363 DOI:
    10.1353/lib.0.0092

5   Paszkiewicz A, Salach M, Dymora P, Bolanowski M, Budzik G, Kubiak P.
    Methodology of Implementing Virtual Reality in Education for Industry 4.0.
    Sustainability. 2021 [cited 2022 Jan 5];13(9):5049. Available from:
    https://www.proquest.com/docview/2530184712/C4DC4FC719B848A5PQ
    /4?accountid=11363 DOI: 10.3390/su13095049

6   Computer History Museum [Internet]. 2022 [cited 2022 Jan 5]. Available
    from: https://www.computerhistory.org/revolution/input-output/14/356/1888

7   Angelov V, Petkov E, Shipkovenski G, Kalushov T. Modern Virtual Reality
    Headsets. International Congress on Human-Computer Interaction,
    Optimization and Robotic Applications (HORA). 2020 [cited 2022 Jan 29].
    Available from: https://ieeexplore-ieee-
    org.ezproxy.metropolia.fi/document/9152604 DOI:
    10.1109/HORA49412.2020.9152604

8   Rubio-Tamayo J, Barrio MG, Francisco G. Immersive Environments and
    Virtual Reality: Systematic Review and Advances in Communication,
    Interaction and Simulation. Multimodal Technologies and Interaction. 2017
    [cited 2022 Jan 29];1(4). Available from:
    https://www.proquest.com/docview/2124655643/fulltextPDF/1E22B688994
    24B88PQ/11?accountid=11363 DOI: 10.3390/mti1040021
39
9 Baxter G, Hainey T. Student perceptions of virtual reality use in higher
education. Journal of Applied Research in Higher Education. 2020 Jun
[cited 2020 Jan 29];12(3):413-424. Available from: https://www-emerald-
com.ezproxy.metropolia.fi/insight/content/doi/10.1108/JARHE-06-2018-
0106/full/html
10 Zhang L, Zhang L. Research on Innovative Teaching Method of University
Physical Education Courses Based on Virtual Reality Technology —
Taking Table Tennis Course Teaching as an Example. 2021 2nd
International Conference on Big Data and Informatization Education
(ICBDIE). 2021 Apr [cited 2022 Jan 29]. 653-657 p. Available from:
https://ieeexplore-ieee-org.ezproxy.metropolia.fi/document/9457439 DOI:
10.1109/ICBDIE52740.2021.00154
11 Saab M, Hegarty J, Murphy D, Landers M. Incorporating virtual reality in
nurse education: A qualitative study of nursing students' perspectives.
Nurse Education Today. 2021 Jul [cited 2022 Jan 29];105. Available from:
https://www-sciencedirect-
com.ezproxy.metropolia.fi/science/article/pii/S0260691721003026 DOI:
https://doi.org/10.1016/j.nedt.2021.105045
12 Higgins V. Augmented & Virtual Reality: The Future of Work, Not Just
Play. Professional Safety. 2017 Jun [cited 2022 Jan 30];62(6):86-87.
Available from:
https://www.proquest.com/docview/1910288162/4DE5FF5A8540413DPQ/
9?accountid=11363
13 Raya L, García-Rueda JJ, López-Fernández D, Mayor J. Virtual Reality
Application for Fostering Interest in Art. IEEE Computer Graphics and
Applications. 2021 Jan [cited 2022 Feb 2];41(2):106-113. Available from:
https://ieeexplore-ieee-org.ezproxy.metropolia.fi/document/9340297 DOI:
10.1109/MCG.2021.3055685
14 Peters J. Kid A Mnesia Exhibition is an unsettling and beautiful Radiohead
art exhibit [Internet]. The Verge. 2021 Nov [cited 2022 Feb 2]. Available
from: https://www.theverge.com/22788135/radiohead-kid-a-mnesia-
exhibition-review
15 VIVE products [Internet]. 2022 [cited 2022 Feb 6]. Available from:
https://www.vive.com/us/product/
16 Valve Index [Internet]. 2022 [cited 2022 Feb 6]. Available from:
https://www.valvesoftware.com/en/index/headset
17 Varjo products [Internet]. 2022 [cited 2022 Feb 6]. Available from:
https://varjo.com/products/
18 Sony PlayStation VR [Internet]. 2022 [cited 2022 Feb 6]. Available from:
https://www.playstation.com/en-fi/ps-vr/You can also read