Student User Guide April 2021 - Learning Management System (LMS)
←
→
Page content transcription
If your browser does not render page correctly, please read the page content below

Learning Management System (LMS)
  Student User Guide
           Version 1.1

          April 2021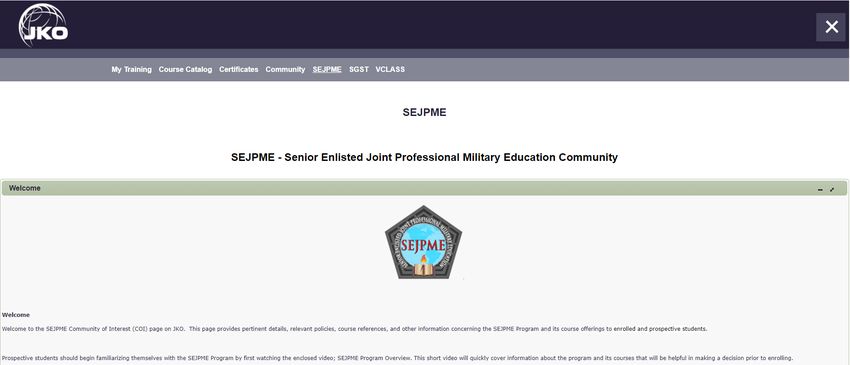
Contents
Create a JKO Account ........................................................................................................................................................ ..3
    Military / Government Personnel Registration…………………………………………………………………………………………………………3
    Non-Government Personnel / Sponsored Account Registration……………………………………………………………………………….4
Create an Initial Password................................................................................................................................................... 5
Log in to Joint Knowledge Online ........................................................................................................................................ 5
    Join an Organization…………………………………………………………………………………………………………………………………………………6
    Join an Audience………………………………………………………………………………………………………………………………………………………7
My Training ......................................................................................................................................................................... 8
    Alerts……………………………………………………………………………………………………………………………………………………………………….8
    Training Information…………………………………………………………………………………………………………………………………………………9
    Assigned Training……………………………………………………………………………………………………………………………………………………..9
    Elective Training……………………………………………………………………………………………………………………………………………………..10
Course Catalog ............................................................................................................................................................... …10
    Enroll in a Course or Curriculum……………………………………………………………………………………………………………………………..11
Certificates ........................................................................................................................................................................ 16
Communities ..................................................................................................................................................................... 17
SEJPME .............................................................................................................................................................................. 18
SGST .................................................................................................................................................................................. 18
VCLASS .............................................................................................................................................................................. 19
Forgot User Name ............................................................................................................................................................. 19
Forgot Password ............................................................................................................................................................... 20
JKO Help Desk Information ............................................................................................................................................... 22
Frequently Asked Questions ............................................................................................................................................. 22

LMS USER GUIDE                                                                        APRIL 2021                                                                                   Page 2
Create a JKO Account
        1. The Joint Knowledge Online (JKO) Learning Management System (LMS) requires Users to have a JKO account in
order to take advantage of the capabilities in the LMS. Once you have a JKO account, you may log in with either your
CAC, VA PIV, or a User Name and Password.

        2. To log in to JKO, go to https://jkodirect.jten.mil

        3. Select OK in the DoD Warning Banner. If you do not select OK, you will not be able to access the JKO LMS.

        4. There are two ways to create a JKO account:

                A. If you have a CAC or VA PIV, select the Login using my CAC / VA PIV Login button at the top-right of
the page to automatically create an account.

                 B. If you do not have a CAC, fill out an online Form using one of the below Links in the Login window.

                        i. Military / Government Personnel Registration. Select this link if you have a .MIL, .GOV, or
specified .EDU email address, but do not have a CAC reader. You must have direct access to this email address in order to
complete the account creation process. Authorized email address extensions include: .GOV, .MIL, .NPS.EDU,
.DODEA.EDU, .USMA.EDU, .USNA.EDU, .USAFA.EDU, .CGA.EDU, .USMMA.EDU, AAFES.COM, or you are a Foreign Military
member. Allow up to 48 for JKO to create your account.

                                  a. Once you fill out and submit the form, JKO will send an automated email to your .MIL,
.GOV, or specified .EDU email address that requires you to confirm you have access to that email address. Follow the
instructions in the email. This process is in place for security reasons. Skip forward to Step 6 for your next instruction.

LMS USER GUIDE                                           APRIL 2021                                                Page 3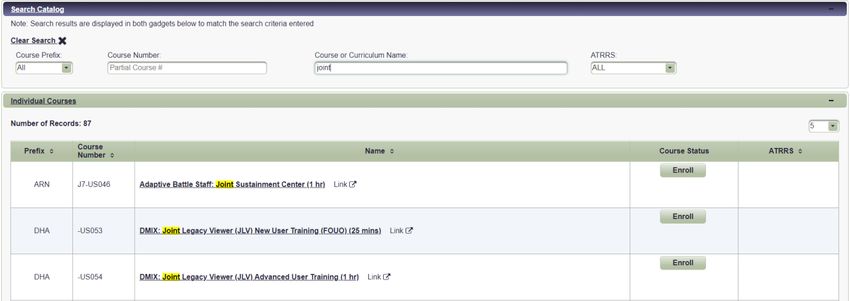
ii. Non-Government Personnel / Sponsored Account Registration. Select this link if you do not
have a .MIL, .GOV, or any of the email address extensions in 5.B.i. You are required to have a Sponsor who is a U.S.
Military or Federal Government Civilian who has one of the following email address extensions: .MIL, .GOV, .NDU.EDU,
.NPS.EDU, or DODEA.EDU. You will need the Sponsor’s Name, Phone Number, and Email Address.

                 Note: Contractors may not be Sponsors.

                                 a. Once you fill out and submit the form, an automated email will be sent to your
Sponsor’s official email address that you provided, and requires the Sponsor to validate your requirement for a JKO
account. Your Sponsor must follow the instructions in the email. This process is in place for security reasons. Once JKO
receives your Sponsor’s validation of your account request, allow up to 48 hours for JKO to create your account.

     Create an Account
     automatically using
         your CAC.

  Users with a .MIL, .GOV,                                                                              Users who do not
  or specified .EDU email                                                                              have a .MIL or .GOV
    address who do not                                                                                  email address and
    have a CAC reader.                                                                                  require a Sponsor.

        5. Once JKO creates your account, you will receive two emails. One email includes your User Name. You will
need to know your User Name in order to create a Password. The second email contains a Token. A Token is a string of
alpha-numeric letters and numbers that you will use to create your Password. Once you have both your User Name and
your Token, you may begin the process of creating a Password, as described in the next section.

                 Note: A Token is not a Password. You will use the Token one time to create your Password. Tokens
                 expire after 24 hours. If you have not created your initial Password within 24 hours, contact the Help
                 Desk for a new Token, or follow these steps in the Forgot Password section of this document to generate
                 a new Token.

                 Note: CAC users are not required to create a Password because they log in to the LMS via their CAC,
                 however, it could be helpful to create a Password if you want to access JKO from home and do not have a
                 CAC reader there. Do not request a new account just so you can log in from home.

LMS USER GUIDE                                        APRIL 2021                                                 Page 4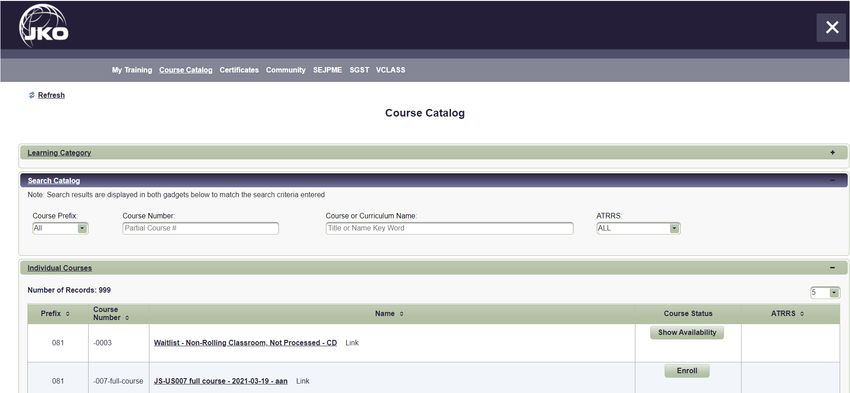
Create an Initial Password
       1. This is required for users who do not log in via CAC. You will need both your User Name and your Token. JKO
emailed both to you when they created your new account. On the JKO Login page, click OK in the DoD Warning Banner.

        2. In the Login area, select the Received a Token
link.

          3. In the workspace that opens, enter your
User Name and Token. To reduce possibility of errors,
we highly recommend you Copy/Paste your Token
directly from the email you received rather than type
it in. Click the Submit button.

        4. In the appropriate fields, create a
Password that conforms to the rules outlined on
the screen. Click Reset Password.

         5. When you have successfully created your Password, you will be returned to the main JKO Page. Follow the
steps in the next section to log in to JKO.

Log in to Joint Knowledge Online
        1. On the JKO Login page, click OK in the DoD Warning Banner.

        2. If you have a CAC, select the Login using my CAC / VA PIV Login button at the top-right of the page.

LMS USER GUIDE                                        APRIL 2021                                                  Page 5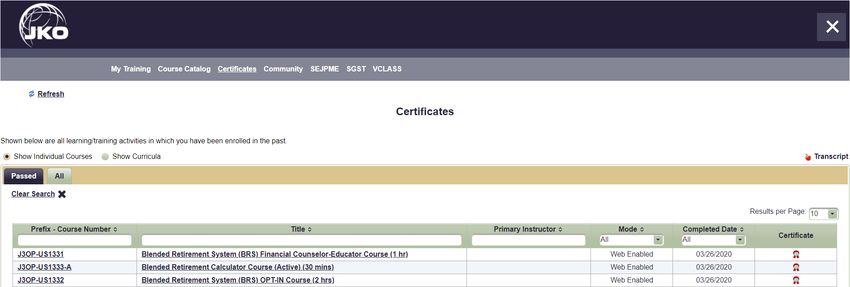
3. If you do not have a CAC, you must log in with your User Name and Password. Enter both into the appropriate
fields, and then select Login.

        4. If this is your first time logging in to JKO, your Profile is the first page you see. Ensure your Personal Data and
Career Information are correct. You may add, correct, or modify information in some fields, but others are Read-only,
and the JKO Help Desk must make modifications.

         5. Organization and Audience selections are not required Profile entries. Not all Organizations are listed in JKO.
However, your Training Coordinator may direct you to join an Organization or Audience so that you receive required
training, or so that your training records can be tracked by your Organization. Follow the steps below to join an
Organization and/or an Audience.

                 A. Join an Organization. To join an Organization, click the Select Primary Organization link.

LMS USER GUIDE                                           APRIL 2021                                                    Page 6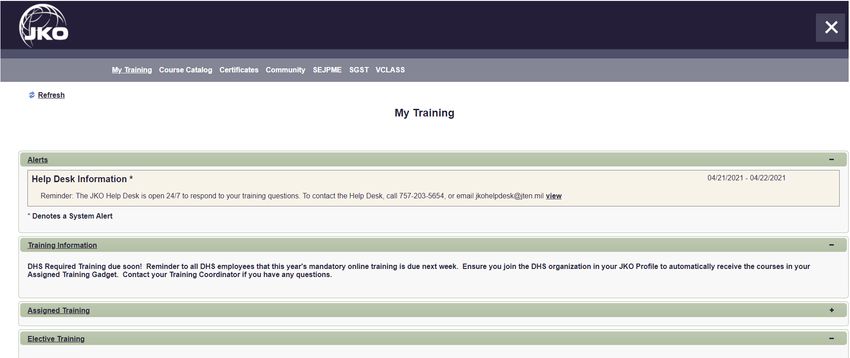
In the window that opens, click on the black triangle next to the root
Organization: (JKO) – Joint Knowledge Online (LOCKED). This will open
the entire directory of Organizations in JKO. Use the scroll bars to
navigate up and down the list. If an Organization has a Folder icon
next to it, that means there are Sub-Organizations within that Parent
Organization. Click on the black triangle to the left of the Folder to
open the Parent Organization.

Organizations with Sub-Organizations are listed in alphabetical order in
the directory. Organizations without any Sub-Organizations are listed in
alphabetical order below the Organizations with Sub-Organizations.

There is also a Search window you can use to find an Organization. Enter
text into the search field and select the Search button. Organizations
matching your search criteria will display. Select Clear Search to erase
your search criteria and return to the default view.

Once you locate your Organization, click on it to highlight it, and then
click the Select Organization button. Your Organization now appears listed in your Profile. If there are any course
assignments assigned to this Organization, you will automatically receive them; you will not have to locate them in the
Course Catalog and enroll in them manually.

                 B. Join an Audience. To join an Audience, click the Add Audience(s) link in your Profile.

In the window that opens, a list of all Audiences
displays at the bottom of the window. Use the
scroll bar and the pagination buttons at the
bottom of the list to navigate. Or, enter text in the
Search field and Audiences matching your search
criteria will display.

When you locate your Audience, click on the Add
icon to select that Audience and move it to the
top of the screen. When you are ready, select the
Add Audience(s) button. Your Audience now
appears in your Profile. If there are any course
assignments assigned to this Audience, you will
automatically receive them; you will not have to
locate them in the Course Catalog and enroll in
them manually.

Your Organization and your Audience now display
in your Profile. To remove them, simply click on
the X icon next to their names.

        6. Ensure your Business Email address is
correct. This is the email address where you will receive all LMS-generated emails. When your Profile is updated, select
the Save button.

LMS USER GUIDE                                          APRIL 2021                                                Page 7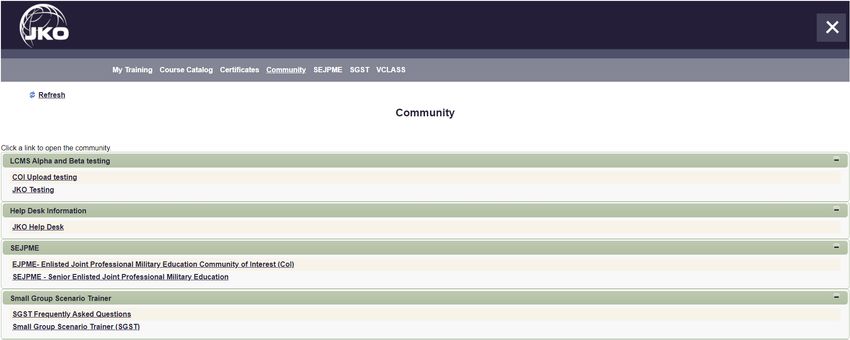
My Training
The My Training Tab is the landing area each time you log in to the LMS. From here you can access all other LMS
products via the links at the top of the page. My Training displays up to four Gadgets. Gadgets are separate areas or
blocks of information on the page that contain specific training data. The Gadgets available in My Training are shown in
the Blue boxes below, and include:

                 A. Alerts
                 B. Training Information
                 C. Assigned Training
                 D. Elective Training

         1. Alerts. Alerts are either system-wide or Organization-level announcements that are usually temporary and are
meant to convey something important. System-level Alerts (denoted with an asterisk in the Title) are usually generic and
appear to every user in the LMS, regardless of their Organization. Organization-level Alerts are announcements that
specifically apply to your Organization. You only see Organization-level Alerts if you belong to that Organization in your
Profile. Those users not in your Organization will not see your Organization-level Alerts. The Alerts Gadget only appears
if there is either a system-wide or Organization-level Alert. If there is no Alert, the Gadget will not appear.

LMS USER GUIDE                                        APRIL 2021                                                  Page 8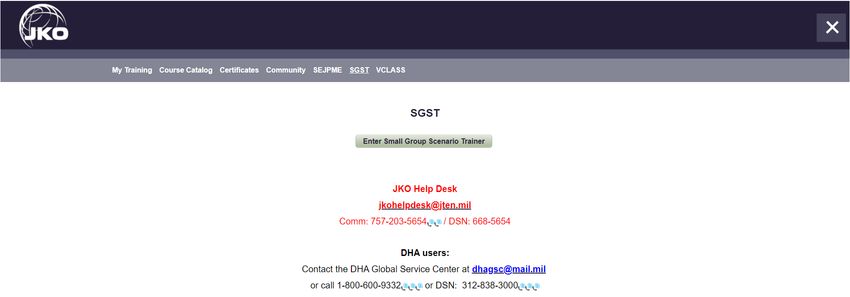
2. Training Information. This Gadget is specifically tied to your Organization and is meant to display specific
information to only your Organization. It is similar to an Alert, but this Gadget can contain much more information within
it. You only see the Training Information Gadget if you belong to that Organization in your Profile, and there is
information entered into it. Training Coordinators have the ability to enter information into this Gadget, and only then
will it display in the My Training Tab. If there is no Training Information, the Gadget will not appear.

        3. Assigned Training. The Assigned Training Gadget displays courses that are assigned to you by your
Organization or Audience. You must be a member of that Organization or Audience in your Profile in order to receive the
courses. See here for joining an Organization or an Audience. If you do not belong to any Organization or Audience, or
your Organization or Audience has not assigned any courses, this Gadget will not appear. Each time your Organization or
Audience assigns a new, or another course, the LMS will send an email to the email address in your Profile.

                                                                    Source of assignment

                 A. To Enroll in a Course, select the Enroll button to the left of each Course Number and Title. The button
will then turn in to a Launch button. Click the Launch button to open the course.

                 Note: You do not have the option to withdraw from assigned courses. Assigned courses are generally
                 mandated by your Organization or Audience, so the only option is to enroll in and then complete them.

                B. To identify the Source of the assigned course and other information such as Due Date, see the
information on the right side of the screen. From the image above, you can see that one course is assigned by the User’s
Organization (Department of Homeland Security), and three courses by the User’s Audience (DMDC – TASS TA).

               C. Courses will remain in the Assigned Training Gadget until you complete them, even if it is after the
Due Date identified to the right of the course. Should you enroll in a course and then leave the Organization or Audience
(through your Profile) that assigned it to you before you have completed it, the course will move down to the Elective
Training Gadget until you complete it or withdraw from it.

LMS USER GUIDE                                         APRIL 2021                                                  Page 9
4. Elective Training. This Gadget displays courses that you manually enroll in through the Course Catalog. From here, you can begin the course by clicking the Launch button, or withdraw from the course by selecting the Withdraw button. Courses will remain in this Gadget until you complete them or withdraw from them. There is no Due Date for courses in this Gadget, but they generally expire after one year (Enrollment Expiry Date). This is an administrative function to remove Users who do not intend to complete the course. However, that does not mean that you don’t have to complete a course next week if your Organization requires it. Just because it is not an assigned course in the Assigned Training Gadget does not necessarily mean your Organization does not require you to complete it. Course Catalog The Course Catalog contains the library of content available to Users. Content in the library consists of Courses and Curricula. In the Individual Courses section at the top of the page, a complete list of courses is available. In the Curricula section at the bottom of the page (not shown in the image below) all the curricula (a collection of courses grouped into one package) is available to you. Each Course Name and Curricula Name is selectable and will display a description. LMS USER GUIDE APRIL 2021 Page 10
1. Enroll in a Course or Curriculum. There are several ways to locate your desired content in the Course Catalog:

                A. Use the pagination functions at the bottom of the Individual Courses or Curricula lists to advance by
one or several pages. Courses are displayed in Prefix numerical and then alphabetical order by default. Curricula are
displayed in Name numerical and then alphabetical order by default.

                B. To view more courses or curricula per page view, click on the Results per Page drop-down menus
above the far-right column and choose to view up to 50 courses or curricula per page.

                 C. You can also use any of the multiple search fields in the Search Catalog workspace to locate a course
or curricula:

                          i. Use the Course Prefix drop-down menu to search by Course Prefix. All courses with the selected
Prefix will display in the Individual Courses section.

LMS USER GUIDE                                         APRIL 2021                                                  Page 11
Any curricula containing courses with the selected prefix (highlighted in Yellow) will display in the
Curricula section. Select the Expand Curricula icon to view those courses. Click the collapse icon to hide the
curriculum’s component courses.
ii. Enter a Partial Course Number in the Course Number search field. All courses containing that
number (highlighted in Yellow) will display in the Individual Courses section.
Any curricula containing courses with that number (highlighted in Yellow) will display in the
Curricula section. Select the Expand Curricula icon to view those courses. Click the collapse icon to hide the
curriculum’s component courses.
LMS USER GUIDE APRIL 2021 Page 12iii. Enter any part of the Course or Curriculum name into the Course or Curriculum Name field. All
courses with that text in the Course Name (highlighted in Yellow) will display in the Individual Courses section.
Any curricula containing courses with that name (highlighted in Yellow) will display in the Curricula
section. Select the Expand Curricula icon to view those courses. Click the collapse icon to hide the curriculum’s
component courses.
iv. Select the ATRRS drop-down menu to display ATRRS courses with or without Distance Learning
(DL) Points. Only ATRRS courses and curricula with will display in the Individual Courses and Curricula areas.
LMS USER GUIDE APRIL 2021 Page 13v. To clear your Search Results, or begin a new search, click on the Clear Search icon .
D. Once you locate a course in the Individual Courses area, select the Enroll button to enroll in it.
E. You must acknowledge the Academic Integrity Notice.
F. The Course Status now changes to Enrolled. You may start the course directly from the Course Catalog
if you wish by selecting the Launch button.
G. The course is also now available in the Elective Training Gadget in the My Training Tab. You may also
Launch or resume the course from here.
H. Once you locate a curriculum in the Curricula area, select the Expand icon to view a list of courses
in that curriculum. Click the collapse icon to hide the curriculum’s component courses.
When ready, select the Enroll button.
LMS USER GUIDE APRIL 2021 Page 14I. You must acknowledge the Academic Integrity Notice.
J. The curriculum Status is now Enrolled. The curriculum displays in the Elective Training Gadget in the
My Training Tab. You may now begin the component courses of the curriculum by clicking the Launch button in the
Actions column.
LMS USER GUIDE APRIL 2021 Page 152. Learning Categories. The Course Catalog also contains a Gadget called Learning Category, displayed above the
Search Catalog workspace. Learning Categories are groups of courses organized by their similarity, generally recognizable
by the Title of the Learning Category. Courses within each Learning Category are all available in the Course Catalog, but
are organized here for easier access if a User is looking to enroll in multiple courses of a similar genre. You can enroll in a
course or a curriculum from a Learning Category the same way you enroll in a course or curriculum from the Course
Catalog.
Certificates
The Certificates Tab is where your course and curriculum Completion Certificates are located. From here, you can view,
download, and print your Completion Certificates. You can also access your Transcript, which lists details of all of your
completions. The default view of the Certificates Tab displays completed Courses in Completion Date order.
1. To view a course Completion Certificate, select the Certificate icon in the Certificate column on the right
side of the page. Use your browser options available to download, save, or print the certificate.
2. To view your Transcript, select the Transcript icon on the right side of the page. Use your browser options
available to download, save, or print the Transcript.
3. If you have man completion certificates and would like to search for a specific certificate, you may use any of
the search or sort functions available to quickly locate it.
4. To view a list of all courses; including Passed and Dropped courses, select the All Tab. Completion Certificates
for Passed courses are also available under the All Tab. You can toggle between Passed and Dropped courses by
changing your selection in the Status drop-down menu.
LMS USER GUIDE APRIL 2021 Page 165. To view Curriculum Completion Certificates, select the Show Curricula radio button. The default view will
display Passed curricula. An overall curriculum completion certificate is available by selecting the Certificate icon in
the Certificate column on the right side of the page. Select the Expand icon to display a list of the curriculum’s
component courses and view those individual course completion certificates.
6. To view a list of all curricula; including Passed, Dropped, and Enrolled, select the All Tab. Completion
Certificates for Passed curricula are also available under the All Tab.
Communities
The Community Tab contains topical information on a variety of subjects. JKO Users create Communities to convey
additional information to members of that Community, or to the enterprise as a whole. Communities can be limited to
specific organizations, as determined by the Community Manager, or open to all Users. Click on a Community Name to
enter the Community and view content such as videos, documents, links, and much more. The content available in a
Community is limited only by the imagination of the Community Manager.
LMS USER GUIDE APRIL 2021 Page 17For additional information on creating a Community, contact the JKO Help Desk at jkohelpdesk@jten.mil SEJPME SEJPME is an abbreviation for Senior Enlisted Joint Professional Military Education. The SEJPME Tab contains links to the two SEJPME curricula, contact information for the SEJPME staff at JKO, and helpful links and documents related to the SEJPME program. Enrollment in SEJPME curricula is rank-restricted, and therefore not available to all users searching for this content. SGST SGST is an abbreviation for Small Group Scenario Trainer. SGST is a web-based collaborative work environment for staff and small-team training. SGST provides tailored scenarios where participants must form as a team to solve the problem as well as practice techniques and procedures along the way. SGST participation is by assignment only. If you are not assigned to an exercise or event, no information is available to you in the tool. LMS USER GUIDE APRIL 2021 Page 18
For additional information on SGST, contact the JKO Help Desk at jkohelpdesk@jten.mil

VCLASS
VCLASS stands for the JKO Virtual Classroom. VCLASS provides an interactive online classroom environment for
instructors and students. Courses are typically composed of a series of modules scheduled over a period of days or
weeks. The classroom mirrors the classroom learning environment at most academic institutions. Courses may be linked
to JKO LMS courses at the Instructor’s discretion to track course completions in the student’s training history.

For additional information on VCLASS, contact the JKO Help Desk at jkohelpdesk@jten.mil

Forgot User Name
If you forgot your User Name and are unable to log in to JKO, you can request it from the JKO Login Page.

        1. Log in to JKO at https://jkodirect.jten.mil

        2. Select OK in the DoD Warning Banner. If you do not select OK, you will not be able to access the JKO LMS.

        3. From the Login area, select the Forgot User Name Link.

LMS USER GUIDE                                           APRIL 2021                                             Page 19
4. Enter the Email address associated with your JKO Account. Click the Submit button. JKO will send your User
Name to that address. JKO cannot send email to any other email address.
Forgot Password
If you forget your Password, you may reset it by following these steps.
1. From the Login window, select the Forgot Password / Expired Token Link.
LMS USER GUIDE APRIL 2021 Page 202. Enter your JKO User Name and the Email address associated with your JKO Account. Select Submit. A
temporary Token will be emailed to the Email address associated with your JKO Account.
3. Once you receive your Token, return to the JKO Login window, and select the Received a Token link.
4. In the workspace that opens, enter your User
Name and Token. To reduce possibility of errors, we
highly recommend you copy/paste your Token directly
from the email you received rather than type it in. Click
the Submit button.
5. In the appropriate fields, create a
new Password that conforms to the rules
outlined on the screen. Click Reset Password.
LMS USER GUIDE APRIL 2021 Page 216. When you have successfully set a new Password, you will be returned to the main JKO Page. Follow the steps detailed here to log in to JKO. JKO Help Desk Information The JKO Help Desk is available to assist 24 hours a day, seven days a week, except Federal Holidays. Email us at jkohelpdesk@jten.mil, or call Commercial: (757)203-5654. Frequently Asked Questions Q: How do I log in to JKO from home? I don’t have a CAC reader at home. A: To log in at home, you can use your JKO User Name and Password. If you don’t know your User Name, review the Forgot User Name section above. If you don’t know your Password, review the Forgot Password section above. You must have access to the Email Address associated with your JKO Account. Q: I have a family member who is required to take the Antiterrorism Awareness Training. Does he/she need a JKO account? A: No, he or she can take the Antiterrorism Awareness Training without a JKO account directly from the main JKO page. Upon completion, the system will generate a completion certificate, however the system will not keep a record of the completion. Ensure you Save or Print a copy of the certificate for your records when you finish the course. Q: I have requested several Tokens, but every time I enter it in the Password field I am unable to create or change my Password. What am I doing wrong? A: A Token is not a Password, and should never be entered into the Password field. When you request or receive a Token, follow the steps in the Forgot Password section above, to create or change your Password. Entering an incorrect Password three times will result in your account being deactivated. Contact the JKO Help Desk for assistance. Q: I entered my email address into the field to request a Token. I still haven’t received it? Why won’t it send me a Token? A: The Token is sent to the Business Email Address in your JKO Profile. For security reasons, you cannot enter any email address into the Email field when requesting a Token. Q: I can’t find my Organization in the list in my Profile. What do I do? A: First, Organization is not a required entry to complete your Profile. Second, not all Organizations are loaded into JKO. If you know your Organization is in JKO, try entering a smaller amount of text into the Organization search field, which increases the number of results. You may now see your Organization. Or, contact your Training Coordinator to verify the exact nomenclature of your Organization in the list. If you are still having problems, contact the JKO Help Desk for assistance. LMS USER GUIDE APRIL 2021 Page 22
You can also read