SOFTWARE USER GUIDE HDM / HDA - HD MANAGER version 8
←
→
Page content transcription
If your browser does not render page correctly, please read the page content below
GO WITH THE FLOW.

                                                       SERVICE
QUICK GUIDE

SOFTWARE USER GUIDE-
 HDM / HDA

 HD MANAGER                version 8

www.horn-tecalemit.co.uk       customerservice@pclairtechnology.com
GO WITH THE FLOW.

WELCOME
       Thank you for your recent purchase! We couldn’t be more excited to receive you into our
TECALEMIT family, which we believe, is something very special. We know there are other options
out there, but we’d like to think that we won your business for any number of reasons. Whether
it was our high-quality products, our dependable customer service, our knowledge of the Industry,
or our dedication to customizing solutions to best fit your needs. We always want to ensure your
expectations are not only met but exceeded with every piece of equipment we put out.

       We work hard to stay ahead of the Industry, constantly updating our product manuals, cre-
ating videos to guide you through set-ups and installs, and most importantly - listening to your
feedback. Inviting you to become a part of our inner circle is important because we create and
design with you in mind. Our passion is based on our company core pillars which you will find
throughout our entire organization: Performance, Innovation, Technology, and Service.

       Follow us on Twitter, Like us on Facebook, browse through our pins on Pinterest, and read
our blogs online. It’s all for you! These tools are carefully crafted to inform, engage, and resolve.
If you have an idea, comment, or question - we always encourage you to say so. We fully acknowl-
edge that we cannot grow without your help. So keep watching our YouTube channel, call us, or
shoot us an email - hold us responsible for evolving our products so you too, can evolve and grow.

      We appreciate your support, input, and business. We look forward to building a relationship
with you and your customers and welcome you to the new TECALEMIT experience!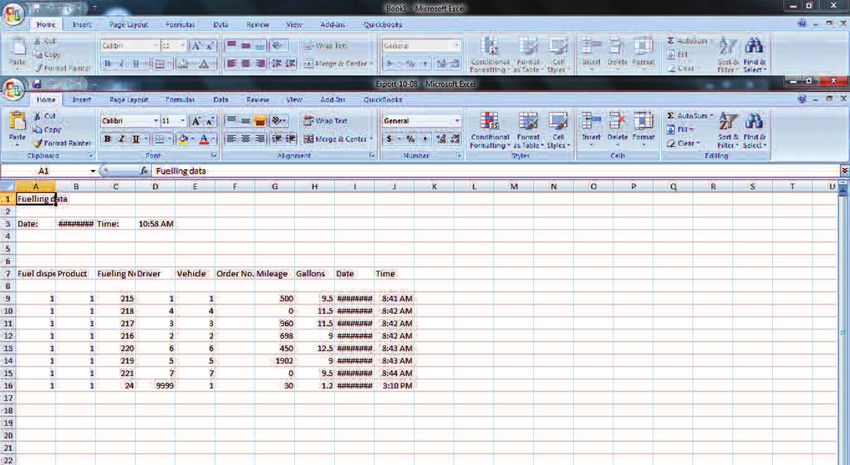
GO WITH THE FLOW.

BEFORE YOU START
1. Make sure the HDM / HDA is powered up and all necessary connections have been made.

2. If you are not using the Auto Nozzle function in the system, make sure that this feature is turned off. At
the HDM / HDA, enter the master code to get into the system…once you are in the system, navigate the menu
to the following areas: enter master data, 99999/ System / Refuel options / Nozzle switch / No /.
       This is how you can navigate at the box controls to ensure nozzle switch is turned off if you are not
using this function. Press the exit key until you return to the home screen for Driver info input.

3. Before you get started in the software, make sure that you change preferences to US units. Open your HD
manager 8 software , and navigate to settings tab / now click on settings icon on the left / now click on units
tab / set everything to gallons, miles, and inches.

Note: Now you are ready to proceed to setting up your system.

                                                                               3

    3

    3
GO WITH THE FLOW.

SAFETY INSTRUCTIONS
The software has been programmed in accordance with state of the art and recognized safety specifications.
Nevertheless, there is a danger of loss of data if it is used inappropriately. It is therefore essential to act
in accordance with these safety instructions, and in particular with those sections identified as warnings.

WARNING NOTICES AND SYMBOLS
In this guide, the following signs are used for highlighting important
information.

          Special information

          Special information on “do’s and don’ts” for damage prevention.

  !       Attention

ORGANIZATIONAL MEASURES
This quick guide should always be kept readily available at the site of operation! Each person con-
cerned with the installation and use of the software must have read and understood the entire manual.

QUALIFIED PERSONNEL
Persons who install or use the software must be appropriately qualified to carry out this work. The areas of re-
sponsibility, competences, and supervision of the personnel must be precisely regulated by the operating com-
pany. If the personnel does not have the required knowledge, they must be trained and instructed. The operating
company must also ensure that the contents of the operating manual are properly understood by the personnel.

SOFTWARE INSTALLATION
      Before installing new HD Manager 8 software, disable any windows anti-virus you may have and
      disable windows fire wall. Visit with your IT manager for future help.
      You can also download the HD Manager from our resources tab on our website.
       Visit us at: www.horn-tecalemit.co.uk

      Insufficient knowledge of this guide may void your warranty.

  !

                                                                                            LAN         Wi-Fi

                                                                                                  +
GO WITH THE FLOW.

TABLE OF CONTENTS

        Wi-Fi SET UP
   1

        LAN SET UP
   6

        USB SET UP
   8

        SOFTWARE SET UP - FUEL TERMINAL
  11

        UPLOAD DATA TO SYSTEM
  16

        IMPORT FUEL DATA
  19
                                          LAN       Wi-Fi

                                                +
GO WITH THE FLOW.

Wi-Fi SET UP

   Note : You are ready to set up Wi-Fi connection to your HDM / HDA.
                                                                                      Initial Set Up

          Open your HD Manager 8 Software and proceed to the next Page.

                                                                          Wi-Fi

                                                                                  1
GO WITH THE FLOW.

Wi-Fi SET UP
                                                    1

 1a

                                       1b
                                                                                  STEP 1
  2

             3
1. Click on settings to open up the category.
1a. Click on settings sub category.
1b. Click on the miscellaneous tab.
2. Make sure “activate UDP” is checked.
3. Now click on HDA - (W) LAN / GPRS for the next step.

                                                        * For steps 4-6 contact your IT manager
                                                          for further help.

                            1

                                                        2                           STEP 2

                                           3                6
                            4

                            5
                                                7

1. Check WLAN.
2. Check (DHCP).
                                                                                                              Initial Set Up

3. Make sure “54937” is entered in the port box.
4. Enter your Wi-Fi network name.
5. Enter your Wi-Fi network password.                                                             Wi-Fi

6. Select your Wi-Fi network encryption.
7. Save and turn page for the next step.                                                                  2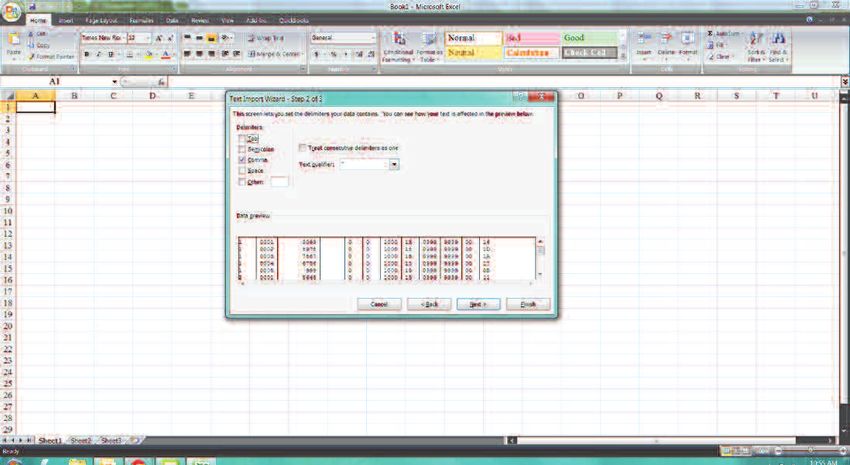
GO WITH THE FLOW.

Wi-Fi SET UP

                                                            1

                                                                              STEP 3

1. Clicking “save” takes you to a new screen. Save the file named “network” to a TECALEMIT USB DRIVE.
   DO NOT CHANGE THE FILE NAME “NETWORK” TO SOMETHING DIFFERENT, THE HDM / HDA
   WILL NOT RECOGNIZE IT.

2. Close ‘save file’ dialogue box. Take USB to HDM / HDA.

  Continue to next step.

     Make sure the file “network” was saved to a TECALEMIT USB key.
                                                                                                             Initial Set Up

                                                                                                 Wi-Fi

                                                                                                         3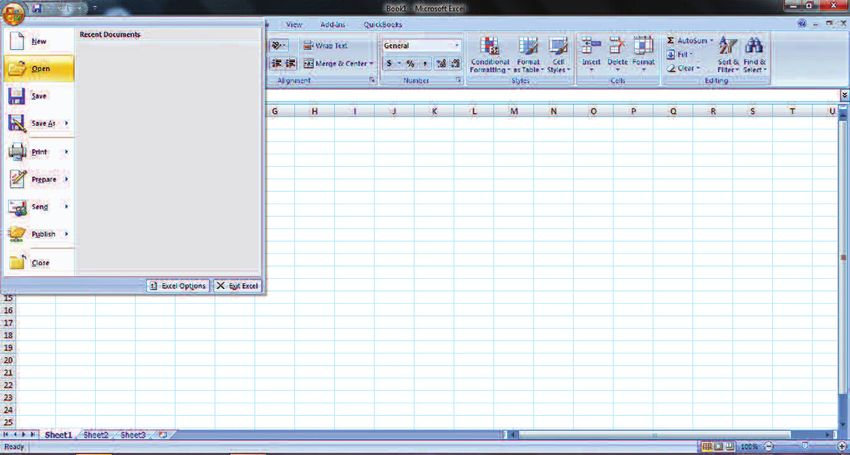
GO WITH THE FLOW.

Wi-Fi SET UP
                                                                                            STEP 4
 Note : Use provided USB only. Follow steps below before inserting USB in HDM / HDA.

 Note : Take USB key where you saved the “network” file name and walk to the HDM / HDA.
        DO NOT INSERT USB KEY YET.

                                                       1. Enter master code to access menu.

                                                       2. Scroll down to “system” and press enter.

                                                       3. Scroll down to “extended” and press enter.

                                                       4. Scroll down to “interface” and press enter.

                                                       5. Scroll down to “read config” and press enter.

                                                       6. Now insert memory stick (USB). The HDM / HDA
                                                          will read the information and will begin to search
                                                          (connect with your Wi-Fi system).

                                                       7. Press exit button until you get to the first screen,
                                                          unit will re-start.

                                               * Once connected to your network, proceed to page #11
                                                 to set up your new HDM / HDA, drivers, and vehicles.
                                                                                                                    Initial Set Up

 Note : On your screen, if signal strength level indicator is more than 1%, you are good.
                                                                                                        Wi-Fi

 Note : On your screen, if signal strength level indicator is 0%, check all network
        configuration data for your router.                                                                     4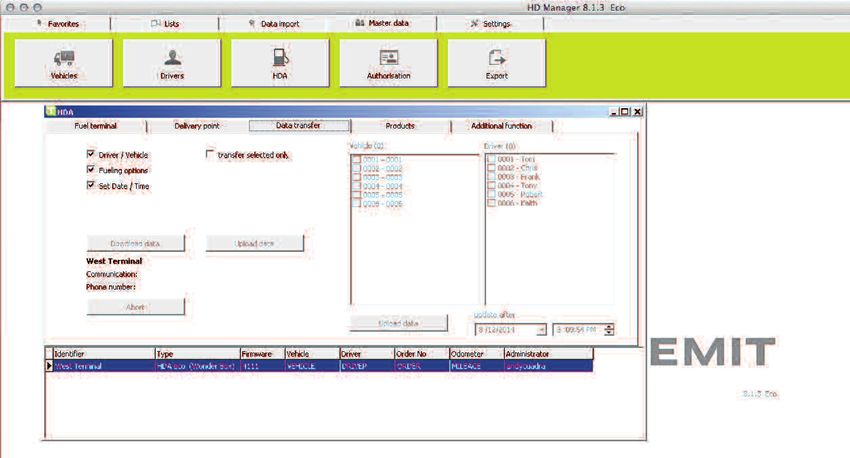
GO WITH THE FLOW.

Wi-Fi SET UP AT THE BOX
    Note : If you are working without access to the software, you can set up the HDM / HDA with Wi-Fi
           at the system. Follow the next steps:

    **Note : If you have already set up Wi-Fi through the software, you can skip this step.

1. Enter master code to                2. Navigate to System /               3. Navigate to SSID- here you
get in the system.                     Extended / Interface..                will enter the wireless network
                                                                             name. Once you have entered
                                                                             it press enter key to continue.

6. Navigate to DHCP and               5. Navigate to encryption, enter       4. Navigate to Paraphrase- en-
make sure it is set to “ON”.          the type of encryption associ-         ter the password for the wire-
                                      ated with your wireless router.        less network you want to con-
                                      Ask your IT manager for help...        nect to. Once you have entered
                                                                             it press enter key to continue.

7. Navigate to IP address:             8. Navigate to Subset                 9. Navigate to IP gateway:
Make sure it is at zero.               mark: Make sure it is at zero.        Make sure it is at zero.

                                      11. Navigate to Signal: The Won-       10. Navigate to Port: make
                                      derbox will start trying to con-       sure “54937” is entered in the
                                      nect to your wireless network.         system.

                                              Once connected to your network, proceed to page #11
                                              to set up your new HDM / HDA, drivers, and vehicles.
                                                                                                                  Initial Set Up

                                                                                                     Wi-Fi

                                                                                                              5
GO WITH THE FLOW.
LAN SET UP
Note : You are ready to set up your LAN connection
to yourHDM / HDA. Open your HD Manager 8
Initial Set Up
Software and proceed to the next page.
6GO WITH THE FLOW.
LAN SET UP
STEP 1
1. Make sure HDM / HDA is powered up.
2. Now connect the ethernet cable from the HDM / HDA port to your
office router.
Note : Do not connect ethernet cable directly to a P.C.
STEP 2
1
1
2
Initial Set Up
1. Open up HD Manager 8 Software, click on Master data, and now fuel terminal.
2. The HDM / HDA will populate this field automatically after a couple of minutes.
Once populated, you are connected to the system. LAN
Once connected to your network, proceed to page #11 to set up your new HDM / HDA, 7
drivers, and vehicles.GO WITH THE FLOW.
USB SET UP
Initial Set Up
Note : You are ready to set up your USB connection
to your HDM / HDA. Proceed to the next page
to set up global parameters.
8GO WITH THE FLOW.
USB SET UP
STEP 1
1. Here we are going to set the global preferences for what is required at the HDM / HDA.
(USB set up).
2. At the HDM / HDA, you are going to set up the following parameters: Vehicle, Driver, and
Odometer. Let’s get started.
3. Enter your 5 digit master code / navigate to system / navigate to refueling options / navigate to
identification. You can toggle left to right to choose Driver only, Vehicle only, or both. Choose your
prefered setting by hitting Enter on your selection.
4. Scroll down to mileage. Here you are going to select if the HDM / HDA will require an odometer
input with the following selections: inquiry, always inquire, or do not inquiry. Select appropriate
setting by entering your selection.
5. Scroll down to ‘previous mileage’. Here you are going to select if the HDM / HDA will require a
previous mileage with the following selections: yes or no. Select appropriate setting by entering
your selection.
6. Scroll down to Nozzle switch. If you are not using a nozzle witch make sure this feature if turned
off.
7. Scroll down to ‘Refueling limit ‘. Here you are going to select the max refueling gallons allowed.
Enter your desired gallon refueling limit by scrolling left and entering your selection.
8. Scroll down to ‘Max refuel time’. Here you are going to select the max refueling time per
transaction. Factory setting is at 2 minutes, enter your desired maximum refueling time refueling
limit by scrolling left and entering your selection.
9. Scroll down to ‘Time out refuel’. Here you are going to select the time out refuel option during
Initial Set Up
dispensing w/o any medium being dispensed. Factory setting is at 2 minutes, enter your desired
time out option by scrolling left and entering your selection.
10. Press the exit key until you return to the home screen for Driver info input.
9
Congratulations, you have set up your global parameters, continue to the next page to set up your
new HDM / HDA, drivers, & vehicles.GO WITH THE FLOW.
USB SET UP
1
2
3
4
5
6
7
9
STEP 2
8
10
1. Select Master data.
2. Now select HDA icon.
3. Select fuel terminal tab.
4. Identifier: Enter the name you wish to call your HDM / HDA. (ie. west terminal).
5. Type: From the pull down menu, select HDA eco HDM / HDA.
6. Device address: This remains at “0” for the initial HDM / HDA. If you are installing more than 1
HDM / HDA, the second one will become Device Address #1 .
7. Enter Master Code: 99999 as communication pin.
8. Communication: From the pull down menu select USB Flash Drive.
9. Now click save. Save box will now show ‘Ok’ to confirm changes.
10. The new HDM / HDA parameters will be automatically populated here and info will be displayed at
the bottom of the window.
STEP 2 Initial Set Up
Once you have set up your system, this is what it will look like. 10
Now you are ready to begin setting up drivers and vehicles.
Proceed to the page #13.GO WITH THE FLOW.
SOFTWARE SET UP
HD MANAGER version 8
11GO WITH THE FLOW.
SOFTWARE SETUP - FUEL TERMINAL
1
2
3
7 4
5
6 10
8
9
NOTE 1
Note 1 : This entry automatically populates
with the correct identifier, type, firmware,
vehicle, driver, etc..(Wi-Fi option only)
Wi-Fi / LAN Fuel Terminal set up- Follow these next steps after you have set up your Wi-Fi/LAN connection.
1. Click Master data tab, then click HDA icon, then select fuel terminal.
2. Identifier: Enter the name you wish to call your HDM / HDA unit (ie. West terminal).
3. From the type pull down menu, select HDA HDM / HDA.
4. Select appropriate options needed at the HDM / HDA.
5. Communication pin can be left blank.
6. Communication: Select LAN.
7. Device address: From the factory it is set at “zero”. If you are setting up 1x HDM / HDA, leave it at
“zero”. If you are setting up more than 1x HDM / HDA, the second unit will need to be set at “1”.
8. Com Port/Modem: This will automatically populate or stay blank.
9. IP address will automatically populate.
10. Click save.
Software Set Up
USB Fuel Terminal set up- These steps have been performed in pages 8-10. You can skip to the next page.
LAN Wi-Fi
+
12GO WITH THE FLOW.
SOFTWARE SET UP - DELIVERY POINT
1
2
4
5
6 8
3
7
8
9
Wi-Fi / LAN Delivery Point set up-
1. Select Master data tab, then HDA icon, then delivery point tab.
2. Delivery point “1” is automatically selected.
3. Enter new product name that the HDM / HDA will manage. Enter product name first, then enter
displayed name. Click save. Save box will now show ‘Ok’ to confirm changes. To change product
name, simply highlight existing product, retype a different name in both fields and save.
4. Here you can limit total litre output on the HDM / HDA per transaction .
5. Here you can limit time allocated between entering code and picking up nozzle to dispense.
6. Here you can limit max fueling time during each transaction.
7. Select appropriate product name from pull down menu.
8. Hit save and exit.
USB Delivery Point set up-
1. Select Master data tab, then HDA icon, then delivery point tab.
2. Delivery point “1” is automatically selected.
3. Enter new product name that the HDM / HDA will manage. Enter product name first, then enter displayed
Software Set Up
name. Click save. Save box will now show ‘Ok’ to confirm changes. To change product name, simply
highlight existing product, retype a different name in both fields and save.
4. You can now go to set up your drivers and vehicles on the following page.
LAN Wi-Fi
+
13GO WITH THE FLOW.
SET UP - VEHICLES & DRIVERS
1
2 8
3 9
4 10 11
6
5
STEP 1 - VEHICLES
7
Wi-Fi / LAN Vehicles set up-
1. Under Master data, select vehicles icon to start adding your vehicles.
2. Vehicle number is already populated as vehicle number.
3. Here you will name your vehicle. Type in your description.
4. Code is the number associated with the vehicle and assigned by admin. Transponder keys are optional.
5. Optional transponder key FOB.
6. Optional security. You can force an additional pin # for this vehicle.
7. Year of manufacture, enter value here.
8. Optional entry. Here you can assign max limit in gallons per transaction per this vehicle.
9. Here you can force the vehicle to travel a certain mileage range before refueling. To activate, go
back to options and check “force mileage inquiry”.
10. Here you can force a maximum fueling time once he/she starts refueling.
11. Click “Save” once completed.
USB Vehicle set up-
1. Under Master data, select vehicles icon to start adding your vehicles.
2. Vehicle number is already populated as vehicle number.
3. Here you will name your vehicle. Type in your description.
4. Code is the number associated with the vehicle and assigned by admin. Transponder keys are optional.
5. Optional transponder key FOB. *Additional programming steps are needed here.
6. Optional security. You can force an additional pin # for this vehicle.
7. Year of manufacture, enter value here.
Software Set Up
8. Click ‘save’ once completed. Truck info should populate at the bottom of the window.
LAN Wi-Fi
+
14GO WITH THE FLOW.
SET UP - VEHICLES & DRIVERS
1
2 3
7
4
STEP 2 - DRIVERS
5
6
Wi-Fi / LAN / USB driver set up-
1. Select Master data tab, then “Drivers” icon.
2. Driver number is already populated as driver #1.
3. Input driver name.
4. Here you get to assign a code (up to 6 digits) that your driver will use to access the system.
5. Optional. Applicable only if you need to set up transponder key. *Additional programming steps are
needed here.
6. Optional. Additional security added to driver by forcing pin.
7. Once steps completed above, hit save. Info will populate at the bottom of the window.
Software Set Up
LAN Wi-Fi
+
15GO WITH THE FLOW.
UPLOAD DATA TO SYSTEM
Software Set Up
LAN Wi-Fi
+
16GO WITH THE FLOW.
DATA EXPORT - VIA USB
Note : These next steps will show you how to upload the information you just entered (i.e. drivers,
vehicles, etc...) to the HDM / HDA.
1
2
3
4
Text
USB data export -
1. Select Master data, then “export” icon.
2. Select fuel terminal. This is what you named your HDM / HDA in the master data/fuel terminal.
3. Select the HDA eco v 4.230 or higher option.
4. Click on “export“ to begin process.
5. Save file to USB drive. DO NOT change file name from: DATAIN. Once bar is green, info has been saved.
6. Walk to box and plug in USB. Your HDM / HDA will show “Storing...” and you will hear a series of beeps.
When the box is done uploading the information from the USB, it will go back to the the home screen
for driver info input.
Software Set Up
Congratulations! You have completed the set up for USB.
LAN Wi-Fi
+
17GO WITH THE FLOW.
DATA EXPORT - VIA Wi-Fi/LAN
1
1
1
2
3
Wi-Fi / LAN data export
1. Select master data / select HDA / select data transfer tab.
2. Select options to be uploaded & downloaded.
3. Click upload data.
Congratulations! You have completed the set up for Wi-Fi / LAN.
Software Set Up
LAN Wi-Fi
+
18GO WITH THE FLOW.
IMPORT FUEL DATA
LAN Wi-Fi
+
19GO WITH THE FLOW.
IMPORT - VIA USB
NOTE: Walk to the HDM / HDA and insert the TECALEMIT USB stick. HDM / HDA will automatically down-
load file “001” for the first time and place it on USB stick. Once you have downloaded, walk back to your
computer and insert USB. Follow steps below...
1
STEP 1
1a
2 USB import data-
1. Select Data import.
1a. Import data.
2. Click “select file”.
3. Look for USB drive.
4. Look for file 001 in USB file.
5. Highlight file 001 and click open.
6. Click import data button.
3
5
4
Import Fuel Data
6
LAN Wi-Fi
This is what it looks like
after importing data.
+
20GO WITH THE FLOW.
IMPORT - VIA Wi-Fi/LAN
1
2
4
3
5
Wi-Fi / LAN import data-
1. Click on data import tab.
2. Click on data import icon.
3. Select download data tab.
4. Fuel terminal and communication will automatically populate.
Remember you have already set up Wi-Fi/LAN in previous chapter.
5. Click on download data.
Import Fuel Data
LAN Wi-Fi
+
21GO WITH THE FLOW.
VIEW FUEL REPORT
1
2
5
3
4
1. Go to lists tab.
2. Click on fueling data.
3. Check fuel terminal, showing the name you have assigned your HDM / HDA.
Check your product(s) already assigned previously.
4. Optional date range to view fuel report.
5. Click on ‘show’ then ‘report’ to view your transaction report. See sample on next page.
Fuel Report
LAN Wi-Fi
+
22GO WITH THE FLOW.
FUELING REPORTS
HDM Fuel Driver Vehicles Miles Fueling Order Products Gallons Date Time
Dispenser No. No.
ON ROAD 1 DAVID 100 1414 00059 Diesel 5.20 1/20/2014 12:30PM
ON ROAD 1 MARK 102 1256 00061 Diesel 5.80 1/20/2014 12:31PM
ON ROAD 1 TOM 101 5236 00060 Diesel 5.40 1/20/2014 12:31PM
ON ROAD 1 LARRY 104 1235 00063 Diesel 5.20 1/20/2014 12:32PM
ON ROAD 1 SAM 103 5656 00062 Diesel 5.40 1/20/2014 12:32PM
Fuel Report
LAN Wi-Fi
+
23GO WITH THE FLOW.
EXPORT DATA TO EXCEL
1
2
4 5a
3
5
6
7
1. Go to lists tab.
2. Click on data export icon.
3. Check appropriate boxes for fuel terminal, product(s), vehicles, and drivers you wish to see in your report.
4. Date range to export data from.
5. Check all that apply.
5a. Make sure the “with column heading” is checked.
6. From the pull down menu select “tab”.
7. Click ‘show’ and info will populate at the bottom of the window.
8. Export and save file to your computer as a .csv file.
Fuel Report
LAN Wi-Fi
+
24GO WITH THE FLOW.
EXCEL
1
1. Open excel and let’s look for your file. Click file open....
Fuel Report
LAN Wi-Fi
+
25GO WITH THE FLOW.
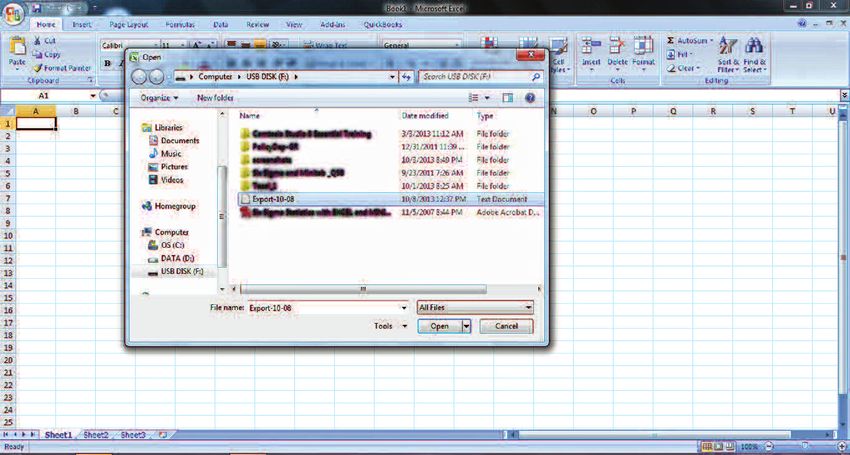
EXCEL
Look for the file to open.
Make sure you select all files since the file you will be looking for is not an excel file.
Fuel Report
LAN Wi-Fi
+
26GO WITH THE FLOW.
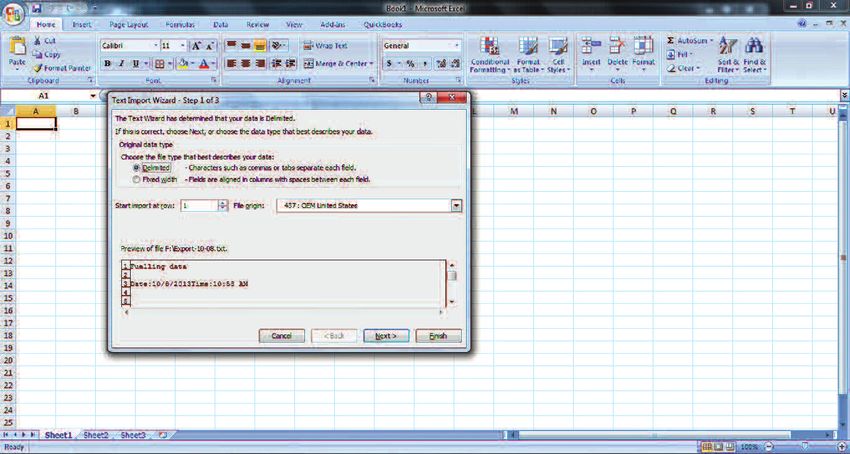
EXCEL
1
2
1. Make sure that you select Delimited as shown.
2. Click next...
Fuel Report
LAN Wi-Fi
+
27GO WITH THE FLOW.
EXCEL
1
2
1. Click on comma option.
2. Now click next...
Fuel Report
LAN Wi-Fi
+
28GO WITH THE FLOW.
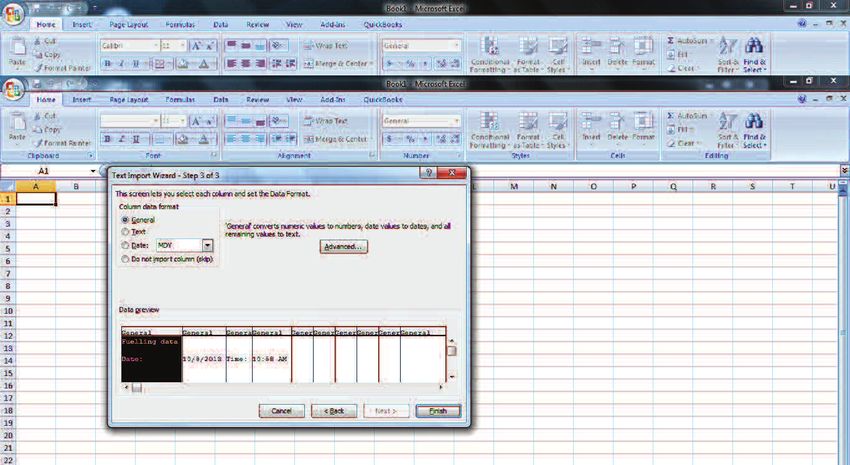
EXCEL
1
2
3
1. Make sure you have selected General as shown.
2. You can leave the date as shown. “MDY”.
3. Click finish.
Fuel Report
LAN Wi-Fi
+
29GO WITH THE FLOW.
EXCEL
This is the screen that you should have in front of you.
If you see the following characters on your file, simply drag the columns to make them wider to show the
numbers.
Fuel Report
LAN Wi-Fi
+
30You can also read