Thank you for choosing the Encore grinder. You're on the road to making great tasting coffee! - Baratza
←
→
Page content transcription
If your browser does not render page correctly, please read the page content below
ENCORE OPERATIONS MANUAL
                      ®

Encore™
INTRODUCTION

Thank you for choosing the Encore
grinder. You’re on the road to making
great tasting coffee!
The Encore offers an easy and simple coffee-grinding experience, resulting in a
delicious coffee-drinking experience for you. Below are detailed descriptions of
the features that make the Encore stand out from other grinders in its class.

Precision Conical Burrs                                           Efficient Motor

Manufactured in Europe, the Encore’s 40 mm conical burrs          The Encore houses a powerful DC motor that produces
will grind for many styles of coffee. Its hardened steel          more than four times the output with twice the efficiency of
burrs produce the quality grind that is going to make a key       a standard AC motor found in most grinders in this class.
difference to the taste in your cup. Our conical burrs grinders   The motor spins at less than one-third the speed, making it
are exceptional at producing consistent grinds from very fine     quieter and lower in pitch. Extremely well-made, the motor
to very coarse as well as being durable and will remain sharp     is built to handle long-duty cycles. In addition, it possesses
for many years.                                                   a thermal safety device that protects the motor from
                                                                  overheating and automatically resets once the motor cools.
Grind Adjustment

The Encore has 40 distinct settings to enable grinding from
espresso to French Press with the simple turn of the hopper.
This range of grind settings helps you explore an extensive
range of brew methods (AeroPress, Hario V60, Chemex,
automatic drip brewers).

September 2019 (v4)
ENCORE OPERATIONS MANUAL
®
TABLE OF CONTENTS
INTRODUCTION 1
TABLE OF CONTENTS 2
SAFETY INFORMATION 3
PARTS IDENTIFICATION 4
OPERATION 5
Setting the Grind Control 6
Manual Switch Operation 6
Front Mounted Pulse Button 6
CARE AND CLEANING 7
Removing the Bean Hopper 7
Removing the Ring Burr 7
Cleaning the Grounds Bin, Hopper and Burrs 7
Replacing the Ring Burr 7
Replacing the Bean Hopper 8
Clearing a Clogged Grinder 8
Automatic Cleaning 8
WARRANTY AND SERVICE 9
September 2019 (v4)
2ENCORE OPERATIONS MANUAL
®
SAFETY INFORMATION
Please read the information below very carefully. It contains
important safety information for this appliance. Please keep
these instructions for future reference.
!! Use only with AC current and the correct voltage. See the !! Do not leave your grinder unattended while turned ON.
label on the base of the grinder to determine the correct
voltage. !! This appliance can be used by children aged from 8 years
and above and persons with reduced physical, sensory or
!! Only clean the grinder housing with a dry or slightly damp mental capabilities or lack of experience and knowledge if
cloth. Do not immerse the grinder, plug or cord in water or they have been given supervision or instruction concerning
any other liquid. use of the appliance in a safe way and understand the
hazards involved.
!! Baratza will not accept any liability for damage, injury, or
warranty if the grinder is used other than for its intended !! Cleaning and user maintenance shall not be made by
purpose (i.e. grinding roasted whole coffee beans) or is children without supervision.
improperly operated or repaired.
!! Always unplug the grinder from the electrical supply before
!! Keep the appliance and its cord out of reach of children aged assembling, disassembling or cleaning. To unplug, grasp
less than 8 years. plug and remove from the outlet. Never pull on the cord.
!! Do not operate the grinder with a damaged cord or plug.
If the supply cord is damaged, it must be replaced by the
manufacturer, its service agent or similarly qualified persons
in order to avoid a hazard.
CAUTION: ALWAYS unplug the electrical supply cord prior to cleaning the grinder.
September 2019 (v4)
3ENCORE OPERATIONS MANUAL
®
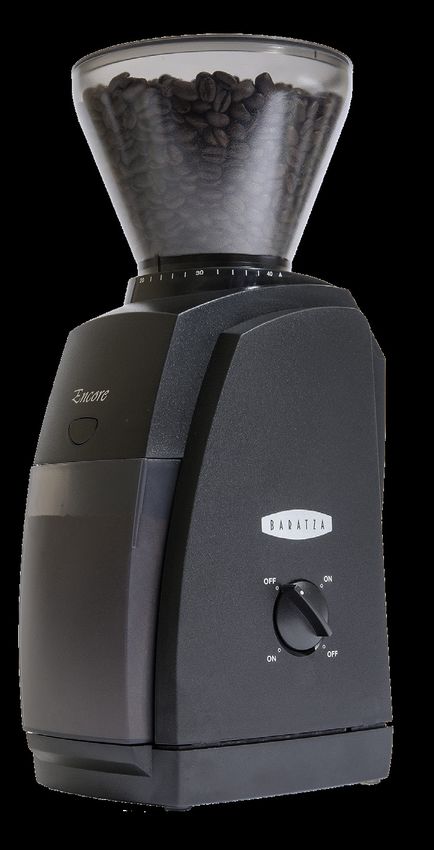
PARTS IDENTIFICATION
1. Hopper Lid
1
2. Bean Hopper
3. Grind Setting Indicator
4. Black Silicone Gasket
(cut away in 2nd illustration)
5. Removable Ring Burr
2 6. Grind Adjustment Scale
7. Pulse Button
8. Grounds Bin with Max Fill Line
9. On/Off Knob *
3 10. Brush *
11. Weighted Base
4 12. Grind Adjustment Ring
13. Grind Adjustment Tab
5 14. Burr Alignment & Lifting Tabs
6 15. Wingnut (do not remove)
16. Center Cone Burr
* included in grounds bin
7
4 13
8
9 12
5
10 16
14
10
30
20
11
15
September 2019 (v4)
4ENCORE OPERATIONS MANUAL
®
OPERATION
IMPORTANT TO KNOW BEFORE USING YOUR GRINDER
• Follow the steps in the Quick Start Guide (included with your grinder or available online here)
to get your grinder ready for use
• Be sure all parts are washed, dried, and clean. If you need further instructions, check out the Care & Cleaning section
Prior to using your Encore grinder for the first time you should wash the bean hopper and grounds bin in warm soapy water.
Be sure to fully dry these parts before re-installing. See the section on Care and Cleaning for instructions on how to remove
and reinstall these parts. There may be some rust or discoloration on the burrs when you receive your grinder. This is normal
and will disappear after a small amount of coffee has been ground. To remove the rust and season the burrs, grind 50 grams
of coffee and discard.
INITIAL OPERATION
• Place the Encore on level surface, plug into AC Outlet
• Remove lid from hopper, pour in roasted beans and replace the lid
• Ensure grounds bin is in place
• Set the grind adjustment/control* (see below for details)
• Use On/Off switch, or front mounted pulse button to start the grinder
* Grinder will not activate if above setting 40
September 2019 (v4)
5ENCORE OPERATIONS MANUAL
®
Note: Partially ground coffee beans may remain between the burrs after the grinder is turned
off. When making ANY grind adjustments, the grinder must be running.
SETTING THE GRIND CONTROL
The grind setting indicator moves from coarse (40) to fine (1). Slowly rotate the bean hopper clockwise or counter clockwise
to align the grind setting indicator on the bean hopper with the desired number setting on the grind scale.
Turning the hopper to the right ( ) produces a coarser particle size and left ( ) produces a finer particle size.
The settings shown in the table below can be used as a general starting point. The actual grind size for a particular setting
will vary depending on many factors including: degree of roast (light vs. dark), freshness, humidity, type of bean, oil content,
etc. With use, you will determine the setting that is right for your taste, brewing style, and your favorite beans.
Espresso AeroPress Hario V60 Automatic Chemex French
Brewer Press
Suggested Setting 8 12 15 18 20 28
MANUAL SWITCH OPERATION
You may rotate the On/Off switch clockwise or counter clockwise from any position without
damaging it.
* Leaving the grinder unattended while grinding a large dose may result in a clog
FRONT MOUNTED PULSE BUTTON
For short duration grinding, the Encore is equipped with a front-mounted pulse button.
Push and hold the pulse button to grind; the grinder will grind as long as the button is pressed.
Grinding will stop when the button is released.
Note: It is important that if using an espresso basket, hold it below the discharge chute so that
coffee powder can fall freely into the basket. Holding the basket too close to the discharge
chute may cause coffee to back up and clog your grinder.
September 2019 (v4)
6ENCORE OPERATIONS MANUAL
®
CARE & CLEANING
REMOVING THE BEAN HOPPER
Remove all beans from the hopper then press the front-mounted pulse button to grind any remaining beans through the
grinder. Remove the plug from the power outlet. Remove the hopper by rotating it counterclockwise until it stops and then lift
the bean hopper off of the grinder.
REMOVING THE RING BURR
Pull the black silicone gasket off the top of the ring burr. Remove the ring burr by lifting it straight up out of the grinder by the
lifting tabs. If the burr does not lift out, ensure that the grind adjustment ring is turned fully counterclockwise.
CLEANING THE GROUNDS BIN, HOPPER & BURRS
Wash the grounds bin, hopper, and the hopper lid in warm soapy water, then rinse and dry. If the grinder is used daily, the
burrs should be cleaned at least every few months using tablets (see below for Automatic Cleaning) or with a stiff brush.
Proper cleaning enables the burrs to achieve the most consistent grind possible. Cleaning also removes some coffee oils,
which will stale and degrade the flavor of the ground coffee.
REPLACING THE RING BURR
Ensure that the black adjustment ring is rotated counterclockwise as far as it will go. Replace the burr by lining up the red tab
on the burr with the rectangular cutout on the black adjustment ring. Both should be lined up with the setting 30. Wiggle and
push down firmly on the ring burr to ensure that it seats properly. After replacing the burr, place the silicone gasket on top of
the ring burr by aligning the two notches in the silicone gasket with the ring burr tabs (one of which is red) and gently work
the gasket down until it is seated on the top 1⁄8” (4mm) of the ring burr.
Caution: Do not put the bean hopper, hopper lid or grounds bin in the dishwasher. Hand wash
only. Do not immerse the grinder housing in water. Do NOT wash the burrs with water, or they
will rust.
September 2019 (v4)
7ENCORE OPERATIONS MANUAL
®
REPLACING THE BEAN HOPPER
To replace the bean hopper, line up the silver grind setting indicator tab with the black triangle on the right side of the grind
setting scale, near setting 40. Once the hopper is in place, press down gently, and rotate it clockwise to lock it in.
CLEARING A CLOGGED GRINDER
If your grinder is not dispensing coffee normally, it could be clogged with coffee powder. This can happen if the grounds
bin or portafilter are overfilled and ground coffee gets backed up into the grounds chute and grinding chamber. It can also
happen with the buildup of coffee powder over time. Clearing a clog requires more effort than and is different from a normal
cleaning, as coffee becomes packed in a hard-to-access passageway between the burr and grounds bin. The clog needs to
be cleared with the aid of tools.
Go to the Troubleshooting section on baratza.com/troubleshooting for help unclogging your grinder.
AUTOMATIC CLEANING
A thorough, fast, and easy cleaning can be accomplished using biodegradable grinder cleaning tablets. Grinder cleaning
tablets are designed to dislodge coffee particles, absorb/remove odors, as well as coffee oil residue. Remove all beans from
the hopper and run the grinder to remove any beans inside. Place the recommended amount of tablets into the empty grinder
hopper. Adjust the grind setting to 30, insert the grounds bin and use the dial to run the grinder. Grind all of the tablets into
the bin. Once complete, we recommend grinding approximately 30g coffee to remove any tablet residue. Discard the ground
tablets/coffee.
* Rice is not a substitute for grinder cleaning tablets. It may damage components within the grinder.
September 2019 (v4)
8ENCORE OPERATIONS MANUAL
®
WARRANTY & SERVICE
U.S. & CANADIAN WARRANTY INFORMATION
Limited Warranty for Baratza Grinders is 1 year from the original date of purchase or 25 hours of cumulative run time,
whichever occurs first. This warranty covers all defects in materials and workmanship (parts and labor) including free ground
transportation to and from our repair facility within the US and Canada. This warranty does not apply to: improper use, lack of
cleaning, abuse, normal wear and tear, lack of proper adjustment, foreign objects (stones, screws, etc.) in the beans, or uses
outside the intended use of grinding whole roasted coffee beans (roasted beyond 1st crack). If your grinder fails within one
year, e-mail us support@baratza.com or call 425-641-1245 or toll free 877-701-2021.
For additional warranty, support, or troubleshooting information, go to baratza.com.
INTERNATIONAL WARRANTY INFORMATION
For all countries outside the US and Canada, the warranty, support and service is provided by the International Retailer you
purchased from. If you purchased this grinder from a retailer outside of the country you live in, you may be responsible for
any shipping costs to service the grinder, and you may need to pay for service.
PROOF OF PURCHASE & PRODUCT REGISTRATION
You can register your grinder at baratza.com/register-your-grinder. Registration will enable us to contact you in the unlikely
event of a product safety notification and assist us in complying with the provisions of the Consumer Product Safety Act.
The serial number is located on the bottom of the grinder. Please keep your sales receipt that shows the date of purchase.
FOR REPAIRS OR QUESTIONS
Email: support@baratza.com
For Parts and Information go to: baratza.com
For Troubleshooting Help: baratza.com/troubleshooting
©2019 Baratza
124th Avenue NE
Suite A108/109
Bellevue, WA 98005, USA
baratza.com
Manual Revision Date 09/11/2019
September 2019 (v4)
9You can also read