Timberland Freedom User Guide
←
→
Page content transcription
If your browser does not render page correctly, please read the page content below

Timberland Freedom
                 User Guide

                Compiled by Colin Townend

               01625 611306 or 07825 702020

                          RAC
                 24 hr Breakdown Cover
                     0800 0151 888.

                   Reference HU 32525

                    Vehicle Registration

12/02/2009                  1                 Colin Townend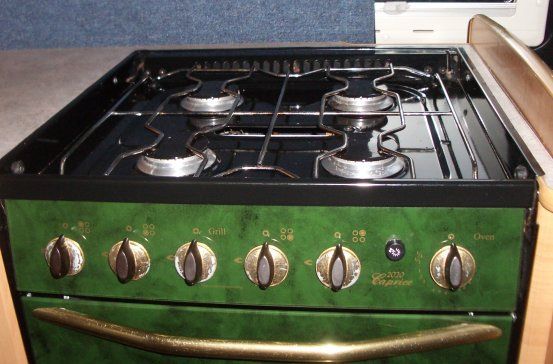
Pre-Start Checks
There are a lot of items that need to be safely stowed before driving the
vehicle. Please follow this checklist – it starts at the back, and works
forward through the vehicle.

      1.         TV put on the floor.
      2.         Gas off.
      3.         Boiler vent cover on.
      4.         Mains connection cover latched, and cable stowed.
      5.         Table and worktop extension stowed.
      6.         Toilet valve closed, and lid down.
      7.         Levelling Ramps retrieved from under wheels.
      8.         Bikes fixed to rack, or rear storage box locked.
      9.         Check rear repeater lights are working.
      10. No loose items on or around wash basin.
      11. Fridge: contents secure and door locked shut.
      12. All cupboards and drawers properly closed.
      13. Both roof lights latched closed.
      14. Work surfaces clear of loose items.
      15. Cooker lid down (with anti rattle towel in place).
      16. Water heater off.
      17. Central heating off.
      18. Windows latched shut with blinds open.
      19. Rear window curtains fully opened.
      20. Clean water tank: does it need filling?
      21. Wastewater tank: does it need emptying?
      22. Toilet: does it need emptying?
      23. Mirror adjustment: can you see the rear wheels?
      24. Remember the extra length; be prepared to run wide on
          corners.

    12/02/2009                           2                      Colin Townend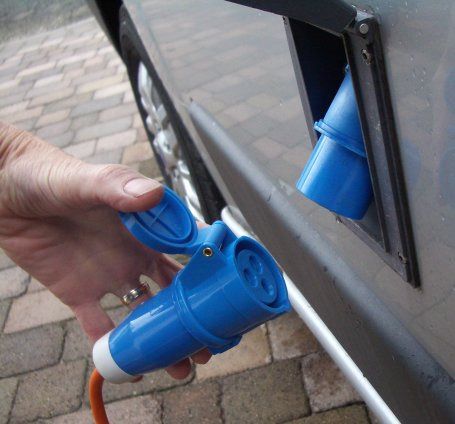
Driving a large vehicle
The dimensions of this vehicle are printed on the front cover.

Width: Although it appears big, the van is actually not much wider than an ordinary car.
The exterior mirrors are the widest part of the vehicle, and they give you a good “feel”
for the width. Be careful though about getting too close to trees and hedges; vans are
frequently scratched by strong branches hidden among the leaves.
The biggest difficulty for a new driver is in judging the extra length.

Length: The rear wheels are significantly further back from the driver than in a normal
car. As a result it is very easy to turn too soon and have the rear wheels bump over the
kerb, or worse, to scrape the side of the van against something.
The trick is to turn later, running wider on corners and at junctions. Adjust each external
mirror so that you can see both the kerb and the rear wheel. As you turn glance in the
mirror, and you will quickly learn when to turn.

Height: Watch out for overhanging branches, particularly when you are squeezing into
the side of the road to avoid another oncoming vehicle and your attention is focussed at
ground level. The height (2.7m) is written on a label at the top of the windscreen.

Parking: The vehicle is too tall to fit in most multi-storey car parks, and longer than
most on-street parking bays. If you effectively occupy two parking bays, it is safer to
buy two parking tickets. Some car parks have high-level barriers that are open during
the day, but close in the evening, and could prevent your tall vehicle from leaving.

Reversing: Ask your passenger to walk ahead to guide you. Tell them to stand where
they can see you in the mirrors, so you can see them – and open both front windows, so
you can hear them.

Driving: Diesel engines are generally happier to run at lower revs than petrol engines.

Passengers must remain seated with seat belts fastened whenever the vehicle is
moving.

                  Height: 2,650mm,     Width: 2,050mm,       Length: 5,5mm,

                                Max Gross Weight: 3300kg

     12/02/2009                               3                               Colin Townend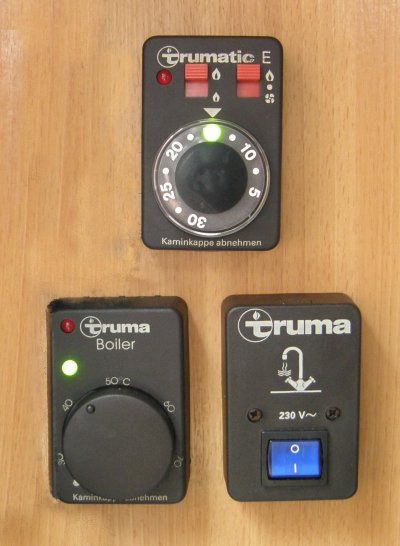
No Smoking
There is no smoking inside the van. We have also had problems when smokers have
stood outside the door or under the awning. It seems the wind has taken the smoke
into the van where it has adhered to the soft furnishings leaving a very unpleasant
odour for the next users. Smokers tend to under estimate how pervasive cigarette
smoke is.

Fire Prevention
Frying pan or grill fires are probably the greatest risk in a caravan.
Don’t try and carry a burning pan outside as the flames may blow back onto your arms.
Use a wet tea towel to cover flames entirely.
Switch off heat, and leave covered until cool.
   •     There is a red fire extinguisher is beside the driver.

Emergency Equipment
Behind the passenger seat are stored:-
   • One High-visibility Vest
   • First Aid Kit

Gas
Inside the rear door is the gas compartment. The gas is
switched on and off knob on top of the cylinder.

The gas must be off when driving, and it is illegal to have
it on in petrol filling stations and ferries.

If you have to change a gas cylinder, remember that the
fittings have left-hand threads (opposite to most
screws) so in the illustration above you would turn the nut clockwise to release it.
Finally, there are distribution valves in the bottom of the wardrobe. These give separate
control over which appliances receive gas:-
   •     Cooker
   •     Water Heating

       12/02/2009                               4                           Colin Townend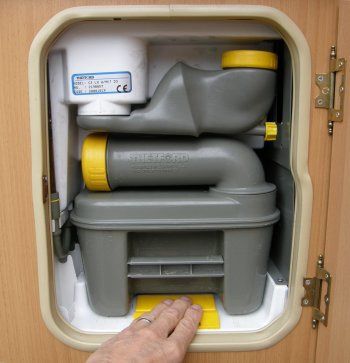
Cooker
The lid of the cooker should be always raised before use, and not lowered until the hob
has cooled. There is push-button ignition on the front - to the right of the knobs.
The gas ring controls start with the rear left, and move around the hob anti-clockwise. It
may help to think of them as forming a sort of smile? (As shown here in blue)

The knobs must be held in for a few seconds after lighting. This is a safety feature that
turns off the gas if the flame blows out.
When travelling, the lid should be lowered on to a tea towel folded and placed on the
hob, to prevent rattles.

Microwave Oven
The microwave is only useable when the van is connected to a 230 v ac mains supply.
Do not put melamine crockery in the microwave, or any metal items.
Put a tea towel under the glass turntable to prevent rattles when travelling. See makers
leaflet on Page 24.

     12/02/2009                             5                              Colin Townend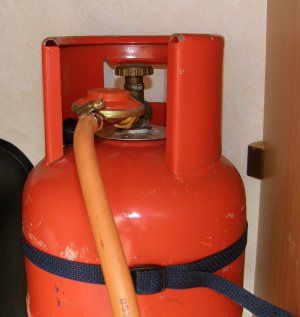
Fridge
The fridge is a compressor type which runs economically off either 12v or mains 230v
electricity. The main on-off switch is behind the passenger seat and the temperature is
adjust by a knob inside.
The door has a push button latch, designed to prevent the door swinging open under
heavy acceleration with a fully loaded door.
The latch has two positions, one of which holds the door slightly ajar when it is not in
service. Make sure you use the other position to tightly seal the door otherwise ice
builds up inside the fridge.

Water Tanks
The van has storage tanks for clean water and waste “grey” water. Grey water is
exclusively what has gone down the drains of the sinks or shower. The toilet is a
completely different system.
Clean water is not suitable for drinking without boiling. A separate bottle of drinking
water should be carried for that purpose.
The clean water tank is filled through a filler on the right side of the vehicle, using a
hose stored in the gas compartment.
Water is electrically pumped from the tank to the taps, shower, and toilet flush. The
pump creates a small positive pressure in the system and then switches off.
When any tap is opened, the pressure falls and the pump runs again until the pressure
is restored – when the tap is turned off.
If the pump can be heard running for no reason, this may be a sign of a leak in the
system or a fault in the pump – or a tap left dripping.
Water tank levels are indicated on the electrical control panel – see later
Water is obviously heavy, so there is no point in carrying excessive amounts around
when not required. The clean water tank can be fully or partially drained using the tap
outside the van just ahead of the sliding door. .
Empty the waste-water tank over a designated drainage point. The outlet is just ahead
of the left rear wheel and it drains best if the vehicle is level or facing downhill. The tap
is unfortunately quite stiff.
Try to avoid putting fat and solid material down the drain. It accumulates in the
tank and causes bad smells.

     12/02/2009                               6                                Colin Townend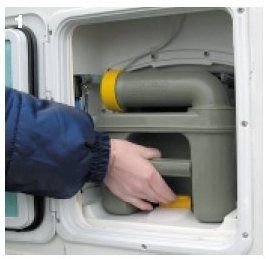
Heating
           Once the van is connected to mains on site, it can be
           heated using the fan thermostatically controlled fan
           heater
           Away from a 230v mains supply, the van can be
           heated with a gas fuelled blown-air heater controlled by
           the top switch below.

     Ignition
     Failed                                                    If the blown-air heater fails to light
                                         Heat                  the red light glows. Give it a few
                                         Off                   minutes and try again. This heater
            Strong                       Fan Only              can be used when the van is
            Weak                                               moving.
                                         Heating
     Temperature                         On                    The lower switches provide water
     adjust                                                    heating either by gas or 230v
                                                               electricity (on site).
Ignition
Failed                                        Mains
                                              Water            Electricity is normally provided free
                                              heater           by the site operator.
Heating
On                                                             When using gas to heat water for a
                                                               shower, the temperature should be
                                                               set high to get the best use out of
                                                               the 10 litres of hot water produced.

           The cover over the boiler flue must be removed before operation, and placed on the
           dashboard as reminder to the driver to replace it before driving further.
           Choose your water temperature, and the boiler spark ignition can be heard for a few
           seconds until it lights the flame.
           If the boiler fails to light, a red warning light appears on the switch. You must then wait
           5 minutes for the unburned gas to dissipate before trying to light the boiler again.

           Once alight, the boiler will take about 15 minutes to fully heat the tank.

           Showering
           The hot water tank holds 10 litres, so don’t waste hot water otherwise it may run out….

                12/02/2009                              7                                Colin Townend
Electrically Operated Step
The step is controlled by a switch beside the sliding door (inside by the passenger seat).
Electrics
The van has an additional “leisure battery” which feeds all the appliances in the living
area:- interior lights, water pump, electrical outlets, fridge,
cooker ignition, toilet flush, and water-level gauges.
Many of these devices are disabled when the ignition is
switched on.
There is also a 16amp 230v mains input on the right side.
This is connected using the 25 metre long orange cable
stowed in the gas compartment. This cable has a blue plug,
which suits most caravan site outlets, but there is also a
13amp adaptor for normal UK domestic sockets.
There is a control panel above the fridge.
You should normally select the leisure battery (to save the starter battery) and turn on
the pump. Press again to switch off.
.
12/02/2009 8 Colin TownendTV
A TV can be mounted on top of the fridge. But remember to put it on the floor before
travelling.
The aerial amplifier is found in the cupboard over the sink.
Inverter (Optional)
When the van is not connected to the mains, the inverter creates a small 230v ac supply
from one of the 12volt dc outlets. It is however limited to 300W - enough for phone
chargers and small laptops, but not generally suitable for heating appliances (e.g. hair
driers/ straighteners) – unless they are below this power rating.
Toilet
Turn to Splash-
open proof
and toilet roll
press to holder
flush
The toilet has an electric flush, so turn on
the water pump first.
Wet the bowl with a brief press of the
button.
Level
Red=Full
The outlet from the toilet bowl is normally closed with a black sealing “blade”.
This is moved out of the way by rotating the knob
After use, flush the toilet by pressing the knob, and close the blade by turning the knob
back.
A red warning shows when the toilet tank is nearly full. See details of emptying at the
back of this guide. Spare fluid is kept in the gas locker, and a 1-litre bottle is provided for
measuring the water to be added.
Never added more fluid through the bowl of the toilet. It must always be added through
the tank filler cap.
Storage
Bedding is normally stowed in the lockers above the driver, and under the sofa.
The sofa base is released by depressing a lever under the front edge. You can either
pull the sofa fully out and reach down the back of the base cushion, or once the back
rest has been pushed off the base cushion, you can grasp the front edge of the base
cushion and lift it on a complex hinge mechanism, so that it is upright.
12/02/2009 9 Colin TownendYou must first move the drivers seat forward out of the way and lifting the cushion
requires the use of both hands to keep the cushion level as it goes up.
In cold weather, some condensation may form inside lockers, and bedding may need to
be aired before use.
It is a good idea to avoid putting any dirty items in these lockers so that bedding stays
clean.
Lounging
The sofa has a “lounging” position. Press the latch in the centre front of the sofa, and
pull the base cushion forwards about 10 cm. The bottom of the backrest should follow
and adopt an inclined position that is more comfortable for relaxing.
When you need more space for walking around, simply push the sofa back.
Beds
The double bed is made simply by lifting the latch on the front centre of the sofa and
pulling it towards you.
Windows
The windows are supported in the open position by a ratchet mechanism, which
prevents the window closing under its own weight. You must fully open the window
before the ratchet will allow it to close.
The window behind the driver is directly above the boiler flue, so a safety switch is fitted
which prevents the boiler from operating when this window is open.?
Levelling.
If you don’t have a level place to park, you can use levelling
ramps to lift one end (or one side) of the van. The ramps are
stowed behind the drivers seat. You should drive forward
onto the ramps, and make sure that you firmly apply the
handbrake and engage 1st gear.
Safe
There is a key-lockable safe under the passenger seat,
12/02/2009 10 Colin TownendAwning
The side door must be shut before opening the awning otherwise they collide.
Do not use the awning in strong winds, or leave the vehicle with the awning out when
strong winds might arise in your absence.
Once the awning is in position the door can be used normally.
A switch at the back of the passenger doorframe operates the awning electrically.
When it is extended by about one metre, pause to put the struts in place.
The struts are hidden in the bottom edge of the awning frame.
Swing them down taking care not to let them scratch the bodywork.
Lift the sides of the white slide latches, and insert the strut as shown
Then slide the latch down to lock the strut in place.
Continue to extend the awning, push the struts to the require length, and lock them to
that length.
Picnic
The table can be used outside, and there are two camp folding chairs under the sofa.
12/02/2009 11 Colin Townend12/02/2009 12 Colin Townend
Servicing the Toilet
                   1. This job is not as bad as you might expect.
                   2. Make sure that the slide valve in the bottom of
                      the toilet pan is closed. (Push the lever towards
                      the back of the van).
                   3. Move outside, and open the toilet compartment.
                   4. Lift the yellow latch and withdraw the grey tank.
                   5. At the disposal point, stand the tank upright, (this
                      keeps the runners on the bottom clean), and
                      swivel the neck upwards.
                   6. Remove the yellow cap, and pour away the
                      contents.
                   7. When you have begun to pour, press down the
                      yellow air vent button with your thumb (to avoid
                      splashing).
                   8. Don’t press the yellow button until you have
                      tipped the tank, and the button is above the liquid
                      level.
                   9. Rinse the tank with clean water until it runs clear.
                   10. Use the yellow cap to measure 60ml of toilet fluid
                       into the tank.
                   11. Top up with two litres of water.
                   12. Never add more fluid through the bowl of the
                       toilet. It must always be added through the tank
                       filler cap.

  12/02/2009            13                                Colin Townend
Toilet Flush Tank
The toilet has its own storage tank for the flush water.
The flush
tank filler
hinges
The sight
gauge outwards
shows how
much flush
water
remains
The flush water is replenished using the hosepipe, adding pink flushing
additive at the rate of 30ml per 10 litres of water.
The flush water tank holds 15 litres, and the waste holding tank is 20 litres.
12/02/2009 14 Colin TownendInventory
• Aerial -fixed omni-directional for TV with • Mains lead adaptor 16A-13A
signal amplifier
• Mains lead orange 16A 25metre
• Awning Electric
• Microwave oven with glass dish
• Bin flip-top green
• Modem USB 3g and cable (extra)
• Bottle opener, corkscrew
• Mug ceramic 4
• Bowls cereal ceramic 4
• Optional: two sleeping bags, two
• Bowls glass round nesting set 2 pillows.
• Can opener • Peeler
• Car radio/CD player with removable • Picnic chairs folding 2
front (does not play MP3 discs).
• Plate dinner 3
• Chopping board white
• Plate side 4
• Cleaner liquid all-purpose
• Saucepans 3
• Diesel tank full
• Scissors
• Dishcloth foam sponge 2
• Soap, hand liquid
• Dust pan and brush
• Spatula wooden 2
• Fan-heater
• Spirit level
• Fire extinguisher
• Table indoor/outdoor
• First aid kit
• Thermometer, fridge freezer
• Frying pan
• Toilet fluid bottle 1
• Gas cylinder
• Toilet rinse fluid bottle 1
• Glasses tumblers 2
• Toilet rolls 2
• Glasses wine plastic 2
• Torch Yellow
• Heater thermostatic mains electric fan
• Towels tea 3
• Heater gas-fired blown air.
• Vest hi-viz 1
• Hose pipe and screw tap connector
• Washing up bowl
• Kettle with whistle
• Washing up brush and green scotchbrite
• Kitchen worktop extension
• Washing up liquid
• Knife kitchen 1 large, 1 small
• Water bottle, drinking water, 5-litre
• Knives, Forks, spoons, teaspoons x5
• Levelling Ramps 2
12/02/2009 15 Colin TownendYou can also read