Tuning with CROME The Complete Guide to tuning Honda Vehicles with Cui's ROM Editor
←
→
Page content transcription
If your browser does not render page correctly, please read the page content below
Tuning with CROME
The Complete Guide to tuning Honda Vehicles with Cui’s ROM Editor

                                                Copyright 2006 MoatesWare LLC.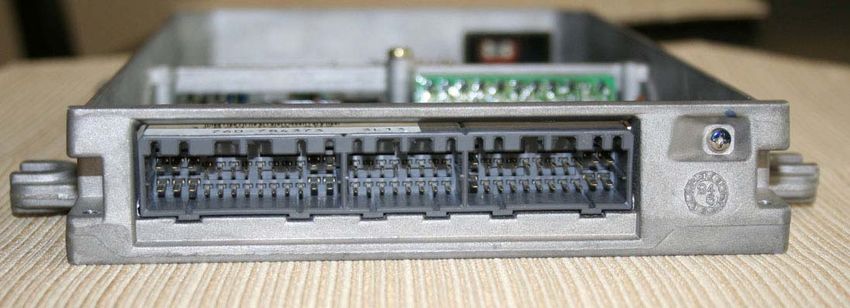
Requirements

 Recommended Requirements

    •   Laptop running Windows XP
    •   CROME Professional
    •   Moates Ostrich
    •   Moates Burn1
    •   Moates HondaLog/Hulog
    •   Compatible Honda OBD I ECU (See Supported ECUs)

 Minimum Requirements
   • Laptop running Windows 98 or Higher
   • CROME
   • Moates Ostrich or Other Emulator
   • Moates Burn1 or Other EEPROM Burner
   • Moates HondaLog/Hulog or other datalogging adapter
   • Compatible Honda OBD I ECU (See Supported ECUs)

                                          2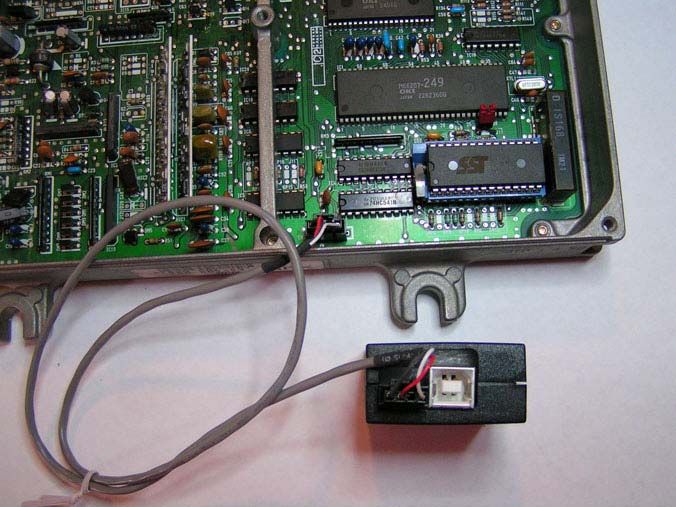
Installing CROME

    1) CROME can be found in one of two places:
       • http://forum.pgmfi.org/
       • http://www.tunewithcrome.com/

    2) Download, Extract and run the setup file to install CROME on your system.

           Note: CROME was developed in conjunction with pgmfi.org. For this
      reason, legitimate install packages will require ‘pgmfi.org’ as the password.

    3) Once installed, CROME can be launched by clicking:
         Start>Programs>CROME>CROME

           Note: The free version of CROME available for download does not have
      data logging capabilities. However, there are other data-logging packages
      available free of charge from www.pgmfi.org sthat will allow you to data-log
      outside of CROME.

      You will be able to modify fuel maps and even use your Ostrich to change maps
      Real-Time. However you will not be able to see live engine parameters from
      within CROME. Most noticeably, you will not see the purple box indicating
      your position in your maps.

      To use these features requires a CROME Pro License costing $149.

    4) To upgrade to CROME Pro, Launch CROME then click:
           Help->Register->Get Reg String
    5) You will be directed to a webpage where you can purchase a CROME Pro
       license.

                                             3             Copyright 2006 MoatesWare LLC.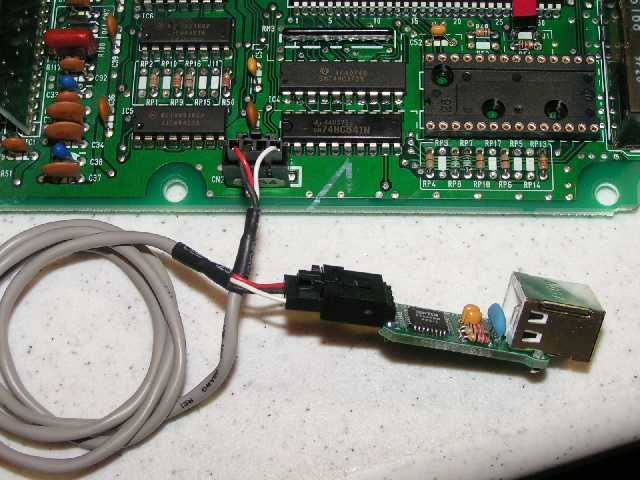
Hardware Setup
  Installing Drivers from the CD-ROM

       Note: All Moates Hardware uses the FTDI chipset for USB Communication. This means
  you only have to install the drivers once for all Moates Hardware. For the absolute latest drivers,
  visit FTDI and download the D2XX drivers: http://www.ftdichip.com/

  1. Insert the CD-ROM that came with your hardware.
  2. Connect your Moates Hardware
  3. When prompted for Driver Installation, select Install from a list or specific location, then click
     next.
  4. Check Include this location in the search, then click browse.
  5. Expand your CD-ROM Drive, and then click USB Drivers.
  6. Click Ok, then next, and Windows should find the drivers and install them accordingly.

  Uninstalling Drivers

   Note: If FTDI Serial Converter Drivers is not listed, follow the steps below on
     Uninstalling Drivers using FTClean.

  1. Goto Start -> Control Panel -> Add/Remove Programs
  2. Select FTDI Serial Converter Drivers

  3. Click Change/Remove
  4. Click Continue
  5. Click Finish

  Uninstalling Drivers using FTClean

     Note: The FTClean utility can be found at:
       http://www.ftdichip.com/Resources/Utilities.htm

  1. Double Click My Computer, and then Double Click your CD-ROM drive
  2. Double Click the USB Drivers folder
  3. Double Click FTClean.exe

                                                    4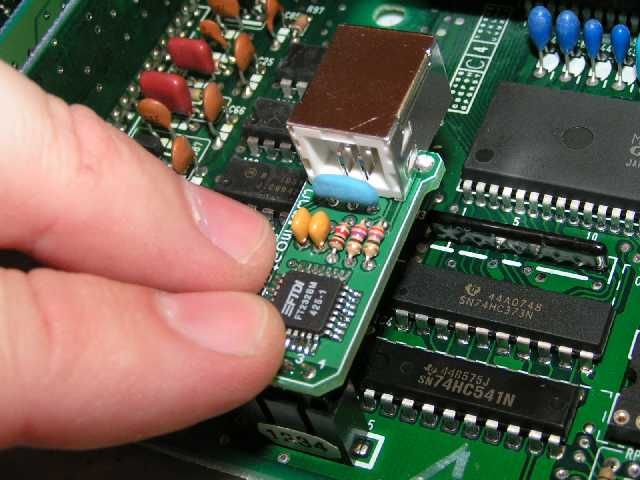
Connecting Hardware to the PC

         Note: In order to remain compatible with a variety of tuning packages, Moates
     Hardware uses Virtual COM (Serial) Ports. It is important to note that COM Ports are
     generally assigned by USB Port and not by the Device itself.

     For example, if you have two USB                Ports on your laptop, a top and a bottom
     port, if the top port is assigned COM1 the first time, it will generally remain COM1 no
     matter what Moates Device is used.

     In future revisions, the COM port will remain with device, eliminating the need to
     remember which COM Port each USB Port is assigned.

1.   Start by plugging the Ostrich into any USB Port.

          Note: If the drivers have been preinstalled correctly, Windows will Find New
     Hardware and install the drivers in the background. Once the drivers have finished
     installing, Windows will notify you that Your Hardware is Ready for Use.

2.   Right-Click on My Computer, then click Properties
3.   Click the Hardware tab, then click Device Manager
4.   Expand Ports (COM & LPT) and look for USB Serial Port (COMX)

                                              5               Copyright 2006 MoatesWare LLC.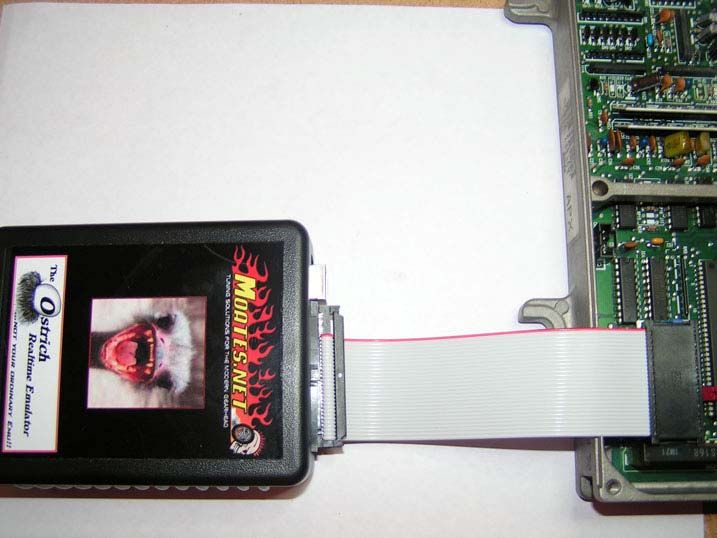
5.   Make a note of what number X is, as we will use it to configure CROME shortly.
               In our example, the Ostrich appeared as COM7.

6.   If you plan on using CROME Pro to datalog, keep the Device Manager open, and plug in
          your Hondalog or Hulog.

7.   Also make a note of which COM Port this device is assigned.
               In our example, the Hondalog/Hulog Device appeared as COM5

8.   Next, see Configuring Hardware for information on setting up the devices in CROME

                                            6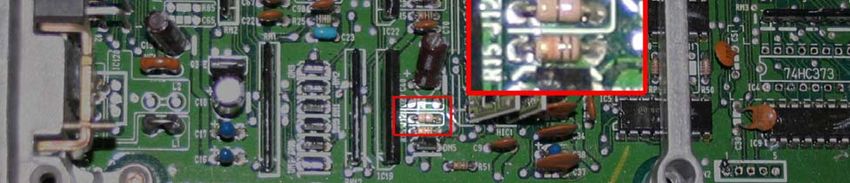
Configuring Hardware

  Configuring Ostrich

  1.   Launch CROME
  2.   Go to the Settings Panel by clicking File then Settings
  3.   To Configure the your Ostrich or Burn1, click Real Time Programming
  4.   Under Hardware Type select Moates Ostrich/Burn1
  5.   Under Port, Select the COM Port you noted for the Ostrich earlier

              Note: Ostriches ordered after January 2007 require a Baud Rate of 920,000
         in CROME. This allows for downloads 8x faster than previous revisions. Please
         ensure you have this selected before testing the connection.

         For old Ostrich users wishing to utilize the higher speeds, simply update the
         firmware on the Ostrich and connect using the higher baud rate.

         The latest Firmware and Update Utility can be found here:
         http://www.moates.net/documentation.php?documentation_id=22

  6. Click Test Connection
         a. If you are unable make the connection, refer to the Troubleshooting
            Section of this document.

                                               7              Copyright 2006 MoatesWare LLC.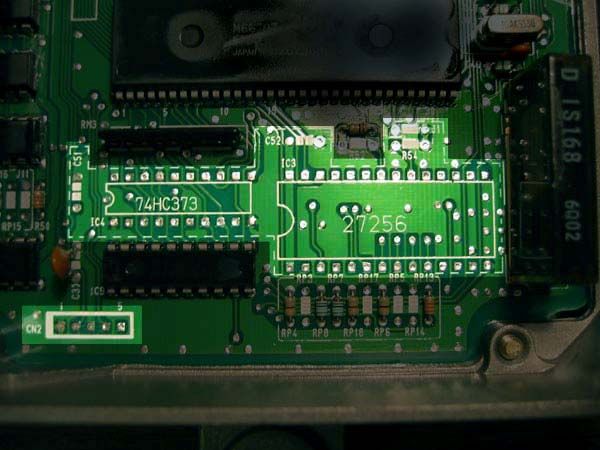
Configuring HondaLog/Hulog (CROME Pro)

1. In the Setting Panel, Click the Tuner Comm tab
2. Under Serial Protocol, select PGMFI OBD1

         Note: The Developers on pgm-fi.org have developed a data-logging routine
    that is much more efficient than the stock routine. In order to take advantage of it,
    first make sure J12 is cut/removed from your ECU. This is to enable high speed bi-
    directional communication. Secondly, use a P30 or a P72 as your base ROM since
    the PGM-FI routine only works on these ROMs. Finally to add the routine to your
    ROM, Click:
             Plugins->Enhancements-> Quickdatalogger +RTP

3. Under Port, select the COM Port you noted for your HondaLog/Hulog
4. Ensure the Baud Rate is set for 38400

          Note: The Test Connection feature may fail even if your hardware is
     configured properly, because it requires the ECU to first be running a data-logging
     compatible ROM. For this reason, we do not advise using it unless you have already
     added Quickdatalogger +RTP and Put it to the ECU.

                                            8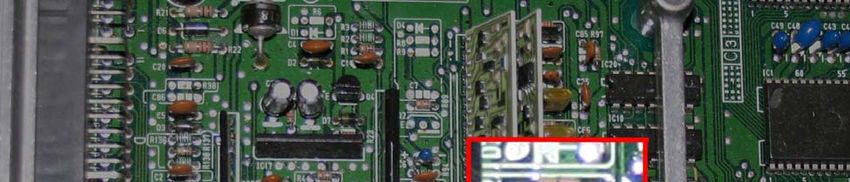
Connecting Hardware to the ECU

Connecting the Ostrich
     1) Now that the Ostrich is plugged into the PC, we must ensure proper connection
        to the ECU. With the ECU plugged into the vehicle, ensure the ignition is off,
        and then proceed to plug the Ostrich into the ECU with the cable in the
        following orientation.

                Note: Conventionally speaking, the red line on ribbon cables corresponds to
           Pin 1 on the connecting device. Pin 1 is usually the pin directly to the left of the
           half moon cut out on most chips and sockets. For this reason, the red line on the
           ribbon cable for the Ostrich should be on the same side as the half moon cut out
           on your socket.

                                                 9              Copyright 2006 MoatesWare LLC.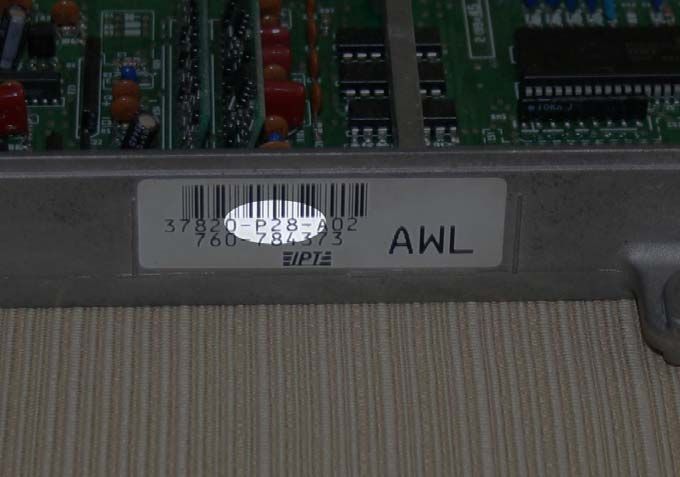
Connecting Hulog to the ECU
  1. The Hulog is connected to the ECU as shown below

                                       10
Connecting HondaLog to the ECU
1. The HondaLog connects to the ECU in the following fashion:
11 Copyright 2006 MoatesWare LLC.ROM Creation
1) From the list, Select the Base ROM that best matches your engine
Note: If you plan on fully tuning the ROM, the Base ROM you choose does
not depend on your engine code. Instead, choose a Base ROM that will support the
features you require. For example, if you have a D16Y8, but you would like to data
log, don’t choose the P28 as your Base ROM as it is not Data-logging compatible.
If you are not satisfied with the ROMs listed, visit:
http://www.pgmfi.org/twiki/bin/view/Library/EcuDefinitionCodes
If you do wish to start with a P30/P72 base and use the original values from another
ROM, you can copy and paste these values, but keep in mind that the scalars (RPM
values and Pressure values across the left and bottom of the map) are typically
different for various ROMs and should be changed accordingly after pasting the new
values.
2) Next, Remove the Checksum Routine from the ROM by clicking
Plugins->Enhancements-> Remove Checksum Routine
12Note: Removing the Checksum Routine is required because Honda includes
a routine within the ROM that instructs the ECU to add up every byte in the ROM
and check it against a predetermined number at the end of the ROM every few
seconds. If they match, the ROM is valid.
When tuning, these numbers will very rarely match since we are constantly
changing the data in the ROM. We remove this routine from the ROM to prevent
the ECU from defaulting to limp mode every time a change is made.
3) If you plan on Data-logging, click
Plugins->Enhancements-> Add Quickdatalogger +RTP
4) This is a good time to save your ROM, since we are ready to Connect to the
ECU.
5) Click the on the toolbar.
6) The Real-Time Programming toolbar will appear.
7) To send the ROM you just created to the Ostrich, Click
8) Then, to Enable Real-Time changes, Click
13 Copyright 2006 MoatesWare LLC.9) If you are running CROME Pro, continue to the next step, otherwise at this
time, turn the key to the second click and you’re connected and ready to tune.
Note: Once you click Put the first time, as long as Realtime Update is enabled,
you should not have to do it again. It is good practice, however, to Verify the ROM
intermittently during the tuning session to ensure hardware failure hasn’t occurred. If
the ROM does not verify, simply press Put, and cycle the ignition to apply the
changes.
10) To Enable Data-logging, click the on the toolbar.
11) You will notice the Data-logging Toolbar appear at the Bottom of the screen:
Note: At this point, make sure you have added Quickdatalogging +RTP to the
ROM. If you are unsure of how to do this, see Configuring HondaLog/Hulog in this
documentation.
12) Click Live Tuning… and then a Window should appear at the right
containing a list of active readings from the ECU. If this Window fails to appear,
see the Troubleshooting section in this documentation.
13) At this point you are ready to tune!
14Burning Chips with CROME
To configure the Moates Burn1, we use the exact same procedure as we did for
Configuring the Ostrich:
1. Open the Device Manager
2. Connect the Burn1 (Disconnecting the Ostrich if necessary)
3. Note which COM port the device was assigned
4. Launch CROME
5. Goto File->Settings-> Real Time Programming
6. Set the COM Port to the port you noted in step 3.
Note: Since the traditional Atmel 29C256 chips have been long since
discontinued, the Burn1 and CROME both fully support the replacement SST
27SF512 chips. In order to use this type of chip, make sure you Check “Used for
27SF512” under the Settings->Real Time Programming
7. Click Test Connection
If this Test Fails, refer to the Troubleshooting section of this document.
8. Click OK
9. Click
10. When you click Put, the open ROM will be burned to the chip in the burner.
15 Copyright 2006 MoatesWare LLC.Identifying Your ECU
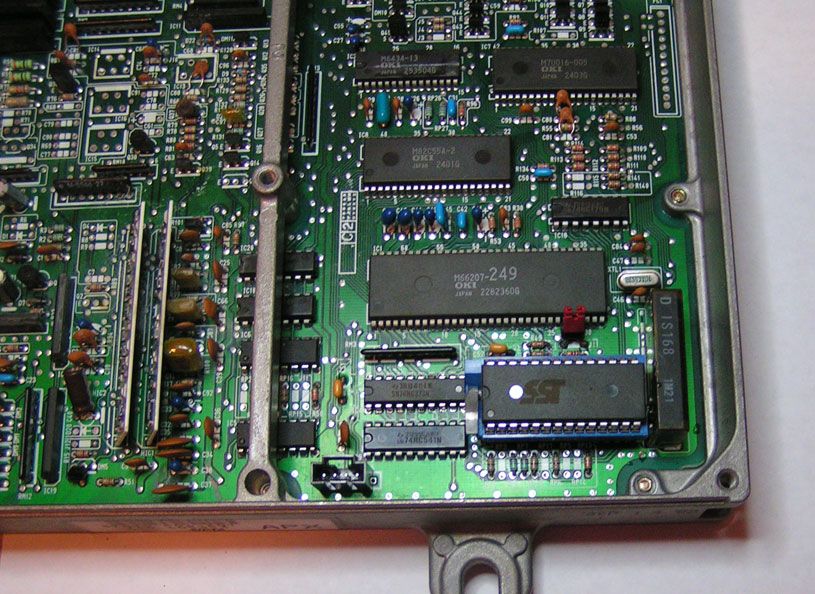
While CROME can open OBD 0, I, and some II ROMs, it is specifically designed to work
with OBD I. The first thing you should do is make sure you have an OBD I ECU. You can
tell by looking at the main connector, it should look like this:
Note: All 1992 – 1995 Hondas were equipped with OBD I ECUs. If your vehicle is
older down to 1989 or newer up to 2001, the vehicle can be adapted to accept an OBD I
ECU by using a commercially available conversion harness.
Secondly, make sure you have a compatible Honda ECU. Use the label on the outside of
the case and reference it to the Supported ECUs page in this document. Here is an
example of the outside label on a P28.
16Supported ECUs
Model Vehicle Features
P05/P06 92-95 Civic DX
P08 JDM SOHC VTEC (Square Case) • VTEC
P28 92-95 Civic Ex/Si • VTEC
P30 94-95 Del Sol VTEC/92-95 JDM B16 Vehicles (Square • VTEC
Case) • Knock Sensor
P61 92-93 Integra GS-R • VTEC
• Knock Sensor
P72 94-95 Integra GS-R/JDM GS-R • VTEC
• Knock Sensor
• Intake Air Bypass (IABs)
P74 94-95 Integra RS/LS/GS/SE
P75 94-95 Integra RS/LS/GS/SE
PR4 92-93 Integra RS/LS/GS/SE
Note: If you have a 96-01 (OBD II) Honda or Acura, you will need a purchase
an OBD II to OBD I conversion harness in order to run the aforementioned ECUs. If
you have a 96-98 Civic or 94-99 Integra, you will need an OBD IIa to OBD I
hardness, if you have a 99-00 Civic or 00-01 Integra, you will need an OBD IIb to
OBD I conversion harness.
The rule of thumb, if your Honda has the Immobilizer, (Chip in the Key, and Green Key
Light on gauge cluster when starting vehicle) it is OBD IIb. This of course does not apply
to vehicles newer than 2001, as these use a completely different engine/ECU setup.
The harnesses are available through vendors such as http://www.xenocron.com/
17 Copyright 2006 MoatesWare LLC.Chipping/Preparing a Stock ECU
Note: This guide is for a standard P28 ECU. Other ECUs, such as the P72, will
not require the resistor included with your kit. Note, if you have a JDM (square case)
ECU, your kit will require surface mount components. Unless you have soldering
experience, it is recommended you have these ECUs chipped professionally by
Moates.net.
Required Tools:
• Moates Honda ECU Chipping Kit
• Soldering Iron (Any RadioShack Iron will work)
• De-Soldering Iron (RadioShack Model: 64-2060)
• Wire Cutters
• Thin Rosin Core Solder
• Philips Screwdriver
Optional Tools:
• Cheap Carburetor/Choke Cleaner (Do not use B12-Chemtool)
• Electrical Tape
• Old Toothbrush
Note: In this process, we use Carburetor/Choke Cleaner to remove the plastic
coating found on the circuit board before desoldering, and also after to remove the
residual rosin left by the solder.
1. Remove both top and bottom covers from the ECU.
2. Remove all screws holding the circuit board in place, and loosen the screw holding
the main voltage regulator to the case.
183. Remove the circuit board, and use the electrical tape to cover the small hole on the
barometric pressure sensor
4. Spray the lower half of the ECU with the Carb Cleaner and use the toothbrush to
scrub the plastic coating off. This usually takes about three iterations before it is
clean. Clean both the front and the back. Also clean the area around J12 (or J4 on
a JDM ECU)
19 Copyright 2006 MoatesWare LLC.5. Once clean, Desolder the items outlined in this illustration:
6. Remove J12 (or J4 for JDM ECUs) as we saw above.
Note: Desoldering some of the joints can be tricky. Adding solder to the joint
will often help. Adding solder causes rosin to be added to the existing joint, allowing
easier flow into the desoldering iron.
7. Solder the following components included in your kit to the indicated location in
the ECU.
20ECU Location Illustration Description
27256
74HC373 CMOS Latch
27256 28-Pin DIP Socket
CN2 (Pins 1 - 4) 4-Pin Straight Header
R54 1k Resistor
C51 & C52 .1uF Capacitor
J1 Red Jumper Header
27256 28-Pin ZIF Socket
8. Insert the Blue ZIF Socket into the 28-Pin DIP Socket
9. Reinstall Circuit Board into the case, remembering to tighten up the screw on the
Voltage Regulator.
21 Copyright 2006 MoatesWare LLC.Figure 1: Finished Product
22Troubleshooting
Problem Solution
This indicates failed communication to the
Ostrich. Make sure you are using the COM
port to which the Ostrich is assigned. You
When I click test connection under Real
can check this by disconnecting all Moates
Time Programming, I get a message stating,
devices except for the Ostrich, then check
“Unable to Connect to the ECU”
Device Manager to see which COM ports
remain. The one remaining port will be the
Ostrich.
First make sure you have added
Quickdatalogger +RTP to your ROM (See
ROM Creation)
Make sure the ROM with Quickdatalogging
When I click Live Tuning… I get an error +RTP is actually on the ECU by clicking
message stating, “Unable to Connect to the Put, then verify, then cycle the ignition.
ECU”
Next ensure your Hondalog/Hulog is
configured for the appropriate COM Port
with the Baud Rate set at 38400. (See
Configuring HondaLog/Hulog)
Make sure J12 is cut on your ECU to enable
Full Duplex communication.
23 Copyright 2006 MoatesWare LLC.When I click test connection under Tuner
Comm, I get a message stating, “Unable to See Previous Solution
Connect to the ECU”
This error usually occurs due to a glitch in
CROME. First try clicking the Chip Icon to
When I click Put… The progress window
disconnect from the Ostrich, then click
comes up then an error message appears
again to reconnect. Click Put to load the
stating, “The operation failed after 3
most recent changes, then click Real-Time
attempts…”
Update. If this does not work, save your
work, then restart CROME.
Ensure you have a Moates Device Plugged in
then restart the computer. If this does not
I do not see any Serial Ports listed under
correct the problem. Uninstall then reinstall
Device Manager
the drivers according to the Hardware Setup
section of this document.
24Remove the Checksum Routine from the
ROM. (See ROM Creation)
Ensure you have disabled any sensors you
may have disconnected. (I.E. Oxygen
Sensor)
The Check Engine light stays on. If you are not sure, jump the Service Check
Connector located in a green rubber
grommet above the ECU kick panel to
determine the trouble code. For complete
instructions and a Code List, Reference:
http://www.honda-
tech.com/zerothread?id=1171263
25 Copyright 2006 MoatesWare LLC.You can also read