Union County 4H Exhibition Ducks & Meat Ducks
←
→
Page content transcription
If your browser does not render page correctly, please read the page content below
OHIO STATE UNIVERSITY EXTENSION

       Union County 4H
Exhibition Ducks & Meat Ducks
           Handbook
             2015

4‐H Duck Projects

150 DE Ducks, Exhibition
150DM Ducks, Market

                                                                                           union.osu.edu
                                                                 CFAES provides research and related educational
                                                             programs to clientele on a nondiscriminatory basis. For
                                                                       more information: go.osu.edu/cfaesdiversity.
Getting Started
Preparation and Brooding
The term brooding refers to the period immediately after hatch when special care and
attention must be given to ducklings to ensure health and survival.
The term rearing refers to the remainder of life after brooding until maturity.
Handling of day‐old ducklings has a direct relationship on the life‐time production of the bird.
Effective management begins before the day‐olds arrive.
The three factors to control are environment, feed and water.
Environment
Brooding houses should be isolated from other houses containing older birds. The producer
should follow an “all‐in, all‐out” program, never mixing birds of different ages.
Brooders must be set up in a draft‐free environment.
Heat lamps must be checked to ensure that they are working properly before the arrival of
the ducklings. This is a routine check to be carried out daily.
Ventilation should be adequate to remove undesirable gases such as ammonia and provide
clean air but not so much to remove heat or create drafts.
The brooding area should be heated to 95‐98° before the arrival of the ducklings. Be careful
to always check the temperature at the level of the ducklings.
A hatched duckling cannot maintain a proper body temperature without your help.
Exposing a duckling to cool temperatures in the first three weeks of life makes the bird
uncomfortable and less likely to eat the feed and drink the water needed for a good start.
Turn the heat on at least one day before the birds arrive. The temperature ½ " below the
litter surface should be at least 80ºF. Even if the air is the correct temperature, the birds can
be chilled by the cold floor under them.
Pine shavings are the ideal bedding choice for brooding and rearing your poultry. Meat birds
need at least 1” of clean fresh bedding for each week of age. A 3 week old bird should be on
3” of bedding.
Bedding is used to conserve heat and must be leveled and compacted to prevent chick
crowding.
Bedding should not contain too much dust as it can cause your birds to have breathing
problems.
Cedar and hard‐Wood chips should not be used as it will stain your birds.
It is important to keep your bedding clean and dry at all times. Dirty bedding can cause
health problems for your birds.
Always remove any wet or caked bedding and replace it with dry shavings.
The following chart shows the average temperatures for brooding chicks as they mature
week by week.
Larger breed ducks are usually comfortable at a temperature of 65° by 21 days of age.
For ducks you can decrease the brooder temperature by 10 degrees per week following the
first week.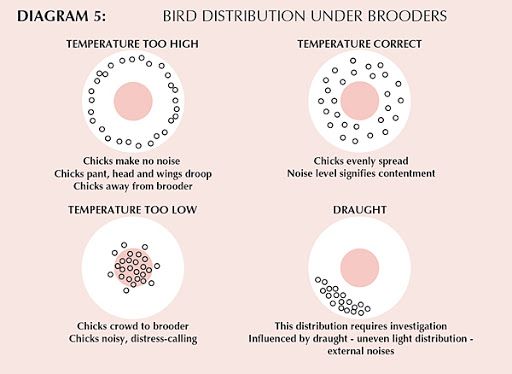
Age of Ducklings (weeks) Temperature
1 95°
2 85°
3 75°
4 65°
Judging Bird Comfort
The behavior and sounds of the ducklings will indicate their comfort level. Comfortable birds
will form a circle under the lamp while cold birds will huddle and pile. If birds are too hot, they
will crowd as far from the lamps as possible. Some birds will pant if the temperature is too high.
Ducklings won’t make the same noises as chicks do when they are uncomfortable. You will have
to watch for signs to show if they are too hot or too cold. Your birds will do a better job than a
thermometer of telling you if they are comfortable. The diagrams below show how birds will
move away or towards the heat lamp if they are hot or cold.
Feed and Water
Fresh food and water should be available on arrival of the day old ducklings.
Young ducklings can easily drown so it is important to use chick waterers, not open trays.
Do not place them directly under the light source.
Fresh water should be available at all times. The waterers need to be cleaned on a routine
basis. Ducklings make more of a mess than chicks and tend to drop feed into the waterer. It
is very important to keep it clean.
It is helpful to dip the ducklings beaks into the water when you first place them into the
brooder ring.
Feed should be provided continuously. Never restrict feed during the brooding stage of
duckling development.
Water is the most important nutrient you can provide for your birds. If the water is not
clean, your birds may not drink enough thus limiting their feed intake and their growth rate.
Guidelines for Feeding Your Ducklings
Exhibition Ducks:
Begin feeding your day old ducklings a balanced duck starter ration.
Duck starter is typically at least 20% protein.
It is very important to use a non‐medicated starter for ducks. If duck starter is not availbale you
may use a non‐medicated chic starter.
Medicated feeds contain amprolium which may be toxic to ducks.
As soon as the ducklings are large enough you will want to switch them to a pelleted feed. Since
ducks tend to drink water while still having a mouth full of food, they will digest more nutrients
if given pelleted feed. A duck grower ration is typically 18‐20% protein.
Meat Ducks:
Begin feeding your meat ducks much the same as exhibition ducklings.
It is important to use a non‐medicated turkey starter, non‐medicated duck starter or non‐
medicated chick starter.
Since a meat duck has a higher rate of gain, a higher protein level will help the ducklings grow
faster. At approximately 3 weeks of age, switch the ducklings to a grower‐finisher with 18‐20%
protein. You are aiming for a 7 pound duck in 7 weeks.
Use continuous lighting to promote fast growth. The light does not have to be bright, just
enough for them to see their feeder and waterer.Selecting, Preparing and Showing Ducks
Male vs Female:
There are several ways to tell the difference between a male and a female duck.
Male ducks (drakes) have two sex feathers located on the tail.
Male ducks can have a different color patter than the female duck. Check
the Standard of Perfection.
Female ducks have a louder quack than male ducks.
Exhibition Ducks:
Make a preliminary selection from your entire flock a week or two before the show.
Take time to handle your ducks before the show so they get used to being picked up.
When making your final decision on which ducks are in the best “condition.” There are
things to consider:
Feather Quality
Best coloring for breed
How close do they match the Standard of Perfection
Does the bird have any disqualifications as listed in the Standard of Perfection.
How close does the drake and duck match each other.
Meat Ducks:
A week or so before the show, make a preliminary selection from your entire flock.
Take time to handle your ducks before the show so they get used to being picked up.
Examine all birds for defects that could cause them to be downgraded. General defects can
include cuts and tears, broken or dislocated bones, bruises, crooked keel bone, deformed
legs or wings, breast blisters or external parasite damage.
When making your final decision on which ducks to place in your pen there are several
things to consider:
Confirmation: The shape of the ducks breast. It should be long, wide and carry back
as far as possible on the keel bone. The closer the breast is to the shape of a brick,
the better the breast is.
Fleshing: Refers to the amount of meat or muscle.
Uniformity: All the birds need to match. They should be similar in weight,
confirmation and fleshing. You want all of the 3 birds in your pen to be as close as
possible so that if the judge were to close his/her eyes they would all feel the same
Bathing Your ducks:
After selecting your ducks, make sure you give them a beauty bath.
Always sponge or rub the bird with the feathers, not against them.
Rinse the bird completely after shampooing, removing any residue.
After rinsing, remove extra water from the bird with a towel and allow the bird to
dry. Ducks are better than chickens at keeping themselves clean. Check for stains on white
ducks. Always check their feet and bill for dirt. It is easier to clean a duck for show if it has
been kept clean while growing.
Before the show, spot clean or rewash your birds, depending on how clean they are. Check
the shanks and feet as well. The judge likes clean ducks!
Duck Showmanship
Always take clean birds into the show arena for showmanship.
Always put a bird into or take a bird out of the cage head first.
Make sure you hold your bird securely so that it feels safe. Grasp the birds legs between
your fingers and rest the breast bone on your arm.
When showing your birds, be proud of a job well done. Demonstrate to the judge all that
you have learned.
Have Fun!
Preventing Health Problems
If your flock becomes sick, it is important to obtain an accurate diagnosis. The problem can be
poor nutrition, poor management, or an infectious disease. You need to know the source of the
problem in order to treat the birds properly and prevent future losses. Check your flock daily to
spot diseases or parasites so you can start treatment right away.
For more information about identifying and treating poultry diseases contact your local
veterinarian.
Everyday sanitation: Disease is often transmitted from older birds to younger ones. Feeders
need to be cleaned frequently to remove caked feed. Never use moldy feed.
Wash your waterers daily and disinfect at least once per week using a brush to clean them out.
Proper ventilation in the brooder and the coop will reduce moisture and disease organisms.
Caked or wet litter should be removed as soon as it forms to keep the house clean and dry.
Classifications for Breeds of Ducks
Ducks are classified by size (weight)
Heavy Class
Pekin, Aylesbury, Rouen, Muscovy
Medium Class
Cayuga, Crested, Swedish, Buff
Light Weight Class
Runner, Campbell, Magpie
Bantam Class
Call, East Indie, MallardFair Participation
150 Duck Exhibition
If you wish to exhibit your Duck Exhibition Project at a Fair, you will need to meet all date and
exhibit guidelines of the fair. The Duck Exhibition Project consists of a pen of 2 birds. Most
members show a male and a female of the same breed as a pair. Exhibitors are limited to 1
entry (1 pair) of exhibition ducks.
For Union County Fair, Exhibition Ducks must be owned by the exhibitor by May 1st.
For Richwood Fair, Exhibition Ducks must be owned by the exhibitor by June 1st.
150DM Duck, Market
If you wish to exhibit your Market Duck at a Fair, you will need to meet all date and exhibit
guidelines of the fair. The Market Duck Project consists of a pen of 3 market ducks (Heavy Class)
and will be taking their best matched 2 ducks in for competition at the time of the show. Ducks
are required to be no more than 7 weeks in age and have a required hatch‐date. Although this
is a market project, since it is new, it will NOT be included in the livestock sales this year.
Hatch Dates:
To participate at Union County Fair Market Ducks must be hatched on or after June 8.
To participate at Richwood Fair Market Ducks must be hatched on or after July 15.
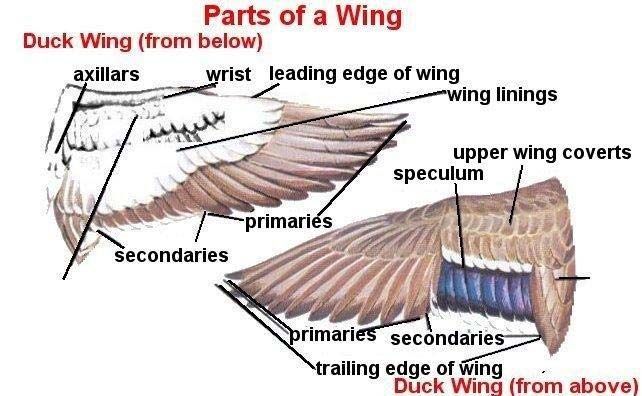
Parts of a Ducks WingParts of a Ducks Head Parts of a Duck
You can also read