User Manual - Bushnell Golf
←
→
Page content transcription
If your browser does not render page correctly, please read the page content below
User Manual
   www.bushnellgolf.com
					                     07-17
ENGLISH			   3-18

FRANÇAIS		19-33

ESPAÑOL			34-48

DEUTSCH			49-63

ITALIANO			64-78

         2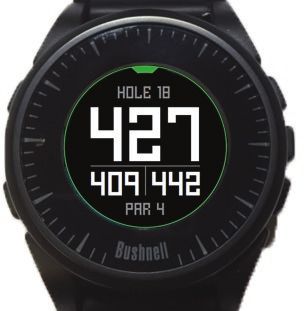
ENGLISH

Congratulations on your purchase of the Bushnell Excel GPS Rangefinder Watch!

For ideal performance, please do the following:
  1.   Fully charge your device before first time use.
  2.   Log on and register your device at bushnell.igolf.com and full sync your device
       to get latest golf course information and data.
  3.   Enter Play Golf mode 5 minutes prior to teeing off to allow for a satellite fix.

To maintain proper battery performance, please do the following:
  1.   Charge your device using a computer USB port, a powered USB hub, or
       smartphone AC charger only.
  2.   Disconnect the device from the charger once full charge is reached.
  3.   Avoid leaving your device in extremely hot environments such as your vehicle
       during warm days.

                                           3
BUTTONS / FUNCTIONS
Golf Menu                                                                     Up
     1                                                                         3

                                                                          Select
                                                                            4

   2                                                                        5
  Menu                                                                    Down/
 1.   Golf Menu Button: View Golf Menu                                    Power
 2.   MENU Button: View Main Menu Options.
 3.   UP Button: Scrolls up through Menu items.
 4.   SELECT Button: Selects from menu items.
 5.   DOWN Button: Scrolls down through menu items. Press & hold (5 seconds) to power on/off.

                                              4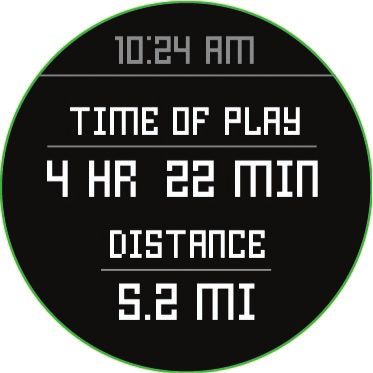
*Note: Backlight is activated with any button push. The backlight will remain lit for 10 seconds after last button push.
Care and Maintenance
The Excel watch is durable and waterproof. To help ensure reliable operation, the following care and maintenance
guidelines are recommended :
• Avoid exposing the watch to extreme environmental conditions for a prolonged period of time.
• Avoid severe impacts on the watch.
• You may clean the watch occasionally with a soft, damp cloth.
• Brush the clip contacts at the bottom of the watch regularly. Dirt build-up on the surface of the contact points may
affect normal charging and data transfer. *Note: Use a soft-bristled brush (included). Hard bristles or wire brushes
may leave scratches on the watch.
• DO NOT expose the watch to strong chemicals such as gasoline and alcohol, as they will damage the watch.
• Store the watch in a dry place when it is not in use.
Charging the Battery
The rechargeable battery of the Excel Watch is long lasting and provides up to 3 rounds of golf (based upon average of
4 hours per round), or one year of use as an everyday (time only) watch. However, battery life may be reduced due to
a variety of factors (external temperature, etc). All rechargeable batteries lose their effective charge length over time.
Charging your battery when it is 25% will guarantee that you will be able to make it through the entire next round.
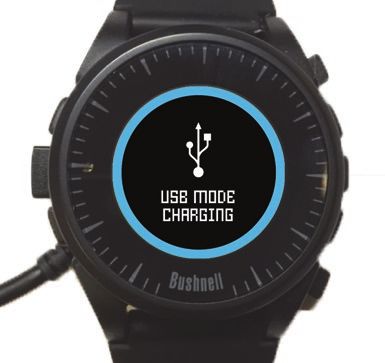
To check your remaining battery life, press the MENU button (2) and select BATTERY. To recharge the battery, insert the
watch into the charging cradle, with the charge contacts on the back of the watch (Fig 2) lined up with the charge pins on
the left side of the cradle (Fig 3). Then, connect the charging cradle to an open USB port on your computer, a powered USB
hub, or smartphone AC charger. Look for the screen to display “CHARGING” to indicate that your Excel watch is charging-
make sure to connect from either the Home (Time) screen (as seen on pg. 4) or from the BATTERY screen (Fig 1).
Fig. 1
5
Charge Contacts                                                Charge Pins

                             Fig. 2                                          Fig. 3   Charging Cradle
Package Contents
      1 - Bushnell Excel GPS Rangefinder Watch
      1 - Charging Cradle w/USB Cable
      1 - Contact Cleaning Brush
      1 - User Manual
Band: 22mm width, replacable via T-6 torx screwdriver
Computer Requirements
USB Port
OS: Windows (XP or later), Mac (OS 10.6 or later)
Firmware/Software Updates
Please check www.bushnellgolf.com or www.
bushnellgolf.eu periodically for the latest firmware and
software releases.
                                                                                Watch on Charging Cradle
SETTING THE TIME
Set Time by GPS
*To ensure reception, make sure you are outdoors away from tall buildings and trees, with a clear view of the sky.
This is the easiest way to set the time. From the TIME Options Menu (Fig. 4), select SET TIME, then select BY GPS from the

                                                            6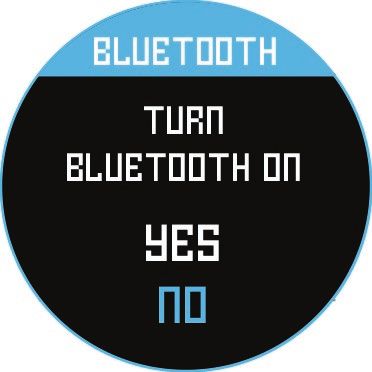
SET TIME Menu (Fig. 5). The Excel will acquire GPS signal, and upon GPS Lock, will return to the Home (Time) screen, where
the time and the date will be set via your longitude position. When BY GPS is selected (Fig 5), other GPS features (Play Golf,
Fitness, GPS Status) will update your time via your longitude position as well, which is convenient for the travelling golfer.
*Note: In rare instances, time zone boundaries may conflict. In these cases, it may be necessary to manually adjust the time as
detailed in the Set Time Manually section.
1 3
4
2 5
Fig. 4 Fig. 5
Set Time Manually
To set the time manually, select MANUALLY from the SET TIME Menu (Fig. 5). Use the SELECT button (4) to cycle between
fields. Use the UP button (3) and DOWN button (5) to change the setting of a field. After the year, time and date have been
set, you can select the MENU button (2) to return to the TIME Options Menu.
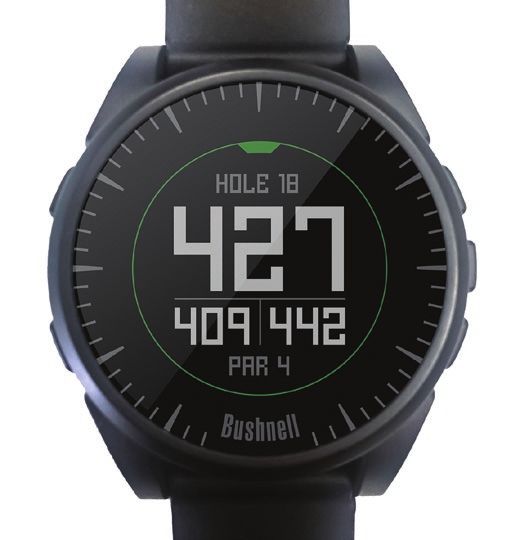
PLAY GOLF MODE
To activate Play Golf Mode, press the GOLF MENU button (1), then select PLAY GOLF (Fig. 6).
The Excel will search for a satellite signal, and upon acquisition will yield a list of local course
results, with the nearest course at the top. Select your course to view the Front, Center, Back
(FCB) screen for Hole 1 (Fig. 7, next page).
*To ensure reception, make sure you are outdoors away from tall buildings and trees, with a
clear view of the sky. Fig. 6
7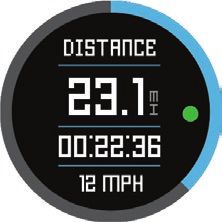
Button Functions in Play Golf Mode (Fig.7)                                 Shot                              Next Hole
                                                                           1                                 3
Track Shot Distance: This feature allows you to easily check the
distance between any two points and would normally be used to                                                   Select
measure the length of your shot. Press the SHOT button (1) to set Point                                           4
A (where you are standing) to “0”. After walking to your ball (Point B),
the Excel Watch will display the distance between Point A and Point B
in a straight line (Fig. 8).
                                                                           2                                  5
                                                                           Menu                               Previous
View Golf Menu Options: Press the MENU button (2) to view the Golf                                            Hole
                                                                                            Fig. 7
Menu options (SWING PRO, CHANGE COURSE, BATTERY, or EXIT ROUND).
Press MENU again to return to your game.

Manual Hole Advance: Press NEXT HOLE (3) to manually advance to the next hole, or
press PREVIOUS HOLE (5) to manually go back to the previous hole. *Note: the Excel does
feature auto-advance; this one button advance feature is very useful for shotgun starts.

View Hazards/Round Information: Pressing the SELECT Button (4) will toggle between
1 or 2 Hazards screens, Round Info, and the FCB (Front, Center, Back) pages (Fig. 8a). Hazard            Fig. 8
and Round Info screens will automatically return to FCB after 7 seconds if no other button is pushed. See the list on page
8 for a complete glossary of Hazard definitions. Round Info is a Golf Odometer that tracks total round time and distance
travelled.

                                                          Fig. 8a
                                                             8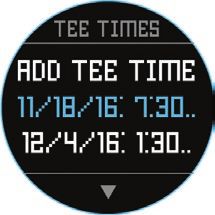
e   GOLF MENU OPTIONS
    From the Time screen, pressing the Golf button will display Golf Menu options (PLAY GOLF, TEE TIME, SWING PRO, SETUP).
    Tee Time
    The Tee Time function allows the user to schedule and store multiple Tee Times on their device. A Tee Time can be set
    from both the watch and the app. The watch will display up to 7 Tee Times, while the App can store as many as the user
    schedules.
    When a Tee Time is scheduled through the app and synced with your watch, at10 minutes prior to start time, the user will
s   get a Tee Time notification on their connected device. 7 minutes prior to scheduled start time, the watch will automatically
    begin searching for satellites. Once a GPS fix is established the watch will automatically select the golf course that was
    chosen by the user when creating the Tee Time on the App. If Tee Time is created manually on the watch, only the Date and
    Time can be specified, and the watch will only display the nearest courses upon GPS fix. A flag icon ( ) will appear on
    the time screen when a Tee Time is set.

    Swing Pro
    The Swing Pro feature allows the user to monitor the swing speed and swing tempo. When the watch is on the Swing Pro
    screen, the user will first select the club. Then the watch will continue to monitor and automatically display the last swing
    measurement. If the watch is connected to the mobile app, the swing data will be uploaded to the connected mobile
    device after each swing. The app on the mobile device displays and stores the swing data. The watch will continue to use
    the Swing Pro function until the user exits out of the Swing Pro screen (Fig. 11).

                  Fig. 9a                       Fig. 9b                        Fig. 10                        Fig. 11
                                                                  9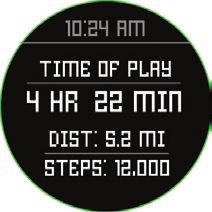
GOLF SETUP
The SETUP Menu (Fig. 10) allows you to set your preferences for units of measurement in Play Golf mode (Yards or Meters),
set the Auto-Off time, Configure the Pedometer for during Play Golf mode, and to view the battery charge level. To access
the Setup Menu, Select SETUP from the GOLF Menu (Fig. 6). Use the UP Button (3) and the DOWN Button (5) to scroll
between options. Use the SELECT Button (4) to select the desired option.

Golf Setup: Yards or Meters (Golf Preference)
Select YDS/M to set your preference for unit of measurement in Play Golf Mode. Use the UP Button (3) or the DOWN Button
(5) to highlight YARDS or METERS. Use the SELECT Button (4) to confirm the selected option.

Golf Setup: Auto-Off
The Auto-Off feature is designed to automatically exit Play Golf mode when the preset time has expired. When in Play
Golf mode, after the preset time has expired, the watch will automatically exit the round and return to the Home (Time)
screen to preserve battery life.

To set the Auto-Off time, select AUTO-OFF from the Golf/Setup Menu. From the set AUTO-OFF screen (Fig. 12), use the UP
Button (3) and the DOWN Button (5) to toggle the time up and down. Auto-Off is always set to whatever current time
duration is showing on the set AUTO-OFF page. Time can be set between 1.5 and 9 hours, or press UP or DOWN once more
at either end of the time range to select DISABLE and turn the feature off.

          Fig. 12a                        Fig. 12b                      Fig. 13                        Fig. 14

                                                           10
Golf Setup: Pedometer
, For the pedometer to be active during Play Golf, the pedometer must be turned on from this menu.
s
MAIN MENU ITEMS
From the Time screen, pressing the MENU button will display the MAIN MENU options. The MAIN MENU provides access to
the functions of: Pedometer, Fitness, Weather, Time functions, and Settings.
Main Menu: Pedometer
In order to track steps taken, the Excel Golf Watch supports a pedometer. This uses an internal accelerometer to track
the number of steps taken. Once enabled, the pedometer screen can be accessed from the Time screen using the down
button. In order for the Pedometer to be active during Play Golf, the Pedometer (Fig. 15) must be enabled from the Golf
menu. The Pedometer goal is the target number of steps. The goal can be set in increments of 1000 from 1,000 to 99,000
) steps. The Pedometer goal is set in the Menu – Settings section. The Pedometer goal may also be configured from the
smartphone app.
Main Menu: Fitness
The Excel golf watch supports an odometer to track the distance traveled, time elapsed, and speed. Fitness uses GPS for its
location. Once enabled, the Fitness screen can be accessed from the Time screen using the down button (Fig. 16).
e
Fig. 15 Fig. 16 Fig. 17
11Main Menu: Weather
The Excel Golf Watch supports Weather Mode which provides temperature and pressure readings (Fig. 17).
Notes:
• The Excel Golf Watch is not intended as a substitute for a precision weather instrument
• Sudden changes in temperature can affect pressure readings which can introduce errors to the readings
• Body temperature, direct sunlight and GPS being active will affect the temperature readings.
• To more accurately measure temperature, remove watch, place in a well ventilated area out of direct sunlight for 20-30
mins before taking measurement.
Main Menu: Timing related functions
The Main MENU provides access to other watch related functions such as alarm, stopwatch, and timer.
Main Menu: Battery
The battery level can be read from the Main MENU.
Main Menu: Settings
The Main Menu provides a SETTINGS menu (Fig. 13) to allow the user to configure the golf watch. Within the SETTINGS
menu is the capability to set the time and time format, set the units, turn Bluetooth on/off and Pair with a mobile device,
configure the clock screen, set the language, turn the sound on/off, check the GPS status and check the software version
number.
Language Settings
The Excel Golf Watch features 5 language settings (English, German, French, Spanish and Italian). By default, the user
interface is in English. To change the language setting, press the MENU Button (2), then use the UP Button or the DOWN
Button to scroll to “SETTINGS.” Press the SELECT Button to select “SETTINGS,” then use the UP Button or the DOWN Button
to scroll to “LANGUAGE” (Fig. 13) and select it using the SELECT Button. Use the UP Button or the DOWN Button to scroll
between options on the Language menu (Fig. 14), then press the SELECT Button to set your preferred (highlighted)
language.
12BLUETOOTH SETTINGS
The Excel Golf Watch can connect to the smartphone app via Bluetooth. Once connected the Excel Golf Watch can receive
text, email, phone, calendar, and Tee Time alerts. Further the smartphone app can configure the Excel Golf Watch, display
Fitness data and Swing Pro data.
The smartphone app can be obtained from the Apple Store and Google Play store for iPhone and Android devices,
respectively. Download and install the app on the mobile device. Go to the mobile devices’ settings page to turn on
Bluetooth, then launch the app.
To connect your watch to the smartphone app follow the steps below:
1. On your smartphone, make sure you have Bluetooth turned on.
2. On your watch, go to the “Main Menu” and then select “Bluetooth” (Fig.
18).
3. Select “Yes” to turn Bluetooth on.
4. Your watch will then give you a code. Enter that code into the smartphone
app when requested.
5. Once paired correctly, your smartphone app will display a confirmation.
The device is now paired with your smartphone. Fig. 18
Alert Messages
Once the Excel Golf Watch is paired to the mobile device, the golf watch can receive alert messages. The various messages
to be received can be configured in the smartphone app under the My Device Settings tab.
The Excel Golf Watch will only receive alerts from the mobile device while the app is running.
13iGolf Hazard Glossary
Hazards within the iGolf application are shown as abbreviations. These abbreviations are defined as follows:
1. LFB- Left Fairway Bunker 16. FGW- Front Green Water Layup
2. MFB- Middle Fairway Bunker 17. LGW- Left Green Water
3. RFB- Right Fairway Bunker 18. BGW- Back Green Water
4. LFW- Left Fairway Water Layup 19. CRK- Creek Layup
5. LFWC- Left Fairway Water Carry 20. CRKC- Creek Carry
6. MFW- Middle Fairway Water Layup 21. EOF- End of Fairway
7. MFWC- Middle Fairway Water Carry
8. RFW- Right Fairway Water Layup
9. RFWC- Right Fairway Water Carry The Excel will provide up to 4 hazard
10. FGB- Front Green Bunker callouts per hole. Press the SELECT Button
11. RGB- Right Green Bunker to cycle between FCB, Hazards (up to 2
12. LGB- Left Green Bunker screens) & the Round Info Odometer.
13. BGB-Back Green Bunker
14. RGW- Right Green Water
15. FGWC- Front Green Water Carry
Middle Fairway Water Carry
Left Green Bunker
Round Info Screen
14WARNING
Do not attempt to open the Excel watch. Risk of explosion if battery is replaced with incorrect type.
• Do not attempt to open, disassemble, or service the device. There are no customer serviceable items in the unit.
• The device contains a rechargeable lithium ion battery. Lithium ion batteries can explode or catch fire if not
handled correctly.
• Do not attempt to open, disassemble, or service the internal battery. The battery must be replaced by a qualified
technician.
• Do not crush, puncture or short the battery’s external contacts.
• Do not expose the device to temperatures above 140deg. F (60deg C). Do not leave unit in a hot car.
• Do not expose the device to high moisture surroundings.
• To store the unit for long time, discharge to 50% capacity, then store in a dry and low temperature place. Charge
the unit every 3 months.
• If using a car charger, disconnect the device while starting the car.
• Properly recycle or dispose of device. Do not dispose in fire or water.
Legal Disclaimer
By using this product, you agree that Bushnell Outdoor Products will not be held legally responsible for any injury or
damage to you or any person or property caused by the user’s improper operation and/or poor judgment while using this
product. Note: See Limited Warranty for other limitations to our liability.
Additional Information
The Global Positioning System (GPS), a network of 32 satellites orbiting Earth, is operated and maintained by the U.S.
government. This GPS device requires at least 3 satellites to be acquired to accurately determine your position. Any change
made to the system by the government could affect the accuracy and performance of this product.
Bushnell Golf GPS Website
www.bushnellgolf.com or www.bushnellgolf.eu is the best online resource for all our Golf GPS product owners,
including product support, FAQs, etc. It also serves as a portal to access iGolf.com GPS course files to use with these
Bushnell products. Registering your Excel Watch via www.bushnell.igolf.com is not required, but will ensure you have
access to the latest updated GPS course data.
15ONE YEAR LIMITED WARRANTY
Your Bushnell® product is warranted to be free of defects in materials and workmanship for one year after the date of purchase. In the event
of a defect under this warranty, we will, at our option, repair or replace the product, provided that you return the product postage prepaid.
This warranty does not cover damages caused by misuse, improper handling, installation, or maintenance provided by someone other than
a Bushnell Authorized Service Department.
Any return made under this warranty must be accompanied by the items listed below:
1. A check/money order in the amount of $10.00 to cover the cost of postage and handling.
2. Name, address and daytime phone # for product return.
3. An explanation of the defect.
4. Copy of your dated proof of purchase.
Do not send in accessories (batteries, SD cards, cables), only the product for repair.
Product should be well packed in a sturdy outside shipping carton to prevent damage in transit, and shipped to the address listed below:
IN U.S.A. Send To: IN CANADA Send To:
Bushnell Outdoor Products Bushnell Outdoor Products
Attn.: Repairs Attn.: Repairs
9200 Cody 140 Great Gulf Drive, Unit # B
Overland Park, Kansas 66214 Vaughan, Ontario L4K 5W1
For products purchased outside the United States or Canada please contact your local dealer for applicable warranty information. In
Europe you may also contact Bushnell at: Bushnell Germany GmbH
European Service Centre
Mathias-Brüggen-Str. 80
D-50827 Köln
GERMANY
Tél: +49 221 995568-0
Fax: +49 221 995568-20
This warranty gives you specific legal rights.
You may have other rights which vary from country to country.
©2017 Bushnell Outdoor Products
16NOTE: Your Bushnell Golf GPS Rangefinder Watch should have a sticker with serial number on the outer
package and on the product (see below). These serial numbers are used to ensure you are
purchasing the unit from an authorized dealer. If you are unable to locate this sticker or
if the serial number has been obscured, the product may not be authentic (counterfeit)
or it may not have been purchased through an authorized dealer. In either case, Bushnell
will not honor warranties on these products. You should return the unit to the seller for a
refund, and purchase your GPS rangefinder from an alternate location.
For a list of authorized dealers, please visit www.bushnellgolf.com.
Serial # sticker
on packaging
Serial # sticker
on product
Disposal of Electric and Electronic Equipment
(Applicable in the EU and other European countries with separate collection systems)
This equipment contains electric and/or electronic parts and must therefore not be disposed of as normal household waste.
Instead, it should be disposed at the respective collection points for recycling provided by the communities. For you, this is
free of charge.
If the equipment contains exchangeable (rechargeable) batteries, these too must be removed before and, if necessary, in turn
be disposed of according to the relevant regulations (see also the respective comments in this unit’s instructions).
Further information about the subject is available at your community administration, your local waste collection company, or
in the store where you purchased this equipment.
17FCC NOTE
This device complies with Part 15 of the FCC Rules. Operation is subject to the following two conditions: (1) This device may not cause harmful
interference, and (2) this device must accept any interference received, including interference that may cause undesired operation.
This equipment has been tested and found to comply with the limits for a Class B digital device, pursuant to Part 15 of the FCC Rules. These limits are
designed to provide reasonable protection against harmful interference in a residential installation. This equipment generates, uses and can radiate
radio frequency energy and, if not installed and used in accordance with the instructions, may cause harmful interference to radio communications.
However, there is no guarantee that interference will not occur in a particular installation. If this equipment does cause harmful interference to radio
or television reception, which can be determined by turning the equipment off and on, the user is encouraged to try to correct the interference by
one of the following measures:
• Reorient or relocate the receiving antenna.
• Increase the separation between the equipment and receiver.
• Connect the equipment into an outlet on a circuit different from that to which the receiver is connected.
• Consult the dealer or an experienced radio/TV technician for help.
Shielded interface cable must be used with the equipment in order to comply with the limits for a digital device pursuant to Subpart B of Part 15
of FCC Rules.
FCC Caution: Any changes or modifications not expressly approved by the party responsible for compliance could void the user’s authority to
operate this equipment.
This transmitter must not be co-located or operating in conjunction with any other antenna or transmitter.
Radiation Exposure Statement:
The product complies with the FCC portable RF exposure limit set forth for an uncontrolled environment and is safe for the intended operation as
described in this manual. Further RF exposure reduction can be achieved if the product can be kept as far as possible from the user ‘s body or when
set to lower output power if such function is available.
Industry Canada Statement
This device complies with ISED’s licence-exempt RSSs. Operation is subject to the following two conditions: (1) This device may not cause harmful
interference, and (2) this device must accept any interference received, including interference that may cause undesired operation.
Radiation Exposure Statement:
This device complies with the Industry Canada portable RF exposure limit set forth for an uncontrolled environment and is safe for the intended
operation as described in this manual. Further RF exposure reduction can be achieved if the product can be kept as far as possible from the user’s
body or if the device is set to a lower output power if such function is available.
18FRANÇAIS
Félicitations pour l’achat de votre montre GPS Bushnell Excel!
Pour des performances idéales, veuillez suivre les étapes ci-dessous :
1. Rechargez complètement votre appareil avant la première utilisation.
2. Connectez-vous et enregistrez votre appareil sur bushnell.igolf.com,
et synchronisez-le pour obtenir les dernières informations et données
sur les parcours de golf.
3. Entrez en mode Play Golf cinq minutes avant de jouer pour que la
connexion satellite ait le temps de s’établir.
Pour maintenir les performances de la batterie, veuillez suivre les étapes ci-dessous :
1. Rechargez votre appareil grâce au port USB d’un ordinateur,
à un port USB alimenté, ou à un chargeur de smartphone uniquement.
2. Déconnectez l’appareil du chargeur une fois la charge terminée.
3. Évitez de laisser votre appareil dans des environnements à température
très élevée, comme votre véhicule par temps chaud.
19BOUTONS/FONCTIONS
Menu Golf Up
1 3
Sélectionner
4
2 5
Menu Down/
1. Bouton de menu Golf : afficher le menu Golf. Power
2. Bouton MENU : afficher les options du menu principal.
3. Bouton HAUT : fait défiler les éléments de menu vers le haut.
4. Bouton SELECT : effectue une sélection parmi les éléments de menu.
5. Bouton BAS : fait défiler les éléments de menu vers le bas. Appuyez longuement (5 secondes)
pour allumer/éteindre.
20*Remarque : le rétro-éclairage s’active grâce à un appui sur n’importe quel bouton. Le rétro-éclairage reste allumé pendant
10 secondes après le dernier appui sur un bouton.
Entretien et maintenance
La montre Excel est résistante et étanche. Pour assurer un fonctionnement fiable, nous vous recommandons de suivre les
directives d’entretien et de maintenance suivantes :
• Évitez d’exposer la montre à des conditions environnementales extrêmes pendant une période prolongée.
• Évitez tout choc important sur la montre.
• Vous pouvez nettoyer la montre de temps à autre avec un chiffon doux et humide.
• Brossez régulièrement les contacts à clip en bas de la montre. L’accumulation d’impuretés à la surface des points
de contact peut affecter la charge et le transfert de données. *Remarque : utilisez une brosse à poils doux (incluse).
Les brosses à poils durs ou métalliques risquent de rayer la montre.
• N’EXPOSEZ PAS la montre à des produits chimiques puissants, comme de l’essence ou de l’alcool, car ces substances
l’endommageraient.
• Rangez la montre dans un endroit sec lorsque vous ne l’utilisez pas.
Recharger la batterie
La batterie rechargeable de la montre Excel affiche une grande autonomie et couvre jusqu’à trois parties de golf
(d’après une moyenne de quatre heures par partie), ou un an d’utilisation en montre du quotidien (donnant l’heure uniquement).
Cependant, l’autonomie de la batterie peut être réduite en raison de différents facteurs (température extérieure, etc.).
Toutes les batteries rechargeables perdent en charge effective au fil du temps. Rechargez votre batterie lorsqu’elle atteint
25 % de charge restante ; vous aurez ainsi l’assurance de pouvoir terminer la totalité de la partie suivante.
Pour vérifier le niveau de batterie restant, appuyez sur le bouton MENU (2) et sélectionnez BATTERIE. Pour recharger la batterie,
insérez la montre dans le socle de chargement, les contacts de charge à l’arrière de la montre (Fig. 2) alignés avec les broches de
charge sur le côté gauche du socle (Fig. 3). Puis, branchez le socle de chargement à un port USB ouvert sur votre ordinateur, à un port
USB alimenté, ou à un chargeur de smartphone CA. L’écran doit afficher « CHARGING » pour indiquer que votre montre Excel se
charge ; veillez à vous connecter à partir de l’écran Home (Time) (tel qu’indiqué à la p. 4) ou à partir de l’écran BATTERY (Fig. 1).
Fig. 1
21Contacts de charge Broches de charge
Fig. 2 Fig. 3 Socle de chargement
Contenu de l’emballage
1 – Montre Bushnell Excel GPS Rangefinder
1 – Socle de chargement avec câble USB
1 – Brosse de nettoyage des contacts
1 – Mode d’emploi
Bracelet : largeur 22 mm, remplaçable avec un tournevis torx T-6
Configuration requise pour l’ordinateur
Port USB
SE : Windows (XP ou version ultérieure),
Mac (OS 10.6 ou version ultérieure)
Mises à jour de micrologiciel/logiciel
Veuillez consulter www.bushnellgolf.eu ou
www.bushnellgolf.eu régulièrement pour obtenir
les dernières versions de micrologiciels et logiciels.
RÉGLAGE DE L’HEURE Montre sur le socle de chargement
Régler l’heure selon le GPS
*Pour assurer la réception, vérifiez que vous êtes en extérieur, à l’écart de grands bâtiments et d’arbres, avec une vue dégagée
sur le ciel.
22Le moyen le plus simple pour régler l’heure est le suivant. Dans le menu d’options TEMPS (Fig. 4), sélectionnez REGLER H,
puis sélectionnez PAR GPS dans le menu REGLER H (Fig. 5). L’Excel acquiert le signal GPS, et une fois la localisation effectuée,
elle retourne à l’écran Home (Time), où l’heure et la date seront réglées selon votre position longitudinale. Lorsque PAR GPS
est sélectionné (Fig. 5), d’autres fonctions GPS (Jouer au Golf, Fitness, GPS Status) mettront également à jour votre heure
via votre position longitudinale, une fonction pratique pour les golfeurs en voyage. *Remarque : dans quelques rares cas,
des limites de fuseaux horaires peuvent entrer en conflit. Dans ce cas, il peut s’avérer nécessaire de régler l’heure manuellement,
tel qu’indiqué dans la section Régler l’heure manuellement.
1 3
4
2 5
Fig. 4 Fig. 5
Régler l’heure manuellement
Pour régler l’heure manuellement, sélectionnez MANUELLEMENT dans le menu REGLER H (Fig. 5). Utilisez le bouton SELECT (4)
pour faire défiler les champs. Utilisez les boutons UP (3) et DOWN (5) pour modifier le paramètre d’un champ. Une fois l’année,
l’heure et la date définies, vous pouvez sélectionner le bouton MENU (2) pour retourner au menu des options TEMPS.
JOUER AU GOLF
Pour activer le mode Jouer au Golf, appuyez sur le bouton GOLF MENU (1), puis sélectionnez
JOUER AU GOLF (Fig. 6). L’Excel recherche un signal satellite, et une fois l’acquisition
effectuée, elle affiche la liste des résultats de terrains locaux, le plus proche apparaissant
en haut. Sélectionnez votre terrain pour afficher l’écran Entrée, Milieu, Fond de Green pour
le Trou 1 (Fig. 7, page suivante).
e *Pour assurer la réception, vérifiez que vous êtes en extérieur, à l’écart de grands bâtiments
et d’arbres, avec une vue dégagée sur le ciel. Fig. 6
23Fonctions des boutons en mode Jouer au Golf (Fig. 7) Lancer Trou
1 suivant
Calcul Distance Coup Joué : cette fonction vous permet de vérifier 3
facilement la distance entre deux points et est généralement utilisée
Sélec-
pour mesurer la longueur de votre frappe. Appuyez sur le bouton
tionner
SHOT (1) pour définir le Point A (l’endroit où vous vous trouvez) sur
4
« 0 ». Lorsque vous avez rejoint votre balle (Point B), la montre Excel
affiche la distance entre le Point A et le Point B en ligne droite (Fig. 8).
2 5
Afficher les options du menu Golf : appuyez sur le bouton MENU (2) Menu Précédent
pour afficher les options du menu Golf (SWING PRO, CHANGEMENT DE Trou
PARCOURS, BATTERIE ou EXIT ROUND). Appuyez à nouveau sur MENU Fig. 7
pour retourner à votre jeu.
Avancée de trou manuelle : appuyez sur PROCHAIN TROU (3) pour avancer manuellement
au trou suivant, ou sur PREVIOUS HOLE (5) pour retourner manuellement au trou précédent.
*Remarque : l’Excel est dotée de l’avance automatique ; cette fonction d’avance à un bouton
est très utile pour les départs simultanés.
Afficher les informations de obstacles/partie : appuyez sur le bouton SELECT (4) pour
basculer entre les écrans Obstacle 1 ou 2, Round Info et les pages FCB (Entrée, Milieu, Fond de
green) (Fig. 8a). Les écrans Obstacles et Round Info retourneront automatiquement au FCB après Fig. 8
7 secondes si aucun autre bouton n’est actionné. Consultez la liste à la page 8 pour obtenir un glossaire complet des définitions
de danger. Round Info est un odomètre de golf qui suit la durée totale de la partie et la distance parcourue.
Fig. 8a
24OPTIONS DU MENU GOLF
Depuis l’écran Time, appuyez sur le bouton Golf pour afficher les options du menu Golf (JOUER AU GOLF, DEPART, SWING
PRO, CONFIG).
DEPART
La fonction Tee Time permet à l’utilisateur de planifier et de stocker plusieurs heures de depart sur son appareil. Un départ
peut être défini à partir de la montre et de l’application. La montre affiche jusqu’à sept départs, tandis que l’application
peut en stocker autant que le nombre de plannings d’utilisateur.
Lorsqu’un départ est planifié via l’application et synchronisé avec votre montre, 10 minutes avant l’heure de début, l’utilisateur
reçoit une notification départ sur son appareil connecté. Sept minutes avant l’heure de début planifiée, la montre commence
automatiquement à rechercher des satellites. Une fois la localisation GPS établie, la montre sélectionne automatiquement le
terrain de golf qui a été choisi par l’utilisateur lors de la création du départ sur l’application. Si le départ est créé manuellement
sur la montre, seules la date et l’heure peuvent être spécifiées, et la montre n’affichera que les terrains les plus proches sur la
localisation GPS. Une icône de drapeau ( ) s’affiche sur l’écran de l’heure lorsqu’un départ est défini.
Swing Pro
La fonction Swing Pro permet à l’utilisateur de surveiller la vitesse du swing et son tempo. Lorsque la montre affiche l’écran
Swing Pro, l’utilisateur sélectionne le club en premier. Puis, la montre continue à surveiller et à afficher automatiquement la
mesure du dernier swing. Si la montre est connectée à l’application mobile, les données du swing sont envoyées à l’appareil
mobile connecté après chaque swing. L’application sur l’appareil mobile affiche et stocke les données de swing. La montre
continue à utiliser la fonction Swing Pro jusqu’à ce que l’utilisateur quitte l’écran Swing Pro (Fig. 11).
Fig. 9a Fig. 9b Fig. 10 Fig. 11
25CONFIG
Le menu CONFIG (Fig. 10) vous permet de définir vos préférences pour des unités de mesure en mode Jouer au Golf
(yards ou mètres), de définir la durée Auto-Off, de configurer le podomètre pendant le mode Jouer au Golf, et d’afficher le
niveau de charge de la batterie. Pour accéder au menu CONFIG, sélectionnez CONFIG dans le menu GOLF (Fig. 6). Utilisez les
boutons HAUT (3) et BAS (5) pour faire défiler les options. Utilisez le bouton SELECT (4) pour sélectionner l’option souhaitée.
CONFIG : yards ou mètres (préférence golf)
Sélectionnez YDS/M pour définir votre préférence pour l’unité de mesure en mode Jouer au Golf. Utilisez les boutons HAUT (3) et
BAS (5) pour mettre en évidence l’option YARDS ou METERS. Utilisez le bouton SELECT (4) pour confirmer l’option sélectionnée.
Configuration Golf : Auto-Off
La fonction Auto-Off est conçue pour quitter automatiquement le mode Jouer au Golf lorsque la durée prédéfinie a expiré.
En mode Play Golf, lorsque l’heure prédéfinie a expiré, la montre quitte automatiquement la partie et retourne à l’écran
Home (Time) pour préserver la batterie.
Pour définir la durée Auto-Off, sélectionnez AUTO-OFF dans le menu Golf/Config. Sur l’écran de réglage AUTO-OFF (Fig. 12),
utilisez les boutons HAUT(3) et BAS (5) pour augmenter et diminuer la durée. Auto-Off est toujours défini sur la durée en
cours qui s’affiche sur la page AUTO-OFF définie. La durée peut être définie entre 1,5 et 9 heures. Sinon, appuyez sur HAUT
ou BAS une fois de plus à la fin de la plage pour sélectionner DESACTIVE et désactiver la fonction.
Fig. 12a Fig. 12b Fig. 13 Fig. 14
26Configuration Golf : podomètre
f Le podomètre doit être activé à partir de ce menu pour être actif pendant le mode Jouer au Golf.
s ÉLÉMENTS DU MENU PRINCIPAL
Depuis l’écran Temps, appuyez sur le bouton MENU pour afficher les options du MENU PRINCIPAL. Le MENU PRINCIPAL offre
l’accès aux fonctions suivantes : Podometer, Fitness, Weather, Fonctions Temps et Paramètres.
Menu Principal : Podometer
t
Pour pouvoir suivre les pas effectués, la montre Excel Golf prend en charge un podomètre. Il utilise un accéléromètre interne
pour suivre le nombre de pas effectués. Une fois le podomètre activé, son écran est accessible à partir de l’écran Temps,
à l’aide du bouton BAS. Pour que le podomètre soit actif pendant le mode Jouer au Golf, la fonction Podometer (Fig. 15) doit
être activée dans le menu Golf. L’objectif du podomètre est d’atteindre le nombre de pas cible. L’objectif peut être défini par
incréments de 1 000, de 1 000 à 99 000 pas. L’objectif du podomètre se définit dans la section Menu – Paramètres. L’objectif
du podomètre peut également être configuré à partir de l’application smartphone.
MENU PRINCIPAL : Fitness
La montre Excel Golf prend en charge un odomètre qui suit la distance parcourue, le temps écoulé et la vitesse. La fonction
Fitness utilise le GPS pour la localisation. Une fois activé, l’écran Fitness est accessible à partir de l’écran Temps, à l’aide du
bouton BAS (Fig. 16).
Fig. 15 Fig. 16 Fig. 17
27MENU PRINCIPAL : MÉTÉO
La montre Excel Golf prend en charge le mode MÉTÉO, qui fournit les relevés de température et de pression (Fig. 17).
Remarques :
• La montre Excel Golf n’est pas conçue pour remplacer un instrument météorologique de précision
• Des changements de température soudains peuvent affecter les relevés de pression, ce qui peut introduire des erreurs
dans les relevés.
• La température corporelle, l’exposition directe au soleil et l’activation du GPS affectent les relevés de température.
• Pour mesurer la température avec plus de précision, retirez la montre, placez-la dans un endroit bien aéré, à l’écart de
la lumière directe du soleil, pendant 20 à 30 minutes avant la mesure.
Menu Principal : fonctions liées à l’heure
Le MENU PRINCIPAL offre un accès à d’autres fonctions liées à la montre, comme une alarme, un chronomètre et un minuteur.
Menu principal : Batterie
Le niveau de batterie peut être consulté depuis le MENU PRINCIPAL.
Main Menu : Paramètres
Le Menu Principal fournit un menu Paramètres (Fig. 13) qui permet à l’utilisateur de configurer la montre de golf. Dans le
menu PARAMÈTRES, l’utilisateur peut définir l’heure et le format d’heure, définir les unités, activer/désactiver le Bluetooth
et coupler la montre avec un appareil mobile, configurer l’écran de l’horloge, définir la langue, activer/désactiver le son,
vérifier le statut GPS et contrôler le numéro de version logicielle.
Paramètres de langue
La montre Excel Golf dispose de cinq paramètres de langue (anglais, allemand, français, espagnol et italien). Par défaut,
l’interface utilisateur est en anglais. Pour modifier le paramètre de langue, appuyez sur le bouton MENU (2), puis utilisez
les boutons HAUTou BAS pour accéder à PARAMÈTRES. Appuyez sur le bouton SELECT pour sélectionner PARAMÈTRES, puis
utilisez les boutons HAUT ou BAS pour accéder à LANGUES (Fig. 13) et sélectionner l’option avec le bouton SELECT. Utilisez
les boutons HAUT ou BAS pour défiler entre les options du menu Langue(Fig. 14), puis appuyez sur le bouton SELECT pour
définir votre langue préférée (mise en évidence).
28PARAMÈTRES BLUETOOTH
La montre Excel Golf peut se connecter à l’application smartphone via Bluetooth. Une fois connectée, la montre Excel Golf
peut recevoir des SMS, des e-mails, des appels téléphoniques, des alertes de calendrier et de Départs. De plus, l’application
smartphone peut configurer la montre Excel Golf, afficher les données Fitness et Swing Pro.
L’application smartphone est disponible sur l’Apple Store et sur Google Play pour iPhone et appareils Android,
respectivement. Téléchargez et installez l’application sur l’appareil mobile. Accédez à la page des paramètres de l’appareil
mobile pour activer le Bluetooth, puis lancez l’application.
Pour connecter votre montre à l’application smartphone, suivez les étapes ci-dessous :
1. Sur votre smartphone, assurez-vous que le Bluetooth est activé.
2. Sur votre montre, accédez le MENU PRINCIPAL, puis sélectionnez
« Bluetooth » (Fig. 18).
3. Sélectionnez « Oui » pour activer Bluetooth.
4. Votre montre affiche un code. Saisissez ce code dans l’application
smartphone lorsque vous y êtes invité.
5. Une fois le couplage correctement effectué, votre application smartphone
affiche une confirmation. L’appareil est désormais associé à votre smartphone.
Fig. 18
Messages d’alerte
Une fois la montre Excel Golf couplée à l’appareil mobile, elle peut recevoir des messages d’alerte. Les différents messages
devant être reçus peuvent être configurés dans l’application smartphone, sous l’onglet Ma montre Paramètres.
La montre Excel Golf ne reçoit des alertes de l’appareil mobile que lorsque l’application est ouverte.
29Glossaire Obstacles iGolf
Les Obstacles dans l’application iGolf sont indiqués sous forme d’abréviations. Ces abréviations sont définies comme suit :
1. LFB – Bunker Fairway Gauche 16. FGW – Layup Eau Devant Green
2. MFB – Bunker Fairway Milieu 17. LGW – Eau Green Gauche
3. RFB – Bunker Fairway Droite 18. BGW – Eau Fond Green
4. LFW – Layup Eau Fairway Gauche 19. CRK – Layup Ruisseau
5. LFWC – Carry Eau Fairway Gauche 20. CRKC – Carry Ruisseau
6. MFW – Layup Eau Fairway Milieu 21. EOF – Fin Fairway
7. MFWC – Carry Eau Fairway Milieu
8. RFW – Layup Eau Fairway Droite
9. RFWC – Carry Eau Fairway Droite
10. FGB – Bunker Devant Green
11. RGB – Bunker Green Droite L’Excel fournit jusqu’à quatre légendes de danger
12. LGB – Bunker Green Gauche par trou. Appuyez sur le bouton SELECT pour
13. BGB – Bunker Green Fond basculer entre FCB, Hazards (jusqu’à deux écrans)
14. RGW – Eau Green Droite et l’odomètre Round Info.
15. FGWC – Carry Eau Devant Green
Carry Eau Fairway Milieu
Bunker Green Gauche
Écran Info Tour
30AVERTISSEMENT
N’essayez pas d’ouvrir la montre Excel. Risque d’explosion si la batterie est remplacée par une batterie de type incorrect.
• N’essayez pas d’ouvrir, de démonter ou d’entretenir l’appareil. Aucun élément de l’unité n’est réparable par l’utilisateur.
• L’appareil contient une batterie au lithium-ion rechargeable. Les batteries au lithium-ion peuvent exploser ou
prendre feu si elles ne sont pas manipulées correctement.
• N’essayez pas d’ouvrir, de démonter ou d’entretenir la batterie interne. La batterie doit être remplacée par un
technicien qualifié.
• N’écrasez, ne percez ou ne raccourcissez pas les contacts externes de la batterie.
• N’exposez pas l’appareil à des températures supérieures à 60 °C. Ne laissez pas l’unité dans une voiture exposée au soleil.
• N’exposez pas l’appareil à des environnements très humides.
• Pour ranger l’unité pendant une période prolongée, déchargez-la à une capacité de 50 %, puis rangez-la dans un
lieu frais et sec. Chargez l’unité tous les 3 mois.
• Si vous utilisez un chargeur de voiture, déconnectez l’appareil lorsque vous démarrez la voiture.
• Recyclez ou mettez l’appareil au rebut de la manière appropriée. Ne le mettez pas dans l’eau ou le feu.
Limitation de responsabilité
En utilisant ce produit, vous reconnaissez que Bushnell Outdoor Products ne sera pas tenu pour responsable juridiquement
de tout blessure ou dommage infligé à vous ou toute personne ou propriété, causé par l’utilisation incorrecte de l’utilisateur
et/ou un mauvais jugement lors de l’utilisation de ce produit. Remarque : consultez la garantie limitée pour prendre
connaissance des autres limitations de notre responsabilité.
Informations supplémentaires
Le Global Positioning System (GPS), un réseau de 32 satellites qui orbitent autour de la Terre, est exploité et maintenu
par le gouvernement américain. Cet appareil GPS a besoin de l’acquisition d’au moins trois satellites pour déterminer
votre position avec précision. Tout changement apporté au système par le gouvernement peut affecter la précision
et les performances de ce produit.
Site Web Bushnell Golf GPS
www.bushnellgolf.com ou www.bushnellgolf.eu est la meilleure ressource en ligne pour tous les propriétaires de
produits GPS Golf, comprenant un support produit, une FAQ, etc. Ces sites servent également de portail pour accéder aux
fichiers de terrain GPS iGolf.com à utiliser avec ces produits Bushnell. Il n’est pas obligatoire d’enregistrer votre montre Excel
via www.bushnell.igolf.com, mais l’enregistrement vous donne accès aux données de terrain GPS les plus récentes.
31GARANTIE LIMITEE D’UN AN
Votre produit Bushnell® est garanti exempt de défauts de matériaux et de fabrication pendant un an à partir de la date d’achat.
En cas de défectuosité sous garantie, nous réparons ou remplacerons le produit, à nos frais, sous réserve que vous le retourniez avec
l’affranchissement prépayé. Cette garantie ne couvre pas les dommages causés par une mauvaise utilisation, une mauvaise manipulation
ou installation, ou l’entretien fournis pas une personne autre qu’un service de maintenance agréé par Bushnell.
Tout retour effectué en vertu de cette garantit doit être accompagné des éléments suivants :
1. Un chèque/mandate-poste d’un montant de 10,00 $ pour couvrir les frais d’affranchissement et de manutention.
2. Nom, adresse et numéro de téléphone de jour pour le retour du produit.
3. Une explication du défaut.
4. Une copie de votre preuve d’achat datée.
Ne pas envoyer d’accessoires (batteries, carte SD, cables), mais uniquement la produit à réparer.
Le produit doit être bien emballé dans solide un carton d’expédition pour éviter tout dommage durant le transit et expédié à l’adresse
suivante :
AUX U.S.A. Envoyé à : AU CANADA Envoyé à :
Bushnell Outdoor Products Bushnell Outdoor Products
Attn.: Repairs Attn.: Repairs
9200 Cody 140 Great Gulf Drive, Unit # B
Overland Park, Kansas 66214 Vaughan, Ontario L4K 5W1
Pour les produits achetés à l’extérieur des Etats-Unis ou du Canada, veuillez contacter votre revendeur local pour obtenir les conditions
de garantit applicables. En Europe, vous pouvez également contacter Bushnell au : Bushnell Germany GmbH
Centre de service Européen
Mathias-Brüggen-Str. 80
D-50827 Köln
GERMANY
Tél : +49 221 995568-0
Fax : +49 221 995568-20
Cette garantie vous confère des droits légaux spécifiques.
Vous pouvez avoir d’autres droits qui variant d’un pays à l’autre.
©2017 Bushnell Outdoor Products
32Traitement des déchets d’équipements électriques et électroniques
(En vigueur dans l’Union européenne et autres pays européens
ayant des systèmes de collecte des déchets séparés)
Cet équipement contient des composants électriques et/ou électroniques et par conséquent ne doit pas être éliminé en fin de vie avec les autres
déchets ménagers. Vous devez au contraire vous débarasser de ce produit afin qu’il soit recyclé aux points de collecte respectifs fournis par les
communautés locales. Pour vous, ceci est sans frais.
Si l’équipement contient des piles amovibles (rechargeables), celles-ci doivent également être retirées de l’équipement et, si nécessaire, être
éliminées à leur tour conformément aux règlements en vigueur (voir également les commentaires respectifs dans la notice d’utilisation de ce
produit).
De plus amples renseignements à ce sujet sont disponibles auprès de votre mairie, votre compagnie de ramassage d’ordures locale, ou dans le
magasin où vous avez acheté cet équipement.
In
Th
Industry Canada Statement in
Le présent appareil est conforme aux CNR d’ ISED applicables aux appareils radio exempts de licence. L’exploitation est autorisée aux deux conditions
suivantes: (1) le dispositif ne doit pas produire de brouillage préjudiciable, et (2) ce dispositif doit accepter tout brouillage reçu, y compris un
R
Th
brouillage susceptible de provoquer un fonctionnement indésirable.
op
Déclaration d’exposition aux radiations: b
Le produit est conforme aux limites d’exposition pour les appareils portables RF pour les Etats-Unis et le Canada établies pour un environnement
non contrôlé.
Le produit est sûr pour un fonctionnement tel que décrit dans ce manuel. La réduction aux expositions RF peut être augmentée si l’appareil peut
être conservé aussi loin que possible du corps de l’utilisateur ou que le dispositif est réglé sur la puissance de sortie la plus faible si une telle fonction
est disponible.
33ESPAÑOL
¡Enhorabuena por la compra de su reloj medidor GPS Excel de Bushnell!
Para obtener el mejor rendimiento, siga las siguientes instrucciones:
1. Cargue el dispositivo al máximo antes de su primer uso.
2. Inicie sesión y registre el dispositivo en bushnell.igolf.com y sincronice el dispositivo
con la información y los datos más recientes sobre el campo de golf.
3. Entre en el modo Play Golf 5 minutos antes del primer golpe para permitir
la conexión a un satélite.
Para mantener el correcto rendimiento de la batería, siga las siguientes
instrucciones:
1. Cargue el dispositivo usando exclusivamente un puerto USB de ordenador,
un hub USB con alimentación o un cargador de smartphone de CA.
2. Desconecte el dispositivo del cargador cuando esté totalmente cargado.
3. Evite dejar el dispositivo en entornos extremadamente calurosos, como el vehículo
en días de calor.
34BOTONES/FUNCIONES
Menú de golf Arriba
1 3
Seleccionar
4
2 5
Menú Abajo/
1. Botón de menú de golf: Ver menú de golf. Alimentación
2. Botón de MENÚ: Ver opciones del menú principal.
3. Botón ARRIBA: Se desplaza hacia arriba por los elementos del menú.
4. Botón SELECCIONAR: selecciona entre los elementos del menú.
5. Botón ABAJO: Se desplaza hacia abajo por los elementos del menú. Pulse y mantenga pulsado
(5 segundos) para encender/apagar.
35*Nota: La retroiluminación se activa tocando cualquier botón. La retroiluminación se mantendrá encendida durante
10 segundos tras el toque del último botón.
Cuidado y mantenimiento
El reloj Excel es duradero e impermeable. Para ayudar a garantizar un funcionamiento fiable, se recomiendan las siguientes
pautas de cuidado y mantenimiento:
• Evite exponer el reloj a condiciones medioambientales extremas durante un periodo de tiempo prolongado.
• Evite impactos fuertes en el reloj.
• Puede limpiar el reloj de manera ocasional con un trapo suave húmedo.
• Cepille los contactos del cargador de la parte inferior del reloj con regularidad. La acumulación de suciedad en la
superficie de los puntos de contacto puede afectar a la carga y la transferencia de datos normales. *Nota: Utilice
un cepillo de cerdas suaves (incluido). Los cepillos con cerdas duras o metálicas pueden dejar arañazos en el reloj.
• NO exponga el reloj a productos químicos fuertes como gasolina o alcohol ya que dañarán al reloj.
• Guarde el reloj en un lugar seco mientras no esté en uso.
Cambiar la batería
La batería recargable del reloj Excel es de larga duración y proporciona hasta 3 recorridos de golf
(cifra basada en una media de 4 horas por recorrido) o un año de uso como un reloj de uso diario (solo reloj).
Sin embargo, la duración de la batería se puede ver reducida debido a diversos factores (temperatura externa, etc).
Todas las baterías recargables pierden su duración de carga efectiva con el paso del tiempo. Recargar la batería cuando
está al 25% le garantiza que durará durante la totalidad del siguiente recorrido.
Para comprobar cuánta carga le queda a la batería, pulse el botón MENÚ (2) y seleccione BATERÍA. Para cargar la batería,
inserte el reloj en la base de carga con los contactos de carga de la parte posterior del reloj (Fig 2) alineados con las clavijas de
carga de la parte izquierda de la base de carga (Fig 3). Después conecte la base de carga a un puerto USB del ordenador, un hub
USB con alimentación o un cargador de smartphone de CA. Mire la pantalla para asegurarse de que aparece “CARGANDO” para
indicar que el reloj Excel esté cargando correctamente. Asegúrese de conectar desde la pantalla de inicio (hora) (como aparece
en la pág. 4) o desde la pantalla BATERÍA (Fig 1).
Fig. 1
36You can also read