USING THE PUMA 560 ROBOT - A User's Guide to Basic Operation of the PUMA Arm Robot
←
→
Page content transcription
If your browser does not render page correctly, please read the page content below
USING THE PUMA 560 ROBOT
By Jerry Rutherford

    A User’s Guide to Basic Operation of the PUMA Arm Robot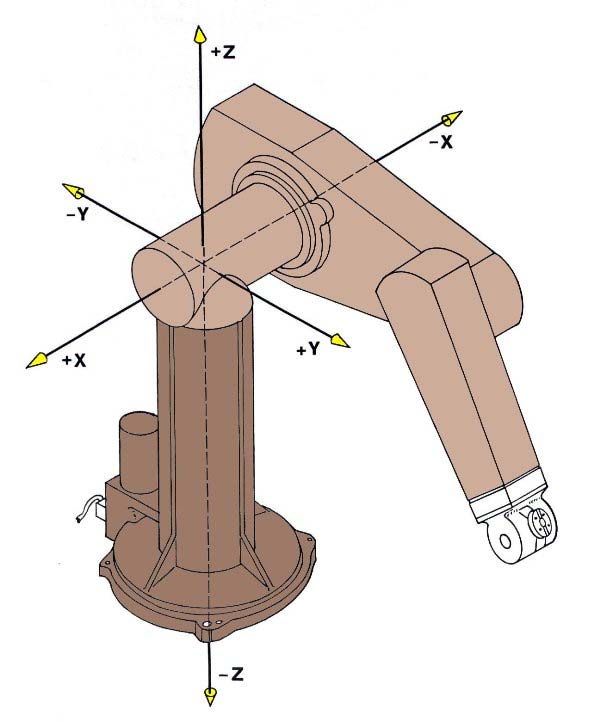
The PUMA robot is connected to a 1980 series controller that has a programming language
called VAL II which translates simple commands into the electrical signals needed to drive the
robot. We will be using a laptop/PC to send commands to the controller using a serial port. We
can use custom software written in C, BASIC, or other languages to drive the robot by sending
commands through the serial port. Another method is to simply connect a terminal program
which allows us to interact directly with the robot in real time.

Getting started
To operate the PUMA we must first be sure that the PC or laptop/PC is running and that a serial
connection is established so that we can enter commands directly. When the power for the
PUMA controller is first turned on, it will ask specific questions that need to be answered
before power will be applied to the arm. Without the computer connection, the robot arm will
not function.

                                                          AUTO START

                               POWER ON                                      ARM POWER ON

                                                            HALT
                                                RESTART                RUN

                                                                             ARM POWER OFF

                               POWER FUSE

                                TERMINAL       MANUAL

                                            Figure 1: PUMA Controller

The serial cable should be connected between the TERMINAL port of the PUMA controller and
the laptop/PC serial port. The connection on the PUMA controller marked MANUAL should be
connected to the orange TEACH PENDANT to allow manual control once the unit is powered
on. Once these connections are made, we are ready to bring the PUMA online and begin
operations.

PUMA Unofficial User’s Guide                              Page 2                             By Jerry Rutherford © 2012
Power On Laptop/PC Procedure
Follow these steps to bring the laptop/PC online before the PUMA is switched on.
1) Press the POWER switch on the laptop/PC.
2) When prompted, enter the password and press .
3) Once the laptop/PC is completely powered up locate the icon for TERA TERM or
HYPERTERMINAL which is a simple terminal program. This is what we will use to
communicate with the PUMA. (Tera Term will be presumed in this document.)
4) Double click on the TERA TERM icon to start the program.
5) The terminal program should start up and already be configured for the proper settings.
6) Power the PUMA Robot Controller on.
If you are unable to communicate in the following steps, you may need to manually set the
software to the following values.
a. Comm Port 1 (This may change based on the laptop/PC you use.)
b. 9600 Baud, no parity, 1 stop bit
c. 250 ms delay after a line feed. (This is important when sending files.)
d. 0 ms delay after a character.
PUMA Unofficial User’s Guide Page 3 By Jerry Rutherford © 2012Power ON Robot Procedure
Once the laptop/PC is running follow these procedures.
AUTO START
POWER ON ARM POWER ON
HALT
RESTART RUN
ARM POWER OFF
POWER FUSE
TERMINAL MANUAL
Figure 2: PUMA Controller
1) Locate the switch marked RESTART/HALT/RUN and make sure it is in the RUN position.
2) Turn the POWER ON switch to the UP position.
3) On the laptop/PC you should get the first response from the puma
INITILIZE (Y/N) ?
You need to answer Y or N to continue, the default answer is N .
If you answer Y to this question, all programs will be erased, the speed will be set
to 100%, and all location names will be erased. If you need to clear out all
memory to start over, then you would answer Y .
4) After the question is answered, press the ARM POWER button.
5) You will hear a click and all joints of the robot will now freeze, you will no longer be able
to freely move the gripper by pressing on it.
6) Follow the PUMA CALIBRATION PROCEDURE next.
Power OFF Robot Procedure
1) Press the red ARM POWER OFF switch.
2) Turn the POWER ON switch to the DOWN position.
3) Power off the laptop/PC if not being used.
WARNING: Turning the controller OFF before pressing the RED ARM POWER OFF switch
may damage the driver boards of the robot controller. Always press the RED
ARM POWER OFF switch first!
PUMA Unofficial User’s Guide Page 4 By Jerry Rutherford © 2012PUMA Calibration Procedure
The PUMA robot has a series of potentiometers which indicate its position during use. If the
robot is not calibrated, location data may be incorrect and the robot will not be as accurate
during operation. It is a good idea to run the calibration procedure at least once after power up,
and any time after the robot arm power has been switched off.
CLAMP CLAMP TP TP
REC # 1 2 - +
COMP TOOL WORLD JOINT FREE TICK
TEACH HOLD RUN CAL
X
1
Y
2
Z
3
RX
4
RY
5
RZ
6
Figure 3: PUMA TEACH PENDANT
1) On the TEACH PENDANT press the COMP button to enter computer control mode.
2) Type CAL on the terminal.
3) The PUMA should respond with
ARE YOU SURE (Y/N) ?
4) Answer Y .
5) The robot will move slightly for about 5 seconds then respond “.” On the terminal.
6) The robot is now calibrated and ready for operation.
7) Make sure that everyone is out of the way and that there is nothing for the arm to
collide into.
WARNING: The robot can move faster than you do!
8) Type DO READY on the terminal and press .
9) The arm will move to the READY position which is straight up.
PUMA Unofficial User’s Guide Page 5 By Jerry Rutherford © 2012PUMA VAL Command Structure
The PUMA robot will respond to a series of commands in a language called VAL II. There are
two methods of sending the commands; first is from within a program, the other is by manually
entering them into the computer.
Example:
The command to make the arm go to the default position is READY. From within
a program you can issue the command directly:
READY
From the terminal you must issue a sub‐command to inform the robot to access
the command structure, the sub‐command is DO. To make the robot move to
the default position from the terminal program you would enter:
DO READY
In the following text it will be presumed that the commands are being used from within a
computer program. If you are entering them manually use the DO sub‐command or you will get
an error message.
Writing a software program in VAL II
The PUMA was built in the days of floppy disk drives; the editor is very primitive and hard to
work with by today’s standards. We get around this issue by using Microsoft WordPad or
similar text editor to create a text file that we then send to the robot.
From the TERA TERM program you can evoke the EDIT command which will start the creation
of a file in the VAL Controller memory. There is a limit of about 64K so if you run out of program
space; you may need to ZERO the memory. This will also cause the loss of any pre‐programmed
locations. Usually for the simple programs we are writing, this will not be an issue.
To create and update a program on the PUMA using VAL you must first open WordPad and
create a text file. Start the file with the EDIT command and the name of the program you wish
to create. In the example below we will create a program to open the gripper, wait 5 seconds,
and then close the gripper. The commands we will use are:
• OPENI ‐ Causes gripper to open immediately.
• CLOSEI ‐ Causes gripper to close immediately.
• DELAY ‐ Causes the robot to do nothing for seconds.
PUMA Unofficial User’s Guide Page 6 By Jerry Rutherford © 2012Now that we have decided what we want the robot to do, we will create our program in the
word processor. Open WordPad to a new document and type the following:
EDIT SAMPLE
OPENI
DELAY 5
CLOSEI
E
Figure 4: Sample code
Once you have done this, save the document in the C:\PUMA\ file in TXT format. (DOS
FORMAT) You will get a message box asking if you are sure, you want to use this format… this is
normal. Click OK to save the file as SAMPLE.TXT onto the hard drive or a thumbdrive if you
have one.
In the text file we included the command EDIT SAMPLE as the first line of text. This will cause
the VAL II to create a new program space called SAMPLE where your file will be uploaded. In
the next step we will send the file to the VAL II through the terminal. The PUMA controller will
think that someone is typing the text into the memory and will save the program.
The last line of the file contains a line with “E” on it. The reason for this is so that the editor in
VAL II will automatically exit. (The editor has single letter commands; this is how we get around
not having a floppy drive.) From TERA TERM, select the Send File command to send your
program to the robot. (If using another terminal program it may be “SEND ASCII FILE” or SEND
TEXT FILE”.)
Figure 5: Terminal Program
PUMA Unofficial User’s Guide Page 7 By Jerry Rutherford © 2012Select your file from the previous step, in this case SAMPLE.TXT and the terminal will send it to
the PUMA controller. When finished you should be at the normal prompt and able to enter
commands again.
To run your new program type EXE SAMPLE and the robot should execute the
program. If you wanted to run your program multiple times you may enter the number of times
to repeat after the program name.
Example: EXE SAMPLE 5
In this example, the robot gripper would open and close 5 times during the 25 seconds it takes
to run the commands. (Including the DELAY command in our code.)
The command EXE is used to execute any program in memory. If the program does not exist it
will return an error message. If you type EXE without specifying a program name, the
last program run will be executed again.
Figure 6: Teach Pendant – PUMA Manual Controller
Note: Programs will not run unless the PUMA is in the computer mode. If you
get an error message when attempting to run your program, press the
COMP button.
PUMA Unofficial User’s Guide Page 8 By Jerry Rutherford © 2012WARNING: Always have someone with one hand on the EMERGENCY STOP button
located on the top of the teach pendant the first time you run new
software. The robot may surprise you… and not in a good way!
PUMA Teach Pendant
Figure 7: Teach Pendant – PUMA Manual Controller
Here is a quick note as to what the most used buttons on the teach pendant do.
CLAMP‐1 ‐ Closes the Gripper
CLAMP‐2 ‐ Opens the Gripper
COMP ‐ Sets robot to Computer Mode
TOOL ‐ Sets position/direction relative to the tool orientation.
WORLD ‐ Uses X/Y/Z coordinate system to move robot.
JOINT ‐ Sets control buttons to operate joint motors directly.
FREE ‐ Releases a joint. WARNING: Can cause damage!!! (Arm can fall.)
TICK ‐ Used in program mode. (Special function.)
SWITCH 1 ‐ Move X‐axis or control joint #1 (base)
SWITCH 2 ‐ Move Y‐axis or control joint #2 (main arm up/down)
SWITCH 3 ‐ Move Z‐axis or control joint #3 (forearm up/down)
SWITCH 4 ‐ Rotate about X or control joint #4 (wrist rotate)
SWITCH 5 ‐ Rotate about Y or control joint #5 (wrist up/down)
SWITCH 6 ‐ Rotate about Z or control Joint #6 (hand/gripper rotate)
(LEFT‐SIDE) ‐ UP = High speed, MIDDLE = Normal speed, DOWN = Precision (slow) speed
PUMA Unofficial User’s Guide Page 9 By Jerry Rutherford © 2012PUMA Command List
Here are the PUMA commands that are used to create software to run the robot arm in
automatic mode. Editor commands and commands dealing with the floppy drive have been
omitted. The references here are simplistic. If you need more detail please download the
official manual: Users Guide to VAL 398H2A.pdf
Defining Locations
The most common method to define a location is by using the teach pendant to move
the robot to the desired location than issue the HERE command followed by a name to
be used to reference the location. If you wanted to define a place that the robot could
move to when you are finished with a program, and you wanted to call it “HOME”, you
could move the robot to that location then issue the command:
HERE HOME
The robot will respond by sending back the coordinates and asking if you want to make
the change.
.HERE HOME
X/JT 1 Y/JT 2 Z/JT3 O/JT 4 A/JT 5 T/JT 6
34.75 530.47 ‐23.06 ‐167.459 57.437 114.247
CHANGE?
Pressing will define the position.
PUMA Unofficial User’s Guide Page 10 By Jerry Rutherford © 2012Another method for assigning multiple positions is the TEACH command. To use this
command you issue TEACH [location] where the location is a name that you specify. You
then use the teach pendant to move to the multiple locations, at each location press the
REC button to record that location. When you are finished teaching locations, press the
key on the terminal.
Example: Teaching multiple PART locations.
• Type TEACH PART then press .
• Move to a location and press REC.
• Move to another location and press REC.
• Press to end the command. Locations PART1 and PART2 will be
saved.
The BASE command allows an offset to compensate for movement or shifting of the
robot. Say for example that the drawing pad was moved 50mm to one side. Rather than
rewriting the entire program, we could offset the coordinate system to compensate.
Example: Shift 100mm in the X axis and 25mm in the Y axis.
Type BASE 100 , 25
The command structure will insert a zero value for any items not included. The format
for the BASE command is as follows:
BASE [dx] , [dy] , [dz] , [z rotation]
This would be a valid command to move the robot x=300, y=0, z=‐50, and rotate 30
BASE 300 , , ‐50 , 30
PUMA Unofficial User’s Guide Page 11 By Jerry Rutherford © 2012Status
There is an easy way to get the current status of the machine, use the STATUS
command. It will return information about speed, any offsets, etc.
.STATUS
MONITOR CONTROLLED SPEED: 100.00
TOOL TRANSFORM:
"EXEC" LOOPS COMPLETED O.
"EXEC" LOOPS REMAINING O.
RTN NEXT STEP
.
PUMA Unofficial User’s Guide Page 12 By Jerry Rutherford © 2012Tool Offset
The PUMA can be equipped with many types of tools which can vary in shape and size
quite a bit. Normally the PUMA’s point of reference for any movement is the flat plate
where the tool or gripper is mounted. This location is [ 0, 0, 0, 90, ‐90, 0 ] in the world
coordinate system. If you wanted to install a tool that was 100mm long, the tool tip
could be defined as the new reference point… movements and rotations would be
relative to the tip of the tool instead of the mounting flange.
To change the tool offset you must define a location with the proper offset points. This
location would be given a name like HAND for example. Once the location is defined,
you can issue the command:
TOOL HAND
And the offsets would be applied. The TOOL command cannot be issued if the teach
pendant is in the TOOL or WORLD mode, you will need to set it to COMP or JOINT
mode. You could define this HAND position with the use of the HERE command. Once
the point is defined, we can make changes to it with the POINT command.
.HERE HAND
X/JT 1 Y/JT 2 Z/JT3 O/JT 4 A/JT 5 T/JT 6
34.75 530.47 ‐23.06 ‐167.459 57.437 114.247
CHANGE?
.POINT HAND
X/JT 1 Y/JT 2 Z/JT3 O/JT 4 A/JT 5 T/JT 6
34.75 530.47 ‐23.06 ‐167.459 57.437 114.247
CHANGE?
Æ type this: 0, 0, 100, 90, ‐90, 0
That set the HAND offset values to [ 0 , 0 , 100 , 90 , ‐90 , 0] which is 100mm more than
the default flange position of [ 0, 0, 0, 90, ‐90, 0 ]. Now that we have the new offset…
we can apply it to the tool like this:
.TOOL HAND
PUMA Unofficial User’s Guide Page 13 By Jerry Rutherford © 2012At this point the robot will now consider a point in space 100mm from the flange as the
new tool tip location. All movements will reflect this new position.
PUMA Commands by Type
The PUMA has several commands which are used in the creation of programs by the user. This manual
will give a brief description of each of the major commands to help you with making your own
programs. For more detailed information you should download and read the VAL Programming Manual:
Users Guide to VAL 398H2A which goes into all the commands in much more detail.
CONFIGURATION CONTROL
The PUMA can be configured to operate in different modes to better reach for an object or to
clear obstacles, etc. The robot can be configured such that the arm bends downward (ABOVE) or
bends with the elbow lower to reach upward (ABOVE). It can be configured to act like the right
arm (RIGHTY) or like a left arm (LEFTY) .
ABOVE Configure the robot to take a “reaching downward” stance.
BELOW Configure the robot to take a “reaching upward” stance.
LEFTY Configure the robot so the arm is left of the column.
RIGHTY Configure the robot so the arm is right of the column.
FLIP Not applicable to the PUMA 500 robot.
NOFLIP Not applicable to the PUMA 500 robot.
MOTION Commands
ALIGN Aligns the robot gripper to the nearest world coordinate system.
Use: ALIGN
Example: ALIGN
If the robot arm and gripper are at an unusual angle, this command would cause
the gripper to move to the nearest 90 degree reference; vertical or horizontal.
APPRO Approach a specified point in space , but only come within
mm of the point. A negative number would place the gripper mm below
the specified point. (Like reaching into a container.)
Use: APPRO ,
Example: APPRO PART, 50
This would cause the gripper to move toward the point specified as “PART” and
would stop 50mm over the location.
PUMA Unofficial User’s Guide Page 14 By Jerry Rutherford © 2012APPROS This is the same as APPRO except that the movement is in a straight line from
the current location to the new location. Be careful that the path does not
intersect the column.
Use: APPROS ,
Example: APPROS PART, 50
DEPART Move the gripper away from the current location by mm.
Use: DEPART
Example: DEPART 50
DEPARTS Same as DEPART except that the motion is in a straight line.
Use: DEPARTS
Example: DEPARTS 50
PUMA Unofficial User’s Guide Page 15 By Jerry Rutherford © 2012DRAW Move the robot gripper relative to the current location by , ,
amounts. This command can be used to draw or move in straight lines in any
direction. Offsets are relative, so issuing the same command twice will cause
double the movement. This command uses IK to move multiple joints at once as
needed.
Use: DRAW < x > , < y> , < z>
Example: DRAW 100,0,0
Example: Draw , , 50
Note that in the second example the X and Y coordinates were not specified, a
ZERO movement is presumed for those axes.
Figure 8: Direction is relative to the base of the robot as shown above.
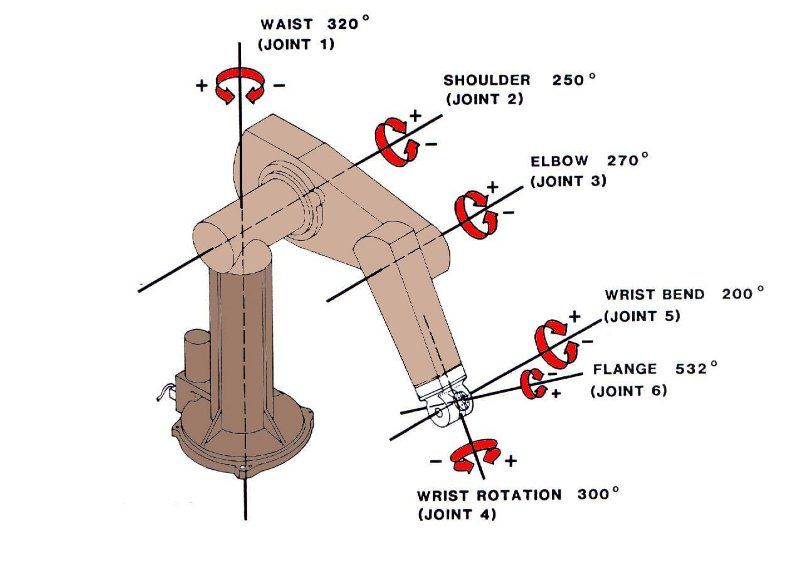
PUMA Unofficial User’s Guide Page 16 By Jerry Rutherford © 2012DRIVE Used to directly move a specified joint a specified number of degrees and at a
specified maximum speed . This command can be used to move from a known location such as
the READY position to a new location in the initial setup of the machine, or it can be used to move a
specific joint to assist in alignment.
Use: DRIVE , ,
Example: DRIVE 3, 40, 50
Note that if the maximum speed was set in a previous step to a value lower than
that specified, the robot would move at the speed set in the previous command.
In the example above the speed of 50 was specified, but if the command SPEED
20 ALWAYS was set prior to this step, the robot would only move at a speed of
20.
Figure 8: The joints and their maximum rotations are shown above.
PUMA Unofficial User’s Guide Page 17 By Jerry Rutherford © 2012MOVE Move the gripper/tool to the location set up. Usually this command follows an
APPRO but it is not required. The robot will move at the last speed specified.
Use: MOVE
Example: MOVE PART
In the example the robot would move directly to the location “PART” that was
set up in a previous step.
MOVES Similar to the above, but the movement is in a straight line. Be careful that the
end location is not on the opposite side of the column or the robot will crash.
Use: MOVES
Example: MOVES PART
MOVEST Similar to the above except that the gripper state (open or closed) is also
specified at the same time as the movement command. Be careful that the end
location is not on the opposite side of the column or the robot will crash. If
gripper =1 then hand will open, if gripper = ‐1 then the hand will close.
Use: MOVEST ,
Example: MOVEST PART , 1
MOVET Same as above but the arm will move in the most efficient way to reach the
goal, not in a straight line. This method will not crash into the column. If gripper
=1 then hand will open, if gripper = ‐1 then the hand will close.
Use: MOVET ,
Example: MOVET PART , 1
NEST Not used in the PUMA 500 or 560 robots.
Causes the PUMA 200 series to move to the pre‐defined NEST position.
READY Causes the PUMA to move to the pre‐defined vertical position no matter how it
is configured. The READY position is the default starting point for the robot.
Use: READY or DO READY from the monitor mode. (Non‐program)
Example: READY
PUMA Unofficial User’s Guide Page 18 By Jerry Rutherford © 2012HAND COMMANDS
OPENI Open gripper, immediate mode.
Use: OPENI
Example: OPENI
CLOSEI Close gripper, immediate mode.
Use: OPENI
Example: OPENI
RELAX Electrically disengage the air valve for the gripper. This will allow the gripper to
go limp.
Use: RELAX
Example: RELAX
Miscellaneous Commands
BASE Change the base reference so that postion commands function properly if the
location or the robot has shifted position since the location was set. If a location
such as PART was defined, but the item is on a conveyor belt and has moved
since that time, the reference location of the robot can be changed. Sometimes
it is better to SHIFT the location, other times if the robot has actually been
moved and all the defined points are relocated relative to the base of the robot,
then use the BASE command.
Use BASE , , ,
Example: BASE 100,0,0,0
DELAY Wait for a specified number of seconds. This can be useful to allow the robot to
settle down after a fast movement or to allow the operator time to perform a
manual task.
Use: DELAY
Example: DELAY 3.5
PUMA Unofficial User’s Guide Page 19 By Jerry Rutherford © 2012REMARK Not acted upon by the robot, this is a method of leaving messages for the
programmer working on software so they know the function of what is
supposed to be happening.
Use: REMARK
Example: REMARK This section of code gets the pen from the holder.
TYPE Sends information to the user terminal for the operator. Can be used to give the
operator instructions, warnings, or other important messages.
Use: TYPE
Example: TYPE The robot is going to move now, be careful!
HERE Used to define a location in space. The name of the location is given and can
then be used in other commands such as APPRO, MOVE, etc.
Use: HERE
Example: HERE PART
The controller will respond with the current coordinates and if evoked from the
monitor mode, will ask if you want to change any of the values. Normally you
would press to accept the current values and store the location. You
do however have the option of typing in new values to be stored.
SHIFT BY This will allow a currently defined location to be relocated to a new position. If
you have a defined location but need it to be referenced to a different point in
space, and you know what the new offset is, you can enter the offset amounts
to redefine the location. In the example below the location PART needs to be
shifted 100mm in the X axis and 50mm up ( Z axis) for a new holding fixture.
Use: SHIFT BY , ,
Example: SHIFT PART BY 100, 0, 50
WHERE Returns the coordinates of the current location.
Use: WHERE
Example: WHERE
PUMA Unofficial User’s Guide Page 20 By Jerry Rutherford © 2012There are several commands and functions which are not covered in the current version of this document. The remaining functions may be added at a future date as needed. This document is not a substitute for the VAL programming manual and is offered here solely to assist a new user in gaining experience with the PUMA robot arm and with basic programming skills. For a complete listing of PUMA (Val II) commands and functions, refer to the User’s Guide to VAL 398H2A, Appendix G for more information. If you have any questions or comments feel free to contact me at: EMAIL: jerryarutherford@gmail.com PUMA Unofficial User’s Guide Page 21 By Jerry Rutherford © 2012
CLAMP     CLAMP          TP     TP
                       REC      #         1         2             -      +

                        COMP   TOOL     WORLD      JOINT      FREE     TICK

                               TEACH       HOLD            RUN        CAL

                                X
                                1

                                Y
                                2

                                Z
                                3

                                RX
                                4

                                RY
                                5

                                RZ
                                6

                                 Figure 9: Teach Pendent Details

PUMA Unofficial User’s Guide                Page 22                         By Jerry Rutherford © 2012
Figure 10: Coordinate References PUMA Unofficial User’s Guide Page 23 By Jerry Rutherford © 2012
You can also read