VAKA intercom Manual Updated 2019-02-25 - Axema
←
→
Page content transcription
If your browser does not render page correctly, please read the page content below
Manual
    Updated 2019-02-25

    VAKA intercom

Axema Access Control AB | Box 90215 | 120 23 Stockholm, Sweden | +46 (0)8-722 34 40 | info@axema.se | www.axema.se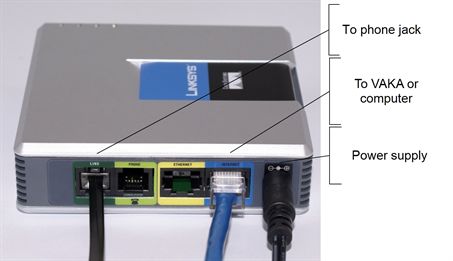
VAKA intercom

 Quick guide                                       3
  Call a person                                    3
  Call an organization group                       4
 About VAKA intercom                               5
 Always show name list in the entry phone          5
 Technical conditions                              5
 IP telephony providers                            6
 IP based software phones and applications         6
 VAKA intercom and switch boards                   6
 Installation and configuration                    6
  General settings                                 8
  Network and connection settings                  9
    Entry phone network settings                   9
    Line types                                    10
  VoIP settings                                   11
    User account                                  11
    Advanced                                      12
 Phone adapters                                   12
  Handytone 503                                   12
  Spa 3102                                        13
 Before you call technical support                14
  Opening with the 5.                             14
  Calling using an analogue line.                 15
  Calling using IP.                               15
  Trouble code 0x1002 in the history log.         16
  IP telephony with broadband, Telia or Comhem.   16

                                    2 (16)        Manual Intercom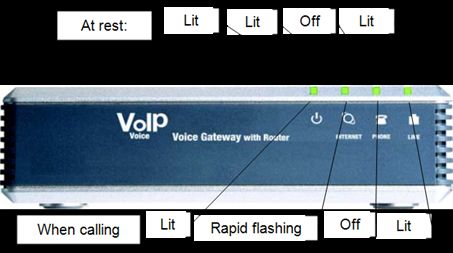
Quick guide
The quick guide assumes that the external/ local SIP server or ATA box is con-
figured and whether VAKA is used to call a person or organization group is
chosen. The choice between calling a person or an organization group is made
under Settings - Intercom.

Call a person
If Call a person is selected, the phone list in the A66 will be sorted by surname
and then by first name, therefor the name must be entered in the following format
in the name field, Surname First name.

  1. Add a user from the menu Users in VAKA.

  2. Enter a Name and Phone number to a user.

  3. Select Quick dial numbers (If the are to be used) and Line.

  4. Add Id (tag number), and select Access group. If a tag is not used, a
      PIN has to be entered.

  5. Assign the organization group access to the door with intercom.

  6. Under Organization groups - Intercom, activate Allow calling from
      the door with intercom.

                                      3 (16)                                        Manual Intercom
Call an organization group
If Call an organization group is selected, the phone list in the A66 will be sor-
ted be the name entered in the Name field for each organization group.

  1. Add organization group in the menu Users in VAKA.

  2. Enter a Name and Phone number to a user.

  3. Select Line type.

  4. Add a User, enter the name and select organization group. If a tag is
      not used, a PIN has to be entered.

  5. Assign the organization group access to the door with intercom.

  6. Under Organization groups - Intercom, activate Allow calling from
      the door with intercom.

                                      4 (16)                                   Manual Intercom
About VAKA intercom
VAKA intercom is IP telephone based (VoIP). With IP telephony, the calls are estab-
lished over internet and follows internet protocols.
VoIP is collection if different protocols and technologies for internet telephony. The
protocols that are used with VAKA intercom are SIP (Session Initiation Protocol)
and RTP (Real-time Transport Protocol). SIP can be described as the protocol that
initiates, changes or ends the call. RTP is the protocol that transport the sound
stream during the call.
Always show name list in the entry
phone
1. Navigate to the Doors tab in VAKA.
2. With B60: Double click on the door in the left field that has the entry
phone.
Without B60: Double click on the door that has the entry phone.
3. Select the Terminals tab and click on the reader that is used as entry
phone next to Settings.
4. Select Name list (Entry phone) next to Standard view:
5. Click on OK and then Save
Technical conditions
A66 includes an integrated microphone and speaker which allows easy and cheap
expansion of a VAKA system to include intercom.
The door controllers where intercom is desired have to be equipped with an inter-
com module, either a C10 master or a C11 slave. Installation of intercom requires
an empty module position in all affected door controllers. One C10 module is
required in the system. The C10 module has to be installed in a door controller
with a free TCP/IP2 connector and a set IP address. C10 is factory configured
with the IP address 10.0.0.51.
5 (16) Manual IntercomIP telephony providers
Axema mediates subscriptions from the IP telephony provider Telavox. Axema has
tested and can guarantee full functionality when using Telavox.
IP based software phones and applic-
ations
Axema does not offer support on or guarantee the functionality of third party soft-
ware phones or applications.
VAKA intercom and switch boards
If VAKA is connected to an IP switch board it has to support third party phones and
numeric extensions or account names.
Axema cannot guarantee proper function but can assist with test to a specific
switch board. Contact Axema for more information.
Installation and configuration
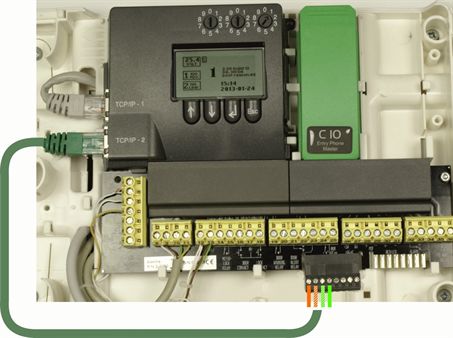
1. The C10 is supplied with a cable and two connectors, one should be
connected below the module and the other in the TCP/IP2 connector. The
C10 can be mounted on any door controller in the system with intercom.
2. The C11 is mounted without a cable in any door controller where intercom is
desired.
3. Log in as installer in the VAKA software
4. VAKA will automaticaly detect the new hardware and a dialog ( New
hardware detected ) will appear.
5. Click on the dialog and follow the instructions to install the module.
6. New hardware can also be installed under Settings - Installation -
Installation of Reader / Module.
6 (16) Manual Intercom7 (16) Manual Intercom
General settings
The main entry phone settings are made under the generals tab .

Calling time
Setting for how long the Door Entry Phone tries to reach the reciever of the call.

Talk time
Setting for how long an established call can last.

Door opening
Setting for what button (DTMF-tone) that is used to unlock the door.

Use [5] to answer calls
If an analogue line is used, this function must be activated. In the case, the receiver
needs to press "5" to open the call.

Ending of call
Selects a button that the receiver can use to disconnect the call.

Prolonging of on-going call
Select a button to prolong an on-going call. When seven seconds remains, a tone
indicates that there's a possibility to prolong the call.

Phone number
When this function is activated it's possible to use the phone number of the receiv-
ers, including a leading zero.

Quick dial numbers
Select the length of the quick dial numbers

                                         8 (16)                                      Manual Intercom
Network and connection settings
Entry phone network settings
Configuration of the network settings required for the entry phone master module,
IP address, gateway, netmask and DNS server IP addresses The network settings
depend on the network in which the system run.
l The C10 and the door controller should sit in the same sub net.
l When using the B60 WAN, the gateway is (most likely) 10.0.0.101.
l If internet is avaliable,
l Google DNS is a public service and is free to use.
DNS server 1, 8.8.8.8
DNS server 2, 8.8.4.4
9 (16) Manual IntercomLine types
Selecting one or more methods for calling In VAKA all three line types can be used
at once.
Analogue line
For entry phone with analogue line (Requires Analogue telephone adapter).
Axema säljer en ATA-box som är förkonfigurerad för VAKA-porttelefoni. Artikel-
nummer 2-6401.
Local SIP server
Is used for network connected IP-phone units,
The C10 module has pre-programmed connections numbers (100-500). When
registering SIP-clients in the local server, the connection number is used as user
name and ax, followed by the connection number is used as the password. For
example, the connection number 100 has the user name 100 and the password
ax100.
The local SIP server's IP address is used as the SIP domain
External SIP server
External SIP server is used to call phones in the existing phone network. Requires
DNS servers and a subscription from an IP telephony provider. The lowest recom-
mended internet speed is 2 mb/s External SIP server requires an internet con-
nection.
10 (16) Manual IntercomVoIP settings
VOIP settings are only needed when using external SIP-serv-
ers
User account
Enter the credentials supplied by the IP telephony provider
Account ID (optional)
For example, the account phone number
For Telavox, Account ID is the same as User name.
Account Registrar URL
For Telavox with SD card with version 1.07, sipproxy1.telavox.se
For Telavox with other versions, sip.telavox.se
For Cellip, sip1.cellip.com
Account Proxy Server
Left blank
Username
Account phone number, Telavox phone numbers start with "u".
Password
Supplied by the IP telapony provider
11 (16) Manual IntercomAdvanced
Normally no configuration of advanced settings are required.
User Agent (advanced settings)
Configuration when using a STUN serve Information is supplied by the IP telephony
provider.
Phone adapters
The adapters are discontinued
Handytone 503
12 (16) Manual IntercomSpa 3102
To prevent unauthorized log ins to an ATA box in a network it can be turned off. Se
manual Change network Linksys SPA3102, Remote management.
During installation, a switch with a computer, controller and ATA box connected to
it is required for configuration and troubleshooting. After installation, connect the
ATA box to the controller.
13 (16) Manual IntercomBefore you call technical support
l When uninstalling the C10 module all settings under Settings -
Intercom, phone numbers etc. will disappear. To keep the information
when uninstalling the C10 module, when trouble shooting, for example, the
database can be exported and imported again when the C10 module is
reinstalled. Settings under Settings - Intercom will be permanently
deleted.
l If External SIP server is used without the proper line type conditions, the
intercom will not work.
l With SD card version 1.07, voice messages are not available.
l Intercom requires VAKA version 2 or more recent.
l VAKA version 3.40, and more recent, require SD card version 1.09
in the C10.
l If the sound quality is poor, check the cables to the reader. (Cat. 5/6 24
V)
l If the C10 module is replaced, restart the controller and ATA box/ Gigaset
base station.
l RPT sound stream UDP 4001-4012. Telavox to VAKA UDP 10000-20000.
l If only some phones can be called, make sure the number is not
blocked in the phone.
Opening with the 5.
l
l The IP telephone provider has the be able to receive button 5 (DTMF) and
send it to VAKA in the correct format. VAKA supports RFC2833 and SIP info.
Opening using the 5 works with Telavox.
14 (16) Manual Intercoml The cell provider 3 has recently changed the switch platform to Telepo.
Because of this, some users will not be able to open the door using the 5
because the DTMF signal is not fully supported in the Telepo switch.
Calling using an analogue line.
l Connect an ordinary phone to the line and call the receiver phone. If the call
is not successful, there is something wrong with the line.
l Make sure the ATA box is connected correctly and factory configured.
l Call the "VAKA number". VAKA should reply, "Select door". Enter a number,
corresponding to a node with intercom. Communication with the door
should be possible.
l If External SIP server is used without the proper line type conditions, the
intercom will not work.
l Chech again.
Calling using IP.
Make sure 5060 and 6060 is allowed in both directions in the fire wall.
Alg should be turned off.
SIP should be activated in the router.
Make sure the external SIP-switch and DNS server, for example 8.8.8.8, is ping-
able.
If Telavox is not registered, make sure that the public address is ping-able at the
customer. (www.myip.se)
15 (16) Manual IntercomTrouble code 0x1002 in the history log.
l Make sure the C10 module is ping-able
l Check the connection to the telephone provider.
l Check the firewalls.
IP telephony with broadband, Telia or Comhem.
These solutions usually have a connector for analogue telephones and therefor
lack compatibility with VAKA intercom. Connect the network to an IP telephone pro-
vider, for example, Telavox, instead.
Logging in to Comhem is done using the last eight digits of the Mac address fol-
lowed by ".duc.comhem.se"m for example, "12345678.duc.comhem.se".
Telia's touch point switch is not compatible with VAKA intercom.
16 (16) Manual IntercomYou can also read