Vector Array User Manual - Updated March 05, 2021 NeuroNexus Technologies, Inc. 2021 | 5200 S. State Street, Suite 200, Ann Arbor, Michigan USA
←
→
Page content transcription
If your browser does not render page correctly, please read the page content below

Vector Array                                                    ™

                    User Manual

                                   Updated March 05, 2021

NeuroNexus Technologies, Inc. ©2021 | 5200 S. State Street, Suite 200, Ann Arbor, Michigan USA
       Telephone: +1.734.913.8858 | Fax: +1.734.786.0069 | support@neuronexus.com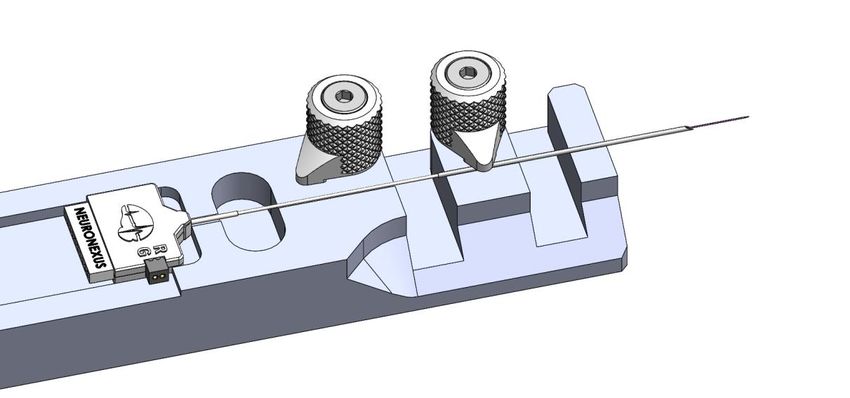
VECTOR ARRAY™

                                                    PLEASE READ
        NeuroNexus is committed to designing and producing cutting-
         edge neuroscience devices. We welcome your feedback to
                        improve the Vector Array™.

        •    Care should be taken when handling and inserting the Vector Array™. Only handle the
             Vector Array™ by holding the manipulator bar, and insert the Vector Array™ using a
             guidetube.

        •    If you plan on stimulating with the Vector Array™, please note that the electrode sites
             are iridium. Optimally, iridium sites should be activated immediately prior to use. The
             upper limit of charge density for iridium oxide is 3 mC/cm2* biphasic cathodic-first
             current pulse. (*With 1 ms per phase and a 100 µs inter-phase delay)

        •    A 2.5” Omnetics jumper cable/adaptor is available for purchase. This allows the
             headstage to be anchored, relieving the strain on the electrode.

        •    Vector Arrays™ are currently available in two designs, Edge and Poly2 (see next page).
             Vector Arrays™ can be tuned to reach different targets, to improve selectivity, to record
             LFPs, or to increase stimulation level by adjusting the electrode site surface area or
             layout. Contact us for details on customization.

    *X. Beebe and T. L. Rose, Charge Injection Limits of Activated Iridium Oxide Electrodes with 0.2 ms Pulses in Bicarbonate Buffered
    Saline, IEEE Tran Biomed Eng. vol 35, 494-495 (1988)

                                                                  p.2

NeuroNexus Technologies, Inc. ©2021 | 5200 S. State Street, Suite 200, Ann Arbor, Michigan USA
       Telephone: +1.734.913.8858 | Fax: +1.734.786.0069 | support@neuronexus.com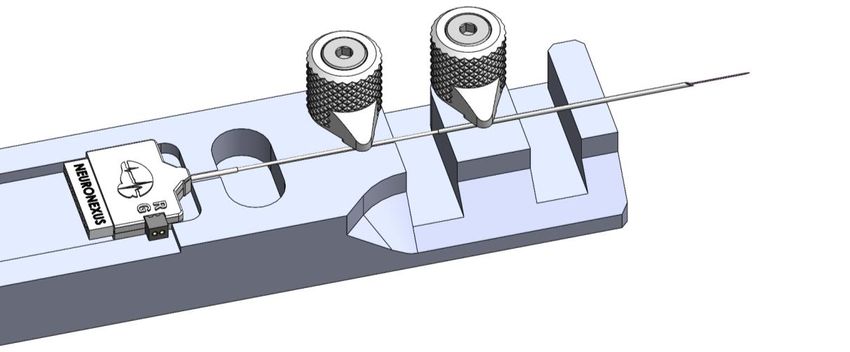
VECTOR ARRAY™

    Vector Array™
    The Vector Array™ is an all-new probe design optimized for large animal deep brain applications
    (e.g. non-human primate, porcine, etc.). The probe design is completely overhauled to fully take
    advantage of our industry-leading silicon probe technology.

    Contact us to customize a design.

    Available Designs
    V1x32-Edge-15mm-100-177

            20 µm
            (175 µm max)

    40 µm                         100 µm                      177 µm2
                            (3100 µm total span)              (≈12x15 µm, rounded corners)

    V1x32-Poly2-15mm-50s-177
                75 µm
                (175 µm max)

      75 µm              50 µm                      177 µm2
                   (775 µm total span)

       S PE C I F I CATI ON S
       Number of Channels                          32

       Implantable Length                          80 mm (15 mm electrode array + 65 mm support body)

       Electrode Array Width                       50 µm (min), 175 µm (max)

       Electrode Array Length                      15 mm

       Site Coverage                               3100 µm (Edge), 775 µm (Poly2)

       Site Area                                   177 µm2

       Manipulator Bar                             0.711mm OD (Stainless Steel or Tungsten), 50mm length

       Support Body Diameter                       400 µm OD (Stainless steel)

                                                           p.3

NeuroNexus Technologies, Inc. ©2021 | 5200 S. State Street, Suite 200, Ann Arbor, Michigan USA
       Telephone: +1.734.913.8858 | Fax: +1.734.786.0069 | support@neuronexus.com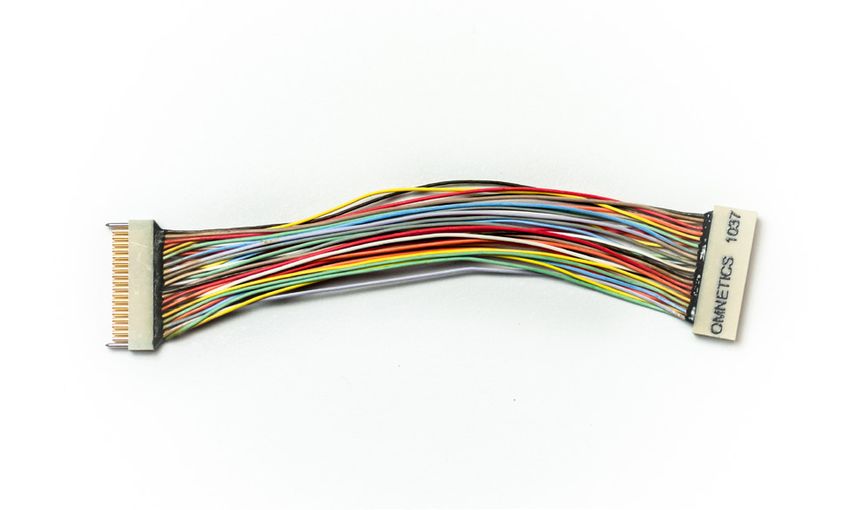
VECTOR ARRAY™

    Storage Precautions
    Store at room temperature (-34°C/-29°F to 57°C/135°F).

    For long-term storage:

    Do not expose to temperatures below -39°C/-29°F or above 70°C/158°F. Maintain relative humidity
    between 10% and 100% (do not allow condensation). Maintain atmospheric pressure between
    500 hPa and 1060 hPa.

    Intended Use
    The Vector Array™ is used for recording extracellular neural activity, or electrical microstimulation
    in acute or chronic animal preparations. It is not approved for use in human applications.

    Components

                                              80 mm

                                        Protective Sleeve (not shown)
              10-12 mm                  480 µm OD. Installed over electrode array prior
                                        to shipment, and to be used during insertion (see
                                        “Guidetube,” below).

         Implantable Electrode

    Guidetube
    Use of a guidetube for insertion can prolong the life of the electrode array. NeuroNexus offers
    a stainless steel, 23 gauge, 35 mm guidetube as an accessory (see page 6). A guidetube of ID
    greater than 0.44 mm should be used.

    Once the Vector Array™ is fully inserted into the guidetube, remove the Protective Sleeve from the
    distal end of the guidetube. This will minimize damage to the electrode array and prolong the life
    of the probe.

                                                       p.4

NeuroNexus Technologies, Inc. ©2021 | 5200 S. State Street, Suite 200, Ann Arbor, Michigan USA
       Telephone: +1.734.913.8858 | Fax: +1.734.786.0069 | support@neuronexus.com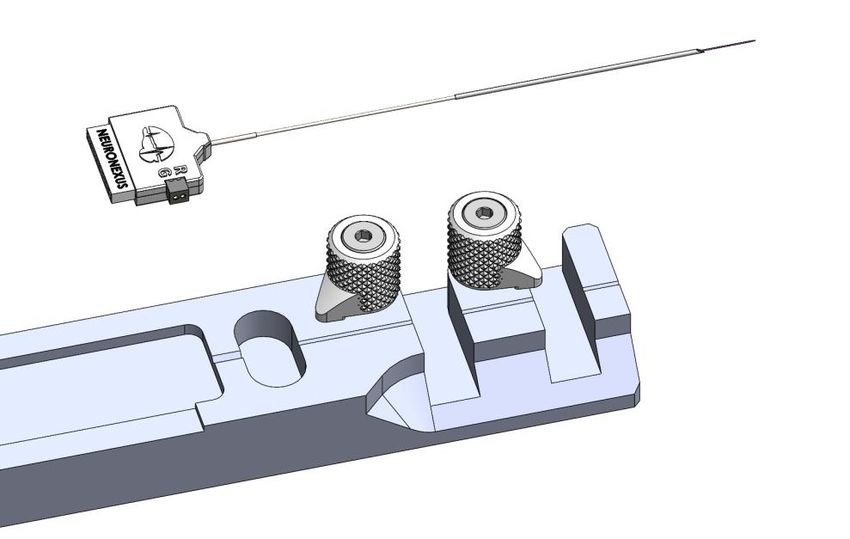
VECTOR ARRAY™

    Guidetube Loading

    Step1:     Remove     the   cannula   from   its
    packaging, taking care to avoid a needle stick.
    Lay it into the indicated groove, bridging
    the cannula loading slot. Ensure the beveled
    tip is pointing away from the loader.

                                                                                    Cannula
                                                                                    Loading Slot

                                                                     Electrode
                                                                     Loading Slot
    Step2: Gently lift and twist the first spring
    clamp into position. Release as shown (above)
    to hold the cannula in place.

                                            p.5

NeuroNexus Technologies, Inc. ©2021 | 5200 S. State Street, Suite 200, Ann Arbor, Michigan USA
       Telephone: +1.734.913.8858 | Fax: +1.734.786.0069 | support@neuronexus.com
VECTOR ARRAY™

    Step3: Insert the provided polyimide tube
    coaxially through the cannula until it becomes
    visible on the opposite side. This flexible tubing
    will serve as a soft guide for the electrode, to
    ensure alignment with the cannula.

    Step4: Remove your Vector™ from its
    packaging and gently lay it in the illustrated
    position. The device should slide freely in
    its track with minimal force. Take care not
    to touch the silicon electrode at the tip.

                                             p.6

NeuroNexus Technologies, Inc. ©2021 | 5200 S. State Street, Suite 200, Ann Arbor, Michigan USA
       Telephone: +1.734.913.8858 | Fax: +1.734.786.0069 | support@neuronexus.com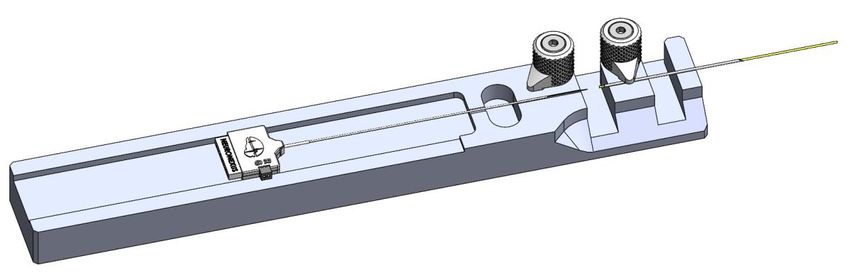
VECTOR ARRAY™

    Step5: It is strongly recommended to
    perform the remaining steps with the aid
    of a low-power (10-20X) microscope.
    Advance the electrode until it overhangs the
    electrode loading slot, 3-5mm from the
    polyimide tubing.

    Step6: Gently push on the polyimide tubing at
    the front of the loader, slowly approaching the
    silicon electrode.

                                            p.7

NeuroNexus Technologies, Inc. ©2021 | 5200 S. State Street, Suite 200, Ann Arbor, Michigan USA
       Telephone: +1.734.913.8858 | Fax: +1.734.786.0069 | support@neuronexus.com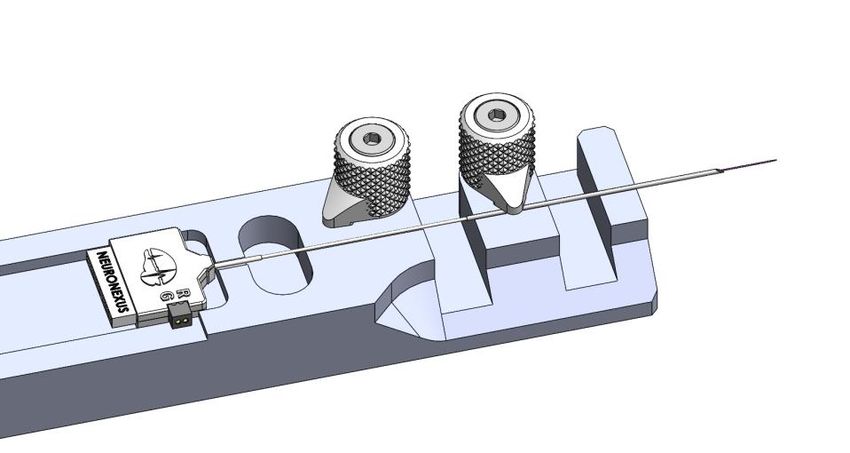
VECTOR ARRAY™

    Step7: Slowly advance the polyimide tubing
    over the tip of the electrode; tweezers may be
    required for this step. Continue advancing the
    PI tubing until it extends 5-10mm past the
    silicon electrode.

    Step8: Gently push the Vector™ forward in its
    track, advancing the electrode into the
    cannula; excessive force should not be
    required. Stop advancing the electrode
    when it is entirely inside the cannula.

                                            p.8

NeuroNexus Technologies, Inc. ©2021 | 5200 S. State Street, Suite 200, Ann Arbor, Michigan USA
       Telephone: +1.734.913.8858 | Fax: +1.734.786.0069 | support@neuronexus.com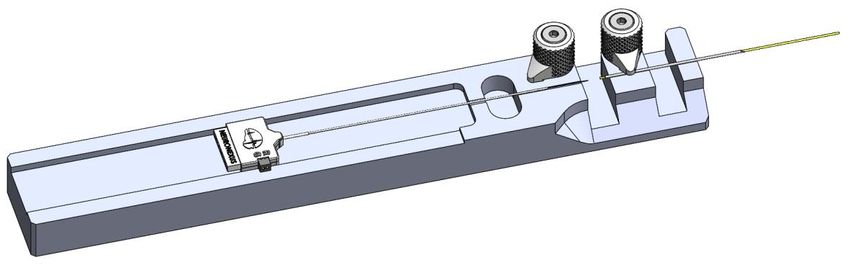
VECTOR ARRAY™

    Step9: Do not perform this step unless the
    silicon electrode is entirely inside the
    cannula, i.e. not visible at either end.
    Slowly pull the polyimide tubing out of the tip of
    the cannula. Keep the tubing as straight as
    possible.

                                                              HOLD
                                                              DOWN

    Step10: Advance the electrode until your
    desired cannula offset is achieved. The Vector™
    can be fixed in place with the unused spring
    clip, if desired. The Vector™ and cannula are
    now ready for mounting into your insertion
    device!                                                          LIFT &
                                                                     TWIST

                                              p.9

NeuroNexus Technologies, Inc. ©2021 | 5200 S. State Street, Suite 200, Ann Arbor, Michigan USA
       Telephone: +1.734.913.8858 | Fax: +1.734.786.0069 | support@neuronexus.com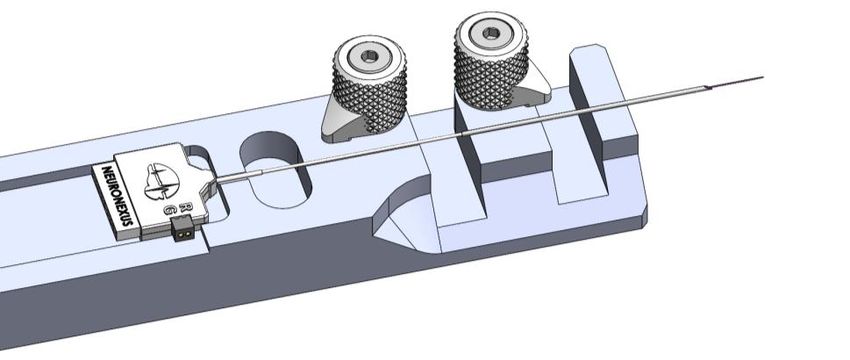
VECTOR ARRAY™

    Step11:      Removing        the cannula.    No
    additional tools are necessary for this step.
    Return the Vector™/cannula assembly to the
    loading track. Ensure that the connector is free
    of any debris or residue that would prevent
    sliding in the loader track.

                                                                                 1

                                                                                 2
    Step12:       Lock the cannula in place using the
    first spring clamp. Gently slide the Vector™ away
    from the cannula. Excessive force should net be
    required. Stop sliding when the electrode is free               TWIST
    of the cannula.                                                 LIFT &

                                                                                 3

                                                                             4
                                            p.10

NeuroNexus Technologies, Inc. ©2021 | 5200 S. State Street, Suite 200, Ann Arbor, Michigan USA
       Telephone: +1.734.913.8858 | Fax: +1.734.786.0069 | support@neuronexus.com
VECTOR ARRAY™
Handling
• Only handle the Vector Array™ using the Manipulator Bar.
• Be careful not to bend the Vector Array™ when removing it from the case.
• Do not clamp on the implantable electrode.
• Observe the correct cleaning and sterilization procedures.
• After cleaning, allow for at least 30 minutes drying time before insertion.
Sterilization
• The Vector Array™ can withstand EtO (Ethylene Oxide) sterilization.
• If sterilizing with IPA, soak between 5 and 10 minutes. Do not soak for longer than 10 minutes.
• Do not autoclave the Vector Array™ as this could cause temperature damage.
Cleaning & Maintenance
• After removal from brain, soak in distilled water for 5 minutes.
• Submerge the implantable region in an enzymatic cleaner or protease solution for up to
2 hours. (NeuroNexus recommends using ReNu®) If you have questions or find alternatve
solutions, please contact us. Do not exceed a 2 hour soak.
• After removal from cleaning solution, soak in distilled water for up to 10 minutes. Do not
exceed a 10 minute soak.
• Let dry for at least 30 minutes between cleaning and use.
We welcome feedback on more optimal cleaning methods!
p.11
NeuroNexus Technologies, Inc. ©2021 | 5200 S. State Street, Suite 200, Ann Arbor, Michigan USA
Telephone: +1.734.913.8858 | Fax: +1.734.786.0069 | support@neuronexus.comVECTOR ARRAY™
Accessories
JUMPER CABLES
Omnetics32-M-F-Jumper_MRI Omnetics32/16_x2-Jumper_MRI
(Approx. length: 2.5” / 6.5 cm) (Approx. length: 2.25” / 6 cm)
ADAPTORS
Adpt-OM32-A32 Adpt-OM32-OM16 Adpt-OM32-OM16x2 Adpt-OM32-Z32
(connects to Samtec (Down-converts to (connects to two 16-channel (connects to 32-channel Zif
headstage) 16-channel Omnetics Omnetics headstages) Clip™ headstage)
connector. Flexible wiring/
channel mapping)
GUIDETUBE
Stainless, 23 Gauge, 35 mm length, Lancet tip
p.12
NeuroNexus Technologies, Inc. ©2021 | 5200 S. State Street, Suite 200, Ann Arbor, Michigan USA
Telephone: +1.734.913.8858 | Fax: +1.734.786.0069 | support@neuronexus.comVECTOR ARRAY™
Connector Pin Out
To Electrode Array
Ground
Reference
NeuroNexus
R 8 7 6 5 4 3 2 1 32 31 30 29 28 27 26 25 G
G 16 15 14 13 12 11 10 9 24 23 22 21 20 19 18 17 -
Configuring Wires for Operation
The following notes are provided only as guidelines. Each setup may require experimenting
with various configurations to obtain the best results.
1. The Ground (green) and Reference (blue) wires are insulated. The insulation can be removed
with heat.
2. Connect the Ground wire (green) to a common shielding point or animal ground. This channel
is connected to the instrument ground of the headstage amplifiers.
3. Connect the Reference wire (blue) to a bone screw or underneath skin/tissue. This serves as a
reference and is subtracted from the signal channels.
p.13
NeuroNexus Technologies, Inc. ©2021 | 5200 S. State Street, Suite 200, Ann Arbor, Michigan USA
Telephone: +1.734.913.8858 | Fax: +1.734.786.0069 | support@neuronexus.comVECTOR ARRAY™
Mapping - Edge
32
31
30
29
28
27
26
25
24
23
22
21
20
19
18
17
16
15
14
13
12
11
10
9
8
7
6
5
4
3
2 SERIAL No:
1 NOTE:
p.14
NeuroNexus Technologies, Inc. ©2021 | 5200 S. State Street, Suite 200, Ann Arbor, Michigan USA
Telephone: +1.734.913.8858 | Fax: +1.734.786.0069 | support@neuronexus.comVECTOR ARRAY™
Mapping - Poly2
20
13
21
12
22
11
23
10
24
9
25
8
26
7
27
6
28
5
29
4
30
3
31
2
32
1
19
14
18
15
17
16 SERIAL No:
NOTE:
p.15
NeuroNexus Technologies, Inc. ©2021 | 5200 S. State Street, Suite 200, Ann Arbor, Michigan USA
Telephone: +1.734.913.8858 | Fax: +1.734.786.0069 | support@neuronexus.comYou can also read