Favourites, Scheduling and Delivery of Reports - RBC One Quick Reference Guide - RBC ...
←
→
Page content transcription
If your browser does not render page correctly, please read the page content below

Favourites, Scheduling and
Delivery of Reports
RBC One Quick Reference Guide

June 2021
Contents

    Favourites, Scheduling and Delivery of Reports | RBC One Quick Reference Guide
          Overview                                                                                                             1
          Common Access IDs                                                                                                    1
          Creating a Favourite                                                                                                 2
          Scheduling reports                                                                                                   4
          Delivering Reports using AutoConnect                                                                                 6
          Delivering Reports using File Transfer                                                                               7
          Appendix 1 Installing and setting up AutoConnect                                                                     8

i    |   F AV O U R I T E S , S C H E D U L I N G A N D D E L I V E R Y O F R E P O R T S   | RBC ONE QUICK REFERENCE GUID E
Favourites, Scheduling and Delivery of Reports | RBC One Quick Reference Guide
Overview
This is guide describes how to create favourites, schedule and deliver reports. Within RBC One, reports that are frequently run, can be saved as
favourites, and set up to run on an automated schedule, with two delivery options:
AutoConnect,enables you to automatically save a copy of your generated reports in a specified folder on your local network drives (e.g. a local folder
on your PC or on a dedicated folder in your organization’s network). AutoConnect is installed and set up from RBC One. Once installed, it can
automatically deliver your favourite reports.
The File Transfer Protocol (FTP) feature enables you to automatically transmit any report from RBC One to your company’s FTP servers through a
secure method of communication
Common Access IDs
Common Access IDs allow a group of users to have common access to the set-up, scheduling and delivery of reports and extracts, rather than via a
single user. Use of a Common Access IDs for the scheduled and delivery of shared reports is recommended.
Please review the Quick Reference Guide: RBC One Common Access ID for more details and the steps an Administrator would follow to setup a
Common Access ID.
Individuals cannot logon directly to a Common Access ID. They must first logon using their individual user ID and then switch to the Common Access ID
by hovering over their name in the upper right-hand corner of the screen, selecting My Toolkit, and then selecting “Switch to Common Access ID”. If a user
has access to multiple Common Access IDs, they can choose which one to access. To switch back to their personal ID, users will hover over their name in
the upper right-hand corner of the screen and select My Toolkit, then select Exit Common Access ID. To know which ID is active, either their name or the
name of the Common Access ID will be displayed in the upper right-hand corner of the menu bar
1 | F AV O U R I T E S , S C H E D U L I N G A N D D E L I V E R Y O F R E P O R T S | Q U I C K R E F E R E N C E G U I D ECreating a Favourite
1. If using Common Access ID functionality, switch to the Common Access ID by hovering over the Hi Name! menu | My Toolkit | Switch to Common
Access ID.
2. From the home page select Custody or Fund Accounting | Reports
3. Select the desired report to be scheduled and set your preferred report parameters
4. Click the Save as Favourite option and, in the Favourite Name field that appears, enter a name for the favourite. Select Private or Public. Private
report favourites can only be viewed by the user who created them and public report favourites can be viewed by all users within your organization
who have proper user access. Click the Save as Favourite command to complete this step. The My Reports page will display.
Select
Figure 1: How to save a favourite
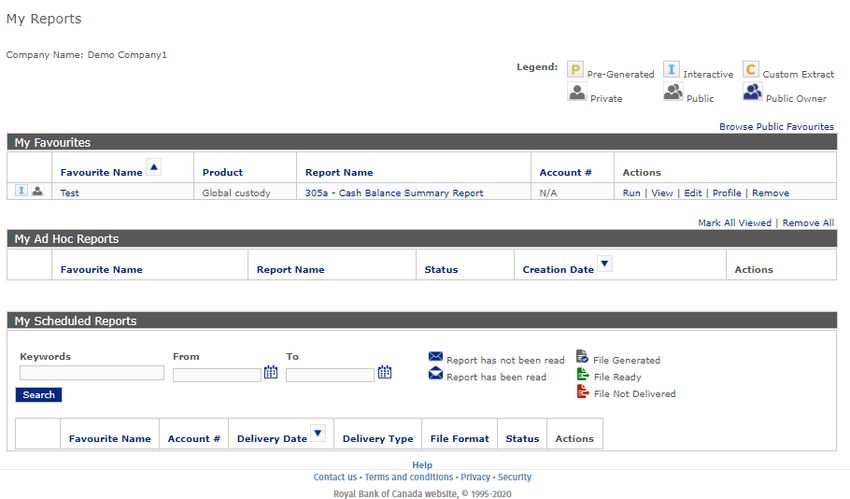
2 | F AV O U R I T E S , S C H E D U L I N G A N D D E L I V E R Y O F R E P O R T S | Q U I C K R E F E R E N C E G U I D EAlternatively, to access the My Reports page from the RBC One Home Page, click on the Hi, Name! menu | My Toolkit | Reports. The My Reports displays by default. Figure 2: My Reports Page The My Favourites table lists the reports that have been added as favourites Public favourites can be found by selecting Browse Public Favourites To view the report, click Run 3 | F AV O U R I T E S , S C H E D U L I N G A N D D E L I V E R Y O F R E P O R T S | Q U I C K R E F E R E N C E G U I D E
Scheduling reports
To schedule a report:
1.       Select the report or extract to be scheduled from the My Favourites table in the My Reports page, and click Profile.

                                                                                                                                     Step 1

Figure 3: Select a report to be scheduled

4    |    F AV O U R I T E S , S C H E D U L I N G A N D D E L I V E R Y O F R E P O R T S | Q U I C K R E F E R E N C E G U I D E
2. To schedule this report, click Edit Schedule from the View Favourite page. The Edit Schedule page appears:
Step 3
The schedule run time is
based on the time zone set up
in Hi Name! menu | My
Toolkit | Preferences.
Step 4
Step 5
Step 6
Figure 4: How to schedule a report
3. Enter the scheduling parameters for this report.
For example: to schedule the report to be generated daily starting on January 21, 2018 at 11:30 with no end date, enter the following values:
Details: Daily
Run-time: 11:30
Start: 2018-08-03
End Date: No end date
5 | F AV O U R I T E S , S C H E D U L I N G A N D D E L I V E R Y O F R E P O R T S | Q U I C K R E F E R E N C E G U I D EWhen you save this report’s schedule the report will be generated at this scheduled date and time and saved to the My Scheduled Reports table in
the My Reports page (Figure 5). If you required delivery via AutoConnect or File Transfer, please see below.
Step 7
Figure 5: My Scheduled Reports
To view this scheduled report, click View for the applicable report in the My Report History table.
Delivering Reports using AutoConnect
If you require a report or extract to be delivered to a personal folder on your network or workstation, enable the AutoConnect setting to send this report.
Ensure that AutoConnect is installed and configured before selecting this option (see the Appendix below for detailed information on installing
AutoConnect).
To have AutoConnect deliver your favourite reports to your local network drive (Figure 4), from the Delivery Options section of this page, enable the
Automated Delivery option.
4. Enable the AutoConnect “To a Personal Folder via AutoConnect” delivery option for the report or set up AutoConnect to overwrite the existing files by
enabling the “Overwrite Existing Files On Delivery” option. Set the filename prefix to match the Favourite Name or enter a new name in the Filename
Prefix field.
5. To alert you that this scheduled report is available, enable the Report Available check box under My Alerts and Email.
6. Click Save to save this favourite report. When the report is generated according to its predefined schedule, it will be automatically copied to the
specified folder using AutoConnect. In addition, a copy will be saved to the My Reports table in RBC One (Figure 5).
Note: In order for the automatic report delivery to run correctly, you must ensure your PC is running and AutoConnect is enabled.
6 | F AV O U R I T E S , S C H E D U L I N G A N D D E L I V E R Y O F R E P O R T S | Q U I C K R E F E R E N C E G U I D EDelivering Reports using File Transfer
The File Transfer Protocol (FTP) feature of RBC One enables you to automatically transmit any report from RBC One on to your company’s FTP servers
through a secure method of communication between authenticated services and clients. Using available FTPS or sFTP security options, this option
enables you to transmit your reports to up to five distinct folders. Reports can be made available on RBC’s servers and downloaded via FTP to your
servers, or they can be transmitted directly to your servers upon report generation. We recommend the use of a Common Access ID for the setup of FTP
delivery on favourite reports.
Note: If you wish to establish File Transfer connectivity, please contact your RBC Investor & Treasury Services representative.
1. From the Delivery Options section of this page, enable the Automated Delivery option
2. Select the File Transfer: To a pre-configured destination option
3. From the drop-down menu select the filename for this file transfer
4. Select to match either the File Transfer filename to this filename, or enter a custom filename prefix
5. Enable the File Transfer alerts to notify you that the report is available, the report failed or the file transfer failed.
Step 1
Step 2
Step 3
Step 4
Step 5
Step 6
Figure 6: Delivery of Reports
6. Click Save to save this favourite report. When the report is generated according to its predefined schedule, it will be automatically deliver to your
destination folder. In addition, a copy will be saved to the My Reports table in RBC One.
7. Wait for the report to be generated at the scheduled time. You can then access the report from your server. When the report is generated, the status
can be viewed from the My Reports page. This will confirm if the download was successful, and to which server (Figure 5).
7 | F AV O U R I T E S , S C H E D U L I N G A N D D E L I V E R Y O F R E P O R T S | Q U I C K R E F E R E N C E G U I D EAppendix 1: Installing and Setting up AutoConnect
To install and set up AutoConnect and its Java applications:
1. When first installing and setting up AutoConnect, you must access its installation commands. These commands are only available in the Edit
Schedule page. To access the Edit Favourite page:
a. Generate a report and save it as a favourite. For example, select the Test Account report, enter its reporting parameters and save it as a
favourite.
b. Edit the favourite report’s schedule by selecting the report from the My Favourites table in the My Reports page
c. From the View Favourite page, click Edit Schedule. The Edit Schedule page appears.
2. Download the supporting Java applications by clicking 1. Download Java. Your PC will automatically download the Java applications with no
required prompts. If you already have Java 5 or higher installed, you will be notified that your Java settings are correct.
3. Download AutoConnect by clicking 2. Download AutoConnect. Follow the prompts to complete the installation. During the installation, the
AutoConnect Client dialog appears (Figure 1).
Step 4
Step 5
Figure 7: AutoConnect
4. To log in to the AutoConnect Client, enter your RBC One user name and password.
5. Enter the folder to which the reports will be downloaded by clicking Browse and selecting the desired folder. Click OK to save this information and
close the AutoConnect Client.
6. Once installed and running, the AutoConnect icon will be displayed on the system tray . To edit these settings after installation, click this
icon to access the AutoConnect client.
7. If AutoConnect is not connected and running, its disabled icon will be displayed on the system tray . Click this icon to access the
AutoConnect Client and log in to, and enable AutoConnect.
8 | F AV O U R I T E S , S C H E D U L I N G A N D D E L I V E R Y O F R E P O R T S | Q U I C K R E F E R E N C E G U I D EFor more information You may also be interested in the following Quick Reference Guides: Quick Reference Guide: RBC One Common Access ID 9 | F AV O U R I T E S , S C H E D U L I N G A N D D E L I V E R Y O F R E P O R T S | Q U I C K R E F E R E N C E G U I D E
CONTACT US

 For further assistance or support, please contact your local Service Desk:

North America/Asia                                             Luxembourg                                                       United Kingdom
1 416 955 3941                                                 +352 2605 9595                                                   +44 20 7653 4451
1 866 309 6255                                                 9595_support@rbc.com                                             service.internet@rbc.com
service.internet@rbc.com

 © Copyright Royal Bank of Canada 2021. RBC Investor & Treasury Services™ is a global brand name and is part of Royal Bank of Canada. RBC Investor & Treasury Services operates prim arily through the following
 companies: Royal Bank of Canada, RBC Investor Services Trust and RBC Investor Services Bank S.A., and their branches and affiliates. In Luxembourg, RBC Investor Services Bank S.A. is authorized, supervised and
 regulated by the Commission de Surveillance du Secteur Financier (CSSF), and jointly supervised by the European Central Bank (ECB). In the United Kingdom (UK), RBC Investor & Treasury Services operates through
 RBC Investor Services Trust, London Branch and Royal Bank of Canada, London Branch, authorized and regulated by the Office of the Superintendent of Financial Institutions of Canada. Authorized by the Prudential
 Regulation Authority. Subject to regulation by the Financial Conduct Authority and limited regulation by the Prudential Regul ation Authority. Details about the extent of our regulation by the Prudential Regulation Authority
 are available on request. RBC Investor & Treasury Services UK also operates through RBC Europe Limited, authorized by the Prudential Regulat ion Authority, and regulated by the Financial Conduct Authority and the
 Prudential Regulation Authority. Additionally, RBC Investor & Treasury Services’ trustee and depositary services are provided through RBC Investor Services Bank S.A., London Branch, aut horized by the CSSF and ECB,
 and subject to limited regulation by the Financial Conduct Authority and Prudential Regulation Author ity. Details about the extent of our regulation by the Financial Conduct Authority and the Prudential Regulation Authority
 are available on request. RBC Investor Services Bank S.A. maintains a representative office supervised by the Federal Reserve Bank of New York. RBC Investor Services Trust (Australian Branch) is licensed and regulated
 by the Australian Securities and Investment Commission, Australian Financial Services licence number 295018. Details about th e extent of our regulation by the Australian Securities and Investment Commission are
 available on request. RBC Investor Services Trust Singapore Limited is licensed by the Monetary Authority of Singapore (MAS) as a Licensed Trust Company under the Trust Companies Act and approved by MAS to act as
 a trustee of collective investment schemes authorized under S286 of the Securities and Futures Act. RBC Investor Services Trust Singapore Limited is also a Capital Markets Services Licence Holder issued by MAS under
 the Securities and Futures Act in connection with its activities of acting as a custodian. RBC Offshore Fund Managers Limited is regulated by the Guernsey Financial Ser vices Commission in the conduct of investment
 business. Registered company number 8494. RBC Fund Administration (CI) Limited is reg ulated by the Jersey Financial Services Commission in the conduct of fund services and trust company business in Jersey.
 Registered company number 52624. RBC Investor Services Bank S.A. is a restricted license bank authorized by the Hong Kong Mon etary Authority to carry on certain banking business in Hong Kong. RBC Investor Services
 Trust Hong Kong Limited is regulated by the Mandatory Provident Fund Schemes Authority as an approved trustee. Royal Bank of Canada, Hong Kong Branch, is regulated by the Hong Kong Monetary Authority and the
 Securities and Futures Commission.
 This document is provided for general information and does not necessarily reflect individual circumstances. It does not cons titute financial, tax, legal or accounting advice, and should not be relied upon in that regard. This
 document must not be reproduced, forwarded or otherwise made available to any third party outside the recipient’s organizatio n without the express written consent of RBC Investor & Treasury Services. Links to external
 websites are for convenience only. RBC Investor & Treasury Services does not review, endorse, approve, control or accept any responsibility for the content of those sites. Linking to external websites is at your own risk.
 ® / ™ Trademarks of Royal Bank of Canada. Used under licence.

 rbcits.com
You can also read