Vet20 USER MANUAL - SunTech Medical
←
→
Page content transcription
If your browser does not render page correctly, please read the page content below
Vet20 BP MONITOR

Automated Blood Pressure Monitor for Veterinary Use

 USER MANUAL

Changes
     This manual is identified as Part number: 80-0066-00 Rev. C. An updated version may be available for download from the
     SunTech Medical website. Should you notice errors or omissions in this manual, please notify us at:

     SunTech Medical, Inc.
     507 Airport Boulevard, Suite 117
     Morrisville, NC 27560 USA
ii   Tel: 800.421.8626
          919.654.2300
     Fax: 919.654.2301
     Email: CustomerService@SunTechMed.com
     Web: www.SunTechMed.com

     Copyright Information
     All content in this manual is the proprietary information of SunTech Medical and is provided solely for purposes of operation,
     maintenance or service of the SunTech Vet20. This manual and the SunTech Vet20 described in it are protected under copy-
     right law under which they may not be copied, in whole or in part, without written consent of SunTech Medical.

     The information in this manual is furnished for guidance only, is subject to change without notice, and should not be
     construed as a commitment by SunTech Medical. SunTech Medical assumes no liability for errors or inaccuracies that may
     appear in this manual.

     © 2016 SunTech Medical. All rights reserved.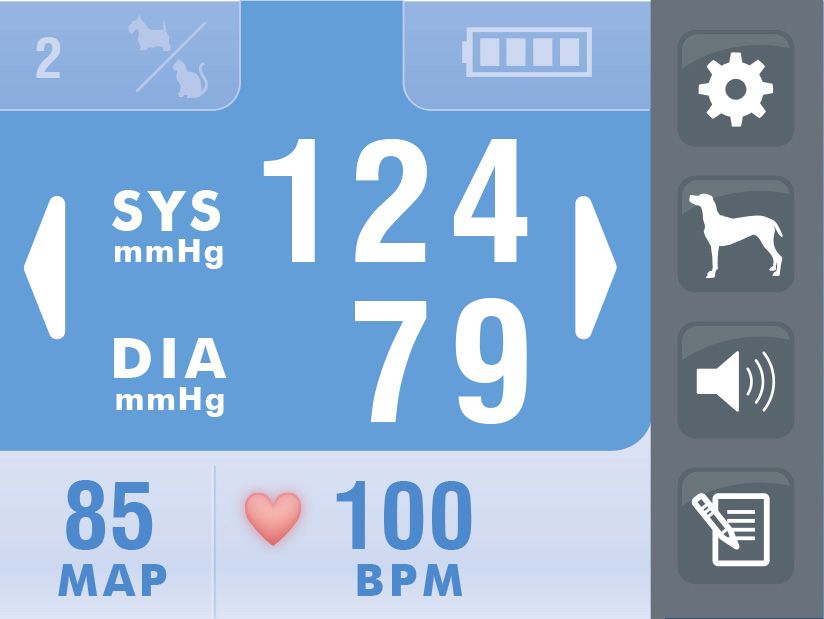
Welcome to the SunTech Vet20!
Thank you for choosing this SunTech Vet20 blood pressure monitor! For over 30 years, SunTech Medical has been the
preeminent supplier of leading edge technology and innovative products to obtain blood pressure measurements. Devel-
oped specifically for the veterinary care environment, the SunTech Vet20 BP monitor quietly takes accurate blood pressure
measurements very quickly and is extremely easy to use. The monitor also is lightweight and portable for convenient mobility
between exam rooms and other clinic locations.

Table of Contents
Welcome to SunTech Vet20!.......................... iii         7. Taking Care of SunTech Vet 20................18

Safety Considerations................................... iv        Accessories & Replacement Parts................... 19

1. Warnings and Precautions.........................1              Status Messages.......................................... 10   iii

2. Icons and Symbols....................................4       8. Frequently Asked Questions....................21

3. Getting to know SunTech Vet20.................5              9. Warranty.................................................22

4. Selecting Your Settings..............................8       10. Technical Information............................23

5. Before You Begin.....................................13      11. Appendix A: Service Screens..................29

6. Using SunTech Vet20...............................15
iv

     Safety Considerations
     Intended Use
     The SunTech Vet20 is intended to be used on companion animals, specifically dogs and cats, to obtain oscillometric
     blood pressure measurements, including systolic, diastolic, mean arterial pressure, and heart beats per minute. This
     non-invasive monitor uses algorithms specifically designed for these animal populations.

     User Responsibility
     The SunTech Vet20 is designed to perform in conformity with the description thereof contained in this operation manual
     when operated. The user of this monitor shall have the sole responsibility for any malfunction which results from im-
     proper use, faulty maintenance, improper repair, damage or alteration by anyone other than SunTech Medical or their
     authorized service personnel.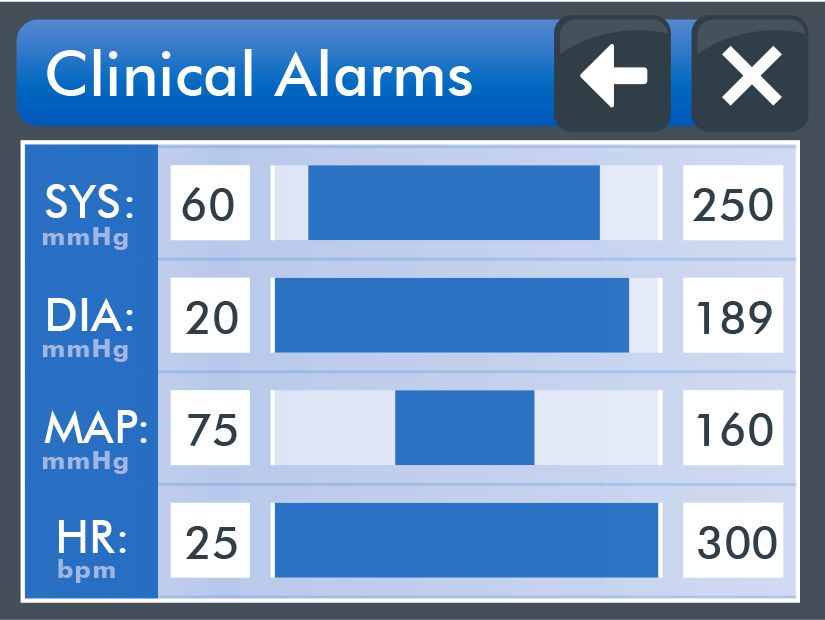
Warnings and
1.    Precautions

     A WARNING indicates a situation which, if not avoided, could result in serious injury or death.
      WARNING: DO NOT connect patient hose or monitor to any other devices or connections, especially
      intravenous (IV) tubes as there is potential for air to be pumped into a blood vessel which could cause serious
      injury.

      WARNING: DO NOT use in the presence of flammable anesthetics; this could cause an explosion. This device
      is not suitable for use in an oxygen enriched environment.

                                                                                                                        1
      WARNING: This monitor is intended for use by healthcare professionals only. This monitor may cause radio
      interference or may disrupt the operation of nearby equipment. It may be necessary to take mitigation
      measures such as re-orienting, relocating or shielding the location.

      A CAUTION indicates a potentially hazardous situation which, if not avoided, may result in minor or
      moderate injury to the user, patient or damage to the equipment or other property.

      CAUTION: This monitor is for veterinary use only. NOT for use on humans.

      CAUTION: DO NOT use the monitor for any purpose other than specified in this manual without written
      consent and approval from SunTech Medical. Substitution of a component or accessory different from that
      supplied may result in measurement error, equipment damage, increased emissions or decreased immunity.
      Repairs should be undertaken only by personnel trained or authorized by SunTech Medical.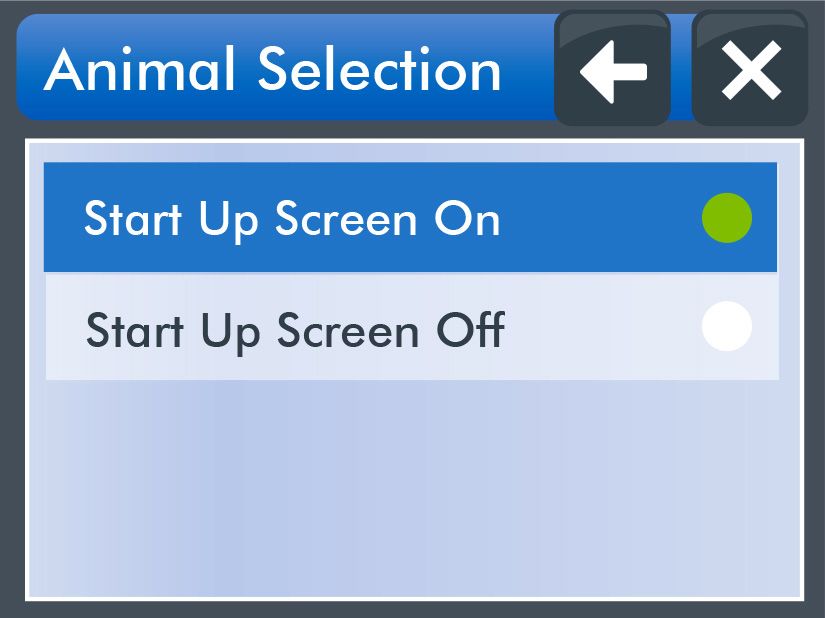
CAUTION: DO NOT use this monitor when oscillometric pulses may be altered by other devices or techniques.

    CAUTION: DO NOT immerse the monitor in any fluid, place fluids on top of or attempt to clean with liquid
    detergents or cleaning agents. This may cause an electrical hazard. Do not use the monitor if accidental
    wetting occurs.

    CAUTION: DO NOT remove unit covers. Doing so may increase the risk of electrical shock. This monitor does
    not contain any user serviceable parts.

    CAUTION: DO NOT gas sterilize or autoclave this monitor.

    CAUTION: Too frequent measurements may cause injury to the patient due to blood flow interference.
2

    CAUTION: At the end of product life, the monitor, accessories, components and other consumable goods may
    become contaminated from normal use. Consult local codes and ordinances for proper disposal of equipment
    and other consumable goods.

    CAUTION: The monitor may not operate correctly if used or stored outside the relevant temperature or
    humidity ranges described in the Performance Specifications.

    CAUTION: Do not use if device is dropped and/or is damaged. Have a qualified service representative check
    the unit before using again. Repairs should only be conducted by an authorized SunTech Medical service
    representative.

    CAUTION: Remove batteries when device is not in use for long periods of time to prevent possible battery
    leakage and product damage.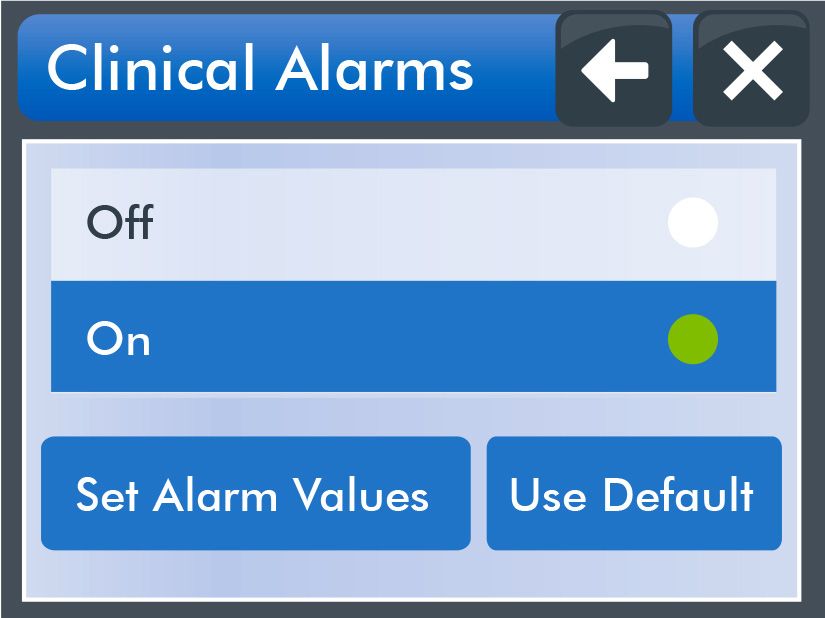
CAUTION: ENSURE batteries are inserted with the correct polarity. Improper installation may cause
 equipment damage or malfunction. Follow battery installation procedures.

A TIP provides application tips or other useful information to assure that you get the most from your
equipment.
 TIP: This device is designed to be used on dogs and cats. In this document where the word “patient” is used, this is to
 mean a small animal such as a cat, dog, or other small animal.

 TIP: Accuracy of any blood pressure measurement may be affected by the position of the subject, the patient’s physical
 condition and use outside of the operating instructions detailed in this manual. Interpretation of blood pressure
 measurements should be made only by a veterinarian or trained medical staff. Minimize limb movement
 during the measurement.

                                                                                                                           3
 TIP: To obtain accurate blood pressure readings, the cuff must be the correct size, and also be correctly fitted to the
 patient. Incorrect size or incorrect fitting may result in incorrect readings.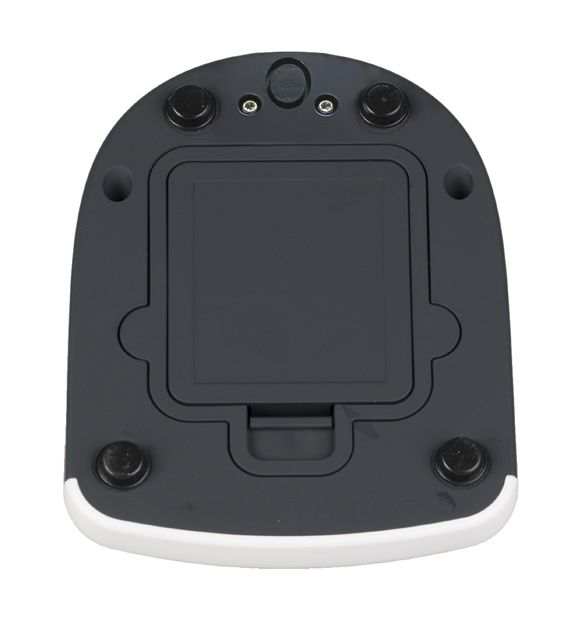
Icons and
    2.   Symbols

                Exits or closes a screen                          Arrow should be placed over artery

                Goes back to previous screen                      Symbol indicating limb circumference

         TIP:   Provides practical advice for using monitor       Index line

                Manual consultation symbol                        Not made with natural rubber latex

4               This product meets the requirements of the        Not made with PVC
                applicable Low Voltage Directive
                                                                  Catalog Number
                Disposal in compliance with WEEE
                                                                  Type BF Applied Part
                Manufacturer
                                                                  Fragile, handle with care
                Date of Manufacture
                                                                  Humidity Limits
                Serial Number
                                                                  Temperature Limits
                Cuff index line must fall within range markings
                                                                  Keep Dry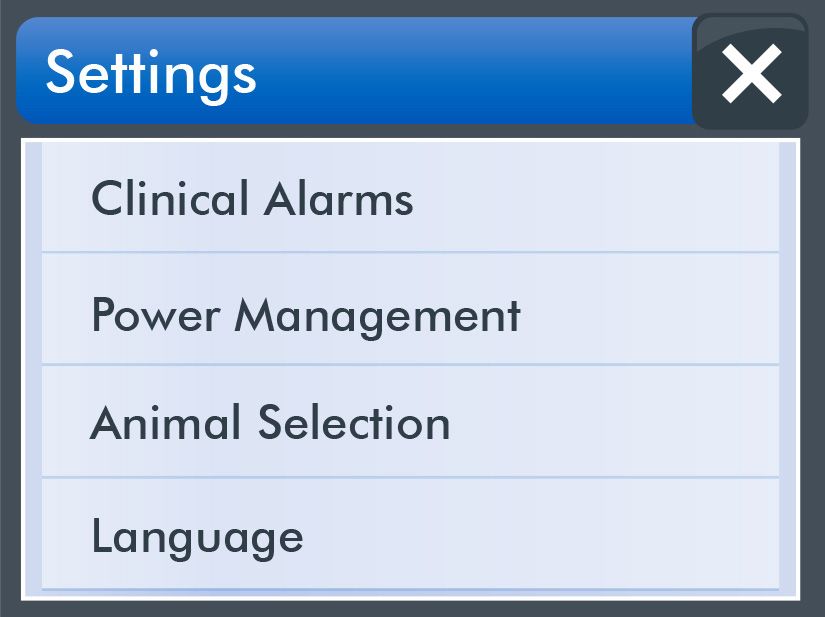
Getting to know
3.      SunTech Vet20

      Connect Power and Hose

                                                                                                                                                5

     Open battery door on monitor back and           Alternatively, insert AC adapter plug into   Connect the patient hose to the back of the
     insert 4 AA batteries paying attention to the   the power receptacle. Only use AC Adapter    monitor making sure the connector “clicks”
     correct polarity. Use lithium ion or alkaline   supplied by SunTech Medical.                 into the locking position.
     batteries.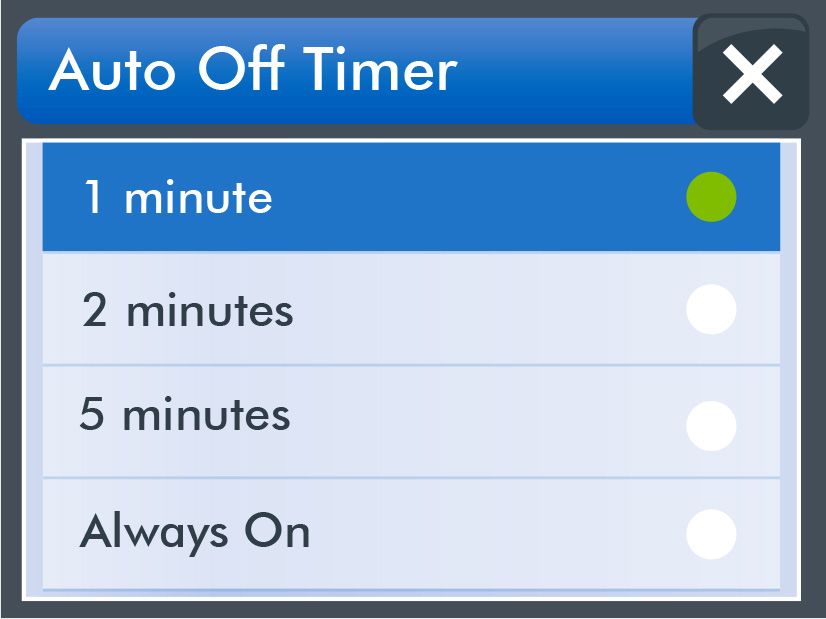
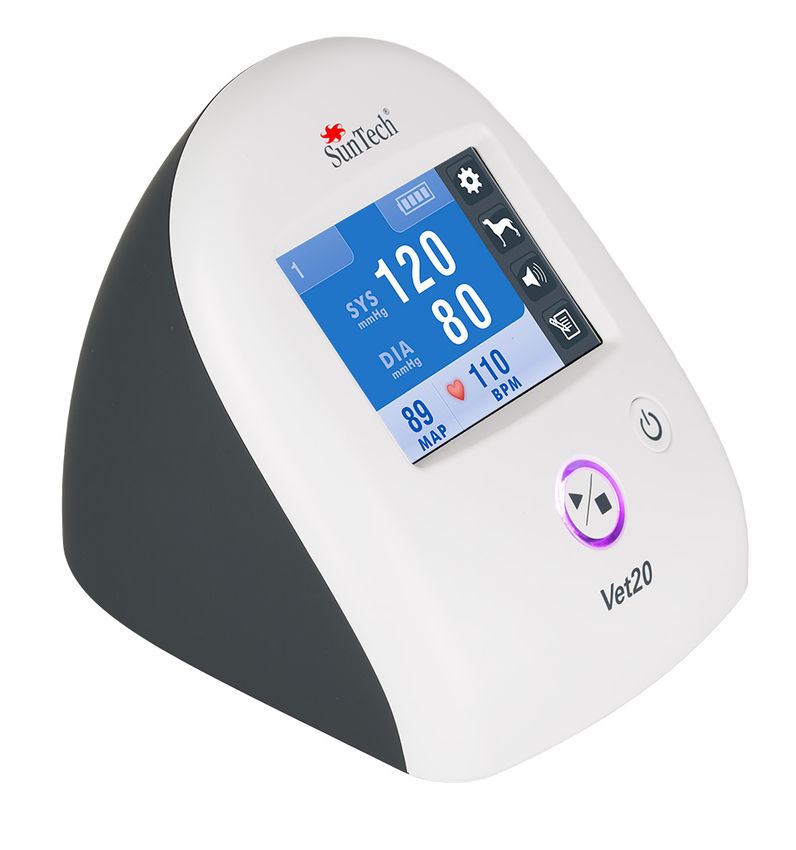
Front Panel

                  Power button.
                  Turns monitor on and off.

6
                  Start/Stop button.
                  Starts blood pressure measurement. Stops measurement at any time.

                  Colors:    Magenta – monitor is ready to take a BP measurement
                             Blue – Measurement is in progress
                             Red – A problem occurred during the measurement
Main Screen View
After you begin using your SunTech Vet20, your main screen will display your most recent patient measurements. Here is a
quick overview of the key symbols and numeric values you will see.
Battery life indicator
Measurement Number/
Size of Animal Measured Settings control
Blood Pressure Reading Animal selection
Left arrow button/ Right arrow button/
View next BP reading 7
View previous BP reading
Speaker control
Mean arterial pressure Access memory/
Previous measurements
Heart beats per minuteSelecting Your
4. Settings
Animal Selection Screen
When you turn on your SunTech Vet20, you will see the Animal Selection Screen. Even if you are not ready to measure BP on
a patient, select either Large or Small animal so that you can proceed to the Main Screen. This screen can be turned off (see
Animal Selection). Additionally, the animal mode can be toggled using the animal selection icon on the Main screen.
8
Choosing the Correct Companion Animal Mode
Small Animal Mode should be chosen when taking BP measurements on cats and dogs up to a #3 BP cuff size. Large Animal Mode
has been designed for animals requiring a #4 BP cuff or larger. This size typically applies to dogs weighing more than 8 kg (~17.5
lbs.). If a problem arises try switching animal modes.Speaker Setting/Noise Control
The SunTech Vet20 monitor’s default setting is Speaker Off so that patients are not disturbed by sounds. To toggle between Speaker
Off and Speaker On, press the Speaker button. When sound is OFF, you still will hear a very quiet clicking when you touch buttons
but no beeps.
Settings
9
Clinical Alarms.
Power Management.
Provides access to turning ON
and setting clinical alarms. Select how long monitor stays
on before Auto OFF shutdown.
Animal Selection. Auto OFF is disabled when
powered by an AC adapter.
Turn ON or OFF startup screen.
Language.
Select desired language.Clinical Alarms
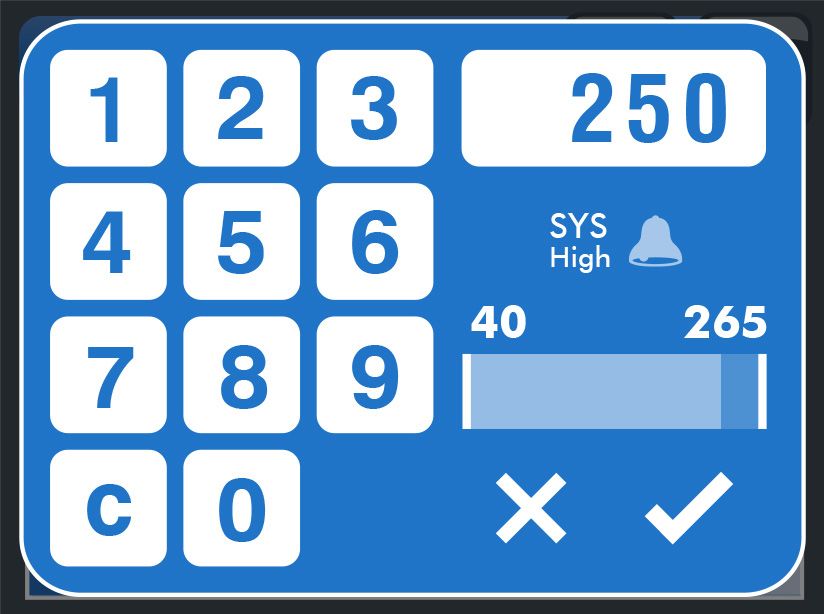
The SunTech Vet20 allows clinical alarms for all BP values (SYS, DIA, MAP and HR). Factory setting is OFF.
10
• To change alarm values, touch Set Alarm Values.
• Touch the range value that you want to adjust.
• Using the keypad, type in the desired value and touch the checkmark.
• To reset to default clinical alarms, touch Use Defaults.
• Out of range values will be Red on the Main Screen. If speaker is ON,
a beep will occur.Power Management
The SunTech Vet20 includes an Auto OFF feature which turns
the monitor off after a selected time period. The Auto OFF
timer is disabled when powered by an AC Adapter.
Factory setting is 1 minute.
• Intervals include 1, 2 and 5 minutes as well as always
ON.
TIP: Batteries may be rapidly depleted if set to always ON.
Animal Selection 11
The animal selection start up screen can be turned OFF. This
is useful for clinics catering to a specific species such as an all
cat clinic.Languages
Multiple languages are available including English, French,
Italian, German, Spanish and Brazilian Portuguese.
12Before You Begin:
5. Important Preparations
These preparations can help ensure a successful and accurate blood pressure measurement.
Where to Apply the Cuff
SunTech recommends that the cuff be placed on a front limb while the patient is lying on the right or left side. This helps
ensure that the cuff is at heart level, which is best for measurement accuracy. Also, the patient is less likely to retract the front
limb when the cuff gently squeezes it during the measurement. The cuff should be placed so that its artery marker aligns with
the limb artery.
Alternate Patient Positioning: If the patient seems more comfortable seated, position the cuff as described above and hold up 13
the limb during the BP measurement. This will help keep the cuff at heart level and relax the patient’s muscles. If the patient
appears agitated enough to bite or scratch, or is standing, the base of the tail is an acceptable alternate location.
Cuff Size
The SunTech Vet20 comes with a variety of different BP cuff sizes. Each cuff contains important markings that help with
selecting the right cuff size.Make sure this part of cuff is placed over the patient’s artery.
When the cuff is wrapped around the patient’s limb, its Index Marker should fall within this line.
When you wrap the cuff around the patient’s limb, the Index Marker should fall within the Range Marker
on the inside of the cuff.
Indicates limb circumference range of the cuff.
14
Not made with natural rubber latex.
Not made with PVC.
TIP: When more than one cuff size fits the limb, always choose the larger size for more accurate measurements. When a cuff
is too small, it can cause BP values to be overestimated.
An alternative sizing method is to measure the circumference of the limb and choose a cuff whose width is 40% of the cir-
cumference for dogs and 30% for cats.Using SunTech
6. Vet20
Taking a BP Measurement
Step 1. Place blood pressure cuff on patient and connect hoses.
Position patient so that they are lying down. Place the cuff just above the paw making sure not to place it over a joint. Con-
nect cuff hose to monitor hose. (See “Before You Begin” for cuff size/placement guidelines and alternate positioning options.)
TIP: The success of the BP measurement is dependent on choosing the correct cuff and attaching it to the patient correctly.
The cuff is the sensor so make sure to snugly fit the cuff as this provides better signals to the monitor.
Step 2. Power up and select animal mode.
Press the Power Button. Select Large or Small companion animal. 15
TIP: To change animal size after initial selection, touch the Animal Selection icon on Main Screen to toggle between Large
and Small.
Step 3. Take blood pressure reading.
Press START/STOP button to start blood pressure measurement. START/STOP button turns Blue during measurement. Reading
is complete when START/STOP button returns to Magenta. Main Screen will show SYS and DIA values, plus MAP and heart
rate (BPM).
Interrupting/Stopping a Measurement
To stop a measurement while in progress, touch the START/STOP button. START/STOP button returns to Magenta and moni-
tor is ready to start new reading.Taking/Viewing Multiple Measurements
To take additional readings, press START/STOP again.
To view previous readings from the Main Screen, touch the
Buttons
Left Arrow button on Main Screen.
disabled
Touch the right arrow to see more recent measurements
and to return to the Main Screen.
Deletes all Averages values
memory data for selected data
16
To view previous readings from the Memory Screen, touch the Memory
button on Main Screen.
Up to 50 measurements can be stored in memory.Averaging Measurements
To average measurements, touch the rows with the measurements you wish to average. Selected rows will turn green.
To unselect a measurement, touch its row a second time.
Average of selected readings shows on top row with “A” as the identifier.
17Taking Care of the
7. SunTech Vet20
Cleaning the Monitor
CAUTION: The SunTech Vet20 is not sterilizable. Do not immerse the monitor in any fluid or attempt to clean
with any liquid detergents, cleaning agents, or solvents.
Dampen a soft cloth with mild medical grade disinfectant and wipe the monitor to remove surface dust and dirt.
Preventative Maintenance
18 System Self Checks
The SunTech Vet20 performs a range of system checks during normal operation. If the monitor detects a problem, it will
display an error message recommending a trouble-shooting action or to contact SunTech Customer Service.
Replaceable Parts
On a routine basis, inspect the monitor, cuffs and hoses for cracks, fraying, or kinks. Immediately replace any damaged part.System Components
Your Vet20 System should contain the following items. Some items are only included in upgraded packages.
Vet20 System Standard Qty.
Vet20 BP Monitor 1
Patient Hose, 4ft 1
AA Batteries 4
Vet System Cuff Kit (6 cuffs) 1
Vet20 User Manual 1
Additional Accessories (included with some Vet20 systems) Standard Qty.
AC Adaptor, Universal 0
Protective Armor - Blue Peacock 0
19
Protective Armor - Pink Flamingo 0
Accessories & Replacement Parts
Contact your sales representative to purchase the following items:
Description Part Number Details
#1 Cuff 98-0400-80 3 – 6 cm, white, non-locking, box of 20
#2 Cuff 98-0400-81 4 – 8 cm, white, non-locking, box of 20
#3 Cuff 98-0400-82 6 – 11 cm, white, non-locking, box of 20
#4 Cuff 98-0400-83 7 – 13 cm, white, non-locking, box of 20
#5 Cuff 98-0400-84 8 – 15 cm, white, non-locking, box of 20
#6 Cuff 98-0400-F1 12 – 19 cm, white, non-locking, box of 20
#7 Cuff 98-0400-F3 17 – 25 cm, white, non-locking, box of 20Patient Hose 91-0028-72 4 ft (1.2m), black, individual
AC Adapter 19-0018-00 Power Supply, 5.9 VDC, 3.0 A, individual
Vet20 Armour in Blue Peacock 39-0195-01 Protective cover, blue, individual
Vet20 Armour in Pink Flamingo 39-0195-00 Protective cover, pink, individual
Status Messages
If the SunTech Vet20 has a problem taking a blood pressure measurement, a short beep will occur (if speakers are ON), the
START/STOP button will turn Red and a Status Message will appear on the monitor screen. Take action as directed on the
screen, or as suggested in the table below.
Status Message Reason Solution
20 Air Leak There is a leak in the cuff, hose or • Check that the hose is connected to the monitor and cuff.
monitor. Also possible if cuff or • Check that the cuff is properly tightened.
hose is not attached to the monitor. • Check that the cuff is in the correct position.
• Check that the cuff is not leaking air.
• Check that the hose connections are not damaged or loose.
Status Message Reason Solution
Value out of The blood pressure value is outside • Make sure you are using the proper cuff size.
Range of SunTech Vet20’s published • Patient may have been moving too much.
ranges. • Check that the cuff is properly tightened and in proper position.
Poor Signal Monitor is not receiving a strong • Check that cuff is in correct position.
Quality signal from patient. Also possible • Check the patient.
if a rapid deflation occurs during a • Check that cuff is properly tightened.
measurement. • Check that correct size cuff is used.Artifact Detected Monitor is picking up on • Check animal mode. It might be on wrong setting.
unexpected noise or movements. • Check patient for motion, trembling. Too much movement.
• Check that cuff is in correct position.
• Check that correct size cuff is used.
Measurement The monitor is not detecting • Check to ensure cuff is fitting snugly on patient and is positioned properly.
Too Long strong and consistent signals from • Check that cuff is in correct position.
the patient for an extended time • Check patient for moving, trembling.
period.
Check Batteries! Battery power is low. • See the battery life indicator on the Main Screen.
Replace batteries if needed.
Air Blockage Air is not able to pass through the • Check that hose has no sharp bends and is not pinched.
hose or cuff properly. • Check that patient is not lying or stepping on cuff.
• Check that cuff is in correct position.
Cuff Overpres- Pressure in the cuff briefly exceeded • Check that correct size cuff is being used.
sure 300 mmHg due to patient • Check that hose has no sharp bends and is not pinched.
movement, air blockage or using a 21
• Check that patient is not lying or stepping on cuff.
cuff that is too small. • Ensure patient is not moving excessively.
Monitor Not Monitor is preparing for next • Touch START/STOP to start a new measurement. For repeated errors,
Ready measurement or may need service. calibration or service may be required.
System Failure A monitor system has failed. • Service is required.Frequently
8. Asked Questions
How many measurements can I store in Memory? How long will the batteries last?
You can store up to 50 measurements. The monitor has a 250+ BP measurements can be expected from typical
revolving memory. When you take your 51st measurement, it alkaline batteries. Lithium batteries will provide even more
will be listed as measurement #1. measurements. Battery life is very dependent on the touch
screen display ON time. To maximize life, SunTech suggests
How do I delete BP data from memory? setting the Auto OFF timer to 1 minute.
Select the Memory button and touch the Delete button.
Before the memory is cleared, you will be asked to confirm Can I use this monitor on awake and anesthe-
or cancel the deletion. When you clear the Memory, you tized animals?
delete all measurements. Yes. The SunTech Vet20 can be be used on anesthetized
22 animals as well as awake animals.
For medium-sized dogs, which animal mode do I
choose? How do I keep the cuff from slipping down the
Use cuff size as the determination factor. If a #3 cuff or limb or coming off?
smaller is the best fit, choose small animal mode. If #4 or Attach the cuff as tight as possible. Extra attention will be
larger, choose large animal mode. needed on species with dense or thick fur. If the cuff will
not stay attached, check the Velcro for fur and remove if
How do I choose the correct cuff size? possible.
Wrap the cuff around the patient’s limb and make sure the
index line falls within the range marker. If two different cuff Are there other power options?
sizes fit the patient, choose the larger size. Yes. An AC adapter is available.What are the minimum and maximum cat & dog
weights when taking measurements with the
Vet20?
There are none. Any cat or dog that has a limb that fits
within the cuff ranges is acceptable.
Can I use rechargeable batteries?
Yes, you can use NiCd and NiMH rechargeable batteries but
the Vet20 does not charge them.
23Limited
9. Warranty
SunTech Medical, Inc. provides to the original purchaser the following limited warranty from date of invoice.
Monitors 24 months
Cuffs/Hoses 90 days
SunTech Medical, Inc. warrants each instrument to be free from defects in material and workmanship. Liability under this war-
ranty covers servicing of the instrument when returned from the customer’s facility within the United States prepaid to the fac-
tory. SunTech Medical, Inc. will repair any component(s) or part(s) that it finds to be defective during the period of this limited
warranty. Should a defect become apparent, the original purchaser should first notify SunTech Medical, Inc. of the suspected
defect. The instrument should be carefully packaged and shipped prepaid to:
24
SunTech Medical, Inc. SunTech Medical, Ltd.
Service Department Service Department
507 Airport Boulevard, Suite 117 Oakfield Industrial Estate
Morrisville, NC 27560 USA Eynsham, Oxfordshire OX29 4TS UK
Tel: 800.421.8626 Tel: 44 (0) 1865.884.234
919.654.2300 Fax: 44 (0) 1865.884.235
Fax: 919.654.2301
This limited warranty is void if the instrument has been damaged by accident, misuse, negligence, act of God or serviced by
any person not authorized by SunTech Medical, Inc. It contains the entire obligation of SunTech Medical, Inc. and no other
warranties expressed, implied or statutory are given. No representative or employee of SunTech Medical, Inc. is authorized to
assume any further liability or grant any further warranties except as herein.Technical
10. Information
Factory Default Settings
Parameter Name Default Value
Clinical Alarms Status OFF
Clinical Alarms – low SYS 40 mmHg
Clinical Alarms – High SYS 265 mmHg
Clinical Alarms – low DIA 20 mmHg
Clinical Alarms – High DIA 200 mmHg 25
Clinical Alarms – low MAP 27 mmHg
Clinical Alarms – High MAP 222 mmHg
Clinical Alarms – low HR 25 bpm
Clinical Alarms – High HR 300 bpm
Speaker Status OFF
Auto OFF Timer 1 minute
Language English
Startup Animal Selection ONPerformance Specifications
Method of Measurement: Oscillometric
Blood Pressure Range: Systolic: 40 – 265mmHg
MAP: 27 – 222mmHg
Diastolic: 20 – 200mmHg
Pulse Rate Range: 25 to 300 BPM (Beats Per Minute)
Cuff Deflate Rate: Deflation step size varies with heart rate, cuff pressure and cuff volume
Initial Inflation Pressure: 180 mmHg (default)
Subsequent initial inflation: previous Systolic + 30 mmHg
26
Transducer Accuracy: ±3mmHg between 0 mmHg and 300 mmHg
Transducer Calibration: Recommended bi-annually or if a calibration problem is suspected
Operating Conditions: 0°C to 50°C, 15% to 95% non-condensing humidity
Storage Conditions: -20°C to 65°C, 15% to 90% non-condensing humidity
Altitude: Measurement accuracy not affected by altitude
Power: 4 AA alkaline batteries.
AC Adapter - Input: 100-240V ~ 47-63Hz 0.48A Max, Output: 5.9V 3A 17.7W Max
Dimensions: 6.25” x 5” x 5.25” (15.9cm x 12.7cm x 13.3cm)
Weight: 1.3 lbs (0.59Kg) with batteriesElectromagnetic Compatibility (EMC)
Changes or modifications to the SunTech Vet20 that are not approved by SunTech Medical may cause EMC interference
problems with this or other equipment.
Medical equipment can be affected by portable and mobile RF communications equipment.
Guidance and manufacturer’s declaration – electromagnetic emissions
The Vet20 is intended for use in the electromagnetic environment specified below.
The customer or the user of the Vet20 should assure that it is used in such an environment.
Emissions test Compliance Electromagnetic environment – guidance
RF emissions Group1 The Vet20 uses RF energy only for its internal function. Therefore, its RF emissions are very low
CISPR 11 and are not likely to cause any interference in nearby electronic equipment 27
RF emissions Class B The Vet20 is suitable for use in all establishments, including domestic establishments and those
CISPR 11 directly connected to the public low-voltage power supply networks that supplies buildings used
for domestic purposes.
Harmonic emissions Class A
IEC 61000-3-2
Voltage fluctuations/ Complies
flicker emissionsGuidance and manufacturer’s declaration – electromagnetic immunity
The Vet20 is intended for use in the electromagnetic environment specified below. The customer or user of the Vet20 should assure that it
is used in such an environment.
Immunity test IEC 60601test level Compliance level Electromagnetic environment - guidance
Electrostatic ± 6 kV contact ± 6 kV contact Floors should be wood, concrete or ceramic tile.
discharge (ESD) ± 8 kV air ± 8 kV air If floors are covered with synthetic material, the
IEC 61000-4-2 relative humidity should be at least 30%
Electrical fast ± 2 kV for power supply lines ± 2 kV for power supply lines Mains power quality should be that of a typical
transient/burst commercial or hospital environment.
IEC 61000-4-4
± 1 kV for input/output lines Not applicable
Surge ± 1 kV differential mode ± 1 kV differential mode Mains power quality should be that of a typical
IEC 61000-4-5 ± 2 kV common mode ± 2 kV common mode commercial or hospital environment.
28
Voltage dips, short >95% dip in UT for 0.5 cycle >95% dip in UT for 0.5 cycle Mains power quality should be that of a typical
interruptions and 60% dip in UT for 5 cycles 60% dip in UT for 5 cycles commercial or hospital environment.
voltage variations 30% dip in UT for 25 cycles 30% dip in UT for 25 cycles
on power supply >95% dip in UT for 5 s >95% dip in UT for 5 s
input lines
IEC 61000-4-11
Power frequency 3 A/m 3 A/m Power frequency magnetic fields should be at
(50/60 Hz) levels characteristic of a typical location in a typical
Magnetic field commercial or hospital environment.
IEC 61000-4-8
NOTE UT is the a.c. mains voltage prior to application of the test levelGuidance and manufacturer’s declaration – electromagnetic immunity
The Vet20 is intended for use in the electromagnetic environment specified below. The customer or user of the SunTech Vet20 should
assure that it is used in such an environment.
Immunity test IEC Compliance level Electromagnetic environment - guidance
60601
test level
Portable and mobile RF communications equipment should be used no
closer to any part of the Vet20, including cables, than the recommended
separation distance calculated from the equation applicable to the
frequency of the transmitter.
Recommended separation distance
Conducted RF IEC 3 V rms 3 V rms d = 1.2√P
61000-4-6 150KHz 150KHz to 80MHz
to 80MHz d = 1.2√P 80 MHz to 800 MHz
29
Radiated RF 3 V/m 3 V/m d = 2.3√P 800 MHz to 2,5 GHz
IEC 61000-4-3 80MHz to 80MHz to 2.5GHz where P is the maximum output power rating of the transmitter in watts
2.5GHz (W) according to the transmitter manufacture and d is the recommended
separation distance in metres (m). Field strengths from fixed RF
transmitters, as determined by an electromagnetic site survey,a should be
less than the compliance level in each frequency range.b
Interference may occur in the vicinity of
equipment marked with the following symbol:
NOTE 1 At 80 MHz and 800 MHz, the higher frequency range applies.
NOTE 2 These guidelines may not apply in all situations. Electromagnetic propagation is affected by absorption and reflection from
structures, objects and people.
a
Field strengths from fixed transmitters, such as base stations for radio (cellular/cordless) telephones and land mobile radios, amateur
radio, AM and FM radio broadcast and TV broadcast cannot be predicted theoretically with accuracy. To assess the electromagnetic en-
vironment due to fixed RF transmitters, an electromagnetic site survey should be considered. If the measured field strength in the location
in which the Vet20 is used exceeds the applicable RF compliance level above, the Vet20 should be observed to verify normal operation. If
abnormal performance is observed, additional measures may be necessary, such as re-orienting or relocating the Vet20.
b
Over the frequency range 150 kHz to 80 MHz, field strengths should be less than 3 V/m.Recommended separation distances between portable and mobile RF communications equipment and the Vet20
The Vet20 is intended for use in an electromagnetic environment in which radiated RF disturbances are controlled. The customer or the
user of the Vet20 can help prevent electromagnetic interference by maintaining a minimum distance between portable and mobile RF
communications equipment (transmitters) and Vet20 as recommended below, according to the maximum output power of the communi-
cations equipment.
Rated maximum output Separation distance according to frequency of transmitter
power of transmitter m
150 kHz to 80 MHz 80 MHz to 800 MHz 800 MHz to 2,5 GHz
W
d=1.2√P d=1.2√P d=2.3√P
0.01 0,12 0,12 0,23
0.1 0,38 0,38 0,73
1 1,2 1,2 2,3
10 3,8 3,8 7,3
30
100 12 12 23
For transmitters rated at a maximum output power not listed above, the recommended separation distance d in metres (m) can be esti-
mated using the equation applicable to the frequency of the transmitter, where P is the maximum output power rating of the transmitter in
watts (W) according to the transmitter manufacturer.
NOTE 1 At 80 MHz and 800 MHz, the separation distance for the higher frequency range applies.
NOTE 2 These guidelines may not apply in all situations. Electromagnetic propagation is affected by absorption and reflection from
structures, objects and people.Appendix A: Service Screens The SunTech Vet20 BP monitor includes a service mode where service information can be accessed, factory default settings can be restored and hardware verification checks can be performed. The service screens are accessed by holding down the power but- ton for approximately 6 seconds when turning the monitor ON. When viewing service screens, the Start/Stop button LED is white. No parts on the monitor or its accessories are serviceable. Service Information 31 Basic details are logged which includes the number of measurement cycles, user interface firmware version, both firmware versions for the BP algorithm as well as a count for each status message. Status codes are provided to assist in troubleshooting during a service call.
Calibration Check
     The pressure transducer in the SunTech Vet20 BP monitor is designed to hold its
     calibration for many years. Human NIBP devices require that the maximum static
     pressure accuracy shall be ± 3mmHg or 2% of the reading, whichever is greater.
     This is a stringent requirement and all test equipment must be in excellent working
     order to properly perform this test. If you do not have access to this equipment or
     prefer to have someone else verify the calibration, the monitor can be sent to SunTech
     following the procedure described in the Limited Warranty section of this manual.
     There may be a charge associated with the verification if the transducer is not out of
     calibration.

     SunTech suggests this check be performed every 2 years or if there is suspicion that
     the monitor may be out of calibration.
32
     Equipment Needed
       •   Calibrated Manometer
       •   Pneumatic "T" Adapters
       •   Volume (500mL bottle or #6 or #7 cuff wrapped tightly around a solid object)
       •   Hand Bulb
       •   Connection Tubing

     Procedure
       • Connect a manometer, volume and the hand bulb to the end of the monitor
         hose using "T" adapters and connection tubing.
       • Touch the Start button which closes the valves and shows the pneumatic pressure.
       • Apply various pressures (between 0 mmHg and 250 mmHg) to the monitor with
         the hand bulb. INFLATE SLOWLY when adding pressure over 200 mmHg to
         avoid an overpressure. Verify that the module pressure is equal to the manom-
         eter pressure (±3 mmHg or 2% of the target value).
• If the pressure is within limits, then touch the Stop button and the calibration check is complete.
• If the pressure does not agree with the manometer, then the transducer needs to be re-calibrated. Send monitor back to
SunTech Medical following the procedure in the Limited Warranty section of the manual.
Air Leak Check
International standards for human NIBP devices require that air leakage within the
pneumatic system must not exceed 6 mmHg/min. During manufacturing at SunTech
Medical, acceptable air leakage is less than 3 mmHg/min. Both of these pass criteria
will not affect the performance or accuracy of the NIBP module so the SunTech Vet20
uses the 6 mmHg/min pass criteria. If you do not have access to this equipment or
prefer to have someone else perform the air leak check, the monitor can be sent to
SunTech following the procedure described in the Limited Warranty section of this
manual. There may be a charge associated with performing an air leak check.
SunTech suggests this check be performed if there is suspicion of an air leak.
33
Equipment Needed
• Volume (500mL bottle or #6 or #7 cuff wrapped tightly around a solid object)
• Standard patient hose
TIP: A reduction in cuff pressure is expected during the first 60 seconds due to pneumatic expansion of the cuff, patient
hose and internal tubing. Make sure cuff is wrapped tightly around a solid object. Do not perform with cuff on a patient,
laying flat or wrapped loosely.Procedure
• Connect the volume to the monitor patient hose.
• Touch the Start button which begins the air leak check and shows the pneumatic
pressure and a timer. This check takes approximately 2 minutes.
• When the check is complete, the monitor will indicate a pass or fail result.
• If pass, then touch the Pass button and the air leak check is complete.
• If fail, then there is an air leak within the pneumatic system. Try repeating the
check with a different cuff making sure all connections are sealed. If it still fails,
you may send the monitor and cuffs back to SunTech Medical following the
procedure in the Limited Warranty section of the manual.
Restore Factory Defaults
Factory defaults are restored by accessing this screen. A list of factory default settings
34 is in the Technical Information section of this manual.35
SunTech Medical, Inc.              SunTech Medical, Ltd.           SunTech Medical, Ltd.
507 Airport Boulevard, Suite 117   Oakfield Industrial Estate      105 HuanGuan South Road, Suite 15 2~3/F
Morrisville, NC 27560-8200 USA     Stanton Harcourt Road           DaHe Community Guanlan,
Tel: + 1.919.654.2300             Eynsham, Oxfordshire OX29 4TS   LongHua District, Shenzhen
        1.800.421.8626             England                         GuangDong PRC 518110
Fax:+ 1.919.654.2301               Tel: + 44 (0) 1865.884.234      Tel.:     + 86-755-2958 8810
                                   Fax:+ 44 (0) 1865.884.235       		        + 86-755-29588986 (Sales)
                                                                   		        + 86-755-29588665 (Service)
                                                                   Fax:      + 86-755-2958 8829
www.SunTechMed.com                 www.SunTechMed.com              www.SunTechMed.com.CN                   80-0066-00-MO-RevC
You can also read