Wikki Stix Christmas Lesson Plans
←
→
Page content transcription
If your browser does not render page correctly, please read the page content below
Wikki Stix Christmas Lesson Plans
The Wikki Stix Christmas Lesson Plan is designed for children ages 3-6. Where possible,
extension activities are given for older children in the red text. The suggested books and the
Wikki Stix Christmas Crafts can be enjoyed by children of all ages!
Introduction
The Polar Express by Chris Van Allsberg is a classic book for introducing Christmas lessons to
children. It is a delightful book with wonderful illustrations that has become a Christmas
tradition in many homes and classrooms. The story of the Polar Express paves the way for
discussions about Santa. If Santa visits your younger children, it is fun to talk about the North
Pole, the elves, and the anticipation of Christmas Eve. For older children, the book can open
discussions about Santa and/or the true Christmas spirit of generosity, hope, and kindness.
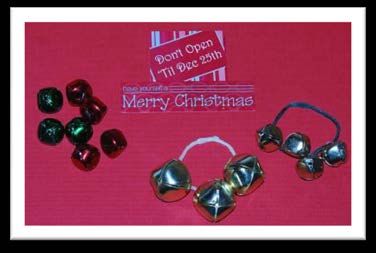
In The Polar Express, the spirit is Christmas is embodied in a Christmas bell. All who truly
believe in the Christmas spirit will continue hear the bell. Invite the children to make a
Christmas bell bracelet/band craft to wear for the day. The bell will be a special symbol of the
spirit of Christmas at home or in the classroom.
The Polar Express Bell Bracelet Craft
Materials needed: Red, White, and Green Wikki Stix and craft bells.
Thread one Wikki Stix through the opening at the top of the bell. Press the Wikki Stix ends
together to form a circle bracelet for the children to wear or shake. A two-toned effect can be
achieved by twisting a separate strand of Wikki Stix around the bracelet (see photo above).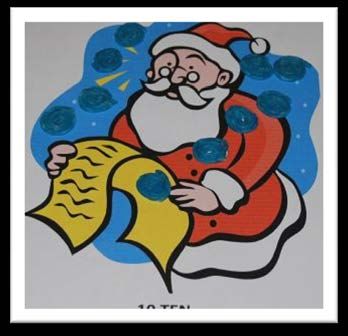
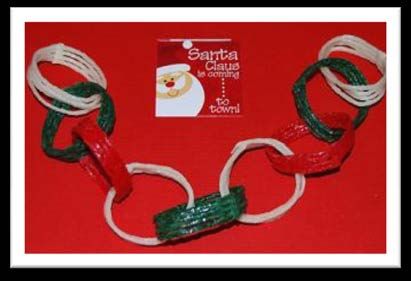
The Wikki Stix Christmas Countdown Crafts below are great crafts to begin lessons during the
Christmas Season.

Wikki Stix Christmas Countdown Chain

Materials needed: Wikki Stix

Activity: It’s fun for kids to make a countdown chain to Christmas or Hanukkah, but once you rip
a chain off, you are left with scraps of paper that get thrown in the trash. By creating a
countdown chain with Wikki Stix, each day you are left with items that are re-useable! Also,
you only need one item for this activity as no staples or glue are necessary to hold the links
together!

Make a chain of Wikki Stix with each link of the chain containing four Wikki Stix of the same
color. This will keep your countdown chain sturdier than just using one Wikki Stix per link.
Make one chain for each day left until Christmas or Hanukkah. As your child removes one chain
each day you can practice counting backwards. Your child also has Wikki Stix to play with each
day as they take off each link.

Wikki Stix Christmas Countdown Pony Bead Garland/Chain

Materials needed: Red, green and white small pony beads; Red, green or white Wikki Stix.

Activity: Children can place pony beads onto the Wikki stick to make a necklace or chain. This
activity helps children to strengthen their fine motor skills as well as work on hand-eye
coordination. Children can also work on creating patterns by making simple AB patterns with
the beads. To make an AB pattern you will need two different colored pony beads. Children
alternate colors on their necklace to complete the pattern. For younger children, you can start
the pattern for them and they can finish the pattern chosen. Older children can create the AB
pattern on their own, or work on more complex patterns using two or three colors. Some
examples might be an AAB (red, red, green), ABB (red, green, green), AABB (red, red, white,
white) or ABC (red, white, green).
Extension idea: You can continue to work on finding patterns in your environment by looking
for patterns in lights, ornaments, garland, etc.
Literacy Activities
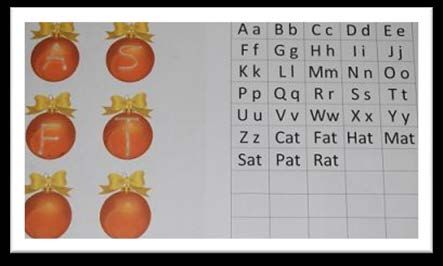
Wikki Stix Christmas Ornament Letters and Words
Materials needed: One Christmas Ornament Letters_Words printable per child (separate
download), scissors, and Wikki Stix.
Print the ornament file to heavy paper and laminate the pages for durability. Cut out the
ornaments prior to use.
Invite the children to create any letter(s) that have been introduced with Wikki Stix on the
ornaments. Scissors will be necessary to cut smaller pieces to form the letters. Wikki Stix can
be cut with safety scissors, but younger children will need assistance.
All letters and the _at words are located on the second page of the file. There are blank boxes
on the second page to use with any additional words your children may be working on.
Younger children may wish to look at the letter/word formations while creating with Wikki Stix.
Wikki Stix aids in the retention of letter/word recognition by asking the children to use a hands-
on manipulative to cement basic concepts.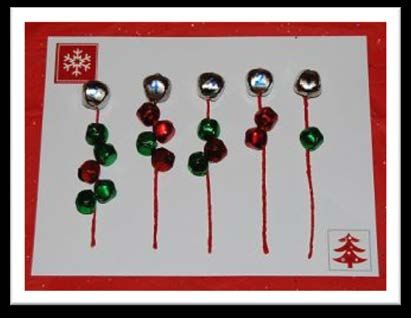
For older children: The children can create any words by using as many individual ornaments
as necessary for the number of letters in each word. It is a great hands-on way to practice new
words as the words are introduced.

Polar Express Name Train

Materials needed: One printable train (separate download), scissors, and Wikki Stix.

It is a developmental milestone when younger children can correctly recognize the letters that
form their own name. This activity is a pre-writing activity that enhances letter/name
recognition and fine motor skills.

Print the train to heavy paper and laminate for durability. Invite the children to create their
own name on the train using Wikki Stix. For very young children, write the child’s name on a
separate index card and see if the child can copy the letters to the train template with Wikki
Stix. For older children: older children can create any spelling or sight words they are working
on with Wikki Stix on the train template. The children can also use the train template as a start
to a writing activity. Ask the children what they liked best about The Polar Express and have
them use a separate page to write about it. The children might also like to write about a time
when they have seen a train or even rode on a train.

Extension Activity (Name Rubbing Plate): Place the train with the Wikki Stix letters on a
clipboard with a plain sheet of white paper on top. Invite the children to gently rub across the
Wikki Stix letters with a crayon. The letters of the child’s name will then appear on the white
sheet of paper. Children think it is a little “magical” when the letters appear (see photo above).

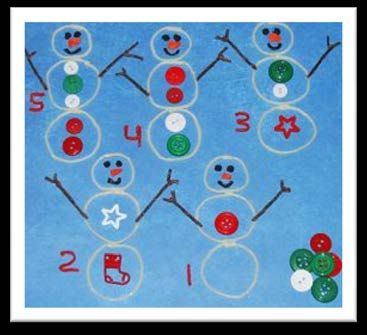
Math Activities

Wikki Stix Snowman Counting Craft

Materials needed: White, black, orange, red and brown Wikki Stix; small buttons of assorted
colors and sizes.

Activity: First, create several snowmen by using the white Wikki Stix for the snowballs/body,
brown Wikki Stix for the arms (branches), black Wikki Stix for the eyes and mouth, and orange
Wikki Stix for the nose. Then, using the red Wikki Stix have your child practice making numerals
1-5, and place each one next to one of the snowmen created.

Next, give your child small buttons and have him/her count out the number of buttons
corresponding to the numeral next to the snowman. For example, for the number two
snowman, your child would place two buttons onto their snowman. This is a great activity for
children to work on one-to-one correspondence. One-to-one correspondence is the ability to
match one object to a number (i.e. two buttons = 2).

For slightly older children, you can practice the concept of adding on by 1’s. For each
numbered snowman, children would try to predict how many buttons are needed on each
snowman by adding +1 to the number shown. For example, on the snowman labeled with the
number 3, the child would mentally try to add or count 3 + 1 and place 4 buttons on the
snowman.

Another extension activity would be to create the snowman but not place a numeral next to
each one. Instruct your child to place as many buttons as s/he wants in each of the circles of
the snowman’s body. Then your child can practice beginning addition by adding the buttons in
the top circle of the snowman’s body to the bottom circle. For example, if there were 2 buttons
in the top circle and 1 snowman in the bottom circle your child can practice saying and/or
writing the addition fact 2+1=3.
Wikki Stix Christmas Counting Book (#’s 1-10)

Materials needed: One printable Wikki Stix Christmas Counting Book (separate download) and
Wikki Stix. For durability, laminate the book pages before the activity. Note – clear contact
paper works well to laminate the pages if laminating supplies are not available.

Print the counting book for each child. Introduce the numbered pages one at a time to younger
children. Have the children make balls or spirals from Wikki Stix that correspond to the number
on each page. Invite the children to count out loud as they place each Wikki Stix ball (spiral) on
the white circles. The counting book will help the children understand that a number (and/or
number word) corresponds to the number of Wikki Stix balls on each page. Once the children
have completed all the pages, save the counting book for future practice.

Wikki Stix Ornament Symmetry Craft

Materials needed: Wikki Stix Ornament Symmetry.pdf (separate download), Wikki Stix

Activity: Print off one or both pages of the Wikki Stix Ornament Symmetry.pdf file. Page 1 is
for older children to do independently and page 2 is for younger children who are still learning
about the concept of symmetry.

For this activity, children can use Wikki Stix to decorate one side of the ornament circle by

creating lines, shapes, or patterns. Then the child can make the other side of the ornament
look identical to the design they made initially. Younger children can use the second page of
the PDF file to copy the design on the blank side of the ornament. Very young children might
need to outline the shapes on the left-hand side of the ornament first and then move or
transfer it to the right side when complete.

Wikki Stix Christmas Bells Counting Sticks

Materials needed: Wikki Stix (at least 10 per child), a permanent marker, and assorted
(colored) craft bells (note – pony beads with Christmas colors can also be used as counters for
the activities suggested below).

Prior to playing the math games: Invite the children to thread a strand Wikki Stix through
each of the bells to form a counting stick (the bells should be kept near the top of the Wikki
Stix – see the silver bells in the photo above).

4 Math Game Suggestions for the Wikki Stix Christmas Bells Counting Sticks

1. One-to-One Correspondence: Label the bells with any numbers the children have had
introduced and put them on top of a Wikki Stix. Ask the children to place the corresponding
number of bells/pony beads on the Wikki Stix.

2. Number Order: Label 10 bells with the numbers 1-10 and put them on top of the Wikki Stix.
Have the children place the counting sticks in the correct number order - 1-10.

Variation: Label the bells with 10 numbers, but do not begin with the numeral one. Have the
children place the counting sticks in the correct number order (starting at a number OTHER
than one).

3. Ten Sticks and Skip Counting: Label 10 bells with the number 10. Have the children place
10 bells/pony beads on each of the counting sticks. These counting sticks make great “10 bars”
for counting to 100 by 10’s. For younger children, label the bells with various numbers for
practice with skip counting by 2’s and 5’s.

4. Patterning: Write any basic pattern on the bells (for example: Write AB on one of the bells).
The children must then choose two colors of craft bells/pony beads - the first chosen color is
“A”; the second chosen color is “B”] and alternate the colors when placing them on the Wikki
Stix.) Older children can create the AB pattern on their own, or work on more complex patterns
using two or three colors. Some examples might be an AAB (red, red, green), ABB (red, green,
green), AABB (red, red, white, white) or ABC (red, white, green).

                                        Science Activity

Wikki Stix Sounds Discrimination Experiment

Materials needed: At least 3 different sizes of craft bells (small, medium, and large) and
Wikki Stix.

Prior to the experiment: Thread a single strand of Wikki through the bells. Make sure that
bells of the same size are strung together. There can be as many (or few) bells on each Wikki
Stix strand as desired. Bend the Wikki Stix so that the ends meet to form a circle and press
them together. (Note – other items can also be used for this experiment. Some suggestions:
canning jar lid rings of different sizes, keys (use different amounts of keys on the Wikki Stix),
different sizes of binder clips, or other classroom/household items that make a variety of
sounds).

Show the children the different sizes of bells. Ring the bells for the children one at a time for
the children to hear the different sounds they make.

Set the bells out on a tray or table for the children to explore. As the children become familiar
with the sounds the bells make, play a game where the children close their eyes and try to
identify whether the bell is the small, medium, or large bell by the sound that it makes.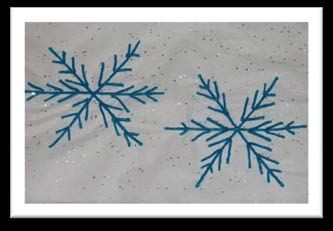
The children can practice with peers or family members, too. The bell experiment promotes
listening skills and auditory discrimination within a playful learning activity.

                                 Wikki Stix Christmas Crafts

Wikki Stix Cardboard Tube Reindeer Craft

Materials needed: Red, white, black and brown Wikki Stix; cardboard tube (such as a toilet
paper roll). The children will use Wikki Stix to decorate the cardboard tube to look like a
reindeer or Rudolph.

First, take a white Wikki Stix and create a circle by making a tight, spiral, pinwheel shaped
pattern. This will be part of the reindeer’s eye. Repeat the process to create a second eye.
Add a small piece of black Wikki Stix to complete the reindeer’s eyeball. Attach to the toilet
paper tube near the top. Since the Wikki Stix are coated in wax, they will adhere to the
cardboard tube (no glue is necessary).

Next, create antlers by twisting and bending several pieces of brown Wikki Stix. Place inside the
tube, with the antlers sticking out slightly from the top. Third, roll a red Wikki Stix into a ball
and place just under the eyes, for the reindeer’s nose. Finally, use a black Wikki Stix to create
the reindeer’s mouth and to finish your Rudolph cardboard tube craft.

Wikki Stix Snowflake Craft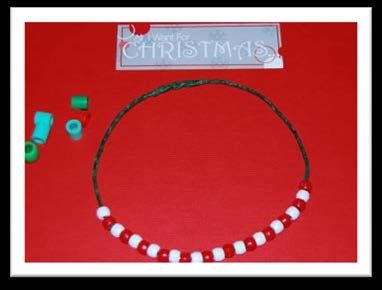
Materials needed: White or Blue Wikki Stix and scissors.

Make a tray of blue and/or white Wikki Stix and invite the children to play. The snowflakes in
the photo above were made by making an X with two strands of Wikki Stix. A third Wikki Stix
strand can then be place horizontally across the center of the X to form 6 ends.

Wikki Stix pieces can then be cut and formed into the V shapes. The V shapes are then added
(3 per side) to each of the 6 snowflake ends (see photo above).

Wikki Stix can be cut with safety scissors, but younger children will need assistance.

The Wikki Stix snowflakes crafts are simple yet quite impressive looking crafts for kids. Children
can also design the snowflakes on wrapping/tissue paper as decorations for Christmas packages
(the snowflakes in the photo above were created on white tissue paper).

       Suggested Books to enjoy with the Wikki Stix Christmas Lesson Plan
The Polar Express by Chris Van Allsburg
Pete the Cat Saves Christmas by James Dean and Eric Litwin
A Wish to be a Christmas Tree by Colleen Monroe and Michael Glenn Monroe
The Night Before Christmas (many different versions to choose from)
Bear Stays Up for Christmas by Karma Wilson and Jane Chapman
The Little Christmas Elf by Nikki Shannon Smith and Susan Mitchell
The Biggest Christmas Tree Ever by Steven Kroll
Daddy Christmas and Hanukkah Mama by Selina Alko
10 Trim the Tree-ers by Janet Schulman and Linda Davick

    For more Wikki Stix activities for children, please visit the Wikki Stix Blog!
You can also read