WizePanel system specification - generation+ (3G+) (version 216) Technology always develops from the primitive
←
→
Page content transcription
If your browser does not render page correctly, please read the page content below

WizePanel
                                               3. generation+ (3G+)
                                     system specification

                                                         (version 216)

                                        Technology always develops from the primitive,
                                                     via the complicated,
                                                         to the simple.

                                                        (Antoine de Saint-Exupéry)

Wilke Technology GmbH · Heider-Hof-Weg 23D · 52080 Aachen · Germany · +49.2405.408 55-0 · info@wizepanel.de · www.wizepanel.de   1 von 77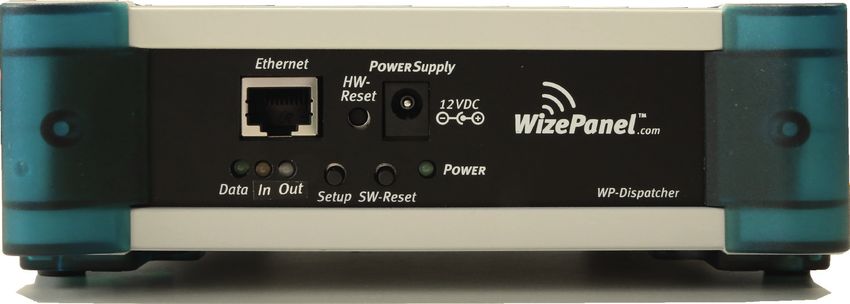
Publisher:
Wilke Technology GmbH
Heider-Hof-Weg 23D
52080 Aachen
Germany

Phone: +49‐2405 / 408 55 - 0
Fax:   +49‐2405 / 408 55 – 444

E-Mail: info@wilke.de
Web: www.wilke.de | www.wizepanel.com

Copyright Wilke Technology GmbH. All rights reserved.
This manual, as well as the hardware and software presented in this manual, are copyrighted and may not be
copied in any way, translated or modified without the explicit written permission of Wilke Technology GmbH.

WizePanel™ are registered trademarks of Wilke Technology GmbH. Windows™ is a registered trademark of
Microsoft Corp.

Those designations of products and methods given in this publication, which are trademarks, where not
especially indicated, are trademarks of the respective trademark owner.

Editors, translators and authors of this publication created texts, figures and programs with due diligence.
However, errors are still possible. Wilke Technology does not accept guarantees, legal responsibility or liability
for consequences which were caused by incorrect statements. Any feedback concerning errors is welcome.

Information given in this manual is not a warranty of specific product features. Changes, which conduce to
technical progress, remain reserved.

Wilke Technology GmbH · Heider-Hof-Weg 23D · 52080 Aachen · Germany · +49.2405.408 55-0 · info@wizepanel.de · www.wizepanel.de   2 von 77

Content

Content
1 System.����������������������������������������������������������������������������������������������������������������������������������������������� 7

2 Subsystems.��������������������������������������������������������������������������������������������������������������������������������������� 9

    2.1 LAN subsystem.�������������������������������������������������������������������������������������������������������������������������������������������9

    2.2 RF subsystem.�������������������������������������������������������������������������������������������������������������������������������������������� 10

3 Components.�����������������������������������������������������������������������������������������������������������������������������������11

    3.1 WizePanel–Dispatcher G3.�������������������������������������������������������������������������������������������������������������������� 11

        3.1.1 Components.������������������������������������������������������������������������������������������������������������������������������������ 11

        3.1.2 Technical Data.��������������������������������������������������������������������������������������������������������������������������������� 12

        3.1.3 Startup procedure.�������������������������������������������������������������������������������������������������������������������������� 13

        3.1.4 Factory Settings.������������������������������������������������������������������������������������������������������������������������������ 14

        3.1.5 Function buttons & signal indicators.�������������������������������������������������������������������������������������� 15

        3.1.6 Functions of the HW-Reset-Button.������������������������������������������������������������������������������������������ 16

        3.1.7 Functions of the SW-Reset-Button.������������������������������������������������������������������������������������������� 17

        3.1.8 Functions of the Setup-Button.�������������������������������������������������������������������������������������������������� 18

        3.1.9 Drilling Template.���������������������������������������������������������������������������������������������������������������������������� 20

    3.2 WizePanel 6.0“ display.��������������������������������������������������������������������������������������������������������������������������� 21

        3.2.1 Components.������������������������������������������������������������������������������������������������������������������������������������ 21

        3.2.2 Technical Data.��������������������������������������������������������������������������������������������������������������������������������� 22

        3.2.3 Startup Procedure.�������������������������������������������������������������������������������������������������������������������������� 23

        3.2.4 Function Keys.����������������������������������������������������������������������������������������������������������������������������������� 24

        3.2.5 Status.�������������������������������������������������������������������������������������������������������������������������������������������������� 25

        3.2.6 Drilling Template.���������������������������������������������������������������������������������������������������������������������������� 27

    3.3 WizePanel 9.7“ Display.��������������������������������������������������������������������������������������������������������������������������� 28

        3.3.1 Components.������������������������������������������������������������������������������������������������������������������������������������ 28

        3.3.2 Technical Data.��������������������������������������������������������������������������������������������������������������������������������� 29

Wilke Technology GmbH · Heider-Hof-Weg 23D · 52080 Aachen · Germany · +49.2405.408 55-0 · info@wizepanel.de · www.wizepanel.de                             3 von 77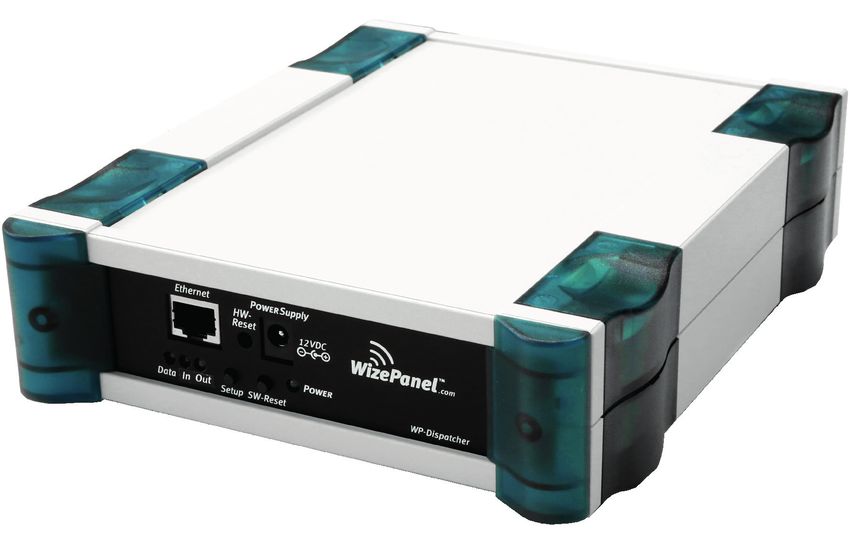
Content

        3.3.3 Startup Procedure.�������������������������������������������������������������������������������������������������������������������������� 30

        3.3.4 Function button.������������������������������������������������������������������������������������������������������������������������������ 32

        3.3.5 Status.�������������������������������������������������������������������������������������������������������������������������������������������������� 33

        3.3.6 Anti-Theft Device.���������������������������������������������������������������������������������������������������������������������������� 35

        3.3.7 Drilling Template.���������������������������������������������������������������������������������������������������������������������������� 35

    3.4. WizePanel 6“ Quadro.���������������������������������������������������������������������������������������������������������������������������� 36

        3.4.1 Function button.������������������������������������������������������������������������������������������������������������������������������ 37

        3.4.2 Drilling Template.���������������������������������������������������������������������������������������������������������������������������� 38

    3.5 WizePanel 9,7“ Quadro.�������������������������������������������������������������������������������������������������������������������������� 39

        3.5.1 Drilling Template.���������������������������������������������������������������������������������������������������������������������������� 40

4 Installation.��������������������������������������������������������������������������������������������������������������������������������������41

    4.1 Network- and Firewall Configuration.���������������������������������������������������������������������������������������������� 41

        4.1.1 One subnetwork | Firewall-Exceptions.����������������������������������������������������������������������������������� 41

        4.1.2 One subnetwork | Firewall-Exceptions.����������������������������������������������������������������������������������� 41

        4.1.3 Multiple subnetworks | Port-Forwarding & Firewall-Exceptions.����������������������������������� 42

        4.1.4 Multiple subnetworks | Port-Forwarding & Firewall-Exceptions.����������������������������������� 42

        4.1.5 Multiple subnetworks | Port-Forwarding & Firewall-Exceptions.����������������������������������� 42

    4.2 Java Runtime Environment 32-bit Version.������������������������������������������������������������������������������������� 43

    4.3 WizePanel-Server and Studio.�������������������������������������������������������������������������������������������������������������� 44

        4.3.1 WizePanel-Server Service.������������������������������������������������������������������������������������������������������������ 45

        4.3.2 Starting WizePanel-Studio.���������������������������������������������������������������������������������������������������������� 45

        4.3.3 Managing Users.������������������������������������������������������������������������������������������������������������������������������ 46

        4.3.4 Managing Dispatchers and WizePanels.��������������������������������������������������������������������������������� 47

        4.3.5 Send Image.��������������������������������������������������������������������������������������������������������������������������������������� 50

5 WizePanel-Adapters.����������������������������������������������������������������������������������������������������������������������52

    5.1 MS Exchange 365 (Graph).�������������������������������������������������������������������������������������������������������������������� 53

Wilke Technology GmbH · Heider-Hof-Weg 23D · 52080 Aachen · Germany · +49.2405.408 55-0 · info@wizepanel.de · www.wizepanel.de                             4 von 77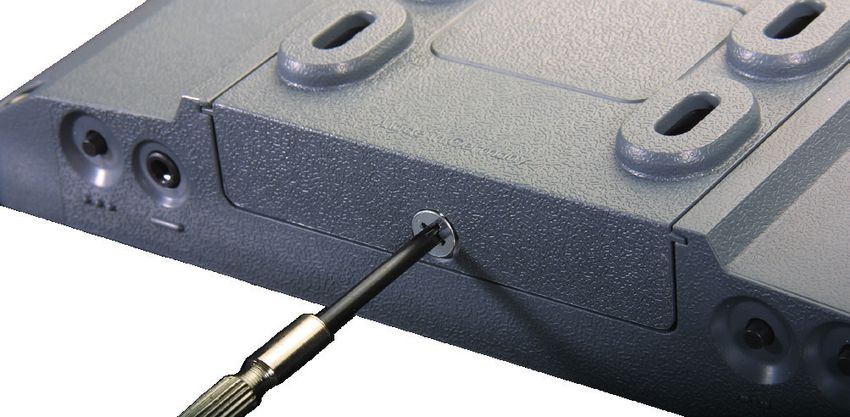
Content

        5.1.1 Registering the App in Azure Active Directory.�������������������������������������������������������������������� 53

        5.1.2 Configuring the Adapter in WizePanel-Studio.��������������������������������������������������������������������� 59

    5.2 MS Exchange 2010 SP2+ (EWS) .�������������������������������������������������������������������������������������������������������� 60

    5.3 Google Calendar (*.ics).�������������������������������������������������������������������������������������������������������������������������� 61

    5.4 MS Excel (*.csv).����������������������������������������������������������������������������������������������������������������������������������������� 62

    5.5 XML (*.xml).������������������������������������������������������������������������������������������������������������������������������������������������ 64

    5.6 iCalendar (*.ics).���������������������������������������������������������������������������������������������������������������������������������������� 65

    5.7 Wilke HTTP.������������������������������������������������������������������������������������������������������������������������������������������������� 66

    5.8 DEA Event Management System (EMS).������������������������������������������������������������������������������������������ 67

    5.9 aSc TimeTables.����������������������������������������������������������������������������������������������������������������������������������������� 68

    5.10 WizePanel Universal Protocol Interface (UPI).����������������������������������������������������������������������������� 68

    5.11 Self-Signed Certificates.���������������������������������������������������������������������������������������������������������������������� 69

        5.11.1 Symptoms.��������������������������������������������������������������������������������������������������������������������������������������� 69

        5.11.2 Export the certificate to a PEM-file.���������������������������������������������������������������������������������������� 69

        5.11.3 Import the PEM-file to Java.������������������������������������������������������������������������������������������������������ 70

6 Configuration of a WizePanel.������������������������������������������������������������������������������������������������������71

7 Editor - Templates and Placeholders.�����������������������������������������������������������������������������������������72

    7.1 List of actual placeholders:.������������������������������������������������������������������������������������������������������������������ 74

8 History.���������������������������������������������������������������������������������������������������������������������������������������������76

Wilke Technology GmbH · Heider-Hof-Weg 23D · 52080 Aachen · Germany · +49.2405.408 55-0 · info@wizepanel.de · www.wizepanel.de                           5 von 77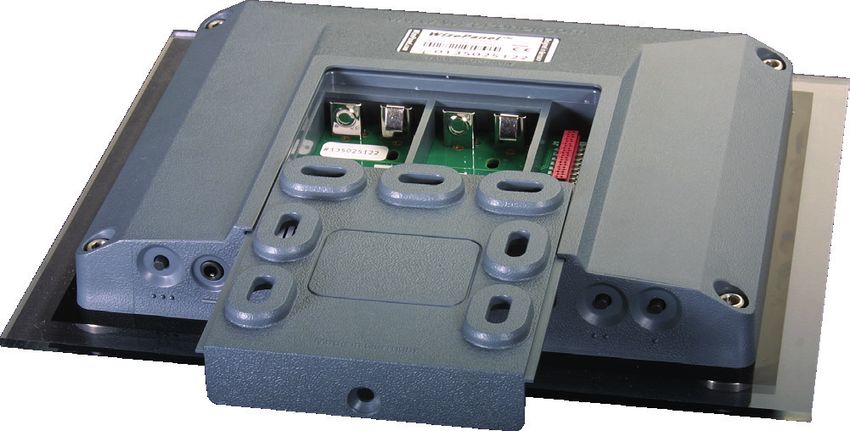
Content

Wilke Technology GmbH · Heider-Hof-Weg 23D · 52080 Aachen · Germany · +49.2405.408 55-0 · info@wizepanel.de · www.wizepanel.de   6 von 77
1 System

1 System
The following chapters will describe in detail the structure, function and configuration of a WizePanel-System.

The whole system is fundamentally composed from two subsystems.

•         The LAN subsystem connects all local area network components.
•         The RF subsystem connects all wireless components.

The following graphic shows a simple WizePanel-System with all main components…

Wilke Technology GmbH · Heider-Hof-Weg 23D · 52080 Aachen · Germany · +49.2405.408 55-0 · info@wizepanel.de · www.wizepanel.de   7 von 77
1 System

                                                                                                                                  System

                                                   Display 9,7“

                                                   868 MHz

                                                                                   Display 6“

                Display 9,7“
                                           Dispatcher

                                                                                                                        Display 9,7“
                                                                                                 868 MHz

                                                               Display 6“
 WizePanel                                                                                 Dispatcher
  Studio

               WizePanel
                Server                                                                                                           Display 9,7“

In total we recognize six display units (WizePanels) of different sizes as wireless radio controlled components.
Additionally there are two socalled WizePanel-Dispatchers. Dispatchers have a radio and a LAN interface,
so they can be seen as a gateway between the RF subsystem and the LAN subsystem. On the LAN-side the
dispatchers communicate with the WizePanel-Server, which is the central management Software of the whole
system.

The already mentioned configuration is done by an administration application called WizePanel-Studio. Of
course this tool may be started at any workstation in the network. Here you can observe the status of the
whole system or of single components, you are able to change the configuration and you are able to create
images and send to your WizePanel-Displays.

Number of displays may be used and configured. Each display can be moved around freely due to the battery
concept. The only condition we have to mind is keeping the display in the receive/transmission range of at
least one WizePanel-Dispatcher.

Wilke Technology GmbH · Heider-Hof-Weg 23D · 52080 Aachen · Germany · +49.2405.408 55-0 · info@wizepanel.de · www.wizepanel.de          8 von 77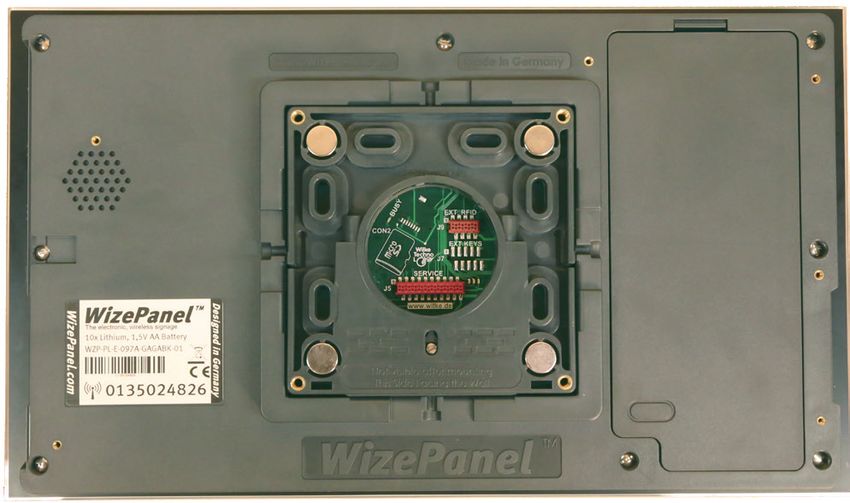
2 Subsystems

2 Subsystems
As described before the WizePanel-System is composed from a LAN and an RF subsystem. In the following we
will have a look on their characteristics.

2.1 LAN subsystem
Connecting all WizePanel components offering an ethernet connector, results in a more or less simple LAN
subsystem. During installation we recommend to first establish a running LAN subsystem. We will show how
to do this, in the sections describing the different components and the administration tool.

Configuration of LAN subsystem components is in general an assignment of LAN typical parameters, like IP
addresses (either manual or by means of a DHCP server).

As seen in the graphics, the LAN is the essential connection between WizePanel-Dispatchers and the
dedicated WizePanel-Server. Radio frames either transmitted or received at one of the Dispatchers have to
cross the LAN cables in one or another direction coming from or going to the server.

The administration tool WizePanel-Studio is used for the configuration of the whole system (including the LAN
components and the wireless components). The tool may be started on different workstations. During
installation the ideal place is a notebook, which may be carried around from room to room to configure
components in their natural environment and put them into the system.

Wilke Technology GmbH · Heider-Hof-Weg 23D · 52080 Aachen · Germany · +49.2405.408 55-0 · info@wizepanel.de · www.wizepanel.de      9 von 77
2 Subsystems

2.2 RF subsystem
The following graphics show the different components of the WizePanel-RF subsystem.
We already know the WizePanel-Dispatcher as the gateway between LAN and RF subsystem. There we also
already mentioned, that the dispatcher needs some configuration (e.g. IP-address, port number, etc.) for the
correct LAN functionality.

Wilke Technology GmbH · Heider-Hof-Weg 23D · 52080 Aachen · Germany · +49.2405.408 55-0 · info@wizepanel.de · www.wizepanel.de     10 von 77
3 Components

3 Components
The WizePanel system is composed from several basic components, which are described in the following
sections in detail.

3.1 WizePanel–Dispatcher G3
The WizePanel-Dispatcher G3 serves as an intelligent gateway between the LAN subsystem and the
RF subsystem. Commands coming from the server are stored inside the Dispatcher, waiting for the correct
WizePanel-Display to wake up and deliver the command. In the opposite direction status information (e.g.
battery status) coming from the WizePanel-Displays is received and immediately transmitted to the server for
further processing.

3.1.1 Components

1. WizePanel-Dispatcher G3

2. 12V AC/DC adapter including changeable
AC-plugs (EU, UK, US)

3. Ethernet LAN cable, RJ-45, Cat-5

Wilke Technology GmbH · Heider-Hof-Weg 23D · 52080 Aachen · Germany · +49.2405.408 55-0 · info@wizepanel.de · www.wizepanel.de     11 von 77
3 Components

3.1.2 Technical Data

Features                                                                     Technical Parameter
     • 100 BASE-TX Ethernet connection                                              •   Power consumption: 2 W
     • Ultra low power radio module with                                            •   IP-Address: DHCP,
        868 MHz ISM band                                                                Standard IP: 192.168.1.209
     • Integrated or external antenna                                               •   Ethernet - Specification: 100 BASE-TX
     • Horizontal and vertikal usage
     • Power supply 100 VAC - 240 VAC                                        Absolute Maximum Ratings
        or POE (Power over Ethernet)                                                •   Power supply: max. 264 VAC
     • Power adapter: 12 VDC at low voltage input                                   •   Frequency of the power supply: 47 Hz ... 440 Hz
     • Status LEDs: 1x Data Ethernet (green)
        		              1x Radio in (yellow)                                 Radiomodul
        		              1x Radio out (Blue)                                      • Frequency: 868 MHz
     • 3 Buttons:       1x Configuration                                         • 			        ISM band
        		              1x Software-Reset                                        • Reach:		   up to 400 m on free range.
        		              1x Hardware-Reset                                          		         Within buildings according
Casting                                                                            		         to circumstances correspon
     • Casing protection class: IP40/DIN 6N 60529                                  		dinglyless
     • Fire protection classification: UL 94 HB 1,6                          Dimensions
     • Casing color: light grey (RAL 7035)                                          •   Dimensions:           ca. 206 x 177 x 55 mm
     • Casing material: ABS                                                         •   Weight: 		            ca. 540g

Wilke Technology GmbH · Heider-Hof-Weg 23D · 52080 Aachen · Germany · +49.2405.408 55-0 · info@wizepanel.de · www.wizepanel.de     12 von 77
3 Components
3.1.3 Startup procedure
The WizePanel-Dispatcher G3 may be placed standing or mounted on the wall. For the wall mount the
WizePanel-Dispatcher G3 is supplied with 4 special assembly parts on the bottom side for easy installation:
177 mm 55 mm
206 mm
206 mm
At the end of this chapter you will find a drilling template for the wall mount of the WizePanel-Dispatcher G3.
Please print the page unscaled from this PDF file to use it as a template. Attention: Already printed versions of
this page could be scaled and therefore differ in size.
1. Please take the AC/DC adapter and choose the 2. Connect the selected AC plug with the AC/DC
fitting AC plug for your country (in the image the adapter by pushing it on the pro-vided socket.
EU plug was selected).
Wilke Technology GmbH · Heider-Hof-Weg 23D · 52080 Aachen · Germany · +49.2405.408 55-0 · info@wizepanel.de · www.wizepanel.de 13 von 773 Components 3. Please plug in the network cable to connect your WizePanel-Dispatcher G3 to your local network (either via switch or hub). 4. Now connect the AC plug of the AC/DC adapter with your 230V power supply and push the 12V plug into the connector „Power Supply“ of the WizePanel-Dispatcher G3. As soon as the power supply is established the startup procedure of the Dispatcher starts. 5. At first all 4 LEDs („Power“, „Data“, „In“ and „Out“) are turned ON and the Dispatcher starts its operating system. This procedure may take up to 45 seconds. After that the Dispatcher application is started. As a confirmation the „Data“, „In“ and „Out“ LEDs are turned OFF. After all tasks of the Dispatcher started successfully, you will get two short beeps together with two flash of the „Out“ – LED (blue) as a confirmation. 3.1.4 Factory Settings The WizePanel-Dispatcher G3 will be delivered with following factory settings: IP Address 192.168.1.209 Subnet Mask 255.255.255.0 Standard Gateway 192.168.1.254 TCP and UDP Ports 8000 DHCP Usage on UDP Broadcast on Changes of the factory settings can be made by using the WizePanel-Studio or by pressing the Setup-Button immediately on the Dispatcher for a specific time. Detailled description according this setting you will find in the chapter „WizePanel-Server and Studio“ and in the section „Functions of the Setup-Button“. Wilke Technology GmbH · Heider-Hof-Weg 23D · 52080 Aachen · Germany · +49.2405.408 55-0 · info@wizepanel.de · www.wizepanel.de 14 von 77
3 Components

3.1.5 Function buttons & signal indicators

Wilke Technology GmbH · Heider-Hof-Weg 23D · 52080 Aachen · Germany · +49.2405.408 55-0 · info@wizepanel.de · www.wizepanel.de     15 von 77
3 Components

3.1.6 Functions of the HW-Reset-Button

                                                                              The HW-Reset-Button of the WizePanel–Dispatcher
                                                                              G3 may be pushed by e.g. a ballpen or any other
                                                                              spiky utensil.

By pressing this Button, similar to applying the power supply, a hardware system restart of the Dispatcher is
initiated. The start of the operating system and all necessary components is done with all LEDs turned ON. This
takes about 45 seconds. After that the „Data“, „In“ and „Out“ LEDs are turned OFF and the Dispatcher
application starts with configured settings. The end of the restart procedure is indicated by 2 beeps together
with
2 fast blinks of the blue „Out“-LED.

Wilke Technology GmbH · Heider-Hof-Weg 23D · 52080 Aachen · Germany · +49.2405.408 55-0 · info@wizepanel.de · www.wizepanel.de     16 von 77
3 Components 3.1.7 Functions of the SW-Reset-Button By pressing the „SW-Reset“ button for longer than 1 second the software reset procedure is initiated. Keeping the button pressed for a longer time the „Out“-LED starts blinking once a second. After releasing the button the „Out“-LED will flashes 2 times as a confirmation. The software reset procedure only restarts the dispatcher application and not the whole operating system. The end of the restart procedure is indicated by 2 times beep together with 2 times fast flashes of the blue „Out“-LED. Wilke Technology GmbH · Heider-Hof-Weg 23D · 52080 Aachen · Germany · +49.2405.408 55-0 · info@wizepanel.de · www.wizepanel.de 17 von 77
3 Components

3.1.8 Functions of the Setup-Button

1. Activate static TCP/IP-Setting

The Setup-Button is pressed for 3 seconds. The blue Transmit-LED flashes 3 times. After releasing the button
the configured TCP/IP settings are enabled and the DHCP usage is turned off. As confirmation the blue
Transmit-LED flashes 2 times.

IP Address 		                   static value		                   (default: 192.168.1.209)
Subnet Mask 		                  static value		                   (default: 255.255.255.0)
Standard Gateway                static value		                   (default: 192.168.1.254)
TCP and UDP Ports               static value		                   (default: 8000)
DHCP Usage 		                   off

2. Activate DHCP-Usage

The Setup-Button is pressed for 5 seconds. The blue Transmit-LED flashes 5 times. After releasing the button
the DHCP–Usage is activated and a DHCP request is started. If the DHCP request is not successful, the static
TCP/IP settings are used until the next restart of the Dispatcher. As confirmation the blue Transmit-LED flashes
3 times.

DHCP Usage		                    on

3. Deactivate UDP Broadcast

The Setup-Button is pressed for 7 seconds. The blue Transmit-LED flashes 7 times. After releasing the button
the transmission of UDP broadcast messages is deactivated. As confirmation the blue Transmit-LED flashes 4
times.

UDP Broadcast		                 off

Wilke Technology GmbH · Heider-Hof-Weg 23D · 52080 Aachen · Germany · +49.2405.408 55-0 · info@wizepanel.de · www.wizepanel.de     18 von 77
3 Components

4. Activate Factory Setting

The Setup-Button is pressed for 10 seconds. The blue Transmit-LED flashes 10 times. After releasing the
button the WizePanel – Dispatcher G3will be reset to the factory settings (see this section above). As confirma-
tion the blue Transmit-LED flashes 2 times After reaching the factory set-tings the device performs a complete
Reset.

IP Address 			       192.168.1.209
Subnet Mask 			      255.255.255.0
Standard Gateway 		  192.168.1.254
TCP and UDP Ports 		 8000
DHCP Usage 			       on
UDP Broadcast			on

5. Activate UDP Unicast

The Setup-Switch is pressed for 12 seconds. The blue Transmit-LED flashes12 times. After releasing the button
UDP information will be sent to the IP-Address that corresponds to the DNS name „WizePanelServer“ which
must be known to the used DNS Server.
As confirmation the blue Transmit-LED flashes 2 times.

6. Request DHCP Usage / UDP Broadcast Settings

The Setup-Switch is pressed for 1 second. The blue Transmit-LED flashes 1 time. After releasing the button
the blue Transmit-LED shows the settings of DHCP Usage and UDP Broadcast by flash codes. Is more than one
setting to report the flash codes are separated by a break of 2 seconds.

3 x flashes retime		                       DHCP Usage off
5 x flashes retime		                       DHCP Usage on
7 x flashes retime		                       UDP Broadcast off
12x flashes retime		                       UDP Unicast on

Wilke Technology GmbH · Heider-Hof-Weg 23D · 52080 Aachen · Germany · +49.2405.408 55-0 · info@wizepanel.de · www.wizepanel.de     19 von 77
3 Components

3.1.9 Drilling Template

Drilling template of the wall mount. Dimensions in mm:
                                                                                                                                          20 mm
please print in 1:1 (do not scale!)                                                                                              5 mm
 206 mm

                                                                             177 mm

Wilke Technology GmbH · Heider-Hof-Weg 23D · 52080 Aachen · Germany · +49.2405.408 55-0 · info@wizepanel.de · www.wizepanel.de      20 von 77
3 Components
3.2 WizePanel 6.0“ display
The WizePanel 6.0” display unit contains an electrophoretic display (ePaper). The pixels of such display can
keep a programmable state (4bit greyscale) without consuming any power. The display content may be
changed by radio transmission, so that the whole unit works wireless.
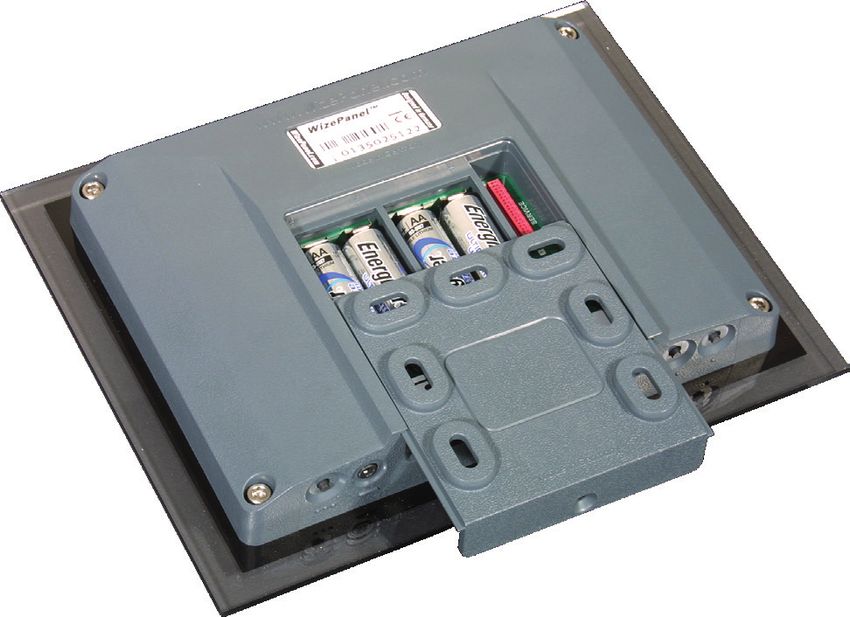
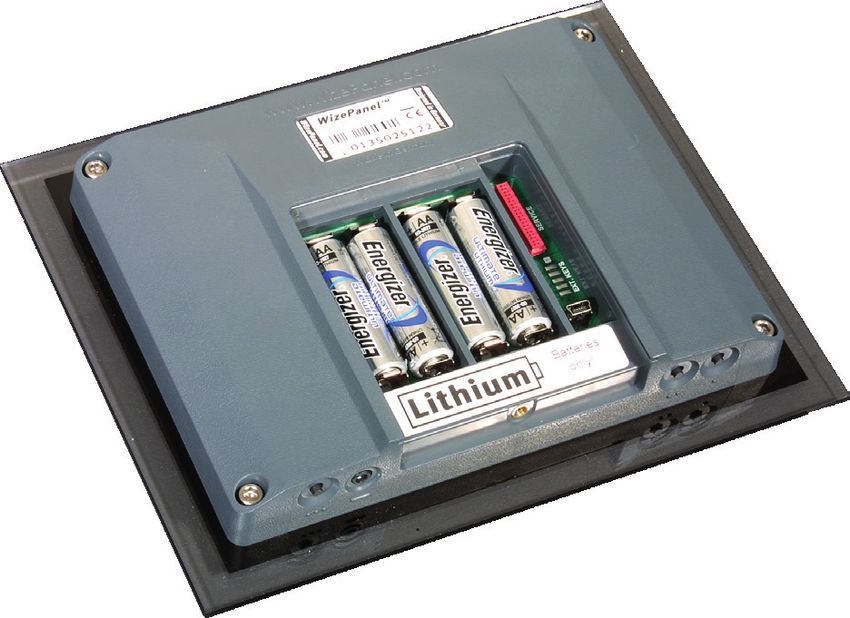
3.2.1 Components
1. WizePanel 6.0”
2. Wall mount for WizePanel 6.0” (classic)
3. 4 screws and 4 dowels to connect the wall mount
4. 4 x lithium batteries, size AA, 1.5 V
Please only use lithium batteries!
In the countries of the EU:
Used batteries are marked with a crossed-out-wheelie bin and are strictly forbidden to discar within
the household waste. The enduser has to discard the used batteries at the sales point or the local
collection scheme to make sure they are professionally recycled or disposed of. Batteries potentially
contain hazardous substances, posing a risk for health and the environment.
Wilke Technology GmbH · Heider-Hof-Weg 23D · 52080 Aachen · Germany · +49.2405.408 55-0 · info@wizepanel.de · www.wizepanel.de 21 von 773 Components
3.2.2 Technical Data
Front Classic
custom specific colors and designs
on request
Display Power Supply
• 6.0-inch ePaper, monochrome • 2 or 4 x AA-batteries, 1.5 V, lithium-system
• 800 x 600 pixels, 16 greyscale, high contrast, • Article-Nr.: WZP-BAT4-EL
true paper white
• pixel density 0,151 mm
Weight
• about 660 g (without batteries)
RF
• Frequency 868,3 MHz, ultra low power
• Range up to 300m free field, inside of Dimensions
buildings less depending on the conditions • Overall incl. Front panel 213 mm x 170 mm x
41,6 mm (WxHxD)
• Electronic Display Area 122 mm x 89 mm
Case (WxH)
• Material ABS, UV-resistant
• Protection IP20
• Color Iron Grey (RAL 7011) Article-Nr.:
• WZP-PL-E-060A-GSGABK-01
Front
• Standard front panel
• Replaceable front with/without visible
screws
• Custom specific design of front panel on
request possible
Wilke Technology GmbH · Heider-Hof-Weg 23D · 52080 Aachen · Germany · +49.2405.408 55-0 · info@wizepanel.de · www.wizepanel.de 22 von 773 Components 3.2.3 Startup Procedure At the end of this chapter you will find a ready-made drilling template for the wall mount of the WizePanel 6.0“ display units. Please be sure to print the template page unscaled immediately from the pdf file for correct scaling of the template. ATTENTION: Already printed versions of the template page could have been scaled and therefore differ in size. 1. Please put the WizePanel 6.0 with the frontside down on a clean, slip-free desk. 2. Release the fixing bolt from the wall mount. 3. Pull the wall mount out of the WizePanel 6.0. 4. Now drill four holes by help of the drilling template from this chapter, punch in the dowels and fix the wall mount with the screws. Wilke Technology GmbH · Heider-Hof-Weg 23D · 52080 Aachen · Germany · +49.2405.408 55-0 · info@wizepanel.de · www.wizepanel.de 23 von 77
3 Components

5. Put 4 batteries into the battery compartment.
The WizePanel 6.0 will start immediately. On the
display you still see the image left there from the
manufacturer.

6. Now push the WizePanel 6.0 back on the already
fixed wall mount and secure it with the fixing bolt.

3.2.4 Function Keys

Wilke Technology GmbH · Heider-Hof-Weg 23D · 52080 Aachen · Germany · +49.2405.408 55-0 · info@wizepanel.de · www.wizepanel.de     24 von 77
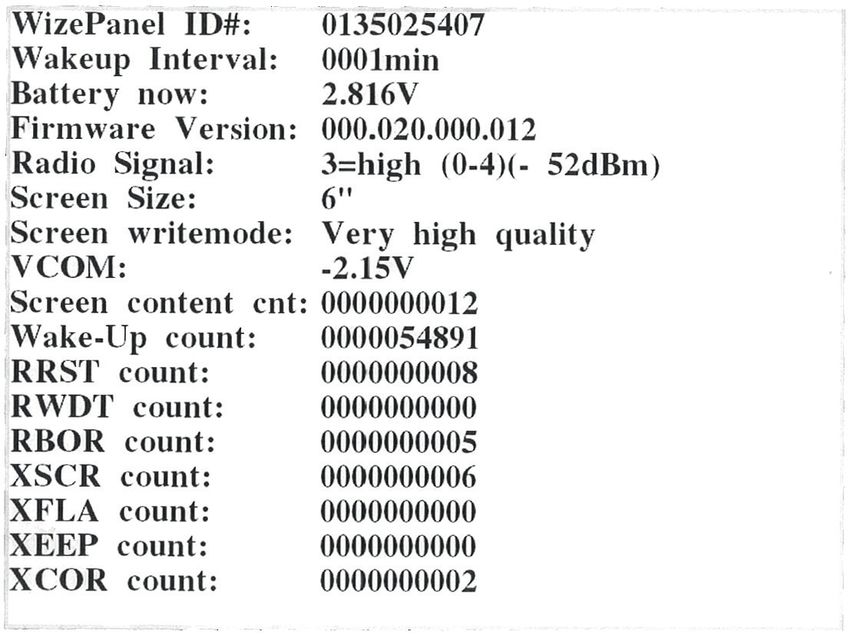
3 Components

3.2.5 Status
After pressing the status button a status information screen is shown on the display for 60 seconds:

WizePanel ID#
The ID-number of the WizePanel 6.0. The ID number is assigned by the manufacturer and identifies the
WizePanel-Display (also used in WizePanel-Studio).

Wakeup Interval
The interval in minutes in which the WizePanel-Display is turned on, to check by radio if a new image is
available. After the request the WizePanel 6.0 goes back to sleep mode. The predefined interval time is
5 minutes (default).

Battery now
Shows the current charge of the battery in [Volts].

Firmware Revision
The revision number of the implemented firmware.

Wilke Technology GmbH · Heider-Hof-Weg 23D · 52080 Aachen · Germany · +49.2405.408 55-0 · info@wizepanel.de · www.wizepanel.de     25 von 77
3 Components

Radio Signal
Shows the quality of the wireless communication. First a quality benchmark in the range from 0...4 followed by
the Received Signal Strength Indicator (RSSI) in decibel-milliwatts.

Screen Size
The screen size in inch.

Screen writemode
The configured methad the WizePanel uses to refresh the Display.

VCOM
The Display specific VCOM voltage as defined in the firmware (must be identical to the VCOM voltage of the
used display).

Screen content cnt
The screen content Counter counts the number of image changes.

Wake-Up count
The wakeup Counter counts the number of wakeup interval cycles.

RRST count
System Restart Counter (Reset Key).

RWDT count
System Watchdog Reset Counter.

RBOR count
System Brownout Restart Counter.

XSCR count
Screen Update Error Counter.

XFLA count
Flash Access Error Counter.

XEEP count
Eeprom Access Error Counter.

XCOR count
Core Communication Error Counter.

Wilke Technology GmbH · Heider-Hof-Weg 23D · 52080 Aachen · Germany · +49.2405.408 55-0 · info@wizepanel.de · www.wizepanel.de     26 von 77
3 Components

3.2.6 Drilling Template
unit: mm

Wilke Technology GmbH · Heider-Hof-Weg 23D · 52080 Aachen · Germany · +49.2405.408 55-0 · info@wizepanel.de · www.wizepanel.de     27 von 77
3 Components

3.3 WizePanel 9.7“ Display
The WizePanel 9.7-inch display unit contains an electrophoretic display (ePaper). The pixels of such Display
can keep a programmable state (4bit greyscale) without consuming any power. The Display content may be
changed by radio transmission, so that the whole unit works wireless.

3.3.1 Components

1. WizePanel 9.7“

2. Wall mount for WizePanel 9.7“

3. 4 screws and 4 dowels to connect the wall mount

4. 10 x lithium-batteries, size AA, 1.5 V
Please only use lithium batteries!

            In the countries of the EU:
            Used batteries are marked with a crossed-out-wheelie bin and are strictly forbidden to discar within
            the household waste. The end-user has to discard the used batteries at the sales point or the local
            collection scheme to make sure they are professionally recycled or disposed of. Batteries potentially
            contain hazardous substances, posing a risk for health and the environment.

Wilke Technology GmbH · Heider-Hof-Weg 23D · 52080 Aachen · Germany · +49.2405.408 55-0 · info@wizepanel.de · www.wizepanel.de     28 von 77
3 Components
3.3.2 Technical Data
Standard front
panel
Customer specific front panel
many variations available
Display Weight
• 9.7-inch ePaper, monochrome • about 1500 g (without batteries)
• 1200 x 825 pixels, 16 greyscale, high
contrast, true paper white
• pixel density 0,169 mm Dimensions
• Overall incl. Front panel
340 mm x 198 mm x 40,3 mm (WxHxD)
RF • Electronic Display Area
• Frequency 868,3 MHz, ultra low power 202,3 mm x 138,9 mm (WxH)
• Range up to 300m free field, inside of • Customisable Area
buildings less depending on the conditions 100 mm x 184 mm (WxH)
Case Article-Nr.
• Material ABS, UV-resistant • WZP-PL-E-097A-GAGABK-01
• Protection IP20
• Color Iron Grey (RAL 7011)
Product-Variant
• WZP-PL-E-097A-GAGABK-01
Front • WZP-PL-E-097A-O-01
• Standard front panel • WZP-PL-E-097A-X-01
• Replaceable front panel
• Custom specific design of front panel on
request possible
Power Supply
• 10 x AA-batteries, 1.5 V,
lithium-system
• Article-Nr.: WZP-BAT10-EL
Wilke Technology GmbH · Heider-Hof-Weg 23D · 52080 Aachen · Germany · +49.2405.408 55-0 · info@wizepanel.de · www.wizepanel.de 29 von 773 Components 3.3.3 Startup Procedure At the end of this chapter you will find a ready-made drilling template for the wall mount of the WizePanel 9.7-inch display unit. Please be sure to print the template page unscaled immediately from the pdf file for correct scaling of the template. ATTENTION: Already printed versions of the template page could have been scaled and therefore differ in size. 1. Please put the WizePanel 9.7 with the frontside down on a clean, slip-free desk. 2. Press inward the spring mechanism of the wall mount with any applicable item. 3. Now lift the wall mount of the WizePanel case while still pressing the spring mechanism. 4. Adjust the wall mount, so that the two extensions point up. In this position it should be fixed to the wall. Wilke Technology GmbH · Heider-Hof-Weg 23D · 52080 Aachen · Germany · +49.2405.408 55-0 · info@wizepanel.de · www.wizepanel.de 30 von 77
3 Components

5. Now drill four holes by help of the drilling
template from this chapter, punch in the dowels and
fix the wall mount with the screws.

  Attention:
  After inserting the first two batteries of the WizePanel 9.7-inch the power supply is stable. This means, that
  also the anti-theft protection is activated.

6. Open the battery compartment of
the WizePanel 9.7-case.

7. Put the batteries in the battery compartment.
Please mind the correct polarity.

Wilke Technology GmbH · Heider-Hof-Weg 23D · 52080 Aachen · Germany · +49.2405.408 55-0 · info@wizepanel.de · www.wizepanel.de     31 von 77
3 Components

9. Now slightly tilt the WizePanel 9.7“. Lift it onto
the wall mount, so that the extensions of the wall
mount fit into the notches of the WizePanel 9.7“-case.
Push the case into the vertical position again. While
doing that the wall mount will click into the
WizePanel 9.7“ case.

3.3.4 Function button

Wilke Technology GmbH · Heider-Hof-Weg 23D · 52080 Aachen · Germany · +49.2405.408 55-0 · info@wizepanel.de · www.wizepanel.de     32 von 77
3 Components

3.3.5 Status
After pressing the status button a status information screen is shown on the display for 60 seconds:

WizePanel ID#
The ID-number of the WizePanel 9.7. The ID number is assigned by the manufacturer and identifies the
WizePanel display (also used in WizePanel-Studio).

Wakeup Interval
The interval in minutes in which the WizePanel-Display is turned on, to check by radio if a new image is
available or not. After the request the WizePanel 9.7 goes back to sleep mode. The predefined interval time is 5
minutes (default).

Battery now
Shows the current change of the battery in Volts.

Firmware Revision
The revision number of the implemented firmware.
Radio Signal

Wilke Technology GmbH · Heider-Hof-Weg 23D · 52080 Aachen · Germany · +49.2405.408 55-0 · info@wizepanel.de · www.wizepanel.de     33 von 77
3 Components

Shows the quality of the wireless communication. First a quality benchmark in the range from 0...4 followed by
the Received Signal Strength Indicator (RSSI) in decibel-milliwatts.

Screen Size
The screen size in [inch].

Screen writemode
The configured method the WizePanel uses to refresh the Display.

VCOM
The display specific VCOM voltage as defined in the firmware (must be identical to the VCOM voltage of the
used display).

Screen content cnt
The screen content counter Counts the number of image changes.

Wake-Up count
The wakeup Counter counts the number of wakeup interval cycles.

RRST count
System Restart Counter (Reset Key).

RWDT count
System Watchdog Reset Counter.

RBOR count
System Brownout Restart Counter.

XSCR count
Screen Update Error Counter.

XFLA count
Flash Access Error Counter.

XEEP count
Eeprom Access Error Counter.

XCOR count
Core Communication Error Counter.

Wilke Technology GmbH · Heider-Hof-Weg 23D · 52080 Aachen · Germany · +49.2405.408 55-0 · info@wizepanel.de · www.wizepanel.de     34 von 77
3 Components

3.3.6 Anti-Theft Device
The anti-theft device is activated already after inserting the first two batteries into the battery compartment
of the WizePanel 9.7” display units.

If you separate the wall mount from the WizePanel 9.7-inch display unit an alarm tone will sound until both
parts are joined together again.

3.3.7 Drilling Template
unit: mm

Wilke Technology GmbH · Heider-Hof-Weg 23D · 52080 Aachen · Germany · +49.2405.408 55-0 · info@wizepanel.de · www.wizepanel.de     35 von 77
2 Subsystems

3.4. WizePanel 6“ Quadro

Display                                                  Power supply
     • High resolution 6,0“ monochrome ePaper Display        • 6 x AA-Lithium prime cells, 1.5 V
     • Ultra low power consumption                           • Recommendation: Energizer Ultimate
     • 800 x 600 pixel / 16 greyscales                          Lithium, long battery lifetime (depending on
     • Brilliant display of text, graphics                      usage profile up to 20 years)
        and photos
     • New Pearl technology with high contrast,          Dimensions
        180°reading angle and best visibility even in        • External dimensions without front:
        bright environments                                     ca. 183 x 176 x 18 mm (w x h x d)
     • Pixel density: ca. 166 dpi                            • Display:
                                                                ca. 122 x 91 mm (w x h)
Casing
     • Casing protection class: IP20                     Weight
     • Environment: 0 - 40 °C dry room                       • ca. 710 g
     • Fire protection classification: UL 94 V0              • without batteries, incl. front plate & wall
     • Casing color: Iron grey (RAL 7011)                       mount.
     • Casing material: ABS                                  • The weight can change depending on the
     • Interchangeable front plate, default front plate,        front plate.
        customer specific front plate

Radio
    • 868 MHz ultra low power radio
    • Reach up to 400 m on free range. Within buildings
      according to circumstances correspondingly less.

Wilke Technology GmbH · Heider-Hof-Weg 23D · 52080 Aachen · Germany · +49.2405.408 55-0 · info@wizepanel.de · www.wizepanel.de     36 von 77
2 Subsystems
3.4.1 Function button
Reset
Display
Info Wake-Up
Wilke Technology GmbH · Heider-Hof-Weg 23D · 52080 Aachen · Germany · +49.2405.408 55-0 · info@wizepanel.de · www.wizepanel.de 37 von 772 Subsystems
3.4.2 Drilling Template
10 mm
20 mm
26 mm
56 mm
98 mm
60 mm
91 mm
36 mm
49 mm
Itemref Quantity Title/Name, designation, material, dimension etc
Drawn by Checked by Approved by - date File name
3 4 5 6 7
Wilke Technology GmbH · Heider-Hof-Weg 23D · 52080 Aachen · Germany · +49.2405.408 55-0 · info@wizepanel.de · www.wizepanel.de 38 von 772 Subsystems
3.5 WizePanel 9,7“ Quadro
Display Power supply
• High resolution 9,7“ monochrome ePaper • 6 x AA-Lithium prime cells, 1.5 V
Display • Recommendation: Energizer Ultimate
• Ultra low power consumption Lithium, long battery lifetime (depending on
• 1200 x 825 pixel / 16 greyscales usage profile up to 20 years)
• Brilliant display of text, graphics •
and photos Dimensions
• New Pearl technology with high contrast, • External dimensions without front:
180°reading angle and best visibility even in ca. 280 x 280 x 20 mm (w x h x d)
bright environments • Display:
• Pixel density: ca. 150 dpi ca. 202,3 x 138,9 mm (w x h)
Gehäuse Weight
• Casing protection class: IP20 • ca. 2200 g
• Environment: 0 - 40 °C dry room • without batteries, incl. front plate & wall
• Fire protection classification: UL 94 V0 mount.
• Casing color: metallic / black (RAL 9005) • The weight can change depending on the
• Casing material: Alu front plate.
• Interchangeable front plate, default front
plate,
customer specific front plate
Radio
• 868 MHz ultra low power radio
• Reach up to 400 m on free range. Within
buildings
according to circumstances correspondingly
less.
Wilke Technology GmbH · Heider-Hof-Weg 23D · 52080 Aachen · Germany · +49.2405.408 55-0 · info@wizepanel.de · www.wizepanel.de 39 von 772 Subsystems
3.5.1 Drilling Template
210 mm
17mm
176 mm
210 mm
17mm
17mm 176 mm 17mm
Wilke Technology GmbH · Heider-Hof-Weg 23D · 52080 Aachen · Germany · +49.2405.408 55-0 · info@wizepanel.de · www.wizepanel.de 40 von 774 Installation
4 Installation
4.1 Network- and Firewall Configuration
The WizePanel-System exchanges data over the network and by default needs access to following ports:
• Communication between WizePanel-Server and WizePanel-Dispatcher:
port 8000 | protocol TCP
port 8000 | protocol UDP
• Communication between WizePanel-Studio and WizePanel-Server:
port 8182 | protocol TCP
It is therefore necessary to configure a firewall present on the computer that runs the WizePanel-Server. When
using the WizePanel-System over multiple subnetworks, the routers inbetween have to be set up to forward
the listed ports. In this case a DNS entry is also needed which resolves the hostname “WizePanelServer” to the
IP-address of the computer that runs WizePanel-Server software.
Exemplary illustration of different network configurations:
4.1.1 One subnetwork | Firewall-Exceptions
4.1.2 One subnetwork | Firewall-Exceptions
Wilke Technology GmbH · Heider-Hof-Weg 23D · 52080 Aachen · Germany · +49.2405.408 55-0 · info@wizepanel.de · www.wizepanel.de 41 von 774 Installation 4.1.3 Multiple subnetworks | Port-Forwarding & Firewall-Exceptions 4.1.4 Multiple subnetworks | Port-Forwarding & Firewall-Exceptions 4.1.5 Multiple subnetworks | Port-Forwarding & Firewall-Exceptions Wilke Technology GmbH · Heider-Hof-Weg 23D · 52080 Aachen · Germany · +49.2405.408 55-0 · info@wizepanel.de · www.wizepanel.de 42 von 77
4 Installation

4.2 Java Runtime Environment 32-bit Version
Both, the WizePanel-Server and the WizePanel-Studio are Java applications, so they need a Java Runtime
Environment for execution. You can download the Java Runtime Environment for free from the website
https://java.com. The latest version usually includes important improvements, to increase performance,
stability and security of the the WizePanel-System and applications.

If you are not sure, which Java Runtime Environment you are using, you can verify your version online at
https://java.com/en/download/installed.jsp („Do I have Java?“, „Java Verification“).

It is strictly recommended to uninstall old releases of the Java Runtime Environment. If you keep old Java
versions on your machine, this may result in a serious security risk. Uninstall of old releases ensures, that only
Java applications according the security and performance standards are running on your system.

You can remove older releases of Java without any risk from your system as explained in detail on the web
page https://java.com/en/download/help/uninstall_java.xml („How do I uninstall Java on my Windows
computer?“).

The Java installation starts by calling the downloaded setup application. Now follow carefully the given
instructions. After accepting the licence agreements, you maybe will be asked to install additional browser
add-ons. We recommend to deselect possible addons, since they are not used to execute the
WizePanel-Software.

After pressing [continue] the installation starts, which may take several minutes. As soon as the message „You
have successfully installed Java“ appears, all requirements are fulfilled to install WizePanel-Server
and WizePanel-Studio.

Wilke Technology GmbH · Heider-Hof-Weg 23D · 52080 Aachen · Germany · +49.2405.408 55-0 · info@wizepanel.de · www.wizepanel.de    43 von 77
4 Installation

4.3 WizePanel-Server and Studio
             WizePanel-Server is central for the WizePanel-System while WizePanel-Studio acts as a user frontend
             for its configuration. The WizePanel-Software is downloadable from the internet. (http://www.
             wizepanel.com)
             After starting the WizePanel installer, please follow the instructions on the screen. Installation starts
             with the welcome screen. When pressing [Next], you will find the license agreements. Please read
             the license agreements carefully and confirm by pressing [I agree].

In the following step you have to define the destination path of the installation. Confirm your choice again by
pressing [Next]. Now select WizePanel-Server and/or -Studio as the components to be installed and confirm
again by pressing [continue].

Wilke Technology GmbH · Heider-Hof-Weg 23D · 52080 Aachen · Germany · +49.2405.408 55-0 · info@wizepanel.de · www.wizepanel.de    44 von 77
4 Installation
On the following page you are asked to define a folder for the start menu. Confirm by pressing [Next]. Now
you have to specify your license file. The license file was delivered during the purchase procedure and verifies
the activation of fee based options. If you don‘t have a licence file the WizePanel-Server works in a limited
mode.
You will see the farewell screen. Pressing [finish] will now end the installation assistance of WizePanel-Server
and/or -Studio.
4.3.1 WizePanel-Server Service
The WizePanel-Server software runs as application after the installation. However, it can also be installed as a
service by executing the following files in the WizePanel-Server installation folder.
• Install the WizePanel-Server service: install_service.bat
• Autostart the WizePanel-Server service: start_service.bat (with administrator rights)
4.3.2 Starting WizePanel-Studio
The WizePanel-Studio application starts with the following pop-up window, where the configuration and
connection parameters to a dedicated WizePanel-Server are requested. So please enter the appropriate IP
address and port number. If you are not yet a registered user, leave the fields for User [default: user] and
Password [default: empty] untouched and confirm by clicking on [Login].
Wilke Technology GmbH · Heider-Hof-Weg 23D · 52080 Aachen · Germany · +49.2405.408 55-0 · info@wizepanel.de · www.wizepanel.de 45 von 774 Installation Now the main window of the WizePanel-Studio application will open: 4.3.3 Managing Users To establish access for multiple users please first select from the menu [WizePanel-Studio] and then [Users]. A configuration window for managing access rights will open. As a default we see the predefined user „user“, who needs no password. To create a new user, click the [New] button. The „New User“ page appears asking for a new user name and password to enter. Confirm the new entry by clicking [OK]. Wilke Technology GmbH · Heider-Hof-Weg 23D · 52080 Aachen · Germany · +49.2405.408 55-0 · info@wizepanel.de · www.wizepanel.de 46 von 77
4 Installation

The new user will be registered now in the system and shown in the managing window. To increase security
you should additionally remove the default user „user“.

4.3.4 Managing Dispatchers and WizePanels
To gain control over the Displays, we have to control the section between Server and Dispatchers (which is
the LAN subsystem) and then the section between Dispatchers and Displays (which is the RF-subsystem).
So we first define, which Dispatchers generally belong to our WizePanel-System, in a second step we allocate
Displays to the Dispatchers.

Move the mouse pointer in the section „Server Explorer“ over the button [Edit] and confirm with the left
mouse button. A matrix view opens, showing all dispatchers (horizontal) and displays (vertical) seen by your
WizePanel-Server.

At the crosspoints you find checkboxes with a percentage value of the Receiver Signal Strength Indicator
(RSSI).

Wilke Technology GmbH · Heider-Hof-Weg 23D · 52080 Aachen · Germany · +49.2405.408 55-0 · info@wizepanel.de · www.wizepanel.de    47 von 77
4 Installation

Now you have to set crosspoints, showing a good (high) RSSI value, which means, that the combination of
Dispatcher and Display at your location has a good wireless signal strength and therefore a good
communication quality.

Helpful might be the button [Fieldstrength], which does a calculation by an internal algorithm. The best RSSI
values are shown in bold letters.

Finally check your settings and confirm with [OK]. After successful assignment of Displays to Dispatchers the
server explorer shows a tree view representing the resulting assignments.

In the given example we see some active WizePanel-Dispatchers.

Clicking the left mouse button over one of the Dispatcher or Display icons opens a related properties window
on the right side of the studio window, showing the actual settings of the device.

Clicking the right mouse button instead opens a popup window, allowing to change some parameters or to
trigger specific functions.

Wilke Technology GmbH · Heider-Hof-Weg 23D · 52080 Aachen · Germany · +49.2405.408 55-0 · info@wizepanel.de · www.wizepanel.de    48 von 77
4 Installation

      •    (Rename)		                      adjust the dispatcher name
      •    (Address) 		                    set the network parameters (IP, Port, Gateway, Subnet)
      •    (Timezone)		                    set the timezone (worldwide)
      •    (Firmware Update)               trigger a Firmware Update
      •    (Restart)		                     trigger a Restart
      •    (Ident) 		                      identify the dispatcher
      •    (Delete)		                      remove the dispatcher

Here we like to mention in particular the ident function. The ident function is able to detect Dispatchers. After
clicking the menu [Ident...] an additional popup window opens, where you can select additional functions.

You can choose between [OFF], [AUDIO], [VISUAL] and [AUDIOVISUAL]. After clicking [Send] a command is
send to the selected Dispatcher. Depending on the selected function the Dispatcher will respond with an
acoustic repeated beep and/or with an optical blink of the blue LED. Sending [OFF] will end the activated
function(s).
Clicking [OK] closes the Ident window.

Wilke Technology GmbH · Heider-Hof-Weg 23D · 52080 Aachen · Germany · +49.2405.408 55-0 · info@wizepanel.de · www.wizepanel.de    49 von 77
4 Installation
Clicking the right mouse button on one of the shown WizePanel Displays opens a context menu, where you
can change display specific parameters or trigger functions.
• (Open) shows actual display data including display content
• (Rename) adjust the display name
• (Wakeup Time) set the cyclic wakeup time
• (Rotation) set the orientation (portrait, landscape)
• (Screen Update Method) set the screen update method
• (Send Image) send an image
• (Delete) remove the image
4.3.5 Send Image
As an example and as verification of proper operation we now would like to transmit an image to a WizePanel.
So we need an appropriate image of correct size and quality:
• 6.0-inch: bmp, png, gif, jpg 800 * 600 pixels
• 9.7-inch: bmp, png, gif, jpg 1200 * 825 pixels
If you created such images or you found suitable files, please move the mouse pointer over the menu topic
[Send Image...] and click with the left mouse button. A context menu opens asking you for the path to your
image file.
So now choose the desired image file, below appears in the section „Image Preview“ a small preview of the
image.You can chuse thecolor depth between 1 (black and white) and 4 (16 grayscale) Now press [Send] to
start the transmission.
In the section „Session Logs“ a new entry appears „open (ON_ROUTER)“, telling you, that the image was
transmitted to the Dispatcher. We now have to wait for the next wakeup cycle of the selected Display.
Wilke Technology GmbH · Heider-Hof-Weg 23D · 52080 Aachen · Germany · +49.2405.408 55-0 · info@wizepanel.de · www.wizepanel.de 50 von 77You can also read