Copyright August 13, 2021 Grace Company (Reproduction Prohibited) Version 1.3 - The Grace Company
←
→
Page content transcription
If your browser does not render page correctly, please read the page content below
Copyright August 13, 2021 Grace Company (Reproduction Prohibited) Version 1.3
Important Safety Instructions
Please read all these safety instructions before using this machine.

DANGER - To reduce the risk of electric shock, do not leave the machine unattended when plugged
in. Always unplug this machine from the electric outlet immediately after using and before cleaning.

WARNING - To reduce the risk of burns, fire, electric shock, or injury to persons:

    •   Do not allow this machine to be used as a toy. Pay close attention when this machine is used by
        or near children.
    •   Use this machine only for its intended use as described in this manual. Use only attachments
        recommended by the manufacturer as contained within this manual.
    •   Never operate this machine if it has a damaged cord or plug, it is not working properly, or it has
        been dropped, damaged, or dropped into water. Return the machine to the nearest authorized
        dealer or service center for examination, repair, or electrical or mechanical adjustment.
    •   Never operate the machine with any air openings blocked. Keep ventilation openings of the
        quilting machine free from the accumulation of lint, dust, and loose cloth.
    •   Never drop or insert any object into any opening.
    •   Do not use outdoors.
    •   Do not operate where aerosol (spray) products are being used or where oxygen is being
        administered.
    •   To disconnect, turn all controls to the off position, then remove the plug from the outlet by
        grasping the plug. Do not pull on cord.
    •   Keep fingers away from all moving parts. Special care is required around the quilting machine
        needle.
    •   Always use the proper needle plate. The wrong plate can cause the needle to break.
    •   Do not use bent or damaged needles.
    •   Do not pull or push fabric while stitching. It may deflect the needle, causing it to break.
    •   Switch the quilting machine off when making any adjustments in the needle area, such as
        threading the needle, changing the needle, or changing the presser foot, etc.
    •   Always unplug the quilting machine from the electrical outlet when removing covers, lubricating,
        or when making any other user servicing adjustments mentioned in the instruction manual.

If using this machine in an area with inconsistent input power, it is recommended the surge protector
is connected to a backup battery supply.

Connect this machine to a properly grounded outlet only. See “Grounding Instructions” (next page).

                          SAVE THESE INSTRUCTIONS
                      Do not discard box or packaging
2
Important Safety Instructions
GROUNDING INSTRUCTIONS
This product must be grounded. In the event of malfunction or breakdown, grounding provides a path
of least resistance for electric current to reduce the risk of electric shock. This product is equipped
with a cord that has an equipment-grounding conductor and a grounding plug. Plug the cord from the
quilting machine into a surge protector. The surge protector must be plugged into an appropriate outlet
that is properly installed and grounded in accordance with all local codes and ordinances.
DANGER - Improper connection of the equipment-grounding conductor can result in a risk of electric
shock. The conductor with insulation having an outer surface that is green, with or without yellow
stripes, is the equipment-grounding conductor. If repair or replacement of the cord or plug is necessary,
do not connect the equipment-grounding conductor to a live terminal. Check with a qualified electrician
or serviceman if the grounding instructions are not completely understood, or if in doubt as to whether
the product is properly grounded.
Do not modify the plug provided with the product - if it will not fit the outlet, have a proper outlet
installed by a qualified electrician. Grounding Methods
Figure 61.1
Grounding Methods
Surge
Protector
To Sewing Metal
Machine Screw
Grounding Cover of
Pin Grounded
(A) Outlet Box (B)
Surge
Adapter Protector
To Sewing
Machine
Grounding
Means
Grounding
(C) PIN
(D)
This product is for use on a nominal 120 V circuit, and has a grounding pin as illustrated above (A). A
temporary adapter, shown in (B) and (C), may be used to connect this plug to a 2-pole receptacle (B) if
a properly grounded outlet is not available. The temporary adapter should be used only until a properly
grounded outlet can be installed by a qualified electrician. The green colored rigid ear, lug, and the like,
extending from the adapter must be connected to a permanent ground such as a properly grounded
outlet box cover. Whenever the adapter is used, it must be held in place by the metal screw.
A qualified electrician should be consulted if there is any doubt as to whether an outlet box
is properly grounded.
3Table Of Contents
Important Safety Instructions.............. 2 Adjusting the Hopping Foot................ 61
Machine Specifications.......................... 5 Height Adjustment........................ 61
Machine Layout..................................... 6 Rotation Instructions.................... 62
Ports and Plug-Ins................................. 8 Removal Instructions.................... 64
Included Parts & Tools.......................... 9 Installation Instructions............... 65
Reinstalling the Needle Plate.............. 66
Out-of-the-Box Assembly.....................12 Removal Instructions.................... 66
Installing the Wheels.......................... 13 Installation Instructions............... 67
Installing the Wheel Covers................ 16 Calibrating the Touch Display.............. 68
Assembling the Handlebars................. 17
Connecting the Display....................... 19 Repairs and Diagnostics......................69
Attaching the Thread Mast.................. 20 Checking the Firmware....................... 70
Installing the Upper Encoder.............. 21 Replacing the Encoder Spring............. 71
Installing the Lower Encoder.............. 23 Reinstalling the Hook Holder.............. 74
Turning the Machine On/Off................ 26 Removal Instructions.................... 74
Installation Instructions............... 75
Preparing to Quilt...............................27
Choosing Machine Settings................. 28 Appendix...........................................81
Winding a Bobbin................................ 30 Choosing Your Needle......................... 82
Loading the Bobbin Case..................... 32 Choosing Your Thread......................... 84
Threading the Machine........................ 35 Choosing Your Fabric and Batting....... 87
Troubleshooting Guide........................ 88
Quilting..............................................40 Index................................................... 90
Using the Handlebar Controls............. 41
Using the Precise Quilting Mode......... 42
Using the Cruise Quilting Mode........... 44
Using the Basting Mode...................... 46
Using the Manual Quilting Mode......... 48
Adjusting Thread Tension.................... 50
Tracking Stitch Count and Run Time... 52
Maintaining the Machine......................53
Preparing the Oil Bottle....................... 54
Oiling and Cleaning............................. 55
Changing the Needle........................... 58
Adjusting the Bobbin Cam................... 60
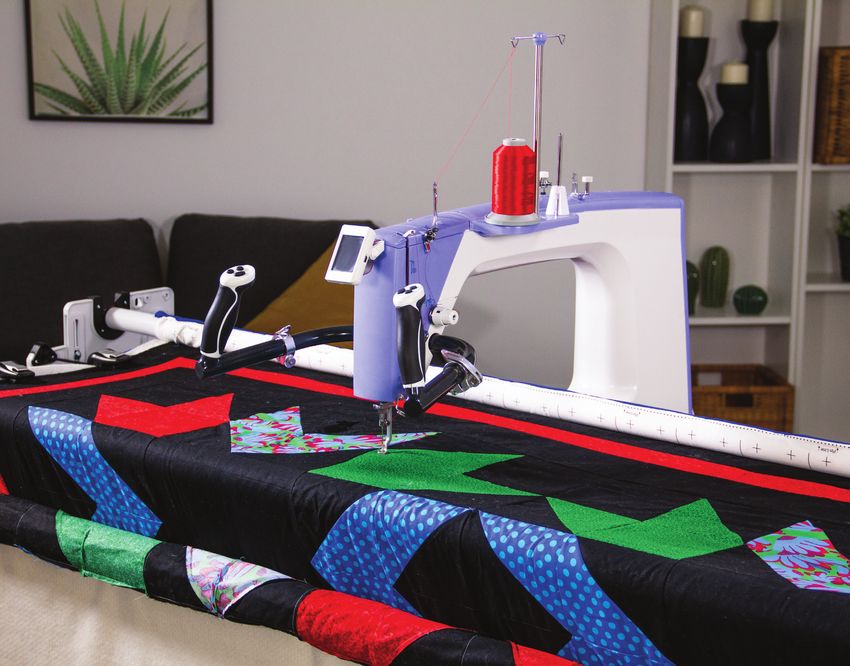
4Machine Specifications
3
4
2
1
5
Product Dimensions Features
Body: •1 Adjustable handles for efficient, extended
• Height: 680.2 mm, or 26.8 inches use (page 17)
• Width: 395.4 mm, or 15.6 inches
•2 2.4” Touch Display (page 19)
• Length: 831.9 mm, or 32.8 inches
• Weight: 15.9 kg, or 35 lbs •3 Dual thread mast and stands for quilting
Quilting Arm: and winding bobbin at the same time
• Height: 224.8 mm, or 8.9 inches •4 Built-in bobbin winder (page 30)
• Width: 482.6 mm, or 19 inches •5 Dual wheels for stability (page 13)
Electrical • Stitcher per minute (SPM) range of 90 to
• Input Voltage: 110-220 VAC 2000 stitches
• Peak Power Consumption: 300 W • Regulated stitching
5Machine Layout
Quilting Machine (Side View)
7
8
5
11 9
6 4 3
12 10
2
13
1
14
19
15
16 20
18
17
1 Hand Wheel
1. 7.
7 Thread Mast (page 20)
Raises and lowers the needle bar. Guides thread when quilting.
2.
2 Bobbin Stand (page 30) 1.
8 Thread Stand (page 35)
Holds the bobbin for winding. Holds a cone of thread.
3.
3 Bobbin Cam (page 30) 2.
9 Thread Guide Rod (page 35)
Starts and stops bobbin winding. Positions thread when quilting.
4.
4 Bobbin Thread Cutter (page 30) •10 Small Thread Tensioner (page 35)
Cuts wound bobbin thread. Tensions thread when quilting.
5.
5 Bobbin Thread Tensioner (page 30) 11
3. Display Port Cover (page 19)
Tensions thread when winding a bobbin. Accesses display ports.
6 Bobbin Thread Guide (page 30)
6. 12 Take-Up Lever (page 35)
•
Positions thread for winding a bobbin. Tensions thread when quilting.
613
4. Display 17
• Needle Bar (page 58)
Provides access to quilting options. Holds the needle when quilting.
5. Handlebar Controls
14 •
18 Hopping Foot (page 61)
Controls machine functions. Presses fabric down when quilting.
•15 Thread Guides (page 35) • Large Thread Tensioner (page 35)
19
Positions thread when quilting. Tensions thread as adjusted when quilting.
16 Lamp (page 28)
6. •
20 Machine Wheels (page 13)
Lights up needle area when machine is on. Shuttles the machine up and down the
bottom carriage.
Hook Assembly (Front View)
21
22
23
24
21 Thread Cutter (page 32)
• 23
• Bobbin Case (page 32)
Cuts excess thread from threading machine. Holds M class bobbin and controls bottom
thread tension.
22 Hook Assembly (page 32)
•
Holds the bobbin case and hooks the top • Hook Assembly Cover (page 32)
24
thread to create stitches. Covers the hook assembly area.
7Ports and Plug-Ins
Machine Rear (Underside View) Machine Front
1 8
9
2
5 3
4
6 7
1 Power On/Off Switch (page 26) 6 Accessory Ports
Turns machine on and off. For accessories.
2 Encoder Ports (page 21) 7 Back Handle Ports
Connects encoders to machine. For back handle accessory.
3 Quilt Motion Tablet Port 8 Display Cable Port (page 19)
For optional automation accessory. Connects display cable to machine.
4 USB Connector Port 9 Display Clip Port (page 19)
For updating only. Connects and holds display.
5 Power Port with Retainer (page 26)
Connects and holds power cable to the
machine.
8Included Parts & Tools
Please make sure all pieces are included in your kit.
Back Wheel Base Front Wheel Front Left Wheel Front Right Wheel
Assembly Base Assembly Base Cover Base Cover
SMP-09-14099 SMP-09-14089 SMP-05-12166 SMP-05-12167
See page 13 See page 13 See page 16 See page 16
Back Left Wheel Back Right Wheel Handlebar Assembly Thread Stand
Base Cover Base Cover Assembly
SMP-05-12164 SMP-05-12165 SMP-09-13176 SMP-09-14104
See page 16 See page 16 See page 17 See page 20
Box 1
SBHCS Screw Shoulder Bolt 2.4 Inch Touch SBHCS Screw
M6 x 20 mm (x2) M6 (x2) Display M4 x 8 mm (x2)
HDW-03-10088 HDW-03-12206 SMP-09-12911 HDW-03-10012
See page 13 See page 13 See page 19 See page 20
Zip Tie (x2) M Class Bobbin (x3) Needle Magnet Needle Size 16 (x10)
Zip Tie Mount (x2) (two pre-installed)
MIS-08-10805 SMP-08-10070 SMP-09-13837 ACC-01-11024
See page 23 See page 30 See page 58 See page 58
9Included Parts & Tools
Box 1 (Continued)
Needle Size 18 (x11) Thumb Screw M3 Hopping Foot Screw SBHCS Screw
(one pre-installed) (needle bar spare) M6 x 16 mm (x4)
ACC-01-11025 HDW-03-11736 HDW-03-10966 HDW-03-10974
See page 58 See page 58 See page 61 See page 16
Box 2
T-handle Allen T-handle Allen T-handle Allen Lint Brush
Wrench 4 mm Wrench 3 mm Wrench 2.5 mm
4 mm 3 mm 2.5 mm
HDW-03-13114 HDW-03-13115 HDW-03-13116 SMP-03-10170
See page 55
Flat-head Hopping Foot Timing Spacer T-handle Allen
Screwdriver Height Tool Wrench 2 mm
2 mm
SMP-03-10169 SMP-03-12171 SMP-03-11320 HDW-03-13117
See page 66 See page 61 See page 77
10Included Parts & Tools
Box 3
Upper Encoder Lower Encoder Upper Encoder Lower Encoder
(silver spring) (black spring) Spring (silver) Spring (black)
SMP-09-10668 SMP-09-13427 HDW-03-10216 HDW-03-10671
See page 21 See page 23 See page 71 See page 71
Box 4
Power Cord Oil Bottle
SMP-02-14466 SMP-09-13888
See page 26 See page 55
11Out-of-the-Box Assembly
These steps are for assembling the machine when it is first removed from the packaging materials.
Your quilting frame should be set up prior to machine assembly.
Installing the Wheels..........................................................................................page 13
Installing the Wheel Covers................................................................................page 16
Assembling the Handlebars.................................................................................page 17
Connecting the Display.......................................................................................page 19
Attaching the Thread Mast..................................................................................page 20
Installing the Upper Encoder..............................................................................page 21
Installing the Lower Encoder..............................................................................page 23
Turning the Machine On/Off................................................................................page 26
Tip: For additional help, scan the QR code below with the camera on your iphone
to visit our online support videos!
https://www.graceframe.com/en/resources/support/videos
12Out-of-the-Box Assembly
Installing the Wheels
Set up the frame before
assembling the machine.
Parts & Tools Needed:
Back Wheel Base SBHCS Screw T-handle Allen Front Wheel Base
Assembly M6 x 20 mm (x2) Wrench 4 mm Assembly
Shoulder Bolt • Tape Measure (not included)
M6 (x2)
Instructions
The machine wheels move the machine across the bottom carriage. To install the machine wheels:
11. Place the back wheel base assembly 2 Screw in place with two SBHCS M6 x 20
1.
under the rear of the machine with the set mm screws and the 4 mm Allen wrench.
screws facing the rear.
Back Wheel
Base Assembly
SBHCS Screw
M6 x 20 mm (x2)
Set Screw
13Out-of-the-Box Assembly
Installing the Wheels (Continued)
3 Place the front wheel base assembly
1. 6 Loosen two set screws on one side of the
under the front of the machine with the set machine (either the right side or left side)
screws facing the rear. with the 4 mm Allen wrench
Front
Wheel Base
Assembly
Set Screw
2. Use the 4 mm Allen wrench to screw in the
4 4.
7 Slide the machine up and down the bottom
shoulder bolts. carriage tracks. The machine should move
smoothly.
Shoulder Bolt
M6 (x2)
5
3. Place the machine onto the bottom 85. Check that the machine is centered over the
carriage, aligning the wheels with the wheels. If needed, shift the machine from
tracks. side to side.
Tip: See your frame manual for bottom
carriage orientation.
14Out-of-the-Box Assembly
Installing the Wheels (Continued)
9 Re-tighten the wheel block set screws with
6.
the 4 mm Allen wrench.
15Out-of-the-Box Assembly
Installing the Wheel Covers
Parts & Tools Needed:
Front Left Wheel Front Right Wheel Back Left Wheel Back Right Wheel
Base Cover Base Cover Base Cover Base Cover
SBHCS Screw T-handle Allen
M6 x 16 mm (x4) Wrench 4 mm
Instructions
11. Locate the label on the inside of each wheel 3 Screw each cover into place using an SBHCS
3.
cover. M6 x 16 mm screw and the 4 mm Allen
wrench. Tighten until snug.
SBHCS Screw
M6 x 16 mm (x4)
22. Slide the covers onto the associated leg.
Back Left
Back Right
Front Left
Front Right
16Out-of-the-Box Assembly
Assembling the Handlebars
Parts & Tools Needed:
T-handle Allen
Handlebar Assembly Wrench 4 mm
Instructions
Take the following steps to install and adjust the handlebars:
11. With the 4 mm T-handle Allen wrench, 21. Slide the handlebars into the slot so that the
remove the handlebar cover screw. handlebar cables are on the bottom.
Handlebar
Cables
The handlebar cover (shown in blue) opens. 1.
3 Press the cover closed and loosely screw in the
cover screw. Note: The cover will not close
fully until tightened.
Cover Screw
17Out-of-the-Box Assembly
Assembling the Handlebars (Continued)
4 Hold the handlebars at the desired angle
1. 7 Twist the controls vertically until they are
2.
and tighten the cover screw. comfortable to hold and operate.
5 Plug the color-coded cables from the
1. 8 Close the handlebar levers.
1.
handlebars into the machine.
6 Open the handlebar levers.
1. Tip: For micro-stippling, angle the
handlebars down toward the fabric in step 4,
and leave the controls horizontal in step 7.
18Out-of-the-Box Assembly
Connecting the Display
Parts & Tools Needed: 3 Slide the display clip into the display clip
3.
port, and plug the display cable into the
display cable port.
Display Cable
Port
2.4 Inch Touch Display
Display Clip Port
Instructions
Take the following steps to install the display:
1.
1 If not already done, plug one end of the 4 Close the display cover.
4.
ribbon cable into the display. Weave the
cable through the display clip.
Display Clip
Ribbon
Cable
2 Lift the display cover on the machine.
2. Note: To remove the display, turn off the
machine. Then unplug the display ribbon cable.
Press down on the clip release and pull out
the display.
Clip Release
19Out-of-the-Box Assembly
Attaching the Thread Mast
Parts & Tools Needed:
Thread Stand T-handle Allen SBHCS Screw
Assembly Wrench 2.5 mm M4 x 8 mm (x2)
Instructions
The thread stand assembly is installed onto the top of the right side of the machine. Take the
following steps:
1 Slide the thread stand assembly over the screw holes on the machine.
1.
Thread Stand
Assembly
SBHCS Screw
M4 x 8 mm (x2)
2 Use the 2.5 mm Allen wrench to screw in two SBHCS M4 x 8 mm screws.
2.
Note: It may be necessary to push back the foam on the thread stand for this step.
20Out-of-the-Box Assembly
Installing the Upper Encoder
Parts & Tools Needed:
Upper Encoder T-handle Allen T-handle Allen
(silver spring) Wrench 4 mm Wrench 2.5 mm
Instructions
The encoders monitor the position of the machine over the frame, allowing for regulated stitching.
The upper encoder is installed on the outward-facing, left-rear wheel of the machine. Please take the
following steps:
11. Use the 4 mm Allen wrench to remove the 1. Loosen the lock collar screw (shown in
2
left rear wheel from the machine. blue) on the upper encoder with the 2.5
mm Allen wrench until the lock collar
turns freely.
Left Rear Wheel
Lock Collar
Note: Depending on the encoder, this step
may require the 2.0 mm Allen wrench.
The wheel screw will not be needed 2. Slide the wheel onto the upper encoder
3
again, and can be stored with the packaging screw so that the wheel hub faces away
materials. from the encoder.
Wheel Hub
Wheel Screw
Encoder Screw
21Out-of-the-Box Assembly
Installing the Upper Encoder (Continued)
3. Place the encoder screw into the left rear
4 6.
7 Plug the encoder cable into one of the
wheel hole so the encoder O-Ring is encoder ports (shown in blue) on the back
between the two left machine wheels. of the machine.
Encoder O-Ring
5
4. Tighten the encoder screw with the 4 mm
Allen wrench.
Encoder
Screw
6
5. Turn the encoder lock collar (shown
in blue) to point up and tighten the lock
collar screw with the 2.5 mm Allen
wrench. Note: Depending on the encoder
model, this step may require the 2.0 mm
Allen wrench.
Lock Collar
Screw
22Out-of-the-Box Assembly
Installing the Lower Encoder
Parts & Tools Needed:
Lower Encoder T-handle Allen T-handle Allen Zip Tie (x2)
(black spring) Wrench 4 mm Wrench 2.5 mm Zip Tie Mount (x2)
Instructions
The encoders monitor the position of the machine over the frame, allowing for regulated stitching.
The lower encoder is installed on the left-rear wheel of the bottom carriage. Please take the following
steps to install the encoder onto the bottom carriage:
11. Locate the left rear wheel of your bottom 1.
3 Use the 4 mm Allen wrench to remove the
carriage. Note: If needed, review your left rear wheel from the bottom carriage.
frame assembly manual to determine the
front of the bottom carriage.
Front
Spacer
Wheel
2. Loosen the lock collar screw (shown in
2 On dual-wheel carriages, remove the
blue) on the lower encoder with the 2.5 mm outward-facing wheel.
Allen wrench until the lock collar turns
freely. Note: Depending on the encoder
model, this step may require the 2.0 mm
Allen wrench.
Lock Collar
Wheel
23Out-of-the-Box Assembly
Installing the Lower Encoder (Continued)
4 Slide the wheel onto the encoder screw,
2. For dual-wheel carriages, slide the wheel
followed by the wheel spacer. onto the encoder screw with the wheel
hub facing away from the encoder.
Encoder Screw
Wheel
Hub
Spacer Encoder
Wheel
Screw
3. Place the encoder screw into the left rear
5
wheel hole on the carriage so the O-ring is
between the rear wheels.
Single-Wheel Carriage Dual-Wheel Carriage
O-Ring O-Ring
6 Turn the encoder lock collar (shown in
4.
blue) to point up. Then tighten the lock
collar screw with the 2.5 mm Allen wrench.
Note: Depending on the encoder model, this
step may require the 2.0 mm Allen wrench.
Single-Wheel Carriage Dual-Wheel Carriage
Lock Collar Screw
247 Take the free end of encoder cable
(shown in blue) and pull it through the
open slit in the bottom carriage behind
the wheels
Single-Wheel Carriage Dual-Wheel Carriage
5. Plug the encoder cable into one of the
8
encoder ports on the back of the
machine.
Encoder
Ports
25Out-of-the-Box Assembly
Turning the Machine On/Off
Parts & Tools Needed:
Power Cord
Instructions
The power cable port and power switch are located on the back of the machine. To power on the
machine, take the following steps:
1. Lift up the power cable retainer.
1 33. Press the power cable retainer down
firmly until it grasps the power cable.
Power Cable
Retainer
2. Plug the power cable into the machine.
2 4 Press the power switch up to turn the
4.
machine on.
Power
Switch
Power Cable
26Preparing to Quilt
Before quilting, choose the settings for your machine, load the bobbin, and thread the machine.
Choosing Machine Settings.................................................................................page 28
Winding a Bobbin................................................................................................page 30
Loading the Bobbin Case.....................................................................................page 32
Threading the Machine........................................................................................page 35
27Preparing to Quilt
Choosing Machine Settings
To customize the settings for the handlebar controls, screen buttons, or display appearance, take the
following steps:
Regulated
1. Press the Settings icon
1 atPrecise
the top of the touch display.
12 SPI
Regulated
Settings Precise
6 10 14
12 SPI
Jog
6 10 14
Needle
Jog
Needle
STOP
STOP
The Settings menu opens.
Settings
Stitch
Stitch Button Half Full
Units
Stitches Stitches
Units
per cm per in
Reverse Buttons
Screen
Light
Settings
Screen Settings
28Preparing to Quilt
Choosing Machine Settings (Continued)
Note: While in the Settings menu, the System Information screen, or the Screen Settings menu, only
two of the handlebar buttons have a function:
Return to
Quilting
Back to Previous
Menu
2 Choose desired settings:
2.
• Stitch Button: Choose whether the stitch button on the quilting mode screens will create a
half-stitch or full stitch when pressed.
• If “Half” is selected, pressing on a quilting mode screen (precise, cruise, manual,
or baste) will create a half-stitch.
• If “Full” is selected, pressing on a quilting mode screen (precise, cruise, manual,
or baste) will create a single full stitch.
• Units: Choose to display machine stitch length in stitches per centimeter (cm) or stitches
per inch (in).
Screen
• Reverse Buttons: Select between handlebar controls for right or left-handed quilters.
Settings
• Screen Settings: Press to go to the Screen Settings page, where you can choose a color
Screen
theme for the display by tapping Calib
to cycle ration
through the colors.
Settings
Color Them e Half
Stitch
Full
Units
Stitches Stitches
per cm per in
Screen
3 From the settings menu, you can also press the System Information icon
3. Settings
to access the
System Information screen. This displays the machine’s firmware versions (see page 70) as
well as the stitch count and run-time (see page 52).
4 To return to quilting, press the Home Settings
4. icon or the Return to Quilting button on the
handlebar controls. Stitch
Half Full
Units 29
Stitches Stitches
per cm per inPreparing to Quilt
Winding a Bobbin
For information on adjusting the
bobbin fill levels, see page 60.
Parts & Tools Needed:
Bobbin
(Class M Large)
Instructions
Your machine comes with two bobbins pre-wound with 50 weight cotton thread. An empty M-class
bobbin has also been provided. It’s important to choose bobbin thread that is similar in type and
quality as the top thread. For more information on choosing thread, see “Choosing Your Thread” on
page 84.
Note: This machine uses cone-style thread. Unless you have the spool accessory, please use only
thread cones for this machine.
The following diagram outlines the path the thread (shown in blue) must take to wind the bobbin.
2
5
4
1
6
6 5
4 3
1.
1 Thread Stand 33. Bobbin Thread Guide 5 Bobbin Thread Tensioner
5.
2 Guide Loops
2. 44. Bobbin Tensioner Guide 6 Bobbin Stand with Bobbin
6.
30Preparing to Quilt
Winding a Bobbin (Continued)
1. Run the thread through the thread mast
1 4
4. Tightly wrap the thread clockwise around
guide loop directly above the thread cone. the bobbin a few times to hold the thread
in place. Push the bobbin cam toward the
bobbin to start winding.
Guide Loop
Bobbin Cam
Thread Mast
Class M
Bobbin
2. Feed the thread through the back of the
2 5 Winding stops automatically when the bobbin
5.
hole closest to the thread cone on the is full. Cut the thread with the thread cutter
bobbin thread guide. Then wrap it back near the bobbin cam.
over and through the back of the second
hole.
Thread
Cutter
Bobbin Thread Guide
The bobbin thread should appear neat and
smooth.
3
3. Pull the thread through the hole in the
tensioner thread guide. Wrap the thread
around the back of the bobbin thread
tensioner, between the two discs.
Bobbin
Thread
Tensioner
Tensioner
Thread Guide
Note: Bobbin fill levels can be adjusted (see
page 60).
31Preparing to Quilt
Loading the Bobbin Case
Take the following steps to insert the wound bobbin into the bobbin case and place it in the machine:
1.
1 Check that the needle is up. If needed, 4 Pull on the bobbin case release lever to
4.
rotate the hand wheel or press and hold remove the bobbin case from the hook
“Jog Needle” on the display to raise the assembly.
needle.
Hand
Wheel
Release
Lever
2 To disable stitching, press the Settings icon
2. 5. Place the wound bobbin into the bobbin
5
on the display to go to the Settings menu. case. Note the direction that the thread is
coming off the bobbin in relation to the case.
Regulated
Settings Precise
12 SPI
6 10 14
Jog
Needle Bobbin
Case
STOP
3 Push in and down on the hook assembly
3. 6 Slip a few inches of thread through the slot
6.
cover to open it. and out of the hole.
Hole
Slot
32Preparing to Quilt
Loading the Bobbin Case (Continued)
Note: If the bobbin is installed correctly, it turns clockwise when the thread is pulled.
77. Test the tension of the bobbin case every time bobbin thread is changed; bobbin tension is the
foundation for correct thread tension.
a. Place the bobbin case on its side, on your palm.
b. Pull up on the thread. The thread should run freely and the bobbin should rise into a vertical
position without lifting off your hand.
Too Little Tension Correct Tension Too Much Tension
• If the bobbin case remains on its side, there is too little tension. Turn the large screw
(shown below in blue) clockwise.
• If the case lifts into the air, there is too much tension. Turn the large screw (shown
below in blue) counter-clockwise.
33Preparing to Quilt
Loading the Bobbin Case (Continued)
8. Place the bobbin case inside the quilting machine with the release lever (shown in blue) at the
8
3 o’clock position. It should click into place. Do not pull on the lever while inserting the bobbin
case.
9
9. Close the hook assembly cover.
34Preparing to Quilt
Threading the Machine
Before threading the machine, make sure you’ve selected quality thread for your project. Choosing
the right thread for the machine can prevent the thread from breaking or tangling up under the
needle plate. Note the following:
• This machine uses cone-style thread, not thread from a spool. Do not use spool thread unless
the spool accessory has been installed.
• Choose thread that is strong enough to pass the yank test, and re-test thread as it ages. Thread
strength can diminish over time.
a. Hold the cone in one hand and the end of thread in the other.
b. Tug on the thread. If the thread snaps easily, it may be too brittle to use for quilting.
35Preparing to Quilt
Threading the Machine (Continued)
The following diagram outlines the path the thread (shown in blue) must take through the machine.
2
1
3
4
8
6
5
7
9
10
11
1.
1 Thread Cone 5.
5 Large Thread Tensioner 9.9 Bottom Thread Guide
2 Thread Mast Guide Loop
2. 6.
6 Check Spring 10.
10 Eyelet of Needle Bar
3 Thread Guide Rod
3. 7 Thread Guide
7. 11.
11 Eye of Needle
4 Small Thread Tensioner
4. 8 Take-up Lever
8.
36Preparing to Quilt
Threading the Machine (Continued)
11. Rotate the hand wheel or press and hold 4.
4 Pull the thread straight up, through the
“Jog Needle” on the display to raise the thread mast guide loop above the thread
needle to the top position. stand.
Hand Wheel
Guide Loop
Thread Mast
2.
2 To disable stitching and prevent needle 5 Feed the thread through the top hole of the
5.
movement, press the Settings icon on the thread guide rod. Wrap the thread around
display to go to the Settings menu. to the back of the guide and insert through
the bottom hole.
Regulated
Settings Precise
12 SPI
6 10 14 Thread Guide Rod
Jog
Needle
STOP
3 Place the thread cone on one of the cone-
3. 6 Run the thread through the top hole on the
6.
style thread stands. small thread tensioner. Then slip the
thread between the two discs, and through
the bottom hole of the small thread
tensioner.
Thread Cone
Thread Stand
Small Thread
Tensioner
37Preparing to Quilt
Threading the Machine (Continued)
7 Pull the thread around the large thread
7. 10 Pass the thread down through the bottom
10.
tensioner, between the tension discs. Wrap thread guide on the way to the needle.
the thread over the check spring.
Check
Spring
Large Thread Bottom Thread
Tensioner Guide
8 Next, run the thread under the thread
8. 11 Now pass the thread through the front of
11.
guide next to the large thread tensioner. the needle bar eyelet, located above the
needle.
Needle Bar
Eyelet
Thread Guide
9.
9 Pull the thread through the hole in the 12 Thread through the eye of the needle.
12.
take-up lever.
Take-up
Lever
Eye of the
Needle
38Preparing to Quilt
Threading the Machine (Continued)
13 Loop excess thread over the thread cutter to cut the thread.
13.
Thread Cutter
39Quilting Now that the machine is set up, it’s time to start quilting! This section of the manual describes handlebar control, using the four quilting modes, and tensioning the thread. Using the Handlebar Controls.............................................................................. page 41 Using the Precise Quilting Mode.......................................................................... page 42 Using the Cruise Quilting Mode............................................................................ page 44 Using the Basting Mode....................................................................................... page 46 Using the Manual Quilting Mode.......................................................................... page 48 Adjusting Thread Tension..................................................................................... page 50 Tracking Stitch Count and Run Time.................................................................... page 52 Tip: While familiarizing yourself with the controls and display of your quilting machine, it’s a good time to test out new quilting materials and practice stitching. Test your thread tension while using the different quilting modes available on the machine. 40
Quilting
Using the Handlebar Controls

When first turned on, the machine starts in regulated precise quilting mode and can start quilting
right away. Please take a moment to review the handlebar controls used when quilting. While in the
Settings menu, System Information screen, or Screen Settings menu, some buttons have a different
purpose or do not function (see page 28 for details).

Note: Left-handed quilters may prefer to reverse these buttons. This can be done in the Settings
menu (see page 28).

                                 1                                     5
                                        3                    4

                             2                                             6

  1 Change Quilting mode: Press to cycle through the quilting modes: regulated precise,
  1.
     regulated cruise, baste, and manual.

  2.
  2 Settings: This button opens the Settings menu.

  3 Single Full Stitch or Half-stitch
  3.
     •   Press to create a single full stitch or a half-stitch, based upon settings (see page 28).

  4 Start/Stop Quilting: Press to start or stop stitching.
  4.

  5.
  5 Increase: This button increases the number, size, or speed of the stitching, depending upon
     the quilting mode. For example, in precise quilting mode, this button increases the number of
     stitches the machine makes per inch (SPI) or per centimeter (SPC).

  6.
  6 Decrease: This button will decrease the number, size, or speed of the stitching depending
     upon the quilting mode.

                                                                                                     41
Quilting
Using the Precise Quilting Mode
The machine defaults to the precise quilting mode when turned on. In this regulated quilting mode,
the machine maintains the length of the stitch despite the speed and direction of the quilter’s
movements. If the quilter stops moving, the machine stops stitching.
Regulated
To switch to a different quilting mode, press the next quilting mode icon
Precise
.
12 SPI
Regulated Next Quilting
Settings
Precise Mode
6 10 14
12 SPI Jog
Stitch Length
Needle
Stitch Length
6 10 14
STOP
Presets
Jog Over-speed
Jog Needle Indicator
Needle
Needle Stop STOP Stitch Button
Position
To quilt in the Regulated
regulated precise quilting mode, take the following steps:
1. Precise
1 Confirm Regulated
that the stitch length, measured in stitches per inch (SPI), is the desired length.
Note: To Precise
switch to stitches per centimeter (SPC), go to the Settings menu (see page 28).
Regulated
Precise
12 SPI
• Press12
to reduce
SPI the number of stitches per inch and increases stitch length.
12 SPI
6•6 Press 10
to
10increase the number of stitches per inch, which decreases stitch length.
14 14
10 2. 14 the needle
2 Check Jog stop position indicator to see if the needle will stop in the “Up” or “Down”
Jog
position when stitching is inactive. Pressing the icon will change the stop position.
Needle
Needle
Jog
Needle •
STOP Needle stops in the “Down” position.
STOP
• Needle stops in the “Up” position.
STOP
42Precise
12 SPI Quilting
Using the Precise Quilting Mode (Continued)
6 10 14
3 Check the stitch button icon. When stitching is inactive, pressing this button or the stitch
3.
Jog button on the handlebars will create a single full stitch or a half-stitch, depending on the icon
Needle displayed. To switch the type of stitch created, go to the Settings menu (see page 28).
• Press to create a full stitch.
Regulated Regulated
Precise Precise
•
12 SPI 12Press
SPI
to create a half-stitch.
4. Position the quilting machine over the quilt. If needed, use the needle jog buttons to move the
4
6 Regulated
10 6needle
14 closer
10 or 14
further from the fabric in small increments to help place your first stitch.
Precise
Jog 12 Jog
SPI
• Needle
Press to move the needle up or down in small increments.
Needle
P 6 5.
5STOPPress
10 the start/stop
14 quilting button on the handlebar to begin (activate) stitching. Move the
machine across the quilt to place stitches. Keep the pace slow and even; moving too quickly
prevent stitch regulation. If this happens, a beeping alarm will sound and the over-speed
canJog
indicator
Needle on the display will turn red. Pressing the icon mutes the alarm.
STOP • Stitching is not active and alarm is not muted.
• Stitching is not active and alarm is muted.
• Stitching is active and alarm is not muted.
• Stitching is active and alarm is muted.
• Machine moving too quickly for stitching and alarm is not muted.
• Machine moving too quickly for stitching and alarm is muted.
Note: While stitching is active, the stitch button on both the display and handlebar controls
are disabled.
6
6. To inactivate stitching, press the start/stop quilting button on the handlebars. The needle will
move into the needle stop position indicated on the display.
43Quilting
Using the Cruise Quilting Mode
In cruise mode, the quilting machine maintains the length of the stitch despite the speed and
direction of the quilter’s movements. However, the machine will continue to stitch in place (at the
minimum speed) if the quilter stops moving the machine.
Regulated
To switch to a different quilting mode, press the next quilting mode icon .
Precise
12 SPI
Regulated Next Quilting
Settings
Cruise 6
Mode
10 14
12 SPI Jog
Stitch Length Needle
25%
Minimum Speed STOP
Min Speed
Over-speed
Jog Indicator
Jog Needle Needle
Needle Stop
Position STOP Stitch Button
To quilt in the Regulated
regulated cruise quilting mode, take the following steps:
1.
1 Confirm that Precise
the stitch length, measured in stitches per inch (SPI), is the desired length.
Note: To switch to stitches per centimeter (SPC), go to the Settings menu (see page 28).
Regulated
Precise
12 SPI
• Press to reduce the number of stitches per inch and increases stitch length.
12 SPI
6• Press to
10increase 14
the number of stitches per inch, which decreases stitch length.
Regulated
2 DeterminePrecise
2. the minimum speed the machine will stitch at when stitching is active but the
10 14
machine Jogbeing moved. This can be set from 5% to 25% of the machine’s top speed.
is not
Regulated
Precise
12
NeedleSPI
• Decreases the minimum speed.
Jog
12
NeedleSPI
STOP
6• Increases
10 the minimum
14 speed.
10 14 Jog
Needle
44
Jog12 SPI
Quilting
Using the
6 Cruise
10 Quilting
14 Mode (Continued)
3. Check the needle
3 Jog stop position indicator to see if the needle will stop in the “Up” or “Down”
Needle
position when stitching is inactive. Pressing the icon will change the stop position.
Regulated
Precise •
STOP
Needle stops in the “Down” position.
12 SPI
• Needle stops in the “Up” position.
STOP
10 14
4 Check the stitch button icon. When stitching is inactive, pressing this button or the stitch
4.
Jog button on the handlebars will create a single full stitch or a half-stitch, depending on the icon
Needle displayed. To change the type of stitch, go to the Settings menu (see page 28).
Regulated •Regulated
Press to create a full stitch.
Precise Precise
12 SPI • 12Press
SPI to create a half-stitch.
6 5.
5 6Position
10 14 10
Regulated 14 machine over the quilt. If needed, use the needle jog buttons to move the
the quilting
needle closer or further from the fabric in small increments to help place your first stitch.
Precise
Jog Jog
Needle 12
• Needle
SPI Press to move the needle up or down in small increments.
6.
6 Press the start/stop quilting button on the handlebar to activate stitching. Move the machine
P 6 STOPacross
10 the quilt
14 to place stitches. Keep the pace slow and even; moving too quickly can stop
proper stitch regulation. If this happens, a beeping alarm will sound and the over-speed
indicator
Jog on the display will turn red. Pressing the icon mutes the alarm. Note: While stitching
isNeedle
active, the stitch button on both the display and handlebar controls are disabled.
• Stitching is not active and alarm is not muted.
STOP
• Stitching is not active and alarm is muted.
• Stitching is active and alarm is not muted.
• Stitching is active and alarm is muted.
• Machine moving too quickly for stitching and alarm is not muted.
• Machine moving too quickly for stitching and alarm is muted.
7 To inactivate stitching, press the start/stop quilting button on the handlebars. The needle will
7.
move into the needle stop position indicated on the display.
45Quilting
Using the Basting Mode
Use the basting mode to create loose, temporary stitches to hold layers of fabric together while
quilting.
Regulated
To switch to a different quilting mode, press the next quilting mode icon .
Precise
12 SPI
Settings Baste 6 10
Next Quilting
14 Mode
Short Jog
Needle
Stitch Length
STOP
Over-speed
Jog
Indicator
Jog Needle Needle
Needle Stop STOP
Stitch Button
Position
Regulated
To quilt in the regulated cruise quilting mode, take the following steps:
Precise
Regulated
1.
1 Confirm that the stitch length is the desired length (small, medium, or large).
Precise
Regulated
Precise •
12 SPI
Press12
to reduce
SPI stitch length.
12 SPI • Press 10
to increase stitch length.
66 10 14 14
2 Check the needle
2. Jog
stop position indicator to see if the needle will stop in the “Up” or “Down”
10 14 when
position Jog
stitching
Needle is inactive. Pressing the icon will change the stop position.
Needle
Jog •
STOP Needle stops in the “Down” position.
Needle
STOP
• Needle stops in the “Up” position.
STOP
46Precise
12 SPI Quilting
Using the Basting Mode (Continued)
6 10 14
3 Check the stitch button icon. When stitching is inactive, pressing this button or the stitch
3.
Jog button on the handlebars will create a single full stitch or a half-stitch, depending on the icon
Needle displayed. To change the type of stitch, go to the Settings menu (see page 28).
• Press to create a full stitch.
Regulated Regulated
Precise Precise
•
12 SPI 12Press
SPI
to create a half-stitch.
4 Position the quilting machine over the quilt. If needed, use the needle jog buttons to move the
4.
6 10 6Regulated
needle
14 closer
10 or 14
further from the fabric in small increments to help place your first stitch.
Precise
Jog 12 Jog
SPI
• Needle
Press to move the needle up or down in small increments.
Needle
5 Press
6 5. 10 the start/stop
14 quilting button on the handlebar to begin (activate) stitching. Move the
P STOP
machine across the quilt to place stitches. Keep the pace slow and even; moving too quickly can
Jogproper stitch regulation. If this happens, a beeping alarm will sound and the over-speed
stop
indicator
Needle on the display will turn red. You can press the icon to mute the alarm.
STOP • Stitching is not active and alarm is not muted.
• Stitching is not active and alarm is muted.
• Stitching is active and alarm is not muted.
• Stitching is active and alarm is muted.
• Machine moving too quickly for stitching and alarm is not muted.
• Machine moving too quickly for stitching and alarm is muted.
Note: While stitching is active, the stitch button on both the display and handlebars are
disabled.
6 To inactivate stitching, press the start/stop quilting button on the handlebars. The needle will
6.
move into the needle stop position indicated on the display.
47Quilting
Using the Manual Quilting Mode
In this quilting mode, the machine produces stitches at a constant speed. It’s up to the quilter to
move the machine the distance needed to get the desired stitch length. This mode is useful for small,
continuous stippling patterns.
Regulated
To switch to a different quilting mode, press the next quilting mode icon
Precise .
12 SPI
Next Quilting
Settings Manual 6 10 14Mode
80% Jog
Needle
Speed
STOP
Speed Preset 10 50 90
Over-speed
Jog
Indicator
Jog Needle Needle
Needle Stop STOP Stitch Button
Position
To quilt in the Regulated
regulated cruise quilting mode, take the following steps:
1 Confirm that
1. Precise
the stitch speed is the desired speed. The stitching speed is displayed as a
percentage of the maximum machine speed of 2000 stitches-per-minute.
Regulated
Precise
12 SPI
• Press to reduce stitching speed.
12 SPI
6• Press to
10increase 14
stitching speed.
2 Establish your speed presets. Selecting a preset adjusts the machine’s speed to the percent
2.
10 14
indicated. ToJog
customize a preset, first set the machine to the desired speed. Then press and
Needle
hold the preset you’d like to change for three seconds. It will update to the new speed.
Jog Example: In the display shown above, holding down the “10” preset button for three seconds
Needle would update that button to “80,” the current stitching speed.
STOP
4812 SPI
Quilting
Using the Manual Quilting Mode (Continued)
6 10 14
3 Check the needle
3. Jog stop position indicator to see if the needle will stop in the “Up” or “Down”
position when stitching is inactive. Pressing the icon will change the stop position.
Needle
Regulated
Precise •
STOP Needle stops in the “Down” position.
12 SPI
• Needle stops in the “Up” position.
STOP
10 14
4 Check the stitch button icon. When stitching is inactive, pressing this button or the stitch
4.
button on the handlebars will create a single full stitch or a half-stitch, depending on the icon
Jog
Needle displayed. To change the type of stitch, go to the Settings menu (see page 28).
• Press to create a full stitch.
Regulated Regulated
Precise Precise
• Press to create a half-stitch.
12 SPI 12 SPI
5 Position the quilting machine over the quilt where you want to stitch. If needed, use the needle
5.
6 10 6
jog buttons
14 10
to move
14
the needle closer or further from the fabric in small increments to help
Regulated
place your first stitch.
Precise
Jog Jog
Needle • Needle
12 SPI Press to move the needle up or down in small increments.
6 The over-speed indicator shows whether stitching is active or not. Press the start/stop
6.
P STOPquilting button on the handlebar to activate stitching. Move the machine across the quilt to
6 10 14
place stitches. Change the speed of your movements to match the stitching speed of the
machine in order to create stitches of the desired length. Moving quickly will create longer
Jog
stitches, while moving slowly will create shorter stitches.
Needle
• Stitching is not active.
STOP
• Stitching is not active.
• Stitching is active.
• Stitching is active.
Note: While stitching is active, the stitch button on both the display and handlebar controls
are disabled.
7 To inactivate stitching, press the start/stop quilting button on the handlebars. The needle will
7.
move into the needle stop position indicated on the display.
49Quilting
Adjusting Thread Tension
Proper thread tension prevents unwanted puckering, poorly-formed stitches, and malfunctions that
can damage the fabric. Test your thread tension on extra materials before sewing on a project.
Tip: Bottom thread tension is the foundation for proper thread tension. It is addressed in “Loading
the Bobbin Case” on page 32.
Large Thread
Tensioner
1 Loosen the tension knob on the large thread tensioner to set the tension to “1.” The bottom of
1.
the tension knob lines up with the number that the tension is set to.
Tension Knob
4
32
1
Note: Setting “1” is the lowest tension for the machine. This is an ideal starting place to find
the correct top thread tension.
50Quilting
Adjusting Thread Tension (Continued)
2. Slowly increase the tension while stitching into scrap material similar to your project. When the
2
thread tension is balanced, the top and bottom thread (shown in blue and red) will knot in the
middle of the fabric layers.
Too Little Top Tension Balanced Tension Too Much Top Tension
Top thread is pulled to Bottom thread is pulled to
the bottom of the fabric. the top of the fabric.
• If the bobbin (bottom) thread (shown in red) is pulled through the top layer of fabric,
there is too much top tension. Loosen the tension by turning the large thread tensioner
knob toward the setting “1.”
4
32
1
• If the top thread (shown in blue) is pulled down through the bottom layer of fabric, there
is too little top tension. Increase the tension on the top by turning the large thread tensioner
knob toward setting “4.”
4
32
1
51Settings
Quilting Half
Stitch
Full
Tracking Stitch
Units
Count and Run Time
Stitches
per cm
Stitches
per in
To track the number of stitches your machine has sewn or hours it has run, press the System
Information icon from
Screen the Settings menu (see page 28).
Settings
Return to System
Quilting Info Back to Settings
Machine Rev.
V522 04/25/19
Firmware Versions Motor: 2000 RPM
(see page 70)
Display R ev.
F411A12 04/25/19
System Stitch Count: Hours Run:
InfoCount
Stitch 143173 143173 Hours Run
Reset Reset
Reset Reset
System
Machine Rev.
V522 04/25/19
Info
Motor: 2000 RPM
Total Stitches: Total Hours:
143173 143173
Display RRev.
Machine ev.
F411A12 04/25/19
V522 04/25/19
Motor: 2000 RPM
Stitch Count: R
Display ev. the number of stitches since the last reset.
Stitch Count: Hours Run:
• Displays
143173 143173
F411A12 04/25/19
Reset• Press to start
Resetthe stitch count back at 0.
Stitch Count: Hours Run:
Hours
• Total
143173 Run: Displays
Stitches: 143173
Total the number of hours run since the last reset.
Hours:
143173
Reset• Press to143173
Reset
start the hour count back at 0.
• Total Stitches: Shows the total number of stitches since the machine was purchased. This
Total Stitches: Total Hours:
cannot be reset.
143173 143173
• Total Hours: Shows the total number of hours the machine has run. This cannot be reset.
Tip: It’s recommended to oil your machine after 20 hours of use. The “Hours Run” counter can help
keep track of when your machine is due to be oiled.
1 After cleaning and oiling your machine (see page 55), press Reset underneath Hours Run.
1.
This will set the hour count back to 0.
2 Check the Hours Run count regularly. When it reaches 20 hours, it’s time to clean and oil the
2.
machine again. Repeat from step 1.
52Maintaining the Machine
Keep your machine at peak performance by practicing good machine maintenance habits.
Preparing the Oil Bottle........................................................................................ page 54
Oiling and Cleaning.............................................................................................. page 55
Changing the Needle............................................................................................ page 58
Adjusting the Bobbin Cam.................................................................................... page 60
Adjusting the Hopping Foot................................................................................. page 61
Reinstalling the Needle Plate............................................................................... page 66
Calibrating the Touch Display............................................................................... page 68
This section of the manual covers oiling the machine, changing the needle, adjusting the bobbin cam
and hopping foot, reinstalling the needle plate, and calibrating the touch display.
53Maintaining the Machine
Preparing the Oil Bottle
Parts & Tools Needed: 3.
3 Peel the safety foil off the opening of the oil
bottle.
Oil Bottle
• Scissors (not included)
Instructions
Take the following steps to prepare the oil bottle
for use in oiling the machine.
1.
1 Snip off about 1/4th of an inch from the tip 4.
4 Carefully screw the lid onto the oil bottle.
of the plastic lid with a pair of scissors.
2
2. Place the applicator needle onto the top of 55. Hold bottle upside down and squeeze gently
the cap. to apply oil. When not in use, cover the
applicator needle with the safety cap.
54Maintaining the Machine
Oiling and Cleaning
Parts & Tools Needed:
Oil Bottle Lint Brush • Compressed Air Can (optional; not included)
Instructions
Oil and Clean:
• At the start of a new project
Machine • After 20 hours of use
• After sitting without use for more than 30 days
Hook Assembly • Every other bobbin change
Tip: The “Hours Run” counter on the System Information page can be used to track hours of quilting
time (see page 52).
Take the following steps to clean and oil the machine:
1 Power off the machine.
1.
2 Set the large thread tensioner to “1” to expose the tensioner discs. Use the lint brush or a
2.
can of compressed air to clear away lint and thread remnants.
Note: Lint build-up between the tensioner discs can prevent proper thread tensioning.
Large Thread
Tensioner
4
32
1
55Maintaining the Machine
Oiling and Cleaning (Continued)
3.
3 Clear debris from the spring and discs of the 6.
6 Set the bobbin aside. Clean the bobbin case
small thread tensioner. with the lint brush or compressed air. Be sure
to clean the area under the bobbin tension
thread arm.
Bobbin Thread
Tension Arm
Small Thread
Tensioner
4 Press in on the hook assembly cover and
4. 7 In and around the hook assembly, clear
7.
push down to open it. away any lint, cloth, and thread remnants.
Hook Assembly
5 Pull the release lever (shown in blue) on
5. 8 Rotate the hand wheel until the needle is
8.
the bobbin case to remove it from the hook halfway down. This will put the hook in the
assembly. If the case won’t release, raise best position for oiling.
the needle with the hand wheel at the rear
of the machine.
Hand
Wheel
56Maintaining the Machine
Oiling and Cleaning (Continued)
9 Place one to two drops of oil into the hook assembly between the inner part (shown in gray)
9.
and outer part (shown in blue).
1-2 Drops
10 Reload the bobbin case and return it to
10. 12 Unplug the display cable. Press down on
12.
the machine (for detailed instructions on the clip release and pull on the display to
tensioning the bobbin case, see page 32). remove it from the machine.
Close the hook assembly cover.
Clip Release
11.
11 Open the display cover. 13.
13 Place 1-2 drops of oil down the machine.
1-2 Drops
57Maintaining the Machine
Changing the Needle
For information on selecting a
Parts & Tools Needed: needle, see page 82.
Needle Needle Magnet
Instructions
A broken, bent, or burred needle may break thread, damage fabric, or even damage the machine.
Always check that the needle is in good repair before starting a new project, and replace the needle
after eight hours of use.
Straight Needle Bent Needle
To avoid damage to the machine, please choose an approved needle style from the list below:
• DPx5 MR
• 134 MR
• 1955 MR
To change the needle, take the following steps:
1.
1 Power off the machine.
2 Raise the needle to the highest position with
2. 3 Loosen the needle thumb screw and pull
3.
the hand wheel. down the needle. If needed, use a flat-head
screwdriver
Hand
Needle
Wheel
Thumb Screw
58Maintaining the Machine
Changing the Needle (Continued)
45. Insert the new needle all the way into the 8.
7 Hand-tighten the thumb screw. Do
needle bar. Check the needle bar sight not over-tighten if using the flat-head
hole above the thumb screw to make sure screwdriver.
the needle is inserted all the way.
Needle Bar
Sight Hole
Needle
5 The scarf, a cut-out on the back of the
6. 1.8 Regularly wipe down the needle bar to
needle, should face the throat of the prevent the accumulation of oil that can stain
machine. Place the needle magnet on the your fabric.
opposite side of the scarf.
Needle
Magnet
Scarf
Needle Bar
6 Use the needle magnet as a visual guide.
7.
Twist the needle until the magnet points as
straight out from the machine as possible.
Note: Do not attempt to adjust the needle
by moving the magnet directly.
59You can also read