2016 Science Demonstrations - University of Northern Colorado
←
→
Page content transcription
If your browser does not render page correctly, please read the page content below
2016 Science Demonstrations

The following science demonstrations were prepared and presented by the teacher candidates
in the University of Northern Colorado’s and Colorado School of Mines’ SCED 441/541
(Methods in Teaching Secondary School Science) in Fall 2016. Dr. Rob Reinsvold and Dr.
Stephanie Fanselow were the instructors for the courses. Most of the demonstrations were
presented at the 2016 Colorado Science Conference as “30 Demos in 50 Minutes”. This
continued the tradition started by Dr. Courtney Willis over two decades ago.

Although each demonstration was tested by the teacher candidates, you are encouraged to
test it yourself before using it for instruction. Often a slight change in materials can affect the
success of the demo. Also, even though some safety considerations are mentioned, please use
additional caution with any of the demos, especially if students will be using the demos.

You are free to use these demos if you like.

Music Box Speaker System

                                       Maggie Hodge – Physics Senior
MATERIALS:
Music box apparatus (works best if it has a crank)
A flat wooden surface (table, whiteboard, piece of wood, etc.)

SETUP:
    Minimal setup required for this demo; for added effect, draw a speaker on the white board beforehand. Students
get a kick out of the “speaker system.”

PROCEDURE:
   1. Crank the music box while holding it in the air
   2. Ask the students in the back if they were able to hear the music
   3. Hold the music box against your flat wooden surface‐this sound is much louder than it originally was

TIPS:
     Practice using the music box ahead of time; without a crank it is hard to control the speed of spinning the apparatus,
so practice helps perfect the timing.

EXPLANATION:
    When a music box apparatus spins, the long metal fingers rub against raised bumps and music is produced. Since the
finger lengths are different sizes they produce different notes. When the music box is held in air the fingers vibrate the
surrounding air. The surface area of the fingers are small and do not vibrate many particles. The waves produced by the
music box are sound waves, and sound waves are longitudinal waves. Longitudinal waves need a medium to travel
through. When the music box is placed on a flat wooden surface, all the particles from the surrounding wood vibrate.
Since the surface area that is being vibrated increases the amplitude is increased. When the amplitude is increased the
volume of the sound that vibrates off of the wood is increased. When surface area is increased the volume is increased.
This principle can also be seen when looking at guitars (needing a sound box), pianos (piano strings are attached to a
sounding board), and why when a phone is placed in a cup the volume of the music increases.

SAFETY:
    There are no safety precautions with this demo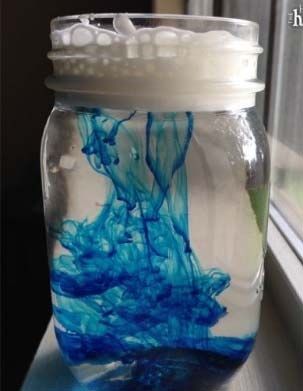
Hot and Cold Water Convection

                                       Maggie Hodge – Physics Senior
MATERIALS:
Four small glass bottles
Hot and cold water
        Hot plate and beaker for hot water
        Ice for cold water
Red and blue food coloring
Playing card or small laminated card
Large rimmed baking sheet
Towel(s)
White poster board behind

SETUP:
    Bring water to a boil in the beaker. Fill two of the bottles with the hot water. Fill the other two bottles with
ice cold water. Place blue food coloring in the bottles with cold water and place red food coloring in the
bottles with hot water.

PROCEDURE:
   1. Hot over cold: Place the cold bottle in the rimmed baking sheet. Place the playing card or small laminated card
       over the opening of the warm bottle. Hold the card in place as you turn the bottle upside down. Place it over the
       cold water bottle. The bottles should be mouth to mouth in position with the card separating the two liquids.
       Carefully move the card out from in between the two bottles. Make sure that you are holding onto the top
       bottle when you remove the card. Observe what happens to the colored liquids in the two bottles.
   2. Cold over hot: Repeat the previous step but this time place the bottle of cold water on top of the warm water.
       Observe what happens.
   3. Compare the two situations side by side. Helps to have white poster board behind bottles to easily see color.

TIPS:
     Practice ahead of time to make sure you are able to do it; do not want the first time you preform the demo to be in
front of a crowd.

EXPLANATION:
    Similar to warm air rising, warm water is less dense then cold water. Warm water rises when placed on top of cold
water. Like in the first situation, when the warm water is placed on top of the cold water, the more dense cold water
stays in the bottom bottle and the less dense warm water stays in the top bottle. When the cold water is on top of the
warm water, like in the second situation, the less dense warm water rises to the top bottle and the cold water sinks. This
movement of warm and cold water inside the bottles is referred to as the convection current. This topic relates to the
ocean currents.
SAFETY:
    Be careful with the hot beaker and hot plate
Bernoulli Windsock

                                       Maggie Hodge – Physics Senior
MATERIALS:
Two bags which are closed at one end, about 3‐5 feet in length and 5‐10 inches in diameter

SETUP:
    No setup required for this demo

PROCEDURE:
   1. Straighten each bag so that someone can blow into it
   2. Challenge one volunteer to blow up the bag in one breath
           a. Have them blow their single breath close to the opening (not much air should be blown in)
   3. Condense the air to the bottom of the bag showing how much air they actually got into the bag
   4. Have them hold their condensed air bag as you blow into your bag
   5. When you blow hold the bag open about 5 inches from your face
           a. A lot of air should blow into the bag
   6. Condense your bag and compare the two

TIPS:
     Practice ahead of time to make sure you are able to do it; do not want the first time you preform the demo to be in
front of a crowd.

EXPLANATION:
    When the bag is held close to your face and blown into, the only air that gets into the bag is the air from your lungs.
When the bag is held open away from your face, the air that is blown creates a stream. The stream of air has low
pressure around it, and the high pressure in the room rushes to fill the low pressure of the stream. This demonstrates
Bernoulli’s principle. Bernoulli’s principle states that as the speed of a moving fluid (in this case gas) increases the
pressure within the fluid decreases.

SAFETY:
    There are no safety precautions with this demo
Tennis Ball Inertia‐ Newton’s Laws

                                         Maggie Hodge – Physics Senior
MATERIALS:
Wire hanger
Two tennis balls
Knife (to poke one hole in each ball)

SETUP:
    Unwrap the wire hanger into a straight line. Poke a hole in each ball so that the metal wire can fit in. Place
the ends of the wire in each ball. Wrap the end of the wires so that the ball does not fall off. In the middle of
the wire place an indent like seen in the illustration below. Practice using the demo ahead or time and adjust
the bend in the wires as needed. Took about 15 minutes to make.

PROCEDURE:
   1. Ask for a volunteer
   2. Place the apparatus on their head with the point being where their soft spot used to be
   3. Ask the student to spin slowly‐ the balls might start moving with the student and that is okay
           a. If the balls do move have the student stop and see if the balls continue to move
                    i. Objects in motion stay in motion
   4. Have the student spin faster – the balls should not move with the student
           a. Objects continue in its existing state of rest

TIPS:
     Students with short hair or less hair fluff works best (less force from the hair).

EXPLANATION:
    Newton’s first law of motion is the law of inertia; an object will remain at rest or in uniform motion in a straight line
unless acted upon by an external force. The tennis balls stay in place because that is what their current state started as
and they want to continue to remain in that state. If the tennis balls are moving and the person spinning stops and the
balls continue to spin then this is a great example of the other part of the law that objects in motion continue to remain
in motion until an external force is applied to the system. This demonstration really helps students see and understand
Newton’s first law of motion.
SAFETY:
    When setting up be careful using the knife. Also the ends of the wires can be pointy. When performing the demo the
apparatus can fall and hit the student. Also, be aware of the point in the middle of the wire, it can be pointy and hurt.

                                                        Cell Walls

                                       Shawn Walter – Post Bac, Biology
MATERIALS:
Balloons (2), preferably small and not good quality
Nylon stocking, can use knee high or child size, doesn't need to be new
Bicycle pump (optional)

SETUP:
    No prior setup

PROCEDURE:
    Blow up a balloon until it pops. This simulates an animal cell. Water can flow in until the cell membrane pops. Now
blow up a balloon inside of the nylon stocking. It is virtually impossible to blow it up enough that it will pop. This shows
how the cell wall protects the cell.

TIPS:
     Choose small balloons that will pop easily, such as from the dollar store. Balloons from party stores tend to be
higher quality and will take more effort to pop, which will make the demo take longer than necessary.

EXPLANATION:
    This demo is illustrating the purpose of cell walls. The cell wall protects the cell from growing so large that it will
burst.

SAFETY:
    Beware of small pieces of broken balloon.
Exothermic Reaction (handwarmers)

                                       Shawn Walter – Post Bac, Biology
MATERIALS:
Large ziplock bag
Small ziplock bag
Calcium chloride ice‐melt pellets

SETUP:
    Fill the large ziplock bag approximately 1/4 full of calcium chloride pellets. Fill the small ziplock bag ½ full of water
and seal tightly.

PROCEDURE:
   Place the small ziplock of water inside of the large ziplock of calcium chloride pellets. Seal the large ziplock.
Squeeze the small ziplock of water until it opens. The water and calcium chloride will create an exothermic reaction.

TIPS:
     Leaving some air in the smaller ziplock containing water will help you to pop it open.

EXPLANATION:
    The calcium chloride and water create an exothermic reaction. This is how commercial hand warmers work, though
their chemicals mix with oxygen rather than water.

SAFETY:
    Be cautious with calcium chloride, causes irritation to skin, eyes and respiratory organs. Harmful if inhaled or
swallowed.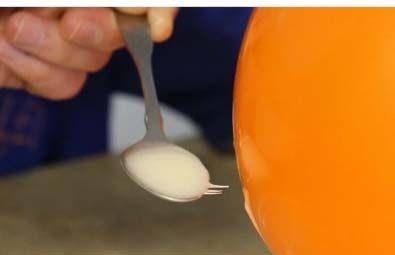
Semi‐permeable Membranes

                                      Shawn Walter – Post Bac, Biology
MATERIALS:
Colander
Pie pan
Clear drinking glass or jar
Salt, sugar, or sand
Marbles, beans, or other small object too large to go through colander holes

SETUP:
    Before class, mix together salt and marbles and place in clear glass.

PROCEDURE:
    Show the students the mixture of salt and marbles, explaining that these are molecules outside of a cell membrane.
Show them the colander and tell them it is representing the cell membrane. Placing the pan underneath the colander,
show that the salt (small molecules) pass through while the marbles (large molecules) stay trapped outside of the cell.
Be sure your pie pan is positioned under the colander to catch the small molecules.

TIPS:
     Ziplock bags can be used to hold and/or mix “ingredients”.

EXPLANATION:
    This demonstration is illustrating the concept of semi‐permeable membranes. It shows how small molecules can
pass through while larger ones are trapped outside of the cell.

SAFETY:
    No safety concerns.
How taste is related to smell

                                     Shawn Walter – Post Bac, Biology
MATERIALS:
Apple peeled and cut into small pieces
Potato peeled and cut into small pieces

SETUP:
    Peel apple and cut into small pieces and place in plastic bag or other suitable container. Do the same for the potato.

PROCEDURE:
    Have student close eyes and pinch nose shut. Give them one piece of apple and one of potato. See if they can tell
the difference between the two.

TIPS:
     Yukon gold potatoes are more yellow and may match apple color more closely.

EXPLANATION:
    Your brain uses cues from scent to help determine taste. When you are deprived of smelling your food, you lose
some information making it harder for the brain to differentiate the two.

SAFETY:
    Eating in the science lab is not recommended.
Dancing Worms
Tory Wilson ‐ Biology Post‐Baccalaureate
MATERIALS:
2 glasses
Small dish
Fork
4‐6 gummy worms
3 Tablespoons baking soda
½ cup vinegar
1 cup water
SETUP:
Cut each gummy worm lengthwise at least four times with scissors or knife. In a glass jar, mix the water and baking
soda. Add the gummy worms to the baking soda and water mixture, mix. Let the gummy worms sit in the baking soda
mixture for 10‐15 minutes.
PROCEDURE:
Transfer the gummy worms with a fork into a small dish. Pour the vinegar into an empty glass and begin to add the
gummy worms one at a time. Watch the worms dance!
EXPLANATION:
When you add the worms soaked in baking soda, the acetic acid in the vinegar reacts with the bicarbonate in the
baking soda. When an acid and base react, carbon dioxide gas bubbles form. These gas bubbles form on the gummy
worms and as the gas bubbles rise to the surface, they pull the gummy worms up with them, making them wriggle and
dance. As the gas bubbles burst, the worm falls back down until enough bubbles form to pull it back up. The bubbles will
continue to form until all the baking soda on the worm is used up and the worm will stop wiggling.
SAFETY:
There are no safety concerns for this demo.How Clouds Make Rain
Tory Wilson ‐ Biology Post‐Baccalaureate
MATERIALS:
Jar
Water
Shaving Cream
Food Coloring
SETUP:
There is no set‐up required prior to completing this demo.
PROCEDURE:
Fill the jar to almost the top with water. Cover the top of the water with a cloud of shaving cream. Add blue food
coloring drops onto the cloud until the color starts to “rain” down into the water below.
TIPS:
Use blue food coloring and white shaving cream to most closely resemble natural processes.
EXPLANATION:
When water droplets and ice crystals collect in a cloud, they continue to get heavier and heavier. They will
eventually become too heavy to float on the air. Water droplets will fall to the earth as rain.
SAFETY:
There are no safety considerations for this simulation.
DIAGRAM:Static Electricity with Jumping Goop
Tory Wilson ‐ Biology Post‐Baccalaureate
MATERIALS:
Balloon
Spoon
Vegetable oil
Corn starch
Food Coloring
SETUP:
Mix ¼ cup corn starch with ¼ cup vegetable oil. Stir until makes a slimy liquid.
PROCEDURE:
Inflate a balloon and tie it off. Rub the balloon on your hair or a piece of fur to charge the balloon. Hold a spoonful of
the goop close to the balloon and watch the goop move. If the spoon gets too close to the balloon, the goop will ‘jump’
to the balloon.
TIPS:
Add a few drops of food coloring to give the goop color to make it easier for students to see.
EXPLANATION:
When you rub the balloon on your hair, electrons from the molecules in your hair rub off onto the balloon. This gives
the balloon a negative charge and it is attracted to the positive charges with in the goop, specifically within the
cornstarch. Opposite charges attract and negative charges repel.
SAFETY:
There is no safety concern for this demo.
DIAGRAM:Dispersal of Viruses from a Cell
Tory Wilson ‐ Biology Post‐Baccalaureate
MATERIALS:
Balloon
Hole punches from hole puncher
Pin
SETUP:
Cut out several dozen hole punches from colored paper using hole puncher. Place hole punches in a deflated
balloon.
PROCEDURE:
Discuss viruses. Inflate the balloon that contains hole punches. Tie off end. When discussing the dispersal of a virus
from a host cell, stand in a central location in the room and burst the balloon with a pin. The hole punches will disperse
upon impact, demonstrating the dispersal of a virus from a cell. Analyze how many students were exposed to the newly
released virus form this one dispersal event.
TIPS:
Add any useful tips that would help to make the demo successful such as the specific concentration of a chemical.
EXPLANATION:
Once inside the host cell, the viral enzymes take over and begin making copies of the viral material. The host cell
breaks or bursts and the virus disperse outside the cell, infecting other cells that it comes in contact with.
SAFETY:
The popping of a balloon will produce a very loud noise.The Little Man in the Tin Can
Gabrielle Sauer – Chemistry Senior
MATERIALS:
2 Tin cans (I used Ravoli cans)
Acetone (I used Nail Polish Remover)
Styrofoam cups
SETUP:
Pour a decent amount of acetone into one of the tin cans. Be sure not to do this too early because the acetone will
evaporate.
PROCEDURE:
Pour a decent amount of acetone into one of the tin cans. Count how many Styrofoam cups fit into the can without
acetone. Then count how many Styrofoam cups fit into the can with acetone
TIPS:
I poured acetone about 1/3 of the way up the ravoli can.
I also used this little story: “Have you heard of the little man who lived in the tin can? Well he loves Styrofoam. He
munches on Styrofoam day and night. Rumor has it that the little man who lives in the tin can is here with us today. We
are going to find out what can he is in by counting how many Styrofoam cups fit into each tin can.”
EXPLANATION:
This demo illustrates the principle of like dissolves like.
SAFETY:
Working with acetone, use precaution. Wear safety goggles.Floating Ping‐Pong Ball
Gabrielle Sauer‐ Chemistry Senior
MATERIALS:
Hair dryer
Ping Pong Ball
SETUP:
Be sure that the hair dryer is plugged in.
PROCEDURE:
Turn on the hair dryer and point the hair dryer upwards so that the air is blowing strait up. Then place the ping pong
ball in the column of air.
TIPS:
N/A
EXPLANATION:
This is a good demonstration illustrating forces acting on an object. The ping pong ball does not leave the column of
air around it due to air pressure.
SAFETY:
N/AHomopolar Motor
Gabrielle Sauer – Chemistry Senior
MATERIALS:
AA Battery
Cylindrical Conductive Magnet (I used a Neodymium Magnet)
Copper Wire (shielding/insulation removed)
SETUP:
Remove the insulation from the copper wire. Twist copper wire if necessary (i.e. a bunch of little wires). Make a
heart shape with the wire but do not connect the point at the bottom. Instead, create two half circles at the end. Make
sure the wire is long enough to touch the top of the batter and the sides of the magnet without touching the battery.
Below is some examples of wire setup.
PROCEDURE:
Place the magnet on the negative side of the AA Battery.
Place the copper wire over the battery.
TIPS:
Be sure that the wire is not touching the sides of the battery, otherwise it will not work. If the motor is too strong
use an AAA Battery instead.
EXPLANATION:
A magnetic field is produced by the electrical current moving through the circuit. Another magnetic field is produced
by the magnet. Since the magnetic flow from the current is also passing through the magnet, which has its own
magnetic field, the magnetic fields want to repel from each other, causing torque to turn the copper wire.The Unpoppable Balloon
Gabrielle Sauer‐ Chemistry Senior
MATERIALS:
Candle
Lighter
2 Balloons
Water
SETUP:
Fill one balloon up with water. You want to fill it up all the way while it is not blown up and then blow up the rest of
the balloon and tie it off.
PROCEDURE:
Light the candle. Blow up one balloon and tie it off. Touch the balloon with just air to the candle, it will pop. Then
put the balloon with the water to the candle and it will not pop. You can touch this balloon too the flame and it still will
not pop.
TIPS:
Be sure you have enough water in the balloon to conduct heat.
Also be sure that the popping of the first balloon does not blow out the candle. If it does, relight the candle.
EXPLANATION:
Water is a conductor of heat. The water inside the balloon is lowering the melting point of the plastic balloon.
SAFETY:
Fire
When the balloon pops, there will be debris to look after.The Unbreakable Egg
Alyssa Mills ‐ Biology Senior
MATERIALS:
Carton of Eggs, Large (works with only 1 egg as well)
Towel
Bowl or Bucket
SETUP:
The only set up required for this demonstration is to have the eggs ready and have towels for each of your
participants.
PROCEDURE:
Take out a single egg and place it in the middle of your palm, wrap your fingers around the egg so that most of the
egg is covered evenly by your hand. Squeeze the egg in attempt to break the egg. The egg will not break. Now have
several volunteers try and beak the eggs with their hand and place a towel or bucket underneath them to increase the
“fear” of the egg breaking.
TIPS:
Make sure your participants do not have any rings on as this will alter the pressure on the egg and the egg will
break. Also be sure the eggs are not old as this may compromise the integrity of the shell. If possible keep eggs cold,
squeezing a room temperature egg has lead to egg fractures.
EXPLANATION:
Pressure is the force applied to the surface of an object per unit area over which that force is distributed, in this case
the pressure given by your hand is applied to the whole egg rather than just one side. When you crack an egg, you put
pressure on one side of the egg and it cracks, but when the same force is applied on the entire egg, the egg will not
break. You can use this to explain why eggs don’t crack when a mother hen sits on her eggs.
SAFETY:
If the eggs are old or the grasp on the egg is not even, the egg may break releasing the raw egg. Make sure to wash
your hands if this happens to avoid salmonella poisoning.Cutting Rope with Rope
Alyssa Mills ‐ Biology Senior
MATERIALS:
Camping Rope Alternative: Tow Rope and Camping Rope
SETUP:
Have the rope pulled out in a loose, unknotted, pile. If you are using two different types of rope, have about 2 arms
lengths ready of each kind. Take one of the rope and tie it in a circle, the other rope will stay linear.
PROCEDURE:
Explain to the students that when camping, rope is a very important item to bring; however, it may render useless if
you forget to bring a knife or scissors to cut the rope. But! Fear not, your knowledge of science will save the day! Take
one side of the rope and wrap it around your feet so that there is a taught rope across the top of your feet. Then take
the other end of the rope and run it perpendicular to the rope around your feet. (See Image). You will take the vertical
rope and pull each side up and down in a fast motion. In a matter of seconds, the rope will break! Have your students
feel the end of the rope that was broken, and ask them to smell it as well. They will describe that its hot and smells
burnt.
TIPS:
I have tried this demo with several different types of rope and it appears that this demo may be fool proof. Make
sure to have each rope taught against each other to make sure the friction force is applied.
EXPLANATION:
When the ropes are rubbed together, a friction force is applied. This friction force releases an excess amount of heat
and will break through the small threads of the rope, eventually breaking through the rope. This can be used to explain
friction force as well as heat lost within a system.
SAFETY:
Make sure not to trip on the rope when it is wrapped around your legs.
With only one rope Alternative with Two ropesHydrophobic Sand
Alyssa Mills ‐ Biology Senior
MATERIALS:
Sand (approx. 10oz)
Water (enough to fill the bucket)
Towel
Two Bowls or Buckets
SETUP:
To get the sand to be hydrophobic, you will need to take the sand and spread it on a cooking sheet and put it in the
over set at 200 degrees F for 2 hours. This will remove any moisture from the sand. Then apply Scotch Guard evenly on
the sand and let sit for 4 hours. Repeat this application 4 times. To do the demo fill the bucket or bowl halfway with
water.
PROCEDURE:
Take normal, untreated sand and put it in the water. Lift this sand out of the water to show the students how sand
normally reacts with water. Then take the hydrophobic sand and put it in the water. When you pull the hydrophobic
sand out of the water, pour it into the dry bowl to the side and it will fall out of your hand just like dry sand would.
TIPS:
To get the sand to be fully water resistant, the sand needs to be able to dry completely for 48 hours. This requires a
head start on the prep for this demo. Also be sure the water resistant spray purchased is for fabric and not rubber.
EXPLANATION:
This demo will help students understand what hydrophobic truly means and how the water is repelled from the
molecules. The scotch guard applies a hydrophobic layer around the sand and does not let the water in.
SAFETY:
The towel under the bowl is used to catch any loose sand.Enzymes are Affected by Temperature
Alyssa Mills ‐ Biology Senior
MATERIALS:
Three beakers labeled A, B, and C
Three glow sticks that are the same size, brand, and color
Hot, room temperature, and cold water
SETUP:
Have 3 beakers labeled ABC and fill A with hot water and place on a hot plate to keep the water temperature high,
take beaker B and fill it with water and have it sit at room temperature. Lastly take beaker C and fill it with ice and
water. Have 3 glow sticks for each beaker out of the packaging and ready to break.
PROCEDURE:
Make sure everyone is seated or standing in a place where they can see all three beakers, then turn off the lights so
the brightness and glowing of the glow stickers is more visible. Have one volunteer with cold and one with the room
temperature beakers. On the count of three break the glow sticks and place them in the beakers. The hot beaker will
reach full glow in a matter of seconds.
TIPS:
The size of glow sticks does not matter but be sure to have extra on hand in case some glow sticks do not react.
EXPLANATION:
This demo shows how enzymes are affected by temperature. Enzymes are used to speed up reactions and several
factors such as temperature and pH can alter the rate of the enzymatic activity. Often enzymes are hard for students to
understand and how they are a catalyst in a reaction, this demo brings enzymes into the “light”. (pun intended)
SAFETY:
If the water gets to a boil, make sure to turn down the heat to avoid water burns.Bottle Vacuum
Viktor Baeza ‐ Chemistry Senior
MATERIALS:
A balloon
A bottle or piece of glassware with an opening and a small hole in the bottom
SETUP:
1. If the glassware or bottle doesn’t have a small hole in the bottom, create one using a drill or other known ways
2. Insert the balloon into the bottle through the opening at the top, leaving the mouth of the balloon out and
wrapping it over the opening so that you can blow the balloon up
PROCEDURE:
1. Blow the balloon up to fill the inside of the glassware
2. Remove your mouth to let the balloon deflate, being sure to leave the hole in the bottom of the glassware
uncovered. This will allow the balloon to deflate.
3. Blow the balloon up again to fill the inside of the glassware
4. This time, before removing your mouth to let the balloon deflate, cover the hole in the bottom of the bottle.
This prevents the balloon from deflating by creating a vaccum.
TIPS:
Pick a bottle or glassware that is large enough to clearly see the balloon inflating and deflating
EXPLANATION:
The balloon will deflate during the first attempt because air is allowed into the bottle through the hole in the
bottom. This will allow pressures to stabilize when the balloon deflates. The second time, by blocking the hole in the
bottom of the bottle, air is prevented from entering the bottle. This creates a vacuum in the area between the outside of
the balloon and the inside of the bottle, keeping the balloon from deflating.
SAFETY:
There are no safety precautions with this activity unless the glassware breaks. In this case, broken glass must be
cleaned and disposed of appropriately.Vinegar and Baking Soda Fire Extinguisher
Viktor Baeza ‐ Chemistry Senior
MATERIALS:
Empty Jug
Baking Soda
Vinegar
Candle
Match/Lighter
SETUP:
3. Have all materials laid out together
4. Light the candle
PROCEDURE:
5. Pour Baking soda into the jug
6. Slowly pour vinegar on the baking soda
7. Wait for the reaction to stop (it will bubble a lot)
8. Slowly tip the jug over the candle
9. Do not pour the vinegar/baking soda solution, the candle will go out with gas from the reaction
TIPS:
Use just enough baking soda to cover the bottom of the jug
Pour the vinegar slowly so the reaction doesn’t bubble out of the jug
When trying to extinguish the candle, pour slowly because the CO2 gas will not be visible
EXPLANATION:
The reaction between vinegar and baking soda creates CO2 gas. CO2 is more dense than the air of its surroundings.
Because of this, the CO2 will remain in the jug as concentrated gas. The burning candle is an example of a combustion
reaction. In order for combustion to take place O2 (oxygen) gas is needed. By pouring the CO2 gas over the candle, it is
more dense than the air and will displace any gases available to the candle, putting out the flame.
SAFETY:
If students are conducting the experiment, they will be working with flames so there is a burning hazard. Also, if the
vinegar and baking soda reaction does bubble over the jug, it can wet the area making it slippery.Density Lava Lamp
Viktor Baeza ‐ Chemistry Senior
MATERIALS:
Clear water bottle
Vegetable oil (or any other cooking oil)
Food Coloring
Alka‐Seltzer tablets
SETUP:
5. Fill the water bottle about ¼ full of water
6. Fill the rest of the water bottle with cooking oil, leaving about an inch to an inch and a half open at the top
PROCEDURE:
10. Put a couple drops of food coloring into the bottle. The food coloring will drop through the vinegar and color the
water.
11. Add an Alka‐Seltzer tablet to the water bottle
12. Do not cap the water bottle during the process
TIPS:
Add more food coloring for a darker color of water, add less for a lighter color
Break up the Alka‐Seltzer tablet into pieces that will fit into the mouth of the water bottle
Using more Alka‐Seltzer tablets will create a more intense effect
EXPLANATION:
The oil and water separate because oil is less dense than water. They do not mix because water is composed of polar
molecules and oil is composed of nonpolar molecules. When the food coloring is added, it sinks through the oil and
mixes with water because it is denser than the oil and is polar like the water. When Alka‐Seltzer is added, it will sink
because it is denser than either liquid. It will react with the water to create a gas. The gas is less dense than either liquid
and will rise. The gas gets surrounded by a hydration sphere of water. When the gas rises, it brings some water with it.
Once the gas is able to release into the air, the water will sink back down because it is denser than the oil.
SAFETY:
Do not cap the water bottle during the reaction. This will trap all the air that is forming, building up pressure inside
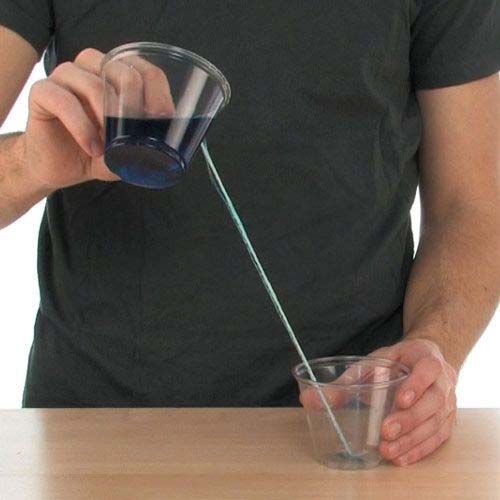
the bottle. This can cause the cap to explode off the water bottle.Traveling Water
Viktor Baeza ‐ Chemistry Senior
MATERIALS:
2 Clear Plastic Cups
A Piece of Yarn or String
Food Coloring
Tape
SETUP:
1. Fill one plastic cup about ¾ full of water
2. Wet the piece of string or yarn with water
3. Tape the string or yarn to the bottom of the empty cup
4. Put the other end of the string with the cup of water
5. Add food coloring to the water so that students can see its movement more clearly
PROCEDURE:
1. Hold each cup of water, keeping the empty cup on the table and raising the cup of water so it is off center from
the empty cup. It is best to have it far enough off center so that water cannot be poured directly into the empty
cup.
2. Hold the yarn against the inside edge of the cup of water with your finger and make sure the cup is raised
enough so the yarn is not touching the edge of the empty cup.
3. Begin to slowly pour the water out of the filled cup. Some water may spill, but most should begin to travel down
the string or yarn if poured slowly.
TIPS:
Pour the water slowly for best results
Keep the string or yarn taught when pouring
Using a longer piece of string or yarn will increase the distance the water can travel
EXPLANATION:
The water is able to travel down the string due to adhesion and cohesion of water molecules. The string was wet in
order for this to work. A wet string contains water molecules adhering to the string, which creates a path for the water
from the cup to travel across. Water molecules will have an attraction to each other, cohesion.
SAFETY:
Students will need to be careful moving around the room if they do the experiment. Any spilled water can leave the
floor slippery and students may slip and fall.Dollar Bill Grab
Jacob Risinger‐ Physics Education Senior
MATERIALS:
Two bottles that can stack on top of each other. Glass beer bottles, Starbucks bottles, 2 liter bottles etc.
A dollar bill, a piece of paper, or a small piece of cloth.
SETUP:
Have materials prepared beforehand maybe have bottles in classroom so they can be dry and ready to use beforehand.
Other than that this can be done with materials had on hand with a variety of different objects.
PROCEDURE:
Set the two bottles tacked on top of each other putting the smaller edges of the bottles tip to tip. While you stack the
bottles on one another stick the dollar bill between the bottles. Place the class bottle on one of the outer edges of the
dollar bill so there is enough room to grab and bend the dollar bill. With one hand hold the bill and bend the section of
paper towards the bottles to create a “U” shape. Taking a finger from your other hand flick the U downward taking the
whole bill with you but leaving the bottles stacked on top of each other.
TIPS:
It takes practice to be able to stack beer bottles neck to neck and have them balance without the addition of the trick.
Making sure the bill is set on an outer edge will help because the dollar bill doesn’t have to travel as far before it comes
out from between the two bottles. Be careful when you flick the bill that it is strait down and your hand doesn’t hit the
set up on the way by try and practice a couple times. It is also to have a hand ready to catch any bottles that might start
to tip.
EXPLANATION:
This is a great example of Newton’s First law of motion that is dealing with objects in motion tend to stay in motion and
objects at rest tend to stay at rest. It is similar to a table cloth being pulled from underneath dishes but is a new spin
looking at Inertia.
SAFETY:
Glass will be falling so there is a chance that it can fall and break if not careful. Most beer glass is thicker to help against
this safety concern so just be careful that students aren’t too close to the demonstration just in case of this possibility.
Diagram (optional)Resonance With a Tuning Fork
Jacob Risinger‐ Physics Education Senior
MATERIALS: (CALIBRI 11 FONT IN ALL CAPS, UNDERLINED AND RED)
A PVC pipes one that I larger than the other that can be closed off and be filled with water.
A PVC pipe that is smaller that has two open ends and is marked with measurements of cm
A tuning fork and striking mallet.
Water to fill up the PVC pipe.
Amplifier if needed the demonstration can be quite at times.
A stand so that you can have the closed tube filled with water standing p right and you can manipulate the small pipe
and tuning fork with your other two hands.
SETUP:
You will need to fill up the closed pipe with water before hand and attach it to the stand so that it can be moved easily
and can be set to the correct height of water that won’t make it to heavy and still produce a sound.
PROCEDURE:
Place the tuning fork over both of the tubes and move the smaller tube up and down until you find a resonance
frequency. You will be able to find an odd harmonic because the sound of the tuning fork will be louder because the
closed tube acts as an amplifier. You may need to zero in on a value when you are doing the demonstration because it
might be tricky to find in a loud room so having room or students be as quite as possible will help you find the right
harmonic.
TIPS:
Manipulating the mallet tuning fork PVC pipe and the other materials might require an extra set of hands to move and
implement. If you are doing this in a classroom have students be as quite as possible because finding the harmonics can
be difficult but you will be able to hear the change in loudness because you are so close to the device so checking with
students can help you find the harmonics easier.
EXPLANATION:
In this demo we are looking at waves and harmonics of waves in a closed tube oscillator of a tuning fork. You can talk
about properties of waves with students and they can help you find the properties of the tuning fork using this
demonstration. This demo is for odd harmonics using the water to create the end of a closed tube.
SAFETY:
There is water in the closed tube and moving this can be quite heavy. There is also a potential for leaking in your tube so
having something to catch water so there are no slipping hazards would be a safety concern.Follow Me Laser
Jacob Risinger‐ Physics Education Senior
MATERIALS:
A laser pointer of some kind
A bottle of water that can have a hole punched into it. Suggested a 2 liter bottle.
Water and somewhere to catch the water when it comes pouring out of the two liter.
Stand for laser pointer so that you can align the height of the laser pointer with the whole in the bottle.
SETUP:
Punching and taping over the hole needs to be done before hand. Creating the correct height so that the water will be
able to follow the stream of water down is necessary and requires some measurements. Creating a bottle that has a
steady stream will work best to show this sort of internal reflection.
PROCEDURE:
Have two liter filled with water that has a piece of tap over a whole. Show that the laser can go straight through the
bottle and out the other side using a whiteboard or you hand to show that the light can clearly pass through all the
mediums. This needs to be aligned with the hole you have put in the bottle and tap combination so that when the steam
beings to flow it will follow the stream. Then removing the tap and allowing the stream to pour out we will see that the
light will follow the path of the water because as the water bends it is changing the angle at which the laser is hitting the
water air barrier. This will cause the laser to follow the stream down into the cup showing total internal reflection.
TIPS:
Working on getting a steady stream of water is the trickiest part. Once you have a hole that works at a certain height
you will need to set up the laser at a similar height so that the laser can’t escape the stream of water because the
incoming angle will be less than what is needed to leave and will just continue to reflect down the stream of water. This
can be messy so make sure you have something set up to catch any water that might run away.
EXPLANATION:
We are showing total internal reflection with this demonstration. We can show light hitting a medium and due Snell’s
law it will not be able to pass back out of the water air barrier. Incoming angle is outgoing angle and it can’t be greater
than Snell’s law dictates.
SAFETY:
Safety with the laser pointed near anyone’s eyes and water might cause a slipping hazard so be cautious with set up and
taking down demo.
DIAGRAM:Parallel and Series Circuit (Energy Ball)
Jacob Risinger‐ Physics Education Senior
MATERIALS:
An Energy Ball for showing electricity.
Volunteers
SETUP:
The only set up required is getting the energy ball and having another person to help you with the device. You can do
this by yourself but to demonstrate series and parallel circuits you will need more people and know how you would like
to arrange them to demonstrate these concepts
PROCEDURE:
Have a volunteer join you from your class. Have them place one finger out so that can be in contact with one of the
metal backings pieces. Then you will use your hand to hold and make contact with the other end. As long as you are not
toughing the other person nothing will happen but once you make contact with them you will complete the circuit and
the energy ball will light up and make noise. You can then repeat the demonstration adding more people in series to
show a series circuit and then arrange them a final time to demonstrate a parallel circuit that will take either road to
continue making the ball glow and make noise.
TIPS:
Have people willing to roll with the demonstration you can complete the circuit by lightly bopping them on the nose.
Skin contact on the metal on back of energy ball and to your volunteers works best. It does not travel through clothing
as well as it should so using skin which is a great conductor with help move the current along and helps show the effects
of the energy ball.
EXPLANATION:
Through the demonstration you can see how series and parallel circuits work using people and a very simple battery
attached to a light. It gets people involved and come to terms with the ideas of series and parallel circuits because they
have a chance to become a part of the connection.
SAFETY:
No Safety concerns the circuit is designed to be completed by a human hand. There isn’t not enough energy in the tiny
battery of the energy ball to cause any harm students will just have to hold hands so embarrassing but no safety issues.
DIAGRAM:You can also read