#22470 STARSENSE EXPLORER 8" DOBSONIAN #22471 STARSENSE EXPLORER 10" DOBSONIAN
←
→
Page content transcription
If your browser does not render page correctly, please read the page content below
I N ST R U CT I O N M A N U A L
#22470 STARSENSE EXPLORER 8” DOBSONIAN   #22471 STARSENSE EXPLORER 10” DOBSONIAN
INTRODUCTION
    Congratulations on your purchase of the StarSense Explorer Dobsonian (SSE Dob) telescope. Your SSE Dob combines large
    optics with the exciting StarSense Explorer dock and app to make finding and observing all kinds of astronomical objects fun
    and easy! You’ll be able to locate faint deep-sky objects—galaxies, nebulae, star clusters and more— and place them within the
    field of view of the eyepiece in seconds. The large primary mirror collects lots of light, enabling you to see details in objects that
    you have never seen before.
    Before you take your StarSense Explorer Dob outside for your first night of observing, we recommend reading through this
    manual. It will help you to better understand the features of your telescope and know what to expect.

2 I ENGLISH
TABLE OF CONTENTS
What’s in the Box . . . . . . . . . . . . . . . . . . . . . . . . . . . . . . . . . . . . . . . . . . . . . . 4

Base Assembly  .  .  .  .  .  .  .  .  .  .  .  .  .  .  .  .  .  .  .  .  .  .  .  .  .  .  .  .  .  .  .  .  .  .  .  .  .  .  .  .  .  .  .  .  .  .  .  5

Telescope Assembly  .  .  .  .  .  .  .  .  .  .  .  .  .  .  .  .  .  .  .  .  .  .  .  .  .  .  .  .  .  .  .  .  .  .  .  .  .  .  .  .  .  .  .  .  6

Pointing the Telescope  .  .  .  .  .  .  .  .  .  .  .  .  .  .  .  .  .  .  .  .  .  .  .  .  .  .  .  .  .  .  .  .  .  .  .  .  .  .  .  .  .  .  .  7

Focusing  .  .  .  .  .  .  .  .  .  .  .  .  .  .  .  .  .  .  .  .  .  .  .  .  .  .  .  .  .  .  .  .  .  .  .  .  .  .  .  .  .  .  .  .  .  .  .  .  .  .  . 8

Using the StarPointer .  .  .  .  .  .  .  .  .  .  .  .  .  .  .  .  .  .  .  .  .  .  .  .  .  .  .  .  .  .  .  .  .  .  .  .  .  .  .  .  .  .  .  .  9

StarSense Explorer Dock and App .  .  .  .  .  .  .  .  .  .  .  .  .  .  .  .  .  .  .  .  .  .  .  .  .  .  .  .  .  .  .  .  .  .  .  .  .  10

Determining Magnification and Selecting Eyepieces  .  .  .  .  .  .  .  .  .  .  .  .  .  .  .  .  .  .  .  .  .  .  .  .  .  .  .  11

Cooling your Telescope’s Optics .  .  .  .  .  .  .  .  .  .  .  .  .  .  .  .  .  .  .  .  .  .  .  .  .  .  .  .  .  .  .  .  .  .  .  .  .  .  11

Your First Night Out - What to Expect .  .  .  .  .  .  .  .  .  .  .  .  .  .  .  .  .  .  .  .  .  .  .  .  .  .  .  .  .  .  .  .  .  .  .  12

Dark Adaptation and Light Pollution  .  .  .  .  .  .  .  .  .  .  .  .  .  .  .  .  .  .  .  .  .  .  .  .  .  .  .  .  .  .  .  .  .  .  .  .  13

Use of Filters .  .  .  .  .  .  .  .  .  .  .  .  .  .  .  .  .  .  .  .  .  .  .  .  .  .  .  .  .  .  .  .  .  .  .  .  .  .  .  .  .  .  .  .  .  .  .  .  . 13

Collimating the Optics  .  .  .  .  .  .  .  .  .  .  .  .  .  .  .  .  .  .  .  .  .  .  .  .  .  .  .  .  .  .  .  .  .  .  .  .  .  .  .  .  .  .  .  14

Transporting .  .  .  .  .  .  .  .  .  .  .  .  .  .  .  .  .  .  .  .  .  .  .  .  .  .  .  .  .  .  .  .  .  .  .  .  .  .  .  .  .  .  .  .  .  .  .  .  .  16

Care and Maintenance .  .  .  .  .  .  .  .  .  .  .  .  .  .  .  .  .  .  .  .  .  .  .  .  .  .  .  .  .  .  .  .  .  .  .  .  .  .  .  .  .  .  .  17

Specifications StarSense Explorer 8” Dobsonian .  .  .  .  .  .  .  .  .  .  .  .  .  .  .  .  .  .  .  .  .  .  .  .  .  .  .  .  .  18

Specifications StarSense Explorer 10” Dobsonian .  .  .  .  .  .  .  .  .  .  .  .  .  .  .  .  .  .  .  .  .  .  .  .  .  .  .  .  . 19

Solar Warning .  .  .  .  .  .  .  .  .  .  .  .  .  .  .  .  .  .  .  .  .  .  .  .  .  .  .  .  .  .  .  .  .  .  .  .  .  .  .  .  .  .  .  .  .  .  .  .  20

                                                                                                                                                                      ENGLISH I 3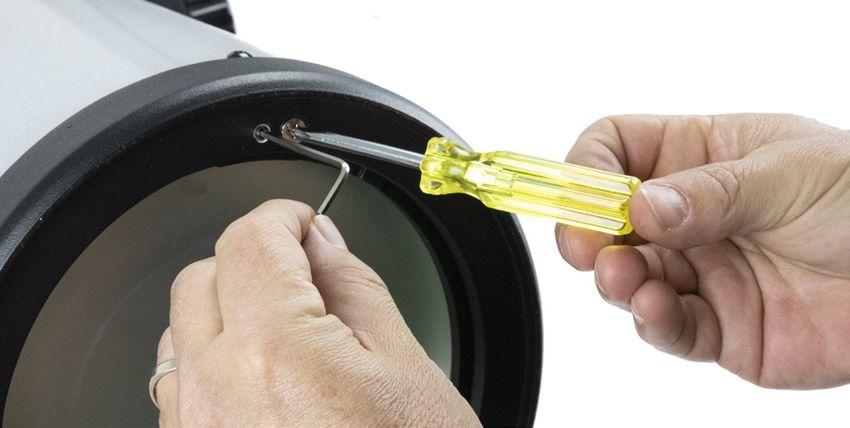
WHAT’S IN THE BOX

   Box 1 - Dobsonian Base

                                                                                                                                             E Side supports
                                                                                                                                                     (x2)

    A1 Left side panel           A2 Right side panel             B Front panel      C Top plate                D Bottom plate                F       Base assembly
                                                                                                                                                     screws (x22)

     FEET ASSEMBLY                                                      AZIMUTH PIVOT BOLT ASSEMBLY

     G1 Feet (x3)        G2 Feet screws        G3 Feet screw           H1 Bolt        H2 Nut          H3 Steel          H4 Hollow                  H5 Teflon
                             (x3)                  covers (x3)                                              washers          plastic                        washer
                                                                                                            (x2)             cylinder

     HANDLE ASSEMBLY                                    EYEPIECE RACK ASSEMBLY                              ALTITUDE BEARING ASSEMBLY

              J1 Base        J2 Handle                   K1 Eyepiece rack        K2 Rack                         Altitude bearing
                                                                                                             L1 cylinders (x4)
                                                                                                                                                        Bearing
                                                                                                                                               L2 screws (x4)
                  handle            screws (x2)                                       Screws (x2)

                                                                                             INCLUDED TOOLS

                                                                       Rubber                 Screwdriver          Crescent                        Hex keys (x2)
                                                                  M
                                                                       bumper                                      wrenches (x2)
   Box 2 - Optical Tube Assembly

     O Optical tube assembly with dust cover                                                         P      StarSense dock            Q StarPointer
                                                                                                                                               red dot finderscope

    N1 Altitude
       tensioning knob
                                                      25mm Omni
                                                  R1 Plössl eyepiece                          T
                                                                                                  2”-to1.25” eyepiece
                                                                                                  adapter with 1.25”
                                                                                                  cover cap                  U      Collimation cap with
                                                                            2” focuser                                              2mm and 2.5mm hex keys*
                      N2 Cosmetic knob                                  S   extension tube                                          *2.5mm hex key included with 8” Dob only

                                                                                                                                    NOTE: For collimating your telescope’s
                                                                                                                                    optics, refer to page 14

4 I ENGLISH
BASE ASSEMBLY

                                                                        J2

                                                J2                                                                                                                F

                                                                                                                                                  L2

                                                                                     K1
                                                                                                                                L1                     L2
                                                                                                                                                                  F

                                                     J1                                                                                      L1

                                                                                                                F
                                                                                                                                                                  F

                                                          L1

                                                               L1
                                                                                                                                                             E
                                                                         F                                      F

                                                                                                                                                       A2
                       L2

             F                                                                                                  F
                                                                         F
                            L2
                                                                                              B

             F                                                                                              H2
                                                                         F

                                                                                                                 H3

                                                               A1
             F
                                                                                                            H4

E                                                                                                 C

                                                                                                                                     F

                                                                                                            F
                                                                    F

                                                                                 F                                        F

                                                                                          F           H5                                 F
                                                                                                                      F
                                                                             F

                                                                                     F

                                                                                                  D

                                                                                                            G1
                                                                    G1

                                                                                                       H3
                                                                                                             G2

                                                                        G2
                                                                                                             G3
                                                                                                                          G1

                                                                                                       H1
    Figure 1A: Exploded view of the StarSense                           G3

    Explorer Dobsonian base.                                                                                               G2

                                                                                                                           G3

                                                                                                                                                            ENGLISH I 5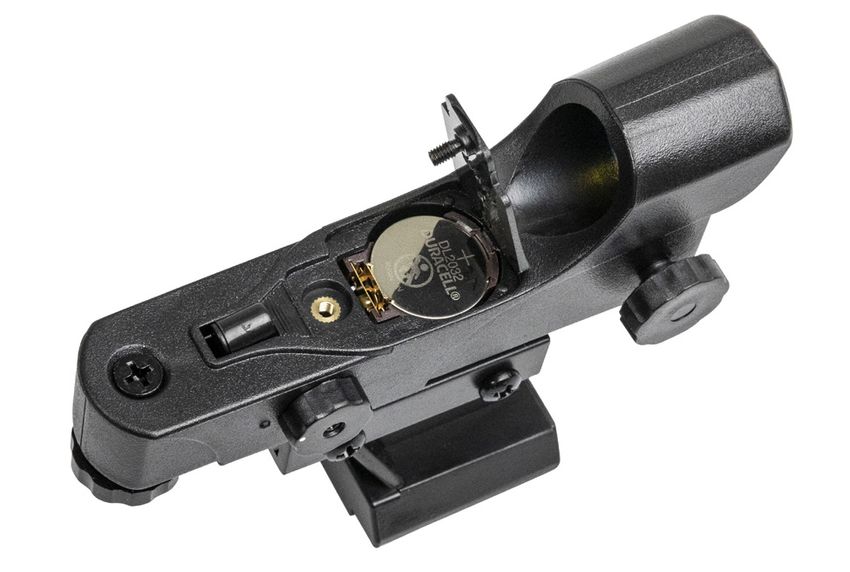
TELESCOPE ASSEMBLY
                                                                                  R1

                                                                                       T

                                                                                           S
                                                                        P

                                                              Q

                                O

                                               N1

                                                                                                  N2

    Figure 1B: Exploded view of the StarSense Explorer Optical Tube Assembly

    Refer to Figure 1 to see how the parts of the SSE Dob fit together.
    For detailed assembly instructions, refer to the printed Quick Setup Guide included in the box, or on the SSE Dob product page
    at www.celestron.com

6 I ENGLISH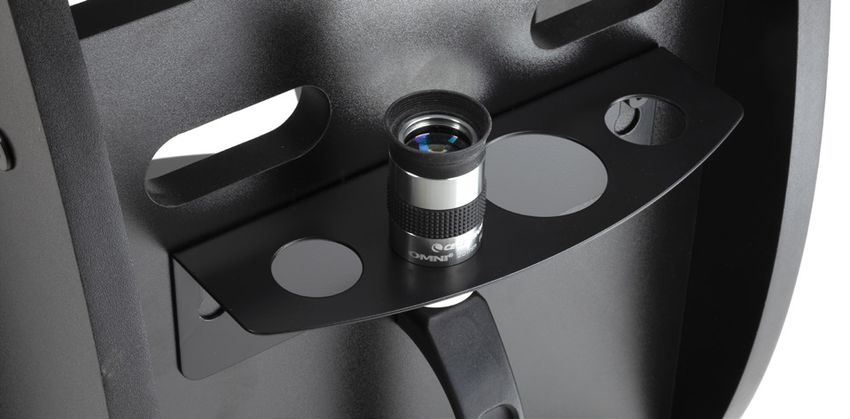
POINTING THE TELESCOPE
Dobsonian bases are altazimuth mounts. This means that                       You can adjust the tension along the altitude axis by turning
the telescope moves in two directions: up-and-down                           the knob located on the same side as the telescope’s
(i.e. altitude), and left-to-right (i.e. azimuth) (Figure 2).                focuser—the altitude tensioning knob (Figure 4).

   ALTITUDE

                                                                             Figure 4: The tension of the altitude motion can be adjusted with the
                                                                             altitude tensioning knob. (NOTE: the other knob on the opposite side does
                                                                             not function for adjusting altitude tension.)

                                          AZIMUTH                            Turn the knob to add enough tension to provide a smooth
                                                                             up-and-down motion. Under most circumstances you won’t
                                                                             need to add much tension. The telescope is balanced for
Figure 2: The StarSense Explorer Dobsonians have two axes of motion:         normal use. However, if you are using a heavy eyepiece or
altitude (up-and-down) and azimuth (left-to-right).                          a larger smartphone, you may need to add more tension so
                                                                             that the telescope remains still when not touched.

Pointing your Dob at an object is easy. Simply move the
telescope tube up-and-down and left-to-right until the
telescope is pointed toward the desired object and the
object appears in the telescope’s eyepiece. The panning
knob at the front of the telescope tube provides a convenient
place to grasp the tube for pointing (Figure 3). Using this
knob also prevents heat from your hand from entering the
optical path, which can temporarily distort the view.

Figure 3: The panning knob provides an excellent place for your fingers to
grasp when pointing the telescope.

                                                                                                                                            ENGLISH I 7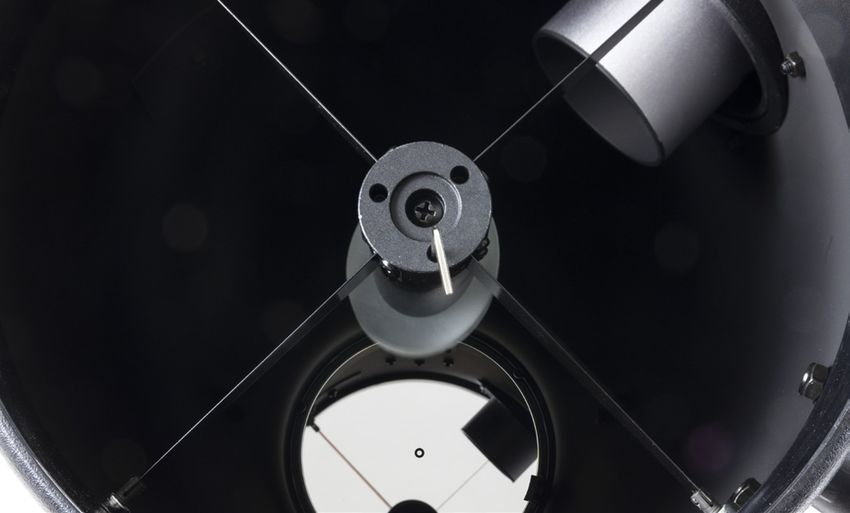
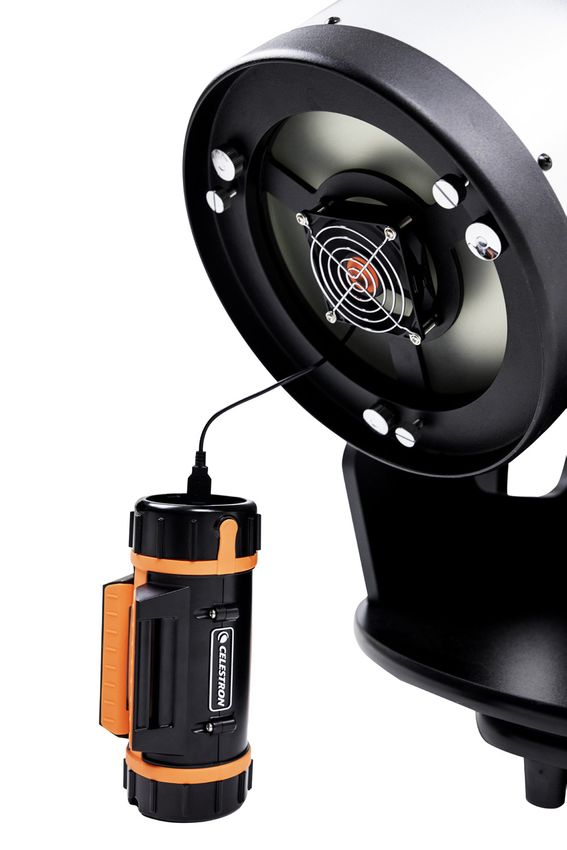
FOCUSING
    The SSE Dobs come with a 2” Crayford focuser, a 2”                    Since the SSE Dob is a Newtonian reflector, the images
    extension tube, and a 2”-to-1.25” eyepiece adapter.                   you’ll see will appear upside-down as compared to the
    With these three items, you can use virtually any telescope           naked eye (Figure 6). While this has little impact on
    eyepiece with the SSE Dob.                                            astronomical observing, it can be a bit confusing when you
                                                                          are viewing land-based objects.
    For most eyepieces, make sure the 2” extension tube
    is in place in the focuser. If it’s not, the eyepiece will not
    reach focus. If you’re using an eyepiece that requires a lot of
    inward focus travel, remove the 2” extension tube. You may
    need to remove the tube if attempting to use your Dob with
    an astronomical imaging camera.

    If you wish to use a 1.25” format eyepiece, you’ll need to
    use the 2”-to-1.25” eyepiece adapter. Simply place it in the
    focuser (with 2” extension tube attached), and then place
    the 1.25” eyepiece in the adapter. Tighten the thumbscrew
    on the adapter to secure the eyepiece in place. The adapter
    uses an internal brass compression ring so your eyepiece
    barrel won’t be scratched or marred.
                                                                                                     NAKED EYE VIEW
    To focus, turn the focus knobs clockwise or counterclockwise
    until the object in the telescope eyepiece is in sharp focus.
    To lock the focuser position in place once you have achieved
    sharp focus, tighten the focus lock thumbscrew (Figure
    5). If you need to adjust the focus knob’s tension, you can
    tighten or loosen the focuser tensioning set screw using the
    provided hex key.

                                                  FOCUS LOCK
                                                  THUMBSCREW
                                                                               VIEW THROUGH NEWTONIAN REFLECTOR TELESCOPE

                                                                          Figure 6: Like all Newtonian reflectors, the SSE Dobs produce images
                                                                          that appear upside-down as compared to the naked eye.

                                                  FOCUSER
                                                  TENSIONING
                                                  SET SCREW

    Figure 5: The focus lock thumbscrew locks the focuser in place once
    focus has been achieved. The focus tensioning set screw adjusts the
    tension of the focusing knobs.

8 I ENGLISH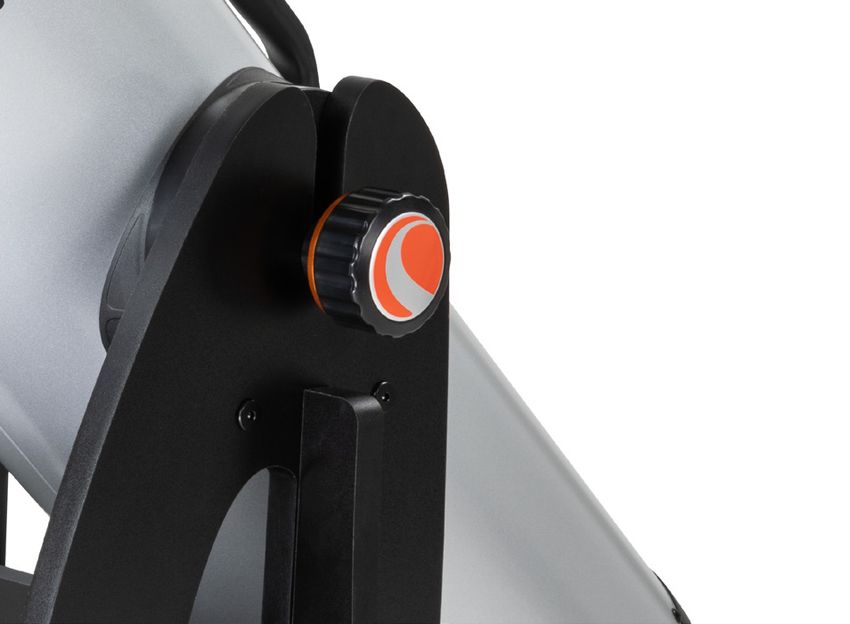
USING THE STARPOINTER
Although you won’t need to rely on the StarPointer red-dot       To replace the battery:
finder when you are using the StarSense Explorer app, it can
help you align the app with the telescope. The StarPointer       1. U
                                                                     se a Phillips-head screwdriver to remove the battery
also comes in handy when you are locating objects during            cover securing screw (Figure 8).
the day, since the app only works under the stars at night.

To align the StarPointer, first point the telescope at an
object that is at least ¼ mile away. We recommend aligning
during the day. Choose a distant tree, sign, building, or
other landmark. If you are aligning at night, you can use a
streetlight, the Moon, or a bright star or planet.

Once you have pointed the telescope at the object, check
to ensure that it appears in the eyepiece. Next, turn the
StarPointer on using the LED dial (Figure 7).

                          LED DIAL

                                                                 Figure 8: To open the StarPointer’s battery cover, first remove the
                                                                 securing screw.

         ALTITUDE KNOB                           AZIMUTH KNOB
                                                                 2. Remove the discharged battery from the battery com-
                                                                    partment. You may need to use a knife or screwdriver to
                                                                    pry the battery out of its holder.

Figure 7: The StarPointer red-dot finderscope.                   3. Insert the new battery so that the positive side is visible to
                                                                    you. Make sure the battery is properly seated within the
Turn up the brightness level until you can easily see the           battery compartment (Figure 9).
red dot. Now, without moving the telescope, use the
StarPointer’s altitude and azimuth adjustment knobs to
center the red dot on the same object that you centered
in the telescope eyepiece. When you’re finished, check
to make sure the object is still centered in the telescope
eyepiece. If it is, you are done aligning the StarPointer. If
not, move the telescope so the object in the telescope’s
eyepiece is centered again. Continue using StarPointer’s
altitude and azimuth adjustment knobs to center the red dot
on the object again.

Turn off the StarPointer when you aren’t using it to conserve
its battery. While the StarPonter’s battery should last a long
time, eventually it will need to be replaced with a CR2032
3V Lithium button cell battery. These are very common and
available from a wide variety of retailers.
                                                                 Figure 9: When the battery is properly seated in the compartment as
                                                                 shown, the battery cover should be easy to reinstall.

                                                                 4. C
                                                                     lose the battery compartment and reinstall the securing
                                                                    screw.

                                                                                                                                 ENGLISH I 9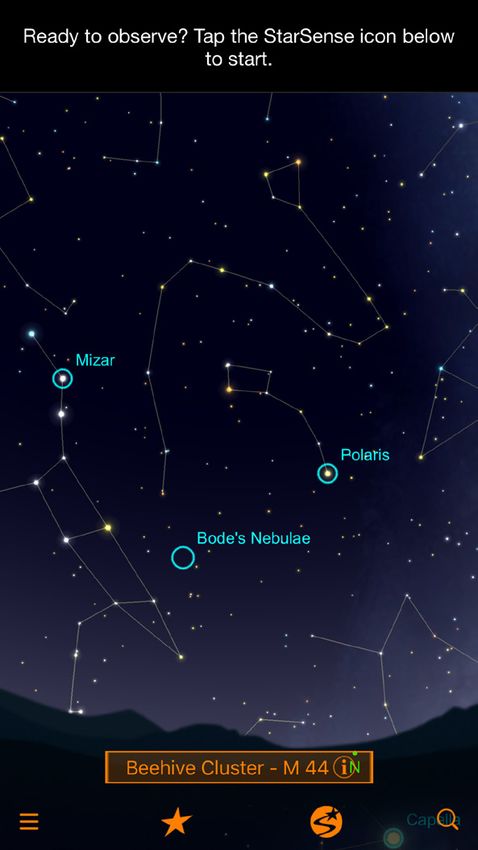
STARSENSE EXPLORER DOCK
    AND APP
    Perhaps the most exciting feature of the StarSense
    Explorer Dobsonian is the StarSense Explorer dock and the
    StarSense Explorer smartphone app. With the app to guide
    you, you’ll spend more time observing objects instead of
    struggling to find them among myriad stars overhead! The
    Celestron StarSense Explorer is the only Dobsonian that
    includes this incredible feature.

    To begin, download and install the app from the Apple
    App Store (iOS) or Google Play (Android). You’ll also find
    the minimum system requirements there. If you have any
    questions about whether your smartphone is compatible
    with the app, please visit celestron.com/SSE

    Once you have downloaded the app, use the app unlock
    code that you’ll find on the printed card that came with your
    telescope (Figure 10).

                              Download the app from the                  or
                              before your first observing session.

                              When prompted, enter the unique unlock code below to
                              enable telescope control on your device.

                                                                                                              STARSENSE ICON
                                                                                     Figure 11: Once you have unlocked the StarSense Explorer app, press the
                                                                                     StarSense icon to begin finding objects.
    Figure 10: The StarSense Explorer App unlock code is printed on the card
    included with your telescope.

    Each code can enable up to five devices to use the
    StarSense Explorer functionality. If you use the code all five
    times and need to unlock the app on more devices, please
    contact Celestron Technical Support at celestron.com/
    pages/technical-support for options.

    With the app unlocked, you are ready to begin. Place your
    smartphone into the StarSense Explorer dock and press
    the StarSense icon at the bottom of the planetarium screen
    (Figure 11).

    Choose the “NEEDS ALIGNMENT” option and follow the
    on-screen prompts to align the smartphone’s camera with
    the telescope. Once this procedure is complete, you can
    use the app to locate objects.

    Select an object to view from the planetarium or the
    “Tonight’s Best” list (i.e. press the star icon). Arrows will
    appear on screen, guiding you to the object. Follow the
    arrows until the bullseye turns green and the object is in
    your telescope’s field of view. It’s that easy!

    While you observe, you can read detailed information about
    the object. Hundreds of the most popular objects also offer                      Figure 12: Press the Object Info bar to receive additional information about
    an audio presentation. To listen, press the bar at the bottom                    the selected object, including images and audio presentations for many
    of the screen that contains the object’s name (Figure 12).
                                                                                     objects.

10 I ENGLISH
DETERMINING MAGNIFICATION COOLING YOUR
AND SELECTING EYEPIECES TELESCOPE’S OPTICS
To change the magnification of the telescope, you’ll need You’ll get the best views through your telescope when it
to swap out the eyepiece in the telescope’s focuser. To has reached thermal equilibrium with the ambient air. If the
calculate the magnification you can achieve with a given telescope is warmer than the outside air, the mirror will
eyepiece, use this formula: be acclimating to the temperature and its figure will be
changing. The images you see through a telescope that
Focal length of telescope ÷ has not cooled will not appear as sharp as they otherwise
Focal length of eyepiece would. If you are taking your telescope from a heated house
= Magnification to the outdoors, allow around one hour before expecting it
to produce sharp images. For this reason, we recommend
The SSE Dobs have a focal length of 1200mm. They come storing your telescope in a dry but unheated area like a
with a 25mm Omni Plössl eyepiece. Using the formula, we garage or storage shed.
can calculate that this combination yields a magnification
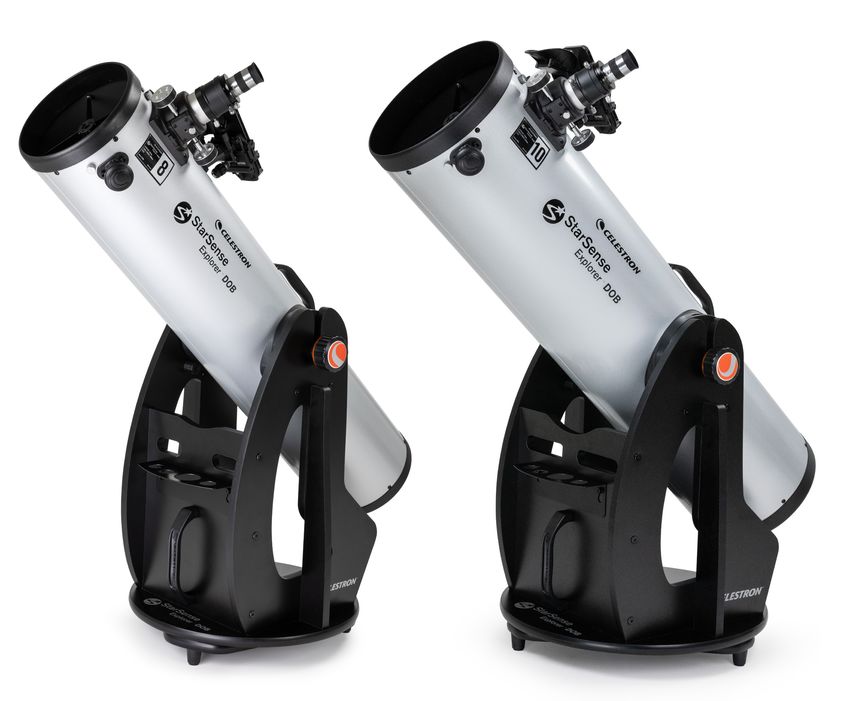
of 48x (1200mm ÷ 25mm = 48x). This is an excellent For the 10” SSE Dob, there is an optional USB Cooling Fan
magnification for locating and observing wide-field deep for Dobsonians available. It mounts onto the rear of the mirror
space objects. You may want to consider purchasing a cell and blows air on the mirror to expedite cooling (Figure
higher-magnification eyepiece, like a 10mm Omni Plössl, 14). The fan will help the optics reach thermal equilibrium
for higher-power views of the Moon and planets. Do not faster. (The 8” SSE Dob does not have a fan mount so it is
increase magnification too much though, or the view may not compatible with the Cooling Fan.)
degrade due to atmospheric seeing conditions (i.e. air
turbulence).
The maximum magnification for any telescope is about 60
times per inch, which equates to 480x for the 8” SSE Dob,
and 600x for the 10” SSE Dob. In many locations, however,
it will be difficult to achieve sharp images much over 100x
magnification due to turbulence in the air above you. If you
notice that the stars overhead are twinkling heavily, seeing
conditions are poor. You should stick to lower magnification.
If the stars appear to shine steadily, seeing conditions are
good. You can try using higher-magnification eyepieces.
The SSE Dobs can accept both 1.25” and 2” format
eyepieces. 2” eyepieces generally provide a wider field of
view but can cost significantly more. To use a 2” eyepiece,
remove the 2”-to-1.25” adapter from the focuser and insert
the eyepiece directly into the 2” extension tube. Secure the
eyepiece with the thumbscrews on the 2” extension tube.
The eyepiece rack located on the front of the base provides
a convenient place to put eyepieces when they are not
in use. It can accept three 1.25” eyepieces and one 2”
eyepiece (Figure 13).
Figure 14: The optional USB Cooling Fan for Dobsonians is compatible with
the 10” SSE Dob..
Figure 13: The eyepiece rack is a convenient place to store additional
eyepieces during your observing session.
ENGLISH I 11YOUR FIRST NIGHT OUT -
WHAT TO EXPECT
You can observe literally thousands of objects with the Globular Star Clusters
larger aperture of the SSE Dobs: These are tight clusters of hundreds of thousands of
stars that coalesced early in our galaxy’s formation. These
The Moon clusters appear like globes of light. The brighter ones can
Observing the lunar surface is a great place to start. You’ll be resolved into individual stars in good conditions. Most
easily see craters, maria, lacus, valleys, mountains, and globular clusters are best viewed with a medium-power
other features. The Moon is so bright that you might want eyepiece, as they are not nearly as wide as open clusters,
to consider using an optional Moon filter. It threads onto yet not bright enough for high power either.
bottom of the eyepiece to dim the view. We also recommend
a higher-power eyepiece to help you explore the Moon Nebulae
up-close. You’ll generally need to be under dark skies to see
gaseous nebulae, which appear as a faint glow around
Planets stars. Don’t expect to see any nebulosity from urban skies
The best planets to view are Jupiter, Saturn, Mars, and except for perhaps the brightest ones, like the Orion
Venus. A higher-power eyepiece will help bring out the Nebula and Lagoon Nebula.
fine details. You’ll be able to see the rings of Saturn,
surface detail on Jupiter along with its moons, the phases Galaxies
of Venus, and perhaps some surface detail on Mars if it is Perhaps the most fascinating of all objects to view,
near opposition (i.e. when it is closest to the Earth). galaxies are like “island universes” unto themselves.
While you can detect the brightest galaxies, like the
Stars and Double Stars Andromeda Galaxy, from somewhat light-polluted skies,
Stars will appear like points of light regardless of the they are best observed from dark skies. Literally hundreds
magnification used. However, a telescope can reveal a of galaxies are well within the observing reach of the SSE
star’s color and also “split” double stars using higher Dobs. The best ones display fine details like faint spiral
magnifications. For variable stars, see if you can detect arms and dust lanes. Many, however, will just appear as
a star’s change in brightness over a period of days or non-stellar “streaks” or “blobs.” Even so, just being able
weeks. to detect the light from another galaxy outside our own is
rewarding in itself.
Open Star Clusters One thing to keep in mind is that the SSE Dobs are not
These are star groups that formed together within our motorized. This means that they will not automatically track
Milky Way galaxy. They can appear spectacular in the celestial objects as the Earth rotates. As a result, you will
telescope eyepiece, even from somewhat light-polluted notice that objects drift a bit as you observe them and will
skies. Astronomers often describe star clusters as exit the eyepiece’s field of view within a minute or two,
resembling “crushed diamonds on black velvet” in the depending on the magnification you are using. Objects will
telescope’s eyepiece. Clusters are generally best viewed drift out of the field of higher-power eyepieces faster, since
with low-power eyepieces, as they usually require a wide their field of view is narrower. You will need to manually push
field of view to see the entire cluster. the Dob along to keep objects centered over time. This is
easy to do. Grab hold of the telescope’s panning knob and
move it slightly up-and-down and left-to-right as needed.
12 I ENGLISHDARK ADAPTATION AND USE OF FILTERS
LIGHT POLLUTION
Experiment with adding optional filters to your setup to
It takes at least a half-hour for the human eye to become help improve the view. Astronomical filters thread onto the
dark-adapted, so don’t immediately expect to see subtle bottom of your eyepiece and usually come in both 1.25” and
detail in faint deep-sky objects as soon as you get outside. 2” formats. Simply remove the eyepiece from the focuser,
While you are observing, avoid any bright lights (like thread the filter onto the bottom of the eyepiece’s barrel,
going from outside to inside a lighted house) or else your and then reinsert it into the focuser.
dark adaption will need time to reset. Use red flashlights
designed for astronomical use, as the red light will not There are many useful filters to choose from:
greatly affect your night vision. The Moon will also affect
your dark adaptation, so if you directly observe the Moon oon Filter – An essential for viewing lunar details, this
M
expect it to take time to regain your night vision. filter cuts down on glare and makes bright objects dimmer.
Local light pollution will greatly diminish the appearance Variable Polarizer – Like a Moon filter, a polarizer dims your
and contrast of fainter deep-sky objects in the telescope. view. The key difference is that you can customize the extent
Do not expect to see much detail from urban skies. You’ll of the dimming effect by rotating the polarizer.
get your best views from dark sky locations away from city
or suburban night lighting. Bright objects such as the Moon, Color Filters – Available in a variety of colors, these can
planets, double stars, and bright open star clusters are not improve contrast when observing planetary details.
affected by light pollution as much, so they make good
ight Pollution Filters – If you are viewing deep-space
L
objects for backyard viewing regardless of where you are.
objects from urban or suburban skies, these improve
Also keep in mind that the Moon itself can light up much of
contrast by blocking the “bad” light from local light pollution
the night sky, preventing views of faint objects even from
and transmitting the “good light” from deep-sky objects.
dark sites. So schedule deep sky observing when the Moon
You’ll notice the greatest improvement in contrast when
won’t be visible.
observing nebulae
ENGLISH I 13COLLIMATING THE OPTICS
Collimation is the process of aligning the telescope’s optics. It is easiest to collimate a telescope during the day with
Dobsonians use the Newtonian reflector optical design, the telescope pointed toward a blank wall. This will provide
which consists of a parabolic primary mirror and a flat a high-contrast view, making it easier to determine which
secondary mirror. To ensure best performance, you should adjustments should be made. Use the supplied hex key(s)
periodically check the alignment of the optics. To help with to make adjustments. The 8” SSE Dob comes with 2mm
this, we have included a special “collimation cap” you can and 2.5mm hex keys. The 10” SSE Dob comes with a single
use. In addition, the primary mirror is center-marked with an 2mm hex key. For the 8” SSE Dob, you’ll also need to use
adhesive ring label to aid in collimation. the supplied Phillips head screwdriver.
To check alignment of the mirrors, first remove any First, adjust the secondary mirror at the front of the telescope
eyepieces. Make sure the 2”-to-1.25” adapter is installed in using the 2mm hex key. While making adjustments, we
the focuser. Then, place the collimation cap in the focuser recommend positioning the tube horizontally. This prevents
(Figure 15). anything from falling onto the primary mirror.
1. Y
ou should be able to see the reflection of the entire
primary mirror centered within the secondary mirror as
shown in Figure 16. If you can’t (like in Figure 17, for
example), use the three socket-head set screws in the
secondary mirror holder to adjust the tilt of the secondary
mirror (Figure 18).
Edge of
secondary
mirror
Figure 15: To check the alignment of the mirrors, use the included
collimation cap in the focuser.
Look through the small hole in the center of the collimation
cap. The view should look like Figure 16. If it does not, you’ll
need to make some adjustments to the mirrors’ alignment.
Reflection of Bottom edge
your eye of focuser Reflection of
drawtube primary mirror
Reflection
Edge of of primary
secondary
Figure 17: If the reflection of the primary mirror is not centered within
mirror
mirror the secondary mirror as shown above, you will need to adjust the tilt of
the secondary mirror.
Secondary 2mm
mirror Primary Hex key
holder mirror clip
Reflection of
secondary mirror holder
Figure 18: The three socket head set screws in the secondary mirror
Figure 16: If your telescope is properly aligned, the view through the
holder adjust the tilt of the secondary mirror.
collimation cap should look like the drawing above.
14 I ENGLISHa. A
djust one set screw at a time. Make only small or the 8” Dobsonian, use the 2.5mm hex key and
F
adjustments. Phillips head screwdriver to tilt the primary mirror. There are
three pairs of collimation screws. Each pair works together
b. If one set screw becomes too tight or too loose, make
to adjust the tilt.
adjustments to the other set screws to compensate.
a. A
djust one pair of screws at a time. Start by
2. Continue adjusting the set screws until the primary mirror
loosening one of the screws in the pair and
appears centered within the secondary mirror (Figure
tightening the other (Figure 20).
19). When you are finished, make sure all three of the set
screws are snug.
Edge of
secondary
mirror
Figure 20: For the 8” Dob, there are three sets of push-pull screws
in the mirror cell that adjust the tilt of the primary mirror. Loosen one
screw in the pair and tighten the other to adjust the tilt.
Reflection of Reflection of b. If the mirror tilts opposite the desired direction,
secondary mirror primary mirror loosen the screw that you previously tightened,
and tighten the other screw in the pair.
Figure 19: Continue making tilt adjustments to the secondary mirror until c. Once you have adjusted one pair of screws as
much as you can, move onto another pair of screws.
the primary mirror reflection is centered as shown in the drawing above.
d. C
ontinue adjusting until the reflection of the
secondary mirror is centered within the reflection
3. N
ext, adjust the tilt of the primary mirror until the reflection of the primary mirror. When you are finished, the
of the secondary mirror is centered within the reflection view through the collimation cap should look like
of the primary mirror. Figure 16.
ENGLISH I 15 or the 10” Dobsonian, you won’t need any tools
F
to tilt the primary mirror. Instead, simply adjust the
TRANSPORTING
thumbscrews. Three of the thumbscrews are locking
screws, while the other three thumbscrews adjust the
Transporting the StarSense Explorer Dobsonian is
tilt.
easy, especially considering its size. First, remove the
a. S
tart by loosening all three of the locking telescope tube from the base by loosening the altitude
thumbscrews (Figure 21). tensioning knob and lifting the telescope tube. You can
carry the tube and the base separately by their integrated
carry handles. The handles are positioned to balance the
LOCKING load, so neither component should be awkward to carry.
THUMBSCREWS
Figure 21: For the 10” Dob, there are three spring-loaded collimation
thumbscrews that adjust the tilt of the primary mirror. The other three
thumbscrews lock the mirror in place once tilt adjustments are completed.
b. Adjust the collimation thumbscrews one at a time.
Each collimation thumbscrew is spring-loaded, so
you can rotate it clockwise or counterclockwise.
c. Continue adjusting the screws until the reflection
of the secondary mirror is centered within the
reflection of the primary mirror.
d.
Re-tighten the three locking thumbscrews until
snug.
e.
When you are finished, the view through the
collimation cap should look like Figure 16.
Your telescope’s optics are now aligned and ready for use.
You can also confirm a telescope’s alignment at night by
pointing the telescope at a bright star at high magnification.
Center the star in the field of view and slightly defocus the
star—it should appear like a circle with a hole in the middle.
(The “hole” is the shadow from the secondary mirror.) If the
hole is not centered within the circle, you’ll need to make
additional adjustments to collimation (Figure 22).
GOOD COLLIMATION NEEDS ADJUSTMENT
Figure 22: You can check collimation by defocusing a bright star centered
in the field of view and checking to see if the “hole” is centered. If it is not
centered, some adjustment is needed.
16 I ENGLISHCARE AND MAINTENANCE
Store the telescope indoors in a dry place. A garage is 5. T
o remove marks and oils, use lens cleaning fluid
ideal; it will keep the optics near the ambient outdoor and lens cleaning tissue to clean the mirror surface.
temperature so the optics won’t take as long to acclimate. Apply the fluid to the tissue and gently wipe the
Keep the dust cover on the front of the telescope and the mirror surface. Use radial strokes (i.e. from the
cover cap on the focuser when the telescope is not in center of the mirror to the edge). Use a new tissue
use. Otherwise, dust and particles can accumulate on for every wipe. Avoid rubbing; this typically just
the optics. spreads oils around instead of removing them.
If the telescope is wet from dew, dry the exterior of the 6. O
nce the mirror is clean, reinstall the mirror cell
telescope tube and base with a towel prior to storage. into the telescope tube and replace the screws.
While a small amount of water on the exterior of the
The secondary mirror will not get dirty often, as its optical
tube and base won’t harm the telescope, storing it wet
surface is pointed downward. However, if it does require
long-term could cause corrosion or water damage. The
cleaning, it can be cleaned in the same manner as the
wooden base has sealed melamine surfaces. Still, water
primary mirror. You do not need to remove the secondary
can seep into cracks if left wet during storage.
mirror from the telescope to clean it. Point the telescope
It is normal for some dust and particles to accumulate on horizontally during cleaning to prevent anything from
the primary mirror over time. They will not have any effect falling onto the primary mirror.
on optical performance. However, if the primary mirror
You may clean the exposed optical surfaces of your
gets excessively dirty, you should clean it.
eyepieces in the same manner described above.
To clean the primary mirror:
1. R
emove the primary mirror cell from the telescope
tube by removing the screws on the tube just above
the mirror cell (Figure 23). You’ll need the Phillips
head screwdriver to do this.
2. Carefully pull the mirror cell off of the tube.
3. T
he mirror surface is now exposed for cleaning.
We recommend leaving the primary mirror in its cell
during cleaning.
4. U
se a blower bulb and optics cleaning brush to
remove larger particles and dust. In some instances,
this will be all the cleaning necessary.
Figure 23: To remove the primary mirror from the telescope tube for
cleaning, first remove the screws located just above the mirror cell.
ENGLISH I 17SPECIFICATIONS
#22470 StarSense Explorer 8” Dobsonian
Optical Design Newtonian reflector
Aperture 8” (203mm)
Focal Length 1200mm
Focal Ratio F/5.9
Optical Coatings XLT reflective coatings with silicon dioxide and tantalum pentoxide protective
overcoatings for primary and secondary mirrors
Mirror Material Pyrex equivalent for primary and secondary mirrors
Primary mirror thickness 25mm (approx. 1:8 thickness ratio)
Secondary mirror thickness 8.5mm
Minor axis of secondary mirror 47mm
Tube material Steel
Focuser 2” Crayford, includes 2” extension tube and 2”-to-1.25” adapter
Eyepiece / Magnification 25mm Plössl, 48x
Finderscope StarPointer red-dot finderscope
Other Accessories StarSense Explorer dock, eyepiece rack, collimation cap,
carry handles for OTA and base, pointing knob, dust covers
Tripod Altazimuth Dobsonian base, adjustable altitude tensioning
Optical Tube Dimensions 44” x 9.5” diameter
Optical Tube Weight 20.6 lbs.
Base dimensions 27” x 19” x 19”
Base weight 22.8 lbs.
Total Telescope Kit Weight 43.4 lbs.
18 I ENGLISHSPECIFICATIONS
#22471 StarSense Explorer 10” Dobsonian
Optical Design Newtonian reflector
Aperture 10” (254mm)
Focal Length 1200mm
Focal Ratio F/4.7
Optical Coatings XLT reflective coatings with silicon dioxide and tantalum pentoxide protective
overcoatings for primary and secondary mirrors
Mirror Material Pyrex equivalent for primary and secondary mirrors
Primary mirror thickness 30mm (approx. 1:8.5 thickness ratio)
Secondary mirror thickness 11.5mm
Minor axis of secondary mirror 64mm
Tube material Steel
Focuser 2” Crayford, includes 2” extension tube and 2”-to-1.25” adapter
Eyepiece / Magnification 25mm Plössl, 48x
Finderscope StarPointer red-dot finderscope
Other Accessories StarSense Explorer dock, eyepiece rack, collimation cap,
carry handles for OTA and base, pointing knob, dust covers
Tripod Altazimuth Dobsonian base, adjustable altitude tensioning
Optical Tube Dimensions 44” x 11.5” diameter
Optical Tube Weight 29.2 lbs.
Base dimensions 26.5” x 21” x 21”
Base weight 25.6 lbs.
Total Telescope Kit Weight 54.8 lbs.
ENGLISH I 19SOLAR WARNING
• Never look directly at the Sun with the naked eye or with a telescope (unless you have the proper solar filter). Perma-
nent and irreversible eye damage may result.
• Never use your telescope to project an image of the Sun onto any surface. Internal heat build-up can damage the tele-
scope and any accessories attached to it.
• Never use an eyepiece solar filter or a Herschel wedge. Internal heat build-up inside the telescope can cause these de-
vices to crack or break, allowing unfiltered sunlight to pass through to the eye.
• Never leave the telescope unsupervised. Make sure an adult who is familiar with the correct operating procedures is with
your telescope at all times, especially when children are present.
WARNING: K EEP BATTERIES OUT OF REACH OF CHILDREN.
• Examine devices and make sure the battery compartment is correctly secured, e.g. that the
screw or other mechanical fastener is tightened.
• Do not use if compartment is not secure.
• Dispose of used button batteries immediately and safely. Flat batteries can still be dangerous.
• Tell others about the risk associated with button batteries and how to keep their children safe.
celestron.com/pages/warranty
This device complies with Part 15 of the FCC Rules. Operation is subject to the following two conditions: (1) This device may not cause harmful interference, and (2) this device must accept any interference received, including interference that may cause
undesired operation.
CAUTION: Changes or modifications not expressly approved by the party responsible for compliance could void the user’s authority to operate the equipment.
NOTE: This equipment has been tested and found to comply with the limits for a Class B digital device, pursuant to part 15 of the FCC Rules. These limits are designed to provide reasonable protection against harmful interference in a residential installation.
This equipment generates, uses and can radiate radio frequency energy and, if not installed and used in accordance with the instructions, may cause harmful interference to radio communications. However, there is no guarantee that interference will not occur
in a particular installation.
If this equipment does cause harmful interference to radio or television reception, which can be determined by turning the equipment off and on, the user is encouraged to try to correct the interference by one or more of the following measures:
• Reorient or relocate the receiving antenna.
• Increase the separation between the equipment and receiver.
• Connect the equipment into an outlet on a circuit different from that to which the receiver is connected.
• Consult the dealer or an experienced radio/TV technician for help.
Product design and specifications are subject to change without prior notification. This product is designed and intended for use by those 14 years of age and older.
Need assistance?
Contact Celestron Technical Support by visiting celestron.com
celestron.com/pages/technical-support © 2022 Celestron • All rights reserved • celestron.com
2835 Columbia Street • Torrance, CA 90503 U.S.A.
20 I ENGLISH 0522MODE D'EMPLOI
#22470 STARSENSE EXPLORER 8” DOBSONIEN #22471 STARSENSE EXPLORER 10" DOBSONIEN
FRANÇAIS I 21INTRODUCTION
Félicitations pour votre achat du télescope StarSense Explorer Dobsonien (SSE Dob). Votre SSE Dob combine de grands
éléments optiques avec la base et l'application StarSense Explorer pour vous permettre de trouver et d'observer toutes sortes
d'objets astronomiques facilement et facilement! Vous serez en mesure de localiser des objets du ciel profond: des galaxies, des
nébuleuses, des amas d’étoiles et plus encore, et de les centrer dans le champ de vision de l’oculaire en quelques secondes. Le
miroir principal est capable de capter une grande quantité de lumière, ce qui vous permet d’observer les objets en détails comme
jamais avant.
Avant de commencer une observation avec StarSense Explorer Dob en extérieur pour la première nuit, nous vous recommandons
de lire ce manuel. Il vous aidera à mieux comprendre les caractéristiques de votre télescope et à savoir à quoi vous attendre.
22 I FRANÇAISTABLE DES MATIÈRES
Contenu de la boîte . . . . . . . . . . . . . . . . . . . . . . . . . . . . . . . . . . . . . . . . . . . . . 24
Assemblage de la monture . . . . . . . . . . . . . . . . . . . . . . . . . . . . . . . . . . . . . . . . . 25
Assemblage du télescope . . . . . . . . . . . . . . . . . . . . . . . . . . . . . . . . . . . . . . . . . . 26
Pointer le télescope . . . . . . . . . . . . . . . . . . . . . . . . . . . . . . . . . . . . . . . . . . . . . 27
Mise au point . . . . . . . . . . . . . . . . . . . . . . . . . . . . . . . . . . . . . . . . . . . . . . . . 28
Utilisation de StarPointer . . . . . . . . . . . . . . . . . . . . . . . . . . . . . . . . . . . . . . . . . . 29
Station d'accueil StarSense Explorer et application . . . . . . . . . . . . . . . . . . . . . . . . . . . . 30
Détermination du grossissement et sélection des oculaires . . . . . . . . . . . . . . . . . . . . . . . . 31
Refroidir les optiques de votre télescope . . . . . . . . . . . . . . . . . . . . . . . . . . . . . . . . . . 31
Votre première observation en extérieur – À quoi vous attendre . . . . . . . . . . . . . . . . . . . . . 32
Adaptation à l’obscurité et pollution légère . . . . . . . . . . . . . . . . . . . . . . . . . . . . . . . . . 33
Utilisation des filtres . . . . . . . . . . . . . . . . . . . . . . . . . . . . . . . . . . . . . . . . . . . . . 33
Collimation des optiques . . . . . . . . . . . . . . . . . . . . . . . . . . . . . . . . . . . . . . . . . . 34
Transport . . . . . . . . . . . . . . . . . . . . . . . . . . . . . . . . . . . . . . . . . . . . . . . . . . . 36
Entretien et Maintenance . . . . . . . . . . . . . . . . . . . . . . . . . . . . . . . . . . . . . . . . . . 37
Spécifications du StarSense Explorer 8” Dobsonien . . . . . . . . . . . . . . . . . . . . . . . . . . . 38
Spécifications du StarSense Explorer 10” Dobsonien . . . . . . . . . . . . . . . . . . . . . . . . . . . 39
Avertissement sur le Soleil . . . . . . . . . . . . . . . . . . . . . . . . . . . . . . . . . . . . . . . . . 40
FRANÇAIS I 23CONTENU DE LA BOÎTE
Boîte 1 – Base Dobsonienne
E Supports
latéraux
(x2)
A1 Panneau latéral A2 Panneau latéral B Panneau avant C Plaque supérieure D Plaque inférieure F Vis de
gauche droit l’ensemble de
la base (x22)
COMPOSANTS DES PIEDS COMPOSANTS DE L’AXE DU PIVOT D'AZI-
MUT
Vis des
G1 Pieds (x3) G2 pieds (x3) G3 Cache - Vis H1 Boulon H2 Écrou H3 Rondelles H4 Cylindre H5 Rondelle
des pieds (x3) en acier de plastique de téflon
(x2) creux
COMPOSANTS DE LA POIGNÉE COMPOSANTS DU PORTE-OCU- COMPOSANTS DE L'ORIENTATION
LAIRE EN ALTITUDE
J1 Base J2 Vis de K1 Support de K2 Vis du Palier d'altitude
L1 cylindres (x4)
Vis
L2 de palier (x4)
la base poignée (x2) l'oculaire support (x2)
OUTILS INCLUS
Amortisseurs Tournevis Clés Clés hexagonales
M
en caout- anglaises (x2) (x2)
Boîte 2 – Composants du tube optique
chouc
O Tube optique avec cache-poussière P Dock StarSense Q Chercheur à point
rouge StarPointer
N1 Bouton de tension
d’altitude
Oculaire Omni de
R1 25mm Plössl T
Oculaire de 2” à 1,25”
Adaptateur avec cache
de 1,25” U Capuchon de collimation
Oculaire de 2” avec clés hexagonales de
N2 Cache décoratif S tube de rallonge 2mm et 2,5mm*
Clé hexagonale *2,5mm incluse avec le Dob de 8"
uniquement
REMARQUE: Pour collimater les optiques de votre
télescope (p34)
24 I FRANÇAISASSEMBLAGE DE LA MONTURE
J2
J2 F
L2
K1
L1 L2
F
J1 L1
F
F
L1
L1
E
F F
A2
L2
F F
F
L2
B
F H2
F
H3
A1
F
H4
E C
F
F
F
F F
F H5 F
F
F
F
D
G1
G1
H3
G2
G2
G3
G1
H1
Figure 1A: Vue éclatée de la base StarSense G3
Explorer Dobsonien. G2
G3
FRANÇAIS I 25ASSEMBLAGE DU TÉLESCOPE
R1
T
S
P
Q
O
N1
N2
Figure 1B : Vue éclatée du tube optique StarSense Explorer
Reportez-vous à la figure 1 pour voir comment les composants de SSE Dob s'emboîtent.
Pour obtenir la liste complète des pièces et les instructions d'assemblage, consultez le guide de configuration rapide imprimé
inclus dans la boîte ou la page produit du SSE Dob à l'adresse www.celestron.com
26 I FRANÇAISPOINTER LE TÉLESCOPE
Vous pouvez régler la tension le long de l'axe d'altitude en
Les bases dobsoniennes sont des montures altazimutales.
tournant le bouton situé du même côté que le focaliseur du
Cela signifie que le télescope se déplace dans deux
télescope — le bouton de tension d’altitude (Figure 4).
directions: vers le haut et vers le bas (p. ex., en altitude)
et de gauche à droite (p. ex., azimuth) (figure 2).
ALTITUDE
Figure 4: La tension du mouvement d'altitude peut être réglée à l'aide du
bouton de tension d'altitude. (REMARQUE: l'autre bouton du côté opposé
ne fonctionne pas pour régler la tension en altitude.)
Tournez le bouton pour ajouter suffisamment de tension
AZIMUT et permettre un mouvement de haut en bas en douceur.
Dans la plupart des cas, vous n’aurez pas besoin d’ajouter
Figure 2: Les StarSense Explorer Dobsoniennes ont deux axes de beaucoup de tension. Le télescope est équilibré pour une
mouvement: l'altitude (haut en bas) et l'azimuth (de gauche à droite). utilisation normale. Toutefois, si vous utilisez un oculaire
lourd ou un téléphone intelligent plus grand, vous devrez
Il est facile de pointer votre Dob vers un objet. Il suffit de peut-être augmenter la tension pour que le télescope reste
déplacer le tube télescope de haut en bas et de gauche stable quand vous n'y touchez pas.
à droite jusqu’à ce que le télescope soit dirigé vers l’objet
désiré et que l’objet apparaisse dans l’oculaire du télescope.
La poignée de panoramique à l'avant du tube télescopique
est pratique pour saisir le tube et le pointer (figure 3). Cette
poignée empêche aussi la chaleur de votre main d’entrer
dans le circuit optique, ce qui peut fausser temporairement
l’observation.
(Figure 3). La poignée panoramique permet de tenir le télescope lorsque
vous le pointez.
FRANÇAIS I 27MISE AU POINT
Les SSE Dobs sont livrés avec un système de focale Étant donné que le SSE Dob est un réflecteur Newtonien,
Crayford de 2”, un tube d’extension de 2” et un adaptateur les images que vous verrez apparaîtront comme vues
d’oculaire de 2 à 1,25”. Avec ces trois éléments, vous dans un miroir et inversées par rapport à la vue directe
pouvez utiliser pratiquement n'importe quel oculaire de (Figure 6). Bien que cela ait peu d'impact sur l'observation
télescope avec la Dob du SSE. astronomique, cela peut être un peu déroutant lorsque vous
regardez des objets terrestres.
Pour la plupart des oculaires, assurez-vous que le tube
d'extension de 2” est en place dans le porte-oculaire. Si ce
n'est pas le cas, l'oculaire n'atteindra pas la mise au point. Si
vous utilisez un oculaire qui nécessite une grande distance
de mise au point interne, retirez le tube de d’extension de 2”.
Vous devrez peut-être retirer le tube si vous tentez d'utiliser
votre Dob avec une caméra d'imagerie astronomique.
Si vous souhaitez utiliser un oculaire au format 1,25”, vous
devrez utiliser l’adaptateur oculaire 2” à 1,25”. Il suffit de
le placer dans l’oculaire (avec un tube d’extension de 2”
fixé), puis de placer l’oculaire de 1,25” dans l’adaptateur.
Serrez les vis à main pour sécuriser l’oculaire en place.
L’adaptateur utilise un anneau de compression interne en VUE À L'ŒIL NU
laiton pour éviter que le barillet de votre oculaire ne soit
égratigné ou abîmé.
Pour faire la mise au point, tournez les boutons de mise
au point dans le sens horaire ou antihoraire jusqu'à ce
que l'objet dans l'oculaire du télescope soit correctement
au point. Pour verrouiller la position du porte-oculaire en
place une fois que vous avez atteint une mise au point
nette, serrez la vis à oreilles du verrouillage de mise au point
(Figure 5). Si vous devez régler la tension du bouton de
mise au point, vous pouvez serrer ou desserrer la vis de
réglage du système de focale à l’aide de la clé hexagonale
fournie.
VUE À TRAVERS UN TÉLESCOPE À RÉFLECTEUR NEWTONIEN
LA VIS À
OREILLES DU
VERROUILLAGE Figure 6: Comme tous les réflecteurs Newtonien, les SSE Dob produisent
DE MISE AU des images qui semblent inversées et retournée par rapport à l’observation
POINT à l'œil nu.
VIS DE
RÉGLAGE DU
SYSTÈME DE
FOCALE
Figure 5: La vis à oreilles du verrouillage de mise au point verrouille le
système de focale une fois la mise au point effectuée. La vis de réglage de
la tension de mise au point règle la tension des boutons de mise au point.
28 I FRANÇAISUTILISATION DU STARPOINTER
Bien que vous n’ayez pas besoin de vous fier au chercheur Pour remplacer la pile:
à point rouge StarPointer lorsque vous utilisez l’application
1. À
l'aide d'un tournevis cruciforme, retirez la vis de fixation
StarSense Explorer, elle peut vous aider à aligner
du couvercle du compartiment des piles (figure 8).
l’application avec le télescope. Le StarPointer est aussi
très pratique lorsque vous repérez des objets durant la
journée, puisque l'application fonctionne uniquement sous
les étoiles la nuit.
Pour aligner le StarPointer, pointez d'abord le télescope
vers un objet situé à au moins ¼ mille de distance. Nous
vous recommandons d’effectuer l’alignement pendant la
journée. Choisissez un arbre, une affiche, un bâtiment ou un
autre point d'intérêt distant. Si vous effectuez l’alignement
de nuit, vous pouvez utiliser un lampadaire, la lune, une
étoile ou une planète brillante.
Une fois que vous avez pointé le télescope vers l'objet,
assurez-vous qu'il apparaît dans l'oculaire. Ensuite, activez
le StarPointer à l'aide du cadran à DEL (figure 7).
AFFICHAGE DEL
Figure 8: Pour ouvrir le couvercle de la pile du StarPointer, retirez d'abord
la vis de fixation.
2. Retirez la pile déchargée du compartiment de la pile.
Vous devrez peut-être utiliser un couteau ou un tournevis
pour extraire la pile de son support.
BOUTON DE TENSION BOUTON D’AZIMUT
D'ALTITUDE 3 . Insérez la nouvelle pile de façon à ce que le côté positif
soit visible pour vous. Assurez-vous que la pile est bien
insérée dans le compartiment de la pile (figure 9).
Figure 7: Chercheur à point rouge StarPointer
Montez le niveau de luminosité jusqu'à ce que vous voyiez
facilement le point rouge. Maintenant, sans bouger le
télescope, utilisez l’altitude du StarPointer et les boutons
de réglage azimut pour centrer le point rouge sur le même
objet que vous avez centré dans l’oculaire télescope.
Lorsque vous avez terminé, assurez-vous que l'objet est
toujours centré dans l'oculaire de télescope. Si c'est le
cas, vous avez terminé l'alignement du StarPointer. Si ce
n'est pas le cas, orientez le télescope de façon à ce que
l'objet de l'oculaire du télescope soit centré de nouveau.
Continuez à utiliser les boutons de réglage de l'altitude et
de l'azimut du StarPointer pour centrer à nouveau le point
rouge sur l'objet.
Éteignez le StarPointer lorsque vous ne l'utilisez pas pour Figure 9: Lorsque la pile est correctement insérée dans le compartiment,
économiser sa pile. Bien que la pile de StarPointer dure comme illustré, le couvercle du compartiment de la pile doit être facile à
longtemps, elle devra au bout d’un moment être remplacée réinstaller.
par une pile bouton au lithium CR2032 3V. Ces produits
sont très courants et offerts par une grande variété de 4. F
ermez le compartiment de la pile et réinstallez la vis de
détaillants. fixation.
FRANÇAIS I 29STATION D’ACCUEIL ET
APPLICATION STARSENSE
EXPLORER
La fonction la plus intéressante de StarSense Explorer Dobsonien est
probablement la station d’accueil StarSense Explorer et l’application
StarSense Explorer pour téléphone intelligent. Avec l’application pour
vous guider, vous passerez plus de temps à observer des objets qu’a
essayer de les trouver parmi la myriade d’étoiles au-dessus de vous!
Le système d’exploration StarSense Explorer de Celestron est le seul
système dobsonien qui intègre cette fonction incroyable.
Pour commencer, téléchargez et installez l’application à partir de l’App
Store d’Apple (iOS) ou de Google Play (Android). Vous y trouverez
également les exigences système minimales. Si vous avez des questions
sur la compatibilité de votre téléphone intelligent avec l’application,
veuillez visiter le site celestron.com/SSE
Une fois l’application téléchargée, utilisez le code de déverrouillage de
l’application que vous trouverez sur la carte imprimée fournie avec votre
télescope (figure 10).
Download the app from the or
before your first observing session.
When prompted, enter the unique unlock code below to
enable telescope control on your device.
ICÔNE STARSENSE
Figure 11: Une fois que vous avez déverrouillé l’application
StarSense Explorer, appuyez sur l’icône StarSense pour
commencer à trouver des objets.
Figure 10: Le code de déverrouillage de l’application StarSense Explorer est imprimé sur
la carte fournie avec votre télescope
Chaque code peut permettre à jusqu’à cinq appareils d’utiliser la
fonctionnalité StarSense Explorer. Si vous utilisez le code les cinq fois
disponibles et que vous souhaitez déverrouiller l’application sur plus
d’appareils, veuillez communiquer avec le soutien technique de Celestron
à l’adresse celestron.com/pages/technical-support pour obtenir des
options.
Lorsque l’application est déverrouillée, vous êtes prêt à commencer.
Placez votre téléphone intelligent sur la base StarSense Explorer et
appuyez sur l’icône StarSense au bas de l’écran planétarium (figure 11).
Choisissez l’option « ALIGNEMENT REQUIS » et suivez les invites
à l’écran pour aligner l’appareil photo du téléphone intelligent avec le
télescope. Une fois cette procédure terminée, vous pouvez utiliser
l’application pour localiser des objets.
Sélectionnez un objet à afficher dans le planétarium ou dans la liste « Le
meilleur de cette nuit ». Des flèches apparaissent à l’écran pour vous
guider vers l’objet. Suivez les flèches jusqu’à ce que la cible devienne
verte et que l’objet se trouve dans le champ de vision de votre télescope.
C’est aussi simple que ça!
Pendant que vous observez, vous pouvez lire des informations détaillées
sur l’objet. Des centaines d’objets les plus populaires disposent Figure 12: Appuyez sur la barre d’information de l’objet
également d’une présentation audio. Pour en écouter, appuyez sur la pour recevoir des informations supplémentaires sur l’objet
barre au bas de l’écran qui contient le nom de l’objet (figure 12) sélectionné, y compris des images et des exposés audio pour
un grand nombre d’entre eux.
30 I FRANÇAISDÉTERMINATION DE REFROIDIR LES OPTIQUES DE
L'AGRANDISSEMENT ET VOTRE TÉLESCOPE
SÉLECTION DES OCULAIRES Vous obtiendrez les meilleures observations à travers
Pour changer le grossissement du télescope, vous devrez votre télescope lorsqu’il aura atteint l’équilibre thermique
changer l’oculaire du focalisateur du télescope. Pour avec l’air ambiant. Si le télescope est plus chaud que l'air
calculer le grossissement que vous pouvez obtenir avec un extérieur, le miroir s'acclimatera à la température et sa forme
oculaire donné, utilisez cette formule : changera. Les images que vous voyez dans un télescope
qui n'a pas refroidi ne seront pas aussi nettes. Si vous
Longueur focale du télescope ÷ sortez votre télescope d'une maison chauffée à l'extérieur,
Longueur focale de l'oculaire attendez environ une heure avant pour qu’il produise les
= grossissement images les plus nettes possibles. C'est pourquoi nous vous
Le SSE Dobs a une longueur focale de 1200mm. Ils sont recommandons de ranger votre télescope dans un endroit
dotés d’un oculaire Omni Plösslun de 25mm. Avec cette sec mais non chauffé, comme un garage ou une remise.
formule, nous pouvons calculer que cette combinaison Pour le SSE Dob 10", un ventilateur de refroidissement
donne un grossissement de 48x (1200mm ÷ 25mm = 48x). USB est offert en option. Il se monte à l'arrière de la cellule
Il s'agit d'un excellent facteur de grossissement pour repérer du miroir et souffle de l'air sur ce dernier pour accélérer le
et observer les objets à champ large du ciel profond. Vous refroidissement (figure 14).
pourriez envisager l'achat d'un oculaire à grossissement Le ventilateur aidera les éléments optiques à atteindre
plus élevé, comme un Omni Plössl 10mm, pour des vues l'équilibre thermique plus rapidement. (Les SSE Dob de 8”
plus puissantes de la lune et des planètes. N'augmentez ne possède pas de support de ventilateur, et ne sont pas
pas trop le grossissement, sinon la vue pourrait se dégrader compatible avec le ventilateur de refroidissement.)
en raison des conditions de vision atmosphérique (p. ex., les
turbulences atmosphériques).
Le grossissement maximal pour tout télescope est d'environ
60 fois par pouce, ce qui équivaut à 480x pour le SSE Dob
de 8 pouces et à 600x pour le SSE Dob de 10 pouces.
Cependant, dans de nombreux endroits, il sera difficile
d'obtenir des images nettes avec un grossissement de plus
de 100x en raison des turbulences atmosphériques au-
dessus de vous. Si vous remarquez que les étoiles au-dessus
de vous scintillent fortement, les conditions de vision sont
mauvaises. Vous devriez vous en tenir à un grossissement
plus faible. Si les étoiles semblent briller sans scintillement,
les conditions de vision sont bonnes. Vous pouvez essayer
d'utiliser des oculaires à grossissement élevé.
Les porte-oculaires se peuvent accepter les oculaires de
format 1,25” et 2”. Les oculaires de 2” offrent généralement
un champ de vision plus large, mais ils peuvent coûter
beaucoup plus cher. Pour utiliser un oculaire de 2”, retirez
l'adaptateur de 2” à 1,25” du porte-oculaire et insérer
l'oculaire directement dans le tube d'extension de 2”. Fixez
l'oculaire à l'aide des vis de serrage du tube de rallonge de
2”.
Le support d'oculaire situé à l'avant de la base offre un
endroit pratique pour ranger les oculaires lorsqu'ils ne sont
pas utilisés. Il peut accepter trois oculaires de 1,25” et un
oculaire de 2” (figure 13).
Figure 14: Le ventilateur de refroidissement USB optionnel pour Dobsonians
est compatible avec le DSE Dob 10".
Figure 13: Le support d'oculaire est un endroit pratique pour ranger des
oculaires supplémentaires pendant votre séance d'observation.
FRANÇAIS I 31You can also read