3.7 Cu. Ft. Free-Standing Gas Range for RVs - USER GUIDE - Forest River
←
→
Page content transcription
If your browser does not render page correctly, please read the page content below
v1                                   USER GUIDE
                                              R6
                                                      Final Trim Size: 8.268 x 11.22 in. (210 x 284 mm)

3.7 Cu. Ft. Free-Standing
Gas Range for RVs
NS-RNG24SS9
NS-RNG24SS9-C

         Before using your new product, please read these instructions to prevent any damage.
Contents
Introduction . . . . . . . . . . . . . . . . . . . . . . . . . . . . . . . . . . . . . . . . . . . . . . . . . . . . . . . . . . . . . . . . . . . . . . . . . . . . . . . . . . . . . . . . . 3
IMPORTANT SAFETY INSTRUCTIONS . . . . . . . . . . . . . . . . . . . . . . . . . . . . . . . . . . . . . . . . . . . . . . . . . . . . . . . . . . . . . . . . . . 3
GENERAL SAFETY PRECAUTIONS . . . . . . . . . . . . . . . . . . . . . . . . . . . . . . . . . . . . . . . . . . . . . . . . . . . . . . . . . . . . . . . . . . . . . . 4
Installation instructions . . . . . . . . . . . . . . . . . . . . . . . . . . . . . . . . . . . . . . . . . . . . . . . . . . . . . . . . . . . . . . . . . . . . . . . . . . . . . . . 5
Features . . . . . . . . . . . . . . . . . . . . . . . . . . . . . . . . . . . . . . . . . . . . . . . . . . . . . . . . . . . . . . . . . . . . . . . . . . . . . . . . . . . . . . . . . . . . . 6
Package contents . . . . . . . . . . . . . . . . . . . . . . . . . . . . . . . . . . . . . . . . . . . . . . . . . . . . . . . . . . . . . . . . . . . . . . . . . . . . . . . . . . . . . . . . . . . . . . . . 6
Main components . . . . . . . . . . . . . . . . . . . . . . . . . . . . . . . . . . . . . . . . . . . . . . . . . . . . . . . . . . . . . . . . . . . . . . . . . . . . . . . . . . . . . . . . . . . . . . . . 6
Control panel . . . . . . . . . . . . . . . . . . . . . . . . . . . . . . . . . . . . . . . . . . . . . . . . . . . . . . . . . . . . . . . . . . . . . . . . . . . . . . . . . . . . . . . . . . . . . . . . . . . . 6
Range dimensions . . . . . . . . . . . . . . . . . . . . . . . . . . . . . . . . . . . . . . . . . . . . . . . . . . . . . . . . . . . . . . . . . . . . . . . . . . . . . . . . . . . . . . . . . . . . . . . . 7
Installing the range . . . . . . . . . . . . . . . . . . . . . . . . . . . . . . . . . . . . . . . . . . . . . . . . . . . . . . . . . . . . . . . . . . . . . . . . . . . . . . . . . . . 8
Clearances and dimensions . . . . . . . . . . . . . . . . . . . . . . . . . . . . . . . . . . . . . . . . . . . . . . . . . . . . . . . . . . . . . . . . . . . . . . . . . . . . . . . . . . . . . . . 9
Important notes to the installer: . . . . . . . . . . . . . . . . . . . . . . . . . . . . . . . . . . . . . . . . . . . . . . . . . . . . . . . . . . . . . . . . . . . . . . . . . . . . . . . . .10
Before installing the range . . . . . . . . . . . . . . . . . . . . . . . . . . . . . . . . . . . . . . . . . . . . . . . . . . . . . . . . . . . . . . . . . . . . . . . . . . . . . . . . . . . . . . .10
Adjusting the height and leveling the range . . . . . . . . . . . . . . . . . . . . . . . . . . . . . . . . . . . . . . . . . . . . . . . . . . . . . . . . . . . . . . . . . . . . .10
Installing the anti-tip device . . . . . . . . . . . . . . . . . . . . . . . . . . . . . . . . . . . . . . . . . . . . . . . . . . . . . . . . . . . . . . . . . . . . . . . . . . . . . . . . . . . . .11
Connecting to gas . . . . . . . . . . . . . . . . . . . . . . . . . . . . . . . . . . . . . . . . . . . . . . . . . . . . . . . . . . . . . . . . . . . . . . . . . . . . . . . . . . . . . . . . . . . . . . .14
Installing rubber pads to the oven back . . . . . . . . . . . . . . . . . . . . . . . . . . . . . . . . . . . . . . . . . . . . . . . . . . . . . . . . . . . . . . . . . . . . . . . . . .15
Connecting to power . . . . . . . . . . . . . . . . . . . . . . . . . . . . . . . . . . . . . . . . . . . . . . . . . . . . . . . . . . . . . . . . . . . . . . . . . . . . . . . . . . . . . . . . . . . .16
Testing for gas leaks . . . . . . . . . . . . . . . . . . . . . . . . . . . . . . . . . . . . . . . . . . . . . . . . . . . . . . . . . . . . . . . . . . . . . . . . . . . . . . . . . . . . . . . . . . . . .16
Testing top burners . . . . . . . . . . . . . . . . . . . . . . . . . . . . . . . . . . . . . . . . . . . . . . . . . . . . . . . . . . . . . . . . . . . . . . . . . . . . . . . . . . . . . . . . . . . . .17
Testing the oven burner . . . . . . . . . . . . . . . . . . . . . . . . . . . . . . . . . . . . . . . . . . . . . . . . . . . . . . . . . . . . . . . . . . . . . . . . . . . . . . . . . . . . . . . . .17
Before you begin using your range . . . . . . . . . . . . . . . . . . . . . . . . . . . . . . . . . . . . . . . . . . . . . . . . . . . . . . . . . . . . . . . . . . .17
Tips for saving gas . . . . . . . . . . . . . . . . . . . . . . . . . . . . . . . . . . . . . . . . . . . . . . . . . . . . . . . . . . . . . . . . . . . . . . . . . . . . . . . . . . . . . . . . . . . . . . .17
Using the cook top burners . . . . . . . . . . . . . . . . . . . . . . . . . . . . . . . . . . . . . . . . . . . . . . . . . . . . . . . . . . . . . . . . . . . . . . . . . .18
Burner control knobs . . . . . . . . . . . . . . . . . . . . . . . . . . . . . . . . . . . . . . . . . . . . . . . . . . . . . . . . . . . . . . . . . . . . . . . . . . . . . . . . . . . . . . . . . . . .18
Selecting a burner . . . . . . . . . . . . . . . . . . . . . . . . . . . . . . . . . . . . . . . . . . . . . . . . . . . . . . . . . . . . . . . . . . . . . . . . . . . . . . . . . . . . . . . . . . . . . . .18
Turning on a burner . . . . . . . . . . . . . . . . . . . . . . . . . . . . . . . . . . . . . . . . . . . . . . . . . . . . . . . . . . . . . . . . . . . . . . . . . . . . . . . . . . . . . . . . . . . . .19
Using the oven . . . . . . . . . . . . . . . . . . . . . . . . . . . . . . . . . . . . . . . . . . . . . . . . . . . . . . . . . . . . . . . . . . . . . . . . . . . . . . . . . . . . . .19
Tips for baking . . . . . . . . . . . . . . . . . . . . . . . . . . . . . . . . . . . . . . . . . . . . . . . . . . . . . . . . . . . . . . . . . . . . . . . . . . . . . . . . . . . . . . . . . . . . . . . . . .19
Tips for roasting . . . . . . . . . . . . . . . . . . . . . . . . . . . . . . . . . . . . . . . . . . . . . . . . . . . . . . . . . . . . . . . . . . . . . . . . . . . . . . . . . . . . . . . . . . . . . . . . .20
Baking times . . . . . . . . . . . . . . . . . . . . . . . . . . . . . . . . . . . . . . . . . . . . . . . . . . . . . . . . . . . . . . . . . . . . . . . . . . . . . . . . . . . . . . . . . . . . . . . . . . . .20
Tips for baking cakes . . . . . . . . . . . . . . . . . . . . . . . . . . . . . . . . . . . . . . . . . . . . . . . . . . . . . . . . . . . . . . . . . . . . . . . . . . . . . . . . . . . . . . . . . . . .20
Tips for baking pastry . . . . . . . . . . . . . . . . . . . . . . . . . . . . . . . . . . . . . . . . . . . . . . . . . . . . . . . . . . . . . . . . . . . . . . . . . . . . . . . . . . . . . . . . . . .20
Tips for cooking vegetables . . . . . . . . . . . . . . . . . . . . . . . . . . . . . . . . . . . . . . . . . . . . . . . . . . . . . . . . . . . . . . . . . . . . . . . . . . . . . . . . . . . . . .20
Oven control knob . . . . . . . . . . . . . . . . . . . . . . . . . . . . . . . . . . . . . . . . . . . . . . . . . . . . . . . . . . . . . . . . . . . . . . . . . . . . . . . . . . . . . . . . . . . . . .21
Turning on the oven . . . . . . . . . . . . . . . . . . . . . . . . . . . . . . . . . . . . . . . . . . . . . . . . . . . . . . . . . . . . . . . . . . . . . . . . . . . . . . . . . . . . . . . . . . . . .21
Adjusting the oven rack . . . . . . . . . . . . . . . . . . . . . . . . . . . . . . . . . . . . . . . . . . . . . . . . . . . . . . . . . . . . . . . . . . . . . . . . . . . . . . . . . . . . . . . . .22
Cleaning and maintenance . . . . . . . . . . . . . . . . . . . . . . . . . . . . . . . . . . . . . . . . . . . . . . . . . . . . . . . . . . . . . . . . . . . . . . . . . .23
Removing the cook top grate . . . . . . . . . . . . . . . . . . . . . . . . . . . . . . . . . . . . . . . . . . . . . . . . . . . . . . . . . . . . . . . . . . . . . . . . . . . . . . . . . . . .23
Cleaning the cook top burners . . . . . . . . . . . . . . . . . . . . . . . . . . . . . . . . . . . . . . . . . . . . . . . . . . . . . . . . . . . . . . . . . . . . . . . . . . . . . . . . . . .23
Cleaning the control panel . . . . . . . . . . . . . . . . . . . . . . . . . . . . . . . . . . . . . . . . . . . . . . . . . . . . . . . . . . . . . . . . . . . . . . . . . . . . . . . . . . . . . .23
Cleaning the oven . . . . . . . . . . . . . . . . . . . . . . . . . . . . . . . . . . . . . . . . . . . . . . . . . . . . . . . . . . . . . . . . . . . . . . . . . . . . . . . . . . . . . . . . . . . . . . .23
Removing the storage drawer . . . . . . . . . . . . . . . . . . . . . . . . . . . . . . . . . . . . . . . . . . . . . . . . . . . . . . . . . . . . . . . . . . . . . . . . . . . . . . . . . . .24
2 www.insigniaproducts.comNS-RNG24SS9
Disassembling range parts . . . . . . . . . . . . . . . . . . . . . . . . . . . . . . . . . . . . . . . . . . . . . . . . . . . . . . . . . . . . . . . . . . . . . . . . . . .26
Disassembling the cook top burners . . . . . . . . . . . . . . . . . . . . . . . . . . . . . . . . . . . . . . . . . . . . . . . . . . . . . . . . . . . . . . . . . . . . . . . . . . . . .26
Accessing the pilot light and oven burner . . . . . . . . . . . . . . . . . . . . . . . . . . . . . . . . . . . . . . . . . . . . . . . . . . . . . . . . . . . . . . . . . . . . . . . .27
Removing and reinstalling the oven door . . . . . . . . . . . . . . . . . . . . . . . . . . . . . . . . . . . . . . . . . . . . . . . . . . . . . . . . . . . . . . . . . . . . . . . .29
Troubleshooting . . . . . . . . . . . . . . . . . . . . . . . . . . . . . . . . . . . . . . . . . . . . . . . . . . . . . . . . . . . . . . . . . . . . . . . . . . . . . . . . . . . .30
Cook top . . . . . . . . . . . . . . . . . . . . . . . . . . . . . . . . . . . . . . . . . . . . . . . . . . . . . . . . . . . . . . . . . . . . . . . . . . . . . . . . . . . . . . . . . . . . . . . . . . . . . . . .30
Oven . . . . . . . . . . . . . . . . . . . . . . . . . . . . . . . . . . . . . . . . . . . . . . . . . . . . . . . . . . . . . . . . . . . . . . . . . . . . . . . . . . . . . . . . . . . . . . . . . . . . . . . . . . .31
Specifications . . . . . . . . . . . . . . . . . . . . . . . . . . . . . . . . . . . . . . . . . . . . . . . . . . . . . . . . . . . . . . . . . . . . . . . . . . . . . . . . . . . . . . .32
ONE-YEAR LIMITED WARRANTY . . . . . . . . . . . . . . . . . . . . . . . . . . . . . . . . . . . . . . . . . . . . . . . . . . . . . . . . . . . . . . . . . . . . . .33
Introduction
Congratulations on your purchase of a high-quality Insignia product. Your NS-RNG24SS9 represents the state of the art in
RV range design and is designed for reliable and trouble-free performance.
IMPORTANT SAFETY INSTRUCTIONS
WARNING: If the information in this manual is not followed exactly, a fire or explosion may result causing property
damages, personal injury or death.
Do not store or use gasoline or other flammable vapors and liquids in the vicinity of this or any other appliance.
WHAT TO DO IF YOU SMELL GAS.
• Extinguish any open flame.
• Do not try to light any appliance.
• Do not touch any electrical switch.
• Do not use any phone in your building.
• Immediately call your gas supplier from a neighbor's phone. Follow the gas supplier's instructions.
• If you cannot reach your gas supplier, call the Fire Department.
• Installation and service must be performed by a qualified installer, service agency or gas supplier.
IMPORTANT SAFETY NOTICE
Gas appliances can cause minor exposure to four of these substances, namely benzene, carbon monoxide, formaldehyde,
and soot, caused primarily by the incomplete combustion of LP fuels. Properly adjusted burners, indicated by a bluish
rather than a yellow flame, will minimize incomplete combustion. Exposure to these substances can also be minimized by
venting with an open window or using a ventilation fan or hood.
WARNING
To reduce the risk of the appliance tipping, it must be secured by a properly installed anti-tip device. To check if this device
is installed properly, remove the broiler drawer to inspect the anti-tip bracket or grasp the top rear edge of the range and
carefully attempt to tilt it forward to make sure the range is properly anchored. For instructions, see Installing the anti-tip
device on page 12.
WARNING
• All RANGES CAN TIP
• INJURY TO PERSONS COULD RESULT
• INSTALL ANTI-TIP DEVICE PACKED WITH RANGE
• SEE INSTALLATION INSTRUCTIONS
www.insigniaproducts.com 33.7 Cu. Ft. Free-Standing Gas Range for RVs
WARNING
Improper installation, adjustment, alteration, service or maintenance can cause injury or property damage. Refer to this
manual. For assistance or additional information consult a qualified installer, service agency, manufacturer (dealer) or the
gas supplier.
WARNING
To avoid the possibility of electrical shock, disconnect the power supply before servicing this unit.
WARNING
NEVER cover any slots, holes or passages in the oven bottom or cover an entire rack with materials such as aluminum foil.
Doing so blocks air flow through the oven and may cause carbon monoxide poisoning. Aluminum foil linings may also trap
heat, causing a fire hazard.
WARNING
NEVER use this appliance as a space heater to heat or warm the room. Doing so may result in carbon monoxide and
overheating of the oven.
GENERAL SAFETY PRECAUTIONS
WARNING
READ ALL INSTRUCTIONS BEFORE USING THIS APPLIANCE
1 CAREFUL THOUGHT SHOULD BE GIVEN TO THE LOCATION OF THE RANGE.
Avoid placement in these areas: in a main “traffic path”; in an isolated area with no counter space nearby; where open
range doors could create a hazard; in a drafty location which could cause the pilot to blow out.
2 KEEP CHILDREN AND PETS AWAY FROM THE RANGE.
Children should not play with the range controls. Range surfaces are hot. The range should not be used as a step stool
to the cabinet above.
3 FOR SAFETY REASONS, DO NOT USE THE RANGE AS A KITCHEN HEATER. Ovens and top burners are
not designed for heating use.
4 BE SURE THE RANGE IS PROPERLY INSTALLED AND GROUNDED BY A QUALIFIED TECHNICIAN.
BE SURE YOUR RANGE IS CORRECTLY ADJUSTED BY A QUALIFIED SERVICE TECHNICIAN OR
INSTALLER FOR THE TYPE OF PROPANE GAS ON WHICH IT IS TO BE USED. SEE INSTALLATION
INSTRUCTIONS.
5 NEVER INSTALL RANGE OVER KITCHEN CARPETING.
Some carpet materials are highly flammable and some absorb grease which could be a fire hazard.
6 REMEMBER FABRIC IS FLAMMABLE.
Long flowing sleeves have no place in a kitchen. Don‘t lean on a range. If the range is near a window, use an
appropriate window treatment.
7 IF THE PILOT GOES OUT, YOU SHOULD DETECT A FAINT GAS ODOR AS YOUR SIGNAL TO
RELIGHT THE PILOT.
As a safety measure, open a window or door to ventilate the room before relighting the pilot. If the range connections
are not perfectly tight, you can have a small leak and therefore a faint gas odor. NEVER use a match or other flame to
locate such a leak. Use a liquid detergent or thick soap and water solution in the areas where you think the leak might
be. If a bubble develops, it indicates a possible leak. Gas supply should be turned off immediately and you should call
your gas company and/or service company.
8 NEVER LEAVE A BURNER ON AND UNLIT FOR MORE THAN 5 SECONDS.
4 www.insigniaproducts.comNS-RNG24SS9
9 A WARNING: SERIOUS HAZARDS ARE ASSOCIATED WITH REACHING INTO STORAGE
CABINETS ABOVE THE RANGE WHEN THE TOP BURNERS AND/OR OVEN ARE IN OPERATION.
Do not store items that are attractive to children above the range. Do not let clothing come into contact with top
burners when range is in operation.
10 POSSIBLE HAZARDS OR INJURIES MAY RESULT FROM THE MISUSE OF APPLIANCE DOORS OR
DRAWERS such as stepping, leaning or sitting on the doors or drawers.
11 DO NOT USE THE TOP OF THE RANGE OR THE OVEN AS A STORAGE AREA.
Items stored on the range top can become too hot and melt. Do not store flammable materials in the oven.
12 USE A GOOD POTHOLDER WHEN PULLING OUT OVEN RACKS TO ADD OR REMOVE FOOD.
Dish towels or other substitutes can cause bad burns. Use only dry potholders. Damp or moist potholders on hot
surfaces may result in burns from steam. Do not let a potholder touch a flame.
13 KEEP ALL PLASTICS AWAY FROM THE RANGE, as plastics are vulnerable to heat.
14 AVOID UNSTABLE, EASILY TIPPED PANS. Pan handles should be turned to the back or side of the range—
not out into the room or over adjacent burners. Only use utensils that are suitable for range and oven use.
15 DO NOT HEAT UNOPENED CONTAINERS OF FOOD ON SURFACE BURNERS OR IN THE OVEN.
Buildup of pressure may cause the container to burst and result in serious personal harm and/or damage to the range.
16 ALUMINUM FOIL WHEN USED IMPROPERLY IS A CAUSE OF MANY RANGE PROBLEMS.
See the oven and broiler sections of this book for instructions for proper use
17 GREASE IS FLAMMABLE AND SHOULD BE HANDLED CAREFULLY. Avoid letting grease deposits collect
around the range or in vent fans. Let quantities of hot fat, a pan of deep fat for example, cool before attempting to
move it. If a grease fire should occur in a pan, put out the flame by placing a lid on the pan. DO NOT throw water on a
grease fire. Do not turn on the vent hood. Use a dry chemical or foam type fire extinguisher. If a fire should occur in the
oven or broiler, tum off the oven, close the oven door and broiler door and allow the food or grease to burn itself out in
the oven. If smoke or fire persist, call your local fire department.
18 AVOID THE USE OF AEROSOL SPRAYS NEAR A RANGE AS MOST ARE FLAMMABLE.
19 NEVER LEAVE SURFACE BURNERS UNATTENDED AT HIGH OR MEDIUM FLAME SETTINGS.
Adjust top burner flame size so it does not extend beyond the edge of the cookware. Excessive flame is hazardous
20 DO NOT USE A RANGE THAT IS IN NEED OF REPAIR. Repairs should be done by a qualified person. Poorly
done repairs could result in a safety hazard. Do not replace or repair any part of the range yourself unless it is
recommended in this book.
21 DO NOT TOUCH THE INTERIOR SURFACES OF THE OVEN DURING OR IMMEDIATELY AFTER
USE. Do not let clothing or other flammable materials contact burners. Although these surfaces may be dark in color
they can still be hot enough to burn. Other areas of the range can become hot enough to cause burns, such as vent
openings, main top, window, oven door, broiler door and oven racks.
22 DO NOT OBSTRUCT THE FLOW OF COMBUSTION OR VENTILATION AIR.
23 BE SURE ALL PACKING MATERIALS ARE REMOVED FROM THE RANGE before operating it to prevent
fire or smoke damage should the packing material ignite.
24 LEAK TESTING OF THE APPLIANCE SHALL BE CONDUCTED ACCORDING TO THE
MANUFACTURER'S INSTRUCTIONS.
Installation instructions
• The installation must conform with local codes or, in the absence of local codes, with the national Fuel Gas Code, ANSI
Z223.1/NFPA 54 or, in Canada the Propane Gas Installation Code, CSA B149.1.
• The installation of appliances designed for manufactured (mobile) home installation must conform with the
Manufactured Home Construction and Safety Standard, Title 24 CFR, Part 3280 (formerly the Federal Standard for
Mobile Home Construction and Safety, Title 24, HUD (part 280)).
• The installation of appliances designed for recreational park trailers must conform with state codes, with the standard
for Recreational Park Trailers, ANSI A119.5.
• When installed, the range must be electrically grounded in accordance with local codes.
• The range and its individual shut-off valve must be disconnected from the gas supply piping system during any
pressure testing of that system at test pressures in excess of 1/2 psi (3.5 k Pa).
• The range must be isolated from the gas supply piping system by closing its individual manual shut-off valve during
any pressure testing of the gas supply piping system at test pressures equal to or less than 1/2 psi (3.5 k Pa).
• The maximum gas supply pressure must be in accordance with the manifold 10" WC inlet pressure rating of the gas
appliance pressure regulator supplied.
• The gas supply pressure for checking the regulator setting must be at least 1" WC (249 Pa) above the manufacturer's
specified manifold pressure. Any opening in the wall behind the range and in the floor under the range must be sealed.
SAVE THESE INSTRUCTIONS
www.insigniaproducts.com 53.7 Cu. Ft. Free-Standing Gas Range for RVs
Features
Note to reviewers: Please see the question in red in the Troubleshooting section.
Package contents
• 3.7 Cu. Ft. Free-Standing Gas Range for RV
• Anti-tip device
• Rubber pad kit
• User Guide
Main components
Cook top
Control panel
Oven racks
Oven door
Storage drawer
Oven door handle
Control panel
Panel Light Oven Light
switch switch
Panel Light Oven Light
Rear Left Front Left Bake knob Rear Right Front Right
6000 BTU 9000 BTU 12000 BTU 3500 BTU 12000 BTU
6 www.insigniaproducts.comNS-RNG24SS9
Range dimensions
Front
23.9" (60.7 cm)
35.6" to 36.6" (90.4 cm to 93 cm) Adjustable
34.4" (87.4 cm)
www.insigniaproducts.com 73.7 Cu. Ft. Free-Standing Gas Range for RVs
Side
26.9" (68.3 cm)
24" (60.9 cm)
.7"
21.7" (55.1 cm) (1.8 cm)
24.3" (61.7 cm)
Installing the range
IMPORTANT: We recommend that a professional installer install your range.
If your range is not installed correctly, incorrect electrical grounding or gas leaks can cause a fire or explosion which can lead to injury
or death.
CAUTION Material damage:
• Do not use the door or handle to lift or move the range.
• The range must be placed directly on a floor with 1/8" (3 mm) thick commercial grade vinyl composition floor
finishing materials. Do not place the range on to a base or pedestal.
8 www.insigniaproducts.comNS-RNG24SS9
Clearances and dimensions
Use the dimensions shown below to install the range. The back and sides of the range below the cook top can be flush to
combustible material.
A minimum clearance of 5 in. (12.7 cm) horizontally and 18 in. (45.7 cm) vertically is required between the sides of the
cooking surface and any combustible construction adjacent to the cooking surface. A minimum clearance of 30 in. (76 cm)
is required between the top cooking surface and any combustible material directly above the cooking surface.
Note: The measurements in the following graphic are minimum requirements.
.5"
30" (76.2 cm)
(1.3
cm)
18" (45.7 cm)
)
12.7 cm
5" (
)
61.5 cm
24.2" (
www.insigniaproducts.com 93.7 Cu. Ft. Free-Standing Gas Range for RVs
Gas and electric location requirements
24.8
" (6
3 cm
)
8.5" (21.6 cm)
8.6" (21.8 cm)
2" (5.1 cm)
(5.1 2"
cm)
2" (5.1 cm)
m)
62.2 c
5" (
24.
Important notes to the installer:
1 Read this manual before installing the range.
2 Observe all governing codes and ordinances.
3 Make sure that you leave these instructions with the range.
4 Before installing the range in an area covered with linoleum or any synthetic floor covering, make sure that the floor
covering can withstand temperatures at least 90°F (32°C) above room temperature without shrinking, warping, or
discoloring.
5 Do not install the range over carpeting unless you place an insulating pad or sheet of 1/4-in. (.64 cm) thick plywood
between the range and carpeting.
Before installing the range
• Remove the exterior and interior packing.
• Wipe the surfaces of the range with a damp cloth or sponge, then wipe them dry with a clean, dry cloth.
Adjusting the height and leveling the range
The range should be the same height as the adjacent countertops or workspaces. The range should also be level. If the
range is not level, the door may not close or seal correctly which can cause uneven heating and gas wastage problems.
• To adjust the height and level the range, turn the feet clockwise (to raise) the range or counter-clockwise (to lower).
Note: To make it easier to adjust the feet, have someone push against the top of the range to tilt it slightly.
10 www.insigniaproducts.comNS-RNG24SS9
Installing the anti-tip device
WARNING:
• All ranges can tip and injure people. Install the anti-tip device that came with the range.
• If you pull the range away from the wall for cleaning, service, or any other reason, make sure that the anti-tip device is
correctly re-engaged when you push the range back against the wall. In the event of abnormal usage (such as a
person standing, sitting, or leaning on an open door), failure to take this precaution can result in tipping of the range.
Personal injury might result from spilled hot liquids or from the range itself.
1 Adjust the range feet to the correct height. Make sure that the range is level. See Adjusting the height and leveling the
range on page 11.
2 Position the rear brackets on the floor with the notches on the brackets facing the front of the range, then screw the
brackets to the floor using four of the provided screws per bracket.
2.4" (6 cm) 18.3" (46.5 cm) 2.4" (6 cm)
(10.1 cm)
4"
20.7" (52.5 cm)
www.insigniaproducts.com 113.7 Cu. Ft. Free-Standing Gas Range for RVs
3 Align the rear feet with the notches on the rear brackets, then slide the range into place. Make sure that the rear feet are
under the brackets.
4 Open the storage drawer, slide the notches on the front brackets over the front feet, then screw the brackets into the
floor using two of the provided screws for each bracket.
12 www.insigniaproducts.comNS-RNG24SS9
5 Close the drawer.
www.insigniaproducts.com 133.7 Cu. Ft. Free-Standing Gas Range for RVs
Connecting to gas
WARNING: If your range is not installed correctly, gas leaks can cause a fire or explosion which can lead to death or injury.
We recommend that a professional installer connect the gas.
CAUTION: Your range can use only LP gas. Do not connect it to any other type gas.
You can connect the gas using a flexible connector or a rigid pipe.
Flexible connector method
Pressure Flexible appliance
regulator conduit
Flare union adapter on
the shut-off valve
Flare union Manual
adapter on the shut-off valve
range
ON
OFF
1 Install a male 1/2" flare adapter at the 1/2" NPT internal thread in the range inlet. Use a backup wrench on the elbow
fitting to avoid damage.
2 Install a male 1/2" or 3/4" flare union adapter in the NPT internal thread on the manual shut-off valve.
3 Connect the flexible metal appliance connector.
4 Make sure that the circuit breaker is off, then plug the power cord into the electrical outlet. Do not turn the circuit
breaker back on.
5 Push the range back into position making sure that the rear legs slide under the anti-tip brackets. The range sits
3/4" (19 mm) away from the wall when correctly installed.
CAUTION: Be careful not to crimp the flexible connector.
6 Carefully tip the range forward to make sure that the front legs are under the anti-tip brackets.
Rigid pipe method
The configuration of the rigid pipe connection varies depending on the location of the gas pipe stub.
Pressure Manual shut-off
regulator Pipe valve
ON
OFF
1 Make sure that the circuit breaker is off, then plug the power cord into the electrical outlet. Do not turn the circuit
breaker back on.
2 Push the range back into position making sure that the rear legs slide under the anti-tip brackets. The range sits
3/4" (19 mm) away from the wall when correctly installed.
3 Carefully tip the range forward to make sure that the front legs are under the anti-tip brackets.
4 Connect the pipe to the range at the union. Access the connection through the access panel behind the storage
drawer.
14 www.insigniaproducts.comNS-RNG24SS9
Installing rubber pads to the oven back
To prevent the range from getting too close to the wall behind the range, install the included rubber pads.
1 Locate the rubber pad kit. It includes:
Screws Rubber pads
2 Align the holes in the rubber pads with the holes on the top, back of the range, then secure the pads to the range with
the provided screws.
www.insigniaproducts.com 153.7 Cu. Ft. Free-Standing Gas Range for RVs
Connecting to power
DANGER: Risk of electric shock, short circuit, or fire if the power cord is damaged.
The power cord must not be clamped, bent, or trapped or come into contact with hot parts of the range. If the power cord is damaged,
it must be replaced by a qualified electrician.
IMPORTANT:
• Electrical installation should comply with national and local codes. The range must be grounded.
• The range requires a 110/120VAC electrical supply to operate the electronic ignition system. The 5 ft. (1.5 m) power cord provided
with the range is equipped with a 3-prong, grounded plug for protection against shock hazard.
• The power outlet should have its own 15 amp circuit breaker.
• In addition, be aware of local codes and ordinances when installing your services.
• The wiring diagram covering the control circuit is located on the back of the range. The power supply data must correspond to the
data specified on the rating plate of the range. The rating plate sticker is on the power cord.
WARNINGS: Avoid fire hazard or electrical shock.
• Do not use an adapter plug, an extension cord, or remove the grounding prong from the power cord. Failure to follow this warning
can cause serious injury, fire, or death.
• The range is equipped with a 3-prong grounding plug for your protection against shock hazard and should be plugged directly
into a correctly grounded receptacle. DO NOT cut or remove the grounding prong from this plug.
• The power cord must be plugged into a mating 3-prong ground-type outlet, grounded to conform with the National Electrical
Code, ANSI/NFPA 70 latest edition, or Canadian Electrical Code (CSA) and all local codes and ordinances.
• For personal safety, the range must be correctly grounded. For maximum safety, the power cord must be plugged into an electrical
outlet that is correctly polarized and grounded.
• If a 2-prong wall receptacle is the only available outlet, have it replaced with a correctly grounded 3-prong wall receptacle installed
by a qualified electrician.
• Do not ground to a gas pipe.
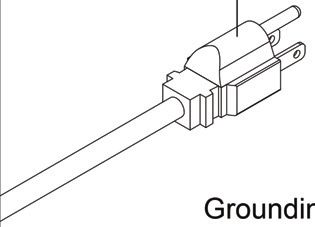
3-prong plug
Outlet cover
Testing for gas leaks
1 Make sure that the circuit breaker is turned off.
2 Turn on the gas.
3 Apply a non-corrosive leak detection fluid to all joints and fittings in the gas connection between the shut-off valve and
the range. Include gas fittings and joints in the range if connections may have been disturbed during installation.
4 If bubbles appear around fittings and connections, turn off the supply line gas shut-off valve, then tighten the
connections.
5 Retest for leaks. The leak check is complete when no bubbles appear.
CAUTION: Never check for leaks with a flame. Do not continue to the next step until all leaks are eliminated.
Before you plug in an electrical cord, make sure that all controls are in the OFF position.
6 Wipe off all detection fluid residue.
7 Turn on the circuit breaker.
16 www.insigniaproducts.comNS-RNG24SS9
Testing top burners
1 Test the burner ignition.
Push in on a burner knob, then turn it counter-clockwise to the flame symbol. The igniter/spark module produces a
clicking sound. After the air has been purged from the supply lines, the burner should light within six seconds.
2 Test the high flame setting.
Turn a burner on to HI. The flame may burn yellow for a few seconds, then it should turn blue. If the burner continues
to burn mostly or completely yellow, see Burner flames are unusually large and yellow on page 31 or contact a
qualified service technician.
3 Test the low flame setting.
Turn a burner on to LOW. Make sure that the flame completely surrounds the burner. There should be a flame at the
burner port and no air gap between the flame and the burner. If the burner does not carry over, see Flames do not burn
all around the burner cap on page 31 or contact a qualified service technician.
4 Repeat these steps to test each burner.
Testing the oven burner
Note: You can see the flame through the holes in the bottom of the oven.
1 Test the bake burner ignition.
While pressing in on the oven control knob, turn it counter-clock wise to the flame symbol. Do not release the knob.
The electrode clicks and the pilot burner ignites. You can see the pilot flame through the holes on the bottom of the
oven.
Keep pushing the control knob on the flame symbol position until the flame is lit and stable. Depending on the length
of the pipe, you may need to keep pushing for one to five minutes until the gas pushes the air out of the pipe.
2 Test the bake burner flame.
While the burner is lit, turn the control knob to each temperature and inspect the flame. If the flame is completely or
mostly yellow, make sure that the regulator is set for the correct fuel, then retest.
Note: Some yellow streaking is normal during initial start-up. Let the oven operate for four to five minutes, then re-evaluate before
making adjustments. If the flame is still yellow, contact a qualified service technician.
Before you begin using your range
Before turning on the burners or oven:
• Remove all packaging materials.
• Wipe the surfaces of your range with a damp cloth or sponge, then dry with a clean, dry cloth.
CAUTION: Do not use harsh detergents, scouring powder, or any sharp objects to clean your range. These items can damage the
surfaces of the range.
When you turn on a burner or the oven for the first time, smoke and odors may be emitted. This is normal. Make sure that
the room is well ventilated.
WARNINGS: Hot surfaces may cause burns.
• Do not touch any hot surface on your range. Use oven gloves or potholders.
• Do not let children near your range.
Tips for saving gas
• Use dark-colored or enamel-coated cookware in the oven because the heat transmission is better.
• Before cooking, preheat the oven if the recipe calls for preheating.
• Do not open the oven door during cooking.
• Try to cook more than one dish in the oven at the same time whenever possible.
• If you plan to cook more than one dish, cook them one after another. The oven will already be hot.
• Defrost frozen dishes before cooking them.
• Use pots and pans with covers for cooking.
• Select the burner that most closely matches the size of the bottom of the pot you are using. Always select the correct
pot size for your dishes. Larger pots require more gas.
www.insigniaproducts.com 173.7 Cu. Ft. Free-Standing Gas Range for RVs
Using the cook top burners
WARNING: Overheated oil can catch on fire.
When you are heating oil, do not leave it unattended. If oil overheats, it may catch on fire. If oil catches on fire, do not try to extinguish
the fire with water. Instead, immediately cover the pot or pan with a lid. If you can safely reach the burner control knob, turn off the
burner. Call the fire department if this does not extinguish the fire.
• Before frying foods, always dry them well, then place them gently into the hot oil.
• Make sure that frozen foods are completely thawed before frying.
• Do not cover a pot or pan you are using to heat oil.
• Do not place empty pots or pans on burners that are switched on. The pots or pans could be damaged.
• Operating a burner without a pot or pan on it will damage your range.
• Turn off burners after cooking is complete.
• When using burners, the cook top can be hot. Do not put plastic or aluminum items on it.
• Use flat-bottomed pots and pans only.
• Put an appropriate amount of food in pots and pans. An overfilled pot or pan can overflow and make cleanup harder.
• Do not put pot or pan lids on a burner.
• Place the pot or pan in the center of the burner.
• When you want to move a pot or pan onto another burner, lift it up and place it on the other burner. Do not slide a pot
or pan from one burner to another.
Burner control knobs
Each burner has a separate control knob.
Selecting a burner
WARNING: Never let the flame extend beyond the outer edge of the cooking pot or pan. A higher flame wastes energy and increases
your risk of being burned by the flame.
Correct flame height Incorrect flame height
18 www.insigniaproducts.comNS-RNG24SS9
The size of a pot or pan and the burner flame must match each other. Adjust the flame so that it does not extend beyond
the bottom of the pot or pan, and center the pot or pan over the burner.
8 to 8.5" 5 to 7"
(20 to 22 cm) (12 to 18 cm)
8 to 8.5" 8.5 to 9.5"
(20 to 22 cm) (22 to 24 cm)
Normal burner (mid-size): 8 to 8.5" (20 to 22 cm) back left
Auxiliary burner (small): 5 - 7" (12-18 cm) back right
Normal burner (mid-size): 8 to 8.5" (20 to 22 cm) front left
Rapid burner (large): 8.5 - 9.5" (22-24 cm) front right
Turning on a burner
Note: The large flame symbol on a burner knob indicates the highest cooking power.
1 While pressing in on a burner control knob, turn it counter-clockwise to the large flame symbol. Your range generates
an ignition spark and ignites the gas.
Note: If there is no electricity, you can ignite the gas with a match.
2 After the gas is ignited, release the knob.
3 Turn the knob to adjust the flame.
4 When cooking is complete, turn the knob to the OFF position.
WARNING: Risk of explosion if gas does not ignite.
Do not press a burner knob for longer than 15 seconds if the gas does not ignite. Release the knob and wait for one minute, then
repeat the ignition process.
Using the oven
WARNING: Risk of scalding by hot steam.
Stand away from the oven when opening the oven door. Escaping hot air or steam can burn your hands, face, or eyes. Let hot air or
steam escape before removing or replacing food.
Tips for baking
• Use appropriate non-stick coated metal sheets or aluminum containers or use heat-resistant silicone molds.
• Make the best use of the space on the rack. We recommend placing the baking pan in the middle of the rack.
• Select the correct shelf position before turning the oven on.
• Do not move oven shelves when hot. If you must move a rack while the oven is hot, do not the let the potholder
contact the hot oven burner.
• Keep the oven door closed as much as possible.
www.insigniaproducts.com 193.7 Cu. Ft. Free-Standing Gas Range for RVs
Tips for roasting
• Seasoning with lemon juice and black pepper helps improve the cooking performance when roasting a whole chicken
or turkey or any large piece of meat.
• Meat with bones takes about 25 to 35 minutes longer to cook than a roast of the same size without bones.
• You should calculate about 10 to 12 minutes cooking time per inch thickness of meat.
• Let meat rest in the oven for about 10 minutes after the cooking is complete. The juice is better distributed all over the
roast and does not run out when the meat is cut.
• Place fish in a heat-resistant dish on the middle or lower rack.
• If you installed a drip pan (not included), add some water to the pan for easier cleaning.
Baking times
FOOD PREPARATION BROILING TIME (Depending on thickness)
Toasting of bread products NA 10 - 15 min.
Small cuts of meat, sausages, NA 15 - 20 min.
bacon, and similar types
Chops, ham steaks, chicken Chicken placed in the bottom of a 20 - 25 min.
pieces broiling pan or deep baking dish.
Whole fish, fish fillets, fish Whole fish and fish fillets placed 15 - 20 min.
fingers in the base of a broiling pan.
Fish in breadcrumbs NA 15 - 20 min.
Precooked potato products NA 15 - 20 min.
Pizza Placed in the base of a broiling 20 - 25 min.
pan.
Grilling/browning of food Food placed directly on the base 8 - 10 min.
of a roasting pan. Heat the oven
to 450 to 500°F.
Tips for baking cakes
• If a cake is too dry, the next time you bake a cake, increase the temperature by 25°F and reduce the cooking time.
• If a cake falls, the next time you bake a cake, use less liquid or lower the temperature by 25°F.
• If a cake is too dark on top, the next time you bake a cake, place it on a lower rack, lower the temperature, and increase
the cooking time.
• If a cake is done on the inside but sticky on the outside, the next time you bake a cake, use less liquid, lower the
temperature, and increase the cooking time.
Tips for baking pastry
• If the pastry is too dry, the next time you bake pastry:
• Increase the temperature by 25F°and decrease the cooking time
• Dampen the layers of dough with a mixture made of milk and egg
• If the pastry takes too long to bake, the next time you bake pastry, make sure that the thickness of the pastry does not
exceed the depth of the baking tray.
• If the upper side of the pastry gets brown but the lower part is not cooked, the next time you bake pastry:
• Make sure that you have not used too much moistening liquid at the bottom of the pastry
• Try placing the pastry on a lower shelf.
Tips for cooking vegetables
• If the vegetables get too dry, the next time you bake vegetables, cook them in a covered dish rather than a tray.
• If a vegetable does not seem to cook, the next time you bake this vegetable, parboil or steam the vegetable before
baking.
20 www.insigniaproducts.comNS-RNG24SS9
Oven control knob
Turning on the oven
WARNING:
Do not try to light the oven with a match or lighter.
1 Close the oven door.
2 While pressing in on the oven control knob, turn it counter-clockwise to the large flame symbol. Your range generates
an ignition spark and ignites the gas.
3 Keep the knob depressed for another 5 to 10 seconds.
4 Look for a flame through the holes in the bottom of the oven to make sure that the gas has ignited.
5 Release the knob, then turn it to select a temperature setting.
6 When cooking is complete, turn the knob to the OFF position.
WARNING: Risk of explosion if gas does not ignite.
Do not press the oven control knob for longer than 60 seconds if the gas does not ignite. Release the knob and wait for one minute,
then repeat the ignition process.
www.insigniaproducts.com 213.7 Cu. Ft. Free-Standing Gas Range for RVs
Adjusting the oven rack
Note: The maximum load for an oven rack is 22 lbs (10 kg).
In the last review, we were told to change 8.8 lbs (4 kg) to 22 lbs (10 kg). The new source PDF shows 8.8 lbs (4 kg). Please verify which is
correct.
The oven racks slide into rails in the inside of the oven. The rails have a stop position so you do not accidentally pull a rack
completely out when you add or remove a backing dish.
1 Pull the rack toward you until it reaches the stop position, then tilt up the front edge of the rack and pull it completely
out.
2 With the rack tilted up, align it with the new rails, then slide the rack over the stop position.
3 Lower the rack, then push it all the way into the oven.
22 www.insigniaproducts.comNS-RNG24SS9
Cleaning and maintenance
Removing the cook top grate
• Use both hands, one on each side of the grate, or one hand in the middle of the grate to pull the grate straight up and
off the cook top.
CAUTION: The grate has a fixed metal rod through the middle of the grate. If you pull the grate off at an angle, the rod may bend and
break.
Fixed rod
Cleaning the cook top burners
CAUTIONS:
• Do not remove the burners.
• Do not let water drip into the burners.
1 Remove the grate, clean it in warm, soapy water, then dry it with a dry cloth. If a stain is difficult to remove, use a plastic
scrubber. See Removing the cook top grate on page 24.
2 Clean the burners with a damp, warm cloth.
3 Re-install the supports.
Cleaning the control panel
CAUTIONS:
• Do not remove the control knobs for cleaning. They may get damaged.
• Do not let water drip into the control panel or under the knobs.
• Wipe the control panel and knobs with a damp, warm cloth. If a stain is difficult to remove, use a plastic scrubber.
Cleaning the oven
• While the oven is warm (not hot), wipe it with a damp cloth.
CAUTIONS:
• Do not use oven cleaner or other cleaning agents to clean the oven. They may damage the oven interior.
• Do not let fat or oils build up on the oven base or oven accessories. If fat or oil splatters or drips, after cooking is complete, turn off
the oven and remove the fat or oil while the oven is warm.
www.insigniaproducts.com 233.7 Cu. Ft. Free-Standing Gas Range for RVs
Removing the storage drawer
1 At the same time, press down on the clip on the left side of the storage drawer and up on the clip on the right side of
the storage drawer.
24 www.insigniaproducts.comNS-RNG24SS9
2 While holding the clips, pull the drawer until it separates from the groove on the guide rail, then remove the drawer.
3 To replace the drawer, align it with the rails, press down on the clip on the left side of the drawer and up on the right
side of the drawer, then slide the drawer back into your range.
www.insigniaproducts.com 253.7 Cu. Ft. Free-Standing Gas Range for RVs
Disassembling range parts
CAUTION: To avoid potential damage or injury, these disassemble tasks should only be done by a qualified technician.
Disassembling the cook top burners
1 Remove the grate. See Removing the cook top grate on page 24.
2 Use a Phillips screwdriver to remove the two screws on a burner cap, then remove the cap and outer burner head.
3 Remove the two screws on the burner base cap, then remove the cap and burner base.
4 Reverse these steps to reinstall the burner.
26 www.insigniaproducts.comNS-RNG24SS9
Accessing the pilot light and oven burner
Note: The illustrations shown in this section are for reference only. The actual product may differ slightly.
1 Open the oven door.
2 Remove the racks from the oven. To remove a rack, pull the rack toward you until it reaches the stop position, then tilt
the front edge of the rack up and pull the rack completely out.
www.insigniaproducts.com 273.7 Cu. Ft. Free-Standing Gas Range for RVs
3 Use a Phillips screwdriver to remove the two screws on the panel on the bottom of the oven, then remove the panel.
4 Remove the two screws from the pilot lamp and the single screw on the tube burner, then lift the lamp and burner up
and out of the oven.
Pilot lamp
screws
Tube burner screw
28 www.insigniaproducts.comNS-RNG24SS9
Removing and reinstalling the oven door
To remove the oven door:
1 Open the oven door to a 90° angle, then fully open the levers on each side.
2 Gently close the door about halfway to disengage the hinges, then pull out the door and place it on a protected
surface.
www.insigniaproducts.com 293.7 Cu. Ft. Free-Standing Gas Range for RVs
To reinstall the oven door
1 While holding the door at approximately a 45° angle, insert the hinge tongues into the slots making sure that the
notches on both sides slide into place.
Notch
2 Carefully close the door. If the door does not easily close, do not force it. Make sure that the hinges are correctly
installed.
Troubleshooting
Cook top
If the solutions in this section do not solve a problem, contact a qualified service technician or Insignia customer service.
PROBLEM PROBABLE CAUSE POSSIBLE SOLUTION
Some burners will not light Burner parts or igniter may • Make sure that the burner parts are clean,
be wet, dirty, or misaligned dry, and correctly assembled.
• Make sure that the igniters are clean and dry.
For instructions on cleaning a cook top burner, see
Cleaning the cook top burners on page 24.
Flames do not burn all Burner parts or igniter may • Make sure that the burner parts are clean,
around the burner cap be wet, dirty, or misaligned dry, and correctly assembled.
• Make sure that the igniters are clean and dry.
For instructions on cleaning a cook top burner, see
Cleaning the cook top burners on page 24.
Burner flames are unusually Burner bezel ports are Clean burner bezel ring ports with a straightened
large and yellow clogged paper clip, needle, or wire.
Burner ports or burner caps Remove and carefully re-install the burner bezels
are not positioned correctly and caps.
Cook top is being operated Make sure that the type of cook top matches the LP
with the wrong type of gas gas supply.
Regulator is not installed, is Check the installation, replace the regulator, or set
faulty, or is set for the wrong the regulator for the correct type of gas.
type of gas
Ignition sparks, but there is Gas shut-off valve is in the Turn the shut-off valve to the ON position.
no flame OFF position
Igniters spark continuously Power supply polarity is Contact a service technician to have the polarity
after flame ignites reversed corrected.
Igniters are wet or dirty Dry or clean the igniters.
30 www.insigniaproducts.comNS-RNG24SS9
PROBLEM PROBABLE CAUSE POSSIBLE SOLUTION
Flames suddenly go out An air draft has extinguished Make sure that an air draft does not blow directly
the flame on the cook top.
A spill has extinguished the Turn off the burners, let the cook top cool, then
flame clean the burner and surrounding area. If the spill is
large, we recommend that you disassemble and
clean the burner and sump area. For instructions
on disassembling a cook top burner, see
Disassembling the cook top burners on page 27.
No LP gas Make sure that you have not run out of LP gas. Refill
the tank if needed.
Can I use the burners during WARNING: If the flames are blown out when a
a power outage? power outage occurs, immediately turn off the
burners. Gas may escape. The burners do not
automatically re-light when power is restored.
Yes, you use the cook top burners during a power
outage.
1 Holding a lighted match to the flame
spreader, push in on the control knob and
turn it counterclockwise to the fire label.
2 When the flame is burning all the way around
the burner, release the knob.
3 Adjust the heat if needed.
Oven
If the solutions in this section do not solve a problem, contact a qualified service technician or Insignia customer service.
PROBLEM PROBABLE CAUSE POSSIBLE SOLUTION
Oven does not heat No power supply • Make sure that the circuit breaker has not
tripped.
• Make sure that there is no power outage in
your RV or area. If there is a power outage,
you cannot use the oven until power has
been restored.
WARNING: Do not try to light the oven with a
match or lighter.
No LP gas Make sure that you have not run out of LP gas. Refill
the tank if needed.
Oven settings are not correct Follow the instructions in Turning on the oven on
page 22.
Oven does not maintain the The oven burner orifice is Make sure that the oven burner orifice is not
temperature blocked. blocked. The orifice is in the pilot light and tube
burner compartment. See Accessing the pilot light
and oven burner on page 28.
The spray fire hole in the Make sure that the spray fire hole is not blocked.
oven tube burner is blocked. The orifice is in the pilot light and tube burner
compartment. See Accessing the pilot light and
oven burner on page 28. In the last review, we were
told to delete the text in red. Please verify.
The thermostat valve may be Contact a qualified service technician to replace
damaged. the thermostat valve.
Condensation around the Food with a high moisture Condensation is normal.
oven control panel or the top content or local climate Wipe the condensation off the control panel or
of oven door conditions, like high oven door. If you experience frequent or excessive
temperature or humidity, can condensation, make sure that the cabinetry around
cause condensation your range is moisture-proofed.
Steam comes from oven Moisture from food is This is normal, especially if you are cooking large
vents at the back of my range evaporating during cooking quantities of food in the oven.
Food is over-cooked or Incorrect cooking time, Adjust the cooking time, temperature, or rack
under-cooked temperature, or rack position position.
www.insigniaproducts.com 313.7 Cu. Ft. Free-Standing Gas Range for RVs
PROBLEM PROBABLE CAUSE POSSIBLE SOLUTION
Cracking or popping sound This is the sound of metal This sound is normal.
heating up or cooling down
Can I use the oven during a No, do not try to use the oven during a power
power outage? outage.
Specifications
Dimensions (W × D × H) 23.9 × 24 × 36 in. (60.7 × 61 × 36 cm)
Gross Weight: 156.8 lbs. (71.3 kg)
Weight Net Weight: 140.8 lbs. (64 kg)
110/120VAC
Power requirements 60 Hz
Current 15 amp
Power cord length 5 ft. (1.5 m)
Cook top Rear left: Normal burner 6000BTU
Front left: Normal burner 9000BTU
Rear right: Auxiliary burner 3500BTU
Front right: Rapid burner 12000BTU
Oven light 4W
Oven power consumption 12000 BTU
Gas type LP only
32 www.insigniaproducts.comNS-RNG24SS9
ONE-YEAR LIMITED WARRANTY
Definitions:
The Distributor* of Insignia branded products warrants to you, the original purchaser of this new Insignia-branded product (“Product”), that the
Product shall be free of defects in the original manufacturer of the material or workmanship for a period of one (1) year from the date of your purchase
of the Product (“Warranty Period”).
For this warranty to apply, your Product must be purchased in the United States or Canada from a Best Buy branded retail store or online at
www.bestbuy.com or www.bestbuy.ca, and is packaged with this warranty statement.
How long does the coverage last?
The Warranty Period lasts for 1 year (365 days) from the date you purchased the Product. Your purchase date is printed on the receipt you received
with the Product.
What does this warranty cover?
During the Warranty Period, if the original manufacture of the material or workmanship of the Product is determined to be defective by an authorized
Insignia repair center or store personnel, Insignia will (at its sole option): (1) repair the Product with new or rebuilt parts; or (2) replace the Product at
no charge with new or rebuilt comparable products or parts. Products and parts replaced under this warranty become the property of Insignia and
are not returned to you. If service of Products or parts are required after the Warranty Period expires, you must pay all labor and parts charges. This
warranty lasts as long as you own your Insignia Product during the Warranty Period. Warranty coverage terminates if you sell or otherwise transfer the
Product.
How to obtain warranty service?
If you purchased the Product at a Best Buy retail store location, please take your original receipt and the Product to any Best Buy store. Make sure that
you place the Product in its original packaging or packaging that provides the same amount of protection as the original packaging. If you purchased
the Product from a Best Buy online web site (www.bestbuy.com or www.bestbuy.ca), mail your original receipt and the Product to the address listed
on the web site. Make sure that you put the Product in its original packaging or packaging that provides the same amount of protection as the
original packaging.
To obtain warranty service, in the United States and Canada call 1-877-467-4289. Call agents may diagnose and correct the issue over the phone.
Where is the warranty valid?
This warranty is valid only in the United States and Canada at Best Buy branded retail stores or websites to the original purchaser of the product in the
county where the original purchase was made.
What does the warranty not cover?
This warranty does not cover:
• Food loss/spoilage due to failure of refrigerator or freezer
• Customer instruction/education
• Installation
• Set up adjustments
• Cosmetic damage
• Damage due to weather, lightning, and other acts of God, such as power surges
• Accidental damage
• Misuse
• Abuse
• Negligence
• Commercial purposes/use, including but not limited to use in a place of business or in communal areas of a multiple dwelling condominium or
apartment complex, or otherwise used in a place of other than a private home.
• Modification of any part of the Product, including the antenna
• Display panel damaged by static (non-moving) images applied for lengthy periods (burn-in).
• Damage due to incorrect operation or maintenance
• Connection to an incorrect voltage or power supply
• Attempted repair by any person not authorized by Insignia to service the Product
• Products sold “as is” or “with all faults”
• Consumables, including but not limited to batteries (i.e. AA, AAA, C etc.)
• Products where the factory applied serial number has been altered or removed
• Loss or Theft of this product or any part of the product
• Display panels containing up to three (3) pixel failures (dots that are dark or incorrectly illuminated) grouped in an area smaller than one tenth
(1/10) of the display size or up to five (5) pixel failures throughout the display. (Pixel based displays may contain a limited number of pixels that
may not function normally.)
• Failures or Damage caused by any contact including but not limited to liquids, gels or pastes.
REPAIR REPLACEMENT AS PROVIDED UNDER THIS WARRANTY IS YOUR EXCLUSIVE REMEDY FOR BREACH OF WARRANTY. INSIGNIA SHALL NOT BE
LIABLE FOR ANY INCIDENTAL OR CONSEQUENTIAL DAMAGES FOR THE BREACH OF ANY EXPRESS OR IMPLIED WARRANTY ON THIS PRODUCT,
INCLUDING, BUT NOT LIMITED TO, LOST DATA, LOSS OF USE OF YOUR PRODUCT, LOST BUSINESS OR LOST PROFITS. INSIGNIA PRODUCTS MAKES NO
OTHER EXPRESS WARRANTIES WITH RESPECT TO THE PRODUCT, ALL EXPRESS AND IMPLIED WARRANTIES FOR THE PRODUCT, INCLUDING, BUT NOT
LIMITED TO, ANY IMPLIED WARRANTIES OF AND CONDITIONS OF MERCHANTABILITY AND FITNESS FOR A PARTICULAR PURPOSE, ARE LIMITED IN
DURATION TO THE WARRANTY PERIOD SET FORTH ABOVE AND NO WARRANTIES, WHETHER EXPRESS OR IMPLIED, WILL APPLY AFTER THE WARRANTY
PERIOD. SOME STATES, PROVINCES AND JURISDICTIONS DO NOT ALLOW LIMITATIONS ON HOW LONG AN IMPLIED WARRANTY LASTS, SO THE ABOVE
LIMITATION MAY NOT APPLY TO YOU. THIS WARRANTY GIVES YOU SPECIFIC LEGAL RIGHTS, AND YOU MAY ALSO HAVE OTHER RIGHTS, WHICH VARY
FROM STATE TO STATE OR PROVINCE TO PROVINCE.
Contact Insignia:
For customer service please call 1-877-467-4289
www.insigniaproducts.com
INSIGNIA is a trademark of Best Buy and its affiliated companies.
Distributed by Best Buy Purchasing, LLC
7601 Penn Ave South, Richfield, MN 55423 U.S.A.
©2019 Best Buy. All rights reserved.
Made in China
www.insigniaproducts.com 33For product inquiries, please contact us with the information below: 1-877-467-4289 www.insigniaproducts.com INSIGNIA is a trademark of Best Buy and its affiliated companies. Distributed by Best Buy Purchasing, LLC 7601 Penn Ave South, Richfield, MN 55423 U.S.A. ©2019 Best Buy. All rights reserved. V1 ENGLISH Made in China 18-0680
You can also read