360 VIDEO USER GUIDE - 360 VISI
←
→
Page content transcription
If your browser does not render page correctly, please read the page content below
360° video user guide

WHO IS THE INTENDED AUDIENCE OF THIS DOCUMENT?

This document provides basic information on producing 360° video using consumer-oriented
equipment. It will discuss what is important to know when shooting 360 ° video, like camera
position, etc. The document will also say something about post production such as editing and
exporting.

                                                1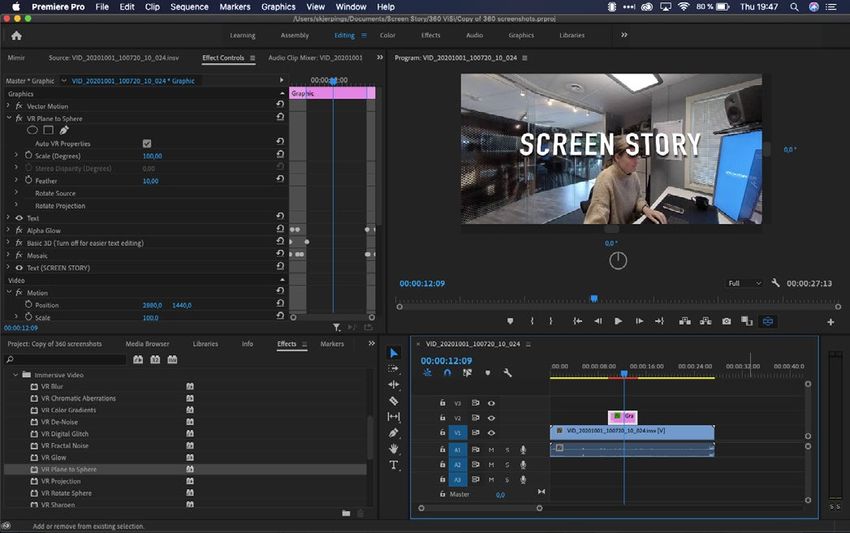
Lab

CONTENTS

What is 360° video?                      3

                                                               VIDEO
Preparing to record                      5

Equipment                                5

Camera settings                          6

Audio                                    7

Insta360 one r app for ios and android   8

Software                                 9
                                              WHAT IS 360° VIDEO?
Nadir-logo                               10   360° video is a new way to experience video. It puts the viewer in the center of the story with
                                              the opportunities and limitations that brings. In traditional video, we have the opportunity to put
Adobe premiere pro                       12   together sequences of images that tell a story that the audience immediately understands. In 360°
                                              video this is different, as the viewer is free to choose where to look in the 360° environment. This
                                              gives the video producer less control when it comes to directing the viewer’s attention.
Davinci resolve                          17
                                              360° video itself is still just video, which means that it is not possible to change the viewers
Inject metadata                          26   position in a 3D-space. It is a spherical projection of a 2D image, which gives the impression of a
                                              360° field of view. It is only possible to pan around the video, and there is no interaction. This is
Live streaming 360-video                 26   perhaps the biggest limitation to 360° video. This limitation is especially noticeable when using a
                                              VR headset to watch the 360° video. The immersive experience of a VR headset, may give the
                                              viewer a stronger feeling of wanting to interact, which is not possible. 360° video in itself often
                                              works best when the viewer is a passive observer, but with an added layer of interactivity, the
                                              viewer can become an active participant.

                                              360° video is recorded with a camera specially designed for this purpose. The camera usually
                                              consists of two or more wide-angle lenses pointing in different directions to capture everything
                                              happening around the camera.

                           2                                                                     3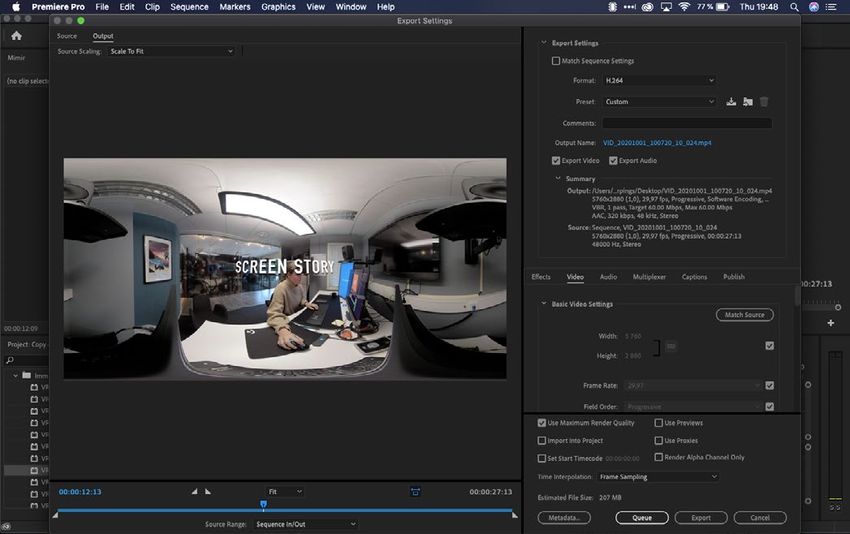
The difference between 360° video, 360° 3D-video, 360° Virtual Tours,                                    PREPARING TO RECORD
VR, AR and MR                                                                                            Before recording, there are a few things to think about and prepare for. The first question to ask is,
It is important to distinguish between the different concepts that are closely related to 360° video.    “What is the purpose of this video?” Once you have figured this out, you should also think about
Here are a few examples:                                                                                 whether this should be a 360° video, or whether the message and purpose are better achieved
                                                                                                         through the use of traditional video.
360° VIDEO
A “spherical” video, which in practice means a large panoramic video where the viewer can pan            THE STORY
around. The video is not interactive and has no depth in a 3D space. Most browsers support               Stories and emotions are effective for learning. Dramaturgy and storytelling will make the film more
playback of 360° videos and the viewer can pan around by clicking and dragging. Alternatively,           interesting and give the viewer greater learning outcome.
you can use a mobile phone and point it in the direction you want to look. The best experience of a
360° video is achieved by using a Virtual Reality (VR) headset.                                          RECORDING
                                                                                                         The camera is a tool for learning how to see without a camera
                                                                                                         - Dorothea Lange
360° 3D VIDEO
In 360° 3D video, the camera has at least two lenses side by side, to recreate the gap between the       Here are a few tips when it comes to recording, what kind of equipment is needed, what settings
eyes. When watching 3D video, the viewer eyes sees two slightly offset images, which gives the           you should have on the camera, where to place the camera and a little about audio recording.
impression of depth in the video. But if the viewer tries to lean forward, the illusion quickly fades,
because there is no actual depth in the video. Only specific 3D screens or VR headsets can be
used to reproduce this effect.

                                                                                                         EQUIPMENT
360° VIRTUAL TOUR
                                                                                                         This is the basic equipment you need:
A 360° virtual tour is 360°-video taken a step further. A layer of interactivity is added to create
a more immersive experience, where the user, by using a dedicated software (i.e. webrowser),               ● 360° video camera (In this user guide a Insta360 One R Twin is used)
can point and click to explore 360° videos and still images. Examples of use is virtual tours of
museums, real estate and so on.                                                                            ● Camera battery

                                                                                                           ● Camera memory card (MicroSD)
VIRTUAL REALITY (VR)
In VR or virtual reality, computer technology is used to create a simulated environment. The most          ● Tripod (preferably with a level)
advanced VR is based on computer generated graphics, which gives the possibility to explore
and interact with the virtual environment. Video games is taking fully advantage of this, and really     Additional equipment, which is convenient:
creates an immersive experience.
                                                                                                           ● Mobile phone with app installed for monitoring

AUGMENTED REALITY (AR)                                                                                     ● External audio recorder
AR lets the user see the reality with an layer of added information, for example when using the
                                                                                                           ● Lavalier microphone
camera on a mobile phone.
                                                                                                           ● Headset
MIXED REALITY (MR)                                                                                       Make sure all batteries are charged, memory cards are formatted and that everything is working
MR is a mixture of the real and virtual world, for example, to create new environments and               properly.
visualizations, where physical and digital objects coexist and interact.

                                                   4                                                                                                       5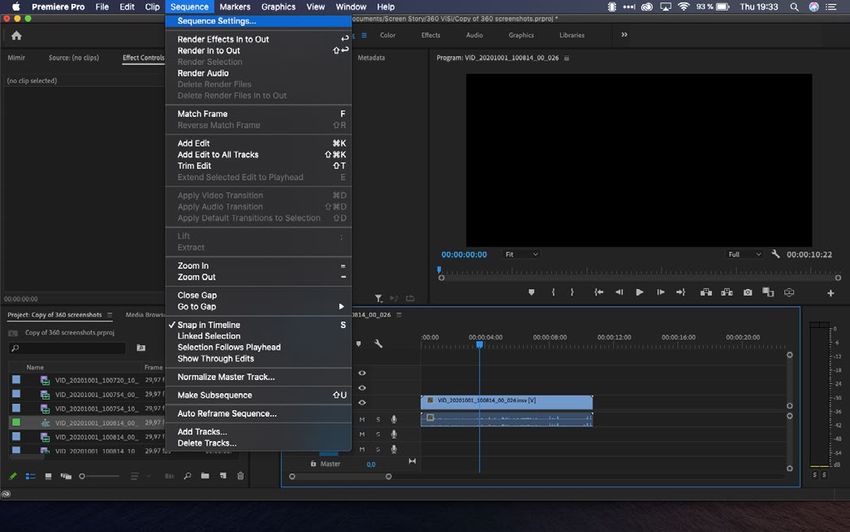
CAMERA SETTINGS                                                                                          AUDIO

Recommended camera settings (Insta360 One R Twin):                                                       The audio quality from the camera’s microphone is rarely very good, so an external microphone is
                                                                                                         needed to achieve high quality sound. Since the camera is filming in 360 degrees, it is difficult to
  ● Resolution: 5.7K                                                                                     hide microphones and audio technicians. Use of lavalier microphones is therefore recommended.

  ● Framerate: 30                                                                                        Small microphone receivers can be placed on top of the Insta360 One R Twin. Red Wireless
                                                                                                         GO is an example of this. A USB-C to 3.5mm jack adapter cable is needed. If you have multiple
  ● File format: h.265                                                                                   microphones, you have to use an external audio recorder.

  ● Shutter: 1/60 (1/50 if you notice any flickering when shooting, ie. from a computer screen,          Here are a few things to think about to improve sound quality when recording:
    or fluorescent lighting)
                                                                                                           ● Place the lavalier michrophone approx. 15 cm from the mouth.
  ● ISO: Adjusted to the room’s lighting, but as low as possible.
                                                                                                           ● Direct the microphone towards the mouth.
  ● LOG: OFF - (Advanced users can select ON and apply LUT afterwards)
                                                                                                           ● Use a headset to monitor the sound.

CAMERA POSITION                                                                                            ● Hide all cables inside clothing, but make sure the microphone is not covered. If the
                                                                                                             microphone rubs against clothing, it will create noise.
In order for the viewer to get the best possible experience of the content, it is important to place
the camera in the right position. A 360-degree camera consists of several lenses, from which               ● Remember to press record on both the camera equipment and the sound equipment.
the video will to be stitched together. In this process, objects, which are placed very close to the
camera, might be distorted.                                                                                ● If you are using an external sound recorder, do a “sync-clap”, where one of the participants
                                                                                                            clap their hand together when both the camera and the sound equipment is recording.
Here are some guidelines when it comes to camera position:                                                  This will make it easier to sync the clips in post-production.

  ● Think about where you would be to observe the action, and use that position as a
    starting point.

  ● Position the camera so that one lens points the way the main action will take place. Try to
    avoid that important parts of the action take place at the sides of the camera
    (in-between lenses), in the so-called stitch line.

  ● Make sure the camera is at least one meter away from the nearest person/object/hand, etc.

  ● Make sure the camera is leveled. Use the Insta360 app to check that the camera is leveled
    all the way around.

  ● Use a tripod and place the camera at eye level. That is, approx. 170 cm/5.6 feet above the
    ground. If the action occurs while sitting, place the camera at a sitting eye level. If any of the
    action occurs both sitting and standing, place the camera at eye level where the main action
    takes place.

  ● Do not move camera while recording.

  ● Remember to get out of sight when recording; if you can see the camera, the camera
    sees you.
                                                   6                                                                                                       7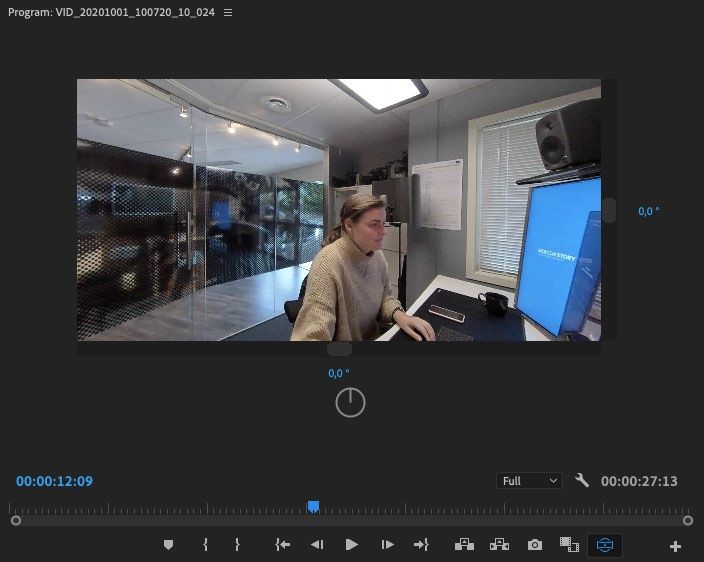
INSTA360 ONE R APP FOR IOS AND ANDROID                                                                   SOFTWARE

                                                                                                         There is various software for editing 360° video material. This user guide will give more details
                                                                                                         about three of them: Insta360 Studio (Windows/Mac), Adobe Premiere Pro (Windows/Mac) and
                                                                                                         DaVince Resolve (Windows/Mac/Linux).

                                                                                                         Download Insta360 Studio and plug-in for Adobe Premiere Pro, for free here:
                                                                                                         https://www.insta360.com/download.

                                                                                                         INSTA360 STUDIO 2020

                                                                                                         Insta360 Studio 2020 is Insta360’s own software to create and edit simple 360-videos. The
                                                                                                         software is very limited and is recommended only for simple edits and exports. If you have a need
                                                                                                         to add a graphic layer or adjust the horizon and so on, Adobe Premiere Pro or DaVince Resolve
                                                                                                         may be a better fit.

With the Insta360 app, you can watch live feed from the camera, change settings and start
recording with your mobile device. Here’s a brief overview of the app. For more detailed
information, see insta360’s web site.

Turn on the camera and connect the Wi-Fi to the camera. Open the app and press the yellow
camera button in the bottom centre. Select your camera from the list.

Now you’ll get a live view from the camera. Touch and drag to look around. At the top of the screen
you can see how much storage space is left on the memory card and also remaining battery time.
You can also change settings, start recording, and view previous recordings. For more detailed
information about the app, see insta360.com/support.

POST PRODUCTION
I love editing. It’s one of my favorite parts of filmmaking.
- Steven Spielberg

In the editing process, there are a few things to be aware of when editing 360 ° video. In traditional
video you can use different cuts, cutting rhythm, etc. to tell the story in a good and effective way.
360° video does not offer the same opportunity. As a storyteller you have no control over where
the viewer chooses to look. A cut in the video will potentially be disorienting and may drag the
viewer out of the story and break the immersion. Therefore, it is recommended to have no or very
few cuts in a 360° video.

TRANSFER RECORDED FILES TO HARD DRIVE

In order to import the video files, you need a memory card reader or a USB cable to connect the
computer directly to the camera. Transfer and organize the video files in folders with date and
name. Good naming conventions is key to finding your material at a later point.

                                                  8                                                                                                       9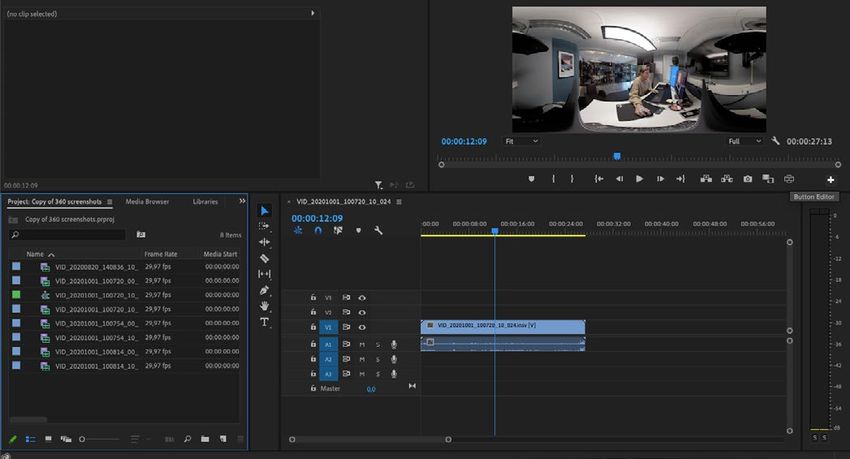
IMPORT FILES                                             Press the yellow export-button. A list of choices will now appear. These are some recommended
Click on the icon to the left beneath “footage” to       settings (you should fit these to your own needs):
import video files, or drag and drop the video files
directly in to the footage tab. A list of the imported   Video for publishing
files will now appear on the left side. Double click
the file you want to edit, to open it in the timeline.     ● Resolution: 5760x2880

EDITING                                                    ● Bitrate: 60 mbps
The timeline is located at the bottom with the
                                                           ● Encoding format: H264
file you have chosen. You can drag the yellow
handles to choose where the video clip should
                                                             ● Export type: Video
start and end.
                                                           ● AI effecs: None
SETTINGS
On the right side there is a couple of settings that     Master in high quality:
may be adjusted.
                                                         Same as the other settings,
  ● Use Flowstate Stabilization – This should            except for bitrate.
    only be checked off if there was any
    camera movement in the shot. If the                    ● Bitrate: 200 mbps
    camera was on a tripod during shooting, this
    should not be checked.                               Clean version:

  ● Stitching – Normal                                   This video should be without
                                                         any graphical elements.
  ● Stitching Optimization – should be checked
    off for Dynamic stitching and                          ● Bitrate: 200 mbps
    Chromaticcalibration

  ● True Audio – Off
                                                         Good naming convention is again key.
  ● Play Rate – None
                                                         For example:
NADIR-LOGO
To hide the tripod at the bottom of the clip, you        YYYYMMDD – PROJECT NAME – MASTER H264/MASTER/MASTER CLEAN – AUTHOR
can add a logo to overlap the image. This is done
by using the “Nadir Logo”. The logo should be            20201010 – 360 NURSING HOME - MASTER
500x500 pixels and in a PNG-format.

EXPORT                                                   VIDEO TUTORIAL
                                                         For more information on the software see: Insta360 Studio 2020
It is important to choose the right settings when
exporting. As a main rule, you should create
                                                         REFRAMING
three different versions of the edited movie. One
                                                         With the reframing tool, you can edit the starting viewpoint, so that the viewer doesn’t have to start
compressed movie for publishing, one high quality
                                                         by finding where the action is. Follow this guide on how to do it:
file for archiving and one high quality file without
graphics.
                                                         https://www.insta360.com/support/supportcourse?post_id=17067&locale=en-us
                                                    10                                                     11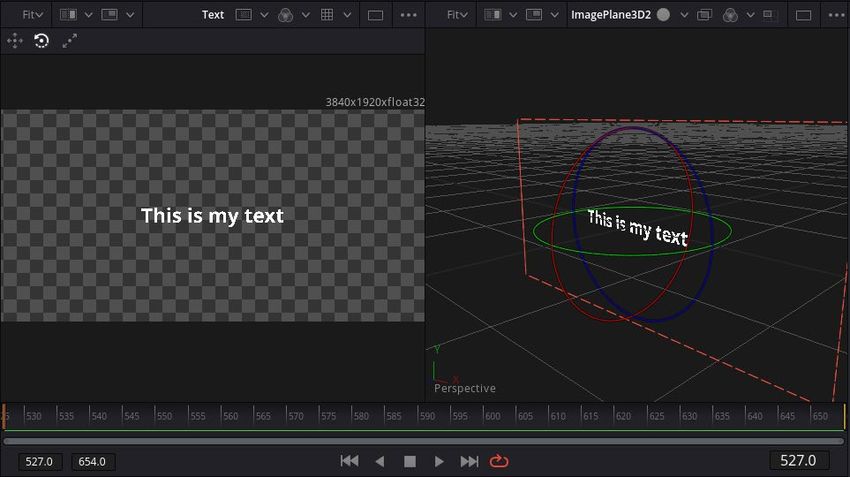
ADOBE PREMIERE PRO

Working with 360-video in Premiere Pro is very similar to editing traditional video. You are still
using regular “flat” video, which you can choose to view in 360 degrees by using built-in tools in
Premiere Pro CC2017 and onwards. Premiere also has its own VR-filters for use with 360-video.
Here you will get a short summary on how to edit 360-video in Premiere Pro.

For more information on Premiere Pro, visit Adobes pages:
https://helpx.adobe.com/premiere-pro/kb/work-with-vr.html

We expect you to have some background knowledge on Premiere Pro.

IMPORTING FILES AND SETTINGS
Importing files is done in the same way as always with Premiere, for example by using “Media
browser”. When the video files are imported, create a new sequence and drag the video clip you
want to edit, in to the sequence.

                                                                                                     Here you can choose the kind of 360 video, and if it is “monoscopic” (2D) or “stereoscopic” (3D).
                                                                                                     As a rule of thumb, the settings will be “equirectangular” and “monoscopic”. Choose OK to confirm.

                                                                                                     To view the video in VR, press the plus icon at the bottom of the player window. Add the button
                                                                                                     called “Toggle VR Video Display”.

Premiere will ask if you want to use the settings from the file, choose “yes”.
If it is not correct, you can manually change the settings by going to “Sequence settings”. At the
bottom there is a section with “VR Properties”.

                                                 12                                                                                                  13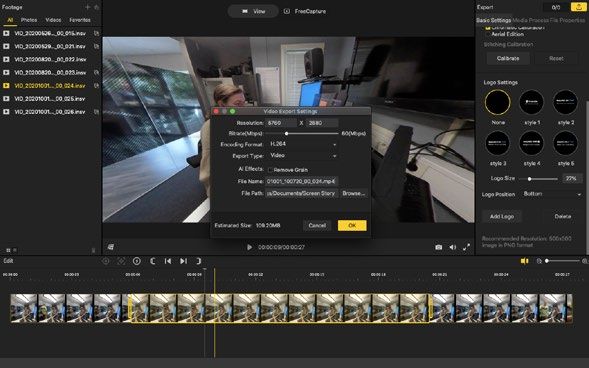
With this button you can
choose to preview the
video as it would in a final
product.

EFFECTS
Premiere Peo has a
                                    GRAPHICS
couple of video effects,
                                    To add 2D graphics such as text, still images or logos, import them and drag them to the timeline
which you can add to your           as you normally would. Then choose the effect “VR Plane to Sphere” to get it to show correctly.
video. These are located
under the effect panel
in the folder “Immersive
video”.

                               14                                                   15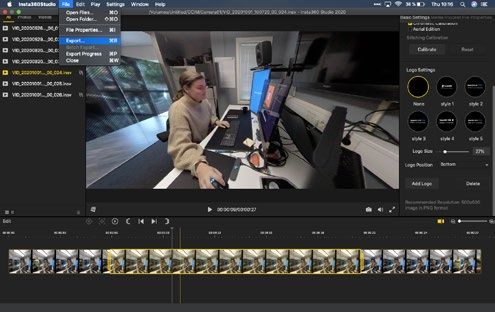
● VR Video
                                                                                                 • Check “Video is VR”.
                                                                                                 • Frame layout: Monoscopic

                                                                                           DAVINCI RESOLVE

                                                                                           DaVinci Resolve is a multiplatform video production kit, where you can do complicated 360° video
                                                                                           editing with Fusion compositing tool in DaVinci Resolve’s free version. In the free version the
                                                                                           maximum resolution is 3840x1920 pixels.
                                                                                           In DaVinci Resolve video editing is done in the editor timeline in the same way like in other editing
                                                                                           programs. 360° effects are composed with Fusion on top of that. In this guide you will learn how to
                                                                                           add text and images onto your 360° video.
EXPORT
                                                                                           After exporting your edited video from Resolve, you need to inject metadata to your video file. The
Here are some recommended settings when exporting 360-video using Premiere Pro
                                                                                           metadata is for video players to play your 360° video correctly. In this manual you will see one way
                                                                                           to do that.
  ● Format: H264
                                                                                           For more information how to use DaVinci Resolve, visit Resolve’s training page:
  ● Under “Basic Video Settings” choose “Match
                                                                                           https://www.blackmagicdesign.com/products/davinciresolve/training
    Source”.
                                                                                           IMPORTING FILES AND SETTINGS
  ● Bitrate Settings
                                                                                           First you need to start new project. Then change resolution in “file/project settings” to 3820x1920,
                                                                                           and match the frame rate to your video footage.
      • Bitrate Encoding: VBR 1 Pass

  ● Target bitrate: Choose anywhere between 40 to 60. The higher the bitrate, the better
    the quality, but this also results in larger files.

                                               16                                                                                           17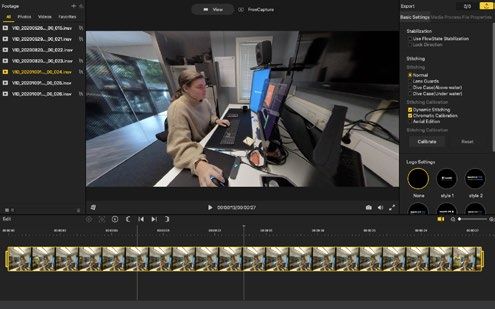
It might be good idea to reduce resolution to quarter in “optimized media and render cache”         It’s recommended to generate
section for more fluent editing experience.                                                         optimized versions of your video
                                                                                                    clips. Right click on your video clip
                                                                                                    and select “Generate Optimized
                                                                                                    Media”. This creates proxy
                                                                                                    versions from your video clip to
                                                                                                    make editing even more fluent.

                                                                                                    In the “Edit” section you can drag
                                                                                                    and drop media files to editing
                                                                                                    tracks. If you don’t see your media
                                                                                                    files, make sure that you have
                                                                                                    “Media Pool” activated in the top
                                                                                                    left corner.
The easiest way to import files is to drag and drop them straight from your operation system file
browser to the “Master” bin. You can create your own bins to keep your files organized.

                                                                                                    FUSION: VIEW 360
                                                                                                    Go to the “Fusion” section and select your video clip from the bottom section. You should see
                                                                                                    every clip that is in use in the editors video layers. First you need to make sure that you have the
                                                                                                    clip that you want manipulate in “Editor”. If you still don’t see clips in “Fusion”, you can toggle the
                                                                                                    “clips” button on the top bar.

                                                 18                                                                                                    19
Select transform node and change “Edges” parameter
You have two nodes: The “MediaIn” node that is to “Wrap” from inspector (on the right side of the
connected to “MediaOut” node. When you hover Resolve window). This will make the video clip wrap
your mouse over the node, little dots appear around the image area when adjusting parameters.
under the node. These dots shows the fusion It should now be possible to adjust the center
views. Left dot is left view and right dot is right position by changing the transform node’s “Center X”
view. If you click the dot, it will toggle between parameter. It might be easier to adjust center point if
black and white. White is “show” and black is you disable “360° View” option.
“don’t show”. This way you can select which
node’s output is showed in which view.
ADD TEXT
Create a new fusion composition in the “Edit” section
To view your footage in a 360 format, select preferred
by right clicking the “Master” bin and selecting “New
node and click the three dots in the viewing window at
Fusion Composition” from the dropdown menu. Drag
the top right corner. From the dropdown menu choose
and drop your newly created fusion composition to
“360° View” and select “auto” or “LatLong”. After that you
timeline.
can rotate view by pressing shift on your keyboard and
Navigate to
dragging with the right mouse button.
the “Fusion”
section and
select your
fusion compose from the bottom section. For now, you
will only have the “MediaOut” node in your fusion editor.
REFRAME OR ADJUST 360 VIDEO CENTER
In the “Fusion” section, select the video clip you First we add a text node by right clicking and selecting
want to reframe. Right click on the arrow between “Add Tool” → ”Generator” → ”Text+”. Click the text node
the “MediaIn” and “Mediaout” nodes. Select “Add to show it in the left side view (black dot under the
Tool” → “Transform” → “Transform”. node). Make modifications to the text in the inspector.
Don’t connect text node to “MediaOut” node yet. We
need to make transformation in 3D space first.
Now the arrows should go from “MediaIn” to “Transform” and from there to “MediaOut”. If not, just
drag and drop the arrows between nodes.
20 21Now it’s time for the 360° magic to happen. Create a spherical camera “Add Tool” → ”3D” →
”Spherical Camera” and connect it to the merge 3D node. View the merge 3D node in the left
side view. Now you have both the text plane and the spherical camera in same view and you can
transform them separately in 3D space.
Next thing is to get back to the 2D plane from 3D space.
This is done through render node
Create a plane to map our 2D text into 3D space. “Add Tool” → ”3D” → ”Image Plane 3D”. Connect “Add Tool” → ”3D” → ”Render 3D”.
the text node to the image plane node, by dragging the arrow from the text node’s grey square to
the image plane node. You can adjust your text size from the text node or scale the image plane Connect the 3D merge to the render node and choose
node. If you view image plane in viewer, you can see that the view is now in 3D mode. the desired camera from inspector. In this case the
only camera is a spherical camera. Render 3D node
duplicates resolution.
To correct that, we need to half the resolution of the
render node. In the inspector, click the “Image” tab,
uncheck “auto resolution” and write your own resolution
in “Width” to 1920 and “Height” to 960.
Finally, connect the render 3d node to the “MediaOut” node. After that you can edit your text in the
“Editor” section.
Create a merge 3D node for collecting different 3D elements into one 3D scene. “Add Tool” → ”3D”
→ ”Merge 3D”. Connect the image plane node to the merge 3D node.
22 23If you want to adjust your text with a video ADD IMAGE
backdrop you need to make it happen in the Adding an image is the same workflow as adding text. In this instruction we will leave the out the
“Fusion” section. Select text fusion composition. details, and just give you the steps that you need to do. Transforming image in desired position,
Drag and drop video clip to the node editor. size and scale is done in the merge 3D node.
Create a merge 2D
In the “Edit” section, create a new fusion composition,
“Add Tool”→ “Composite”→ “Merge”. name it and drag it to the editor. Navigate to the
Connect the video clip to the yellow socket “Fusion” section and select your newly created
(background) and render the 3D node to green composition. Drag and drop your image from the media
socket (foreground). library to fusion node editor. Create “Image Plane
3D”, “Merge 3D”, “Spherical Camera” and “Render
Make sure that “Apply mode” is “Normal” and 3D” nodes. Connect image (“MediaIn”) to the image
”Operator” is “Over”. Click the viewing dot to plane node and do that again to the merge 3D node.
show your merge node in the viewer. Connect spherical camera to merge 3D and merge
3D to Render 3D node. Lastly connect Render 3D to
Change “View 360” to auto. Now you can move, “MediaOut” and change render 3D node resolution
scale and rotate your text with the “Merge3D” to half (desired resolution 3820x1920 → render node
node to make new positions or create animated resolution 1920x960). Then you can position the image
texts. in 3D space.
EXPORT
Navigate to the “Deliver” section. Select “Custom”
preset. Name your video and select your target folder.
If you don’t see the folder you want to use when
browsing, you need to add one in media storages.
Navigate to preferences through the “DaVinci Resolve”
dropdown menu. In preferences find the “Media
Storage” and use the “add” button to add more folder
structures to your options.
In “Video” options:
Format: MP4
Codec: H.264
Resolution: Custom (3840x1920)
Framerate: Match the framerate of the composition
Quality: Choose the one that best suits yo
purpose. Medium is a good starting point.
The better the quality, the larger the file size will be.
In the “Advanced settings”, toggle the “Force sizing to
highest quality” ON. This ensures the scaling of the
images is of good quality.
You can refine rendering range by sliding start and end
points. Rendering range is displayed as a grey line just
under the timeline in the editing section.
24 25The last step is to render your edited video. Click “Add to Render Queue” to get your rendering
in to the waiting list. You can add renders with different settings in the same queue. Click “Start
Render” on the right side of your resolve window.
In Linux, there is no H.264 support directly in DaVinci Resolve. You can use the Quicktime format
with the MPEG codec when rendering the video. Use quality option “Best” to get a high-quality
video for further processing. After rendering, use another software to convert the video to H.264.
Handbrake is a free and good alternative.
https://handbrake.fr/
INJECT METADATA
360° video files need to have correct metadata, so the video players play them correctly. DaVinci
Resolve do not add metadata to video files. For that purpose, we use external application called
“Spatial Media Metadata Injector”. On the github page you will find instructions how to “install” and
use this program.
https://github.com/google/spatial-media/releases
It is a little python program with a GUI for Windows and Mac. After unpacking, start the program.
Choose your video file with the “open” button. Toggle “My video is spherical (360)” ON and press
“Inject metadata”.
With linux you need to use commandline (after downloading and unziping the sourcecode).
python spatialmedia -i
LIVE STREAMING 360-VIDEO
360° video can also be used for real-time transmission. For example, video conferences where the
video is based on 360° video. This allows for greater interaction between the participants as they
can control the camera viewpoint in the room.
GDPR
To ensure the privacy of those involved in the video, everyone involved in the video has to fill out a
document. The document consists of an agreement where the people involved agrees for the use
of the video to be published through different channels.
26 27You can also read