5 YEAR - Inteligentny dom | SALUS Smart Home
←
→
Page content transcription
If your browser does not render page correctly, please read the page content below

                        5

                            YEAR
                            WARRANTY
IX 2019
Introduction
    The SQ610 Quantum is a ZigBee temperature controller for wireless control of iT600 series devices, such as the
    KL08RF wiring centre, mini TRV head, RX10RF boiler control module.
    In order to control SQ610 over the Internet or via the SALUS Smart Home mobile app (ONLINE mode), it
    must be installed together with the UGE600 Internet gateway (sold separately). From the application level, it
    is possible to pair SQ610 with other system elements, e.g. Smart Plug SPE600, Smart Relay SR600 or window/
    door sensor OS600/SW600.
    SQ610 can be used locally without an Internet connection (OFFLINE mode), however, it’s communication with
    other devices must be done using the CO10RF coordinator (sold separately).
    THERMOSTAT SQ610 Quantum can work without Universal Gateway or CO10RF Coordinator as a standalone device.
    Full manual in PDF format is available at www.salus-controls.eu site.
    Product Compliance
    This product complies with the essential requirements and other relevant provisions of Directives 2014/30/ EU,
    2014/35/EU, 2014/53/EU and 2011/65/EU. The full text of the EU Declaration of Conformity is available at the
    following internet address: www.saluslegal.com.

          Safety Information
    Use in accordance to national and EU regulations. Use the device as intended, keeping it in dry condition. Product for
    indoor use only. Installation must be carried out by a qualified person in accordance to national and EU regulations.
    Disconnect your equipment before cleaning it with a dry cloth.
           Warning:
    Please always ensure the AC 230V mains power is switched off before installing or working on any components.

      Package Content:
     1) SQ610 Quantum Thermostat
     2) Mounting screws
     3) Manual instruction

2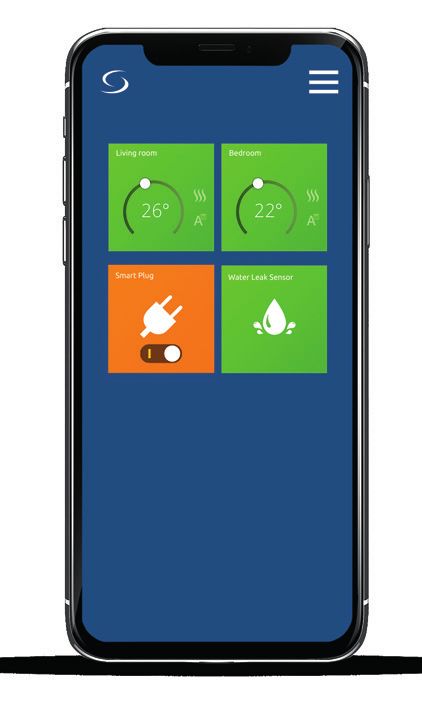
Before you start:                                                 Wiring diagram:
Select correct thermostat location                                     AC 230V

                                                                                                            English
                                                                   L
                                                                   N

                                                                         COM     NO     L    N
                               M                M

                                                                                      230V~,50Hz
                      150 cm

                                                                       SQ610

                                                                                                            Deutsch
                                                                                       S1    S2

                  m
           2   0c
      in
     m

Mounting: to mount thermostat you can use included
                                                                 S                    T

                                                                                                            Español
accessories (mounting screws). Remove plate from
the back to mount it to the wall. After that just put
thermostat on the plate.                                  Symbols explanation:
                                                          S - volt-free contact
                                                          T - temperature sensor
         Please note:                                     L, N - 230V AC pover supply
                                                          COM, NO - Voltage free output
The ideal position to thermostat mounting is about 1,5m

                                                                                                            Português
under floor level far from heating or cooling sources.    S1,S2 Terminals:
Thermostat can’t be exposed to sunlight or any extreme    - air or floor temperature sensor
conditions like for example draft.                        - external volt-free contact to connect any ON/
                                                          OFF switch or occupancy sensor (Hotel card)

                                                                                                                 3
LCD Icon Description

                                                                                      1
                                                                                      2
                                                                                      3
                  19                                                                  4
                                                                                      5
                  18
                  17
                  16
                                                                                      6
                  15                                                                  7

                                       14 13 12 11 10     9         8

         1.   Menu/Settings description + Clock               10.   Standby mode icon
         2.   AM/PM                                           11.   Current Temperature / Setpoint Temperature
         3.   Temperature unit                                12.   Holiday mode
         4.   Heating indicator (icon is animating when       13.   Temporary override mode
              there is heating demand)                        14.   Settings icon
         5.   Cooling indicator (icon is animating when       15.   External / Floor temp sensor indicator
              there is cooling demand)                        16.   Schedule program number
         6.   RF Connection indicator                         17.   Schedule mode icon
         7.   Internet connection indicator                   18.   Day indicator/ SET information
         8.   Occupancy sensor (hotel card)                   19.   Current Humidity value
         9.   Key lock function

4
Buttons Description

                                                                                                                      English
Button    Function
           1) Menu button / Return button.
           2) In the MAIN SCREEN: Press and hold for 3 sec to change the thermostat operating mode
              (Schedule mode / Permanent mode / Temporary override mode).
           3) In the SETTINGS SCREEN: Press and hold for 3 sec to go back without saving the changes.
           4) In the PAIRING SCREEN (in SYSTEM TYPE Menu): Press and hold for 3 sec to see other
              pairing options.

                                                                                                                      Deutsch
          „Down” Button (Decrease parameter value/moving on the menu in ‘DOWN’ direction)

          “Up” Button (Increase parameter value/moving on the menu in ‘UP’ direction)

          1) “OK / Tick” Button (Confirm parameter value / Go to the next menu / Save settings)
          2) In the MAIN SCREEN: Press and hold for 3 seconds to enter Standby mode
          3) In the SETTINGS SCREEN: Press and hold for 3 sec to go back to the MAIN SCREEN & SAVE all the changes.

                                                                                                                      Español
          In the MAIN SCREEN - press and hold these buttons together for 3 seconds to LOCK / UNLOCK
 +        the Thermostat keys).

                                                                                                                      Português
                                                                                                                           5
COMPATIBILTY WITH OTHER SALUS CONTROLS DEVICES
    Quantum Thermostat can work in ONLINE or OFFLINE mode. *
    At first step you need to decide in which mode your thermostat will work.
                              ONLINE MODE                                               OFFLINE MODE
                                       Universal Gateway is                               Universal Gateway is NOT
                                       CONNECTED TO THE INTERNET                          CONNECTED TO THE INTERNET
                                       You can configure and use all your                 You can use your devices locally
                                       devices in the Smart Home App                      without the SmartHome App.
                                                                                          Gateway works in this mode as
    Download the Smart Home                                GET IT ON
                                                                                 OR       standard ZigBee coordinator.
    App on your iOS or Android                             Download on the                 CO10RF Coordinator - You can use
    device for remote access to your                                                       standard ZigBee network coordinator
                                          SALUS
    SALUS equipment.                    Smart Home                                         to install and use your devices.
    Compatibile devices:

       SR600*                 SPE600*                         KL08RF                         TRV                 RX10RF
      Smart Relay            Smart Plug               Wiring Centre for 8-zone         (Thermostatic             receiver
                                                     underfloor heating (UFH).      Radiator Valve) with
         *Only with Online Mode                                                   wireless communication.

        Please note:
    SQ610 Quantum Thermostat can work without coordinators (ONLINE/
    OFFLINE MODE) as a standalone device with the wires use.

6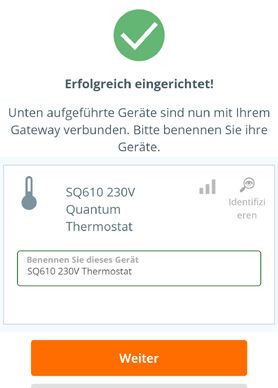
First power up sequence
     Please note:

                                                                                                                                   English
For easier installation, please make sure you have already added other devices to your ZigBee network, such as
Underfloor Heating Control Box (KL08RF) or Radiator heads (TRV’s) etc.
  1                                        2                                             3

                                                                                                                                   Deutsch
To power on the Thermostat you                 ...display will show all icons...          ...then thermostat will display
have to connect it to the 230V power                                                            the software version.
then...

                                                                                   YES - ONLINE, OFFLINE MODE.

                                                                                                                                   Español
                                                                                   You can configure your thermostat
  4                                    5                                           with universal gateway or CO10RF
                                                                                   coordinator. That is, add it to the Salus
                                                                                   Smart Home system.

                                                                                   Thermostat work as a standalone device

                                                                                                                                   Português
                                                                                   for pump, boiler, receivers etc. That is, you
      Now, choose your language by                                                 can directly connect thermostat to selected
      „ ” or „ ” buttons. Confirm
      your language by   button.                                                   device without any network system. You
                                                                                   can add it later anytime.

                                                                                                                                        7
Installation in ONLINE mode
    After Language selection follow below steps to add your device to the Smart Home app and pair with other devices:

     1                                         2                                         3

                                                                                                                SALUS
                                                                                                              SmartHome

                                                                                             Go to SALUS Smart Home app

     4                                        5                                          6

     7                                        8                                         9

                                                                                        Once your thermostat is added to
                                                                                        the app you will see above screen
                                                                                        on the LCD.

8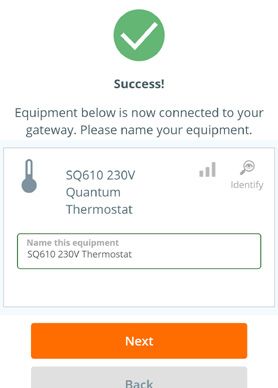
10   11                           12

                                                                     English
                                                                     Deutsch
13   14                           15
             Connect equipment

          Name this equipment

                                                                     Español
          SQ610 230V Thermostat

                    Finish

                                   After that thermostat will show
                             3               main screen.
                                           Congratulations!
                                  You succesfully configured SQ610

                                                                     Português
                                       Quantum Thermostat.

                                                                          9
Installation in OFFLINE mode
     Pairing with Wiring Centre / Control Box (Install the Wiring Centre / Control Box according to the
     instructions included with product)                                            5 sec

         1                                       2                                     3

                                                                                                   5 sec
                                                                                                                    OR

                                                                                               Open the ZigBee network

         4                                       5                                     6

             Select system type: UNDERFLOOR, Using        and       buttons select the Control Use  or      buttons to select
             press button to confirm         Box number (press PAIR button on the Control the zone number and press
                                             Box to see its address number). Press button button to confirm.
                                             to confirm
                                                                                                           5 sec.
         7                                       8                                     9

                                                                                                                          3
                                                                                                                          3
                                                                                                      5 sec
                                                                                                                     OR

             Now you can pair your thermostat
             with additional zones. Select one                                                    Close the ZigBee network
             more zone or finish the pairing
             process by button.
10
Pairing with TRV radiator head (Install the TRV according to the instructions included with
product) 5 sec
English
1 2 3
5 sec.
OR
Open the ZigBee network
Deutsch
4 5 6
10 sec
You can pair up to 6 TRV’s with
Español
Select system type: Now hold antenna button for 10
RADIATORS sec. on all TRV’s which you want 1 Thermostat. All TRV’s have
to pair with your Termostat. to within the same room with
Thermostat.
7 8 9 5 sec
3
Português
OR
3
5 sec
On the LCD you will see the number of
paired TRV’s. Once all TRV’s are paired - press
button to finish the pairing process. Close the ZigBee network
11Wired device
Please note:
Thermostat SQ610 Quantum can work without Universal Gateway or CO10RF Coordinator as a standalone device.
1 Wiring diagram for volt-free connection (e.g. boiler control):
S1
S2
L N COM NO BOILER CONNECTION*
AC 230V
L
N
2 Wiring diagram for 230VAC connections:
S1
S2
S
L N COM NO
MAX 3(1)A
AC 230V
L
N
123 Wiring diagram for control box connection:
Legend:
English
S1 Pump
S2
Valve actuator
S
L N COM NO
Heating mat
Deutsch
Boiler
KL08 NSB L N SL
1-8 Zones Boiler connection * - Boiler’s contacts
Power
L N for ON/OFF thermostat (according to the
boiler’s instructions)
AC 230V
L
N
Español
Português
Please note:
Self-acting SQ610 Quantum Thermostat without application support can be easily added to the
Smart Home app anytime. All settings made before adding to the application are automatically
copied to the Smart Home app.
13SQ610 Full menu structure
DISABLE
Schedule settings MO-FR+SA-SU
MO-SU
SINGLE DAYS
TIME/DATE
HOLIDAY MODE
THERMOSTAT CALIBRATION
SHOW/HIDE DISPLAY HUMIDITY
User settings SHOW/HIDE DISPLAY FLOOR
STANDBY TEMP SETPOINT
HEAT/COOL
RESET USER SETTINGS
TEMPERATURE SCALE
DISPLAY TEMPERATURE RESOLUTION 1.
Main menu
HEAT CONTROL ALGORITHM 2.
COOL CONTROL ALGORITHM
S1/S2 INPUT 3.
MINIMUM SETPOINT
MAXIMUM SETPOINT
Admin settings VALVE PROTECTION 4.
INTERNAL RELAY (NO / NC) 5.
MINIMUM TURN OFF TIME 6.
OPTIMISATION FEATURE 7.
COMFORT WARM FLOOR 8.
PIN CODE
DEVICE INFORMATION 9.
CONNECT WITH GATEWAY
FACTORY RESET 10.*
ENGLISH
Language DANISH
POLISH
...
14Short description of some selected functions
(all functions are described in the full version of the SQ610 manual):
English
1. DISPLAY TEMP RESOLUTION: This function determines the resolution of the displayed
temperature ( 0.5°C or 0.1°C ).
2. CONTROL ALGORITHM: This function defines how to control the room temperature. Available
options are: ITLC for Underfloor Heating / Radiators / Electrical Heating (that’s advanced algorithm for
precise maintenance of room temperature), hysteresis +/-0.5°C or +/-0.25°C, THB Actuator (option
recommended for systems with THB auto balancing actuators).
3. S1/S2 INPUT: A floor sensor, an external temperature sensor or an occupancy sensor can be
Deutsch
connected to the S1/S2 input of SQ610RF. Additionally, by connecting a NO type of ON/OFF voltage-
free contact, you can use this input as a OneTouch rules trigger (programmed in the Salus Smart Home
app) or as a Heat/Cool changeover.
4. VALVE PROTECTION: This function activates all actuators once a week for 5 minutes (in summer,
this function helps to prevent the actuators stuck).
5. INTERNAL RELAY (COM/NO): Internal relay activation or deactivation with COM/NO outputs use. Default
is enable.
6. MIN TURN OFF TIME: Minimum switch-off time (thermostat will not send the signal for
Español
heating/cooling more often than specified in this parameter).
7. OPTIMISATION FEATURE: Optimum Start and Optimum Stop functions are energy saving feature
that makes thermostat most cost effective (in combination with ITLC control algorithm).
8. COMFORT WARM FLOOR: This function helps to keep the floor warm, even if the room is warm
enough and there is no need to turn on the heating. User can select 3 levels of warm floor feature.
Please note it is not an economy feature, as your heating system may be ON even if there is no heating
demand from the room thermostat. It is COMFORT feature which keeps your floor warm all the time.
Português
9. DEVICE INFORMATION: In this menu user can check: Software Version, RF range value, Paired
devices or also user can activate Identification mode.
*10. FACTORY RESET: Here you can RESET your device to factory settings. After successfull reset
device will be removed from ZigBee network and you will need to add / pair your device again.
15Einleitung:
Der SQ610 Quantum ist ein ZigBee-Temperaturregler zur Funk Steuerung von Geräten der iT600-Serie, z.B. Die
Klemmleiste KL08RF, den TRV10RFM (Thermostatkopf ) oder den RX10RF Kesselsystem-Empfänger
Um den SQ610 über das Internet und die mobile SALUS Smart Home-App (ONLINE-Modus) zu regelen, muss
er zusammen mit dem Internet-Gateway UGE600 (separat erhältlich) installiert werden. Ausgehend von der
Anwendungsebene ist es möglich SQ610 mit anderen Systemelementen zu verbinden, z.B. Smart Plug SPE600,
Smart Relais SR600 oder Fenster- / Türsensor OS600 / SW600.
Der SQ610 kann lokal ohne Internetverbindung verwendet werden (OFFLINE-Modus). Die Kommunikation mit
anderen Geräten muss jedoch über den CO10RF-Koordinator (separat erhältlich) erfolgen.
Der Thermostat SQ610 Quantum kann ohne Universal Gateway oder CO10RF Koordinator als eigenständiges
Gerät betrieben werden.
Die vollständige PDF-Version der Bedienungsanleitung finden Sie unter www.salus-controls.com
Produktkonformität
Dieses Produkt erfüllt die grundlegenden Anforderungen und sonstigen einschlägigen Bestimmungen
der Richtlinien 2014/30/EU, 2014/35/EU, 2014/53/EU und 2011/65/EU. Der vollständige Wortlaut der EU-
Konformitätserklärung ist unter folgender Internetadresse abrufbar: www.saluslegal.com.
Sicherheitsinformation
Verwendung in Übereinstimmung mit nationalen und EU-Vorschriften. Verwenden Sie das Gerät wie vorgesehen,
halten Sie es in trockenem Zustand. Produkt nur für den Innenbereich. Die Installation muss von einer qualifizierten
Person gemäß den nationalen und EU-Vorschriften durchgeführt werden.
Nur mit einem trockenen Tuch reinigen.
Warnung:
Bitte trennen Sie immer die 230V Stromversorgung, bevor Sie Komponenten installieren oder daran arbeiten.
Inhalt:
1) Der SQ610 Quantum Thermostat
2) Schrauben
3) Anleitung
16Der Anfang: Schaltplan (S1, S2 Eingang):
Wählen Sie den richtige Montageort AC 230V
English
L
N
COM NO L N
M M
230V~,50Hz
150 cm
SQ610
Deutsch
S1 S2
cm
20
in
m
S T
Montage: zur Montage des Thermostats können Sie
Español
mitgeliefertes Zubehör (Befestigungsschrauben)
Symbolik:
verwenden. Entfernen Sie die Platte von der Rückseite,
um sie an der Wand zu montieren. Danach einfach S – potentialfreie Kontakte
Thermostat auf die Platte legen. T – Temperatur-Sensor
L, N - 230V AC-Pover-Versorgung
COM, NO - Spannungsfreier Ausgang
Bitte beachten: S1,S2 Anschlüsse:
Die ideale Position für die Thermostatmontage ist etwa - Fern oder Bodenfühler
Português
1,5 m über dem Boden, weit entfernt von Heiz- oder - Externer potentialfreier Kontakt für jegliche
Kühlquellen. Thermostat darf weder Sonnenlicht noch AN/AUS Schaltung oder Anwesenheitssensor
extremen Bedingungen wie Zugluft ausgesetzt werden.
(Hotel-Schlüsselkarte)
17LCD Symbol Beschreibung
1
2
3
19 4
5
18
17
16
6
15 7
14 13 12 11 10 9 8
1. Menü/Einstellung Beschreibung + Uhrzeit 10. Standby-Modus-Symbol
2. AM/PM 11. Aktuelle Temperatur / Sollwerttemperatur
3. Temperatur Einheit 12. Urlaubsmodus
4. Heiz-anforderung (Symbol ist animiert bei Heizan 13. Temporärer Override-modus
foderung) 14. Einstellungssymbol
5. Kühl-anforderung (Symbol ist animiert bei 15. Externe / Boden-Temperatursensor-Anzeige
Kühlan foderung) 16. Programmnummer
6. Funkverbindungs Indikator 17. Programm-Modus-Symbol
7. Internetverbindungs Indikator 18. Tagesanzeige/ Einstell-Informationen
8. Anwesenheitssensor (Hotel Schlüsselkarte) 19. Aktueller Feuchtigkeitswert
9. Tastesperre Funnktion
18Tasten Beschreibung
English
Taste Funktion
1) Menütaste /Zurücktaste
2) In der Hauptanzeige: Für 3 Sek gedrückt halten um den Betriebsmodus zu ändern (Programm /
Manuell / kurzfristiger Override).
3) Im der Einstellungsanzeige: Für 3 Sek gedrückt halten um zurückzukehren ohne die Änderun-
gen zu speichern.
4) Im Verbindungsbildschirm (SYSTEMTYP Menü) : drücken und halten für 3 Sek um andere
Deutsch
Verbinndungsoptionen zu sehen.
“Runter” Taste (Wert verringern/ Menü nach unten bewegen)
“Rauf” Taste ( Wert erhöhen /Menü nach oben bewegen)
1) “OK / Hacken” Taste (Wert bestätigen / Zum nächsten Menü gehen / Einstellungen speichern).
Español
2) Im der Hauptanzeige: Halten Sie 3 Sekunden lang gedrückt, um in den Standby-Modus zu wechseln.
3) In der Einstellungsanzeige: Halten Sie für 3 Sek um alle Änderungen zu speichern und zur
Hauptanzeige zurückzukehren.
In der Hauptanzeige - halten Sie diese Tasten zusammen für 3 Sekunden gedrückt um die
+
Português
Tasten zu SPERREN / ENTSPERREN .
19KOMPATIBILTY MIT ANDEREN SALUS CONTROLS GERÄTEN
Quantum Thermostat kann im ONLINE- oder OFFLINE-Modus arbeiten.
Im ersten Schritt müssen Sie entscheiden, in welchem Modus Ihr Thermostat funktioniert.
ONLINE MODUS OFFLINE MODUS
Universelles Gateway ist Universelles Gateway ist NICHT
VERBUNDEN MIT DEM VERBUNDEN MIT DEM INTERNET
INTERNET Sie können alle Ihre Sie können Ihre Geräte lokal ohne die
Geräte in der Smart Home App SmartHome App verwenden. Gateway
konfigurieren und verwenden funktioniert in diesem Modus als
Standard-ZigBee-Koordinator.
Laden Sie die Smart Home GET IT ON ODER
App auf Ihr iOS - oder CO10RF-Koordinator - Sie können
Android-Gerät herunter, um Download on the
den Standardmäßigen ZigBee-
Fernzugriff auf Ihre SALUS- SALUS Netzwerkkoordinator verwenden,
Smart Home
Geräte zu erhalten. um Ihre Geräte zu installieren und
zu verwenden.
Kompatible Geräte:
SR600* SPE600* KL08RF TRV RX10RF
Smart Relais Smart Plug Klemmleiste für (Thermostatic Radiator Empfänger
8-Zonen-Fußbodenheizung Valve) mit drahtloser
*Nur mit Online-Modus (UFH). Kommunikation.
Bitte beachten Sie:
* SQ610 Quantum Thermostat kann ohne Koordinatoren arbeiten
20Erste Einschaltsequenz
Bitte beachten Sie:
English
Um die Installation zu erleichtern, stellen Sie bitte sicher dass Sie bereits andere Geräte in Ihr ZigBee-Netzwerk
hinzugefügt haben, wie Z. B. Fußbodenheizungsklemmleisten (KL08RF) oder Radiator-Köpfe (TRV ’ s) usw.
1 2 3
Deutsch
Um den Thermostat einzuschalten, ... Anzeige zeigt alle Symbole an... ... dann wird Thermostat die
müssen Sie ihn an die 230V-Strom- Software-Version anzeigen.
versorgung anschließen...
Español
Sie können Ihren Thermostat mit
4 5 Universellen Gateway oder CO10RF-
Koordinator konfigurieren. Das heißt, fügen
Sie es dem Salus Smart Home System hinzu.
NEIN - STANDALONE.
Thermostat arbeitet als Standalone-Gerät für
Pumpe, Kessel, Empfänger usw. Das heißt, Sie
Português
können den Thermostat direkt an ausgewählte
Wählen Sie nun Ihre Sprache mit Geräte ohne Netzwerksystem anschließen.
„ ” oder „ ” Tasten. Sie können diesen jederzeit in ein Netzwerk
Bestätigen Sie Ihre Sprache mit hinzufügen.
Taste. .
21Installation im ONLINE Modus
Führen Sie nach der Sprachauswahl die folgenden Schritte aus, um Ihr Gerät zur Smart Home-App hinzuzufügen und mit
anderen Geräten zu koppeln:
1 2 3
SALUS
SmartHome
Zur SALUS Smart Home App
4 5 6
7 8 9
Sobald Ihr Thermostat der App
hinzugefügt wurde, sehen Sie
den obrigen Bildschirm auf der
LCD-Anzeige
2210 11 12
English
Deutsch
13 14 15
Geräte verbinden
Benennen Się dieses Gerät
SQ610 230V Thermostat
Español
Fertig
Danach wird der
3 Hauptbildschirm angezeigt.
Glückwunsch! Sie haben den
SQ610RF Quantum Thermostat
Português
erfolgreich konfiguriert.
23Installation im OFFLINE Modus
Koppeln mit Klemmleiste / Steuerbox (Installieren Sie die Klemmleiste / Control Box
gemäß den im Lieferumfang enthaltenen Anweisungen): 5 sek.
1 2 3
5 sek.
ODER
Öffnen Sie das
ZigBee-Netzwerk
4 5 6
Wählen Sie Den Systemtyp: Verwenden sie die oder Tasten um die Verwenden Sie oder
UNDERFLOOR, drücken Sie die Nummer der Klemmleiste auszuwählen (drücken Tasten, um die Zonennummer
Taste, um zu bestätigen. Sie die PAIR-Taste auf der Klemmleiste um die auszuwählen und drücken Sie
Adressnummer anzuzeigen). drücken um zu Taste, um zu bestätigen
bestätigen.
5 sek.
7 8 9
ODER
5 sek.
Jetzt können Sie Ihren Thermostat mit zusätzlichen
Zonen verbinden. Wählen Sie eine weitere Zone
aus, oder beenden Sie den Verbindungsprozess per Schließen Sie das
Taste . ZigBee-Netzwerk
24Kopplung mit TRV-Heizkörperkopf (Installieren Sie den TRV gemäß den im
Lieferumfang enthaltenen Anweisungen): 5 sek.
3
English
1 2
ODER
5 sek.
3 Öffnen Sie das
ZigBee-Netzwerk
Deutsch
4 5 6
10 sec
Systemtyp auswählen: Halten Sie nun die Antennentaste für Sie können bis zu 6 TRVs mit
Español
RADIATORS 10 Sek. (bis Orange aufleuchtet) auf 1 Thermostat verbinden.
allen TRV die Sie mit Ihrem Termostat
verbinden möchten gedrückt.
7 8 9 5 sek.
Português
5 sek.
ODER
Auf der LCD-Anzeige sehen Sie die Anzahl
der verbundenen TRV’s. Sobald alle TRVs
verbunden sind - drücken Sie die Taste , Schließen Sie das
um den Verbindungsprozess abzuschließen. ZigBee-Netzwerk
25Kabelgebundenes Gerät
Bitte beachten Sie:
Der Thermostat SQ610 Quantum kann ohne Universellem Gateway oder CO10RF Coordinator als eigenständiges
Gerät arbeiten.
1 Schaltplan für Potentialfreien Anschluss (z.B. Kesselsteuerung):
S1
S2
L N COM NO Kesselanschluss*
BOILER CONNECTION*
AC 230V
L
N
2 Schaltplan für 230VAC-Anschlüsse:
S1
S2
S
L N COM NO
MAX 3(1)A
AC 230V
L
N
263 Schaltplan für Klemmleiste:
Legende:
English
S1 Pumpe
S2
Stellantrieb
S
L N COM NO
Heizmatte
Deutsch
Kessel
KL08 NSB L N SL
1-8 Zonen
Zones Kesselanschluss * - Kesselkontakte
Power
L N
für ON/OFF Thermostat (gemäß den
Klemmen des Kessels)
AC 230V
L
N
Español
Português
Bitte beachten Sie:
Freie SQ610 Quantum Thermostat ohne APP Anwendung können jederzeit zur Smart Home
App sehr einfach hinzugefügt werden. Alle Einstellungen die bereits hinterlegt sind werden
automatisch in die Smart Home-App kopiert.
27SQ610 Vollständige Menüstruktur
AUS
Programmeinstellung MO-FR+SA-SO
MO-SO
EINZELNE TAGE
ZEIT/DATUM
URLAUBSMODUS
THERMOSTAT-KALIBRIERUNG
FEUCHTIGKEIT ANZEIGEN/AUSBLENDEN
Benutzereinstellungen SENSOR ANZEIGEN/AUSBLENDEN
STANDBY TEMP-SOLLWERT
HEAT/COOL
ZURÜCKSETZEN VON BENUTZEREINSTELLUNGEN
TEMPERATURSKALA
ANZEIGE TEMPERATURAUFLÖSUNG 1.
Hauptmenü
HEIZUNGSTEUERUNGSALGORITHMUS 2.
KÜHLUNGSSTEUERUNG-ALGORITHMUS
S1/S2 INPUT 3.
MINIMALER SOLL
MAXIMALER SOLL
Admin VENTILSCHUTZ 4.
Einstellungen INTERNES RELAIS (COM/NO) 5.
MINIMALE AUSSCHALTZEIT 6.
OPTIMIERUNGSFUNKTION 7.
KOMORT BODENTEMP 8.
PIN-CODE
GERÄTEINFORMATIONEN 9.
MIT GATEWAY VERBINDEN
WERKSRESET 10.*
ENGLISCH
Srache DÄNISCH
POLNISCH
...
28Kurzbeschreibung einiger ausgewählter Funktionen
(alle Funktionen sind in der Vollversion des SQ610-Handbuchs beschrieben):
English
1. ANZEIGE TEMPERATURAUFLÖSUNG: Diese Funktion bestimmt die Auflösung der angezeigten
Temperatur - Benutzer kann Temperaturanzeige auf (0,5 ° C oder 0,1 °C) eingestellen.
2. REGEL ALGORITHMUS: Diese Funktion definiert, wie die Raumtemperatur gesteuert werden kann.
Verfügbare Optionen sind: ITLC für Fußbodenheizung / Heizkörper / Elektrische Heizung (das ist ein
fortschrittlicher Algorithmus für die präzise Aufrechterhaltung der Raumtemperatur), Hysterese +/-0,5°C oder
+/-0,25°C, THB-Antrieb (Option empfohlen für Systeme mit THB-STellantrieben.
3. S1/S2 INPUT: Ein Bodensensor, ein externer Temperatursensor oder ein Anwesenheitssensor können
an den S1/S2-Eingang von SQ610RF angeschlossen werden. Darüber hinaus können Sie diesen Eingang
Deutsch
als OneTouch-Regelauslöser (programmiert in der Salus Smart Home App) oder als Heiz/Kühl-Wechsel
verwenden, indem Sie einen NO-Kontakt von ON/OFF-potentialfreinen kontakt anschließen.
4. VENTILSCHUTZ: Diese Funktion aktiviert alle ANTRIEBE einmal pro Woche für 5 Minuten (im Sommer
hilft diese Funktion ein festhängen der Ventile zu unterbinden).
5. INTERNES RELAIS (COM/NO): Werkseitig ist das Relais mit COM (potentialfreier Eingang) und NO
(potentialfreier Ausgang) aktiviert
6. MIN ABSCHALTZEIT: Minimale Abschaltzeit (Thermostat sendet das Signal zum Heizen/Kühlen
nicht häufiger als in diesem Parameter angegeben).
Español
7. OPTIMIERUNGSFEATURE: Optimum Start- und Optimum Stop-Funktionen sind energiesparende
Funktionen, die Thermostat am kostengünstigsten machen (in Kombination mit ITLC-
Steueralgorithmus).
8. KOMFORT BODEN TEMP.: Diese Funktion hilft, den Boden warm zu halten, auch wenn der Raum
warm genug ist und es keine Notwendigkeit gibt, die Heizung einzuschalten. Der Benutzer kann
3 Ebenen der warmen Bodenfunktion auswählen. Bitte beachten Sie, dass es sich nicht um eine
Wirtschaftlichkeitsfunktion handelt, da Ihre Heizungsanlage auch dann eingeschaltet sein kann, wenn
kein Heizbedarf vom Raumthermostat besteht. Es ist eine KOMFORT-Funktion, die Ihren Boden die
ganze Zeit warm hält.
Português
9. GERÄTEINFORMATIONEN: In diesem Menü kann der Benutzer folgendes überprüfen: Software-
Version, Batteriestand, Funk-Bereichswert, Verbundene Geräte oder um den Identifikationsmodus zu
aktivieren.
*10. WERKS RESET: Hier können Sie Ihr Gerät auf Werkseinstellungen zurücksetzen. Nach
erfolgreichem Zurücksetzen wird das Gerät aus dem ZigBee Netzwerk entfernt und Sie
müssen Ihr Gerät wieder hinzufügen / verbinden.
29Introducción
El SQ 610 Quantum es un controlador de temperatura ZigBee para la regulación inalámbrica de dispositivos
de la serie Smart Home, como por ejemplo el centro de conexiones KL 08RF, el cabezal de radiador TRV, etc...
Para controlar el SQ 610 a través de Internet o mediante la aplicación móvil SALUS Smart Home (modo ONLINE),
debe instalarse la puerta de enlace universal UGE 600 (se vende por separado). Desde la aplicación, es posible
emparejar SQ 610 con otros elementos del sistema, Smart Home como el Enchufe SPE 600, o el sensor de
ventana / puerta SW 600.
El SQ 610 se puede usar localmente sin una conexión a Internet (modo OFFLINE). Sin embargo, su comunicación
con otros dispositivos debe realizarse utilizando un coordinador, UGE 600 o CO 10RF (se venden por separado).
El termostato SQ 610 Quantum puede funcionar sin necesidad de puerta de enlace o coordinador. Puede usarse
como un cronotermostato frío / calor de manera autónoma (cableado).
El manual completo en formato PDF está disponible en el sitio www.salus-controls.eu.
Cumplimiento de producto
Este producto cumple con las siguientes directivas europeas: 2014/30 / UE, 2014/35 / UE, 2014/53 / UE y 2011/65 / UE.
Visite: www.saluslegal.com para obtener una información completa
Información de seguridad
Usar de acuerdo con las regulaciones nacionales y de la UE. Use el dispositivo según lo previsto, manteniéndolo
seco. Sólo para uso en interiores. La instalación debe ser realizada por una persona cualificada de acuerdo con las
regulaciones nacionales y de la UE. Desconecte su equipo antes de cualquier manipulación.
Peligro:
Asegúrese siempre de que la corriente esté apagada antes de instalar o trabajar en cualquier componente.
Contenido:
1) Termostato Quantum SQ 610
2) Tornillos de montaje
3) Manual de instrucciones
30Antes de empezar: Esquema de cableado
Seleccione la ubicación correcta del termostato AC 230V
English
L
N
COM NO L N
M M
230V~,50Hz
150 cm
SQ610
Deutsch
S1 S2
m
2 0c
in
m
Montaje: para montar el termostato puede usar
S T
Español
los accesorios incluidos (tornillos de montaje).
Realice el cableado necesario, coloque la placa
base del termostato sobre la caja y después de Explicación de los símbolos:
esto, simplemente coloque el termostato sobre S – contacto sin tensión
la placa. T – sonda de temperatura
L, N - alimentación 230V CA
Nota: COM, NO - salida libre de tensión
Português
La posición ideal para el montaje del termostato Terminales S1,S2:
es de aproximadamente a una altura de 1,5 m, le- - sonda de temperatura de aire o suelo
jos de fuentes de calor o frío. El termostato debe - contacto externo sin voltaje para conectar
estar expuesto a la luz del sol ni a condiciones cualquier interruptor de ON / OFF o sensor
extremas como, por ejemplo, corrientes de aire. de ocupación (tarjeta de hotel)
31Descripción de los iconos LCD
1
2
3
19 4
5
18
17
16
6
15 7
14 13 12 11 10 9 8
1. Menú / Descripción de la configuración + Reloj 10. Icono de apagado
2. AM / PM 11. Temperatura actual / temperatura de consigna
3. Unidad de temperatura 12. Modo vacaciones
4. Indicador de calefacción (el icono se anima cuando 13. Modo manual temporal
hay demanda de calor) 14. Configuración del equipo
5. Indicador de refrigeración (el icono se anima 15. Sonda externa
cuando hay demanda de frío) 16. Número de programa horario
6. Indicador de conexión RF 17. Icono programación
7. Indicador de conexión a internet 18. Indicador del día / información SET
8. Sensor de ocupación (tarjeta de hotel) 19. Valor real de la humedad relativa
9. Función de bloqueo de teclas
32Descripción de los botones
Botón Función
English
1) Botón menú / botón retorno.
2) Estando en la PANTALLA PRINCIPAL: Presione y mantenga presionado durante 3 segundos
para cambiar el modo de funcionamiento del termostato (modo de programación / modo
permanente / modo de anulación temporal).
3) En la PANTALLA DE CONFIGURACIÓN: Mantenga presionado durante 3 segundos para regresar
sin guardar los cambios.
4) En la PANTALLA DE EMPAREJAMIENTO (en el Menú TIPO DE SISTEMA): Mantenga presionado
durante 3 segundos para ver otras opciones de emparejamiento.
Deutsch
Botón “Abajo” (Disminuye el valor del parámetro / mueve el menú en la dirección “ABAJO”)
Botón “Arriba” (Aumenta el valor del parámetro / moverse en el menú en la dirección “ARRIBA”)
1) Mantenga presionado durante 3 segundos para ENCENDER / APAGAR el dispositivo
2) Botón “Aceptar / Marcar” (Confirmar el valor del parámetro / Ir al siguiente menú / Guardar
configuración)
Español
3) En la PANTALLA PRINCIPAL: Mantenga presionado durante 3 segundos para APAGAR el
dispositivo
4) En la PANTALLA DE CONFIGURACIÓN: Mantenga presionado durante 3 segundos para volver a la
PANTALLA PRINCIPAL y GUARDAR todos los cambios.
En la PANTALLA PRINCIPAL: mantenga presionados estos botones juntos durante 3 segundos
+ para BLOQUEAR / DESBLOQUEAR las teclas del termostato).
Português
Todas las funciones de configuración deben realizarse con la pantalla encendida (para encender pantalla pulse en cualquiera de los botones).
33COMPATIBILIDAD CON OTROS DISPOSITIVOS DE CONTROL DE SALUS
El termostato SQ 610 puede funcionar en modo ONLINE u OFFLINE.
En el primer paso, debe decidir en qué modo funcionará su termostato.
MODO ONLINE MODO OFFLINE
La puerta de enlace UGE 600 La puerta de enlace UGE 600
está CONECTADA a INTERNET NO está CONECTADA a INTERNET
Puede configurar y usar todos Puede usar sus equipos localmente
sus equipos en la aplicación sin la aplicación Smart Home.
Smart Home La puerta de enlace funciona en
este modo como coordinador.
Descargue la aplicación Smart
Home en su dispositivos iOS o
GET IT ON
O
Android para acceder de forma
remota a sus equipos SALUS.
Download on the
Coordinador CO10RF - Puede
SALUS usar el coordinador de la red para
Smart Home
instalar y usar sus dispositivos.
Dispositivos compatibles:
SR 600* SPE 600* KL 08RF TRV RX 10RF
Smart Relé Enchufe inteligente Centro de conexiones para Actuador radiofrecuencia receptor de caldera
suelo radiante. para radiador.
*Solo en modo OnLine
Atención:
El termostato SQ 610 Quantum puede funcionar sin necesidad de puerta de enlace o coordinador.
Puede usarse como un cronotermostato frío / calor de manera autónoma (cableado).
34Primera secuencia de encendido
Atención:
English
Para una fácil instalación, asegúrese de haber agregado otros dispositivos a su red ZigBee, como la caja de
conexiones para suelo radiante (KL 08RF) o los actuadores radiofrecuencia de radiador (TRV), etc.
1 2 3
software
version
Deutsch
Para encender el termostato, debe ... la pantalla le mostrará todos ...entonces el termostato
conectarlo a la alimentación de los iconos... mostrará la versión del software.
230 V y luego ...
5
CONECTAR
Sí
Español
CON LA RED De esta forma su equipo SQ 610 funcionará
como un termostato radiofrecuencia dentro
4 del sistema Smart Home con todas las
Idioma ventajas que ello conlleva. Además, este
Espanol termostato puede trabajar también de
manera autónoma simultáneamente.
CONECTAR
NO
Português
CON LA RED De esta forma su equipo SQ 610 trabajará
de manera autónoma y funcionará como
Ahora, elija su idioma con los un dispositivo independiente para bombas,
botones o . calderas, actuadores, etc.
Confirme su idioma Siempre mantendrá la posibilidad de ser
con el botón . agregado a una red Smart Home
35Instalación en modo ONLINE
Después de seleccionar el idioma, siga los siguientes pasos para agregar su equipo a la aplicación
Smart Home y emparejarlo con otros dispositivos:
1 2 3
CONECTAR CONECTAR
CON LA RED CON LA RED
SALUS
SmartHome
Vaya a la aplicación
SALUS Smart Home
4 5 6
7 8 9
IR A SMART
HOME APP
Una vez que haya agregado su
termostato a la aplicación, verá la
siguiente pantalla LCD.
3610 11 12
English
Deutsch
13 14 Connectar 15
el equipo
Nombre del equipo
Termostato SQ 610
Español
Terminado
Después de eso, el termostato
mostrará la pantalla principal.
3 ¡Felicidades! Ha configurado
correctamente el termostato
SQ 610 Quantum.
Português
37Instalación en modo OFFLINE
Emparejamiento con el centro de conexiones
(Instale el centro de conexiones de acuerdo con las instrucciones incluidas con el producto)
5 s.
1 2 3
Conectado Conectado
a la red a la red
5 s. O
Poner coordinador en
modo emparejamiento
4 5 6
TIPO SISTEMA SELECCIONE SELECCIONE EL
SUELO RAD CAJA CONTROL NUMERO ZONA
Seleccione el tipo de sistema: Use los botones y y seleccione el Use los botones o para
SUELO, presione el botón número del centro de conexiones (presione seleccionar el número de zona y
para confirmar. el botón PAIR en el centro de conexiones presione el botón para confirmar.
para ver su número de dirección). Presione el
botón para confirmar.
5 s.
7 8 9
ZONA
ADICIONAL
5 s. O
Ahora puede emparejar su termostato con zonas adicionales. Seleccione una
zona o más y termine el proceso de emparejamiento con el botón. . Salir del modo emparejamiento
38Emparejamiento con el actuador radiofrecuencia para radiador TRV
(Instale el TRV de acuerdo con las instrucciones incluidas en el producto) 5 s.
English
1 2 3
Conectado Conectado
a la red a la red
5 s. O
Poner coordinador en
Deutsch
modo emparejamiento
4 5 6
TIPO SISTEMA TRV PULSE
RADIADORES ANTENA
10 s.
Español
Seleccione tipo de sistema: Mantenga presionado el botón de antena durante 10 segundos
RADIADORES en todos los TRV que desee emparejar con su termostato.
7 8 9 5 s.
NuMERO TRV
EMPAREJADOS
Português
5 s. O
En la pantalla LCD verá la cantidad de TRV Puede emparejar hasta 6 TRV con 1
emparejados. Una vez que todos los TRV estén termostato. Todos los TRV tienen que
emparejados, presione el botón , para estar dentro de la misma habitación
finalizar el proceso de emparejamiento. con un mismo termostato. Salir del modo emparejamiento
39Dispositivo cableado
Atención:
Tenga en cuenta que el termostato SQ610 Quantum puede funcionar de forma autónoma, como un dispositivo
independiente, sin necesidad de una puerta de enlace o un coordinador.
1 Esquema de cableado para conexión sin tensión (por ejemplo, control de caldera):
S1
S2
Conexión de caldera
L N COM NO BOILER CONNECTION*
AC 230V
L
N
2 Esquema de cableado para conexiones de 230 VCA:
S1
S2
S
L N COM NO
MAX 3(1)A
AC 230V
L
N
403 Esquema de cableado para la conexión de la caja de conexiones:
English
Leyenda:
S1
Bomba
S2
S Actuador
L N COM NO
Resistencia de
calentamiento
Deutsch
KL08 NSB L N SL Caldera
Power
1-8
1-8 Zonas
Zones
L N
AC 230V
L
N
Español
Português
Atención:
El termostato SQ 610 Quantum se puede agregar fácilmente a la aplicación Smart Home en
cualquier momento. Todos los ajustes realizados antes de agregar a la aplicación se copian
automáticamente a la aplicación Smart Home.
41SQ 610 Estructura completa del menú
INHABILITAR
CONFIGURACIONES LU-VI+SA-DO
DE HORARIO LU-DO
DÍAS SENCILLOS
HORA / FECHA
MODO VACACIONES
CALIBRACIÓN DEL TERMOSTATO
AJUSTES DE MOSTRAR / OCULTAR VALOR DE HUMEDAD
USUARIO MOSTRAR / OCULTAR VALOR DE SUELO
AJUSTE DE TEMPERATURA ANTIHIELO
FRÍO / CALOR
RESTABLECER LA CONFIGURACIÓN DEL USUARIO
UNIDAD DE TEMPERATURA
Menú principal
RESOLUCIÓN DE LA TEMPERATURA DE PANTALLA 1.
ALGORITMO DE CONTROL DE CALOR 2.
ALGORITMO DE CONTROL DE ENFRIAMIENTO 2.
ENTRADAS S1/S2 3.
PUNTO DE CONSIGNA MÍNIMO
CONFIGURACIÓN DE PUNTO DE CONSIGNA MÁXIMO
PROTECCIÓN DE LA VÁLVULA 4.
ADMINISTRADOR
RELÉ INTERNO (NO/NC) 5.
TIEMPO MÍNIMO DE APAGADO 6.
CARACTERÍSTICA DE OPTIMIZACIÓN 7.
SUELO RADIANTE CONFORT 8.
CÓDIGO PIN
INFORMACIÓN DEL DISPOSITIVO 9.
RESET DE FÁBRICA 10.*
INGLÉS
IDIOMA DANÉS
ESPAÑOL
...
42Breve descripción de algunas funciones seleccionadas. (todas las
funciones se describen en la versión completa del manual SQ 610):
English
1. RESOLUCIÓN DE LA TEMPERATURA DE LA PANTALLA: Esta función determina la resolución de la temperatura
mostrada. El usuario puede establecer la temperatura por pasos (cada 0,5 °C o 0,1 °C).
2. ALGORITMO DE CONTROL: Esta función define cómo controlar la temperatura ambiente. Las opciones
disponibles son: ITLC para calefacción por suelo radiante / radiadores / calefacción eléctrica (algoritmo avanzado
para el mantenimiento preciso de la temperatura ambiente), histéresis +/- 0.5 °C o +/- 0.25 °C, actuador THB
(opción recomendada para sistemas con THB automático actuadores de equilibrio).
3. ENTRADAS S1 / S2: Se puede conectar una sonda de suelo, una sonda de aire o un sensor de ocupación a la entrada
Deutsch
S1 / S2 de SQ 610RF. Además, al conectar un contacto libre de tensión ON / OFF, puede usar esta entrada como un
activador de reglas OneTouch (programado en la aplicación Salus Smart Home) o como un cambio de frío / calor.
4. PROTECCIÓN DE LA VÁLVULA: Esta función activa todos los actuadores una vez por semana durante 5 minutos
(en verano, esta función ayuda a evitar que los actuadores se agarroten).
5. RELÉ INTERNO: Activación o desactivación interna del relé con el uso de las salidas. El valor predeterminado es
habilitar. Configuración de los contactos COM - NO/NC.
6. TIEMPO MÍNIMO DE APAGADO: Mientras se mantenga el tiempo mínimo de apagado seleccionado, el
termostato no enviará la señal de calefacción / refrigeración.
Español
7. CARACTERÍSTICA DE OPTIMIZACIÓN: las funciones Optimum Start y Optimum Stop son funciones de ahorro
de energía que hacen que el termostato sea más rentable (en combinación con el algoritmo de control ITLC).
8. SUELO RADIANTE CONFORT: Esta función ayuda a mantener el suelo radiante, incluso si la habitación está
lo suficientemente caliente y no hay necesidad de encender la calefacción. El usuario puede seleccionar 3
niveles de característica de suelo radiante. Tenga en cuenta que no es una característica económica, ya que su
sistema de calefacción puede estar ENCENDIDO incluso si no hay demanda de calefacción del termostato de la
habitación. Es la característica CONFORT que mantiene su suelo radiante todo el tiempo.
9. INFORMACIÓN DEL DISPOSITIVO: en este menú, el usuario puede verificar: Versión de software, Nivel
de batería, valor de rango de RF, dispositivos emparejados o también el usuario puede activar el modo de
Português
identificación.
10.* RESET DE FÁBRICA: aquí puede RESTABLECER su dispositivo a la configuración de fábrica. Después
de un reinicio exitoso, el dispositivo se eliminará de la red y deberá agregar / emparejar su
dispositivo de nuevo.
43Introdução
O SQ 610 Quantum é um controlador de temperatura ZigBee para regulação sem fio de dispositivos da série
Smart Home, como o centro de conexão KL 08RF, o cabeçal do radiador TRV, etc.
Para controlar o SQ 610 via Internet ou através do aplicativo móvel SALUS Smart Home (modo ONLINE), a porta
de enlace universal UGE 600 (vendido separadamente) deve ser instalada. A partir do aplicativo, é possível
emparelhar o SQ 610 com outros elementos do sistema, o Smart Home, como o plug SPE 600, ou o sensor de
janela / porta SW 600.
O SQ 610 pode ser usado localmente sem uma conexão à Internet (modo OFFLINE). No entanto, sua comunicação
com outros dispositivos deve ser feita usando um coordenador, UGE 600 ou CO 10RF (vendido separadamente).
O termostato SQ 610 Quantum pode operar sem a necessidade de uma porta de enlace ou coordenador. Ele pode
ser usado como um cronotermostato de frio / calor de forma autônoma (com fio).
O manual completo em formato PDF está disponível em www.salus-controls.eu.
Conformidade do produto
Este produto está em conformidade com as seguintes diretivas europeias: 2014/30 / EU, 2014/35 / EU, 2014/53 / EU e
2011/65 / EU. Visite: www.saluslegal.com para obter uma informação completa
Informação de segurança
Use de acordo com os regulamentos nacionais e da UE. Use o dispositivo como planejado, mantendo-o seco. Apenas
para uso interno. A instalação deve ser realizada por uma pessoa qualificada de acordo com os regulamentos
nacionais e da UE. Desconecte seu equipamento antes de qualquer manipulação.
Perigo:
Sempre verifique se a energia está desligada antes de instalar ou trabalhar em qualquer componente.
Conteúdo:
1) Termostato Quantum SQ 610
2) Parafusos de montagem
3) Manual de instruções
44Antes de começar: Esquema de cablagem
Selecione a locallização correta do termostato AC 230V
English
L
N
COM NO L N
M M
230V~,50Hz
150 cm
SQ610
Deutsch
S1 S2
m
2 0c
in
m
Montagem: para montar o termostato, você
S T
Español
pode usar os acessórios incluídos (parafusos de
montagem). Faça a fiação necessária, coloque a
placa de base do termostato na caixa e depois Explicação dos símbolos:
disso, basta colocar o termostato na placa. S – contato sem tensão
T – sonda de temperatura
L, N - alimentação 230V CA
Nota: COM, NO - saída livre de tensão
Português
A posição ideal para montagem do termostato, Terminais S1,S2:
é aproximadamente a uma altura de 1,5 m, longe - sonda de temperatura de ar ou piso
de fontes de calor ou frio. O termostato não deve - contato externo sem tensão para ligar
ser exposto à luz solar ou a condições extremas, qualquer interruptor de ON / OFF ou sensor
como correntes de ar. de ocupação (cartão de acesso de hotel)
45Descrição dos icones LCD
1
2
3
19 4
5
18
17
16
6
15 7
14 13 12 11 10 9 8
1. Menú / Descrição da configuração + Relógio 10. Icone de desligado
2. AM / PM 11. Temperatura atual / temperatura de set-point
3. Unidade de temperatura 12. Modo férias
4. Indicador de aquecimento (o ícone fica animado 13. Modo manual temporal
quando há demanda de calor) 14. Configuração da equipe
5. Indicador de arrefecimento (o ícone fica animado 15. Sonda externa
quando há demanda de frio) 16. Número de programa horário
6. Indicador de ligação RF 17. Icone programação
7. Indicador de ligação à internet 18. Indicador do dia / informaçãoón SET
8. Sensor de ocupaçã (cartão de hotel) 19. Valor real da humidade relativa
9. Função de bloqueio de teclas
46Descrição dos botões
Botão Função
English
1) Botão menú / botão retorno.
2) Ao estar no ecrã parcial ECRÃ PRINCIPAL: Carregue e mantenha pressionado durante 3
segundos para mudar o modo de funcionamento do termostato (modo de programação /
modo permanente / modo de anulação temporária).
3) No ECRÃ DE CONFIGURAÇÃO: Mantenha carregado durante 3 segundos para regressar sem
guardar as mudanças.
4) No ECRÃ DE EMPARELHAMENTO (no Menú TIPO DE SISTEMA): Mantenha carregado durante 3
segundos para ver outras opções de emparelhamento.
Deutsch
Botão “Diminui” (Diminui o valor do parámetro / move o menú no sentido para “ABAIXO”)
Botão “Aumenta” (Aumenta o valor do parámetro / move o menú no sentido para “CIMA”)
1) Mantenha carregado durante 3 segundos para LIGAR / DESLIGAR o dispositivo
2) Botão “Aceitar / Marcar” (Confirmar o valor do parámetro / Ir ao seguinte menú / Guardar
configuração)
Español
3) No ECRÃ PRINCIPAL: Mantenha carregado durante 3 segundos para DESLIGAR o dispositivo
4) No ECRÃ DE CONFIGURAÇÃO: Mantenha carregado durante 3 segundos para voltar ao ECRÃ
PRINCIPAL e GUARDAR todas as mudanças
No ECRÃ PRINCIPAL: mantenha pressionados estes botões juntos durante 3 segundos para
+ BLOQUEAR / DESBLOQUEAR as teclas do termostato).
Português
Todas as funções de configuração devem ser executadas com a tela ligada (para ativar a tela, pressione qualquer um dos botões).
47COMPATIBILIDADE COM OUTROS DISPOSITIVOS DE CONTROLO DE SALUS
O termostato SQ 610 pode operar no modo ONLINE ou OFFLINE.
Na primeira etapa, você deve decidir como o termostato funcionará.
MODO ONLINE MODO OFFLINE
A porta de enlace UGE 600 A porta de enlace UGE 600
está CONECTADA À INTERNET NÃO está CONECTADA à INTERNET
Você pode configurar e usar todo Você pode usar seus computadores
o seu equipamento no aplicativo localmente sem o aplicativo Smart
Smart Home Home.
A porta de enlace funciona nesse
Faça o download do aplicativo modo como coordenador.
Smart Home em seus dispo-
GET IT ON
O
sitivos iOS ou Android para
acessar remotamente seus
Download on the
Coordenador CO10RF - Pode usar
dispositivos SALUS. SALUS o coordenador de rede para instalar
Smart Home
e usar seus dispositivos.
Dispositivos compatíveis:
SR 600* SPE 600* KL 08RF TRV RX 10RF
Smart Relé Plug inteligente Centro de ligações Atuador radiofrequencia receptor de
para piso radiante para radiador caldeira
*Somente no modo OnLine
Atenção:
O termostato SQ 610 Quantum pode funcionar sem necessidade de porta de enlace ou coordenador.
Pode ser usado como um cronotermostato frio / calor de maneira autónoma (cablagem).
48Primeira sequencia de ligação
Atenção:
English
Para facilitar a instalação, adicione outros dispositivos à sua rede ZigBee, como a caixa de junção de piso
radiante (KL 08RF) ou os atuadores do radiador de radiofrequência (TRV), etc..
1 2 3
software
versAO
Deutsch
Para ligar o termostato, você ... o ecrã mostrará todos os ...então o termostato mostrará a
deve conectá-lo à fonte de 230 V ícones... versión do software.
e depois...
5
CONECTAR
SIM
Español
A REDE Desta forma seu equipamento SQ
610 funcionará como um termostato
4 radiofrequencia dentro do sistema Smart
Idioma Home com todas as vantagens que ele
PORTUGUES contém. Ademais, este termostato pode
trabalhar também de maneira autônoma
simultaneamente.
CONECTAR
NÃO
Português
A REDE Desta forma seu equipamento SQ
610 funcionará como um termostato
Agora, escolha seu idioma com independente para bombas, caldeiras,
os botões o . atuadores, etc.
Confirme seu idioma Siempre mantendrá la posibilidad de ser
com o botão . agregado a una red Smart Home.
49Instalação no modo ONLINE
Depois de selecionar o idioma, siga as etapas abaixo para adicionar seu dispositivo ao aplicativo
Smart Home e emparelhe-o com outros dispositivos:
1 2 3
CONECTAR CONECTAR
A REDE A REDE
SALUS
SmartHome
Vaya a la aplicación
SALUS Smart Home
4 5 6
7 8 9
IR A SMART
HOME APP
Depois de adicionar o
termostato ao aplicativo, você
verá a seguinte tela LCD.
5010 11 12
English
Deutsch
13 14 Ligar a 15
equipe
Nome da equipe
Termostato SQ 610
Español
Terminé
Depois disso, o termostato
exibirá o ecrã principal.
3 Parabéns!
Você configurou com
sucesso o termostato
Português
SQ 610 Quantum.
51Instalação em modo OFFLINE
Emparelhamento com o centro de conexões
(Instale o centro de conexões de acordo com as instruções incluídas no produto)
5 s.
1 2 3
CONECTAR CONECTAR
A REDE A REDE
5 s. O
Por coordenador no
modo emparelhamento
4 5 6
TIPO SISTEMA SELECIONE SELECIONE O
PISO RAD. CAIXA CONTROLO NUMERO ZONA
Selecione o tipo de sistema: Use os botões e e selecione o Use os botões ou para
PISO, pressione o botão número do centro de conexões (carregue no selecionar o número da zona e
para confirmar. botão PAIR no centro de conexão para ver pressione o botão para confirmar.
o número do seu endereço).
Pressione o botão para confirmar.
5 s.
7 8 9
ZONA
ADICIONAL
5 s. O
Agora você pode emparelhar seu termostato com zonas adicionais. Selecione
uma zona ou mais e termine o processo de emparelhamento com o botão . Sair do modo de emparelhamento
52Emparelhamento com o atuador radiofrequencia para radiador TRV
(Instale o TRV de acordo com as instruções incluídas no produto) 5 s.
English
1 2 3
CONECTAR CONECTAR
A REDE A REDE
5 s. O
Coloque o coordenador no
Deutsch
modo de emparelhamento
4 5 6
TIPO SISTEMA PRES. TRV
RADIADORES ANTENA
10 s.
Español
Selecione o tipo de Pressione e segure o botão da antena por 10 segundos em todos
sistema: RADIADORES os TRVs que você deseja emparelhar com seu termostato.
7 8 9 5 s.
NUMERO TRV
EMPARELHADOS
Português
5 s. O
No LCD, você verá a quantidade de TRV Você pode emparelhar até 6
emparelhada. Depois que todos os TRVs TRV com 1 termostato. Todos
estiverem emparelhados, pressione o botão , os TRVs devem estar na mesma
para finalizar o processo de emparelhamento. sala com o mesmo termostato. Sair do modo de emparelhamento
53Dispositivo cablado
Atención:
Observe que o termostato Quantum SQ 610 pode operar de forma autônoma, como um dispositivo independente,
sem a necessidade de uma porta de enlace ou um coordenador.
1 Diagrama de fiação para conexão sem tensão (por exemplo, controle de caldeira):
S1
S2
Conexão da caldeira
L N COM NO BOILER CONNECTION*
AC 230V
L
N
2 Diagrama de fiação para conexões de 230 VCA:
S1
S2
S
L N COM NO
MAX 3(1)A
AC 230V
L
N
543 Diagrama de fiação para conexão da caixa de conexão:
English
Lenda:
S1
Bomb
S2
S Atuador
L N COM NO
Resistência de
aquecimento
Deutsch
KL08 NSB L N SL Caldeira
Power
1-8
1-8 Áreas
Zones
L N de atuação
AC 230V
L
N
Español
Português
Atenção:
O termostato SQ 610 Quantum pode ser facilmente adicionado ao aplicativo Smart Home a
qualquer momento. Todas as configurações feitas antes da adição ao aplicativo são copiadas
automaticamente para o aplicativo Smart Home.
55SQ 610 Estructura completa do menú
DESABILITAR
CONFIGURAÇÕES SE-SE+SA-DO
DE HORÁRIO SE-DO
DIAS SIMPLES
HORA / DATA
MODO FÉRIAS
CALIBRACÃO DO TERMOSTATO
AJUSTES DE MOSTRAR / OCULTAR VALOR DE HUMIDADE
UTENTE MOSTRAR / OCULTAR VALOR DE PISO
AJUSTE DE TEMPERATURA ANTIGELO
FRIO / CALOR
RESTABELECER A CONFIGURAÇÃO DO UTENTE
UNIDADE DE TEMPERATURA
Menú principal
RESOLUÇÃO DA TEMPERATURA DE ECRÃ 1.
ALGORITMO DE CONTROLO DO CALOR 2.
ALGORITMO DE CONTROLO DE ARREFECIMENTO 2.
ENTRADAS S1/S2 3.
SET POINT MÍNIMO
CONFIGURAÇÃO DE SET POINT MÁXIMO
ADMINISTRADOR PROTEÇÃO DA VÁLVULA 4.
RELÉ INTERNO (NO/NC) 5.
TEMPO MÍNIMO DESLIGADO6.
CARACTERÍSTICA DE OPTIMIZAÇÃO 7.
PISO RADIANTE CONFORT 8.
CÓDIGO PIN
INFORMAÇÃO DODISPOSITIVO 9.
RESET DE FÁBRICA 10.*
INGLÊS
IDIOMA PORTUGUÊS
ESPAÑOL
...
56You can also read